1
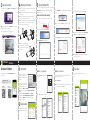
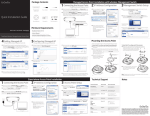
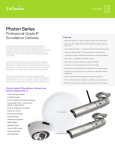
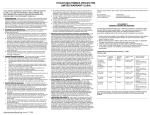
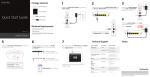
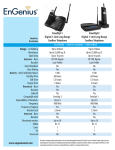
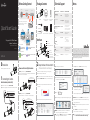
Before Getting Started
Internet
Gateway / Router
Package Contents
Technical Support
Switch
Country of Purchase
Service Center
Service Information
www.engeniuscanada.com
Canada
[email protected]
Toll Free: (+1) 888 397 2788
Local: (+1) 905 940 8181
www.engeniustech.com
Los Angeles, USA
[email protected]
Toll Free: (+1) 888 735 7888
Local: (+1) 714 432 8668
Central & South America
Miami, USA
[email protected]
Miami: (+1) 305 887 7378
Sao Paulo, Brazil: (+55) 11 3957 0303
D.F, Mexico: (+52) 55 1163 8894
Europe
Netherlands
[email protected]
(+31) 40 8200 887
Africa
CIS
Middle East
Russia
Dubai, UAE
[email protected]
Toll Free:
U.A.E.:800-EnGenius
800-364-364-87
General: (+971) 4 357 5599
Asia
Oceania
Singapore
www.engeniustech.com.sg/e_warranty_form
[email protected]
Toll Free:
Singapore: 1800 364 3648
Others
Taiwan, R.O.C
[email protected]
North America
EDS5115
Quick Start Guide
CD with User Manual
and Software
Please ensure your Gateway/Router
has Internet connection to proceed
with the camera setup.
Minimum Requirements
Quick Start Guide
Power Adapter
RJ-45 Ethernet Cable
(EnViewer Finder / EnViewer)
version l.0
For Local Network
PC-based Wizard
EnViewer Finder
3
Mobile Viewer (APP)
EnViewer
4
Video Management Software
EnGenius VMS
3
4
Antenna
4
5
2
EnGenius Cloud Services (Web)
EnViewer
6
1
Quick Start Guide
IR LEDs
Built-in LENs
Cable Management Bracket
1
2
For Remote Network
EDS5115
Screws / Plastic Anchors
Interface
1 Megapixel Wi-Fi HD Bullet Camera
EnGenius Cloud Services
2.4 GHz Detachable
Antenna x1
7
RJ-45 (PoE)
Alarm-In/Out
DC Jack (12V/1A)
3 in 1 button : WPS,
Notes
es.engeniustech.com
pg.engeniustech.com
www.engeniusnetworks.eu
www.engenius-me.com
www.engeniustech.com.sg
www.engeniusnetworks.com
Reboot, Reset to Default
0 Installation
Screw the supplied antenna to the camera.
1 Connecting to Camera
Power over Ethernet (PoE) Connection
Option 1) When connecting to PoE-Enabled Switch:
This is a PoE compliant camera. You can connect the Ethernet Cable from the camera to a PoE-enabled Switch.
PoE-Enabled Switch
2 Setup EnViewer Finder and Wi-Fi
(PC-based Wizard for Local Network)
EnViewer Finder is the setup wizard assisting you to configure the
camera connected to your network (LAN).
Note: If you do not have DHCP server connected, the camera will change
IP address to 192.168.1.200 automatically 3 minutes after booting up.
B) Select the target camera from the list.
EDS5115
admin
admin
Select the target Wi-Fi, click “Save”,
then enter the Wi-Fi password.
EDS5115
D) Click on
Option 2) When connecting to a non-PoE Switch:
Connect the camera to a non-PoE Switch via PoE Injector (optional).
A
Next >
to log in.
E) The wizard will guide you to complete the camera settings step by step.
non-PoE Switch
Set up Wi-Fi : Click on the Scan to search the Wi-Fi nearby.
C) Enter the Username and Password of the camera . The default value of
both username and password is admin.
A) Run the CD on your computer and follow the EnViewer Finder setup
instructions.
B) Connect the supplied power cable from the camera to the power outlet.
EDS5115_e9ff
Basic Connection (without PoE)
A) Connect the camera to a switch via Ethernet Cable.
In the United States of America, use of video or audio equipment for recording the image of a person without
their knowledge and consent is prohibited in certain states, commonwealths, municipalities or jurisdictions.
The enduser assumes all liability for compliance with applicable state, local and federal laws. End-users in other
countries assume all liability for compliance in their country. Product features, specifications, or industrial design
of the camera product are subject to change without notice, and actual product appearance may differ from
what is depicted on product packaging, on websites, or in marketing material. EnGenius Technologies, Inc. is
not responsible or liable for any property loss or damage in any site or deployment where EnGenius camera
products are used. Apple, the Apple logo, iPad and iPhone are trademarks of Apple Inc., registered in the U.S. and
other countries. App Store is a service mark of Apple Inc. Android and Google Play are trademarks of Google Inc.
Trademarks and registered trademarks are the property of their respective owners. For United States of America:
Copyright ©2015 EnGenius Technologies, Inc. All rights reserved.
The wizard will search all cameras within your home network (LAN).
Continue with the process by clicking “Next” to complete the Wi-Fi setup
Cloud Service: You can enable the DDNS Service and create your own
personal Domain name in the DDNS alias field for remote accessing or
sharing with others later on.
B
Config : Set up the Video Resolution, Compression Codec, and Maximum
PoE injector
Frame Rate.
EDS5115
EDS5115_E9FF
Network: Set up IP Address, System Time, Wi-Fi, and Administrator
settings including change of password for the camera.
Note: You can select DHCP mode for default setting, or select Manual
mode to assign a fixed IP Address for the camera.
F)Click “Finish” to close this utility. Double click the camera in the
Camera List for video live view streaming.
Note: Once you have finished the process, your device is now connected
to Wi-Fi. Please remove the Ethernet Cable for Wi-Fi usage.
3 Access Live View
4 Mounting the Camera
5 Setup EnGenius VMS
Please enter default username (admin) and password (admin) to access
live view.
A) Locate an area on the wall. Make sure the area is capable of supporting
the weight of the camera.
B) Mark and drill pilot holes aligning to the screw holes at the base of the
mounting bracket.
admin
C) Insert the plastic anchors into the pilot holes, and align the holes at the base of the bracket with the plastic anchor.
D) Once aligned, insert the provided screws through the holes at the base
of the camera bracket, and ensure the cable is seated in the cable
channel. Screw and secure bracket in place.
Note: You will be asked to download the WebCMS plug-in either for the
first attempt or an updated version available.
(the PC-based VMS, work with EnGenius IP Camera only)
EnGenius VMS is a free bundle Video Management Software can support multiple cameras.
C) Go to Configuration and select camera to obtain the camera setting
panel.
How to run VMS and add camera(s)
EDS5115
A) Select and run the VMS from the CD. Continue with the installation
process.
EDS5115
D) Go to Camera tab, and click Add on the top right side of the Camera
page.
EDS5115
The default value of username and password is admin.
You should now see the Live View streaming successfully.
G) Enter the camera username & password and click Get Camera Settings to verify. Then click Save to add the camera and exit.
admin
admin
EDS5115
F) Select one of the IP cameras that is available and click OK.
E) Click on Discovery to detect IP cameras under local area network (LAN).
EDS5115
B)Run EnGenius VMS to execute live monitor.
EDS5115
EDS5115
E) Please loosen Screw-A/B first to adjust camera position and angle. Align the camera
to the correct field of view and tighten Screw-A&B.
H) Repeat Step D) to G) until all desired cameras are added. You can now
monitor all cameras in live view.
Screw-B
Screw-A
EnViewer
TM
APP Setup
Download EnViewer
Scan below QR code or download “EnViewer by EnGenius” APP from
your mobile device.
EnViewer by EnGenius
or
Google Play
for Android™ Devices
App Store
for iPhone® and iPad®
1 Get Started
Find the EnViewer QR Code Label inside
the box that is specifically for your
camera and other advanced setting
information.
Option I - Scan QR Code
Option II - Auto Search
A) Scan the QR Code with the provided
label.
This option is recommended if you want to add multiple cameras within
your local network at the same time.
Simply select the desired camera to access video live view.
A) Click on Auto Search.
EDS5115
Prior to the usage of EnGenius Cloud
ooooooo
ooooooo
Service, please ensure the following
AA:BB:CC:DD:EE:FF
actions have been completed.
A) Camera device DDNS has been enabled.
Note: From the Web Management Page: Network > EnGenius Cloud
Service
B) Camera device UPnP and UPnP Traversal are both enabled.
C) Network protocol UPnP (Universal Plug and Play) Traversal
function has been enabled from your Internet Administrator or ISP
(Internet Service Provider).
2
3 Live View
EDS5115-Outdoor
B) All cameras within the local network will be listed. Select the device(s)
you would like to add and click on Save.
EDS5115-Living Room
EDS5115-Outdoor
B) Click “ Yes” to add the device in the Camera List.
EDS5115-Lobby
EDS5115-Living Room
EDS5115-Outdoor
EDS5115-Lobby
EDS5115-Outdoor
EDS5115-Living Room
EDS5115-Living Room
Setup Camera
Follow the EnViewer Wizard instruction,
you will have two options to add camera.
EDS5115-Lobby
EDS6115-Lobby
EDS5115-Outdoor
Option I
Option II
EDS5115-Lobby
EDS5115-Outdoor
EDS6115-Lobby
EDS6115-Lobby