Transcript
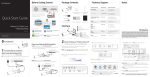
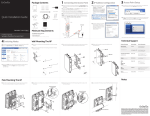
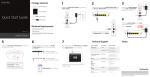
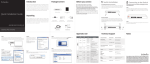
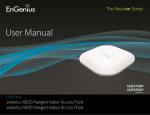
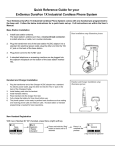
Package Contents
Managed Access Point Installation with Wireless Management Switch
1 Connecting the Access Point 2 IP Address Configuration
3 Management Switch Setup
(Through EnGenius Wireless Management Switch)
Managed Indoor
Access Point
Power Adapter
RJ-45 Ethernet Cable
A) Connect one end of the Ethernet Cable into an Ethernet Port on the
front panel of the EnGenius Wireless Management Switch and the other
end to the Ethernet Port on the computer.
B) Connect another Ethernet Cable into the LAN Port of the Managed AP
and the other end to the Ethernet Port on the Wireless Management
Switch. With the Wireless Management Switches, the Managed AP is able
to obtain proper assigned IP address for further configurations.
Quick Installation Guide
Mounting Bracket
Mounting Kit
T-Rail Mounting Kit
A) Open a web browser on your computer. In the address bar of the web
browser, enter 192.168.0.239 and enter.
A) Once your computer is on, ensure
that your TCP/IP is set to On or
Enabled. Open Network
Connections and then click Local
Area Connection. Select Internet
Protocol Version 4 (TCP/IPv4).
B) A login screen will appear. By default, username is admin and the
password is password. Enter the current username and password of
the Wireless Management Switch and then click Login.
PoE Wireless Management Switch
B
B
A
Minimum Requirements
EWS310AP | EWS320AP | EWS360AP
Dual Band Wireless Managed Indoor Access Point
Broadband Internet Service
(Cable or DSL Modem)
+Internet Browser
(Internet Explorer, Safari, Firefox, Chrome)
+EnGenius Wireless Management L2 Switch
(To use with EWS Series Management Switches)
4Adding Managed AP
5Configuring Managed AP
+
version l.0
(Through EnGenius Wireless Management Switch GUI)
A) All Managed AP(s) connected to the same network as the Wireless
Management Switch will appear on the right side of the screen, under the
Access Point Under Approval list. Locate and select the Managed AP by
checking the box and click Allow to manage the device.
B) If your computer is already on a
network, ensure that you have
set it to a Static IP Address on the
interface.
(Example: 192.168.1.10 and the
Subnet Mask address as
255.255.255.0.)
C) The EnGenius Wireless Management Switch User Interface will appear.
Make sure the Controller State is set to Enabled.
A
Mounting the Access Point
(Through EnGenius Wireless Management Switch GUI)
A) Configure Managed AP(s) through the GUI interface from the switch
for WLAN settings under Device Management.
* Your model number may
be different in the web
browser interface.
The AP can be ceiling mounted or wall mounted depending on the setup.
C) Users may create several clusters simultaneously to accommodate
their deployments under AP Clusters.
To attach the AP to a ceiling or wall using the mounting bracket:
To attach the AP to a ceiling using T-Rail connectors:
A) Attach the mounting bracket to the wall or ceiling using the provided
mounting kit.
A) Attach the T-rail connectors to the bottom cover of the AP
using the provided short screws. Use appropriate size T-rail
connectors (15/16” or 9/16”). If extra space
is required to accommodate drop ceiling tiles,
use the provided spacers and long screws.
B) Insert the provided short screws into the mounting holes. Make sure
there’s enough space between the screws and unit for the mounting
bracket. If extra space is
Wall or Ceiling
required, use the provided
spacers and long screws from
the T-Rail mounting kit.
D) For distinct settings, EnGenius Wireless Management switches still offer
individual Managed Access Point customization for cluster members
such as different channels that best adapt your local WLAN deployments.
Mounting Screw
C) Mount the AP to the mounting
bracket by rotating the unit
clockwise about 90 degrees
to secure it in place.
A
Long Screw
Short Screw
B
Access
Point
E) Upon successful connection and setup, user can go through different
sections on the web management pages to unleash Managed AP’s full
features for your WLAN deployment and performance monitoring.
Stand-alone
Access
Stand-alone
AccessPoint
Point Installation
Installation
1 Connecting the Access Point 2 IP Address Configuration
A) Connect one end of the Ethernet cable into the LAN port of the
Access Point and the other end to the Ethernet port on the computer.
B) Connect the Power Adapter to the DC-IN port of the Access Point
and plug the other end in to an electrical outlet.
A) Once your computer is on, ensure
that your TCP/IP is set to On or
Enabled. Open Network
Connections and then click Local
Area Connection. Select Internet
Protocol Version 4 (TCP/IPv4).
Note: The Access Point supports both IEEE 802.3at PoE (Power over
Ethernet) or the included power adapter. You may use either one as the
power source. DO NOT use both at the same time.
B
B
A
A
B) If your computer is already on a
network, ensure that you have
set it to a Static IP Address on the
interface.
(Example: 192.168.1.10 and the
Subnet Mask address as
255.255.255.0.)
Spacer
T-Rail
Connector
Mounting
Bracket
B) Add Managed AP(s) to specific AP Cluster to save repetitive
configuration tasks.
B) You may configure your Managed AP(s) after you successfully
connected to the Wireless Management Switch through its GUI.
T-Rail
Connector
3 Access Point Setup
A) Open a web browser on your
computer. In the address bar of the
web browser, enter 192.168.1.1
and enter.
B) A login screen will appear. By default,
the username of the Access Point
is admin and the password is admin.
Enter the current username and
password of the Access Point and
then click Login.
C) The EnGenius Access Point User Interface will appear. This device can
operate in the following modes: Access Point, WDS AP and WDS Bridge.
Switch modes by selecting the Operation Mode under “Network”,
“Wireless” tab.
B) Line up the connected T-rail connectors
with an appropriately sized rail and
press the unit onto the rail until it
snaps into place.
Note: To protect your Access Point, use the Kensington security slot to attach
a cable lock (cable lock is not included).
C
Technical Support
Country of Purchase
Service Center
Service Information
North America
Canada
[email protected]
Toll Free: (+1) 888 397 2788
Local: (+1) 905 940 8181
www.engeniustech.com
Los Angeles, USA
[email protected]
Toll Free: (+1) 888 735 7888
Local: (+1) 714 432 8668
Central & South America
Miami, USA
[email protected]
Miami: (+1) 305 887 7378
Sao Paulo, Brazil: (+55) 11 3957 0303
D.F, Mexico: (+52) 55 1163 8894
Europe
Netherlands
[email protected]
(+31) 40 8200 887
Africa
CIS
Middle East
Russia
Dubai, UAE
[email protected]
Toll Free:
U.A.E.:800-EnGenius
800-364-364-87
General: (+971) 4 357 5599
Asia
Oceania
Singapore
www.engeniustech.com.sg/e_warranty_form
[email protected]
Toll Free:
Singapore: 1800 364 3648
Others
Taiwan, R.O.C
www.engeniuscanada.com
es.engeniustech.com
pg.engeniustech.com
www.engeniusnetworks.eu
T-Rail
Notes
www.engenius-me.com
www.engeniustech.com.sg
www.engeniusnetworks.com
* Your model number may be different in the web browser interface.
[email protected]
Maximum data rates are based on draft IEEE 802.11ac and IEEE 802.11 standards. Actual
throughput and range may vary depending on many factors including environmental
conditions, distance between devices, radio interference in the operating environment, and
mix of devices in the network. Features and specifications subject to change without notice.
This device complies with Part 15 of the FCC Rules. Operation is subject to the following
two conditions: (1) this device may not cause harmful interference, and (2) this device must
accept any interference received, including interference that may cause undesired operation.
Trademarks and registered trademarks are the property of their respective owners. For United
States of America: Copyright ©2014 EnGenius Technologies, Inc. All rights reserved.