1
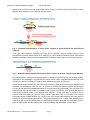
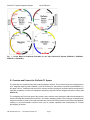
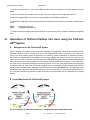
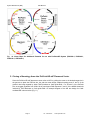
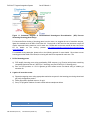
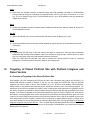
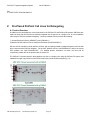
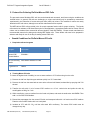
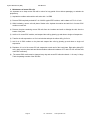
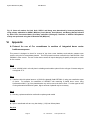
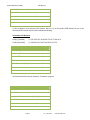
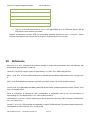
PinPoint™ Targeted Integration System Cat #s PINxxxA-1 . User Manual Store Kits at-20ºC upon receipt A limited-use label license covers this product. By use of this product, you accept the terms and conditions outlined in the Licensing and Warranty Statement contained in this user manual. PinPoint™ Targeted Integration System Cat. # PINxxxA-1 Contents I. Introduction .............................................................................2 A. Overview of the PinPointTM Targeted Integration System ...2 B. List of Components in PinPoint Targeted Integration System C. Additional Materials Required .............................................6 4 II. Generation of PinPoint Platform Cell Lines with the PinPoint-FCTM System A. Background for the PinPoint-FC System ............................6 B. Validation Data for PinPoint-FC System .............................6 C. Vector Map Details for PinPoint-FC System .......................7 D. Overview and Protocol for PinPoint-FC System .................9 E. Details of Plasmid Rescue Assay .....................................11 6 Generation of PinPoint Platform Cell Lines using the PinPoint-HRTM System III. A. Background for the PinPoint-HR System ..........................12 B. Vector Map Details for PinPoint-HR System ....................12 C. Cloning of Homology Arms into PinPoint-HR attP Placement Vector D. Overview and Protocol for PinPoint-HR System...............17 IV. 14 Targeting of Placed PinPoint Site with PinPoint Integrase and Donor Vectors A. Overview of Targeting of the Placed PinPoint Site ...........18 B. Validation Data for Targeting of Placed PinPoint site by Donor Vectors C. Cloning of Inserts into PinPoint Donor Vectors.................20 D. Protocol for Targeting the Placed PinPoint Site with Donor Vectors 21 E. Verification of Insert Integration into PinPoint Site by Junction PCR 22 V. Product Overview ..............................................................25 B. Protocol for Culturing PinPoint HEK293T cells .................26 C. Protocol for Culturing PinPoint Mouse iPSC Cells............27 D. Validation of PinPoint Mouse iPSC Cell Lines ..................29 A. 18 19 Pre-Placed PinPoint Cell Lines for Retargeting ....................25 A. VI. 12 Appendix ...........................................................................30 Protocol for use of Cre recombinase in excision of integrated donor vector backbone sequence VII. References ........................................................................33 VIII. Technical Support .............................................................34 IX. Licensing and Warranty Statement ...................................34 888-266-5066 (Toll Free) 650-968-2200 (outside US) Page 1 30 System Biosciences (SBI) I. User Manual Introduction A. Overview of the PinPointTM Targeted Integration System The PinPoint Targeted Integration system allows users to easily and efficiently create isogenic stable cell lines in mammalian and other cell types. Custom gene expression cassettes can be engineered into target genomes using the unique PinPoint integrase with site-specific control. This technology enables the generation of platform cell lines which can be used to routinely knock-in different transgenes and reporters at the same genetic locus in cells with the same genetic background. This level of targeting control allows for the study of phenotypic effects free from context and positional variations, which results in more accurate genotype to phenotype correlations. The following are some examples of when the PinPoint technology can be particularly useful: Gene function studies Disease modeling (e.g. cancer, differentiation) Gene therapy (e.g. derivation of patient-specific lines) The PinPoint system relies on a two-step approach for engineering of target cells. The first step involves insertion of a plasmid bearing the PinPoint placement site via transfection into the target cell genome (Fig. 1). This can be done using two distinct approaches: i) the PinPoint-FC™ system that uses the wellcharacterized ϕC31 integrase system (Calos 2006, Karow et al. 2011) or ii) the PinPoint-HR™ system that uses either TALE-Nuclease or Cas9 genome engineering tools to induce a double-stranded DNA break in the genome and insertion of the PinPoint placement site by homology-directed recombination (HDR) in a site-specific manner (Hockemeyer et al. 2012). Fig. 1. Schematic Representation of Placement of PinPoint attP Vector into Target Genome The second part of the PinPoint system relies on the introduction of a donor vector containing a desired gene cassette insert, which is integrated into the placed PinPoint site using a hyperspecific and efficient PinPoint integrase which only recognizes the placed PinPoint site (Fig. 2). The PinPoint integrase catalyzes the attB x attP reaction between the placed site (attP) and the attB site in the donor vector to insert the donor vector at the placed site each and every targeting event. Additional specificity of the system is conferred by the presence of a promoterless puromycin-resistance cassette in the donor vector, which uses a PGK promoter Page 2 ver. 1-08122013 www.systembio.com PinPoint™ Targeted Integration System Cat. # PINxxxA-1 introduced at the PinPoint site (by the placement vector in Step 1) to allow only those cells with a correctlytargeted donor plasmid to survive selection with puromycin. Fig. 2. Schematic Representation of Donor Vector Targeted to Placed PinPoint Site with PinPoint Integrase Finally, the entire backbone (excluding the insert and its promoter) may be excised using the wellcharacterized Cre/LoxP reaction (Sauer et al. 1988) (Fig. 3), which allows for efficient excision of exogenous selection components, leaving only the promoter/insert combination (and a single LoxP site) in the genome. Fig. 3. Schematic Representation of Removal of Donor Vector Components using Cre/LoxP Reaction As mentioned above, there are two different options for introducing the PinPoint site into a target genome, each with its own advantages. The PinPoint-FC system utilizes a ϕC31 integrase-based placement of the PinPoint site, while the PinPoint-HR system uses an HR-based approach for placement. Choosing between the PinPoint-FC and PinPoint-HR methods to place the PinPoint site will depend on the application and preferences of the end-user. In general, the PinPoint-FC system is simpler, and is likely to be more efficient than HR-mediated approaches for most cell types being transfected. Use of PinPoint-FC is preferred when the end user wants to repeatedly target a single PinPoint site in the genome, but does not need sequence-specific control of the location being targeted. On the other hand, if precise control is required to achieve targeting of a specific locus (such as a ‘safe harbor’ site), or if the same locus needs to be targeted across multiple samples (e.g. isogenic lines from multiple patient-derived cell lines), then the PinPoint-HR system is the appropriate choice. This method requires use of a custom TALE nuclease pair or Cas9 guide RNA to induce a dsDNA break at a pre-determined location, along with an HR targeting vector to place the PinPoint site near the cleavage site. A table comparing both approaches is listed below: 888-266-5066 (Toll Free) 650-968-2200 (outside US) Page 3 System Biosciences (SBI) User Manual PinPoint-FC PinPoint-HR Ease of Protocol Easy More difficult Efficiency of Placement High (limited only by transfection efficiency) Low (<1-10%) Control of At pseudo-attP sites Placement Integration Single copy Efficiency Section V for details. At desired locus Single copy B. List of Components in PinPoint Targeted i) Integration System PinPoint-FC Vector Options CAT. NO FC200PA-1 PIN200A-1 PIN300A-1 PIN300A-KIT ii) To save on hands-on time, we also offer pre-made PinPoint Platform Cell Lines with the PinPoint site already placed in the host genome, ready for retargeting with any donor vector of choice. This option bypasses the need for the initial placement step, and allows the end-user to quickly generate isogenic cell lines with the modifications of interest. Please see DESCRIPTION PhiC31 Integrase Expression Plasmid PinPoint Integrase Expression Plasmid PinPoint-FC attP Placement Vector PinPoint-FC System for Platform Cell Line Generation & Retargeting (includes PIN300A-1, FC200PA-1, PIN200A-1, PIN510A-1 & PIN600A1) QTY 10 µg 10 µg 10 µg 1 kit PinPoint-HR Vector Options CAT. NO PIN200A-1 PIN400A-1 PIN400A-KIT PIN410A-1 DESCRIPTION PinPoint Integrase Expression Plasmid PinPoint-HR attP Placement Vector – Empty MCS for cloning HR Arms PinPoint-HR System for Platform Cell Line Generation & Retargeting (includes PIN400A-1, PIN200A-1, PIN510A-1 & PIN600A-1) PinPoint-HR attP Placement Vector Page 4 QTY 10 µg 10 µg 1 kit 10 µg ver. 1-08122013 www.systembio.com PinPoint™ Targeted Integration System PIN410A-KIT iii) PIN500A-1 PIN510A-1 PIN520A-1 PIN600A-1 PIN610A-1 1 kit DESCRIPTION EF1α PinPoint Donor Vector (pPPEF1a-MCS-pA-attB-Puro-pA) CAG PinPoint Donor Vector (pPPCAG-MCS-WPRE-pA-attB-Puro-pA) Empty PinPoint Donor Vector (pPPMCS-WPRE-pA-attB-Puro-pA) PinPoint Donor Positive Control Vector: CAG->GFP+Luciferase (pPP-CAG-GFP-T2A-Luc-WPREpA-attB-Puro-pA) PinPoint Donor Positive Control Vector: CM->Luciferase (pPP-CMVLuc-pA-attB-Puro-pA) QTY 10 µg 10 µg 10 µg 10 µg 10 µg Other PinPoint-Related Vectors CAT. NO CRE100A-1 GE601A-1 v) – for targeting the Human AAVS1 Safe Harbor PinPoint-HR System for Platform Cell Line Generation & Retargeting of AAVS1 Safe Harbor Locus (includes PIN410A-1, GE601A-1, PIN200A-1, PIN510A-1, & PIN600A1) PinPoint Retargeting Donor Vectors CAT. NO iv) Cat. # PINxxxA-1 DESCRIPTION Cre Recombinase Expression Plasmid (pCMV-CRE) pZT-AAVS1-L1/R1 vectors (L+R TALEN constructs) QTY 10 µg 10 µg each Pre-made Platform Cell Lines and Kits CAT. NO PIN320A-1 PIN320A-KIT PIN340iPS-1 888-266-5066 (Toll Free) DESCRIPTION PinPoint-FC HEK293T Platform Cell Line for Targeted Gene Insertion PinPoint-FC 293T Platform Kit for Targeted Gene Insertion (includes PIN320A-1, PIN200A-1, PIN510A-1 & PIN600A-1) PinPoint-FC Murine iPSC Platform Cell Line for Targeted Gene 650-968-2200 (outside US) QTY >2x10^5 cells/vial 1 kit >2x10^5 cells/vial Page 5 System Biosciences (SBI) PIN340iPS-KIT User Manual Insertion PinPoint-FC Murine iPSC Platform Kit for Targeted Gene Insertion (includes PIN340iPS-1, PIN200A-1, PIN510A-1 & PIN600A-1) 1 kit C. Additional Materials Required a) LB Agar and Broth containing 50 µg/ml kanamycin b) Any high-transformation efficiency RecA- and EndA- E.coli competent cells c) Dulbecco’s Modified Eagle’s Medium (D-MEM) high glucose with sodium pyruvate and glutamine (Invitrogen, Cat. # 11995073) d) Lipofectamine 2000 transfection reagent (Invitrogen, Cat. # 11668019) e) Qiagen EndoFree Plasmid Maxi Kit (Qiagen, Cat. # 12362) f) Qiagen DNeasy Blood and Tissue Kit (Qiagen, Cat. # 69504) g) iProof High-Fidelity DNA Polymerase (BioRad, Cat. # 172-5301) h) Fetal Bovine Serum (Invitrogen, Cat. # 16000036) i) Penicillin/Streptomycin (Invitrogen, Cat. # 15070063) j) Trypsin-EDTA (Sigma, Cat. # T3924) h) 6-well and 100mm Tissue Culture Plates and Related Tissue Culture Supplies i) Other specific media and additives specific for cell type of interest j) **Optional** - For difficult-to-transfect cells, the use of an electroporation system (e.g. Lonza’s NucleoFector or Invitrogen’s Neon system) is highly recommended II. Generation of PinPoint Platform Cell Lines with the PinPoint-FCTM System A. Background for the PinPoint-FC System The PinPoint-FC system uses the specificity of the ϕC31 integrase to place the PinPoint site in the genome of target cells. ϕC31 is a sequence-specific recombinase encoded within the genome of the bacteriophage ϕC31. This serine integrase has been shown to function efficiently in many different cell types including mammalian cells (Calos, 2006). In the presence of ϕC31 integrase, the attB containing PinPoint placement plasmid can be unidirectionally integrated into a target genome through recombination at genomic sites with sequence similarity to the native bacteriophage attP site, termed pseudo-attP sites. B. Validation Data for PinPoint-FC System In order to validate the PinPoint site placement, we have shown in HEK293T cells that upon co-transfection of ϕC31 integrase expression plasmid (Cat# FC200PA-1) and the PinPoint-FC attP placement vector (Cat# PIN300A-1), we can obtain G418-resistant colonies within 2 weeks of transfection, indicating functionality of the initial targeting (Fig. 4). Page 6 ver. 1-08122013 www.systembio.com PinPoint™ Targeted Integration System Cat. # PINxxxA-1 Fig. 4. Methylene Blue Stained G418-Resistant HEK293T Colonies Obtained via Co-Transfection of ϕC31 Integrase expression and PinPoint placement vectors C. Vector Map Details for PinPoint-FC System Fig. 5. Vector Maps for ϕC31 Integrase Expression and PinPoint attP Placement Plasmids 888-266-5066 (Toll Free) 650-968-2200 (outside US) Page 7 System Biosciences (SBI) User Manual Fig. 6. Vector Maps for PinPoint Integrase and Donor Vectors (PIN200A-1, PIN510A-1, PIN600A-1) Page 8 ver. 1-08122013 www.systembio.com PinPoint™ Targeted Integration System Cat. # PINxxxA-1 Fig. 7. Vector Maps for Additional Plasmids for use with PinPoint-FC System (PIN500A-1, PIN520A-1, PIN610A-1, CRE100A-1) D. Overview and Protocol for PinPoint-FC System The initial step is to create PinPoint attP containing platform cell lines. This is done through the co-transfection of C31 integrase plasmid (Cat# FC200PA-1) with the PinPoint-FC attP placement plasmid (Cat# PIN300A-1) in the target cell line. Transfected cell lines will be selected as G418 (Neomycin) resistant colonies and picked for expansion as platform cell lines for subsequent retargeting using the PinPoint integrase and donor vectors (see Section IV). The retargeting step is the final step of the process, where a donor vector bearing an attB site and transgene of interest will target the placed PinPoint attP site. Successful retargeting results in the puromycin resistance gene fragment in the donor vector to be introduced under the control of the PGK promoter in the PinPoint attP plasmid, resulting in puromycin-resistant colonies which can be clonally expanded and characterized for relevant phenotype(s) of interest. 888-266-5066 (Toll Free) 650-968-2200 (outside US) Page 9 System Biosciences (SBI) User Manual Notes: 1) Plasmids should be transformed and propagated in high-quality competent cells (>1x10^9 CFUs/µg) prior to use according to the manufacturer’s recommended protocols. Plasmids can be grown in LB+Kanamycin (50ug/ml). For extraction of plasmid DNA from maxipreps, we recommend the use of endotoxin-free columns and buffers for optimal results. 2) Depending on the cell type being transfected, please choose a transfection protocol which results in maximal transfection efficiencies. For adherent cell lines such as HEK293T, passive transfection methods using cationic lipid-based methods (e.g. Lipofectamine 2000, FuGene HD) work very well in transfection of donor and integrase vectors. For other types of cells such as primary, stem, or suspension cells, we suggest transfection using electroporation methods (NucleoFection or Neon) for optimal results. 3) The plasmids should be mixed well in minimal serum/no antibiotic media + cationic lipid transfection reagent or electroporation buffer to maximize efficiency of delivery. 4) For selection of target cells, we strongly recommend testing different concentrations of Neomycin (G418) on untransfected cells to determine the optimal concentration of selection agent – which is kills ~90-100% of cells within 48-72 hours after drug administration. 5) In order to limit the number of colonies resulting from random integration of the PinPoint attP placement plasmid, it is recommend to use the C31 integrase plasmid at a 50:1 ratio (w/w) over the PinPoint attP plasmid. For example, for transfection of HEK293T cells using Lipofectamine 2000, a 50:1 ratio of C31 integrase to PinPoint plasmid (2 µg to 40ng) successfully integrated the PinPoint plasmid in a single-copy fashion with a very low incidence of random integration. Day 0 1. Seed ~400,000 cells in a 6-well plate in suitable growth medium optimal for the cell type of interest and grow overnight at 37°C. Please include well(s) for positive and negative control vectors, if desired. Day 1 2. When cells are ~60-80% confluent, co-transfect target cells with C31 integrase and PinPoint attP placement plasmid at a 50:1 molar ratio (e.g. 2 µg of C31 integrase and 40ng of PinPoint plasmid) using the transfection reagent of your choice. Day 2 3. Split co-transfected cells at 1/10 and 1/20 ratios in 100mm plates, and replace transfection medium with complete growth medium including antibiotics. Day 3 4. Add recommended amount of neomycin (G418) suitable for optimal selection of the transfected cells (400 – 1000 µg/ml is a suggested range) Days 4-14 Page 10 ver. 1-08122013 www.systembio.com PinPoint™ Targeted Integration System Cat. # PINxxxA-1 5. Untransfected cells will begin to die and colonies will begin to emerge from cells that were successfully transfected and showing G418 resistance. When the colonies are large enough, transfer them to a single well of a 6-well plate. Keep cells under antibiotic selection at all times. 6. When the clones become confluent, split cells for seeding into a single well of a 6-well plate for the optional Plasmid Rescue assay (see below) and 100mm plate/T-75 flask for continued propagation. Remaining cells can be frozen down for archival purposes. E. Details of Plasmid Rescue Assay In order to ascertain the precise genomic location(s) of donor vector integration, a Plasmid Rescue Assay can be performed on genomic DNA isolated from cells which have been transfected with the donor plasmid and selected. The general idea for this assay is to determine the sequence of the genomic DNA flanking the integrated donor vector by using a series of blunt-cutting restriction enzymes that cut outside the donor vector, induce intramolecular ligation of the cut fragments, and sequencing the regions away from the insert with the provided attB sequencing primers. The results of the sequencing can be mapped to the genome by BLAT analysis (http://genome.ucsc.edu/cgi/bin/hgBlat?command=start) which confirms integration of the donor vector at a specified locus. Detailed Protocol for Plasmid Rescue Assay 1. Isolate cells from one well of a 6-well plate which were previously plated for this assay and isolate genomic DNA from the cells using a suitable genomic DNA isolation kit. 1-5 µg of genomic DNA will be sufficient for this assay. 2. Digest between 1-5 µg of genomic DNA from each sample using 2-5 different blunt-cutting restriction enzymes that do not cut within the donor plasmid and have good activity (>50%) activity in the same reaction buffer. 3. Clean-up the restriction digest using a suitable column purification kit and elute the digested DNA in 20 µl of elution buffer. 4. Set up the following ligation reaction: Volume 10.0 µl 40.0 µl 2.0 µl 348.0 µl 400.0 µl Item Digested DNA 10X T4 Ligase Buffer T4 DNA Ligase (40 U/µl) ddH20 Total Reaction Volume 5. Incubate the ligation reaction O/N at 16°C overnight Performing ligations in a large volume minimizes intermolecular and favors intramolecular ligation events. 6. Purify the ligation reactions in a suitable purification column and elute in 10 µl of elution buffer. 888-266-5066 (Toll Free) 650-968-2200 (outside US) Page 11 System Biosciences (SBI) User Manual 7. Transform bacteria with 5 µl of the purified DNA and plate cells onto kanamycin (50 µg/ml) antibiotic selection plates 8. Select 2-4 colonies from the plates and inoculate 3-5 ml LB + antibiotic for overnight growth at 37°C. 9. Isolate the plasmid DNA from the cultures using a suitable plasmid DNA purification kit. 10. Sequence the plasmids with the following primers to obtain the genomic sequences flanking the ligated donor vector: attBR2 attBF2 5’-actaccgccacctcgac-3’ 5’-atgtaggtcacggtctcgaag-3’ 11. Analyze the sequence data and map the results to the genome using BLAT analysis to identify the integration locus. III. Generation of PinPoint Platform Cell Lines using the PinPointHRTM System A. Background for the PinPoint-HR System Recent advances in genome engineering tools, especially Transcriptional Activator-Like Nuclease (TALENuclease) (Miller et al. 2011, Cermak et al. 2011) and Cas9/CRISPR systems (Jinek et al. 2012, Mali et al. 2013), have made notable impact on approaches for controlled, precise modification of eukaryotic genomes. While there are notable differences between the two major systems with respect to how they work, the end results are very similar in that both TALE-Nuclease and Cas9/CRISPR systems generate targeted dsDNA breaks which can be utilized for homology-directed recombination using a suitable donor template. In this application, the donor vector must contain homologous sequences at the 5’ and 3’ end of the DNA sequence being targeted by TALE-Nuclease or Cas9, with the internal sequence being an expression cassette containing the PinPoint site, which can be subsequently retargeted using PinPoint donor vectors (see Section IV). This approach, while less efficient than PinPoint-FC based placement and more time-consuming (e.g. screening for HR-positive cells, etc.), provides the ultimate in placement control to introduce the PinPoint site into any defined locus of a target genome. B. Vector Map Details for PinPoint-HR System Fig. 8. Vector Maps for attP Placement Vectors – HR MCS and Human AAVS1 Safe Harbor Page 12 ver. 1-08122013 www.systembio.com PinPoint™ Targeted Integration System Cat. # PINxxxA-1 Fig. 9. Vector Maps for PinPoint Integrase and Donor Vectors (PIN200A-1, PIN510A-1, PIN600A-1) 888-266-5066 (Toll Free) 650-968-2200 (outside US) Page 13 System Biosciences (SBI) User Manual Fig. 10. Vector Maps for Additional Plasmids for use with PinPoint-HR System (PIN500A-1, PIN520A-1, PIN610A-1, CRE100A-1) C. Cloning of Homology Arms into PinPoint-HR attP Placement Vector Since the PinPoint-HR attP placement vector relies on HR for guiding the vector to the desired target site in the genome to place the PinPoint site, the end-user must design suitable homology arms 5’ and 3’ of the genomic site being targeted by either TALE-Nuclease or Cas9 guide RNA. For “knock-in” of the PinPoint site, we suggest anywhere from 0.5kb-1kb of homologous DNA sequence 5’ and 3’ of the dsDNA break site induced by TALE-Nuclease or Cas9 guide RNA. An example diagram of the HR arm design for Cas9mediated HR is shown below (Fig. 11). Page 14 ver. 1-08122013 www.systembio.com PinPoint™ Targeted Integration System Cat. # PINxxxA-1 Figure 11. Schematic Diagram of Cas9-mediated Homologous Recombination Illustrating Homology Arm Design (HR) Process For fast and efficient cloning of homology arms into the vector, we suggest the use of restriction enzyme, ligase-free methods such as SBI’s Cold Fusion Kit. Cloning both of the arms into the placement vector will require sequential cloning reactions, one for each arm. Please refer to the user manual for the Cold Fusion Kit for details on the cloning process (http://www.systembio.com/molecular-tools/cold-fusioncloning/literature) For standard cloning strategies, please refer to the following protocol for more details. Since there are two homology arms that need to be cloned, the cloning will need to be repeated for each arm. The 1. PCR of homology arms a) PCR amplify homology arms using proofreading PCR enzymes (e.g. Phusion) with primers containing compatible restriction sites to 5’ MCS (for 5’ homology arm) and 3’ MCS (for 3’ homology arm). b) Run out PCR products on 1.5-2% agarose gel and extract correct size bands using a suitable gel extraction kit 2. Ligation of insert into vector a) Digest the targeting vector using appropriate restriction enzymes for the homology arm being cloned and gel-purify the digestion product b) Dilute gel-purified, digested vector to 10 ng/µl c) Set up 10 µl ligation reactions for each control and test samples as below: Volume 1.0 µl 888-266-5066 (Toll Free) Item PinPoint attP Placement Vector 650-968-2200 (outside US) Page 15 System Biosciences (SBI) User Manual 7.0 µl 5’ or 3’ homology arm PCR product (~70 ng) or water control 10X T4 DNA ligase buffer T4 DNA Ligase (40 U/µl) Total Reaction Volume 1.0 µl 1.0 µl 10.0 µl d) Incubate reactions at 25oC for 1-2 hours (sticky-end ligation) or O/N at 16oC (for blunt-end ligation) 3. Transform E. coli with the ligation product Transform competent cells (with a transformation efficiency of at least 1x10⁹ colonies/g pUC19) with the whole ligation reaction (10 l) following the protocol provided with the competent cells. Plate the transformed bacteria on 50 µg/ml kanamycin agar plates 4. Identify clones with the correct insert a) Depending on the ratio of colony numbers for the test sample vs. the negative control sample, randomly pick 2 or 3 colonies and grow each clone in 100 l of LB Broth with 100 g/ml kanamycin at 37°C for 2 hours with shaking. b) Use 1 l of each bacterial culture for screening homology arm inserts by PCR and continue to grow the culture for another 4 hours. Store the culture at 4°C. c) Prepare a PCR Master Mix with PCR primers flanking the insert: 1 rxn 0.5 0.5 0.5 2.5 19.5 0.5 24.0 l l l l l l l 10 rxn 5 l 5 l 5 l 25 l 195 l 5 l 240 l Composition PCR primer 1 (10 M) PCR primer 2 (10 M) 50X dNTP mix (10 mM of each) 10X PCR Reaction Buffer Nuclease-free water Taq DNA polymerase (approx. 5 U/l) Total volume d) Mix the master mix very well and aliquot 24 l into each well of 96-well PCR plate or individual tubes. e) Add 1 l of each bacterial culture from step (b) into each well (or tube). f) Proceed with PCR using the following program: 94°C, 4 min 94°C, 0.5 min, then 68°C, 1 min/1 kb* 68°C, 3 min 1 cycle 25 cycles 1 cycle * Depending on the size of final PCR product, use a shorter or longer time. g) Take 5 l of the PCR reaction and run it on a 1.5-2% agarose/EtBr gel in 1X TAE buffer to identify clones with correct insert. h) Grow a positive clone containing insert in an appropriate amount of LB-kanamycin broth, and purify the construct using an endotoxin-free plasmid purification kit. Sequence verification of the insert is optional. i) Repeat the entire process with remaining homology arm to build the final placement construct Page 16 ver. 1-08122013 www.systembio.com PinPoint™ Targeted Integration System Cat. # PINxxxA-1 D. Overview and Protocol for PinPoint-HR System The initial step is to create PinPoint attP containing cell line using a combination of TALE-Nuclease pairs or Cas9 along with a HR vector containing the PinPoint site to target a specific DNA locus of interest. We suggest building custom TALE-Nuclease Pairs using SBI’s EZ-TALTM kit (http://www.systembio.com/tale-effectortechnology), or alternatively, use our Cas9 SmartNuclease Kit (http://www.systembio.com/genome-engineeringcas9-crispr-smartnuclease) for cloning in guide RNA sequences into the all-in-one Cas9 vector to target any site in the genome. Once the method of inducing dsDNA breaks is determined, the user will co-transfect the TALE-Nuclease plasmid pair or Cas9-guide RNA vector with a suitable HR vector containing the PinPoint attP site and G418 (Neomycin) marker. After transfection, successfully transfected cells may be selected using G418, and resulting G418resistant colonies can be picked for expansion to create platform cell lines. These cell lines can be retargeted using the PinPoint integrase and donor vectors (see Section IV). The retargeting step is the final step of the process, where a donor vector bearing an attB site and transgene of interest will target the placed PinPoint attP site. Successful retargeting results in the puromycin resistance gene fragment in the donor vector to be introduced under the control of the PGK promoter in the PinPoint-HR attP plasmid, resulting in puromycin-resistant colonies which can be clonally expanded and characterized for relevant phenotype(s) of interest. We provide two HR-based plasmids containing the PinPoint attP site for use with TALE-Nuclease or Cas9 systems. The first vector is a complete HR vector (Cat# PIN410A-1) with 5’ and 3’ arms homologous to a 3’ intronic sequence for the well-characterized human AAVS1 (PPP1R12C) locus, which can be placed in the genome and subsequently retargeted by PinPoint integrase and donor vectors. Validated TALE-Nuclease expression plasmids compatible with Cat# PIN410A-1 for inducing a dsDNA break at the AAVS1 site are also available (Cat #GE601A-1). The second vector (Cat # PIN400A-1) is a cloning vector that allows the user to clone in homologous sequences to any target sequence of interest, which allows for highly precise placement of the PinPoint site anywhere in the genome for subsequent retargeting. The user will need to provide their own TALE-Nuclease Pair or Cas9 guide RNA to target the specific DNA sequence of interest. Notes: 1) Depending on the cell type being transfected, please choose a transfection protocol which results in maximal transfection efficiencies. For adherent cell lines such as HEK293T, passive transfection methods using cationic lipid-based methods (e.g. Lipofectamine 2000, FuGene HD) work very well in transfection of donor and integrase vectors. For other types of cells such as primary, stem, or suspension cells, we suggest transfection using electroporation methods (NucleoFection or Neon) for optimal results. 2) The plasmids should be mixed well in minimal serum/no antibiotic media + cationic lipid transfection reagent or electroporation buffer to maximize efficiency of delivery. 3) For selection of target cells, we strongly recommend testing different concentrations of Neomycin (G418) on untransfected cells to determine the optimal concentration of selection agent – which is kills ~90-100% of cells within 48-72 hours after drug administration. Day 0 4) Seed ~400,000 cells in a 6-well plate in suitable growth medium optimal for the cell type of interest and grow overnight at 37°C. Please include well(s) for positive and negative control vectors, if desired. 888-266-5066 (Toll Free) 650-968-2200 (outside US) Page 17 System Biosciences (SBI) User Manual Day 1 5) When cells are ~60-80% confluent, co-transfect target cells with plasmid(s) encoding for TALE-Nuclease pairs (provided in the kit) or Cas9 gRNA for targeting human AAVS1 or your gene of interest at a 1:1 ratio (e.g. 0.5 µg of Cas9/0.25 µg each of TALE-Nuclease and 0.5 µg of HDR plasmid) using the transfection reagent of your choice. Day 2 6) Change out transfection media to complete growth media and incubate cells. Wait for at least 48-72 hours for HR recombination to occur Day 4/5 7) Split co-transfected cells 1/10 into 100mm plates and allow one day for plating of the cells Day 6 8) Add recommended amount of neomycin (G418) suitable for optimal selection of the transfected cells (400 – 1000 µg/ml) Days 7-17 9) Untransfected cells will begin to die and colonies will begin to emerge from cells that were successfully transfected and showing G418 resistance. When the colonies are large enough, transfer them to a single well of a 6-well plate. Keep cells under antibiotic selection at all times. When the clones become confluent, split cells for seeding into 100mm plate/T-75 flask for continued propagation. Remaining cells can be frozen down for archival purposes. IV. Targeting of Placed PinPoint Site with PinPoint Integrase and Donor Vectors A. Overview of Targeting of the Placed PinPoint Site Once platform cell lines containing the PinPoint site have been developed using either the PinPoint-FC or PinPoint-HR methods (covered in Sections II and III), one can target the PinPoint site using the PinPoint integrase and a donor vector of choice (see Sections II.C or III.C for donor vector details). This transfectionbased reaction is very efficient and limited only by the transfection efficiency of the cell line being targeted. Cotransfection of the PinPoint integrase and a donor vector containing the insert sequence into a platform cell line will result in a specific recombination reaction between the placed PinPoint attP site and the attB site in the donor plasmid. This results in integration of the entire donor plasmid into (and only into) the PinPoint site. As a result of this reaction, correctly targeted donor vectors will have their promoterless puromycin-resistance gene now under control of the mouse PGK promoter present in the PinPoint placement vector, and will be resistant to puromycin when subjected to selection. Platform cell lines can be engineered to express different genes of interest at the exact same location for precise determination of underlying phenotypes, with very high specificity as the PinPoint integrase recognizes only its own attP site. This is a critical feature that distinguishes the PinPoint system from other targeted gene placement systems, which rely on other types of recombinases (e.g. R4) that often recognize pseudo-sites in the genome. Page 18 ver. 1-08122013 www.systembio.com PinPoint™ Targeted Integration System Cat. # PINxxxA-1 B. Validation Data for Targeting of Placed PinPoint site by Donor Vectors After initial generation of the platform cell line with the placed PinPoint attP site, we have co-transfected the same HEK293T cells with a PinPoint positive control donor vector (Cat#PIN600A-1, CAGGFP-T2A-Luciferase) bearing an attB site and the PinPoint integrase expression plasmid (Cat# PIN200A-1), resulting in GFP positive and puromycin-resistant colonies (Fig. 5). Verification of proper insertion of the donor vector into the placed PinPoint site was confirmed by performing junction PCR with primer pairs that span portions of both PGK promoter (in the PinPoint attP placement vector) and puromycin resistance gene fragment (in the donor vector) resulting in a defined PCR amplicon (Fig. 6). Fig. 12. GFP positive and Puromycin-resistant Colonies after Targeting with PIN600A-1 Donor Vector 0.5 0.4 0.3 MW(bp) Neg CTL Line‐1 Line‐2 Line‐3 888-266-5066 (Toll Free) 650-968-2200 (outside US) Page 19 System Biosciences (SBI) User Manual Fig. 13. Junction PCR analysis verified correct targeting of donor vector to the placed PinPoint attP site in HEK293T cells C. Cloning of Inserts into PinPoint Donor Vectors For rapid and efficient cloning of any insert into donor vectors, we recommend SBI’s Cold Fusion Cloning Kit as a ligase and restriction enzyme-free cloning method. More details can be found here: http://www.systembio.com/molecular-tools/cold-fusion-cloning/overview For standard cloning strategies, please refer to the following protocol for more details: 1. Ligation of insert into vector e) Dilute gel-purified, digested vector to 10 ng/µl f) Set up 10 µl ligation reactions for each control and test samples as below: Volume 1.0 µl 7.0 µl Item PinPoint empty donor vector DNA insert (~30-50 ng) or water control 10X T4 DNA ligase buffer T4 DNA Ligase (40 U/µl) Total Reaction Volume 1.0 µl 1.0 µl 10.0 µl g) Incubate reactions at 25oC for 1-2 hours (sticky-end ligation) or O/N at 16oC (for blunt-end ligation) 2. Transform E. coli with the ligation product a) Transform competent cells (with a transformation efficiency of at least 1x10⁹ colonies/g pUC19) with the whole ligation reaction (10 l) following the protocol provided with the competent cells. Plate the transformed bacteria on 50 µg/ml kanamycin agar plates. 3. Identify clones with the correct insert a) Depending on the ratio of colony numbers for the cDNA sample vs. the negative control sample, randomly pick 5 or more well-isolated colonies and grow each clone in 100 l of LB Broth with 100 g/ml of kanamycin at 37°C for 2 hours with shaking. b) Use 1 l of each bacterial culture for screening DNA inserts by PCR and continue to grow the culture for another 4 hours. Store the culture at 4°C. c) Prepare a PCR Master Mix with PCR primers flanking the insert: Page 20 ver. 1-08122013 www.systembio.com PinPoint™ Targeted Integration System 1 rxn 0.5 l 0.5 l 10 rxn 5 l 5 l Cat. # PINxxxA-1 Composition PCR primer 1 (10 M) PCR primer 2 (10 M) 0.5 l 5 l 50X dNTP mix (10 mM of each) 2.5 l 25 l 10X PCR Reaction Buffer 19.5 l 195 l Nuclease-free water 0.5 l 5 l Taq DNA polymerase (approx. 5 U/l) 24.0 l 240 l Total volume d) Mix the master mix very well and aliquot 24 l into each well of 96-well PCR plate or individual tubes. e) Add 1 l of each bacterial culture from step (b) into each well (or tube). f) Proceed with PCR using the following program: 94°C, 4 min 94°C, 0.5 min, then 68°C, 1 min/1 kb* 68°C, 3 min 1 cycle 25 cycles 1 cycle * Depending on the size of final PCR product, use a shorter or longer time. g) Take 5 l of the PCR reaction and run it on a 1.2% agarose/EtBr gel in 1X TAE buffer to identify clones with correct insert. h) Grow a positive clone containing insert in an appropriate amount of LB-kanamycin broth, and purify the construct using an endotoxin-free plasmid purification kit. Sequence verification of the insert is optional. D. Protocol for Targeting the Placed PinPoint Site with Donor Vectors Notes: 1) Depending on the cell type being transfected, please choose a transfection protocol which results in maximal transfection efficiencies. For adherent cell lines such as HEK293T, passive transfection methods using cationic lipid-based methods (e.g. Lipofectamine 2000, FuGene HD) work very well in transfection of donor and integrase vectors. For other types of cells such as primary, stem, or suspension cells, we suggest transfection using electroporation methods (NucleoFection or Neon) for optimal results. 2) The plasmids should be mixed well in minimal serum/no antibiotic media + cationic lipid transfection reagent or electroporation buffer to maximize efficiency of delivery. 3) For selection of target cells, we strongly recommend testing different concentrations of puromycin on untransfected cells to determine the optimal concentration of selection agent – which is kills ~90-100% of cells within 48-72 hours after drug administration. For HEK293T cells, we have used a concentration of 0.5 µg/ml for selection. 888-266-5066 (Toll Free) 650-968-2200 (outside US) Page 21 System Biosciences (SBI) User Manual 4) It is recommend to use the PinPoint integrase plasmid (Cat# PIN200A-1) in a 1:1 ratio (w/w) with the donor. For example, for transfection of HEK293T cells containing a placed PinPoint attP site, using Lipofectamine 2000, a 1:1 ratio (0.1µg/0.1µg) of PinPoint integrase plasmid to donor plasmid successfully integrated the donor vector at the placed attP site. Day 0 1) Seed ~400,000 cells in a 6-well plate in suitable growth medium optimal for the cell type of interest and grow overnight at 37°C. Please include well(s) for a positive and negative control vectors, if desired. Day 1 2) When cells are ~60-80% confluent, co-transfect target cells with PinPoint integrase plasmid and donor vector at a 1:1 ratio (w/w) using the transfection reagent of your choice. Day 2 3) Split co-transfected cells at 1/2 and 1/5 ratios in 100mm plates, and replace transfection medium with complete growth medium including antibiotics. Day 3 4) Next day, add recommended amount of puromycin suitable for optimal selection of the transfected cells. Days 4-14 5) Untransfected cells will begin to die and colonies will begin to emerge from cells that were successfully transfected. When the colonies are large enough, transfer them to a single well of a 6-well plate. Keep cells under antibiotic selection at all times. 6) Test the cell lines for expression of your transgene of interest by qPCR, western blot, immunofluorescence, or any specific assays designed to give readout of transgene expression. 7) Select the cell line(s) that give the desired level of transgene expression for further characterization and/or expansion. Please note that expression may vary from line to line depending on chromatin structure and/or epigenetic modifications surrounding the integration site. 8) The donor vector, including the backbone and selection marker, can be removed by the use of the Cre recombinase (Cat #CRE100A-1), leaving only a loxP site and the promoter/insert sequence. See Appendix A for further protocol details on Cre recombinase-mediated excision. E. Verification of Insert Integration into PinPoint Site by Junction PCR To verify that the retargeting of your cell line is correct, junction PCR can be employed to amplify the attL junction. This will require utilization of a nested PCR scheme: a) Prepare a PCR Master Mix shown below: Page 22 ver. 1-08122013 www.systembio.com PinPoint™ Targeted Integration System Primary PCR Reaction Cat. # PINxxxA-1 Amount (µL) Genomic DNA (50 ng/µL) 1.0 5X iProof HF Buffer 5.0 10 mM dNTPs 0.5 10 uM Primer Mix 1 1.25 iProof Polymerase (2U/µl) 0.25 Water 17.0 Total 25.0 b) Proceed with PCR using the following “Touchdown” program: PCR Settings 1. 98C 30 sec 2. 98C 15 sec 3. 70-65C 30 sec (-0.5C/cycle) 4. 72C 15 sec 5. Go to step 2, nine more times (10 total cycles) 6. 98C 15 sec 7. 65C 30 sec 8. 72C 15 sec 9. Go to step 6, 29 more times (30 total cycles) 10. 72C 1 min 11. 4C forever c) After completion of the primary PCR program, take out 1 µl of the primary PCR reaction for use in the secondary PCR reaction and set up the reaction as following: Secondary PCR Reaction Primary PCR product 888-266-5066 (Toll Free) 650-968-2200 (outside US) Amount (µL) 1.0 Page 23 System Biosciences (SBI) User Manual 5X iProof HF Buffer 5.0 10 mM dNTPs 0.5 10 uM Primer Mix 2 1.25 iProof Polymerase (2U/µl) 0.25 Water 17.0 Total 25.0 d) Proceed with PCR using the following “Touchdown” program: PCR Settings 1. 98C 30 sec 2. 98C 15 sec 3. 66-61C 30 sec (-0.5C/cycle) 4. 72C 15 sec 5. Go to step 2, nine more times (10 total cycles) 6. 98C 15 sec 7. 61C 30 sec 8. 72C 15 sec 9. Go to step 6, 29 more times (30 total cycles) 10. 72C 1 min 11. 4C forever h) Take 5 l of the PCR reaction and run it on a 1.2% agarose/EtBr gel in 1X TAE buffer. Expect ~300 bp PCR product, which confirms correct integration attL Junction Primer Sequences Primary PCR Fwd 5’-CGTGCAGGACGTGACAAATG-3’ Rev 5’-GTGGGCTTGTACTCGGTAGC-3’ Secondary PCR Fwd 5’-CTGAGCAATGGAAGCGGGTA-3’ Page 24 ver. 1-08122013 www.systembio.com PinPoint™ Targeted Integration System Cat. # PINxxxA-1 Rev 5’- GGATGATCCTGACGACGGAG-3’ V. Pre-Placed PinPoint Cell Lines for Retargeting A. Product Overview In addition to the comprehensive vector collections for the PinPoint-FC and PinPoint-HR systems, SBI offers premade cell lines with the PinPoint site already integrated into the genome in a single locus, for use as platform cells ready for PinPoint-mediated retargeting. Currently available cell lines include the following: 1) Human Embryonic Kidney (HEK293T) (Cat # PIN320A-1) 2) Mouse iPSC derived from mouse embryonic fibroblasts (Cat # PIN340iPS-1). We also offer kit formats for these platform cell lines, with everything needed to retarget the above cell lines with donor vectors and the PinPoint integrase. For the 293T platform cell line: Cat# PIN320A-KIT, and for the mouse iPSC platform line: Cat# PIN340iPS-KIT. For detailed product information on these cell lines and kit components, please refer to the product table in Section I.B. The PinPoint™ site was placed in these platform cell lines in a single locus using the PinPoint-FC system, and validated for single-copy insertion of the PinPoint attP site by Southern Blot analysis (Fig. 13). 888-266-5066 (Toll Free) 650-968-2200 (outside US) Page 25 System Biosciences (SBI) User Manual Fig. 14. Southern Blot Analysis of Genomic DNA isolated from Mouse Embryonic Fibroblast (MEF) clones integrated with PhiC31 Reprogramming Vector (Cat# FC305A-1) Reveals Single-Copy Insertion of Vector in Target Cells B. Protocol for Culturing PinPoint HEK293T cells The pre-made 293T cell line can be thawed, recovered, and frozen using standard conditions as outlined in the table below. Complete Growth Medium Freezing Medium D-MEM, high Glucose 90% Complete Growth Medium 10% fetal bovine serum (FBS)* 10% DMSO 2 mM L-glutamine 1% Penicillin/Streptomycin (10,000 I.U. Penicillin; 10,000 g/ml Streptomycin) *FBS does not require heat inactivation Thawing and Recovering Cells for Retargeting with PinPoint Donor Vector Use the following protocol to thaw cells to initiate the culture. The initial propagation of cells should be used to generate stocks to be frozen and stored for future use. 1) Remove the frozen vial of cells from liquid nitrogen and quickly thaw them by swirling in a 37ºC water bath. Try to keep the O-ring and cap of the vial out of the water, to prevent possible contamination. Wear eye protection. 2) Before cells are completely thawed, remove from 37ºC water bath and decontaminate outside of the vial with 70% ethanol. 3) Using sterile technique, transfer the cells to either a 100mm plate or T-75 cm2 tissue culture flask containing 10 ml of complete medium at room temperature. Transfer entire contents of the vial to the tissue culture plate/flask and do not pipet cells up and down as this may kill the cells. 4) Swirl the plate/flask to evenly distribute cells. Incubate the flask at 37ºC, 5% CO2 overnight to allow cells to attach to the bottom of the flask. 5) The following day, aspirate medium and replace with 10 ml fresh complete medium containing 400ug/ml of G418. 6) Incubate the cells at 37ºC, 5% CO2 and check daily until they reach 80% confluency. 7) Once reach desired confluency, subculture the cells 1/5 to 1/10 into 100mm plates for transfection. It may be useful to have one plate devoted to freeze down for archival purposes. 8) When the cells reach target confluency of 60-80%, transfect cells with PinPoint integrase and appropriate donor vector using the protocol in Section IV.D of this user manual. Page 26 ver. 1-08122013 www.systembio.com PinPoint™ Targeted Integration System Cat. # PINxxxA-1 C. Protocol for Culturing PinPoint Mouse iPSC Cells The pre-made mouse fibroblast iPSC cell line can be thawed and recovered, and frozen using the conditions as outlined below. In general, iPS cells are challenging to culture and should only be operated by researchers experienced in the intricacies of mouse embryonic stem (mES) cell culture. The methods for culture are nearly identical to mES cell culture, although more careful maintenance will be required. The MEF-derived iPSC cells provided in the kit require separate feeder cells for proper culturing. The feeder cells need to be resistant to G418 and Puromycin for this application. Appropriate feeder cells for mouse iPS cell culture can be obtained from commercial sources (Amsbio, Cat# GSC-6004G). Please consult manufacturer’s recommended protocols for plating and culturing MEF feeder cells. These feeder cells need to be prepared in advance and ready for use on the day of seeding mouse iPSC cells Growth Conditions for PinPoint Mouse iPS cells 1. Required media and reagents Reagent Information Mouse iPSC Growth Medium SC200M-1 2x Cold Freezing Media 20% DMSO and 80% ES-FBS Trypsin-EDTA GIBCO 2. Thawing Mouse iPS cells To insure the highest level of viability, be sure to warm medium to 37°C before using it on the cells. 1) Remove the vial from liquid nitrogen and thaw quickly in a 37°C water bath. 2) Remove the vial from the water bath as soon as the cells are half-thawed, and sterilize by spraying with 70% ethanol. 3) Transfer the cells with 10 ml of mouse iPSC medium to a 15 mL conical tube and pellet the cells by centrifugation at 200 g for 5 min. 4) While centrifuging, remove medium from the feeder cell plates, and wash the wells twice with DMEM. Then add 1 ml of mouse iPSC Medium. 5) Discard the supernatant from the mouse iPS cells, and resuspend cells with 1 ml fresh mouse iPSC medium. Plate the cells on MEF feeder cells in a 6-well plate. 6) Incubate at 37°C with 5% CO2 until the cells reach 80% confluency. The mouse iPSC media must be changed every day. 888-266-5066 (Toll Free) 650-968-2200 (outside US) Page 27 System Biosciences (SBI) User Manual 3. Maintenance of mouse iPS cells It is important not to keep mouse iPS cells in culture for long period of time without passaging, to maintain the pluripotency. 1) Aspirate the medium and wash the cells twice with 1 ml PBS. 2) Remove PBS completely and add 0.7 ml of 0.05% trypsin-EDTA solution, and incubate at 37°C for 10 min. 3) While incubating, remove a 6-well plate of feeder cells. Aspirate the medium and add 2 ml of mouse iPSC medium to each well. 4) Remove the plate containing mouse iPS cells from the incubator and swirl to dislodge the cells from the bottom of the plate. 5) Add 2 ml of mouse iPSC medium, and suspend the cells by pipetting up and down to single cell suspension. 6) Transfer the cell suspension to a 15 ml conical tube and spin the cells at 200 g for 5 min. 7) Add 2 ml of iPSC medium to the plate and suspend the cells by pipetting up and down to single cell suspension. 8) Distribute ~0.2 ml of the mouse iPS cell suspension to each well of the 6-well plate. Right after plating iPS cells, gently swirl the plate back-and-forth and side-to-side and incubate at 37°C with 5% CO2 until the cells reach 80% confluency. 9) The mouse iPSC media must be changed every day and mouse iPS cells subcultured ~1:10 every 2-3 days. Track the passage number of the iPS cells. Page 28 ver. 1-08122013 www.systembio.com PinPoint™ Targeted Integration System 4. Cat. # PINxxxA-1 Freezing mouse iPS cells 1) Grow cells to the exponential phase in a 6-well plate. 2) Aspirate the medium, and wash the cells twice with 2 ml of PBS. 3) Aspirate the medium, and wash the cells twice with 2 ml of PBS. 4) Add 0.7 ml 0.05% trypsin-EDTA and incubated for 10 min at 37°C. 5) Add 2 ml of mouse iPSC medium, and suspend the cells by pipetting up and down to single cell suspension. 6) Transfer the cell suspension to a 15 ml conical tube, count the number of cells and spin the cells at 200 g for 5 min. 7) Discard the supernatant, and resuspend the cells with mouse iPSC medium to the concentration of 1x10⁶ cells per ml. 8) Add equal volume of 2x freezing medium and aliquot it at 0.5 ml per vial. 9) Put the vials in a cell-freezing container, and store them at -80°C overnight. 10) Transfer the vials to a liquid nitrogen tank for long-term storage. 5. Retargeting of mouse iPSC cells with Donor Vector 1) When the cells are ~60-80% confluent in 6-well plates, transfect cells using the PinPoint integrase and suitable donor vector using NucleoFection or similar transfection method per the protocol below (conditions adapted from Karow et al. 2011) 2) Use the MEF nucleofector kit I (Lonza) and the program T-20 according to the manufacturer’s instructions. 3) Nucleofect with 3 µg total DNA (1.5 µg of PinPoint integrase and 1.5 µg of donor vector). The Neon transfection system from Life Technologies has also been demonstrated to work with similar efficiency. 4) After nucleofection, plate the cells in single wells of a six-well plate with MEF feeder cells already plated. Change media to mouse iPSC media. 5) Next day, switch to mouse iPSC media with 0.5 µg/ml of puromycin, and change the media every day. 6) Allow cells to form colonies (~10-14 days) in the plates, and pick individual colonies for characterization of relevant phenotype(s) of interest and/or expansion into 100mm plates if desired. D. Validation of PinPoint Mouse iPSC Cell Lines Phase 888-266-5066 (Toll Free) Sox2 Alkaline Phosphatase 650-968-2200 (outside US) Nanog Oct4 Page 29 SSEA‐1 System Biosciences (SBI) User Manual Fig. 15. Stem cell markers for Oct4, Sox2, SSEA-1 and Nanog were determined by immunocytochemistry using primary antibodies for SSEA1 (Millipore), Oct4 (Abcam), Sox2 (Abcam), and Nanog (Abcam) followed by Alexa Fluor fluorescent-labeled secondary antibodies (Invitrogen). Detection of Alkaline Phosphatase activity was performed using the AP Detection Kit (Millipore). VI. Appendix A. Protocol for use of Cre recombinase in excision of integrated donor vector backbone sequence This protocol is designed to check for removal of the donor vector backbone and selection cassette upon excision using the Cre recombinase plasmid. The PCR primers have been verified for the Cat# PIN510A-1 and PIN600A-1 donor vectors. The use of other donor vectors will require designing of specific primer pairs to check for Cre excision. Day 0 1) Seed ~400,000 cells in a 6-well plate in suitable growth medium optimal for the cell type of interest and grow overnight at 37°C. Day 1 2) Transfect cells with optimal amount of pCMV-Cre plasmid (Cat# CRE100A-1) using your transfection agent of choice. For example, for transfection of HEK293T cells containing a placed donor vector, using Lipofectamine 2000, 1 µg of the plasmid works very well to remove the donor vector. For other types of cells or using alternative transfection system, higher amounts of plasmid may be necessary. Day 2 3) Next day, replace transfection media with complete growth media Day 3/4 4) Split co-transfected cells at a very low density (~1:20) into 100mm plates Day 5-14 Page 30 ver. 1-08122013 www.systembio.com PinPoint™ Targeted Integration System Cat. # PINxxxA-1 5) Allow the cells to form single colonies on the plate. Note that colonies should not be puromycin-resistant if recombinase reaction has removed the donor vector backbone and selection cassette 6) Pick individual colonies and place them into 6-well plates for further expansion. expanded, pick individual colonies for PCR-based analysis of Cre excision When colonies have 7) Isolate genomic DNA from colonies using standard genomic DNA isolation kit of your choice. 8) Perform junction PCR to determine if the colony is Cre- excised using the conditions below. The junction PCR has been validated with xxxx vectors. Junction PCR Primers: CreEx_F1(67/449) 5’- CCC TTT GAC TGA GAC TGA AAC CTG-3’ CreEx_R1(59/449) 5’-GGT AAT AGC GAT GAC TAA TAC GTA G-3’ a) Prepare a PCR Master Mix shown below: Primary PCR Reaction Amount (µL) Genomic DNA (50 ng/µL) 1.0 5X iProof HF Buffer 5.0 10 mM dNTPs 0.5 10 uM Primer Mix 1 1.25 iProof Polymerase (2U/µl) 0.25 Water 17.0 Total 25.0 b) Proceed with PCR using the following “Touchdown” program: PCR Settings 1. 98C 30 sec 2. 98C 15 sec 3. 61-56C 30 sec (-0.5C/cycle) 4. 72C 15 sec 5. Go to step 2, nine more times (10 total cycles) 6. 98C 888-266-5066 (Toll Free) 15 sec 650-968-2200 (outside US) Page 31 System Biosciences (SBI) User Manual 7. 56C 30 sec 8. 72C 15 sec 9. Go to step 6, 29 more times (30 total cycles) 10. 72C 1 min 11. 4C forever c) After completion of the primary PCR program, take out 1 µl of the primary PCR reaction for use in the secondary PCR reaction and set up the reaction as following: Secondary PCR Reaction CreEx_F2(58/364) 5’- GTA TGC TAT ACG AAG TTA TCT TAA GC-3’ CreEx_R2(63/364) 5’- GGA AAG TCC CAT AAG GTC ATG T-3’ Secondary PCR Reaction Amount (µL) Primary PCR product 1.0 5X iProof HF Buffer 5.0 10 mM dNTPs 0.5 10 uM Primer Mix 2 1.25 iProof Polymerase (2U/µl) 0.25 Water 17.0 Total 25.0 d) Proceed with PCR using the following “Touchdown” program: PCR Settings 12. 98C 30 sec 13. 98C 15 sec 14. 60-55C 30 sec (-0.5C/cycle) 15. 72C 15 sec 16. Go to step 2, nine more times (10 total cycles) 17. 98C 15 sec Page 32 ver. 1-08122013 www.systembio.com PinPoint™ Targeted Integration System 18. 55C 30 sec 19. 72C 15 sec Cat. # PINxxxA-1 20. Go to step 6, 29 more times (30 total cycles) i) 21. 72C 1 min 22. 4C forever Take 5 l of the PCR reaction and run it on a 1.2% agarose/EtBr gel in 1X TAE buffer. Expect ~365 bp PCR product, which confirms Cre excision Optional: An alternative to junction PCR is to replica-plate individual colonies into wells +/- puromycin. Clones that grow in the absence of puromycin and do not grow in its presence will be Cre excised. VII. References Karow, M. et al. 2011. Site-specific recombinase strategy to create induced pluripotent stem cells efficiently with plasmid DNA. Stem Cells 29(11):1696-704. Calos MP. The phiC31 integrase system for gene therapy. Curr Gene Ther. 2006 Dec;6(6):633-45. Miller, J. et al. 2011. A TALE nuclease architecture for efficient genome editing. Nat Biotechnol. 2011 Feb;29(2):1438. Mali P, et al. RNA-guided human genome engineering via Cas9. Science. 2013 Feb 15;339(6121):823-6. Jinek M, et al. A programmable Dual-RNA-guided DNA endonuclease in adaptive bacterial immunity. Science. 2012 Aug 17;337(6096):816-21. Sauer B, Henderson N. Site-specific DNA recombination in mammalian cells by the Cre recombinase of bacteriophage P1. Proc Natl Acad Sci U S A. 1988 Jul;85(14):5166-70. Hockemeyer, D. et al. 2011. Genetic engineering of human pluripotent cells using TALE nucleases. Nat Biotechnol. 2011 Jul 7;29(8):731-4. Cermak, T. et al. 2011. Efficient design and assembly of custom TALEN and other TAL effector-based constructs for DNA targeting. Nucleic Acids Res. 2011 Jul;39(12):e82. 888-266-5066 (Toll Free) 650-968-2200 (outside US) Page 33 System Biosciences (SBI) VIII. User Manual Technical Support For more information about SBI products or to download manuals in PDF format, please visit our website: http://www.systembio.com For additional information or technical assistance, please call or email us at: [email protected] 650-968-2200 IX. Licensing and Warranty Statement Acknowledgement: Design of the AAVS1 TALE-Nuclease Expression vectors was performed by Dr. Jizhong Zou of the NIH Center for Regenerative Medicine, a Common Fund initiative of the U.S. National Institutes of Health. Limited Use License Use of the PinPoint Targeted Integration System (i.e., the “Product”) is subject to the following terms and conditions. If the terms and conditions are not acceptable, return all components of the Product to System Biosciences (SBI) within 7 calendar days. Purchase and use of any part of the Product constitutes acceptance of the above terms.The purchaser of the Product is granted a limited license to use the Product under the following terms and conditions: The Product shall be used by the purchaser for internal research purposes only. The Product is expressly not designed, intended, or warranted for use in humans or for therapeutic or diagnostic use. The Product may not be resold, modified for resale, or used to manufacture commercial products without prior written consent of SBI. This Product should be used in accordance with the NIH guidelines developed for stem cell research. Purchase of the product does not grant any rights or license for use other than those explicitly listed in this Licensing and Warranty Statement. Use of the Product for any use other than described expressly herein may be covered by patents or subject to rights other than those mentioned. SBI disclaims any and all responsibility for injury or damage which may be caused by the failure of the buyer or any other person to use the Product in accordance with the terms and conditions outlined herein. Limited Warranty SBI warrants that the Product meets the specifications described in this manual. If it is proven to the satisfaction of SBI that the Product fails to meet these specifications, SBI will replace the Product or provide the purchaser with a refund. This limited warranty shall not extend to anyone other than the original purchaser of the Product. Notice of nonconforming products must be made to SBI within 30 days of receipt of the Product. SBI’s liability is expressly limited to replacement of Product or a refund limited to the actual purchase price. SBI’s liability does not extend to any damages arising from use or improper use of the Product, or losses associated with the use of additional materials or reagents. This limited warranty is the sole and exclusive warranty. SBI does not provide any other warranties of any kind, expressed or implied, including the merchantability or fitness of the Product for a particular purpose. SBI is committed to providing our customers with high-quality products. concerns about any SBI products, please contact us at (888) 266-5066. Page 34 ver. 1-08122013 If you should have any questions or www.systembio.com PinPoint™ Targeted Integration System Cat. # PINxxxA-1 © 2013 System Biosciences (SBI). 888-266-5066 (Toll Free) 650-968-2200 (outside US) Page 35


![User Manual [5.5 Mb - pdf]](http://vs1.manualzilla.com/store/data/005950654_1-5f0c3bfbdc0fa52796e7d9a416391587-150x150.png)