1
ETC® Supplement
Eos Family v2.3 Supplement to Operations Manual
Welcome
This document is supplemental to information in the Eos Titanium, Eos, and Gio v2.0 Operations Manual, Ion
v2.0 Operations Manual, and Element v2.1 User Manual, and should be used in conjunction with it.
Additions to Query
Query now has the following buttons:
{Keywords} - displays buttons for all the text used in the text 1-10 fields and for all of the default
keywords in Patch.
{Fixture Types} - displays buttons for all of the fixture types used in the current show file.
{Gel} - displays all of the gels used in the current show file.
{Text 1} - {Text 10} - displays only the text used in that text field.
Up and Down Arrows - allows paging of the lists.
See also Renaming Text Fields in Patch (page 17) for more information.
Browser Color Coding
The following color coding for selected items has been added to the browser:
Save - green
Save As - green
Open - red
Merge - yellow
New -red
Clear -red
Corporate Headquarters n Middleton, WI, USA n Tel +608 831 4116 n Service: (Americas) [email protected]
London, UK n Tel +44 (0)20 8896 1000 n Service: (UK) [email protected]
Rome, IT n Tel +39 (06) 32 111 683 n Service: (UK) [email protected]
Holzkirchen, DE n Tel +49 (80 24) 47 00-0 n Service: (DE) [email protected]
Hong Kong n Tel +852 2799 1220 n Service: (Asia) [email protected]
Web: www.etcconnect.com n © 2015 ETC. All Rights Reserved. n Product information and specifications subject to change.
4250M1211-2.3.0 n A n Released 2015-07 n ETC intends this document to be provided in its entirety.
Eos Family Operations Manual Supplement
1
Electronic Theatre Controls, Inc.
ETC® Supplement
Eos Family v2.3.0
Additional Browser Changes
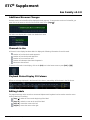
Previous versions of a showfile will be displayed in dark gray text. To see previous versions of a showfile, you
must click on the arrow to the left of the showfile name or use [Page u] .
File folders now display with a folder icon beside their name.
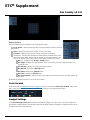
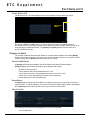
Channels in Use
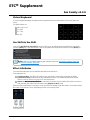
A Channels in Use display has been added. It displays the following information for each channel:
Number of cue lists the channel appears in.
Number of cues the channel appears in.
Number of cue moves from zero.
Number of submasters that channel appears in.
Maximum channel level
To open the Channels in Use display, click on the {CIU} icon in the home screen or press [Tab] + [3][2].
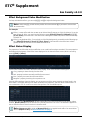
Playback Status Display FX Column
Effects are no longer displayed in the External Links column, instead they will be shown in the FX column.
Editing Labels
The page arrow keys on the console or an external alphanumeric keyboard can be used to move the cursor
within a label to aid in editing.
[Page p] - takes the cursor to the beginning of the label.
[Page q] - takes the cursor to the end of the label.
[Page t] - moves the cursor to the left.
[Page u] - moves the cursor to the right.
Eos Family Operations Manual Supplement
2
Electronic Theatre Controls, Inc.
ETC® Supplement
Eos Family v2.3.0
Virtual Keyboard
The virtual keyboard displays the alphanumeric keyboard shortcut for that hardkey in the lower right hard
corner.
The abbreviations are:
Ca - CTRL + ALT
S - SHIFT
C - CTRL
A - ALT
Use Shift As Eos Shift
In the ECU, {Use Shift as Eos Shift} allows the SHIFT key on an alphanumeric keyboard to be used as the
console's [Shift] key. If not selected, the Z key on an alphanumeric keyboard will function as the [Shift] key.
Note: With 2.3, the Hotkey mapping has changed. Please see Eos Family Hotkeys (page 22)
and Element Hotkeys (page 24).
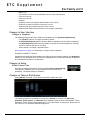
Effect Attributes
Two new effect attributes are now available that affect how effects run.
Those attributes are:
Continuous Run - the effect will keep running until there is a stop effect command. By default,
{Continuous Run} is disabled for all step and absolute effects. It is enabled by default for relative
effects. See Stop Effects on page 5 for more information.
Repeat on Go - previously, effects with a duration or number of cycles would refire when a a new cue
was recorded. Now effects will not restart unless {Repeat on Go} is used.
When an effect with duration is running in a cue, the effect will display in light blue while it is running and dark
blue when it has finished. This is only displayed in the Live Summary View.
Eos Family Operations Manual Supplement
3
Electronic Theatre Controls, Inc.
ETC® Supplement
Eos Family v2.3.0
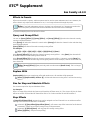
Effect Background Value Modification
For Step and Absolute effects, you can use [+], [-], and [/] to adjust the background value .
Note: When using [-], you will need to preface the command with [+] if you want to remove from
the current value.
For Example:
Effect 1 is a step effect with the on state set to 100 and the off state set to - 50% for all steps. To set the
step off state to -50%, you would use the following syntax [Effect][1] [Step] [1] {Offstate} [+] [-] [/]
[5] <0> [Enter]. If the channels in the effect have a background value of 50, the off state for each step
would be 25.
Effect 2 is an absolute effect. To set a level at + 20 of the background, you would use the following syntax, [Effect][2] {Action} [1] {Level} [+] [2]<0> [Enter]. If the channels in the effect have a background value of 50, the level 1 in the effect would be at 70.
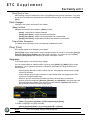
Effect Status Display
The properties of an effect that can be modified at a cue or sub level have been extended. The new properties
are displayed at the bottom of the Effect Status display and in the channel effects screen (which is access by
pressing [Shift] + [Effect]).
Several color indicators are used in the Effect Status Display. Those colors and their meanings are:
Grey - property is drawn directly from the effect.
Red - property has been manually modified but not stored.
Blue - property is an override to the saved effect.
Magenta - property is tracking from a previous cue.
From the Effect Attribute Override display, you can access most of the same properties as those found in the
Effect Editor. This display allows you to make modifications to properties, and store those modifications in a
cue or submaster. Click on a column to make changes from a list of available options.
A new effect attribute, {Restart Effect}, has been added that can only be accessed from this display. When
enabled, {Restart Effect} will cause an effect to restart whenever the cue is fired. This attribute is applied to
the cue that the effect is stored in and not in the effect itself.
Note: {Repeat on Go} is similar to {Restart Effect} but it is applied to the effect. For more information on {Repeat on Go}, see Effect Attributes on page 3.
Eos Family Operations Manual Supplement
4
Electronic Theatre Controls, Inc.
ETC® Supplement
Eos Family v2.3.0
Effects In Presets
Effects can be stored in a preset, and those presets can be used to create submasters and cues. However, the
effect's data is only copied to the submaster or cue, it is no longer referenced through the preset.
Note: If used with submasters and cues, the data is not referenced. So if changes are made to the
effect in the preset, the effect saved to the submasters and cues will remain unchanged.
The preset list display has a new column for effects.
Query and Group Effect
You can use [Query] [Effect] [n], [Query] [Effect], and [Group] [Effect] [n] to select the channels currently
running in the selected effect.
Using [Query] will select the channels in numeric order. [Group] will select the channels in the order that they
were originally selected.
[Query] [Effect] will select all channels currently running effects.
For Example:
[3][1] + [2][6] + [3][0] +[2][7] + [2][9] + [2][8] [Effect] [1] [Enter]
Using [Query] [Effect] [1] will select the channels currently running effect 1. Using [Next], the channels will
be selected in numeric order starting with channel 26.
Using [Group] [Effect] [1] will select the channels currently running effect 1. However, pressing [Next], the
channels will be selected in the order they were originally selected. In this example, channel 31 would be first,
then channel 26.
Note: [Group] [Effect] [n] was previously used as an alternate to [Recall From]. This is no longer
the case.
Replace With
{Replace With} allows you to replace an effect with another one. All overrides will be preserved.
[Effect] [1] {Replace With} <Effect> [2] - all channels that were running effect 1 will now be running
effect 2.
Size for Step and Absolute Effects
Size is now an option for Step and Absolute effects.
For Example:
Effect 1 is a step effect with the On State set to 50 and the Off State set to 10. If Size is set to 50, the On State
will be set to 50% of 50 and the Off State will be 50% of 10. So On would be 25 and Off would be 5.
Stop Effects
A [Stop Effect]/{Stop Effect} command can now be assigned to a list of channels in a cue without an effect
tracking into it or to a list of channels in a submaster.
<channel> [1] [Stop Effect]/{Stop Effect} [Enter] - will create a stop effect instruction for all selected
parameters, if there isn't an effect running on any of the parameters.
<channel> [1] [Effect] [Enter] - will only stop the currently running effect.
[Effect] [0] [Enter] - will place a stop all flag.
Eos Family Operations Manual Supplement
5
Electronic Theatre Controls, Inc.
ETC® Supplement
Eos Family v2.3.0
Manual Control of Non-Intensity Parameters
On Element, non-intensity parameters can now be set by using either the ML Controls or the buttons in the
central information area (CIA).
Parameter Display
The parameter display in the CIA is populated with only those parameters that are found in the patched
devices. As channels are selected, the parameter display will change to show only parameters relevant to the
selected channels.
The parameters are divided into the following categories: Intensity, Focus, Color and Beam. Each parameter
category is represented with buttons in the parameter tiles. These buttons allow you to select the entire collection of all parameters within that category. You can also select a single parameter from a category using
that parameter’s touchbutton in the parameter display.
Within the CIA, in the upper left corner, notice the {All NPs} button. When pressed, this collects all non-intensity parameters for further editing.
Some examples of using parameter touchbuttons are:
[1] {Iris} [5] [Enter] - Places the iris parameter of channel 1at 50%.
[Group] [4] {Zoom} {Edge} [Out] [Enter] - Sends any zoom and edge values for all fixtures in group 4
to 0%.
[1] [Thru] [3] {All Speed} [At] [2][5][Enter] - Sets all the available speed parameters for channels 1
through 3 to 25.
Setting Parameters with the Keypad
When the CIA is placed in parameter mode, all parameters of selected channels may be given numeric values
through the keypad.
When no channels are selected, the CIA shows all of the parameters that are available in the lighting system.
When channels are selected, the CIA condenses to show only the parameters that are appropriate to the selection set. If channels are selected that have different device types, such as spot and wash lights, the CIA will
show all of the available parameters. Parameters that are not available to all channels are grayed out.
Using [At] [/] [/] will place the direct DMX value on the command line. For example,[1] [At] [/] [/] [2][3][9]
[Enter] would put channel 1 at DMX value 239.
The following examples illustrate how to set parameter values with the keypad:
[5] {Iris} [5] {Zoom} [6] [5] {Edge} [5] [Enter] - sets channel 5 to an iris value of 50%, a zoom value of
65%, and an edge value of 50%.
Adjusting Parameters Using + and [+] and [-] can be used to adjust parameters from the command line. When using [-], you will need to preface
the command with [+] if you want to remove from the current value.
For Example:
Eos Family Operations Manual Supplement
6
Electronic Theatre Controls, Inc.
ETC® Supplement
Eos Family v2.3.0
[Channel List] {Pan} [1][0] - sets to 10 degrees.
[Channel List] {Pan} [+] [1][0] - adds 10 degrees.
[Channel List] {Pan} [-] [1][0] - sets to -10 degrees.
[Channel List] {Pan} [+] [-] [1][0] - removes 10 degrees.
Partial Show File Channel Merge
A new option has been added to Merge.
When Merge Channels is selected, channels from cues, submasters, groups, and other channel targets will be
added to any existing channel targets of that same type.
With Merge Channels not selected, those channels will override any existing channels in the channel targets of
the same type.
For Example:
In a show file 1, group 1 has channels 1 through 5. In show file 2, group 1 had channels 6-10. With Merge
Channels and Groups selected for the merge, show file 2's group 1 will merge with show file 1's group 1.
Group 1 will then have channels 1-10. If Merge Channels was not selected, group 1 would just have channels
6-10.
Note: It is important to remember that if the same channels exist in both show files, the data merging in will override the existing data for those channels.
Lightwright Import
Several changes were made to importing Lightwright files. Once a file has been selected for import, you will
now have options for importing.
Merge and Overwrite
You can select to either merge the data with the current show file, or to overwrite the data in the current file.
To do this, check the {Overwrite} box. Leaving this box unchecked will merge the data.
Starting and Ending Channel
You can select starting and ending channels for the import.
Eos Family Operations Manual Supplement
7
Electronic Theatre Controls, Inc.
ETC® Supplement
Eos Family v2.3.0
Mapping
You can map Eos patch fields to fields in the Lightwright file. Channel and Address must be mapped for the file
import to work. Any other field can be set to ignore if desired. Once a Lightwright field has been mapped, it
will display in grey in the dropdown menu. However, greyed out options can be selected again for placement
in multiple fields.
The text fields in the Patch display and database will rename based off of the Lightwright imported fields. See
Renaming Text Fields in Patch on page 17 for more information.
Note: Eos 2.3 does not currently support multiple gels per fixture from Lightwright.
Address Formats
Eos will accept mulitple address formats for importing. Examples of those formats are 2/3, 2.3, 2,3, 2-3. Eos
will convert all formats to n/n.
Device Mapping
Devices can also be mapped. Click {Map Devices} to open the following display.
Select the Lightwright device and the match from the Eos column. Multiple Lightwright devices can be selected at a time. Then click {Link Devices}. The link will appear in the Mapping column. To unlink a device,
select it from the Mapping column, and then press {Unlink Device}.
Device mapping and import fields are saved with the show file.
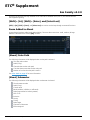
MLA Added to Export Menu
An option for exporting to Moving Light Assistant (MLA) has been added to the Export menu, Displays>File>Export>Moving Light Assistant.
This will open the export screen in the CIA. From this screen, you can choose which aspects of the show file
you want to export. By default all aspects are selected and will be exported. To withhold any show aspects
from exporting, simply deselect them in the CIA by clicking on the respective button. Deselected show aspects
will appear in black.
Eos Family Operations Manual Supplement
8
Electronic Theatre Controls, Inc.
ETC® Supplement
Eos Family v2.3.0
You can also choose to export specific portions of show aspects. To select this information, press the
{Advanced} button. In the Advanced screen, all aspects are deselected (black) by default.
To stop the show file from being saved for export, press the {Cancel} button. If you are ready to save, press
{Ok}. You will be prompted to name the file. A .csv file will be created.
Adding to the Current DMX Value
It is possible to set a channel's parameter levels with the DMX value by using [/][/], which posts DMX to the
command line.
[1] {Pan} [/][/] [2][5] [Enter]
You can add or subtract from the DMX value by using [+] or [-].
[1] {Pan} [/][/] [+] [5] [Enter]
[1] {Pan} [/][/] [-] [7][5] [Enter]
Discrete Time as a Percentage
Discrete times can be entered as a percentage of the cue time.
[2] [Time] [/] [5] [Enter] sets the time for channel 2 to 50% of the cue time.
[2] [Focus] [/] [7][5] [Enter] - sets the focus category time to 75%.
Most Recently Activated Cue
Use [Cue] [n] [/] [Enter] to select the most recently activated cue from that cuelist. If there is no active cue
from that list, the first cue in the cuelist will be used.
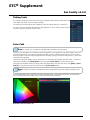
Color Overview
In version 2.3, you will notice several major changes to working with color.
These changes allow for a more complete control of color.
With the color picker open, you now have the choice between six different
Color Spaces (page 10), a Gel Picker (page 11),Color Path (page 13), Tinting Tools (page 13), and Spectrum Tools (page 14).
These options are found by clicking on the display configuration tool (the gear
icon) in the upper left corner of the color picker display.
Eos Family Operations Manual Supplement
9
Electronic Theatre Controls, Inc.
ETC® Supplement
Eos Family v2.3.0
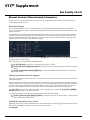
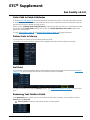
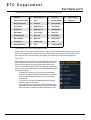
Color Spaces
There are six color spaces that you can choose to work in. All of these spaces are connected. So it doesn't matter which space you wish to work in, the console will translate the information to work with your fixtures.
When the color picker is first opened, the CIE xy color space and the gel picker will open by default. You can
select other color spaces and tools by clicking on the display configuration tool (the gear icon) in the upper left
corner of the color picker display.
Note: Multiple color picker tabs with different color spaces can be opened at the same time. Multiple color spaces can be opened on the same tab.
The available color spaces are:
Note: When a fixture is in HS mode, the brightness control is not provided. Intensity controls the
brightness.
For the CIE xy (CIE 1931) and CIE uv (CIE 1976), the triangle represents the RGB space as defined by the
PLASA standard E1.54. Fixtures that comply to that standard can achieve any color within the triangle. The
cone represents the color spectrum that we can see.
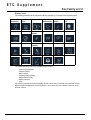
Controls
Each color space has three virtual encoders, a vertical encoder, a {?} button, and a {^} button.
The encoders will change based on the color space selected. Double tapping in a virtual encoder will cause it
to jump to the location of your finger. Pressing and holding will cause the encoder to fade toward your finger.
Tapping anywhere in the color space will cause the crosshair to move to that location. Press and hold, then
move your finger to fade the crosshair toward that location.
The {^} button will create the brightest version of the selected color. Press the {?} button to display labels on all
of the controls.
Eos Family Operations Manual Supplement
10
Electronic Theatre Controls, Inc.
ETC® Supplement
Eos Family v2.3.0
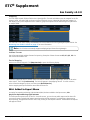
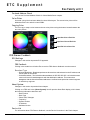
For the RGB and CMY color spaces, you can change which color control is on the vertical encoder. Touch the
label of the virtual encoder to change which color control is located on the vertical encoder. In the following
graphics, Red is on the vertical encoder in the first one and green is on the vertical encoder in the second one.
This is also indicated by the highlighted encoder name.
For the HS Wheel and HSB color spaces, the vertical encoder is always brightness.
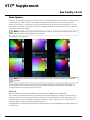
Gel Picker
Several changes have been made to the gel picker for working with the new Color Spaces (page 10). When
the gel picker is opened up with a color space, there will be dots displayed on the color space. These dots represent the gels in the currently selected gel book. Hovering over a dot with a mouse will display the gel's name
and a color swatch.
The following buttons are also available:
Eos Family Operations Manual Supplement
11
Electronic Theatre Controls, Inc.
ETC® Supplement
Eos Family v2.3.0
{Brightest} - determines the color match used. This is helpful when working with fixtures that have
more than three color components, such as RGBA, RGBWm or ETC's fixtures. Pressing {Brightest} or
{Shift} +a gel from the picker will cycle through the three modes.
{Brightest} - matches to the brightest match of that chromaticity.
{Spectral} -matches to the best spectral match chromaticity. However, this mode can remove a
lot of the intensity. This is based off of a 575w long life Source Four®.
{Hybrid} - halfway between the brightest and the best spectral match.
In the channel display, a single dot shows best spectral match, 2 dots indicates hybrid,
and no dot shows brightest.
{Sort Hue} - takes the selected gel library and sorts it by hue instead of by gel number.
{Similar} - will show gels that are in the same selected area of the color picker. Only gels in the same
selected gel book will display. You can switch to another gel book though to discover gels in that area.
{Show} - displays all of the static gels in the show file. This populates from Patch.
{Standard Colors} - shows a range of White Point from 2700K to 6500K. Also shown are colors located
around the triangle and variations of those colors at 25% increments.
How the Gel Picker Affects Scroller and Color Wheel
When possible the Gel Picker will select the closest gel as defined in a scroller or color wheel.
Note: Some devices contain manufacturer specified gel mixes, and will only allow selection from
the Gel Picker of the exact gels in their list.
In previous versions when using the Gel Picker, the channel display would show the gel. Now the channel display shows the frame number and the corresponding label that is defined for that frame.
Eos Family Operations Manual Supplement
12
Electronic Theatre Controls, Inc.
ETC® Supplement
Eos Family v2.3.0
Tinting Tools
The Tinting Tools option is found by clicking on the display configuration tool (the gear icon)
in the upper left corner of the color picker display.
Tint allows you to easily adjust color regardless of the color space that you're working in.
You can increase or decrease the saturation and brightness. You can make a color warmer
or cooler, and you can add or remove colors.
Color Path
Note: In version 2.3, color path is only applicable for additive mixing systems.
Color Path is a new option for controlling color fades between cues. By default, color fades happen in the native space of the fixture. If you want a fade that resembles a fade in a different color space, you can do that
using color paths. There are eight preprogrammed color paths, and you can also record your own . Up to 1000
color paths are supported.
To open the color path display, click on the gear icon in the color picker display and select Fade. To open the
color path list display, press [Path] [Path] or by pressing the {Color Path} icon in the home screen.
Color paths are selected either by clicking on the drop down above the color path or by using [Path] / {Color
Path} [n]. Ion and Element users will need to use the {Color Path} softkey.
Note: Channels involved in the fade have to be selected before you can choose or modify a color
path.
The color path display has a drop down list of the available paths, a color path preview bar, and control buttons. An indication line will display on the color space to show the color fade.
Available control buttons are:
Eos Family Operations Manual Supplement
13
Electronic Theatre Controls, Inc.
ETC® Supplement
Eos Family v2.3.0
- replays the color fade using the cue time.
- replays the color fade using the Go to Cue time from Setup.
- replays the color fade in five seconds.
- replays the color fade in ten seconds.
- pauses the color fade.
- plays / resumes the color fade.
- skips to the end of the color fade.
You can also click on the color path preview bar to scrub to any point along the fade.
Additional controls may be available based on the color path selected. For example, Color Path 7 has additional controls for Hue, Saturation, and Brightness. You can move those controls to adjust the fade, and you'll
see a representation of those changes in both the color path preview bar and in the color space.
Changes can be stored in the destination cue as absolute data by using [Update] or [Record]. When there's a
change to the color path information, a red c will display next to the channel number and the color path's
name will display in red in the color path display. When that data has been saved, a blue c will display.
The color path's name will also display in blue in the color path display.
You can save changes to a new color path by using [Record] [Path] / {Color Path} [n]. That data will then be
referenced, and any changes made to that path will be used anytime that path is used Press [Shift] + [Path] /
{Color Path} to see the values behind the referenced data.
See [About] Color Path on page 16 and Color Path in Patch Attributes on page 17 for more information.
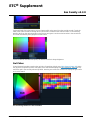
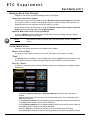
Spectrum Tools
The Spectrum option is found by clicking on the display configuration tool (the gear icon) in the upper left
corner of the color picker display.
This option displays all the color parameters across the color spectrum, and allows for individual control of each
parameter. Press a color point to move it.
This display is a good visual of what the fixture is outputting.
Eos Family Operations Manual Supplement
14
Electronic Theatre Controls, Inc.
ETC® Supplement
Eos Family v2.3.0
The following screenshot shows a 7 color fixture. This display will change based on the type of fixture being
used.
Note: The grey line shows the composite color of the fixture. If multiple fixtures are selected, the
grey line represents the first channel selected.
With the Gel Picker (page 11) open and a gel selected, a dotted line will appear in the Spectrum display.
That line represents the selected gel.
{Hold Color Point} allows you to adjust individual emitters and the other emitters will automatically adjust to
hold the color selected. If an emitter has been adjusted too far, a Limit Reached warning will appear. This can
only be used with fixtures that have more than three color parameters.
If you are working outside of this display, holding down [Color] while adjusting the encoders will cause Hold
Color Point behavior.
Encoder Softkeys
If you press the encoder for any parameter, the softkeys change to display options relevant to that parameter.
These may include {Home}, {Last} and {Next}, or {Min} and {Max}, and depending on the type of parameter,
a {Mode} or {Calibrate} button.
Eos Family Operations Manual Supplement
15
Electronic Theatre Controls, Inc.
ETC® Supplement
Eos Family v2.3.0
Previously this behavior was only available on Ion. Now this is available on Eos, Eos Ti, Gio consoles and the
Eos Programming Wing.
[Shift] + [At], [Shift] + [Enter], and [Select Last]
[Shift] + [At], [Shift] + [Enter], and [Select Last] can now be used to loop through commands five times.
Zoom Added to About
A zoom button has been added to the About display. There are three zoom sizes: small, medium, & large.
Medium is the default size. Press {.a[A]} to zoom.
[About] Color Path
The following information will be displayed when a color path is selected:
The color path number
Label (if any)
Channels that use the color path
Cues that have moves that use the color path
Number of cue lists the color path is used in
See Color Path on page 13 for more information.
[About] Submaster
The following information will be displayed when a submaster is selected:
The submaster number
Label (if any)
Current value
Mode (additive, inhibitive, or effectsub)
Fader (proportional or intensity master)
HTP or LTP
Exclusive
Priority
Timing
Fader Pages
Channels in Submaster
Effects assigned
Eos Family Operations Manual Supplement
16
Electronic Theatre Controls, Inc.
ETC® Supplement
Eos Family v2.3.0
Color Path in Patch Attributes
A default Color Path (page 13) can be assigned at the channel level in Patch. That color path will be used for
all of that channel's color fades unless overridden at the cue level. Submasters and manual transitions that use
that channel will use the default color path as well.
While in Patch, [1] [Path]/{Color Path} [2] [Enter] will assign color path 2 to channel 1. Ion and Element users
will need to use the {Color Path} softkey. You can also go to Patch>Attributes>Color Path to place color
path on the command line.
See also Color Path on page 13 and [About] Color Path on page 16 for more information.
Fixture Lists in Library
The fixture lists in the library are now ordered alphanumerically.
For example, the following fixtures are listed first in alphabetical order and then ordered numerically.
Gel Field
The Gel field in the Patch Database display automatically populates with the gel selected from the Gel Picker
(page 11). The gel information will show up in two places in the Patch Database.
This field is available for use with the [Query] function. See Additions to Query on page 1 for more information.
Renaming Text Fields in Patch
In the {Database} page in Patch, you can now rename the text fields. By default, the text fields are named
{Text 1} through {Text 10}.
{Text 1} [Label] <Position> will rename the text 1 field to Position.
Eos Family Operations Manual Supplement
17
Electronic Theatre Controls, Inc.
ETC® Supplement
Eos Family v2.3.0
Text fields 1 through 4 display in the Patch display. Renaming those fields will rename the columns associated
with them in the Patch display.
See also: Additions to Query on page 1, Gel Field on page 17, and Lightwright Import on page 7
Warning with Out of Sync Fixture Libraries
For multiconsole systems, all devices have to use the same fixture library. If the fixture library is different
between devices, a warning will be displayed on the device trying to connect to the system.
Updating a Fixture Definition Warning
When updating a fixture definition in Patch, a warning message now includes what changes will be made to
the fixture by updating it.
By Type Presets
By Type presets are created with 'default' channels which contain values that can be assigned to any other
channel within the same fixture type. By Type presets can also contain discrete channel values.
By Type presets will display a ‘T’ in the lower corner of the direct selects. A ‘+’ will display after the ‘T’ if there
are channels stored with discrete data.
Using By Type Presets
Storing a By Type Preset
If {By Type} is used when recording, the lowest number channel of each fixture type will be the default channel. Generally, when storing by type presets, you will want only one channel of each fixture type in use. Any
additional channels in that fixture type will be recorded with discrete data.
[1] [Thru] [6] [Record] [Preset] [1] {By Type} [Enter] - Channels 1 through 6 are saved to Preset 1.
Channels 1 through 6 are of the same fixture type. Channel 1 will be the default channel, and channels
2 through 6 will be saved with discrete data.
[1] [Thru] [6] [Record] [Preset] [1] [Enter] - If a by type preset is rerecorded without using the {By
Type} softkey and the default channel is included in the record, the default channel's level will change
and all other changes will be discrete.
[1] [Thru] [5] [Record] {Intensity Palette 1} {Discrete} [Enter] - If a default channel is included in a
record where {Discrete} is used and another channel is tracking it, the default channel will be changed
to having discrete data and the lowest numbered tracking channel will become the new default channel. All other channels in the record will also have discrete data.
Editing By Type Presets in Blind
In Blind, the default channel’s levels will display in blue, discrete data for the other channels will display in
white, and any channels that are using the default channel value will display in magenta.
Softkeys available for editing presets in blind are {By Type}, {Discrete}, and {Cleanup}.
Eos Family Operations Manual Supplement
18
Electronic Theatre Controls, Inc.
ETC® Supplement
Eos Family v2.3.0
[3] {By Type} [Enter] - makes channel 3 the new default channel for that device type. If another channel for that type was the default channel, its data will now be discrete.
[1] [0] [Thru] [2] [0] {Discrete} [Enter] - changes the levels for channels 10 through 20 to discrete. If
any of those channels are default, the lowest numbered tracking channel will become the new default
channel.
[5] [Thru] [8] [At] [Enter] - removes the discrete data for channels 5 through 8. They will now use the
default channel’s values.
[Preset] [2] {Discrete} [Enter] - changes all tracking and default channels to discrete.
[Preset] [5] {By Type} [Enter] - makes the first channel of each device type a default channel.
[Preset] [3] {Cleanup} [Enter] - converts presets created in earlier versions of Eos Family software to by
type presets. This command will use the first channel of each type as the default, and allow other channels of the same type to use that value upon recall.
{Make Null} can be used with by type preset when you wish to withhold a channel from responding to a by
type preset recall. The data will still display but will be in gray with a “N”.
Updating By Type Presets
Pressing {By Type} after an [Update] command, with a channel tracking but no default channel included in
the update, will cause the lowest numbered tracking channel's level to be updated into the default channel.
The tracking channel will remain tracking. This means that when updating a default value in a by type preset,
you don’t need to know the default channel number.
When a default channel is included in an [Update] command without using {By Type} and another channel is
tracking it, the default channel’s data will be changed to discrete. The lowest numbered tracking channel will
then become the new default channel. Any other updated channels will be made discrete.
Indicators in Palette and Preset List Displays
Indicators for absolute (A), locked (L), and by type (T+) have been added to the palette and preset displays .
These indicators displays to the right of the palette or preset number.
Configuration Menu
In the direct select x25 tab, a configuration menu button is located in the top left corner.
Eos Family Operations Manual Supplement
19
Electronic Theatre Controls, Inc.
ETC® Supplement
Eos Family v2.3.0
Menu Options
The following options are available in the Configuration Menu:
Fit to Screen - when selected, the direct selects will fill the screen as much as
possible.
Rows - allows you to select the number of rows in the arrays.
Columns - allows you to select the number of columns in the array.
Use Buttons - selecting the checkbox for these buttons will allow them to display on the direct select screen. With or without the checkbox selected, you
can use the buttons to the right to of the checkboxes to recall the function.
Use +/- - displays the {+ Array} {- Array} buttons.
Use Pages - displays the page # buttons. There is not a way to select a page # from the configuration menu.
Use Arrows - displays the page up and down arrows.
Use Record - displays the {Record} button.
Use Select - displays the {Select} button.
Use Flexi - displays the {Flexi} button.
Use Color Swatch - displays a round color swatch in the lower left corner of a color palette direct select.
By default all options except for Fit to Screen are enabled.
Color Swatch
In the Direct Select Configuration Menu (page 19), there is an option to {Use Color Swatch}. When selected, a round color swatch will appear in the lower left corner of a color palette direct select.
Gadget Settings
In the ECU>Settings>Local I/O, settings are available for Gadget. From this screen, you can configure the
port address, enable Doubled, and set the port speed. Multiple Gadgets will appear in separate boxes and can
be identified by their serial numbers.
Eos Family Operations Manual Supplement
20
Electronic Theatre Controls, Inc.
ETC® Supplement
Eos Family v2.3.0
Note: With a Gadget connected, you will need to go into the main Eos application first before the
Gadget will display in the ECU.
Gadget Support
Eos can now support multiple Gadgets at the same time.
Note: There is a limit of four outputs.
Programming Wing Settings
In the ECU>Settings>Local I/O, settings are available for the Eos Programming Wing. Please see the Eos Programming Wing Setup Guide for more information.
Mini Encoder Display
A mini encoder display will display when an Eos Programming Wing is connected to ETCnomad.
Softkeys
For the Eos Programming Wing, you can hold down [More SK] + Encoder Category Button to access the
second page of softkeys.
For Example
With a channel on the command line, pressing [More SK] + [Intensity] will post Make Manual on the command line.
This also works with Gio.
Encoder Paging
On ETCnomad, while holding down CTRL+ALT+\ , you
can press one of the encoder category buttons to change
the page.
Eos Family Operations Manual Supplement
21
Electronic Theatre Controls, Inc.
ETC® Supplement
Eos Family v2.3.0
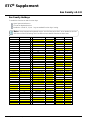
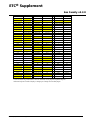
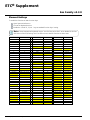
Eos Family Hotkeys
To enable Eos functions on Mac Function keys:
Open Systems Preferences
Go into the Keyboard section
Enable the “Use all F1, F2,etc... keys as standard function keys” setting.
Note: Some international keyboards require “Use Shift Key as Eos Shift” to be disabled in the General section of the ECU Settings. Use Z as shift to access shortcut functions in these cases.
Console Key
Shortcut List
PC
;
?
0
0
1
1
2
2
3
3
4
4
5
5
6
6
7
7
8
8
9
9
. (decimal)
. (decimal)
- (minus)
- (minus)
+ (plus)
=
+
+%
Shift =
Control Alt =
+% (Mac)
Shift Fn Up Arrow
-%
Shift Control Alt -% (Mac)
Shift Fn Down Arrow
/
/
About
Y
Address/Dimmer
Alt A
All NPs
Control N
Assert
Control W
Assert (Playback)
Control Alt A
At
A
@
*
Beam Filter
Control B
Beam Palette
Alt B
Blind
F2
Control 2
Block
B
Console Key
Capture
CIA Hide
Clear
Clear Command Line
Color Filter
Color Palette
Copy To
Cue
Cue Only/Track
Data
Data Mode
Delay
Delete
Delete (Mac)
Displays
PC
Control Alt P
F5
Backspace
Shift Backspace
Control C
Alt C
C
Q
X
Control D
Control Shift D
D
Delete
Fn Delete
F9
Control 9
Effect
Alt E
Effects Softkeys
Alt Shift E
Encoder Display (Gio)
Control Alt \
Encoder Page Color^
Control Alt [
Encoder Page Focus^
Control Alt ,
Encoder Page Form^
Control Alt ]
Encoder Page Image^
Control Alt ;
Encoder Page Intensity^
Alt .
Encoder Page Shutter^
Alt ,
Enter
Enter
Escape
Escape
Expand
F5
Control 5
Fader Pages
Control P
Fader Independent
Fan
FlexiChannel
Shift I
W
F3
Control 3
Control F
Focus Filter
Console Key
Focus Palette
Follow/Hang
PC
Alt F
Shift D
Control Alt D
Format
F4
Control 4
(Scroller) Frame Control Alt C
Freeze
Control Alt F
Full
F
Go
Spacebar
Go To Cue
Control G
Go to Cue Zero Control Alt G
Group
G
Help
Alt /
Highlight
\
Control Alt H
Home
Home
Control H
Home (Mac)
Fn Left Arrow
Intensity Block
Shift B
Control Alt B
Intensity Filter
Control I
Intensity Palette
Alt I
Label / Note
L
Last
Page Up
Control ,
Last (Mac)
Fn Up Arrow
Learn
Alt L
Level
V
Live
F1
Control 1
Load
Control Alt L
Macro
M
Macro 801*
Control Alt 1
Macro 802*
Control Alt 2
Macro 803*
Control Alt 3
Macro 804*
Control Alt 4
.
Eos Family Operations Manual Supplement
22
Electronic Theatre Controls, Inc.
ETC® Supplement
Eos Family v2.3.0
Console Key
Macro 805*
Macro 806*
Macro 807*
Macro 808*
Macro 809*
Macro 810*
Magic Sheet
Manual Override
Mirror, Start
Mirror, Stop
ML Controls
More Softkeys
Next
Next (Mac)
Off
Offset
Out
Page Left
Page Right
Page Up
Page Down
Park
Part
Patch
Path
Pixelmap
Preset
Query
Rate
Recall From
PC
Control Alt 5
Control Alt 6
Control Alt 7
Control Alt 8
Control Alt 9
Control Alt 10
Alt M
Control Alt M
Control Alt N
Alt F1
Alt F2
F7
Control 7
Alt 7
Page Down
Control .
Fn Down Arrow
Control Alt O
Control O
O
Left Arrow
Right Arrow
Up Arrow
Down Arrow
Alt K
P
;;
Control Alt W
Alt X
Alt P
Control Q
Control Alt R
E
Console Key
Record
RecordOnly
Release
Rem Dim
Scroll Lock
PC
R
Control R
Control Alt S
H
F6
Control 6
Select
Control Enter
Select Active
Control A
Select Last
Control L
Select Manual
Control M
Setup
Alt S
Shift
Z
Snapshot
Control S
Sneak
N
Softkey 1
Alt 1
Softkey 2
Alt 2
Softkey 3
Alt 3
Softkey 4
Alt 4
Softkey 5
Alt 5
Softkey 6
Alt 6
Spacebar Disable
Alt G
Stop/Back
Control Spacebar
Stop Effect
Control Alt E
Control Alt K
Submaster
S
Tab
Tab
Time
I
Time (Displays)
Shift I
Control Alt I
Timing Disable
Control Alt T
Toggle Hotkeys
F8
Control 8
Trace
J
Console Key
Thru
Undo
Update
Virtual Keyboard
PC
T
Control X
U
Control K
Shell Shortcut
Shell Key
0
1
2
3
4
5
6
7
8
9
. (decimal)
- (minus)
+ (plus)
/
Arrow, Down
Arrow, Left
Arrow, Right
Arrow, Up
Back
Clear
Delete
Enter
Escape
Select
PC
0
1
2
3
4
5
6
7
8
9
. (decimal)
- (minus)
=
/
Arrow, Down
Arrow, Left
Arrow, Right
Arrow, Up
Esc
Backspace
Delete
Enter
Esc
Return
*Some Shortcut Key combinations are not available on all physical keyboard layouts.
^Alternatively use Encoder Display + category to change the encoder pages.
Eos Family Operations Manual Supplement
23
Electronic Theatre Controls, Inc.
ETC® Supplement
Eos Family v2.3.0
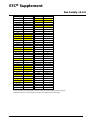
Element Hotkeys
To enable Eos functions on Mac Function keys:
Open Systems Preferences
Go into the Keyboard section
Enable the “Use all F1, F2,etc... keys as standard function keys” setting.
Note: Some international keyboards require “Use Shift Key as Eos Shift” to be disabled in the General section of the ECU Settings. Use Z as shift to access shortcut functions in these cases.
Console Key
Shortcut List
PC
;
?
0
0
1
1
2
2
3
3
4
4
5
5
6
6
7
7
8
8
9
9
. (decimal)
. (decimal)
- (minus)
- (minus)
+ (plus)
=
+
+%
Shift =
Control Alt =
+% (Mac)
Shift Fn Up Arrow
-%
Shift Control Alt -% (Mac)
Shift Fn Down Arrow
/
/
About
Y
Address/Dimmer
Alt A
All NPs
Control N
At
A
@
*
Beam Filter
Control B
Beam Palette
Alt B
Blind
F2
Control 2
Block
B
Capture
Control Alt P
CIA Hide
F5
Console Key
PC
Clear
Backspace
Clear Command Line Shift Backspace
Color Filter
Control C
Color Palette
Alt C
Copy To
C
Cue
Q
Cue Only/Track
X
Data
Control D
Data Mode
Control Shift D
Delay
D
Delete
Delete
Delete (Mac)
Fn Delete
Displays
F9
Control 9
Effect
Alt E
Effects Softkeys
Alt Shift E
Enter
Enter
Escape
Escape
Expand
F5
Control 5
FlexiChannel
F3
Control 3
Focus Filter
Control F
Focus Palette
Alt F
Follow
Shift D
Control Alt D
Format
F4
Control 4
(Scroller) Frame
Control Alt C
Full
Go
Go To Cue
Go to Cue Zero
Group
Help
F
Spacebar
Control G
Control Alt G
G
Alt /
Console Key
Home
PC
Home
Control H
Home (Mac)
Fn Left Arrow
Intensity Filter
Control I
Intensity Palette
Alt I
Label / Note
L
Last
Page Up
Control ,
Last (Mac)
Fn Up Arrow
Learn
Alt L
Level
V
Live
F1
Control 1
Load
Control Alt L
Macro
M
Macro 801*
Control Alt 1
Macro 802*
Control Alt 2
Macro 803*
Control Alt 3
Macro 804*
Control Alt 4
Macro 805*
Control Alt 5
Macro 806*
Control Alt 6
Macro 807*
Control Alt 7
Macro 808*
Control Alt 8
Macro 809*
Control Alt 9
Macro 810*
Control Alt 10
Magic Sheet
Alt M
Manual Override Control Alt M
Control Alt N
Mirror, Start
Alt F1
Mirror, Stop
Alt F2
ML Controls
F7
Control 7
More Softkeys
Alt 7
Next
Page Down
Control .
Next (Mac)
Fn Down Arrow
.
Eos Family Operations Manual Supplement
24
Electronic Theatre Controls, Inc.
ETC® Supplement
Eos Family v2.3.0
Console Key
Offset
Out
Page Left
Page Right
Page Up
Page Down
Park
Part
Patch
Path
Rate
Recall From
Record
RecordOnly
Release
Rem Dim
Scroll Lock
PC
Control O
O
Left Arrow
Right Arrow
Up Arrow
Down Arrow
Alt K
P
;;
Control Alt W
Control Alt R
E
R
Control R
Control Alt S
H
F6
Control 6
Select
Control Enter
Select Active
Control A
Select Last
Control L
Select Manual
Control M
Setup
Alt S
Shift
Z
Snapshot
Control S
Sneak
N
Softkey 1
Alt 1
Softkey 2
Alt 2
Softkey 3
Alt 3
Softkey 4
Alt 4
Softkey 5
Alt 5
Softkey 6
Alt 6
Spacebar Disable
Alt G
Stop/Back
Control Spacebar
Stop Effect
Control Alt E
Control Alt K
Submaster
S
Tab
Tab
Time
I
Console Key
Timing Disable
Toggle Hotkeys
Thru
Undo
Update
Virtual Keyboard
PC
Control Alt T
F8
Control 8
T
Control X
U
Control K
Shell Shortcut
Shell Key
0
1
2
3
4
5
6
7
8
9
. (decimal)
- (minus)
+ (plus)
/
Arrow, Down
Arrow, Left
Arrow, Right
Arrow, Up
Back
Clear
Delete
Enter
Escape
Select
PC
0
1
2
3
4
5
6
7
8
9
. (decimal)
- (minus)
=
/
Arrow, Down
Arrow, Left
Arrow, Right
Arrow, Up
Esc
Backspace
Delete
Enter
Esc
Return
*Some Shortcut Key combinations are not available on all physical keyboard layouts.
^Alternatively use Encoder Display + category to change the encoder pages.
Eos Family Operations Manual Supplement
25
Electronic Theatre Controls, Inc.
ETC® Supplement
Eos Family v2.2 Supplement to Operations Manual
The following information is new for version 2.2.0. This document is supplemental to and should be
used in conjunction with information in the Eos Titanium, Eos, and Gio v2.0 Operations Manual, Ion
v2.0 Operations Manual, and the Element v2.1.0 User Manual..
CAUTION:
If you choose to update fixture definitions in your existing show files after
upgrading to version 2.2, it is recommended that you verify that your show plays
back as expected. Changes have been made to the fixture library to make fixtures
in future shows easier to control, however, these changes will impact existing
shows after you manually update fixture definitions. For more information, see
Changes to Fixtures on page 16
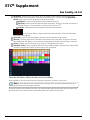
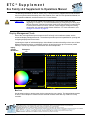
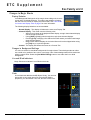
D i s p l a y M a n a g e m e n t To o l s
One of the most significant improvements to the Eos family in this software release are the
enhanced display management tools. The software provides improved capabilities for opening and
navigating displays and control tools.
Increasing the depth of individual displays, this software introduces the ability to have one of three
different workspaces active on individual monitors, as well as to have up to four areas (called
frames) in use in any workspace. Each frame can hold multiple tabs.
Display
Controls
Workspaces
Menu Button
Tabs
A Frame
Monitors
Any physical monitor or touchscreen device connected to your console. The integral touchscreens
on Eos Ti are examples of monitors as are external monitors used with any of the Eos Family
consoles.
Corporate Headquarters 3031 Pleasant View Road, P.O. Box 620979, Middleton, Wisconsin 53562-0979 USA Tel +608 831 4116 Fax +608 836 1736
London, UK Unit 26-28, Victoria Industrial Estate, Victoria Road, London W3 6UU, UK Tel +44 (0)20 8896 1000 Fax +44 (0)20 8896 2000
Rome, IT Via Pieve Torina, 48, 00156 Rome, Italy Tel +39 (06) 32 111 683 Fax +44 (0) 20 8752 8486
Holzkirchen, DE Ohmstrasse 3, 83607 Holzkirchen, Germany Tel +49 (80 24) 47 00-0 Fax +49 (80 24) 47 00-3 00
Hong Kong Rm 1801, 18/F, Tower 1 Phase 1, Enterprise Square, 9 Sheung Yuet Road, Kowloon Bay, Kowloon, Hong Kong Tel +852 2799 1220 Fax +852 2799 9325
Service: (Americas) [email protected] (UK) [email protected] (DE) [email protected] (Asia) [email protected]
Web: www.etcconnect.com QSF 4.1.9.1 Copyright © 2014 ETC. All Rights Reserved. Product information and specifications subject to change.
4250M1211-2.2.0 Rev B Released 2014-06 ETC intends this document to be provided in its entirety.
Eos F ami ly Op er at i on s Man ua l Supp le men t
Pag e 1
El ect r on ic T he at r e Con t ro ls , I nc .
ETC Supplement
Eos Family v2.2.0
Workspaces
Further expanding your monitor capabilities, workspaces have been added to offer independent
display control on all of your connected monitors. Every monitor can have up to three workspaces,
identified by the workspace icons in the upper left corner of any monitor (including any integrated
touchscreens with your console).
You can use [Tab] + [Page ] and [Tab] + [Page ] to cycle through the workspaces. This will
increment or decrement the current workspace and will then force all of the other workspaces to
match the current workspace’s number (1, 2, or 3). This is so you can quickly step through the
workspaces.
Workspaces 1, 2, and 3
These three monitor icons are used to switch between each monitor’s available workspaces. Each
can be set up to include any of the desired layout, displays, and controls options offered on the
Home Screen (page 4) or the Display Controls Screen (page 6).
Frames
Each workspace can have up to four frames in its layout. The number of frames in a workspace
layout is determined by choosing from the Layout Options (page 4) offered in the Home Screen
(page 4) or the Monitor Options Screen (page 6).
Tabs
Any frame can have multiple tabs open. Tabs are now broken down into two categories: Control
and Display. Control tabs (see page 6 for a list of tabs) are the virtual control options that were
formerly available in the browser, such as the color picker and the virtual keyboard. Display tabs
(see page 5 for a list of tabs) are the various displays available on the console, such as the
playback status display and the park display.
You can open or close tabs using the Display Icons (page 5), Control Icons (page 6), or all of the
methods used in previous versions of software. Pressing [Shift] + [Tab] once will clear all tabs on
the selected monitor but tabs in locked frames will remain. Pressing [Shift] + [Tab] twice will clear
all tabs on all monitors but tabs in locked frames will remain. Pressing [Shift] + [Tab] a third time
will clear all tabs on all monitors including those in locked frames.
White text in the tab indicates a Display Tab, and magenta
text indicates a Control Tab.
All Display and Control Tabs have fixed tab numbering
under which they open (for example, “Live” opens under Tab 1, “Patch” under Tab 12, and “Color
Picker” under Tab 27). These numbers are identified on the Home Screen in each icon and in the
following table. For multiple instances of the same display, the tab number will be followed with a
decimal number. Additional tabs will start their numbering with n.2. When you press [Tab], active
focus will move numerically through all open tabs on active workspaces.
Note:
Using just the [Tab] key to cycle through tabs will skip over any Control Tabs in
locked frames. Pressing [Tab] [n] will select the tab regardless of if it is in a locked
frame or not.
Eos F ami ly Op er at i on s Man ual Su pp le men t
Pag e 2
El ect r on ic T he at r e Con tr o ls , I nc.
ETC Supplement
Eos Family v2.2.0
This table lists the tab number for each of the Control and Display tabs.
1
Channels
11
Show Control List
21
Curve List
31
Lamp Controls
2
Playback Status Display
12
Patch
22
Intensity Palettes
99
Diagnostics
3
Magic Sheet Display
13
Effect List
23
Focus Palettes
4
Direct Selects
14
Magic Sheet List
24
Color Palettes
5
ML Controls
15
Submaster List
25
Beam Palettes
6
Effect Status
16
Cue List Index
26
Preset List
7
Virtual Keyboard
17
Group List
27
Color Picker
8
Effect Channels
18
Macro List
28
Virtual Faders
9
Pixel Map List
19
Snapshot List
29
About
10
Pixel Map Preview
20
Park
30
Command History
Focus Rules for Control and Display Tabs
Single clicking on a Controls Tab will bring it to the front of the frame but will not move focus to that
tab unless the tab’s frame already has focus. Double clicking on a Controls Tab will bring it to the
front and grab focus. Single clicking on a Display Tab will bring it to the front and grab focus.
Tab Tools
Every frame has a tab tools menu in the lower left corner of the
frame. Selecting this menu icon will open the tab tools menu,
which provides options for opening and closing tabs in that
frame. You can left click with a mouse or double tap a tab in focus
to also see this menu. Most options are self-explanatory with the
following exceptions:
• “Replace Tab” allows you to close the current tab and
choose from the Home Screen which display to replace it
with. Pressing escape will return you to the previously
selected tab.
• “Lock Frame” prevents any additional tabs from being
opened in the selected frame.
• “Open New Tabs In This Frame” specifies that any new
tabs opened will automatically open in the specified frame.
Only one frame can have this option selected at a time.
Eos F ami ly Op er at i on s Man ual Su pp le men t
Pag e 3
El ect r on ic T he at r e Con tr o ls , I nc.
ETC Supplement
Eos Family v2.2.0
Home Screen
Upon start up or creation of a new show file, any connected monitor that is not already displaying
the Live or Playback Status Displays will show the Display Management Home Screen.
Layout Options
Display Icons
Control Icons
Snapshots Area
This screen consists of four general areas, each offering different display-related options.
Layout Options
These tools offer you greater flexibility in the number of tabs you can view in any given workspace.A
workspace can have up to four frames. Selecting a layout icon will assign the frame layout identified
in the icon. Once a layout is assigned, you can select which displays and controls will be in which
frames.
Eos F ami ly Op er at i on s Man ual Su pp le men t
Pag e 4
El ect r on ic T he at r e Con tr o ls , I nc.
ETC Supplement
Eos Family v2.2.0
Display Icons
The following displays can be selected, and they will open in a new tab in the selected frame:
Channel
(Tombstones)
Channel
(Table)
Split Channel
Playback
Status Display
Magic Sheet
Display
Magic Sheet
List
Patch
Groups
Intensity
Palettes
Focus Palettes
Color Palettes
Beam Palettes
Presets
Effects
Effect
Channels
Submasters
Cue List
Pixel Maps
Macros
Snapshots
Curves
Park
Show Control
The following displays can have multiple instances open:
•
•
•
•
•
•
•
Channel (Tombstone)
Channel (Table)
Split Channel
Playback Status Display
Magic Sheet Display
Effect Channels
Park
For multiple instances of the same display, the tab number will be followed with a decimal number.
Additional tabs will start their numbering with n.2. If you have only one instance, there will be no
decimal number.
Eos F ami ly Op er at i on s Man ual Su pp le men t
Pag e 5
El ect r on ic T he at r e Con tr o ls , I nc.
ETC Supplement
Eos Family v2.2.0
Control Icons
The virtual controls that were located in the browser are now part of the home screen. You can
select from the following list of virtual controls, and they will open in a new tab in the selected frame:
Direct Selects
Classic
Direct Selects
x25
ML Controls
Effect Status
Virtual
Keyboard
Color Picker
Fader Module
About
Command
History
Lamp Controls
Pixel Map
Preview
Snapshots
The snapshots displayed here are single monitor-only snapshots recorded for the visible
workspace. These snapshots can be recalled from any selected monitor from the Home Screen or
the Display Controls menu screen. You can recall a monitor-only snapshot from the command line
by using the syntax [Snapshot] [n] [Enter]. When recalled from the command line, the selected
snapshot will only affect the monitor from which it was originally recorded.
To record a monitor-only snapshot, press the {New Snapshot} button on the Display Controls
menu screen. [Delete] [Snapshot] [n] [Enter] [Enter] will delete a monitor-only snapshot.
All snapshots can be viewed on the snapshot list display, which can be opened by pressing
[Snapshot] [Snapshot] or from the home screen.
Display Controls Screen
Selecting the display controls icon will grant you access to the Layout Options previously
described. Choose the layout icon for the arrangement and number of frames you want to use on
the monitor.
Display
Controls
Menu
Button
New Snapshot
Button
This screen also offers options for opening and closing tabs as well as resizing and resetting the
monitor(s). The icons are:
Eos F ami ly Op er at i on s Man ual Su pp le men t
Pag e 6
El ect r on ic T he at r e Con tr o ls , I nc.
ETC Supplement
Eos Family v2.2.0
Open New Tabs On This Monitor
Select this icon to redirect to the Home Screen where you can open new tabs using
the Display and Controls icons.
Resize Frames In This Workspace
Select this icon to resize frames in any of the workspaces on the monitor. After
selecting, resizing tools will appear between frames of the workspace and you can
select and drag the resize tool icons to adjust sizing as needed.
Resize Tool Icons
Close All Tabs In This Workspace
Select this icon to close all of the tabs in the active workspace on this monitor only.
Reset This Display
This icon will close all of the tabs and frames and will reset the layout for the active
workspace to a single frame displaying the Home Screen, from which you can select
new tabs to open.
R e s e t A l l D i s p l a ys
This icon will close all of the tabs and frames on all monitors, reset all layouts to a
single frame, and return their workspaces to the Home Screen, from which you can
select new tabs to open.
Eos F ami ly Op er at i on s Man ual Su pp le men t
Pag e 7
El ect r on ic T he at r e Con tr o ls , I nc.
ETC Supplement
Eos Family v2.2.0
Changes to Displays
Blind Indicators
The blind indicators have changed with version 2.2. Now while in blind, the background color of the
displays will be blue, the title bar will be bright blue, and the word “Blind” will display in the top left
corner of each monitor. You can click on “Blind” to go back to live.
Clickable Support to Displays
Several displays are more interactive now with click supported cells. Clicking on a row header will
select and place it on the command line. You can click on multiple row headers to select a range of
items. Double-clicking a row header will select that row and deselect any other rows. Clicking on a
column header will place that action on the command line. You can click on multiple column actions
that can be combined, such as cue times, to place those on the command line.
Column Headers
Row
Headers
The following displays have added clickable support:
•
•
•
•
•
•
•
•
•
•
•
•
•
•
Show Control List
Cue List
Playback Status Display
Palette Lists
Sub List
Preset List
Effect List
Group List
Snapshot List
Curve List
Partition List
Pixel Map List
Magic Sheet List
Park Address List
Eos F ami ly Op er at i on s Man ual Su pp le men t
Pag e 8
El ect r on ic T he at r e Con tr o ls , I nc.
ETC Supplement
Eos Family v2.2.0
• Patch Display
• Spreadsheet Display
• Macro List
Displaying Fader Pages with Content
When using [Fader Page] or [Shift]+ [Fader Page], the displayed page will jump to the next page
with content, and then to the next incremental page before skipping to the next page with content.
For example, pages 1-3 and page 11 have content. If on page 2 you press [Fader Page], you will
see pages 3 then 4 then 11 then 12 displayed. After page 12, you will jump back to page 1.
When on page 11, as you press [Shift]+ [Fader Page] you will see page 10 then page 3.
Playback Fader/Page Displayed in Cue List Index
Previously only the playback fader’s ID displayed in the cue list index. Now the page and fader
number display after the playback ID.
Links to Non-existent Cues
When a cue is linked to a non-existent cue, a “*” will display next to the cue number in the
link column of the playback status display and the cue list index.
Beam Subcategories Rearranged
The order of beam parameters has changed from (Shutters, Image, Form) to (Form,
Image, Shutters). This change impacts the live/blind displays, ML controls, the fixture editor
parameter list, and the parameter tiles in the CIA. This change does not affect the physical keycaps.
Virtual Media Server Crossfade
The Virtual Media Server crossfade parameter level will display in subscript beside the
intensity.
Element Playback Status Display
Scrolling with a mouse is now enabled for the Playback Status Display on Element. This
behavior was already available on the other Eos Family consoles.
Changes to Direct Selects
There are now two different direct select modes: direct selects classic and direct selects x25.
Direct Selects Classic
In classic mode, you have two options, fit to screen and classic layout, that were first made
available in version 2.1. You can change between fit to screen and classic layout by toggling the
{Classic/Fit} button.
A couple of new options have been added for version 2.2:
• A {1x/2x} button allows you to toggle the direct selects to show one bank of 5 rows or two
banks of 5 rows.
• A {Record} button has been added that posts Record to the command line.
Eos F ami ly Op er at i on s Man ual Su pp le men t
Pag e 9
El ect r on ic T he at r e Con tr o ls , I nc.
ETC Supplement
Eos Family v2.2.0
Direct Selects x25
The Direct Selects x 25 mode displays only a single category of direct selects at a time.
Page Access
Buttons
By using the {+25} and {-25} buttons, you can change the number of available buttons in
increments of 25. You can select a page of direct selects by using the page access buttons or by
using the page up and down buttons. The {Select} and {Flexi} buttons work the same as in
previous software versions.
Changes to About
The number of patched channels and number of cues have been added to the default [About]
display. The number of cues is a count across all cue lists. Multipart cues are only counted once.To
see this display, press [About] when the command line is clear.
About Palette/Preset
A {Usage} button has been added to the About Palettes and About Presets displays.
{Usage} displays the following information about palettes and presets:
•
•
•
•
•
Number of cues that move
List of channels that use the palette/preset in a cue
List of channels stored in the palette/preset that are not used in a cue
List of cues in which the palette/preset have a move instruction
List of effects that use the palette/preset
About Macro
An [About] Macro display has been added. This display shows a list of cues that will execute a
selected macro. To view this display, you must be in the Macro Editor Display. While in that display,
press [About] and then select the macro by using a mouse or touchscreen.
Abo ut Cuelist
The following information will be displayed when a cue list is selected:
• Cue List Attributes
Eos F ami ly Op er at i on s Man ual Su pp le men t
Pa ge 1 0
El ect r on ic T he at r e Con tr o ls , I nc.
ETC Supplement
Eos Family v2.2.0
•
•
•
•
•
•
•
•
•
Active Cue
The number of cues in the list (Multipart cues are only counted once)
First cue in the list
Last cue in the list
Partition
Playback number and physical fader location of the cue list
Channels currently controlled in live by the cue list
Channels with any intensities above 0 in the cue list
Channels with Parameters stored in the cue list but no intensities
Changes to User Interface
Changes to Snapshot s
The following changes have been made to the snapshot screen ([Snapshot] [Snapshot]):
• The {Faders} button is no longer selected by default.
• A {Visible Workspaces} button has been added to snapshot only the visible workspaces.
• An {All Workspaces} button has been added to quickly include all workspaces, including
those not visible at the time of recording.
• Direct selects is no longer a separate option.
See Snapshots on page 6 for information on single monitor snapshots.
Snapshots Added to Element
Snapshot functionality has been added to the Element console with the addition of a {Snapshot}
softkey.You can now store all of the monitor configurations for your Element console. All displays
are automatically included in all snapshots.
Changes to Setup
Default Preheat Time
An option for default preheat time has been added to Setup>ShowSettings.
If this option is disabled, the cue’s up intensity time will be used when
preheating. The default setting is “Disabled”.
Changes to Channel Distribution
When {Offset} is pressed, a new channel distribution display will open.
The following options are available as extensions of {Offset}. Previously only {Reverse},
{Random}, {Odd}, {Even}, and {Reorder} were available. Options can be used together. These
extensions can be used to create subgroups. For more information on subgroups, please see the
Eos Family v2.0.1 Operations Manual Supplement.
Eos F ami ly Op er at i on s Man ual Su pp le men t
Pa ge 1 1
El ect r on ic T he at r e Con tr o ls , I nc.
ETC Supplement
Eos Family v2.2.0
Direction
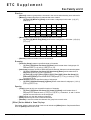
• {Reverse} creates a group with the channels in the reverse order that they were selected in.
• {Mirror In} creates subgroups of channels that mirror inward.
• [1] [Thru] [8] {Mirror In} [Enter] would create 4 subgroups in this order: (1,8) (2,7)
(3,6) (4,5).
Ch 1
Ch 2
Ch 3
Ch 4
Ch 5
Ch 6
Ch 7
X
Ch 8
X
X
X
X
X
X
X
• {Mirror Out} creates subgroups of channels that mirror outward.
• [1] [Thru] [8] {Mirror Out} [Enter] would create 4 subgroups in this order: (4,5) (3,6)
(2,7) (1,8).
Ch 1
Ch 2
Ch 3
Ch 4
Ch 5
X
X
X
Ch 6
Ch 7
Ch 8
X
X
X
X
X
• {Random} creates a random order to the channels.
Grouping
• {Chan Per Group} creates a specified cluster of channels.
• [1] [Thru] [1][2]{Chan Per Group} [3] [Enter] would create these 4 subgroups of 3
channels each: (1,2,3) (4,5,6) (7,8,9) (10,11,12).
• {InterLeave} creates a number of distributed sets of channels, that are not clustered together.
• [1] [Thru] [1][2]{Chan Per Group} [4] {InterLeave} [Enter] would create these 4
subgroups: (1,4,7,10) (2,5,8,11) (3,6,9,12).
• [1] [Thru] [5] [+] [1][1] [Thru] [1][5] [+] [2][1] [Thru] [2][5] {Chan Per Group} [3]
{InterLeave} [Enter] would create these 5 subgroups: (1,11,21) (2,12,22) (3,13,23)
(4,14,24) (5,15,25).
• {Num Groups} creates a specified number of subgroups.
• [1] [Thru] [1][2]{Num Groups} [3] [Enter] would create these 3 subgroups: (1,2,3,4)
(5,6,7,8) (9,10,11,12).
Spacing
• {Jump} is used to skip over a specified number of channels.
• [1] [Thru] [1][2]{Chan Per Group} [3] {Jump} [1] [Enter] would create these 3
subgroups of 3 channels each: (1,2,3) (5,6,7) (9,10,11). Channels 4, 8, and 12 will be
jumped over and will not be in the subgroups.
• {Odd} selects only the odd numbered channels.
• {Even} selects only the even numbered channels.
• {Reorder} is used to reorder the channels of a group into numeric order.
{Offset} Button Added to Some Displays
Submaster, palette, and preset blind views now all include an {Offset} button. Step-based effects
have an {Offset} button now as well.
Eos F ami ly Op er at i on s Man ual Su pp le men t
Pa ge 1 2
El ect r on ic T he at r e Con tr o ls , I nc.
ETC Supplement
Eos Family v2.2.0
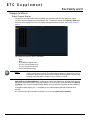
Changes to Effects
Effect Channel Display
The ability to override certain effect properties per channel at the cue level has been added.
The effect channel display has been added for this. To open this display, press [Shift] + [Effect] or
select the effect channel icon from the display management home screen, see Display Icons on
page 5.
The following properties can be overridden:
•
•
•
•
•
•
Rate
BPM
Size (Relative Effects Only)
H Form (Focus Effects Only)
V Form (Focus Effects Only)
Axis (Focus Effects Only)
Note:
To add a channel level override, first you will need to be in the Effect Channel
display with the effect running. The effect status display also needs to be open.To
learn how to apply an effect, please see the Apply an Existing Effect section of the
Creating and Using Effects chapter of your console’s manual.
[2][6]<Effect><1>{Rate}[6][Enter] - to change the rate for just channel 26. With the effect running,
the console will default to the running effect number. You may need to select the effect first ([Effect]
[n] [Enter]). This will open the effect status display, and you will have access to the effect softkeys.
In the effect status display, an “+” will display by any effect property that has a channel level
override.
You can then store these channel overrides in a cue by using [Record] or [Update].
Eos F ami ly Op er at i on s Man ual Su pp le men t
Pa ge 1 3
El ect r on ic T he at r e Con tr o ls , I nc.
ETC Supplement
Eos Family v2.2.0
BPM as a Cue Level Override
BPM can be applied to an effect or individual channels as only a cue level override in live and blind.
As a cue level override, the effect step/action times will not be affected.
Note:
The effect editor cannot be open when applying a cue level override. The effect
status display does need to be open though. You can open the effect status
display from the home screen or by pressing [Effect] while in live.
With an effect recorded into a cue and playing back in live, [Effect] [1] {BPM} [3][0] [Enter] will
change the BPM of the effect running. This change will happen immediately but the step or action
times will not change. You can see the BPM value, which will be in red, in the Effect Status display.
When the cue is updated or recorded with the new BPM, an “*” will appear next to the effect number
in the Ext Links column of the PSD and the cue list. The BPM value in the effect status display will
now be displayed in blue.
[1] [Effect] [1] {BPM} [3][0] [Enter] will only change the BPM for channel 1. A “+” will display in the
BPM column of the effect status display, and the BPM will display in red in the effect channel
display.
Once the cue is updated or recorded, the BPM will display in blue in the effect channel display. The
“+” will still be displayed in the effect status display, and an “*” will appear next to the effect number
in the Ext Links column of the PSD and the cue list.
BPM Impacts All Times of a Step- based Effect
Applying BPM to a Step based effect will now override all timing in the effect. Previously BPM only
impacted the step times. Now the Step, In, Dwell, and Decay times are all affected.
Step/Action Select ion
If an effect step/action is on the command line or indicated in the blue text to the left of the
command line, entering a number on the command line will default to selecting a step/action for the
previous selected effect.
If no step/action is displayed, the command line will default to effect number.
Effect List Navigation
Using the [Next]/ [Last] keys will now only move between effects in the effect list display. To
navigate the effect editor, you will need to use the page arrow keys.
Confirming Effects changes
When using [Page ] to create a new effect step/action in the Effects Editor display, you will first
be asked to confirm the new step/action number before continuing. This is to prevent new step/
action from being created by mistake. To bypass this confirmation, you can hold down [Shift] while
using [Page ] or enter the step/action number manually.
Changes to the ECU
Client Mod e Consoles
Consoles in client or backup mode now by default will not output on their local DMX ports. This
option is found at ECU>Settings>Local I/O. Click on {Output Local DMX in Client mode} to
enable the ability to output.
24 Hou r Format Clock Added
In the ECU>Settings>General, an option has been added to display the clock in the 24 hour
format.
Eos F ami ly Op er at i on s Man ual Su pp le men t
Pa ge 1 4
El ect r on ic T he at r e Con tr o ls , I nc.
ETC Supplement
Eos Family v2.2.0
Changes to Magic Sheets
Display Behavior
In the Background Settings tab of the magic sheet editing tools, there is
a new option for display behavior. This option was added to go along
with the new focus rules for display and control tabs. See Focus Rules
for Control and Display Tabs on page 3 for more information.
The following display behaviors are now available:
• Normal Display - The display will behave the same as a Display Tab.
• Channel Display - This mode uses the following rules:
• When focus is drawn to the playback status display, a magic sheet channel display
will be brought to the front.
• Using [Shift] + [Live] cycles through the magic sheet channel displays.
• Pressing [Live] or bringing a Live tab into focus will restore your last focused magic
sheet channel display.
• Magic sheet channel displays in the locked frame will not be skipped when using
the [Tab] key to cycle through tabs.
• Control - The display will behave the same as a Controls Tab.
Chan ges to Backgr ound Settin gs
You can now select live and blind backgrounds for magic sheets. These backgrounds can either
use a solid color, gradient of two colors, or an image. One of these backgrounds will be used when
editing a magic sheet. Select the {Use While Editing} button to use either the live or blind
background.
Live and Blind Indicators
Magic Sheets now indicate Live or Blind on their tab.
Clock
A clock has been added to the MS Object Library. You can now
add a clock to any magic sheet. By using the MS Object
properties, you can edit the color, font, and size of the clock.
Eos F ami ly Op er at i on s Man ual Su pp le men t
Pa ge 1 5
El ect r on ic T he at r e Con tr o ls , I nc.
ETC Supplement
Eos Family v2.2.0
Changes to Fixtures
Changes have been made to the fixture library in version 2.2 to make fixtures easier to control.
These changes affect the fixture definitions.
These changes include:
• More mode parameters for complex fixtures
• More calibrated ranges
• For example, DMX ranges are calibrated in real units (25 to 50 Hz or 5 to 20 RPM)
instead of their absolute DMX values.
• Changes to the index type parameters
• For example, some index parameters that used to be 0-360 degrees are now -180-180
degrees.
Pixel Mapping Installer Update
Eos Family v2.2 includes an enhancement for operating file system support for Nomad systems
running on a PC or Macintosh. This changes the default location for storing show files and media to
the main “User” documents location of the system; [Windows Drive]:\Users\<<Your User
Name>>\My Documents\ETC\Eos for Windows 7 & 8, ~/Documents/ETC/Eos on Mac platforms.
An update to the Eos Family Pixel Mapping Installer is available (v1.0.1). You may obtain this
release of software by downloading it from the Downloads section of the ETC website,
www.etcconnect.com. First time Nomad installs of Eos Family v2.2 should use Eos Family Pixel
Mapping Installer v1.0.1. This is not required for upgrades to Eos Family v2.2, but it is
recommended.
Note:
For consoles updating from v1.9.2 or earlier, it is recommended that you install
pixel map installer v1.0.1
Note:
Please be sure to check your media archive location in
ECU>Settings>General>Media Archive Path to ensure proper configuration.
Restoring defaults will use the updated locations configured by Eos v2.2 and the
v1.0.1 pixel map installer.
ECU Change for Nomad
Enabled
Disabled
For Nomad, a new option has been added to the ECU to allow Fullscreen Offline Editor mode.
Instead of separate windows, the displays will be fullscreen.
With this mode disabled, you can choose up to six windows to display. Fullscreen Offline Editor
mode is enabled by default.
Eos F ami ly Op er at i on s Man ual Su pp le men t
Pa ge 1 6
El ect r on ic T he at r e Con tr o ls , I nc.
ETC Supplement
Eos Family v2.2.0
Hardware Changes
Element and Ion are now shipping with Windows 7 and a revised motherboard/SSHD.
Element
Ethernet Ports 1 & 2
Hard Power Switch
USB Ports
Fan
Audio Reserved
for Future
Implementation
IEC Receptacle
eSATA
Port
MIDI Ports
In & Out
Phone
Remote
USB Ports
USB
Ports
DVI-D
Port
Display
Port
Remote
Trigger
DMX Ports
1&2
DVI-I
Port
Ion
Ethernet Ports 1 & 2
Hard Power Switch
USB Ports
Fan
Audio Reserved
for Future
Implementation
MIDI Ports
In & Out
Remote
Trigger
Phone
Remote
eSATA
Port
IEC Receptacle
USB
Ports
DVI-D
Port
Display
Port
DVI-I
Port
USB Ports
DMX Ports
1&2
Ion & Element support up to 2 monitors using
the following combinations:
Signal
Type
Physical
Port
Display Port
DVI
Yes
with Adapter
Display Port
Yes
DVI-I Port
No
Yes
DVI-D Port
No
Yes
VGA
Yes
with Active
Adapter
Yes
with Adapter
No
Multitouch monitors need to be Windows 7 or 8 Compatible.
Eos F ami ly Op er at i on s Man ual Su pp le men t
Pa ge 1 7
El ect r on ic T he at r e Con tr o ls , I nc.
ETC® Supplement
Eos Family v2.1.0 Supplement to Operations Manual
The following information is new for version 2.1.0. This document is supplemental to information in
the Eos Titanium, Eos, and Gio v2.0 Operations Manual, and Ion v2.0 Operations Manual, and
should be used in conjunction with it. For Element users, the Element User Manual has been
updated for version 2.1.0.
E o s Ti
Eos Ti consoles cannot automatically update the software on other devices running software
versions prior to 2.1.0. Once those units are updated to version 2.1.0, Eos Ti consoles will be able
to auto update all system devices via the update setting in the ECU.
System Overview Change
Chan nel Counts
The maximum number of allowed channels that can be defined in patch has increased from 10,000
to 16,000, (can be any number from 1 to 99,999). This change impacts Eos Ti, Eos, Gio, and Ion.
System Basics Changes
Direct Selects
There are two options for opening the direct select modules, which are Fit to Screen and Classic
Layout. Fit to Screen is designed for wide format displays. For standard size monitors, use the
Classic Layout. The following example shows both options on a wide format display:
Fit to Screen
Classic Format
[Shif t] + Direct Select
Selecting record targets from direct selects will terminate the command line. To post a control to the
command line without terminating it, hold down [Shift] while pressing the direct select. This allows
multiple commands to be selected and executed at once, and an optional sneak time to be entered.
Modifying a Terminated Channel Selection
It is possible to add or remove channels from a previously terminated command line. You will need
to first press [+] or [-] and then you can add to or remove from your current channel selection.This
includes selecting channels from the direct selects, summary view, and Magic Sheets.
Corporate Headquarters 3031 Pleasant View Road, P.O. Box 620979, Middleton, Wisconsin 53562-0979 USA Tel +608 831 4116 Fax +608 836 1736
London, UK Unit 26-28, Victoria Industrial Estate, Victoria Road, London W3 6UU, UK Tel +44 (0)20 8896 1000 Fax +44 (0)20 8896 2000
Rome, IT Via Pieve Torina, 48, 00156 Rome, Italy Tel +39 (06) 32 111 683 Fax +44 (0) 20 8752 8486
Holzkirchen, DE Ohmstrasse 3, 83607 Holzkirchen, Germany Tel +49 (80 24) 47 00-0 Fax +49 (80 24) 47 00-3 00
Hong Kong Rm 1801, 18/F, Tower 1 Phase 1, Enterprise Square, 9 Sheung Yuet Road, Kowloon Bay, Kowloon, Hong Kong Tel +852 2799 1220 Fax +852 2799 9325
Service: (Americas) [email protected] (UK) [email protected] (DE) [email protected] (Asia) [email protected]
Web: www.etcconnect.com QSF 4.1.9.1 Copyright © 2013 ETC. All Rights Reserved. Product information and specifications subject to change.
4250M1211-2.1.0 Rev A Released 2013-12 ETC intends this document to be provided in its entirety.
E os F ami ly O p er at i on s Man ua l S upp le men t
P ag e 1
E l ect r on ic T he at r e C on t ro ls , I nc .
ETC Supplement
Eos Family v2.1.0
Grandmaster/Blackout
If a grandmaster is set to a value other than 100%, a grandmaster button
with the set value will be shown at the top of each display. If blackout is
currently on, a blackout button will be shown at the top of the displays.
Clicking on either button will open a new display which will allow you to
turn off blackout and set the grandmaster to a different level.
Managing Show Files Change
Show File Advisory
If the loaded show file exceeds the console’s output capacity, an advisory will display in the CIA.
You will need to dismiss the advisory by pressing {Ok} before continuing. To see the capacity of the
console, press [About].
Setup Changes
High Contrast Display
By default, High Contrast Display is now enabled in Setup>Desk>Displays.
100 Channel Display
Additional options have been added to 100 Channel Display in Setup, Setup>Desk>Displays, to
help accommodate different display dimensions.
You can select to have this option disabled, display the channels in 4 rows of 25 (4x25), or 5 rows
of 20 (5x20), depending on the dimensions of your displays. The default for this setting is
“Disabled.”
Encoder Acceleration on Eos and Ion
Encoder Acceleration has been removed from Eos and Ion, which matches the behavior of the Eos
Ti and Gio encoders.
In Setup>Desk>Face Panel>Encoders, there are two options available: {Degrees Per
Revolution}, which is for the pan & tilt encoders, and {Percent Per Revolution}, which is for the
other encoders. When a pan or tilt encoder is moved one revolution, the parameter will change by
as many degrees as defined in Setup. The default is 30. When any other encoder is moved one
revolution, the parameter will change by the set percentage of its entire range. The default is 35.
The settings for {Encoder Degrees Per Revolution} and {Encoder Percent Per Revolution} are
stored with the show file. Starting a new file will reset the two settings to their default values.
Note:
On Eos, toggling an encoder no longer works to place it into fine mode.On both
Eos and Ion, hold down [Shift] while moving the encoder for fine control.
Releasing the [Shift] key will restore the encoder to its default mode
Eos F ami ly Op er at i on s Man ual Su pp le men t
Pag e 2
El ect r on ic T he at r e Con tr o ls , I nc.
ETC Supplement
Eos Family v2.1.0
Remo ving Virtual Hu e and Satur ation Par ameters
In Setup>Show>Show Settings, an option, {Create Virtual HSB}, has been added, which allows
you to disable creation of virtual hue and saturation parameters. This option is “Enabled” by default.
When Virtual HSB controls are disabled, the hue and saturation columns will not display in Table
view. You will not be able to record just the Hue or Saturation values into a cue, submaster, preset,
or palette, and you cannot apply an effect to Hue and Saturation. You will still be able to control Hue
and Saturation from the encoders, ML Controls, Color Picker, and the command line.
Fan Change
Using Subgr oups wit h Fan
Subgroups can be used with the Fan feature. Channels in the same subgroup will act as a single
channel when fanned.
For Example:
Group 1 is made up of channels 120 thru 130. Channels 120 thru 123 are one subgroup,
channels 124 thru 126 are not in any subgroup, and channels 125 thru 130 are another
subgroup.
•
[Group] [1] [Fan] [Enter]
Selects group 1 and puts it into fan mode. Rolling up the level wheel creates the following
result. Channels 120 thru 123 share an intensity, channels 124 thru 126 each have different
intensities, and channels 127 thru 130 share an intensity.
Submaster and Patch Changes
GM Exempt and Intensit y Master
For channels that have been set to GM Exempt in Patch, Intensity Master control will not impact the
intensity of those channels.
[Query] { Unpatched}
To quickly delete channels without addresses in the Patch display, you can use the command
[Query] {Unpatched} [Delete]. This will post to the command line all channels without addresses.
By pressing [Enter][Enter] you will delete them.
Ion users will need to press [Shift] + [Select Last] to access the {Query} softkey in Patch.
[About] Changes
In the default About display, a new field has been added called Parameters. This field references
the number of parameters that have been defined in patch. This includes parameters that have
been patched to output addresses and those that have not. The field below Parameters,
Addresses, only calculates the number of addresses that have been used in patch (which counts
toward available outputs). The Parameters field is useful as even unpatched, but defined,
parameters must be displayed and calculated in the fade engine. If you are running a large show,
it is helpful to delete defined, but unpatched channels. This is where the [Query] {Unpatched}
command is helpful.
Eos F ami ly Op er at i on s Man ual Su pp le men t
Pag e 3
El ect r on ic T he at r e Con tr o ls , I nc.
ETC Supplement
Eos Family v2.1.0
For Example:
Abo ut Cue
In the About Cue display, three new columns that show channel moves have been added. Those
columns are intensity moves, live NPs moves, and dark NPs moves.
Effects Changes
Pr eprogr ammed Rainbo w Effects
Two new preprogrammed effects have been added to the effect list. Effect 917 is a Rainbow RGB
effect, and effect 918 is a Rainbow CMY effect. These effects are for a rainbow on native color
parameters that will fade hue from 0 to 360 with saturation at full, when the parameters are at their
default levels. 0 is the default for CMY, and Full is the default for RGB.
Focus Effects
When adjusting the form of a focus effect, you can hold down [Shift] while using the horizontal
encoder to change the vertical form.
Beats Per Minute/ Tap Rate
For step-based and absolute effects, you can set a beats per minute (BPM). For step-based effects,
BPM affects the step times and for absolute effects, this affects the time/dwell. Note that BPM
impacts the effect directly. It is not currently available as a cue level override.
There are two different ways for assigning BPM to effects:
Directly setting BPM
If you know the BPM, you can assign that directly to the effect by using the {BPM} softkey, which is
available when in the effect editor display.
• [Effect] [1] {BPM} [1][9][0] [Enter] - sets the BPM of effect 1 to 190. The step times will be
adjusted for step-based effects, or the time/dwell will be adjusted for absolute effects.
The BPM will display on the right side of the effect editor beside the effect number/label. Editing the
cycle time, the step time for a step-based effect, or the time/dwell for an absolute effect will remove
the BPM.
Learning BPM
If you don't know the desired BPM, you can learn the BPM.
From Live, with the effect running:
• [Effect] [1] [Learn] [Time] - posts Effect 1 Learn Time Sample BPM to the command line, and
opens the effect editor display.
Eos F ami ly Op er at i on s Man ual Su pp le men t
Pag e 4
El ect r on ic T he at r e Con tr o ls , I nc.
ETC Supplement
Eos Family v2.1.0
While in this mode, press [Enter] to establish the BPM. The console will use an average of the last
four times you press [Enter] in this mode to calculate the BPM. Pressing [Learn] again will stop this
mode.
In this mode, every time the BPM changes, a live running effect will be modified accordingly without
stopping.
Learning Discrete Step Time
In learning discrete step time mode, every time you press [Enter], the time since the last press of
[Enter] is used to set the next step's step time for a step-based effect, or the next step's fade/dwell
time of an absolute effect.
• [Effect] [1] [Learn] [Time] [Time] - posts Effect 1 Learn Time Discrete Steps to the command
line, and opens the effect editor display.
Pressing [Learn] again will stop this mode.
Instead of pressing [Enter], you can press [At] while in this mode to add new steps to the end of the
effect. Pressing [Enter] will send you back to the first step in the effect.
Magic Sheet Changes
Address as Target Type
Address is now an available target for magic sheet objects.
Address Added to List of Fields
Address has been added to the list of fields that can be displayed around an object.
Address Object Color
An address object, with its outline color set to Link to Channel
Color, will have a white outline if the address is patched, or a dark
outline if the address is unpatched.
If the address object's outline color is set to Link to Channel
Intensity, the brightness of the outline color will be tied to the DMX
level of the address. The higher that the DMX value is the brighter
the outline color will be.
To set the outline color to Link to Channel Color or Intensity, select
the outline color icon in the color section of MS Object Properties.
Then select either Link to Channel Color or Link to Channel Intensity.
Outline Color Icon
Eos F ami ly Op er at i on s Man ual Su pp le men t
Pag e 5
At 50%
At 100%
El ect r on ic T he at r e Con tr o ls , I nc.
ETC Supplement
Eos Family v2.1.0
Fixtur e Symbols
Additional fixture symbols can be imported. The symbol must be saved as a .svg image file, and
needs to be tagged properly. These tags can be linked to the channel’s color, intensity or both.
The outline section needs to be tagged as etc_symbol_outline0, etc_symbol_outline, and/or
etc_symbol_outline2. The base section needs to be tagged as etc_symbol_base0,
etc_symbol_base, and/or etc_symbol_base2. Tags can be layered, and they will render in the order
listed below:
•
•
•
•
•
•
etc_symbol_base0 - uses fill color intensity link (not color)
etc_symbol_base - uses fill color and intensity link
etc_symbol_base2 - uses fill color intensity link (not color)
etc_symbol_outline0 - uses outline intensity link (not color)
etc_symbol_outline - uses outline color and intensity link
etc_symbol_outline2 - uses outline intensity link (not color)
Tags that only link to intensity will cause the base or outline to dim based on the channel’s intensity.
The edits to the tags in the .svg file can be made in any text editor program, such as Notepad, or in
a .SVG editor program, such as Inkscape.
ECU Changes
Enable Sensor/ FDX3000 Feedback
Clicking in the enable box will allow your console to receive feedback over the network from a
CEM+, a CEM3, or FDX3000. This option is “Enabled” by default.
Enable FDX2000 Feedback
Clicking in the enable box will allow your console to receive FDX2000 dimmer feedback over the
network.
Client Software Change
Using Offline or Client with Mac Laptops
When using a Mac laptop or wireless
keyboard with the Mac functions
mapped to the F1-F12 keys, Eos
offline/client functions are not
executable. The Mac functions must
first be disabled before Eos offline/
client functions will work:
Step 1:
Step 2:
Step 3:
Open System
Preferences on your
computer.
Open the Keyboard
section.
Enable Use all F1, F2,
etc. keys as standard
function keys by
clicking in the box.
Eos F ami ly Op er at i on s Man ual Su pp le men t
Pag e 6
El ect r on ic T he at r e Con tr o ls , I nc.
ETC® Supplement
Eos Family v2.0.1 Supplement to Operations Manual
The following information is new for version 2.0.1. This document is supplemental to information in
the Eos Titanium, Eos, and Gio v2.0 Operations Manual, Ion v2.0 Operations Manual, and Element
v2.0 User Manual, and should be used in conjunction with it.
Display Changes
Changes in this section impact the System Basics chapter and the Facepanel Shortcuts appendix.
Latching Data and Time
[Data] Key
Pressing and holding [Data] allows you to view the values behind any referenced or marked data.
[Data] exposes the next lower reference level. So if you view a palette reference and press [Data],
the absolute data will be displayed instead. If you are viewing a preset, absolute or palette data will
be displayed, depending on what is contained in the preset.
On Eos Ti, Eos, Gio, and Ion, you can lock this mode by pressing [Shift] + [Data]. When in display
reference values mode, “Data Latched” will display in the upper left of the live display and the
[Data] key will be lit in green on Eos Ti and Gio. To exit this mode, press [Shift] +[Data] again.
[Time] Key
Pressing and holding the [Time] (the one by [Data] on Eos Ti, Eos, and Gio) allows you to view
discrete timing data behind any channel parameter. [Time] exposes channel or parameter specific
timing for any channels in the current cue. The first value is the delay time. If “--” is displayed, there
is no delay. The value to the right of the / is the transition time.
On Eos Ti, Eos, and Gio, you can lock this mode by pressing [Shift] + [Time]. When in display time
mode, “Timing Latched” will display in the upper left of the live display and the [Time] key will be lit
in green on Eos Ti and Gio. To exit this mode, press [Shift] +[Time] again.
On Ion, you can lock this mode by pressing [Shift] + [Time] [Time]. To exit this mode, press [Shift]
+[Time].
Category Time in PSD
When the {PSD Time Countdown} setup option (Setup> Desk> Displays) is enabled, each
category time will individually turn gold when that timing has completed.
Manual Control Changes
Changes in this section impact the Basic Manual Control or the Advanced Manual Control chapter.
Rem Dim /
Rem Dim levels can either be an absolute value, such as Full or 50%, or a proportional value, which
would set the levels to a percentage value of their current levels. To use a proportional value, press
[/] before entering the percentage value.
For Example:
Assume that channels 1 through 10 are selected and set to an intensity level of 60. Select channel
1 and dim the remaining channels.
Corporate Headquarters 3031 Pleasant View Road, P.O. Box 620979, Middleton, Wisconsin 53562-0979 USA Tel +608 831 4116 Fax +608 836 1736
London, UK Unit 26-28, Victoria Industrial Estate, Victoria Road, London W3 6UU, UK Tel +44 (0)20 8896 1000 Fax +44 (0)20 8896 2000
Rome, IT Via Pieve Torina, 48, 00156 Rome, Italy Tel +39 (06) 32 111 683 Fax +44 (0) 20 8752 8486
Holzkirchen, DE Ohmstrasse 3, 83607 Holzkirchen, Germany Tel +49 (80 24) 47 00-0 Fax +49 (80 24) 47 00-3 00
Hong Kong Rm 1801, 18/F, Tower 1 Phase 1, Enterprise Square, 9 Sheung Yuet Road, Kowloon Bay, Kowloon, Hong Kong Tel +852 2799 1220 Fax +852 2799 9325
Service: (Americas) [email protected] (UK) [email protected] (DE) [email protected] (Asia) [email protected]
Web: www.etcconnect.com QSF 4.1.9.1 Copyright © 2013 ETC. All Rights Reserved. Product information and specifications subject to change.
4250M1211-2.0.1 Rev A Released 2013-06 ETC intends this document to be provided in its entirety.
Eos F ami ly v 2. 0. 1 Ope r at io ns Ma nu al Su pp le ment
Pag e 1
El ect r on ic T he at r e Con t ro ls , I nc .
ETC Supplement
Eos Family v2.0.1
•
[1] [Rem Dim] [/] [5][0] [Enter]
Channels 2 through 10 will be dimmed to 30.
Highlight Rem Dim
To temporarily override the {Highlight Rem Dim} option in Setup, you can use either of the
following syntax examples:
• [channel list] [Highlight] [Rem Dim] [#] [Enter]
• [channel list] [Highlight] [Rem Dim] [/] [#] [Enter]
[ -] [Select Manual] / [Select Active]
[-] [Select Manual] or [-] [Select Active] can be used to modify channel selections. Using [-]
[Select Manual] will select all of the channels in the list except those that have manual data. Using
[-] [Select Active] will select all of the channels in the list except those that are active.
• [1] [Thru] [2] [0] [-] [Select Manual] [Enter] - selects channels 1 through 20 except any
channels that currently have manual data.
[1] [Thru] [2] [0] [-] [Select Active] [Enter] - selects channels 1 through 20 except any channels
that are currently active.
[ Undo] [Undo] [Enter]
Pressing [Undo] [Undo] will scroll to the most recent undo-able command in the command history
display. To undo the command, press [Enter].
Captur e Latch
Previously Capture Latch would be enabled for all users when it was enabled by one user. Now
Capture Latch works on a user by user basis. For more information on using Capture Latch, see the
Using [Capture] section of the Advanced Manual Control chapter.
Recording and Playback Changes
Changes in this section impact the Cue Playback, Storing and Using Submasters, or Using
Partitioned Control chapters.
Loading a Cue with Temporary Time
A cue can be loaded with a temporary time.
• [Cue] [3] [Time] [6] [Load] - loads cue 3 with the
manual time of 6.
Note:
For multipart cues, the temporary time will be applied to the entire cue, not just the
part on the command line.
For cues with discrete timing, its parameters will use the temporary time instead
of the assigned discrete timing.
Submasters
The number of submasters has increased to 999. The number of fader pages available is still 30,
which means that there is a still a limit of 300 submasters being used with physical faders at a time.
Partitions on Cue Lists
A partition may be assigned to a cue list. If a partition has already been applied to a cue list, any
channels not in the cue list's partition will not be included in cues when they stored or replayed.
Any data for a cue list that already existed before a partition is applied, will be maintained, including
data for channels not included in the partition. If data existed before the partition was assigned, in
Eos F ami ly v2 . 0. 1 Ope ra t io ns Ma nu al Sup pl eme nt
Pag e 2
El ect r on ic T he at r e Con tr o ls , I nc.
ETC Supplement
Eos Family v2.0.1
blind, channels that are not in the partition will display without a channel graphic, any levels will be
in gray, and a small superscript N will display with it.
Channels that were
initially saved in the
cue list but are not in
the currently
assigned partition
Assigned partitions will display in the external links column in the cue list index.
To assign a partition to a cue list:
• [Cue] [n] [/] {Partition} [n] [Enter]
To remove a partition from a cue list:
• [Cue] [n] [/] {Partition} [Enter]
Wor k i n g w i t h a S i n g l e C u e L i s t C h a n g e s
Changes in this section applies to the Working with a Single Cue List chapter.
Aut o-block Cleanup
Cues that have auto-blocks will display a underscored b in the PSD. {Autoblock Clean} is used to
remove all auto-blocks from a single cue, cue range or entire cue list. {Autoblock Clean} is a
softkey that will be posted when a cue list and/or cue number are on the command line in the Cue
List Index, Live, and Blind. A range of cues or a cue list can be specified with this command.
For Example:
• [Cue] [1] [/] {Autoblock Clean} [Enter] - clears all auto-blocks from cue list 1. Only blocks
displayed with the white underscore are removed. If the [Block] key was previously used, this
command will not unblock it.
• [Cue][1] [/] [1][0] [Thru] [1][0][0] {Autoblock Clean} [Enter] - clears the auto-blocks just
from cues 10 through 100 of cuelist 1.
Default Update Modes
The default Update modes have changed. Eos defaults to Make Absolute for the {Update Mode},
with {Break Nested} and {Update Last Ref} enabled.
Default Update Setup Options
Eos F ami ly v2 . 0. 1 Ope ra t io ns Ma nu al Sup pl eme nt
Pag e 3
El ect r on ic T he at r e Con tr o ls , I nc.
ETC Supplement
Eos Family v2.0.1
Ti m i n g D i s a b l e
This change affects the Setup and Cue Playback chapters.
You can assign a separate time value for [Timing Disable] in Setup> Desk> Manual Control>
Default Times> Timing Disable. When a fader has been set to timing disable mode, cues will use
the time set in Setup. The default time is 0.
[Shif t] + [Go] and [Shif t] + [Back]
[Shift] + [Go] and [Shift] + [Back] can be used to cut to the next cue in the same way as [Timing
Disable] + [Go] and [Timing Disable] + [Back].
Show File
An indicator has been added to show when a show file has been
modified but not saved. An asterisk (*) will display beside the show file
name.
Mirror Mode
This change affects the Mirror Mode section of the Multi-console and Synchronized Backup
chapter.
A device that is currently in mirror mode can select which user number it is mirroring by using the
alphanumeric keyboard shortcut M + # (# being the user number). M + ESCAPE can be used to
leave mirror mode.
Note:
If a device is not currently in mirror mode, pressing M on an alphanumeric
keyboard will post Mark to the command line.
Collapsing PSD Columns
This change affects the Playback Status Display section of the System Basics chapter.
To collapse a column in the Playback Status Display, press [Escape] while clicking on the column
you want to collapse. Press [Shift] + [Select] to bring back all of the collapsed columns.
Magic Sheets on Direct Selects
Magic Sheets can now be accessed from the direct selects. Clicking on a magic sheet direct select
will open the Magic Sheet tab and display the selected magic sheet. Pressing a different magic
sheet direct select will change the displayed sheet.
Using Park Changes
Changes in this section impact the Using Park chapter.
Recall Fr om Par k
You can use [Recall From] [Park] to set a channel or parameter to the same level as the current
park value.
For Example:
Let’s assume that channels 1 through 5 are parked at 55. To recall that level to channels in live or
blind, use the following syntax:
•
[1] [Thru] [1][5] [Recall From] [Park] [Enter]
Channels 1 through 5 will be set to 55 and channels 6 through 15 will be unaffected.
Note:
This does not release the Park buffer.
Eos F ami ly v2 . 0. 1 Ope ra t io ns Ma nu al Sup pl eme nt
Pag e 4
El ect r on ic T he at r e Con tr o ls , I nc.
ETC Supplement
Eos Family v2.0.1
[Thr u][Thru] in Park
When parking a range of addresses in Park, using [Thru] will only park the intensities. If you want
to park all of the addresses and parameters within the selected range, you will need to use [Thru]
[Thru].
Patch Changes
Changes in this section impact the Patch chapter.
{Swap} in Patch
Additional options have been added to {Swap} in Patch.
•
•
•
•
{Swap} - swaps only the patched address
{Swap} {Plus Show} - swaps all show and patch data
{Swap} {Only Show} - swaps only the show data and not patch data
{Swap} {Plus Patch} - swaps addresses and patch data but not show data
Fixtur e Editor Parameter s
The fixture editor parameters list is now displayed in alphabetical order.
[Thru] [Thru]
This change applies to the Multipart Cues chapter.
[Thru] [Thru] can be used in blind to create multiple cue parts in a range. For example, [Cue] [1]
[Part] [1] [Thru] [Thru] [4] [Enter] will create parts 1 through 4. If you were to use just [Thru]
instead of [Thru] [Thru] in that example you would create parts 1 and 4.
Subgroups
This change applies to the Using Groups chapter.
You can create subsets of channels within a group by using [Shift] + [/]. [Shift] + [/] will create
parentheses. These subsets of channels or subgroups are treated as a single channel in the
following ways:
• When applying absolute or relative effects from live, the subgroups are treated as a single
channel by the effect.
• When setting a range of step's channels on a step based effect, the subgroup will not be
spread out amongst multiple steps.
• When the group is selected and next/last is pressed, each subgroup is traversed.
• When a group has subgroups, {Reverse}, {Reorder}, and {Random} in the group editor will
affect the subgroups instead of the channels in each subgroup. {Reorder} will order the
groups based on the first channel in each group.
Subgroups can be created either in the group list or live.
Subgroups
To create a subgroup in live:
• [Shift] + [/] [1] [Thru] [4] [Shift] + [/] [Record] [Group] [2] [Enter]
To create a subgroup in the group list index:
• [Group] [2] [Enter] [Shift] + [/] [1] [Thru] [4] [Shift] + [/] [Enter]
Note:
Fan is not currently supported with Subgroups.
Eos F ami ly v2 . 0. 1 Ope ra t io ns Ma nu al Sup pl eme nt
Pag e 5
El ect r on ic T he at r e Con tr o ls , I nc.
ETC Supplement
Eos Family v2.0.1
Managing Show Files Changes
Changes in this section impact the Managing Show Files chapter.
Impor ting Custom Gobo Images
Custom gobo images can be imported by going to Browser> Import> Gobo Images and selecting
an image file or folder. If a folder is selected, all image files within the folder will be imported. All
standard image files are supported with the exception of .svg files.
Imported gobo images can be deleted by going into Browser> Import> Gobo Images> Imported
Gobos, selecting the image, and pressing [Delete] [Enter].
Impor ted Media and Part ial Show Op en/Mer ge
A new tile, {Media} has been added to the Partial Show Opening and Merge displays. Media is
imported gobo and magic sheet images.
Note:
Media will be included by default when you select Patch, Fixtures, or Magic
Sheets.
Vi r t u a l M e d i a S e r v e r
Changes in this section impact the Virtual Media Server chapter.
Number of Pixel Maps
The number of pixel maps per show file is now 40. Previously it was limited to 10 maps.
{Flash}
The {Flash} softkey is available in the Pixel Map Editor display. {Flash} works the same as it does
in Live. See the section on Flash in the Basic Manual Control chapter for more information.
Patch b y Channel
An option for setting the starting channel has been added to the Edit display for mapping channelbased pixels.
• When either {Starting Channel} or {Starting Address} is selected, both fields will be
cleared.
• Address-based pixels can not overlap with channel-based pixels. This includes the entire
DMX fixture footprint.
• If using {Starting Channel}, any overlapping channel-based pixels will be removed and any
overlapping address-based fixtures will be unpatched.
• If using {Starting Address}, any overlapping address-based pixels will be removed and any
overlapping channel-based fixtures will be unpatched.
• When the [Data] key is latched, the address for channel-based pixels will display.
• When [Format] is pressed, the address will toggle between port/offset and address number.
Eos F ami ly v2 . 0. 1 Ope ra t io ns Ma nu al Sup pl eme nt
Pag e 6
El ect r on ic T he at r e Con tr o ls , I nc.
ETC Supplement
Eos Family v2.0.1
Park and Address Check
You can use Park and Address Check for Virtual Media Server outputs.
Color Picker
A second color picker has been added for virtual effect layers. The second color picker will be
labeled as End Color and will control RGB2.
Cop ying Color
You can copy or swap a color between the two color pickers using the buttons located between the
two color pickers.
Copies Start Color to End Color
Swaps Start Color and End Color
Copies End Color to Start Color
FDX Dimmer Feedback
ECU Settings
Changes in this section impact the ECU appendix.
FDX Feedback
Clicking in the enable box will allow Eos to receive FDX dimmer feedback over the network.
Broadcast Type
• Directed Broadcast - Broadcast packets are directed to a subnet based on the IP address and
subnet mask of the sender.
• Limited Broadcast - The limited broadcast address is 255.255.255.255. It is limited because
routers will never forward datagrams with that destination address. This means that
datagrams with the limited broadcast address are confined to the particular network segment
on which they originate.
About System
Changes in this section impact the About chapter.
Clicking on a FDX rack in the {About System} list will open the About Rack display, which shows
the following information about the rack:
•
•
•
•
•
•
•
Rack number
Rack Type
Phase A,B,C Voltages
Frequency
System Number
IP Address
Software Version
Device List
For information about FDX Dimmer feedback, see the Device List section in the Patch chapter.
Eos F ami ly v2 . 0. 1 Ope ra t io ns Ma nu al Sup pl eme nt
Pag e 7
El ect r on ic T he at r e Con tr o ls , I nc.