1
MLM990H User Manual
Panel Software Version 1.3.0
Note: Mach 3 EL and GL systems function identically, but
conform to different International requirements.
This user guide will refer to EL systems only.
1
Important Notices
WARNING! QUALIFIED TECHNICIAN REQUIRED FOR SERVICE AND INSTALL ATION
WARNING: People with infectious diseases should not use
a spa or hot tub.
WARNING: To avoid injury, exercise care when entering or
exiting the spa or hot tub.
WARNING: Do not use a spa or hot tub immediately
following strenuous exercise
WARNING: Prolonged immersion in a spa or hot tub may be
injurious to your health
CAUTION: Maintain water chemistry in accordance with the
Manufacturers instructions.
CAUTION: The equipment and controls shall be located not
less than 1.5 meters horizontally from the spa or hot tub.
AVERTISSEMENT:
UÊ iÃÊÌi«iÀ>ÌÕÀiÃÊ`iʽi>ÕÊÃÕ«iÀiÕÀiÃÊ>ÊÎnc
Ê«iÕÛiÌÊ
presenter un danger pour la sante.
UÊ iViVÌiÀÊ`ÕÊVÀVÕÌÊ`½>iÌ>ÌÊiiVÌÀµÕiÊ
avante l’entretien.
WARNING/ADVERTISSEMENT:
UÊ ÃViVÌÊÌ
iÊiiVÌÀVÊ«ÜiÀÊLivÀiÊÃiÀÛV}°Ê
Keep access door closed.
UÊ iViVÌiÀÊ`ÕÊVÀVÕÌÊ`½>iÌ>ÌÊiiVÌÀµÕiÊ
avant l’entretien. Garder la porte fermer.
CSA COMPLIANCE/CONFORMITÉ
CAUTION:
UÊ /iÃÌÊÌ
iÊ}ÀÕ`Êv>ÕÌÊVÀVÕÌÊÌiÀÀÕ«ÌiÀÊLivÀiÊi>V
Ê
use of the spa.
UÊ ,i>`ÊÌ
iÊÃÌÀÕVÌÊ>Õ>°
UÊ `iµÕ>ÌiÊ`À>>}iÊÕÃÌÊLiÊ«ÀÛ`i`ÊvÊÌ
iÊiµÕ«iÌÊÃÊ
to be installed in a pit.
UÊ ÀÊÕÃiÊÞÊÜÌ
Ê>ÊiVÃÕÀiÊÀ>Ìi`Ê
-ÊVÃÕÀiÊΰ
UÊ iVÌÊÞÊÌÊ>ÊVÀVÕÌÊ«ÀÌiVÌi`ÊLÞÊ>Ê
>ÃÃÊÊ
ground fault circuit interrupter.
UÊ /ÊiÃÕÀiÊVÌÕi`Ê«ÀÌiVÌÊ>}>ÃÌÊÃ
VÊ
>â>À`]Ê
use only identical replacement parts when servicing.
UÊ ÃÌ>Ê>ÊÃÕÌ>LÞÊÀ>Ìi`ÊÃÕVÌÊ}Õ>À`ÊÌÊ>ÌV
ÊÌ
iÊ
maximum flow rate marked.
WARNING:
UÊ 7>ÌiÀÊÌi«iÀ>ÌÕÀiÊÊiÝViÃÃÊvÊÎnc
Ê>ÞÊLiÊÕÀÕÃÊÌÊ
your health.
UÊ ÃViVÌÊÌ
iÊiiVÌÀV>Ê«ÜiÀÊLivÀiÊÃiÀÛV}°
ATTENTION:
UÊ /ÕÕÀÃÊÛiÀviÀʽivvV>VÌiÊ`ÕÊ`ÃVÌiÕÀÊ`vviÀiÌiÊ
avant d’utiliser differentiel avant d’utiliser le bain.
UÊ ÀiÊ>ÊÌViÊÌiV
µÕi°
UÊ ÀõÕiʽ>««>Ài>}iÊiÃÌÊÃÌ>iÊ`>ÃÊÕiÊvÃÃi]Ê
on doit assurer un drainage adequat.
UÊ «ÞiÀÊÕµÕiiÌÊ>ʽÌiÀiÕÀÊ`½ÕiÊVÌÕÀiÊ
Ê
-ÊVÃÕÀiÊΰ
UÊ iVÌiÀÊÕµÕiiÌÊ>ÊÕÊVÀVÕÌÊ«ÀÌi}iÊ«>ÀÊ
Ê
ÕÊ`ÃVÌiÕÀÊ`vviÀiÌiÊ`iÊ
>ÃÃÊ°
UÊ vÊ`½>ÃÃÕÀiÀÊÕiÊ«ÀÌiVÌÊ«iÀ>iÌiÊVÌÀiÊ
le danger de shock electrique, lors de l’entretien employer
seulement des pieces de rechange identiques.
UÊ iÃÊ«ÀÃiÃÊ`½>ëÀ>ÌÊ`ÛiÌÊiÌÀiÊiµÕ«iiÃÊ`iÊ}ÀiÃÊ
convenant au debit maximal indique.
WARNING! SHOCK HAZARD! NO USER
SERVICEABLE PARTS.
Do not attempt service of this control system. Contact your
dealer or service organization for assistance. Follow all
owner’s manual power connection instructions. Installation
must be performed by a licensed electrician and all
grounding connections must be properly installed.
FCC STATEMENT
This equipment has been tested and complies with the limits
for a Class B digital device, pursuant to Part 15 of the FCC rules.
These limits are designed to provide reasonable protection
against harmful interference in a residential installation.
This equipment generates, uses and can radiate radio
frequency energy. Correct installation and proper use
greatly reduce the likelihood of harmful interference to
radio communications, although it does not diminish the
possibility entirely.
If harmful interference is detected when turning the equipment
off and on, the user is encouraged to try to correct the
interference by one or more of the following measures: (1)
Re-orient or relocate the receiving antenna; (2) Increase the
separation between the equipment and the receiver; or (3)
Connect the equipment into an outlet on a different circuit from
the one to which the receiver
is connected.
The user is cautioned that changes and modifications made to
this equipment without the approval of the manufacturer could
void the user’s authority to operate this equipment and violate
FCC Regulations.
SAVE THESE INSTRUCTIONS
2
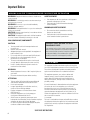
EL SERIES CONTROL WITH MLM990H PANEL
/
iÊäÊ«>iÊV>ÊLiÊÕÃi`ÊÜÌ
ÊÌ
iÊnäää]ÊÓäääÊ>`Ê£äääÊÃÞÃÌiðÊ
-ÞÃÌiÊÃvÌÜ>ÀiÊÛiÀÃÊÓÊÀÊ
}
iÀÊÃÊÀiµÕÀi`ÊvÀÊvÕÊvÕVÌ>ÌÞÊvÊÌ
ÃÊ«>i°
This user guide lists all features that are available. The features shown on your
panel menus may vary depending on the system and equipment used.
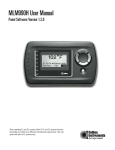
ÀÀÜÊivÌ
ÀÀÜÊ1«
ÀÀÜÊ,}
Ì
LEDs are lit
when functions
are on
ÀÀÜÊÜ
-iiVÌÊ
To exit a menu,
ÀÀÜÊivÌ
NETWORK CONNECTIONS
Establishing a Network Connection
iÊÊ-iÌÊÊ > Link Panel > .
To link your wireless panel to the system, press
Follow the on-screen instructions:
Network/Link another Panel to Control System
iÊÊ-iÌÊÊ > Network > .
.
Shut off power to spa.
Turn spa power back on and
then push select on this
panel within 30 seconds.
``Ì>ÊÃVÀiiÃÊÜÊvÜ\ʺ}Ê*>i°°°7>Ì°°°»ÆÊ
Ì
i]ʺ*>iÊi`Ê-ÕVViÃÃvÕÞ»°Êº-Ì>ÀÌ}Ê1«»ÊÜÊ
also blink.
7ÀiiÃÃÊ iÌÜÀ\Ê
£®Êº*>iÊ»°ÊÊ/
ÃÊÃÊ>Ê£ÓÊ`}ÌÊÕµÕiÊÊ}ÛiÊÌÊÜÀiiÃÃÊ
panels when they are added to the system.
ӮʺÊÌ
iÀÊiÛVi»°Ê/ÊÊÌÊ>Ì
iÀÊ`iÛViÊÃÕV
Ê>ÃÊ
another wireless panel or PC based software from an
>Ài>`ÞÊ>``i`ÊÜÀiiÃÃÊ«>i]Ê}ÊÌʺÊÌ
iÀÊ`iÛVi»]Ê
press
from an already added panel. Then go to
ºÊ*>i»ÊÊÌ
iÊ`iÛViÊÌ
>ÌÊÞÕÊÜ>ÌÊÌÊÊÌÊÊ
the spa system. Press .
ήÊ1Ê°Ê/ÊÕÉÀiÛiÊ>Ê,Ê`iÛViÃÊ>Ài>`ÞÊ
added to the spa system.
vÊÌ
iʺ*À}Ê`i»ÊÃVÀiiÊ>««i>ÀÃ]ÊvÜÊÌ
iÊ
ÃÌÀÕVÌðÊ9սʫÀL>LÞÊV
ÃiʺÝÌÊ*À}Ê`i»Ê
vÊÞÕ½ÀiÊëÞÊVÀi>Ì}Ê>ÊÊvÀÊÌ
iÊ7ÀiiÃÃÊ*>iÊÌÊ
Ì
iÊ-«>Ê
ÌÀÊ-ÞÃÌi°ÊÜÊÌ
iÊ«>iÊÌÊ>VµÕÀiÊÞÕÀÊ
system information.
3
Menu Panel Start Up
PANEL START-UP AND NAVIGATION KEYS
Press and hold the
button for three seconds to
ÌÕÀÊÌ
iÊ7ÀiiÃÃÊ«>iÊ°ÊiÊViÀÌ>ÊÌ
>ÌÊÞÕÊ>ÀiÊ
within range for the panel to find the spa. If the panel
`iýÌÊv`ÊÌ
iÊÃ}>ÊÌÊÌ
iÊë>]ʺ Ê-«>ÊÕ`»ÊÜÊ
>««i>À°Ê/
iÊ«>iÊÕÃÌÊ>ÃÊLiʺi`»ÊÌÊÜÀ°Ê-iiÊ
previous page.) Thereafter, use the front panel buttons
ÌÊÛiÊÜÌ
ÊÌ
iÊiÕÃ\Ê1« , Down , Left
.
chooses your menu selection. To exit
or Right
most menus and go back to Home, press the left arrow
key until the Home display screen appears.
Initial Spa Start-up
If the panel is started up during spa start-up, it may
go into Priming Mode, which will last for less than
5 minutes. During Priming Mode, you are allowed to
control Jet functions. You can choose to exit the Priming
Mode. Highlight your choice, then . (Follow the
on-screen instructions.)
vÌiÀÊiÝÌ}ÊÌ
iÊ*À}Ê`i]ÊÌ
iÊë>ÊLi}ÃÊÌÊ
>Ì>ÊÌ
iÊÜ>ÌiÀÊÌi«iÀ>ÌÕÀiÊvÊÊ-Ì>`>À`Ê`i°Ê
The Home display screen will appear after completion of
Priming Mode.
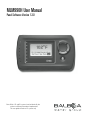
Home Display Screen (or “Home”)
The basic function keys on the main display screen are
º>ÃÌÊiÞû]ʺ-«>»]ʺÕÃV»]Ê>`ʺ-iÌ»°Ê/
iÊë>ÊÌi«iÀ>ÌÕÀiÊ
will appear after the pump has ran for a minute. The
º-Ì>`>À`»Ê
i>ÌÊ`iÊÃÊ`ë>Þi`ÊÊÌ
ÃÊiÝ>«i°Ê
Directly below the temperature shows the status as it is
acquired. Thereafter, the line is blank and is reserved to
show alerts should they occur. Note: Depending on your
installed equipment, the screen may look different.
Battery Display and Keeping the Panel Charged
ÊL>ÌÌiÀÞÊVÊÃÊÃ
ÜÊÊÌ
iÊiÊ>`ÊÌ
iÊ>ÃÌÊiÞÃÊ
«VÌÀ>ÊÃVÀiiðÊÌ
ÊiÝ>«iÃÊ-VÀiiÊÊEÊ®ÊÃ
ÜÊÌ
>ÌÊ
the battery is getting low and the wireless panel needs
V
>À}}°Ê7
iÊÌÊÊÕÃi]Êii«ÊÞÕÀÊ«>iÊÊÌÃÊVÀ>`i°Ê
7
iÊÞÕÀÊ«>iÊÃÊV
>À}}]ÊÌ
iÊL>ÌÌiÀÞÊVÊÜÊv>Ã
°Ê
102°F
Setting the Spa Temperature on the Home Screen
On the Home display screen, press .
or
,
-iÌÊÌ
iÊ`iÃÀi`Êë>ÊÌi«iÀ>ÌÕÀiÊÜÌ
Ê
to return Home. Times out after 5-10 seconds.
then
Setting the Time
/
iÊÌiÊÃ
Õ`ÊLiÊÃiÌÊvÀÃÌ°ÊÊÌi`ÊvÕVÌÃÊ>ÀiÊ
`i«i`iÌÊÊÌ
ðÊ-Ì>ÀÌ}Ê>ÌÊÌ
iÊiÊ`ë>ÞÊÃVÀii]Ê
}
}
Ìʺ-iÌ»]ÊÌ
iÊ«ÀiÃÃÊ .
1ÃiÊÌ
iÊ>ÀÀÜÊiÞÃÊÌÊ
}
}
Ìʺ/iÊvÊ>Þ»°Ê*ÀiÃÃÊ .
Press
or
to change hour.
Press
or
to change minutes.
Press
or
ÊÌÊV
ÃiÊÊÀÊ*°
/Ê->ÛiÊ>`ÊÝÌ\Ê
to highlight minutes.
ÊÌÊ
}
}
ÌÊ°
.
/
iÊ«ÌÊÌÊV
>}iÊÌ
iÊÌiÊvÀ>ÌÊÊÀÊ*®ÊÃÊ
vÕ`ÊÕ`iÀ\ÊÊ-iÌÊÊ1ÃiÀÊ-iÌÌ}ÃÊÊ/iÊvÀ>Ì°
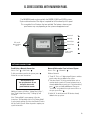
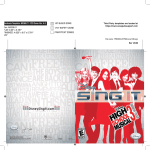
FAST KEYS
Fast Keys allows you to quickly view the status of a
programmed device and change it. For example, from the
Home display screen, highlight Fast Keys. Pressing
will show a menu with the four directional keys, their
preassigned functions, and status.
ÊÌ
iÊiÝ>«i]ʺiÌÃÊ£»ÊÃÊÊÜÆÊ1«ÊÀÀÜÊ ) toggles
iÌÃÊ£Ê}
ÉܰʺiÌÃÊÓ»ÊÃÊÌÊÃÌ>i`]ʺÜiÀ»ÊÃÊÌÊ
ÃÌ>i`ÆÊ-«>ʺ}
Ì»ÊÃÊ"vv°ÊÜÊÀÀÜÊ ) toggles the
spa lights On or Off. The spa temperature is shown in the
Õ««iÀÊÀ}
ÌÊVÀiÀ°ÊÊL>ÌÌiÀÞÊVÊ`ë>Þi`ÊÊÌ
iÊÜiÀÊ
left corner shows the condition of the battery.
Home (
) to go back to the Home display screen.
Jets 1 L
Jets 2
NA
75 ° F
Blower
NA
Light Off
Home
Acquiring System Config.
03:05 PM
Standard Mode
Music
Home Display Screen (Screen A)
4
Fast Keys Pictorial Screen (Screen B)
Spa Functions
CONTROLLING SPA FUNCTIONS
ÀÊÜÌ
ÊÌ
iʺ-«>»ÊiÕ]ÊÞÕÊV>Ê>VViÃÃÊ`iÛViÃÊÊ
your system. You can also view the status of devices you
have installed on your system.
iÊÊ-«>ÊÊ
ÊÊ-«>ÊÕVÌÃÊiÕ°
/
iÊ-«>ÊÕVÌÃÊiÕÊ`ë>ÞÃÊÞÊÌ
iÊiµÕ«iÌÊ
that is installed on your system; equipment may
include: Jet Control, Lighting, Blower, etc. Highlight the
selected device, then press °Ê1ÃiÊÌ
iÊ`ÀiVÌÊiÞÃÊ
to turn the
to move within each menu and press
device On or Off, or to advance through the available
ëii`ÃÊ}
Éi`ÉÜ®°Ê
If you do not have a device installed, the menu will
not include it.
Time Out Notes
The pump responsible for heating and filtration
(pump 1 low on non-circ systems, or the circ pump on circ
systems) will be referred to simply as the pump.
Time-outs refer to a preset length of time that a
function is programmed to operate before shutting off
automatically. Certain conditions (filters or freeze) can
cause a function to operate longer, while faults can
cause a function to operate for a shorter length of time.
The system keeps track of time-outs regardless of other
conditions occurring.
Blower
£Ã«ii`Ê«iÀ>Ì\Ê"É"vv
Óëii`Ê«iÀ>Ì\Ê}
Éi`ÊÀÊ"vv
Îëii`Ê«iÀ>Ì\Ê}
Éi`ÉÜÊÀÊ"vv
If left on, the blower will automatically turn off after a
time-out period.
Mister
ÃÌiÀÊ
ÌÀ\Ê"É"vv
Options
"«ÌÊ£\Ê"É"vvÆÊÊ"«ÌÊÓ\Ê"É"vv
"«ÌÊÎ\Ê"É"vvÆÊÊ"«ÌÊ{\Ê"É"vv
Note: Options have no timeout. Options may include
7>ÌiÀv>]Ê/6]Ê
]ÊiÌV°ÊÊÌ
iÊV>ÃiÊvÊ>ÊvÌ]ʺ"»Êi>ÃÊ
Ì
iÊvÌÊÃÊÀ>Ãi`Æʺ"vv»Êi>ÃÊÌ
iÊvÌÊÃÊÜiÀi`°
Chemistry
The panel provides a readout of the pH and ORP values
in your spa. This option will appear only if your spa is
iµÕ««i`ÊÜÌ
Ê«É",*ÊL>À`Ê>`ÊÃiÃÀð
Standby Mode
-Ì>`LÞÊ`iÊÌÕÀÃÊvvÊ>Êë>ÊvÕVÌÃÊÌi«À>ÀÞ°Ê
/
ÃÊÃÊ
i«vÕÊÜ
iÊV
>}}Ê>ÊvÌiÀ°Ê7Ì
ʺ-Ì>`LÞÊ
`i»Ê
}
}
Ìi`]Ê«ÀiÃÃ}Ê will result in:
Press Select to Enter
ÌiÀÊ-Ì>`LÞÊ`iÊÊÊÊÊÊÊÊÊÊÊÊÊÊÊÊÊÊ
Jet Control
You can turn a pump on or off, and shift between high
and low speeds if equipped. If left running, pump 1 will
turn off after a time-out period. The pump 1 low speed
time-out on some systems may be as long as 4 hours.
On non-circ systems, the low speed of pump 1 runs
when the blower or any other pump is on. It may also
activate for at least 1 minute every 30 minutes to detect
the spa temperature (polling) and then to heat to the
set temperature if needed, depending upon the mode.
7
iÊÌ
iÊÜÊëii`ÊÌÕÀÃÊÊ>ÕÌ>ÌV>Þ]ÊÌÊV>ÌÊLiÊ
deactivated from the panel; however, the high speed may
be started.
Lighting
-«>Ê}
Ì\Ê"É"vvÆÊÀ]Ê}
Éi`ÉÜÊÀÊ"vv
Or,
LiÀÊÊ}
ÌÊÊ7
ii"®
LiÀÊÊ}
ÌÊÊ7
ii"vv®
Fiber - Off
Back
Pressing
again will result in:
Entered Standby Mode
ÝÌÊ-Ì>`LÞÊ`i
(There may be additional options on
this screen on some systems.)
Press
again to exit. Otherwise, system will revert to
previous mode after 1 hour.
Stir
-ÌÀÊÌÕÀÃÊÊ>Ê«Õ«ÃÊ>ÌÊ
}
Êëii`ÊvÀÊxÊÕÌið
-ÌÀÊÃÊÀ>ÞÊÕÃi`Ê>vÌiÀÊ>``}ÊV
iV>ÃÊÌÊÌ
iÊÜ>ÌiÀ°
5
Programming
MANUAL PANEL SET TINGS
Set Menu
iÊÊ-iÌÊÊ
ÊÊ-«>Ê-iÌÌ}ÃÊÊ
.
ÊÌ
iʺ-iÌ»ÊiÕÊÃ
ÜÊÊÌ
iÊiÊ`ë>ÞÊÃVÀii®]Ê
you can preset (program) the equipment on your system,
and view diagnostic and software version information.
ÀÊÜÌ
ÊÌ
iʺ-«>Ê-iÌÌ}ûÊiÕ]ÊV
ÃiÊÜ
V
Ê
setting you’d like to change by using the arrow keys.
Set Temp
ÀÊÜÌ
ʺ-«>Ê-iÌÌ}û]Ê
}
}
Ìʺ-iÌÊ/i«»]Ê
or
to set the temperature, .
,
(Note: The available range for adjustment of spa
Ìi«iÀ>ÌÕÀiÊÃÊnäcÊÊ£ä{cÊQÓÈ°äc
ÊÊ{ä°äc
R]Ê>`Ê>ÞÊ
LiÊ>ÃÊÜÊ>ÃÊÇäcÊÊÃiÊV>Ãiî°Ê/
iÊ>ÃÌÊi>ÃÕÀi`Êë>Ê
temperature displayed is current only when the pump has
been running for at least 1 minute.
Note: To change the format from Fahrenheit to Celsius,
>VViÃÃÊÌ
iʺ1ÃiÀÊ-iÌÌ}ûÊÜÌ
ÊÌ
iʺ-«>Ê-iÌÌ}ûÊ
iÕ°Ê-iiÊ1ÃiÀÊ-iÌÌ}ÃÊÕ`iÀÊÌ
ÃÊÃiVÌ°
Filter Cycles
iÊÊ-iÌÊÊ
> Filter Cycle >
.
You are not required to set filter cycles; however, it is an
option available to you.
On all systems, the pump and the ozone generator will
ÀÕÊ`ÕÀ}ÊvÌÀ>Ì°ÊÌÊÌ
iÊÃÌ>ÀÌÊvÊi>V
ÊvÌiÀÊVÞVi]ÊÌ
iÊ
blower will run briefly on its highest speed to purge the
air channels. The lowest speed of any other pumps and
the Mister will also run briefly. On some circ systems,
Pump 1 may also run for the duration of the filter. There
are two filter cycles per day.
/
iÊÃÌ>ÀÌÉi`ÊÌiÃÊvÊi>V
ÊVÞViÊ>ÀiÊ«À}À>>Li°Ê
/Ê«À}À>ÊÌ
iÊVÞViÃ]ÊÌ
iÊVVÊÕÃÌÊLiÊÃiÌ°Ê1`iÀʺ-«>Ê
-iÌÌ}û]Ê
}
}
ÌʺÌiÀÊ
ÞVi»Ê>`Ê .
-iiVÌÊÌiÀÊ
ÞViÊ£ÊÀÊÓÊLÞÊ«ÀiÃÃ}Ê or .
ÀÀÜÊÜÊÌÊÌ
iÊ-Ì>ÀÌÊ/i]ÊÌ
iÊ .
or ÊÌÊV
ÃiÊÌ
iʺ-Ì>ÀÌÊ/i»Ê
ÕÀ°Ê
-iiVÌÊ
to change minutes, then use the
or
to
Press
select the minutes start time.
ÀÀÜÊ,}
ÌÊÌÊV
>}iÊÊÀÊ*ÊÊ>Ê£ÓÊ
ÕÀÊVVÊÃiiÊ
º1ÃiÀÊ-iÌÌ}ûÊvÊÞÕÊ`½ÌÊÃiiÊÊÀÊ*®°Ê*ÀiÃÃÊ
ÌÊ->Ûi°ÊÀÀÜÊÜÊÌʺ-Ì«Ê/i»Ê>`ÊÀi«i>Ì°Ê"ViÊ
vÃ
i`]ÊÀÀÜÊivÌÊÌÊÝÌÊÀÊÀiÃÕiÊÌÊÃiÌÊÌiÀÊ
ÞViÊÓ°
(Filter Cycles continued next column)
6
If you would like to select continuous filtration, set the
Filter 1 start and end times to be the exact same time.
ÊÌ
ÃÊV>Ãi]ÊÌiÀÊÓÊ-Ì>ÀÌÊ/iÊÞÊVÌÀÃÊÜ
iÊ
the second purge happens. Filter 2 end time will
be unavailable.
Note: The menu panel requires that filters be set by
time of day, not duration. If you add a menu panel to an
existing system that uses a non-time-capable panel, this
system needs to be reconfigured by your installer.
Fast Keys – Programming
iÊÊ-iÌÊÊ > Fast Keys >
.
Here you can designate how each key will respond when
accessing the Fast Keys menu. The following equipment
>ÀiÊ>Û>>LiÊvÀÊi>V
ÊvÊÌ
iÊvÕÀÊ>ÃÌÊiÞÃ\ÊiÌÃÊ£È]Ê
ÜiÀ]Ê-«>]Ê}
Ì]ÊLiÀÊ"«ÌV]ÊÌ
iÀÊ}
Ì]ÊÃÌiÀ]Ê
"«ÌÊ£{]Ê-ÌÀÊÃiiʺ``Ì>Êi>ÌÕÀiû®]ÊÀÊ i°Ê
(Only equipment available on your spa is listed.)
ÊÌ
iÊiÕʺ*À}À>Ê>ÃÌÊiÞû]Ê
}
}
ÌÊ>Ê`ÀiVÌ>Ê
key to program, then °Ê-VÀÊÌÊÌ
iÊ`iÛViÊÞÕÊV
ÃiÊ
to place on the Fast Keys menu. For more options,
ÀÀÜÊ,}
ÌÊ ). Choose your device by highlighting it.
Press .
ivÌÊÀÀÜÊ ®ÊÌÊ}ÊL>VÊÌÊÌ
iʺ*À}À>Ê>ÃÌÊiÞûÊ
menu to program the other Fast Keys. If you wish to go
Home, continue pressing .
Mode or Heat Mode
iÊÊ-iÌÊÊ > Mode >
.
/
ÃÊÃVÀiiÊ>ÜÃÊÞÕÊÌÊV
ÃiÊ-Ì>`>À`]ÊVÞ]ÊÀÊ
-ii«Ê`iÃÊÜ
iÊÕÃ}ÊÌ
iÊ
i>ÌiÀ°Ê-iiVÌÊÌ
iÊ`i]Ê
then .
º-Ì>`>À`Ê`i»Ê>Ì>ÃÊÌ
iÊ`iÃÀi`ÊÌi«iÀ>ÌÕÀi°Ê
Note that the last measured spa temperature displayed
is current only when the pump has been running for at
least 1 minute.
ºVÞÊ`i»Ê
i>ÌÃÊÌ
iÊë>ÊÌÊÃiÌÊÌi«iÀ>ÌÕÀiÊÞÊ
during filter cycles.
Turning on Jets 1 while in Economy mode puts the spa
Ê-Ì>`>À`VÞÊ`i]ÊÜ
V
Ê«iÀ>ÌiÃÊÌ
iÊÃ>iÊ
>ÃÊ-Ì>`>À`Ê`i]ÊÌ
iÊÀiÛiÀÌÃÊÌÊVÞÊ`iÊ
automatically after 1 hour. During this time, entering the
Mode Menu will revert to Economy Mode immediately.
º-ii«Ê`i»Ê
i>ÌÃÊÌ
iÊë>ÊÌÊÜÌ
ÊÓäcÊ££c
®ÊvÊÌ
iÊ
set temperature only during filter cycles.
Programming
Time of Day
iÊÊ-iÌÊÊ
> Time of Day >
.
1`iÀʺ-iÌÊ/iÊvÊ>Þ»]ÊvÜÊÌ
iÊÊÃVÀiiÊ
ÃÌÀÕVÌÃ\Ê*ÀiÃÃÊ1«ÊÀÊÜÊÌÊV
>}iÆÊÌ
iÊivÌÊ>`Ê
right arrow keys designate what to change: hour, minute,
ÊÀÊ*°Ê ÊÌÊ->Ûi°ÊvÊÞÕÊÜÃ
ÊÌÊV
>}iÊÌ
iÊÌiÊ
vÀ>ÌÊvÀÊ>Ê£ÓÊÌÊÓ{ÊÊÓ{É£Ó®]Ê«i>ÃiÊÃiiÊ1ÃiÀÊ-iÌÌ}Ã]Ê
Time Format.
User Settings
iÊÊ-iÌÊÊ ÊÊ1ÃiÀÊ-iÌÌ}ÃÊÊ
.
Pressing ÊÊ>ÞÊÃiÌÌ}ÊÜÌ
ÊÌ
iÊ1ÃiÀÊ-iÌÌ}ÃÊ
menu toggles the choices:
1) Temp Format, F to C.
Ê Ó®Ê/iÊÀ>Ì]Ê£Ó,ÉÓ{,
Ê Î®Ê«
Ê``ÀiÃÃ\ÊäÊâiÀ®ÊÊÇ°Ê Ìi\ÊvÊÌ
iʫ
setting is inadvertently changed, the Dolphin will
Ê Ê ÃÌ«ÊÜÀ}°Ê-iiÊ«
Ê>Õ>ÊvÀÊ>``ÀiÃÃ}
one or two Dolphins.)
Ê {®Ê/i«ÊV]Ê"É"vv°Ê
Ê x®Ê*>iÊV]Ê"É"vv°Ê7
iÊÌ
iÊ««Õ«Ê`>}ÊLÝ
Ê Ê >««i>ÀÃ]ʺ7
iÊ««Õ«ÊÃÊ`ë>Þi`°°°»]ÊiÌiÀÊÌ
i
following button sequence: Left, Right, .
Ê
Ê
Ê
Ê
Ê
Ê
Ê Ê`>}ÊLÝÊÜÊ>««i>ÀÊÃÌ>Ì}ÊÌ
>ÌÊÌ
iÊ«>iÊÃ
Ê Vi`°ÊÊv>Ã
}ʺ*>iÊVi`°°»ÊÜÊ>««i>ÀÊ
the Home screen.
To unlock the panel, press . Then while the
Ê `>}ÊLÝʺ*>iÊVi`°°»Ê>««i>ÀÃ]ÊiÌiÀÊÌ
i
same button sequence: Left, Right, .
È®Ê-Õ««ÀiÃÃÊ,i`iÀÃ]Ê"É"vv°Ê
Ê 7
iÊ-Õ««ÀiÃÃÊ,i`iÀÃÊÃʺ"»]Ê,i`iÀÃÊ>Ài
Ê iÛiÀÊ`ë>Þi`ÊÊÌ
iÊ«>i°Ê7
iʺ"vv»]Ê
Reminders are displayed on the panel periodically.
Panel Settings
iÊÊ-iÌÊÊ ÊÊ*>iÊ-iÌÌ}ÃÊÊ
.
UÊÊ
ÌÀ>ÃÌ
Ê>}>Êʺ
ÌÀ>ÃÌ»ÊÌÊ>`ÕÃÌÊÌ
iʺ
Ê
ÌÀ>ÃÌ»Ê
to finish and exit.
using the arrow keys ( É ).
ÀÀÜÊivÌÊ ®ÊÌÊiÝÌÊ>`ÊÌÊÀiÌÕÀÊÌʺ-«>Ê-iÌÌ}û°
UÊÊ>V}
Ì
Ê>}>Êʺ>V}
Ì»ÊÌÊ>`ÕÃÌÊÌ
iʺ>V}
ÌÊ
/iÕÌ»ÊÕÃ}ÊÌ
iÊÕ«É`ÜÊ>ÀÀÜÊiÞðÊ7
iÊ
vÃ
i`]ÊÀÀÜÊivÌÊ ) to exit and to return to
º-«>Ê-iÌÌ}û°
UÊÊ*>iÊ/iÕÌ
Ê>}>Êʺ*>iÊ/iÕÌ»ÊÌÊ>`ÕÃÌÊÌ
iÊi}Ì
ÊvÊ
ÌiÊLivÀiÊÌ
iÊ«>iÊÌiÃÊÕÌÊLÞÊÕÃ}ÊÌ
iÊÕ«É`ÜÊ
>ÀÀÜÊiÞðÊ7
iÊvÃ
i`]ÊÀÀÜÊivÌÊ ) to exit and
ÌÊÀiÌÕÀÊÌʺ-«>Ê-iÌÌ}û°
The Panel Timeout does not apply when the panel is
on the charger.
UÊÊ7
iÊÊ
>À}iÀ
Ê>}>Êʺ7
iÊÊ
>À}iÀ»ÊÌÊ>`ÕÃÌÊÜ
iÌ
iÀÊ
the backlight will stay lit while being charged or will
/iÕÌ°Ê1ÃiÊÌ
iÊÕ«É`ÜÊ>ÀÀÜÊiÞðÊ7
iÊvÃ
i`]Ê
ÀÀÜÊivÌÊ ®ÊÌÊiÝÌÊ>`ÊÌÊÀiÌÕÀÊÌʺ-«>Ê-iÌÌ}û°
UÊÊiÞÊii«
Ê>}>ÊʺiÞÊii«»ÊÌÊ>`ÕÃÌÊÜ
iÌ
iÀÊÌ
iÊiÞÊ
ÜÊLii«ÊÀÊÌÊÜ
iÊ«ÀiÃÃi`°Ê7
iÊvÃ
i`]ÊÀÀÜÊ
Left ( ®ÊÌÊiÝÌÊ>`ÊÌÊÀiÌÕÀÊÌʺ-«>Ê-iÌÌ}û°
Diagnostics: Fault Log, GFCI Test & More
iÊÊ-iÌÊÊ > Diagnostics > .
ʺ>}ÃÌVÊv»]ÊÕÃiÊÌ
iÊ`ÀiVÌÊiÞÃÊÌÊÃVÀ]ÊÌ
iÊ
press
to view your settings.
to exit.
The available menus are (depending on your system):
1) 6iÀÃÃÉ6iÀÃÊvÀ>Ì°
Ê Ê -ÞÃÌiÊ>`Ê*>iÊÛiÀÃÊvÀ>ÌÊÃÊvÕ`
here. If you call technical support, you may be
required to provide this information.
Ê Ó®Ê-iÃÀÊ/i«iÀ>ÌÕÀiÃÊ-iÃÀÃÊÊEÊ®Ê
to display Fault Log.
3) Fault Log. Press
4) GFCI Test
Ê x®Ê-ÜÌV
iÃ>Ê°Ê °Ê"«ÌÊ££Ó]Ê"É"vv
Ê È®Ê-ÜÌV
iÃ>Ê°Ê °Ê"«ÌÊ£È]Ê"É"vv
(depending on system, you may also have B7-B12)
Ê Ç®Ê
v}ÕÀ>ÌÊ-}>ÌÕÀi
Ê n®Êi>ÌiÀÊ7>ÌÌ>}i
Ê ÀÀÜÊivÌÊ ®ÊÌÊÀiÌÕÀÊÌʺ-«>Ê-iÌÌ}û°
Link Panel
iÊÊ-iÌÊÊ
> Link Panel >
.
This feature is used to link your wireless panel to the
system. Please refer to page 3, “Network Connections”.
Network
iÊÊ-iÌÊÊ
> Network >
.
£®ÊÜÃÊ>``ÌÊvÊ>Ì
iÀÊÜÀiiÃÃÊ«>iÊÌÊÃÞÃÌi]Ê
Ó®Ê1ÃÊ>Ê`iÛViÃÊÌ
>ÌÊ>ÀiÊ>Ài>`ÞÊÊÌ
iÊÃÞÃÌi]Ê
3) Displays the unique panel ID given to added panels.
Please refer to page 3, “Network Connections”.
7
Additional Features Settings and Miscellaneous
Freeze Protection
If the temperature sensors within the heater detect a low
enough temperature, then the pump(s) and the blower
automatically activate to provide freeze protection.
The pump(s) and blower will run either continuously or
periodically depending on conditions.
In colder climates, an optional additional freeze sensor
may be added to protect against freeze conditions that
>ÞÊÌÊLiÊÃiÃi`ÊLÞÊÌ
iÊÃÌ>`>À`ÊÃiÃÀðÊÕÝ>ÀÞÊ
freeze sensor protection acts similarly except with the
Ìi«iÀ>ÌÕÀiÊÌ
ÀiÃ
`ÃÊ`iÌiÀi`ÊLÞÊÌ
iÊÃÜÌV
°Ê-iiÊ
your dealer for details.
Clean-up Cycle
ÞÊÌiÊÞÕÊÌÕÀÊ>Ê«Õ«ÊÀÊLÜiÀÊ]ÊÌ
>ÌÊÜÊLi}Ê
a clean-up cycle for 30 minutes, unless shut off sooner.
The pump and the ozone generator will run for one to four
hours, depending on the system.
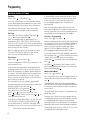
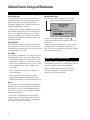
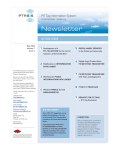
Reminder Messages
Reminders are displayed above the time as shown.
Ê Ê
-iiÊiÝÌÊ«>}iÊvÀÊ,i`iÀÊiÃÃ>}ið®
102°F
*Check pH
03:05 PM
Standard Mode
Music
To dismiss a reminder, highlight it and press .
The dismissed reminder will no longer be seen on the
Home screen.
If additional reminders appear on the screen, follow the
same procedure for each reminder to be dismissed.
Note: You can only manually dismiss reminders and faults
with an asterisk before them.
Circ Pump
If your system is equipped with a circ pump, it may have
been configured to work in one of three different ways:
1) The circ pump operates continuously (24 hours) with
the exception of turning off for 30 minutes at a time
Ü
iÊÌ
iÊÜ>ÌiÀÊÌi«iÀ>ÌÕÀiÊÀi>V
iÃÊÎcÊ£°xc
®Ê>LÛiÊ
the set temperature (most likely to happen in very
hot climates).
2) The circ pump stays on continuously, regardless of
water temperature.
3) The circ pump will come on when the system is
checking temperature (polling), during filter cycles,
during freeze conditions, or when another pump is on.
Ozone
On most systems, the ozone generator (if installed) runs
during filter cycles (except when pump 1 is operating at
high speed on a non-circ system) and during clean-up
cycles. On some systems, the ozone generator operates
whenever the pump runs.
If your system is configured with the optional ozone
suppress feature, the ozone generator will turn off for
1 hour any time you change the state of any equipment
(Jets 1, Jets 2, Blower, etc.) on the spa.
8
MENU PANEL STEREO CONTROL
vÊ>ÊiÃiÊ-ÌiÀi® is installed on your spa, the MLM990H
menu panel can control the basic stereo functions. Refer to
ÌÌ«\ÉÉÃiÀÛVi°L>L>ÃÌÀÕiÌðVÉ>««ÌiÃÉ
1`iÀÊÌ
iʺ>L>Ê««V>ÌÊ ÌiûÊÃÌ]ÊV
ÃiÊ
ÌiÀÌ>iÌÊ*À`ÕVÌÃÊÊiÃiÊ-ÌiÀiÊ*À`ÕVÌÃÊÊ
iÕÊ*>iÊ-ÌiÀiÊ"«iÀ>ÌÊÕ`i°Ê
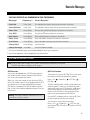
Reminder Messages
USER CAN SUPPRESS ALL REMINDERS IN USER PREFERENCES.
Message*
Frequency**
Action Required
Check pH
Every 7 days
Test and adjust pH chemical levels per manufacturer’s instructions.
Check Sanitizer
Every 7 days
Test and adjust sanitizer chemical levels per manufacturer’s instructions.
Clean Filter
Every 30 days
Remove, clean, and reinstall filter per manufacturer’s instructions.
Test GFCI
ÛiÀÞÊÎäÊ`>ÞÃÊ Ê /iÃÌÊEÊÀiÃiÌÊ
Ê«iÀÊ>Õv>VÌÕÀiÀ½ÃÊÃÌÀÕVÌð
Drain Water
Every 90 days
Clean Cover
ÛiÀÞÊ£näÊ`>ÞÃÊ Ê i>Ê>`ÊV`ÌÊVÛiÀÊ«iÀÊ>Õv>VÌÕÀiÀ½ÃÊÃÌÀÕVÌð
Treat Wood
ÛiÀÞÊ£näÊ`>ÞÃÊ Ê i>Ê>`ÊV`ÌÊÜ`Ê«iÀÊ>Õv>VÌÕÀiÀ½ÃÊÃÌÀÕVÌð
Change Filter
ÛiÀÞÊÎÈxÊ`>ÞÃÊ Ê ÃÌ>ÊiÜÊvÌiÀ°
Change Cartridge
ÃÊii`i`ÊÊ
Drain and refill spa per manufacturer’s instructions.
Ê ÃÌ>ÊiÜÊiÀ>ÊV>ÀÌÀ`}i°
ÊÊIÊÊvÊÌ
iÃiÊ*iÀ`VÊiÃÃ>}iÃÊV>ÊLiÊ`Ã>Li`Ê`Û`Õ>ÞÊLÞÊÌ
iÊë>Ê>Õv>VÌÕÀiÀ°
IIÊÞÊvÊÌ
iÃiÊvÀiµÕiViÃÊ>ÞÊLiÊV
>}i`ÊLÞÊÌ
iÊë>Ê>Õv>VÌÕÀiÀ°
GFCI PROTECTION AND TESTING
Note:Ê/
iÊ
ÊÃiVÌÊ`iÃÊÌÊ>««ÞÊÊÊÃÞÃÌiÃÊÕÃi`ÊÕÌÃ`iÊÌ
iÊ1Ìi`Ê-Ì>ÌiÃÊ>`Ê
>>`>°Ê
This GFCI section does not apply to the GL systems.
GFCI Protection
Your spa may be equipped with a GFCI Protection feature. If
your spa does have this feature enabled, the GFCI Trip Test
must occur to allow proper spa function.
7Ì
Ê£ÊÌÊÇÊ`>ÞÃÊ>vÌiÀÊÃÌ>ÀÌÕ«]ÊÌ
iÊë>ÊÜÊÌÀ«ÊÌ
iÊ
ÊÌÊ
test it. (The number of days is factory programmed.) The GFCI
ÕÃÌÊLiÊÀiÃiÌÊViÊÌÊ
>ÃÊLiiÊÌÀ««i`°ÊvÌiÀÊ«>ÃÃ}ÊÌ
iÊ
GFCI Trip Test, subsequent GFCI trips will indicate a ground
fault or other unsafe condition requiring the power to the spa
to be shut off.
Warning: The Owner should test and reset the GFCI on a
regular basis to verify its function.
GFCI Test Procedure
The installer can cause the GFCI Trip Test to occur sooner
by initiating it with the following button sequence.
iÊÊ-iÌÊ > Diagnostics >
GFCI Trip > .
> GFCI Test >
>
The GFCI should trip within several seconds and the spa
should shut down. If it does not, shut down the power
and manually verify that a GFCI breaker is installed and
Ì
>ÌÊÌ
iÊVÀVÕÌÊ>`Êë>Ê>ÀiÊÜÀi`ÊVÀÀiVÌÞ°Ê6iÀvÞÊÌ
iÊ
function of the GFCI with its own test button. Restore
power to the spa and repeat the GFCI Trip Test.
Once the GFCI is tripped by the test, reset the GFCI and
Ì
iÊ-«>ÊÜÊ«iÀ>ÌiÊÀ>ÞÊvÀÊÌ
>ÌÊ«Ì°Ê
You can verify a successful test by pressing:
iÊÊ-iÌÊÊ > Diagnostics > > GFCI Test, and
ÛiÀvÞ}ÊÌ
>ÌÊÌÊÃ>ÞÃʺ*>ÃÃi`»ÊÊÌ
iÊÌ«ÊiÊvÊÌ
iÊ
Ê
test screen.
9
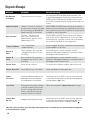
Diagnostic Messages
MESSAGE
MEANING
ACTION REQUIRED
No Message
on Display
Power has been cut off to the spa.
The control panel will be disabled until power returns. Time
of day will be preserved for 30 days with a battery back-up on
näääÊÃÞÃÌiðʣäääÊ>`ÊÃiÊÓäääÊÃÞÃÌiÃÊÀiÃiÌÊÌ
iÊ
ÌiÊvÊ`>ÞÊÊi>V
Ê«ÜiÀÕ«°Ê-«>ÊÃiÌÌ}ÃÊ>ÀiÊ«ÀiÃiÀÛi`ÊÊ>Ê
systems.
Heater Overheat
º"ÛiÀ
i>Ì»ÊÊ/
iÊë>Ê
>ÃÊÃ
ÕÌÊ`Ü.1
On some systems, an alarm may sound.
"iÊvÊÌ
iÊÃiÃÀÃÊ
>ÃÊ`iÌiVÌi`Ê££ncÊ
>««ÀÝ>ÌiÞÊ{Ç°nc
®Ê>ÌÊÌ
iÊ
i>ÌiÀ°
"Ê "/Ê /,Ê/Ê7/,°Ê,iÛiÊÌ
iÊë>ÊVÛiÀÊ>`Ê>ÜÊ
water to cool. Once the heater has cooled, reset by using a Fast
Key. If spa does not reset, shut off the power to the spa and call
your dealer or service organization.
Spa Overheat
º"ÛiÀ
i>Ì»ÊÊ/
iÊë>Ê
>ÃÊÃ
ÕÌÊ
down.1 One of the sensors has
`iÌiVÌi`ÊÌ
>ÌÊÌ
iÊë>ÊÜ>ÌiÀÊÃÊ££äcÊ
>««ÀÝ>ÌiÞÊ{ΰÎc
®°
"Ê "/Ê /,Ê/Ê7/,°Ê,iÛiÊÌ
iÊë>ÊVÛiÀÊ>`Ê>ÜÊ
Ü>ÌiÀÊÌÊV°ÊÌÊ£äÇcÊ>««ÀÝ>ÌiÞÊ{£°Çc
®]ÊÌ
iÊë>ÊÃ
Õ`Ê
automatically reset. If spa does not reset, shut off the power to
the spa and call your dealer or service organization.
Freeze Condition
ºVi»ÊÊ*ÌiÌ>ÊvÀiiâiÊ
condition detected.
No action required. The pumps and the blower will automatically
activate regardless of spa status.
Sensor A
Fault
-«>ÊÃÊÃ
ÕÌÊ`Ü.1 The sensor that
ÃÊ«Õ}}i`ÊÌÊÌ
iÊ-iÃÀʺ»Ê>VÊÃÊ
not working.
If the problem persists, contact your dealer or service
organization. (May appear temporarily in an overheat situation
and disappear when the heater cools.)
Sensor B
Fault
-«>ÊÃÊÃ
ÕÌÊ`Ü.1 The sensor that
ÃÊ«Õ}}i`ÊÌÊÌ
iÊ-iÃÀʺ»Ê>VÊÃÊ
not working.
If the problem persists, contact your dealer or service
organization. (May appear temporarily in an overheat situation
and disappear when the heater cools.)
Sensor Sync
-iÃÀÃÊ>ÀiÊÕÌÊvÊL>>Vi°
This may just be a temporary condition, and may clear itself.
Sensor Sync Fail
-iÃÀÊv>ÕÀi°Ê/
iÊë>ÊÃÊÃ
ÕÌÊ`Ü°1
Contact your dealer or service organization.
Heater
Flow Low
ÊÃÕLÃÌ>Ì>Ê`vviÀiViÊLiÌÜiiÊÌ
iÊ
temperature sensors was detected.
This could indicate a flow problem.
Check water level in spa. Refill if necessary. If the water level
is okay, make sure the pumps have been primed. Highlight the
to reset.
message and press
Low Flow
Persistent low flow problems. (Displays
ÊÌ
iÊvvÌ
ÊVVÕÀÀiViÊvÊÌ
iʺHeater
Flow Low»ÊiÃÃ>}iÊÜÌ
ÊÓ{Ê
ÕÀð®Ê
Heater is shut down, but other spa
functions continue to run normally.
ÜÊ>VÌÊÀiµÕÀi`ÊvÀʺHeater Flow Low»ÊiÃÃ>}i°
Heater May
Be Dry
Inadequate water detected in heater.
Check water level in spa. Refill if necessary. If the water level
ÃÊ>Þ]Ê>iÊÃÕÀiÊÌ
iÊ«Õ«ÃÊ
>ÛiÊLiiÊ«Ài`°Ê7ÊÀiÃiÌÊ
automatically after 15 minutes, or highlight and press .
1 On some systems even when spa is shut down, some equipment may occasionally turn on to continue monitoring temperature
or if freeze protection is needed.
10
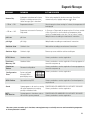
Diagnostic Messages
MESSAGE
MEANING
ACTION REQUIRED
Heater Dry
Inadequate water detected in heater.
(Displays on third occurrence of the
>LÛiÊiÃÃ>}i°®Ê-«>ÊÃÊÃ
ÕÌÊ`Ü°1
ÜÊ>VÌÊÀiµÕÀi`ÊvÀÊÌ
iÊ>LÛiÊiÃÃ>}i°Ê-«>ÊÜÊÌÊ
to reset.
automatically reset; highlight and press
---°F or ---°C
Temperature unknown.
vÌiÀÊÌ
iÊ«Õ«Ê
>ÃÊLiiÊÀÕ}ÊvÀÊ£ÊÕÌi]ÊÌ
iÊÌi«iÀ>ÌÕÀiÊÜÊ
be displayed.
---°F or ---°C
Temperature not current in Economy or
-ii«Ê`i°
ÊVÞÊÀÊ-ii«Ê`i]ÊÌ
iÊ«Õ«Ê>ÞÊLiÊvvÊvÀÊ
ÕÀÃÊÕÌÃ`iÊ
a filter. If you wish to see the current spa temperature, either
ÃÜÌV
ÊÌÊ-Ì>`>À`Ê`iÊÀÊÌÕÀÊiÌÃÊ£ÊÊvÀÊ>ÌÊi>ÃÌÊ£ÊÕÌi°
pH Low
pH is low.
``Ê«ÊVÀi>ÃiÀÊ>VVÀ`}ÊÌÊ>Õv>VÌÕÀiÀ½ÃÊÃÌÀÕVÌð
pH High
pH is high.
``Ê«ÊÀi`ÕViÀÊ>VVÀ`}ÊÌÊ>Õv>VÌÕÀiÀ½ÃÊÃÌÀÕVÌð
Sanitizer Low
->ÌâiÀÊÃÊÜ°
``ÊÃ>ÌâiÀÊ>VVÀ`}ÊÌÊ>Õv>VÌÕÀiÀ½ÃÊÃÌÀÕVÌð
Sanitizer High
->ÌâiÀÊÃÊ
}
°
Remove spa cover and allow sanitizer to dissipate.
RTC Failure
Hardware failure.
Contact your dealer or service organization.
Persistent
Memory Fail
Hardware failure.
Contact your dealer or service organization if message appears on
more than one power up.
Checksum
Failure
Firmware install problem.
Contact your dealer or service organization if message appears on
more than one power up.
Configuration
Error
-ÞÃÌiÊVv}ÕÀi`Ê
incorrectly. Menu
panel displays errors:
Configuration Error
P 2.2
PS.1
---
P 3.2
P6.1
---
P 4.1
bL.1
---
Contact your dealer or service organization
Check Config. Settings
GFCI Failure
-«>ÊVÕ`ÊÌÊÌÀ«Ê
°
Stuck
Ê«Õ«Ê>««i>ÀÃÊÌÊLiÊÃÌÕVÊ]ÊV>ÕÃ}Ê *"7,Ê"7 Ê-*Ê/9°Ê"Ê "/Ê /,Ê/Ê7/,°Ê
the water temperature to creep up,
Contact your dealer or service organization
possibly to hazardous levels.
HOT Call Service
Ê«Õ«Ê>««i>ÀÃÊÌÊ
>ÛiÊLiiÊÃÌÕVÊÊ
the last time spa was powered.
Contact your dealer or service organization. Continued operation
may be unsafe.
*"7,Ê"7 Ê-*Ê/9°Ê"Ê "/Ê /,Ê/Ê7/,°Ê
Contact your dealer or service organization.
1 On some systems even when spa is shut down, some equipment may occasionally turn on to continue monitoring temperature
or if freeze protection is needed.
11
balboa instruments, inc.
£ÎnÓÊLiÊ>ÛiÕi
ÌÕÃÌ]ÊV>ÊÊÓÇnä
ÌÊÇ£{În{äÎn{ÊÊÊvÊÇ£{În{äÎÎn
www.balboawatergroup.com
12
pn: 40725-99_E October 5, 2007