1
User Manual
CNCat 4.1
http://www.cn-software.com/cncat/
User Manual version 1.0.4 (May 19, 2008)
© 2002-2008 "CN-Software" Ltd.
http://www.cn-software.com/
Table of Contents
1 Program Overview.....................................................................................................................4
2 Installation..................................................................................................................................5
3 Upgrading Previous Versions...................................................................................................9
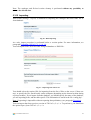
3.1 Upgrading CNCat 4.0.........................................................................................................9
3.1.1 Installing CNCat 4.1 over 4.0.............................................................................................9
3.1.2 Installing CNCat 4.1 into the Separate Database................................................................9
3.1.3 Updating Design Themes.................................................................................................10
3.2 Upgrading CNCat 3.1, 2.1, 2.0, 1.4..................................................................................11
3.2.1 Importing Data from Old Database Directly.....................................................................11
3.2.2 Importing Data from XML...............................................................................................12
3.2.3 Importing Design..............................................................................................................13
4 Catalogue User Interface.........................................................................................................14
4.1 Main User Interface Elements..........................................................................................14
4.2 Adding Link.....................................................................................................................16
4.2.1 Add Wizard......................................................................................................................16
4.2.2 One-step Add Link Form..................................................................................................18
4.3 Adding Article..................................................................................................................19
4.4 Search...............................................................................................................................20
4.5 Broken Link Warning.......................................................................................................21
5 Administrator Interface..........................................................................................................22
5.1 Links and Articles............................................................................................................22
5.1.1 Working with Links and Articles......................................................................................22
5.1.2 New Links/Articles...........................................................................................................26
5.1.3 Submitted Links/Articles..................................................................................................26
5.1.4 Deleted Links/Articles......................................................................................................26
5.1.5 Drafts................................................................................................................................26
5.1.6 Warnings..........................................................................................................................27
5.1.7 Search...............................................................................................................................27
5.1.8 Checking Links.................................................................................................................28
5.1.9 Duplicated Links..............................................................................................................30
5.1.10 Adding Link...................................................................................................................30
5.1.11 Adding Article................................................................................................................33
5.2 Categories.........................................................................................................................33
5.2.1 Categories Management...................................................................................................33
5.2.2 Filters................................................................................................................................36
5.3 Settings.............................................................................................................................37
5.3.1 Catalogue..........................................................................................................................37
5.3.2 Links.................................................................................................................................39
User Manual CNCat 4.1
2
5.3.3 Articles.............................................................................................................................40
5.3.4 Checking Links.................................................................................................................41
5.3.5 Notifications.....................................................................................................................42
5.3.6 Uncontrolled Jumps Protection.........................................................................................42
5.3.7 Backward Link.................................................................................................................43
5.3.8 ‘Black’ List.......................................................................................................................45
5.3.9 Moderators.......................................................................................................................45
5.3.10 Counters.........................................................................................................................47
5.3.11 Service Options..............................................................................................................47
5.3.12 Importing........................................................................................................................48
5.3.13 Exporting........................................................................................................................49
5.3.14 RSS-feed.........................................................................................................................50
User Manual CNCat 4.1
3
1Program Overview
CNCat application is intended to create a catalogue of Internet resources and articles. The
program is easy to install, to set up, and to maintain. Its functionality includes:
•
Adding, editing, and deleting links and articles;
•
Checking links;
•
Filtering links (“through categories”);
•
Creating “black”/“white” lists of links;
•
Creating and editing categories of unlimited nesting level;
•
Creating cross-categories;
•
Exporting data into RSS;
•
Searching through the catalogue;
•
Automatic e-mail notifications;
•
Administering module with moderators involved;
•
A set of templates for interface configuration;
•
Importing links and formatting themes from the previous CNCat versions.
To start make CNCat function, you should have PHP and MySql. The application supports
multi-language interface (the distribution kit includes: Russian, Ukraine, English, and Czech
languages).
Note: This manual describes the principles of working with the catalogue within the bounds of
the program interface. The ways to configure templates, additional fields, database and etc. are
given in separate documents, please see Useful Articles (HOWTO).
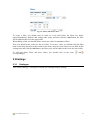
2Installation
To install CNCat 4.1, do the following:
1. Download CNCat from the official website: http://www.cn-software.com/cncat.
2. Extract the files from the archive and then place them into any directory of your site (you
can place the files into the root directory).
3. Run the installer. To do this, specify the path to folder /install/ in the Browser address
field. For example, http://www.server.com/cncat/install/. As a result, the installation
wizard will appear in the screen.
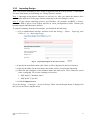
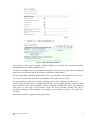
At the first step, select the installation language:
Fig. 1- Selecting Interface Language
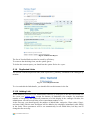
At the second step, you should accept the License Agreement to continue installation:
Fig. 2 – License Agreement
Then, the wizard will check your server configuration for conformance with the system
requirements:
User Manual CNCat 4.1
5
Fig. 3 – Check Results
Next, you will be prompted to choose the installation type: custom installation (Installation) or
v4.0 update (CNCat4.0 Upgrade). Select Installation.
Fig. 4 – Selecting Installation Type
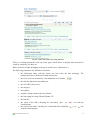
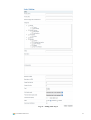
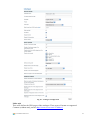
Then, the wizard will display the form to set up database and catalogue parameters (some
parameters are set up automatically):
Fig. 5 – Setting up Parameters
Specify the following parameters on this form:
•
MySql: server, login name, password – data for establishing connection with MySql
server. Enter data you have or data you’ve got from the hosting provider or databases
server administrator.
•
Database name – database name. You can choose any name here.
•
Prefix for CNCat tables – a prefix for CNCat database tables names (by default,
‘cncat41_’).
•
Interface settings: interface language, theme – program interface language and
graphical design theme selection.
•
Administration: login name, password – data necessary for catalogue administering.
Click the Next button and the wizard will create all required tables in the database. In case the
database does not exist, the installer will try to create it.
Then, the installation wizard will display the 'config.php’ file content. You should create this file
manually and place it into the catalogue the CNCat is installed in, and then insert the result code:
User Manual CNCat 4.1
6
Fig. 6 - Configuration File Code
Provided the previous step has been completed correctly, the wizard will display the message
about successful installation completion (otherwise, the code for ‘config.php’ file will be
displayed again). After that, delete /install/ folder from the server. To start working with the
catalogue, specify the path to the catalogue interface in the Browser address field (for example,
http://www.server.com/cncat/), or use the link on the installation form:
Fig. 7 – Installation Completion
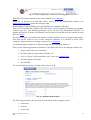
After installation has been completed, go to administrator interface (see paragraph Administrator
Interface) and enter License key there. Get free or commercial key at website: http://www.cnsoftware.com/ru/cncat/
Fig. 8 – Form for License Submission
User Manual CNCat 4.1
7
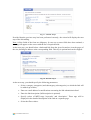
Enter the full license code into the text field and then click the Save button. After your license
has been accepted, you will be able to access all the other administrator page sections and to
manage your catalogue.
User Manual CNCat 4.1
8
3Upgrading Previous Versions
3.1Upgrading CNCat 4.0
Important! Before upgrading, save a backup copy of all data (Administering – Settings –
Export). In case the upgrade is incorrect, you will be able to restore all data using the
backup copy.
!
If the current CNCat version is 4.0, or 4.0.1, or 4.0.2, then there are two ways to move to CNCat
v4.1.
The first one (recommended) – installation over the old catalogue. You should copy new files
over the old ones and then run the installation in the CNCat 4.0 Upgrade mode. The database
will be automatically upgraded.
The second way is to install new version into the separate folder and database. After installation
is over, you should import data from the old database and copy configuration files from the
previous version.
Both upgrade methods are described in the following paragraphs.
Note: If you’ve modified the catalogue formatting, you should modify the theme to enable new
functions (see below).
3.1.1
Installing CNCat 4.1 over 4.0
Export data from the old version into the XML-file (Administering – Settings – Export).
Copy CNCat 4.1 files over CNCat 4.0 files. Run the installation (see paragraph Installation).
When selecting the installation type, choose CNCat 4.0 Upgrade.
The Wizard will display the connection parameters of the current catalogue:
Fig. 9 – Previous Version Upgrade
Click the Next button to update database. As a result, tables will be updated automatically.
Delete /install/ folder.
3.1.2
Installing CNCat 4.1 into the Separate Database
Install CNCat 4.1 into the separate folder and new database (see paragraph Installation). You can
use the same database, but the different tables prefix, for example ‘cncat41_’:
1. In the administrator interface, select the Settings – Import – Import from CNCat 4.x –
Import from XML and database.
User Manual CNCat 4.1
9
2. Specify database name and tables prefix of the previous version.
3. Click the Import.
Note: The importing process can take some time. When importing, information on the amount of
already imported data is displayed.
For more information on data importing, see paragraph Importing.
3.1.3
Updating Design Themes
If you use the modified formatting theme, you should change it to enable new functions of the
catalogue.
New themes have been significantly modified, that is why, if you are using one of the standard
themes with your modifications, we recommend to modify the newly updated theme in the same
way.
If the standard theme has been radically modified, then do the following:
1. Save a backup copy of your theme.
2. Copy new files from the ‘default’ theme into your theme:
•
editor.css
•
add_article.tpl
•
article.tpl
•
extended_article.tpl
•
/images/category-big.gif
•
/images/rss.gif
3. Copy file ‘add.tpl’ from the ‘default’ theme over the file of your theme.
4. To enable the link ‘Add Article’: in ‘common.tpl’ file of the ‘menu’ template, substitute
the string
{IF !$CNCAT[config][add_disable]}…
for:
{IF !$CNCAT[config][add_disable]}<a
href="{$CNCAT[abs]}cncat_add.php"><strong>{$CNCAT[lang]
[menu_add_link]}</strong></a> |{ENDIF}
{IF $CNCAT[config][add_article_enable]}<a
href="{$CNCAT[abs]}cncat_add_article.php"><strong>{$CNCAT[lang]
[menu_add_article]}</strong></a> |{ENDIF}
5. To enable section New Articles: in ‘index.tpl’ file of the ‘index’ template, after the string
{DISPLAY NEW_ITEMS}
add:
<br>{DISPLAY NEW_ARTICLES}
Also, we recommend to copy ‘newitem*’ templates code from the standard theme.
6. To enable the section for selecting the displayed elements of the catalogue
All/References/Articles:
•
Copy all ‘itemtype*’ templates from the file ‘common.tpl’ of the standard theme into
the new theme.
•
In ‘index.tpl’ file of the ‘index’ template right before the string
User Manual CNCat 4.1
10
{DISPLAY SORT}
add the following string
{DISPLAY ITEM_TYPES}<br>
7. To enable RSS: in the ‘category.tpl’ file of the ‘catpath_currentcat’ template, add as the
last string:
{IF $CNCAT[page][show_rss]}<a href="{$CNCAT[abs]}cncat_rss.php?c={$CNCAT[page]
[cid]}"><img src="{$THEMEURL}images/rss.gif" alt="RSS" style="vertical-align:
top; margin-right: -15px;" /></a>{ENDIF}
3.2Upgrading CNCat 3.1, 2.1, 2.0, 1.4
Important! Before upgrading, save a backup copy of all data into XML-files
(Administering – Settings – Export). In case the upgrade is incorrect, you will be able to
restore all data using the backup copy. For more information, see your CNCat User
Manual, paragraph ‘Export’.
!
To upgrade CNCat versions 3.x, 2.x, and 1.x, do the following:
1. Save a backup copy for versions 3.x and 2.x – export data into XML-files (see the
manual for your current CNCat version, paragraph Export).
2. Save the backup copy of all old catalogue files.
3. Install CNCat 4.1 into new folder and new database (or into the same database, but with
the different prefix for the tables. By default, the prefix was ‘cncat_’). For more
information, see paragraph Installation.
4. Import data directly from the old database or from XML-files.
5. You can also choose to import design from the old database.
6. If you have modified the files ‘_top.php’ and ‘_bottom.php’ in the old version, then copy
them into the new version.
7. Make sure the catalogue and its all functions work fine.
8. Once you remove all old files, place the catalogue files into the old folder.
In the following paragraphs, the way data and design can be imported is described.
3.2.1
Importing Data from Old Database Directly
To import data from the old database:
1. Go to administrator interface, then select the Settings – Import – Importing from CNCat
3.x, 2.x, 1.x – Importing from database.
2. Specify the database name and table prefix. Open ‘config.php’ file of your old catalogue
version to get these values:
•
$db["name"]="database name";
•
$db["prefix"]="prefix";
3. Click the Import button.
Note. The importing process can take some time. When importing, information on the amount of
already imported data is displayed.
User Manual CNCat 4.1
11
3.2.2
Importing Data from XML
To import data from XML files:
1. Go to administrator interface, then select the Settings – Import – Importing from CNCat
3.x, 2.x – Importing from XML.
2. Check the Clean the catalogue before importing field.
3. Browse for the XML files if they are of a small size (1 Mb at most):
Fig. 10 – Importing XML from Local Disk
If the files size is larger than 1 Mb, upload the files into the /cncat_export/ folder and then
refresh the import page. On the import form, check the Clean the catalogue before
importing option:
Fig. 11 – Importing XML file from Server
4. Click the Import button.
Note. The importing process can take some time. When importing, information on the amount of
already imported data is displayed.
User Manual CNCat 4.1
12
3.2.3
Importing Design
New CNCat stores formatting in files, which is different from the CNCat version 3.1 and earlier.
For more information on formatting, see ‘Design Themes’ manual.
Note 1. Importing design themes function is a trial one yet. After you import the themes, there
can be slight differences in the pages format comparing to the old catalogue version.
Note 2. If your current operating system is not Windows (for example, FreeBSD, or Linux),
make sure PHP is able to create folders and files in /cncat_config/themes/ folder. Consult your
hosting support staff about these abilities.
To import formatting from the old catalogue, you should do the following:
1.Go
to administrator interface, and then select the Settings – Import – Importing from
CNCat 3.x, 2.x – Importing Design.
Fig. 12 – Importing Design from Previous Versions
2.Specify
the new theme name (this is how it will be displayed in the list of themes).
3.Specify
the folder for the new theme (this folder will be created when importing).
4.Enter
the old catalogue version database name and table prefix. These values are stored
in the ‘config.php’ file of your catalogue old version:
•
$db["name"]="database name";
•
$db["prefix"]="prefix";
5.Click
the Import button.
Go to the Settings – Catalogue – General Settings. Make sure the design theme is displayed in
the list (see the Theme dropdown list).
User Manual CNCat 4.1
13
4Catalogue User Interface
4.1Main User Interface Elements
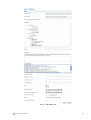
User interface consists of the following elements:
•
Menu (1).
•
The catalogue search (2).
•
Filters (3).
•
The list of the catalogue categories (4).
•
Links sorting (5).
•
The complete list of all the catalogue links (6).
•
Options allowing to select catalogue layout (all content, only links, only articles) (7).
•
The list of new links (8) - displays the latest submitted links.
•
The list of new articles (9) – displays the latest submitted articles.
Fig. 13 – Main Catalogue Page
•
The path to the currently selected category and category’s name (10):
User Manual CNCat 4.1
14
Fig. 14 – Main Catalogue Page – Path to Current Category
Note: The GUI design depends on the selected theme (see Catalogue).
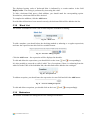
Menu bar (1) allows you to add link, article, and to go to the administrator interface (see
Administrator Interface) and to the catalogue map.
Search engine (2) allows finding the required link in the catalogue efficiently.
Filters (3) are intended for sorting out the links list by various parameters (language, geography,
resource type etc.). The filtering parameters can be set up in the administrator interface; its
number and variety of values are unlimited. Several values of each filter can be selected for each
link (see Filters).
The list of categories (4) includes the number of links contained in every category/subcategory.
Each link can be stored in one or more categories. Besides, it is possible to create crosscategories, which are links to existing categories (see Categories).
A standard sorting mechanism (5) allows sorting links by popularity, name etc.
There are the following parameters defined for each link in the list of all catalogue elements (6):
•
jumps from/to the site (in brackets);
•
the link rating in Google PR and Yandex CY;
•
level of “favour” links (marked by “star” icons) (see Adding Link);
•
brief description of the link;
•
the link URL.
To view detailed description of a link, click on the icon
:
Fig. 15 – Detailed Link Description
The following parameters are specified for each article in the catalogue list (6):
•
article title;
•
abstract;
•
source link.
User Manual CNCat 4.1
15
To display the content, click on the article title:
Fig. 16 – Article Contents
To inform the moderator about a link, which does not display its contents, click on the icon
(see Warnings).
4.2Adding Link
There are two algorithms of adding links:
•
By means of a wizard (recommended).
•
By means of one-step form (brief variant).
The advantage of the wizard is in checking of a backward link while adding. To generate a
backward link, you should know its identifier, which is generated at the first step of the wizard.
In one-step mode, the identifier generation stage is omitted, therefore, backward link checking is
possible only after adding the link into the catalogue.
Setting of addition mode and parameters is performed in the administrator module (see Links)
The catalogue administrator, as well as moderators, can add links via administrator interface (see
Adding Link).
4.2.1
Add Wizard
To add a link, click on the Add link section in the menu bar; the following dialog box will appear
on the screen (see Fig. 17).
Note. The given example describes a standard set of adding parameters. It may differ, depending
on the settings specified at the administrator interface.
At the first step, you should specify the site name and address; enter the characters displayed in
the image (protection from automatic adding) and click the Next button:
User Manual CNCat 4.1
16
Fig. 17 – Wizard: Step 1
Provided that the previous step has been performed correctly, the wizard will display the next
step of the link adding.
Note. All the fields of the form are obligatory. In case one or more fields have been omitted, a
warning will appear on the screen with the list of required fields.
At the next step, you should select a backward link from the given list and set it on the pages of
the site, defining its address at the corresponding field. This step is optional and can be skipped:
Fig. 18 - Wizard: Step 2
At the next step, you should specify the following parameters:
•
Select a category (categories) and subcategory (subcategories), to which the link will
be added (up to three).
•
Enter an e-mail address for notifications concerning the link submission/refusal.
•
Enter the link description (full description is optional).
•
Specify values of META-tags ‘keywords’ and ‘description’. These tags will be
displayed in the detailed description of the link on a separate page.
•
Select the filters values:
User Manual CNCat 4.1
17
Fig. 19 - Wizard: Step 3
To complete adding the link, click the Next.
Provided that all data have been entered correctly, the confirmation of successful link creation
will be displayed. Further, the link will be considered by the administrator and added to the
catalogue or declined.
4.2.2
One-step Add Link Form
One-step adding form comprises all steps of the wizard and contains the same fields:
User Manual CNCat 4.1
18
Fig. 20 – Add Link Form
4.3Adding Article
To add an article, click the Add article menu item on the main catalogue page. As a result the
Add article form will be displayed. Specify the article title, abstract (which will be displayed in
the list of categories for this article), and enter article text. Also, please select the category in the
categories tree and the filters, specify the source link and fill in other fields:
User Manual CNCat 4.1
19
Fig. 21 – Adding Article
After all the necessary fields are filled in, click the Add button.
If you have entered all data correctly, the message box with the information about successful
operation completion will be displayed for you. The article will be added to the catalogue for the
administrator to accept it or decline.
4.4Search
To perform a search through the catalogue, you should enter a certain link parameter in the entry
field and click the Search button:
User Manual CNCat 4.1
20
Fig. 22 – Search Form
Provided that the request has been defined correctly, the system will display the result of the
search:
Fig. 23 – Search Results
4.5Broken Link Warning
The catalogue users can warn the administrator and the moderators, that a certain link in the
catalogue does not display its contents. To single out these links, you should use the button
to
the right of the link name; the following warning will be displayed on the screen:
Fig. 24 – Confirmation Request
Click Yes to confirm that the link is broken: it will be placed to the Warnings section of the
administrator interface. Still, it will be displayed in the catalogue as well.
User Manual CNCat 4.1
21
5Administrator Interface
To enter the administrator interface, you should click on the Administering menu item and enter
the administrator’s login and password defined during the installation process. Then click the
Login button:
Fig. 25 – Administrator Authorization
In case an incorrect password has been entered, you will be returned to the entry form.
5.1Links and Articles
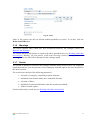
5.1.1
Working with Links and Articles
A unique interface is implemented for working with various types of links and articles at the
Links and Articles section (new, submitted, deleted etc.):
User Manual CNCat 4.1
22
Fig. 26 – Links and Articles Processing Interface
There is a sorting mechanism at the top of the page, which allows to display links and articles
sorted by categories, by dates etc.
Below is the list of links belonging to the given section (new, submitted etc.).
The following parameters are defined for each link:
•
the link/article name with the source site icon (after the link checking). The
background color is different for links and articles;
•
the level of favour (marked by a star multiplied to its number -
•
the date the link/article was added on;
•
the site URL (source site);
•
the category;
•
description;
•
number of jumps from/to the site (In/Out);
•
the link rating in Google PR and Yandex CY;
•
the link ID;
•
the result of the link’s checking for correctness (
checking date;
•
the result of the link’s checking for a backward link availability (
with the checking date.
User Manual CNCat 4.1
- yes,
);
- no) with the
- yes,
- no)
23
Under each catalogue element, there options allowing you to:
•
delete a link/article (see Deleted Links/Articles);
•
submit a new link/article (see Submitted Links/Articles);
•
move a submitted/deleted link/article to the New category (see New Links/Articles);
•
edit the link/article parameters;
•
define the administrator rating for link/article in the catalogue by selecting the
required level (0-10);
•
perform the link checking (see Checking Links);
•
assign the link to the checking queue (see Checking Links).
To process several catalogue elements at a time, you should mark them off and click the
corresponding buttons for group operations at the bottom of the page. To process all links
displayed on the current page, you should enable the option Mark all the links on the page,
located under the links list.
By default, the option All marked links is enabled, i.e. group operations will be applied to all
marked links. To apply the operation to all the catalogue elements, found in this section, you
should select the option All found links.
To edit the link/article parameters, you should use the Edit option. As a result, the editing form
will be displayed on the screen:
User Manual CNCat 4.1
24
Fig. 27 – Edit Link Form
User Manual CNCat 4.1
25
To edit a link, you should enter the required modifications into corresponding fields equal to
those of the addition form. Besides, you can set the following additional parameters of the
catalogue elements:
•
define displaying variant for a link and its detailed description;
•
assign ‘favourite’ level for an element by setting the required level. Favourite
elements are displayed at the top of the links list and are marked by the star icon with
its number. The number of stars corresponds to the indicated level (maximum – 10).
Sorting of favourite elements is performed in decreasing order;
•
define the element status (new/submitted).
To save changes, you should click the Save button. To restore initial data, click the Cancel
button.
5.1.2
New Links/Articles
This section contains catalogue elements, registered in the system but not submitted in the
catalogue. The section interface and options are equal to above-described (see Working with
Links and Articles). The links and articles of this section are not displayed in the catalogue.
5.1.3
Submitted Links/Articles
This section contains links and articles, submitted by the administrator and added to the
catalogue. The section interface and options are equal to above-described (see Working with
Links and Articles).
5.1.4
Deleted Links/Articles
This section contains links and articles, deleted from the catalogue or from the administrator
sections by the administrator. The section interface and options are the same as the ones
described above (see Working with Links and Articles), except for the option Delete from DB:
the link or/and article will be deleted from the catalogue database physically without any
possibility to restore it.
Links and articles located in this section can be restored by moving into the Submitted category
(thus, they will be displayed in the catalogue again) or to the New (without being available in the
catalogue) with the help of the corresponding buttons.
5.1.5
Drafts
This section contains links, which are being added at the moment (in case the wizard is used):
User Manual CNCat 4.1
26
Fig. 28 - Draft
Links of this section can only be deleted without possibility to restore. To do this, click the
Delete from DB button.
5.1.6
Warnings
The section contains links, which have been considered broken by the catalogue visitors (see
Broken Link Warning).
The section interface and options are equal to the above-described ones (see Working with Links
and Articles). Besides, you can remove a link from Warnings section by using Cancel the
warning button: the link will be displayed in the catalogue again.
5.1.7
Search
The section is intended to search for the catalogue elements using various criteria. By setting the
required parameters, you can generate a list of catalogue elements equal to the ones described in
the above sections.
The search form consists of the following parameters:
•
selection of a category, containing required elements;
•
definition of an element status (new, submitted, deleted);
•
selection of filters;
•
definition of initial and final dates (date the element was added);
•
field for textual request.
Search results can be sorted out (see Working with Links and Articles).
User Manual CNCat 4.1
27
Fig. 29 – Search Form
5.1.8
Checking Links
The section is intended for checking links, which have been marked by the administrator in other
sections by clicking the To the checking queue button (see Working with Links and Articles).
Note: In case of the articles check, all the operations are applied to the Source field.
To check a link or a group of links, you should select the following parameters at the top of the
page:
•
check the link efficiency;
•
check availability of a backward link;
•
obtain Google PR and Yandex CY ratings;
•
obtain the site icon (favicon);
•
define the number of intermediate results per page;
•
define time limit for displaying pages with intermediate results of checking (the page
will be reloaded automatically in the specified period);
•
submit the link automatically and display it in the catalogue.
User Manual CNCat 4.1
28
Fig. 30 – Links Checking Parameters
At the bottom of the page is a queue of links waiting to be checked. The list can be sorted by
standard parameters (name, popularity etc.).
To cancel checking of a link, you should use the option Cancel checking (this option is displayed
in the menu of a checked link at all sections, to which the link belongs).
To cancel checking of all links found in this section, you should use the option Clear the queue.
To view the results of the last check, you should use the option The last report.
To start checking, use the Check option: checking process will be displayed on the screen.
As the scripts execution time is usually limited at the server and links checking requires certain
time period, the page with intermediate results is updated automatically in case the parameter
Time limit for each page of intermediate results has been exceeded. Besides, the page is
refreshed according to the parameter The number of intermediate results on the page while
checking.
Final check results are displayed in the report form:
User Manual CNCat 4.1
29
Fig. 31 – Links Check Report
The list of checked links can also be sorted by efficiency.
To return to the checking form, use the option Queue.
To delete the current report, you should use the option Delete the report.
5.1.9
Duplicated Links
The section contains duplicated links (with equal URL), probably, submitted to the catalogue by
mistake:
Fig. 32 – List of Duplicated Links
To view and edit the links details, you should click on their names in the list.
5.1.10 Adding Link
A link addition procedure in the administrator interface is analogous to the above-described one
for a user (see Adding Link), except for absence of limitations (for example, for maximum
number of categories) and additional parameters of a link display in the catalogue. Besides, the
administrator can add several links at once (maximum number is 10).
At the first step, you should specify the number of added links, categories, filters value (if any),
and state (links with the state Submitted will be added to the catalogue immediately after filling
in the form). These parameters will be set automatically for all added links, but they can be
changed at the next step.
User Manual CNCat 4.1
30
Fig. 33 – Adding Link: Step 1
Further, you should define standard link parameters (name, address, description etc.), as well as
additional parameters:
•
define display variant for a link and its detailed description;
•
define ‘favourite’ level for a link by setting the required level. Favourite links are
displayed at the top of the links list and are marked by star icons. The number of stars
corresponds to the indicated level (maximum – 10). Sorting of favourite links is
performed in decreasing order (notwithstanding the order set by the user).
User Manual CNCat 4.1
31
Fig. 34 – Adding Link: Step 2
User Manual CNCat 4.1
32
To finish adding link, click the Add button.
Provided that all data have been entered correctly, the link will be added to the corresponding
section according to the specified state (New or Submitted).
5.1.11 Adding Article
The process of adding an article via Administrator interface is the same as of adding a link (see
Adding Link)
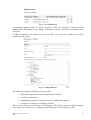
5.2Categories
5.2.1
Categories Management
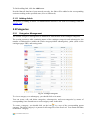
The section Categories Management is intended for modification of the catalogue categories.
The section presents a table containing names of the catalogue categories and subcategories, the
number of links/articles (within the whole category/within subcategories), paths (used on the
catalogue pages URL) and sorting order:
Fig. 35 - Catalogue Categories
To view a category or a subcategory, you should click on its name.
You can create, edit, and delete categories, subcategories, and cross-categories by means of
corresponding icons located next to each category name in the table.
To create a category, you should click on the icon
in a row of the corresponding parent
category. The Main category is a parent for all categories of the first level. You cannot add links
to the Main’ category.
User Manual CNCat 4.1
33
Fig. 36 – Creating Child Category
You should specify the following parameters in the form:
•
the category name (mandatory);
•
path to the category file (mandatory);
•
sorting order for display in the catalogue;
•
the catalogue description;
•
values of META-tags ‘keywords’ and ‘description’;
•
disable/enable adding entries to the category;
•
disable/enable adding entries to the child category;
•
an image for the category.
To complete the addition, click the Add button.
Provided that all data have been entered correctly, the category will be added to the list.
Note 1. The path to the category is used in ‘user-friendly’ addresses of the catalogue pages (see
Links style).
Note 2. The level of categories nesting is unlimited, provided that ‘Common’ links style is used.
Upon using other styles maximum nesting level is limited by maximum URL length (it may
vary, depending on a browser and a web-server; it is recommended not to exceed 1000 symbols).
To edit a category/subcategory, you should select its name in the table and click on the icon
in the corresponding row: editing form will be displayed on the screen:
User Manual CNCat 4.1
34
Fig. 37 – Editing Category
Editing algorithm is equal to adding, except for the following options:
•
to change a parent category, you should mark the corresponding option and select the
required category in the list;
•
to delete an image (if any), check the corresponding option;
•
to move and/or delete groups of the category elements (including child categories),
you should check the corresponding options in the required groups of fields.
A cross-category is a subject link to a real category. To add a cross-category, you should select
the category, to which a cross-category should be added, and click on the icon
in its row: As
a result the adding form will be displayed on the screen:
User Manual CNCat 4.1
35
Fig. 38 – Adding Cross-category
You should specify the following parameters in this form:
•
the cross-category name (mandatory);
•
sorting order;
•
a category, to which the cross-category will refer (mandatory);
•
description of the cross-category;
•
a picture for the cross-category.
To complete the adding, click the Add button.
Provided that all data have been entered correctly, the cross-category will be added to the list.
A cross-category is marked with the symbol @ in the catalogue.
To delete a category/subcategory, you should select it in the list and click on the icon
. You
can delete only an empty category/subcategory, which does not contain links. To delete a nonempty category, you should first delete all its elements or move them to other category.
5.2.2
Filters
The section is intended for creation of filters, which present a mechanism of additional subject
sorting of links and articles in the catalogue. The number of filters and their values is unlimited:
User Manual CNCat 4.1
36
Fig. 39 – Filters and Their Values
To create a filter, you should enter its name in a text field below the filters list, define
optional/mandatory attribute and sorting order value, and then click the Add button: the filter
will be added to the list in the upper table.
When adding a link, you should define at least one value for mandatory filters.
Next, you should create values for the new filter. To create a value, you should select the filter
name in the drop-down list at the bottom of the form, enter the value name in a text field, define
sorting order and click the Add button: the filter value will be added to the list in the lower table.
To edit and delete filters and their values, you should click on the icons
correspondingly.
and
5.3Settings
5.3.1
Catalogue
This section (Settings - Catalogue) contains the catalogue display settings:
User Manual CNCat 4.1
37
Fig. 40 – Catalogue Configuration
Links style
This value defines the URL pages of the catalogue. Three types of format are supported:
Common (without mod_rewrite) http://www.server.com/?c=48&s=0
User Manual CNCat 4.1
38
New (CNCat 4.x) http://www.server.com/external-services/site-analyzer/s2p0.html
Old (CNCat 2.x, 3.x) http://www.server.com/dir/pop/external-services/site-analyzer/
5.3.2
Links
This section (Settings - Links) contains settings of links processing:
Fig. 41 – Links Configuration
User Manual CNCat 4.1
39
Comments to certain parameters:
•
Links display parameters:
o Display favicon – the link icon display mode.
•
Links adding parameters:
o Use CAPTCHA (Completely Automated Public Turing Test to Tell Computers
and Humans Apart) – the option, enabling graphic test for robots definition. It is a
small image with characters in it, which should be entered to the corresponding
field in the form of link addition.
o Hidden parameter name – the name of the parameter used for robots
identification.
o Hidden parameter value – the value of the parameter used for robots
identification.
Once all necessary parameters have been set up, click the Save button to apply the changes.
5.3.3
Articles
To set up working with articles, go to the Settings – Articles page of the administrator interface:
User Manual CNCat 4.1
40
Fig. 42 – Articles Configuration
Some parameters of work with articles configuration are analogous to the ones of the links
settings (see paragraphs Links and Checking Links).
To save and apply the modifications, click the Save button.
5.3.4
Checking Links
To set up parameters for checking links, go to the Settings – Links Checking page:
User Manual CNCat 4.1
41
Fig. 43 – Checking Links
•
Links checking parameters (part of the parameters can be modified before links
checking in Checking section):
o Checking method – select method Sockets. If your server does not support
sockets, then it will automatically enable the second check method
file_get_contents;
o Check Google PR/Yandex CY – check the link rating in search systems Google
and Yandex CY.
o Obtain favicon – import the link icon from the site.
Click the Save button to apply and save your settings.
5.3.5
Notifications
To make your work with links and articles easier, you can set up e-mail notifications which are
sent to the users and administrator automatically upon a specific event in the system. Such
notifications are set up on the Settings – Notifications page:
Fig. 44 – Notifications
Click the Save button to save and apply your modifications.
5.3.6
Uncontrolled Jumps Protection
To obtain relevant information on the catalogue links and articles rating level, you can set up the
corresponding parameters for popularity estimation on the Settings – Uncontrolled Jumps
Protection page:
User Manual CNCat 4.1
42
Fig. 45 – Uncontrolled Jumps Protection Settings
The rating level is estimated according to unique IP’s. If a visitor jumps several times to/from the
site using one and the same IP within the defined timeout period, then only one jump will be
counted.
Click the Save button to save and apply your settings.
5.3.7
Backward Link
The section is intended to create backward links, which should be located on the site pages upon
a link addition. There can be several variants of backward links.
Fig. 46 – Backward Link
To create a backward link, you should use the option Add a new backward link: adding form will
be displayed on the screen:
User Manual CNCat 4.1
43
Fig. 47 – Adding Backward Link
The following parameters should be set in this form:
•
HTML-code, which should be located on the site page;
•
check of HTML-code availability on the page;
•
check of URL availability;
•
check of correspondence to regular expression;
•
sorting order;
•
display of a backward link upon a link addition.
The administrator can set one of the following variants for checking backward link availability:
•
availability of certain HTML-code;
•
availability of URL in the format <a href=...>...</a>;
•
compliance with regular expression.
The following macros can be used in HTML-code of a backward link, as well as in checking
settings:
•
%CATNAME% - the catalogue name;
•
%BACKURL% - automatically generated link to the catalogue (considering jumps
statistics);
•
%SITEID% - the link identifier in the database.
User Manual CNCat 4.1
44
The displayed sorting order of backward links is indicated by a certain number in the field
Display order. The sorting is performed by increasing this value.
To hide a backward link upon a link addition, you should mark the corresponding option.
Nevertheless, a backward link will be checked.
To complete the addition, click the Add button.
Provided that all data have been entered correctly, the backward link will be added to the list.
5.3.8
‘Black’ List
The section is intended to create a list of links templates forbidden for adding:
Fig. 48 – ‘Black’ List
To add a template, you should select the checking method (a substring or a regular expression)
and enter the expression into this field in a suitable format:
Fig. 49 – Form for Adding Template
Click the Add button – the expression will be displayed in the table.
To edit and delete the expressions, you should click on the icons
and
correspondingly.
It is also possible to create the so called “white” list of exceptions: if there is a substring from the
white list in the URL of the forbidden link, then this link can be added to the catalogue:
Fig. 50 – Exceptions List
To add an exception, you should enter the expression in a text field and click the Add button:
Fig. 51 – Form for Adding Exceptions
To edit and delete exceptions, you should click on the icons
5.3.9
and
correspondingly.
Moderators
The section is intended for management of the catalogue moderators.
User Manual CNCat 4.1
45
Fig. 52 – List of Moderators
A moderator manages links in certain categories, which are assigned to him/her by the
administrator. Depending on the settings, a moderator may be also allowed to manage these
categories.
To add a moderator, you should use the option Add a new moderator: adding form will be
displayed on the screen:
Fig. 53 – Adding Moderator
The following parameters should be set in this form:
•
login name and password for the administrator interface;
•
e-mail for notifications;
•
prohibition/permission to manage categories (adding and editing);
•
selection of a category for managing its links.
There are two flags next to the name of each category. The first one grants the rights to manage
this category; the second one – to manage all child categories of this category as well.
User Manual CNCat 4.1
46
To complete adding, click the Add button.
Provided that all data have been entered correctly, the moderator will be added to the list.
To edit and delete moderators, you should click on the icons
and
correspondingly.
5.3.10 Counters
The section is intended to reset the catalogue statistics counters. To do this, you should mark the
required counters and click the Reset button:
Fig. 54 – Resetting Catalogue Counters
5.3.11 Service Options
The section contains options for the catalogue service operations:
•
database optimization;
•
removal of the catalogue contents;
•
synchronization of the number of links and names of child categories;
•
cleanup of the Deleted section:
Fig. 55 – Service Options
User Manual CNCat 4.1
47
Note. The catalogue and Deleted section cleanup is performed without any possibility to
restore the deleted data.
5.3.12 Importing
This section (Settings - Import) is intended for importing the catalogue data from XML file or
from database:
Fig. 56 – Data Importing
As a rule, import procedure is performed before a version update. For more information, see
paragraph Upgrading CNCat 3.1, 2.1, 2.0, 1.4.
You can import from CNCat 4х either using old database or XML file:
Fig. 57 – Importing from CNCat 4.x
You should select the required file for importing from the list of files on the server (if there are
any), or specify the file, stored locally on the computer (depending on the chosen location during
export procedure). If you import from the database, you should specify the name of the database,
you are importing from, and the tables prefix. This information is stored in the file ‘config.php’.
Note 1. Importing is impossible without exporting data preliminary (see paragraph Exporting).
You can import data from previous version of CNCat 3.x, 2.x, 1.х. To perform it, you should use
the option Import from CNCat 3.x, 2.x, 1.х:
User Manual CNCat 4.1
48
Fig. 58 – Importing from CNCat 3.x, 2.x, 1.х
You should specify the import parameters in this form:
•
preliminary deletion of the catalogue contents;
•
rewrite or omit the link with the same ID;
•
files with data on categories and links.
To start importing, click the Import button. For more information on importing from XML file,
see paragraph Importing Data from XML.
To import data from database of the previous versions, select Importing from CNCat 3.x, 2.x, 1.х
- Import from Database (Fig. 56):
Fig. 59 – Importing from DB of Previous Versions
The process of design importing is described in detail in paragraph Importing Design of the
given manual.
5.3.13 Exporting
The section is intended for exporting the catalogue data to XML file. As a rule, export procedure
is performed before a version update or for creation of the catalogue backup:
User Manual CNCat 4.1
49
Fig. 60 – Export Parameters
The following parameters should be set in this form:
•
select data for exporting;
•
define, whether binary data export should be performed (pictures etc.);
•
define, whether XML-file should be compressed in GZIP format;
•
the export file storage.
To perform exporting, click the Export button.
Note 1. Unlike CNCat 3.x/2.x, it is impossible to export/import separate elements of the
catalogue (only categories or only links) in 4.x version.
Note 2. To save file with the exported data onto the server, you need access rights for the
‘cncat_export’ folder located in the root of the catalogue. If you have no rights to change it, use
Browser for exporting.
5.3.14 RSS-feed
You can specify the way RSS-feed will be displayed in your catalogue via Settings – RSS-feed
page:
Fig. 61 –RSS-feed Setup
Specify the parameters presented on the form. Some of these parameters are:
User Manual CNCat 4.1
50
•
Display access to the RSS-feed: on all pages, only on the main page, on all pages except
the main one, do not display.
•
Display catalogue entries: links and articles, only links, only articles.
•
Title: specify the title for your RSS-feed. If you use the value "%TITLE%", then it will
be replaced by the name of the current category on the catalogue pages.
•
Description: specify your RSS-feed description. "%CATNAME%" value, in this case,
corresponds to the catalogue name.
•
Show link: to the main page of the catalogue, to expanded description of the link or
article, to category which a link or an article is submitted to.
Click the Save button for the modifications to take effect.
User Manual CNCat 4.1
51