1
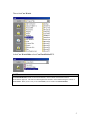
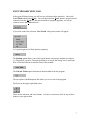
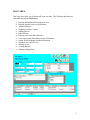
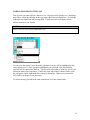
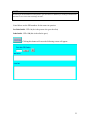
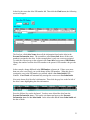
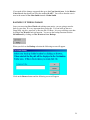
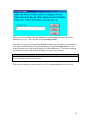
Case Watch Court Case Management Program User Manual Table of Contents INTRODUCTION ........................................................................................................................................ 1 GETTING STARTED.................................................................................................................................. 2 LINKING TO THE DATATABLES .......................................................................................................... 3 SWITCHBOARD MENU BAR ................................................................................................................... 7 SWITCHBOARD ......................................................................................................................................... 8 MAIN AREA................................................................................................................................................. 9 ENTERING A DEFENDANT AND CREATING A NEW CASE ...........................................................10 ENTERING GENERAL COURT CASE INFORMATION .....................................................................12 ADDING A NEW WITNESS OR WITNESSES ......................................................................................13 CHANGING A WITNESS NAME ...........................................................................................................15 ADDING OFFICERS TO THE CASE......................................................................................................16 ENTERING OFFENSES ..........................................................................................................................17 ENTERING COURT CASE DATES AND TIMES .................................................................................17 ACCESSING CURRENT DEFENDANT’S PERSONAL INFORMATION ...........................................18 SEARCHING FOR A DEFENDANTS PERSONAL INFORMATION ..................................................21 SEARCHING FOR A SPECIFIC CASE ..................................................................................................22 DELETING A CASE ................................................................................................................................24 CREATING REPORTS ............................................................................................................................25 PRINTING LABELS ................................................................................................................................26 PRINTING (UNOFFICIAL) SUBPOENAS.............................................................................................27 PRINTING ADJOURNMENT NOTIFICATIONS ..................................................................................28 REPORT MENU OPTIONS .....................................................................................................................28 ADMINISTRATIVE AREA .......................................................................................................................29 UPDATING TABLES ..............................................................................................................................30 CHANGING THE ADMINISTRATIVE AREA PASSWORD ................................................................31 CORRECTING ALIASES........................................................................................................................31 BACKING UP THE DATABASE..............................................................................................................34 REPORT SETTINGS .................................................................................................................................37 WITNESS MAILING LABELS ...............................................................................................................38 UNOFFICIAL SUBPOENAS AND ADJOURNMENT NOTICES .........................................................39 PERSONAL HISTORY............................................................................................................................40 i INTRODUCTION Case Watch is designed to make the process of organizing court case related information easy. This manual is created in a step by step format to walk you through every feature of the program. It is recommended that you read the manual in its entirety. However, you can also skip to any area. NOTE: Throughout this manual, you will be told to click and click and hold this means to press the left mouse button once or press down and hold you will not need to use the right mouse button in this program 1 GETTING STARTED When you first load Case Watch you will get the screen pictured below. The message indicates that the program is not linked to the data table. Before the program can operate it needs to be linked to the table that contains the data. Case Watch was written as two separate programs. The first is the user interface. This interface allows you to enter, view and print information. The second is a database that contains all the data. This data is all the information you have entered like names, dates, addresses, court times, etc. The way the two databases work with each other is through what is called a link. When you first start up Case Watch it checks to see if you have a link set up to the data table. If you do not have a link set up you will get a warning label on the Switchboard as shown above. Along with the message Case Watch disables the navigation buttons so you will not be able to use the program until you link to the data tables. 2 LINKING TO THE DATATABLES In order to link to the tables you must click the Link Tables button. This button will appear in a drop down box when you click the Case Watch button located in the upper right hand corner as show below. When you click on the Link Tables button the following box appears. Clicking the down arrow to the right of the dropdown box located at the top of the form labeled look in: you can find the file CaseWatchTablesTUT. The default location for this file will be C:\Program Files\Case Watch\. NOTE: If you choose a different installation location for Case Watch on install than it will not be in the location described here. If you are setting up a “network installation,” the tables will be located elsewhere. 3 Click on the drop down box and select (C:) as shown below. You select an entry by left clicking on it. Then select Program Files. 4 Then select Case Watch. In the Case Watch folder select CaseWatchTablesTUT. NOTE: CaseWatchTablesTUT stands for the tutorial database, which contains fictitious data used for demonstration purposes. This data is used throughout this manual to aid in demonstrating the features of Case Watch. When you are ready to use Case Watch you will relink to CaseWatchTables. 5 When you have CaseWatchTablesTUT selected click on the Link button. The following screen will appear. This screen shows a list of all the tables associated with the database click the Select All button to highlight all the tables. Now click the OK button. You have successfully linked the database. Case Watch will load the Switchboard Screen, which is the starting point to accessing the various functions of the program. 6 SWITCHBOARD MENU BAR In the upper left hand corner you will see two selections on the menu bar. One is title Case Watch and the other Tools. You will notice that the Tools option is grayed out and cannot be selected. Tools is a function installed for program upgrades, you will no reason to access the Tools selection. If you click on the first selection, Case Watch, a drop down menu will appear. Let’s go through each of these options separately. The Backup option allows you to back up the data to any storage medium you choose (i.e. floppy disk, zip drive, Network mainframe) as long as the storage size is sufficient. How to use this function is described later in this manual. The UnLink Tables option disconnects the data tables from the program. The last option is the Exit option this allows you to exit out of the program. The boxes in the upper right hand corner These are the min/max and close buttons. You have no reason to click on any of these buttons so just ignore them. 7 SWITCHBOARD When the program loads the first screen that appears will be the Switchboard screen. From this screen you can access the different areas of the program. There are three selections on the Switchboard screen. Clicking this button will take you to the Main Area. This area is where all the data entry, printing of reports, and searching is done. Clicking this button takes you to the Administrative Area. There are many functions that you can do in this area that will be described in the Administrative Area section of this manual. This button allows you to exit the program. 8 MAIN AREA This is the area where you will enter all court case data. The following functions are assessable through the Main Area. Entering defendants and creating new cases Entering general court case information Adding witnesses Changing a witness’s name Adding officers Enter offenses Entering court case dates and times Accessing current defendants personal information Search for a defendants personal information Searching for a specific case Deleting a case Creating Reports Printing mailing labels 9 ENTERING A DEFENDANT AND CREATING A NEW CASE Clicking this button in the Main Area will open up the Add Record Page as shown below. This is where you will start a new case by first entering the defendant information. Fist you must search and see if the defendant is already in the database. This is a very important task. If you duplicate names in the database it will cause problems with record keeping. In box located in the upper left you will see all the last names of every defendant in the database. Even though you may have multiple listings of the same last name Case Watch will only display one. When you click on the last name you are looking for Case Watch will display all the first names related to the last name you selected. The first names are displayed like the last names showing only one first name when there maybe many. When you click on the first name you want Case Watch will display first name, middle name, last name, DOB, soc sec, and ops (driver license number) of each individual whose first and last name are the same. This should give you enough information to be able to locate the person you are looking for. Click on the person you want and Case Watch will add that persons information automatically in the “Enter Defendant Personal Info.” area. This type of search is easy and efficient; it allows you to go through numerous records in just a few seconds. 10 For example, in the top left box listing last names click on the name Smith. In this example, you can see that there are three Smiths in the database Joe, John, and Mark. Click the first name of John. Here you see all the records for a John Smith. In this case there is only one but if there were more then one you would be provided with enough information to select the John Smith you wanted. By clicking anywhere on the John Smith display row Case Watch will automatically add his information into the area titled “Enter Defendants Personal Info.” Click this button if the defendant is already in the database and you have loaded them into the “Enter Defendants Personal Info” area. Case Watch will automatically take you to the Main Area and insert the defendant’s to the right of where it says In the Matter of: and set up the program so you can start entering a new record. Click this button if the defendant is not in the database. Case Watch will clear the boxes and set up a new PID (Personal Identification Number) assigned to that subject. Click this button if you want to exit out of the Add Record Page without saving your entry. 11 ENTERING GENERAL COURT CASE INFORMATION When you first access the Main Area it defaults to the first record in the database. If you had just come form the Add Record Page than the defendant you had selected in that page will be displayed. The above screen shot shows the area where you enter the court case information for a defendant. In this example Mark Jacob Smith is the defendant. The entry boxes and their meanings are listed below. Date of Offense – This is the date the offense was committed. Court – This is the court that will handle the case (District, Federal, Juvenile, Traffic, etc.). Judge/Magistrate – This is where you would select the Judge or Magistrate proceeding over the case. PD Case # - This is the police department’s case number. District Court # - This is the case number for the District Court. Circuit Court # - This is the case number for the Circuit Court. DLAD Case # - This is the number for the DLAD (Drivers License Appeal Division) Juv. Court # - This is the number for Juvenile cases. NOTE: To use the drop down box just click on the down arrow located on the right side of the dropdown box. The entries that appear in the box are pre-entered through the Administrative Area. To move from box to box use the [Tab] key for forward and the [Shift] + [Tab] key to go backward. To move to the tables you press [Ctrl] + [Tab] for forward and [Ctrl] + [Shift] + [Tab] for backward. 12 NOTE: For the tab key movements to happen when the [Ctrl] and/or [Shift] key are used you must keep them pressed down as you press the [Tab] key. For traffic ticket numbers you enter a “T” in front of the ticket number. Traffic tickets are entered in the District Court # box. The reason for this will be explained later in this manual. As some court cases progress through the justice system different courts and judges maybe assigned to the same case. It is very important to enter the most current information. ADDING A NEW WITNESS OR WITNESSES Pictured below is the witness table where you enter any witnesses who are involved in the case. Adding new witness can be done one of two ways. Either click toward the left on the first empty space in the table, or click the button located at the bottom of the table. When you see a vertical blinking line appear in the first blank space you can type your entry. To enter a witness’s name click the button and type “Test First Name.” Now press the [Tab] key on your keyboard and type “Test Last Name.” 13 Once you have entered the witness’s first and last name click on the “+” sign to the left of the entry. When you click on the “+” sign a box will drop down where you can enter the witness’s address and phone number. You can’t see the whole box but as you type in the information it will move forward automatically. You can use the [Tab] key to move forward and [Shift] + [Tab] to move backward. The “W” in front of the words stands for witness (i.e. Waddress, Wstreet, etc.) Go ahead and enter the address and phone number shown below. 123 Test St. Anyplace MI 12345 (123) 456-7890 It should appear as shown below. 14 Notice how the state is automatically capitalized and the phone number is automatically formatted. This is done to allow for faster entry. All you need to do is type the letters or numbers. Click on the minus (-) sign to make the address area disappear. CHANGING A WITNESS NAME For this example we will change “Test First Name” to “Test Chg F Name.” First click to the right of the area where “Test First Name” is displayed and highlight all the words by holding down you left mouse button and dragging it across the words. Now type the new entry “Test Chg F Name”. To delete an entry just click on the gray box to the left of the entry you want to delete. Case Watch will highlight the entry. Press the [Delete] key to delete the entry. 15 ADDING OFFICERS TO THE CASE This is where you enter officers, detectives, etc. who are involved in the case. Entering a new officer is done by clicking on the very right edge of the next blank box. Or clicking within the next blank box and pressing [F4]. A drop down box will display all the officers, detectives, etc. names. NOTE: Officer’s names are entered in the Administrative Area. As you move the mouse cursor down the selections each one will be highlighted as the cursor passes over it. Once you have highlighted your selection click once and that selection will be entered into the box. You can only select what is in the box you are not allowed to make your own entries. If there are many selections to choose from a scroll bar will appear on the right hand side of the drop down box. Make sure you enter the OIC (Officer in charge) as the first entry. To delete an entry just follow the same instructions as for the witness table. 16 ENTERING OFFENSES Pictured below is the offenses table. Here you select the offense(s) that pertain to the court case. These selections are made through drop down box similar to adding officers involved in the case. The offense entries are added in the Administrative Area. ENTERING COURT CASE DATES AND TIMES Pictured below is the General Info Table where you enter all the traffic of that particular case. In this table there are six categories, which are explained below. Received by: Indicates who initially received the subpoena in this case it was the dispatcher. This is a drop down box. Case Type: Here you enter what the subpoena was for (i.e. informal hearing, bench trial, evidentiary hearing, etc.) this is a drop down box. R Date: Here you enter the date the subpoena was initially received. All you have to do is enter the date numbers Case Watch automatically puts the numbers into a date format. Ct Date: Here you enter the court date (when the case is to be heard) Ct Time: Here you enter the court time (what time the case is to be heard) Case Status: Here you enter the current status of the case. To enter a new record to the table you start on the first line. If you want to add a new record you add it to the next available blank line. Once you add the new record Case Watch will automatically update the record and put it in its proper sort order. You will see this order the next time you access the record. Case Watch sorts the General Info records in descending order by the court date so the most current entry is on the first line. If the case is active you must select In Progress under the Case Status heading this is what Case Watch checks for when printing subpoenas. If a case is adjourned you must change that selection to Adjourned to be able to print adjournment notices. 17 In the above picture, the line that says Bound Over represents the current status. When the case was first entered the In Progress selection was made. Then when the case was bound over the selection was changed to Bound Over. The person who made the change is listed in the S Received By (In this case is was the records person) and the date the change was made is listed in the S Date box see on the following page. You can add as many entries as necessary for the case. Case Watch keeps track of the past history of a case (how many times it has been adjourned, when it was bound over, etc.). Additionally, you can also enter dispositions in the Case Status box this comes in handy when checking the disposition of cases for evidence destruction. NOTE: Do not enter in Progress or Adjourned twice for the same case. ACCESSING CURRENT DEFENDANT’S PERSONAL INFORMATION This button allows you to view the Personal Information Area of the defendant whose case you are viewing. They are listed below where it says In the Matter of: area at the top of the Main Area screen. 18 Click the Personal Info button. Below you see a screen shot of the defendants personal info area. Most of the boxes are self-explanatory, but there are some that need more explanation. Dob – This displays the defendant’s date of birth Soc Sec – This displays the defendant’s Social Security number Ops – This displays the defendant’s drivers license number SID – This displays the defendant’s state offender identification number (this is only if they have a prior felony conviction) FBI – This displays the defendant’s FBI number (this is only if they have a prior felony conviction) Ops St – This is the two letter abbreviation of the state for which the defendant has a drivers license 19 In the Address(es) table you see the column labeled Status. Here you have a choice of Current or Old. If the address listed is current or last known you select current. If the address is an old address you select old. Case Watch will automatically update the records to always show Current as the first record. The Alias Area shows any aliases the subject might have used in the pasts along with any alias dates of birth. The number written in Red is the subject’s Personal Identification Number (PID) this number is assigned automatically by Case Watch. Each subject in the database has a unique PID number. Clicking this button will display a report showing the subjects complete court case history (known as the case history report). The report will list the subject’s personal information, and all the court cases for which they were defendants along with all related information. Clicking this button will print the subject case history report. Clicking this button will close the Personal Info area and go back to the Main Area. 20 SEARCHING FOR A DEFENDANTS PERSONAL INFORMATION Clicking this button allows you to search and access the personal information of any defendant in the database. When the button is clicked the following screen will appear. The procedure for searching for a defendant’s personal information is described as follows. In the top left box listing last names click on the name Smith. In this example you can see that there are three Smiths in the database Joe, John, and Mark click on John. The long box on the bottom displays all the records for John Smith. In this case there is only one, but if there were more then one you would be provided with enough 21 information to select the John Smith you wanted. Go ahead and click anywhere on the John Smith display row. The “Defendants Personal Information” area will appear displaying John Smith’s information. Clicking this button will close the Personal Info area and go back to the Main Area. SEARCHING FOR A SPECIFIC CASE Clicking on this button will take you to the Case Search Area. Here you can search by name or by six different case type numbers. The case numbers are drop down boxes of all the case numbers in the database divided up into six groupings, which are. PD Case # - Police department case number. DLAD Case # - Drivers license appeal division case number. Ticket # - Traffic ticket number. District Court Case # - District court case number. Circuit Court Case # - Circuit court case number. Juvenile Court Case # - Juvenile court case number. 22 To select a case by the number just open up the drop down box and select the case number you are looking for. When you click the number, Case Watch will take you to the Main Area and display the selected case. To search by name, select the last name of the person you are searching then select the first name from the names that appear in the box titled First Name as shown below. Once you have selected the first and last name Case Watch will display the following information for every name that has the same first and last name Fist name Middle name Last name Dob (Date of birth) Social Security Number Drivers license number 23 From the above listed information, you can identify the defendant you are searching for. Once the defendant is selected, Case Watch will display all related court cases in the next box To select the case just click on the one you want and Case Watch will load that case into the Main Area. Clicking this button will close the Case Search area and go back to the Main Area. NOTE: The Ticket # box displays all the civil infraction ticket numbers. They will have a “T” in front of them to designate that they are tickets and not district court criminal cases. DELETING A CASE In some circumstances, you may find it necessary to delete a case. In order to do this locate the case using the methods previously described and have it displayed in the Main Area. Clicking this button, located in the Main Area, will delete the case in which is currently being displayed. It will not however delete the defendant or their personal info. A warning message will appear to confirm your deletion. 24 CREATING REPORTS Clicking on this button will take you into the report area. The first selection “Check here to print cases without officers” prints a report of all the cases with in the date range entered. However, it groups them by court and does not list what officer is assigned to which case. This is used if you need to get a group of cases together for court the next day or something of that nature. To access the report click on the box to place a check mark in it and then enter a date range. The second selection “Check here to print Officers cases by name” prints a report of all the court cases related to a certain officer within the entered date range. It lists the officer’s name and breaks down the cases by each court. This report is very handy for showing the officer all the court dates they have within a given time period. To access this report just check the box, enter a date range, and select an officer from the drop down box, then click either preview or print. Clicking this button will show a preview of the report before printing. Clicking this button will print the report. Clicking this button will close the Creating Reports area and go back to the Main Area. 25 NOTE: These reports will only list the In Progress cases so it is very important that In Progress is selected for all the cases that are currently in the court system. PRINTING LABELS Clicking here will display the following screen. This box allows you to select how many mailing labels you need to print. It only prints the witness’s names and addresses that are attached to the current case you are viewing. In the first box, enter how many labels of each you want printed. In the second box, enter how many labels you need Case Watch to skip. For example, if you are using a full sheet of 30 labels you would enter 0 because you are not skipping any blank spaces. However, if you have a sheet of 30 labels and 18 are already used up then you would enter 18 in the second box. That would cause Case Watch to start printing on the 19th label. Like before you can select to either preview or print the labels. You would only preview if for some reason you had to set the printer defaults. Case Watch prints labels to the Avery #5160 mailing label template. NOTE: For witness labels to be printed you must have the witnesses complete address entered into the database. 26 PRINTING (UNOFFICIAL) SUBPOENAS Clicking this button will open the following box. This is where you can print individual subpoenas. These subpoenas are not official court subpoenas and are mostly used in house for notification purposes. Checking the first box will print the officer’s subpoenas. Case Watch will print one subpoena for each officer listed with the case. Checking the second box will print witness subpoenas, once again printing one for each witness listed. Case Watch will only print subpoenas containing the case information for the “In Progress” selection. Look at the following example. The top row has “In Progress” selected in the Case Status area so only the court dates and court times in that row will be printed on the subpoena. It is very important that “In Progress” is only selected for the active case. If you do not have “In Progress” selected and you attempt to print or preview a subpoena the following error message will appear. 27 PRINTING ADJOURNMENT NOTIFICATIONS Clicking on this button will open box shown below. This is designed the same way as printing subpoenas except it creates adjournment notices instead. You must have “Adjourned” selected in the Case Status box to be able to print adjournment notifications. Clicking on this button in the Main Area will take you to the Switchboard REPORT MENU OPTIONS Pictured below is the report menu bar. Clicking here will close the report and take you back to the Main Area. Clicking here will allow you to print the report from preview mode. Clicking here will open up a print preview area where you can set your print defaults. When Case Watch is first loaded, it may use your computer printer defaults. If the printer defaults are not the same as the report defaults, the reports will not print correctly. Every report is designed to fit on one page. If they do not here is where you can set the correct printer settings. All the printer settings for the reports are listed in the back of this manual under Report Settings. Clicking here allows you to see multiple reports in one screen. The first option lets you view one report. The second option lets you view two reports. The third option lets you view up to six reports. 28 Clicking here allows you to view your report at different zoom levels. You can zoom in or zoom out, just click the down arrow and select what level you want. Case Watch defaults all the reports to a 75% view. ADMINISTRATIVE AREA Clicking on this button will take you to the Administrative Area. It is highly recommended that only one or two people have access to this area. This area allows you to make changes to various table in the program. For this reason, access should be limited. To aid in limiting access this area is password protected. The default password is the word “Password.” Once you enter the Administrative Area, the password can be changed. In the box enter the word Password and click the OPEN button. 29 UPDATING TABLES Here you can add data to all the lists displayed in the various drop down boxes. The headings at the top of the tables tell you what that table is for. You can add, change, and delete entries just the same as described earlier in this manual. You must keep the entry “In Progress” and “Adjourned” located in the status table in tact, or Case Watch will not work properly. These buttons located on the menu bar allow you to sort a selected table in either ascending or descending order. To select a table move the mouse cursor over the table heading and click once, when you see that the table is highlighted click on the ascending or descending button. NOTE: You will see a “*” wildcard symbol at the top of the officer drop down box. That symbol is there so you can print a report for all the officers listed in the drop down box. Each officer will be on a separate page. 30 CHANGING THE ADMINISTRATIVE AREA PASSWORD Clicking this button will open the Change Password area as shown below. Here you are able to change the password, which allows you to get into the Administrative Area. To change the password just highlight the old password, in this case it is the word Password, and change it to whatever you want. The password can be numbers, letters, or a combination of both. Case Watch does not distinguish between upper and lower case. Once you have changed your password click the EXIT button. CORRECTING ALIASES Clicking this button allows you to correct any aliases that may have gotten into the database. For example, say Joe John Smith gave the alias of John Smith. If you look up the personal information for both you would see that Joe John Smith has the PID number of 6, and John Smith has the PID number of 10. The problem is that they are the same person and you would be sending out subpoenas and scheduling court dates for someone who exists under another name. Aliases are usually discovered before they get this far but in some cases they are not. In order to correct this situation you must first write down the PID number for the alias and the person who gave the alias. For this example, the PID numbers are listed below. However, you can find the PID numbers by searching for the defendant as described earlier. 31 NOTE: If an alias got into the database but the person to gave the alias never did then you would go to the Personal Information Area of the alias and change the name. Listed below are the PID numbers for the names in question. Joe John Smith – PID # 6 (he is the person who gave the alias) John Smith – PID # 10 (this is the alias he gave) Clicking this button will cause the following screen will appear. 32 In the first box enter the Alias PID number 10. Then click the Find button, the following screen will appear. The first box called Alias Name shows all the information listed on the alias in the Personal Information Area. The second box called Court Info shows all the court number(s) assigned to the alias. In this example there is only one court case assigned. To make the correction go to the column in the Court Info section named PIDNumber. Change the number from the alias PID number to the person’s PID number who gave the alias. In the example, change 10 listed in the PIDNumber column to 6. If there were more than one court cases listed, you would change all the PID numbers. What this does is reassign the case to the PID number you entered which is Joe John Smith’s PID Number. Case Watch will automatically reassign the court case to Joe John Smith. Next write down all of the alias’s information. Then click the gray box to the far left of the alias’s name highlighting the alias information. Press the (Delete) key on the keyboard. You have now deleted the alias from the Personal Information Area. Click on the exit button and open up the Personal Information Area for Joe John Smith. In the alias table add the name John Smith and the date of birth. 33 If you made all the changes suggested then go to the Case Search Area. In the District Court Case # drop down box select the number 01-4567. You will see that the case is now in the matter of Joe John Smith instead of John Smith. BACKING UP THE DATABASE Once you start using Case Watch and making some entries, you are going to need to back up your data. It is very important that you do this. You can back up data to a floppy disk, zip drive, network, or Rewrite able CD Rom. It is easy to backup your data by using Case Watch’s back up function. You access the backup function from the Switchboard by clicking on Case Watch and then Backup. When you click on the Backup selection the following screen will appear. Click on the Browse button and the following screen will appear. 34 Here you select the location where you want the data to be backed up to. For this example the data will be backed up to the “A:\” drive or otherwise known as backing up to a floppy disk. In the picture below the “A:\” drive has been selected. Notice how the “A:\” drive is highlighted in the Save in: box. By clicking on the Save button the form closes and the Case Watch back up box is displayed. The Destination Folder box will display the location where the backed up database will be stored. 35 When you click the Ok button Case Watch will automatically backup the data tables database to the “A:\” drive and then close the backup screen. Next time you go to do a backup Case Watch remembers the last location you backed up your data to and will display the path name when you open the backup screen. If you want to backup to the same location then just click the Ok button. If you want to backup to a different location click the browse button and select a new location. NOTE: It is recommended you back up your data often. How often you backup your data is up to you, it is recommended that you do it often. 36 REPORT SETTINGS These are the default settings for all the reports in Case Watch. GENERAL REPORTS Default settings for reports that are accessed by clicking this button 37 WITNESS MAILING LABELS Mailing labels are accessed by clicking this button 38 UNOFFICIAL SUBPOENAS AND ADJOURNMENT NOTICES Accessed by clicking or 39 PERSONAL HISTORY Reports Accessed through the Personal Info Area. 40