1
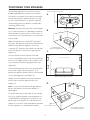
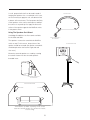
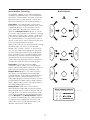
™
S300 and S200 MultiPole Surround Speakers
™
User Manual
®
2
INTRODUCTION
Thanks for choosing a Newton Series surround
loudspeaker. The S200 and S300 both feature the
finest drivers, precision internal crossover circuitry
and an elegant enclosure design.
The Product Development Team at Cambridge
SoundWorks believes there is no better combination of
audiophile-level attention to detail and reasonable cost.
AFTER UNPACKING
Store the shipping carton and packing material for
future use and transport.
CONTENTS
S300 and S200
1. Two loudspeakers
2. Two No. 10 screws and plastic wall anchors
3. Eight rubber feet
INSPECTING FOR DAMAGE
Examine the speaker system carefully for shipping
damage. If there is any, do not install or use the system. Return the speaker to the store where you made
the purchase or call Cambridge SoundWorks at 1-800
FOR-HIFI (1-800-367-4434) for assistance.
3
POSITIONING YOUR SPEAKERS
SPEAKERS ARE LABELED "LEFT" OR "RIGHT"
The following suggestions assume you have some
flexibility regarding where you place your speakers.
A.
Don’t be too concerned if your situation and listening
S200
environment dictate the speakers’ position. As long
Multipole“
Surround
Loudspeaker
as each surround speaker is on the left or right half
Newton, Massachusetts
USA
00000000
RIGHT
—
8 Ohms
+
of the listening space, the speakers are will provide
convincing, lifelike sound.
Back of Speaker
Mounting: The typical way to position surround speak-
B.
ers is to wall-mount them on a protruding screwhead.
Other methods are to place them on short shelves, to
mount them on short swivel brackets, or to install them
on floor stands.
Notice: The speakers are marked LEFT and RIGHT.
Most often, the speakers will be wall-mounted with the
MultiPole switch panel facing down. In this case,
Stand Mounted
Switch Facing Upward
mount the LEFT speaker on the listener’s left side and
the RIGHT speaker on the listener’s right side (see
C.
diagram A).
RIGHT SPEAKER
You may need to invert the speakers to provide
LEFT SPEAKER
WALL MOUNTED - SWITCH FACING DOWNWARD
access to the MultiPole switch (such as when placing
them on small support shelves or floor stands). In this
7 Ft.
case, reverse the speakers’ left/right positions (see
diagram B).
Front to Back placement: Place each surround speak-
4 Ft.
er to the left or right of the listening area. Try to
position the speakers within two feet of a line centered
on your listening postion (see diagram C).
Wall Mounted Height Placement
Height: Place each speaker at least four feet above
the floor, up to seven feet above the floor (see
D.
diagram D).
2 FEET
2 FEET
Note: It is not critical that the left and right speakers
be the same distance from the front speakers or
equal heights.
If you don’t have walls on both sides of your listening
area, try to avoid placing both surround speakers on
a wall behind the listening postion. Sonically, it’s still
better to place one speaker on a side wall and one
speaker on a rear wall. This provides better separation
than two speakers on a wall behind the listeners.
CENTER LINE OF LISTENING POSITION
Front to Back Placement
of Surround Speakers
4
SPEAKER MOUNTING
Hang the S200 or S300 directly on a wall:
Install a No.10 screw in the wall so that its screwhead
protrudes about 3/8 inch. Cambridge SoundWorks
supplies screws and plastic anchors for your convenience, but it is the installer’s responsibility to insure the
screw is securely mounted.
Apply the soft, self-adhesive feet to back of the speakers. The feet protect the finish of the speakers or the
surface and improve stability if the surface is not perfectly flat.
USE THIS KEYHOLE SLOT
TO HANG THE SPEAKER
FROM A SCREWHEAD.
(SIDE VIEW)
USE THE THREADED
INSERT TO ATTACH
A SWIVEL BRACKET.
S200
Multipole“
Surround
Loudspeaker
Newton, Massachusetts
USA
00000000
RIGHT
—
8 Ohms
+
SWITCH
(BACK VIEW)
APPLY SELF-ADHESIVE FEET TO
BACK OF SPEAKERS.
5
A small, purpose-built shelf can be used instead of
BOTTOM OF SPEAKER
hanging the speakers from a screwhead. In this case,
we recommend you apply the soft, self-adhesive feet
to bottom of the enclosures. The feet protect the finish
of the speakers or the surface and improve stability if
the surface is not perfectly flat. Apply the feet to the
surface of the speaker opposite the MultiPole switch,
in the pattern shown.
Using The Speakers On A Stand
Cambridge SoundWorks has floor-stands available
for the S200 and S300.
APPLY SELF-ADHESIVE FEET TO
BACK OF SPEAKERS.
The speakers mount to the stand with the MultiPole
switch on top. For this reason, the positions of the
ATTACHING SPEAKER TO STAND
speaker should be reversed (the speaker marked left
should be placed on the listener’s right side and
—
8 Ohms
+
00000000
Multipole“
Surround
Loudspeaker
Newton, Massachusetts
USA
S200
Mount the surround speaker to a stand by screwing
the stand’s fastener into the surround speaker’s
threaded insert.
SWIVEL BRACKET FOR NON-VERTICAL
OR CEILING MOUNTING
NON-VERTICAL/CEILING MOUNTING
RIGHT SPEAKER
SWITCH
RIGHT
vice versa).
LEFT SPEAKER
SWITCH
Swivel-brackets (available separately) can be used to
attach the surround speakers to a wall that isn't vertical,
or to the ceiling.
6
About MultiPole Technology
MultiPole Modes
The MultiPole capability of your S200 and S300 lets
you better enjoy different types of surround programs
at their best. The descriptions that follow assume you
will position your surround speakers to the left and
right of the listening area and not directly behind it.
Dipole Mode: This mode provides everyone in the
listening space with enveloping surround. Most sound
is projected sideways (to the front and rear of the
room), while little is directed at the listeners (see
Dipole in the Multipole Modes diagram). As a result,
the sound is well mixed with room reflections, following
longer paths. In Dipole mode, a listener can be closer
to one surround speaker than the other and still hear
both surround speakers. This characteristic makes it
ideal for smaller rooms, where a listener may be closer
to one surround speaker than the other.
Dipole mode is ideal for use with synthesized surround
decoding modes; the choices on your decoder
labeled “Hall,” “Theater,” “Church,” or similar names.
Also, use it for Dolby Surround programs (the predecessor to Dolby Digital and the format supported by
stereo TV programs with surround encoding). Dolby
Surround has a monaural surround channel which is
split between the two surround speakers. Dipole
mode’s dispersion pattern prevents this channel from
“collapsing” towards the closer surround speaker.
(S300 only)
Bipole Mode: This mode “fills in the middle”
compared to Dipole mode. Each surround speaker
projects approximately equal amounts of sound to the
sides and at the listening area (see Bipole in the
Multipole Modes diagram). This makes it easier to
hear effects occurring between the left and right
surround speakers. Dolby Digital’s separate left and
right rear channels make this possible. The more
Dolby Digital program material you listen to, the more
you will benefit from Bipole mode. In larger listening
spaces, Bipole mode can even rival Dipole mode on
non-Dolby Digital program sources.
Monopole Mode (S300 only): In this mode, the
S300 substitutes a dedicated, front panel-mounted,
direct-radiating two-way system for the front and rear
surround drivers. This precise system directs sound
mostly at the listening area, like the front three speakers (see Monopole in the Multipole Modes diagram).
For centrally located listeners, this mode provides the
most precise sonic imaging, both front-to-rear and
side-to-side. Use it for Dolby Digital programs with
abundant multichannel sound effects.
speakers positioned with switch undernea
7
PREPARE THE SPEAKER WIRE
Use at least 18 gauge speaker cable for short runs
Strip off 1/2"
(under 15 feet). Use 16 gauge or heavier speaker
cable for longer runs.
1. Determine how long the speaker cable should be
for each speaker. Cut the speaker cable into the
appropriate lengths.
2. Strip 1/2 inch of insulation from the two individual
conductors in the speaker cable. Twist the exposed
Twist Bare Wire
strands of bare wire together
3. Attach any connector plugs (like banana plugs) at
this time.
4. Determine which conductor you will use to connect
the positive terminals of the amplifier and speaker
together. One of the two conductors of a speaker
cable can usually be distinguished by printing or a
ridge on the insulation. Some times the metal of the
conductors has two different colors.
Make The Connections:
SPEAKER WIRE CONNECTION
S200/S300
1. Unscrew the speaker’s red and black connector
knobs to expose the holes in their threaded shafts.
2. Insert the stripped end of one cable’s “indicated”
conductor into the speaker’s red (+) connector.
S200
Hand-tighten the knob to secure the connection.
Multipole“
Surround
Loudspeaker
Newton, Massachusetts
USA
00000000
Make sure no stray strands of wire are exposed.
RIGHT
If you are using a cable connector plug, connect it
according to its instructions
3. Repeat the procedure for the cable’s other conductor and the speaker’s black (–) connector
4. Connect the other speaker cable’s conductors to the
other speaker.
5. Connect the opposite ends of the speaker cable to
the speaker outputs of your receiver. Remember to
observe channel and polarity (Left Positive, Left
Negative, Right Positive, Right Negative).
8
—
8 Ohms
+
SPECIFICATIONS
Speaker Size Setting in Dolby Digital
Decoders
S200:
The S200 and S300 include internal high-pass
Weight: 5 pounds each
Dimensions: 7"H x 11"W x 5 3/4"D
networks that prevent them from responding to low-
S300:
frequency signals below their operation range.
Dimensions: 7"H x 11"W x 5 3/4"D
When connecting either speaker to a Dolby Digital
Weight: 6 pounds each
decoder, set the decoders rear channel size setting to
SMALL. If there is a crossover frequency choice, set
The S200 and S300 can be safely used with any sur-
at 100 Hz or lower.
round receiver rated above 25 watts per channel.
There is little advantage gained in using more power
than 100 watts per surround channel, but amplifiers
above this power rating can be used so long as the
receiver is not operated at distorted levels.
Warning About Excessive Amplifier Distortion
Operating a receiver (of any power rating) beyond its
maximum undistorted output level creates distortion—
added high-frequency sound not part of the musical
program. Distortion dramatically increases the internal
operating temperature of a loudspeaker and will eventually cause the speaker’s failure due to burned or
melted internal parts. While Cambridge SoundWorks
includes the most heat-tolerant parts commensurate
with good acoustic design, the speaker’s Limited
Warranty against defects in materials or workmanship
does not apply to parts that fail from long-term
operation at very high temperatures
Enclosure Cleaning
The speaker enclosures can be cleaned with a
window-cleaning product. Use a soft, lint-free cloth
only. Avoid spraying any cleaner on the grille panels.
Brush or vacuum the grille panels if dust accumulates
on them.
9
10
P81-1700 Rev A