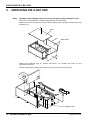
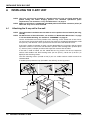
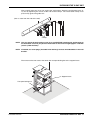
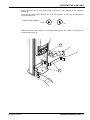
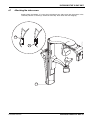
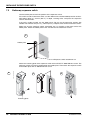
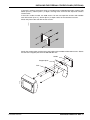
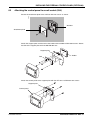
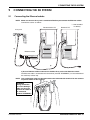
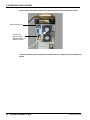
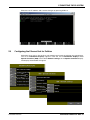
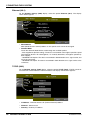
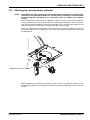
1
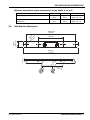
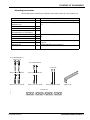
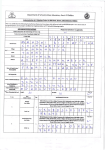
EN
installation manual
10026633_1
TABLE OF CONTENTS
1
INTRODUCTION .........................................................................................................1
2
PRE-INSTALLATION INFORMATION ...........................................................................2
3
2.1
Radiation protection ..................................................................................................................... 2
2.2
Environmental requirements ........................................................................................................ 3
2.3
Power requirements ..................................................................................................................... 3
2.4
3D system requirements .............................................................................................................. 4
2.5
X-ray unit dimensions .................................................................................................................. 6
2.6
Wall bracket dimensions .............................................................................................................. 7
CONTENTS OF THE SHIPMENT ....................................................................................8
3.1
Packages ..................................................................................................................................... 8
3.2
Associated documentation ......................................................................................................... 10
4
GENERAL VIEW OF THE X-RAY UNIT .......................................................................11
5
UNPACKING THE X-RAY UNIT .................................................................................12
6
INSTALLING THE X-RAY UNIT ...................................................................................14
7
8
9
10
6.1
Attaching the X-ray unit to the wall ............................................................................................ 14
6.2
Attaching the X-ray unit to the floor ........................................................................................... 18
6.3
Attaching the second wall bracket ............................................................................................. 19
6.4
Attaching the 3D Mid sensor ...................................................................................................... 20
6.5
Attaching the shoulder arm cover .............................................................................................. 22
6.6
Adjusting the telescopic column position ................................................................................... 23
6.7
Attaching the side covers ........................................................................................................... 25
INSTALLING THE EXPOSURE SWITCH .......................................................................26
7.1
Movable exposure switch .......................................................................................................... 26
7.2
Stationary exposure switch ........................................................................................................ 28
INSTALLING THE EXTERNAL CONTROL PANEL (OPTIONAL) ...................................30
8.1
Attaching the control panel to the wall ....................................................................................... 30
8.2
Attaching the control panel to a wall socket (USA) .................................................................... 33
CONNECTING THE 3D SYSTEM ................................................................................35
9.1
Connecting the Ethernet cables ................................................................................................. 35
9.2
IP Address for reconstruction PC .............................................................................................. 37
9.3
Configuring the Ethernet link for ProMax ................................................................................... 39
9.4
Installing the Romexis software ................................................................................................. 42
9.5
Configuring IP addresses in ProMax3D Tool ............................................................................. 42
9.6
Configuring the reconstruction PC IP address in Romexis ........................................................ 44
INSTALLING THE CEPHALOSTAT ..............................................................................45
10.1 Attaching the cephalostat to the X-ray ....................................................................................... 45
10.2 Attaching the sensor head adapter to the cephalostat .............................................................. 51
10.3 Attaching the second primary collimator .................................................................................... 57
11
CHECKING THE ALIGNMENTS .................................................................................59
Installation manual
Planmeca ProMax 3D Mid 1
TABLE OF CONTENTS
12
DIAGRAMS ..............................................................................................................61
The manufacturer, assembler, and importer are responsible for the safety, reliability and
performance of the unit only if:
- installation, calibration, modification and repairs are carried out by qualified
authorized personnel
- electrical installations are carried out according to the appropriate requirements such
as IEC 60364
- equipment is used according to the operating instructions
Planmeca pursues a policy of continual product development. Although every effort is
made to produce up-to-date product documentation this publication should not be
regarded as an infallible guide to current specifications. We reserve the right to make
changes without prior notice.
COPYRIGHT PLANMECA
Released: 8 November 2010
Publication part number: 10026633 revision 1
2 Planmeca ProMax 3D Mid
Installation manual
INTRODUCTION
1
INTRODUCTION
This manual contains all the information required to install and calibrate the Planmeca
ProMax 3D Mid X-ray unit. Please read this manual carefully before installing the unit.
NOTE
You will also need the ProMax 3D Mid X-ray unit’s technical manual during installation.
The adjustment instructions are given in technical manual.
NOTE
The Planmeca Romexis software has a separate installation manual. You will also need
the Planmeca Romexis software user’s manual.
NOTE
The X-ray unit’s software revision is shown briefly on the control panel when the unit is
switched on. This manual is valid for software revision 1.0.0.0.r or later. This software
revision is compatible with Romexis software revision 2.4.0.r or later. Note, however,
that Didapi software revision 4.7.0.R or later is required for 2D imaging and SmartPan.
Installation manual
Planmeca ProMax 3D Mid 1
PRE-INSTALLATION INFORMATION
2
PRE-INSTALLATION INFORMATION
WARNING
DO NOT CONNECT ITEMS WHICH ARE NOT SPECIFIED AS PART OF THE
SYSTEM.
WARNING
THE X-RAY UNIT MUST BE CONNECTED TO A DEDICATED, PROTECTIVELY
GROUNDED POWER LINE (NO OTHER DEVICES ARE CONNECTED TO THE
SAME POWER LINE).
WARNING
DO NOT CONNECT A MULTIPLE PORTABLE SOCKET OUTLET (MPSO) OR
EXTENSION CORD TO THE SYSTEM.
NOTE The PCs connected to the system must be:
- approved by local authorities: e.g. IEC-approved (CE marked), UL/CSA approved
- located outside the patient area (more than 2m (79 in.) from the X-ray unit) and
- protectively grounded.
NOTE External equipment intended for connection to signal input, signal output or other
connectors, shall comply with relevant IEC standard (e.g. IEC 60950 for IT equipment
and the IEC 60601 series for medical electrical equipment). In addition, all such
combinations - systems - shall comply with the standard IEC 60601-1-1, Safety
requirements for medical electrical systems. Equipment not complying to IEC 60601
shall be kept outside the patient area (more than 2m (79 in.) from the X-ray unit).
Any person who connects external equipment to signal input, signal output or other
connectors has formed a system and is therefore responsible for the system to comply
with the requirements of IEC 60601-1-1.
NOTE EMC requirements have to be considered, and the equipment must be installed and put
into service according to the specific EMC information provided in the Technical
Manual, section “EMC INFORMATION”.
NOTE Portable and mobile RF communications equipment can affect the X-ray unit. For
minimum distance between portable and mobile RF communications equipment and the
X-ray unit, see Technical Manual, section “EMC INFORMATION”.
NOTE The X-ray unit can be disconnected from the mains power supply by unplugging the
mains cable.
NOTE Never place or hang any objects on any part of the X-ray unit.
NOTE Make sure that you cannot get caught or hooked up on any part of the X-ray unit. Keep
loose items of clothing, hair and jewellery tucked away safely.
2.1
Radiation protection
Protect yourself from radiation when you check the radiation beam alignment.
The room in which the X-ray is to be installed and the position from where the user is to
operate the equipment must be correctly shielded from radiation. Since radiation safety
requirements vary from country to country and state to state it is the responsibility of the
installer to ensure that all safety regulations are met.
2
Planmeca ProMax 3D Mid
Installation manual
PRE-INSTALLATION INFORMATION
WARNING
FAILURE TO INSTALL THE X-RAY UNIT IN AN APPROVED LOCATION MAY BE
DANGEROUS TO BOTH PATIENT AND OPERATOR.
2.2
Environmental requirements
NOTE The X-ray unit must be installed in a location where the user can freely monitor the
patient during the whole imaging process. For minimum operational space
requirements, see section 2.5 “X-ray unit dimensions” on page 6.
Wall strength
The X-ray unit must be attached to the wall prior use. Make sure that the wall will support the
X-ray unit. The wall bracket installation must be able to resist a pull-out force of 5518 N (551.8
kg, 1216 lb).
In case the X-ray unit is not attached to the wall, a free standing support must be used.
Temperature & Humidity
The operating temperature range is from +10°C to +35°C, non-condensing. The transport and
storage temperature range is from 0°C to +50°C. The acceptable humidity range is from 15 to
85%.
NOTE
2.3
If the X-ray unit has been stored at temperatures below +10°C for more than a few hours,
time must be allowed for the unit to reach room temperature before connecting it to the
mains voltage.
Power requirements
Make sure that the power requirements of the X-ray unit are the same as the power that is to
be used. The X-ray unit is designed to operate using 100-240V~ universal power supply. The
power requirements are printed on a label which is attached to the mains cable. They are also
printed on the label located at the base of the stationary column. If the voltage is likely to
fluctuate by more than ±10% you will need to install a UPS (Uninterruptible Power Supply) for
the X-ray unit and PCs to ensure correct operation. The mains frequency can be either 50 or
60 Hz.
Make sure that there is a dedicated, grounded power outlet within 2.5 meters (8 feet) of where
the X-ray unit is to be installed.
CAUTION Never connect the X-ray unit to the mains without first checking the voltage
setting. Incorrect voltage setting can cause damage to the unit electronics.
Installation manual
Planmeca ProMax 3D Mid 3
PRE-INSTALLATION INFORMATION
2.4
3D system requirements
The 3D digital system consists of Planmeca ProMax 3D Mid X-ray unit with 3D digital sensor,
Ethernet card, reconstruction PC, one or more PCs and a Planmeca Romexis software package.
Client PC system requirements (minimum)
•
Operating system
Windows Vista, Windows 7or Mac OS 10.5 (64-bit operating system)
•
RAM
8 GB
•
Hard disk
320 GB
•
Processor
3 GHz Core Duo or equivalent
•
Monitor
1280 x 1024
•
Graphics card
ATI or NVIDIA, 512 MB minimum memory
•
Peripherals
DVD-ROM drive
Database server requirements (minimum)
•
Operating system
Windows XP Pro, 2003 Server, Vista or Windows 7 (32-bit or 64-bit operating system)
•
RAM
3 GB
•
Hard disk
2 x 500 GB (RAID1)
•
Processor
3 GHz Core Duo or equivalent
•
Backup medium
DAT or equivalent
•
Monitor
1024 x 768
•
Graphics card
Not required
•
Peripherals
DVD-ROM drive
Network switch
10/100 Mb/s
4
Planmeca ProMax 3D Mid
Installation manual
PRE-INSTALLATION INFORMATION
Planmeca ProMax 3D Mid system network architecture with subnet
Planmeca ProMax 3D Mid
IP = 10.0.0.2
Subnet mask = 255.255.255.0
Gateway = 0.0.0.0
Romexis PC
eth1 (integrated)
IP = 10.0.0.5
Subnet mask = 255.255.255.0
eth0 (added)
IP = e.g. 192.168.3.xxx
Subnet mask = 255.255.252.0
Mid_2.eps
Reconstruction PC
eth1 (integrated, for switch)
IP = 10.0.0.3
Subnet mask = 255.255.255.0
NETWORK
Switch
NOTE!
Reconstruction PC
eth0 (integrated, for sensor)
IP = 192.168.65.1 should NOT be changed
Subnet mask = 255.255.255.0
NOTE Each image acquisition work station (Romexis PC) in the network has to use a different
IP address.
NOTE The network has to be protected by a firewall.
Installation manual
Planmeca ProMax 3D Mid 5
PRE-INSTALLATION INFORMATION
2.5
X-ray unit dimensions
1315–2095 (51.8–82.5”)
1610–2390 (63.4–94.1”)
The numbers given in the figure below are the nominal, physical measurements of the X-ray
unit. The minimum operational space requirements are given in the table.
1130 (44.6”)
930 (36.6”)
810 (32”)
756 (29.8”)
1366 (53.8”)
247
(9.7”)
10
10 ”)
Ø 9.8
(3
6
Planmeca ProMax 3D Mid
Installation manual
PRE-INSTALLATION INFORMATION
Minimum operational space requirements for the digital X-ray unit
Equipment
2.6
Width
Depth
Height
Planmeca ProMax 3D Mid X-ray
1500 mm
59 in.
1630 mm
64 in.
1610 - 2390 mm
63.4 - 94.1 in.
Planmeca ProMax 3D Mid X-ray with
cephalostat
2150 mm
85 in.
1630 mm
64 in.
1610 - 2390 mm
63.4 - 94.1 in.
Wall bracket dimensions
50 mm
(1.97 in.)
m )
m in.
3
1 .51
(0
406,4 mm
(16.0 in.)
200 mm
(7.85 in.)
wall_bracket.eps
440 mm
(17.3 in.)
67.5 mm
(2.66 in.)
Installation manual
Planmeca ProMax 3D Mid 7
CONTENTS OF THE SHIPMENT
3
3.1
CONTENTS OF THE SHIPMENT
Packages
The shipment consists of three packages.
Package 1 contains:
1.
Planmeca ProMax 3D Mi X-ray unit
2.
Package protective part
3.
Stationary column side covers
4.
Shoulder arm cover
5.
Accessories carton
(3D Mid sensor covers, wall bracket(s), cable holder, Ethernet cables, calibration tools,
mounting accessories as described below, product manuals)
5
E
A
(B)
2
Package 1
3
C
3dMax_package_contents.eps
4
1
8
Planmeca ProMax 3D Mid
Installation manual
CONTENTS OF THE SHIPMENT
Mounting accessories
The mounting accessories bag is inside the accessories carton (5). The contents are:
PART
Felt pads
Screw M10x70 DIN 571 +
protective cap
Washer ø10.5/21 DIN 125
Expansion anchor ø14x70
OPTIONAL: Cover plugs to close
unneeded holes in wall bracket
Screw M8x50 DIN 571
Washer ø8.4/17 DIN 125
Expansion anchor ø10x50
Screw 4x30
Expansion anchor ø6x30
Alignment pin
QTY
REFER TO
2
section 5 “UNPACKING THE X-RAY UNIT” on page 12
section 6.1 “Attaching the X-ray unit to the wall” on page
14
2
2
2
2
2
2
2
2
section 6.2 “Attaching the X-ray unit to the floor” on page
18
section 7 “INSTALLING THE EXPOSURE SWITCH” on
page 26
ProMax 3D Mid Technical Manual
Screw M10x70 DIN 571
+protective cap
Screw M8x50 DIN 571
Screw 4x30
Washer ø10.5/21 DIN 125
Expansion anchor ø14x70
Washer ø8,4/17 DIN 125
Expansion anchor ø10x50
Expansion anchor ø6x30
Alignment pin
3DMax_acc.eps
Felt pads ø24
Installation manual
Planmeca ProMax 3D Mid 9
CONTENTS OF THE SHIPMENT
Package 2 contains:
1.
Reconstruction PC
2.
3D Midsensor
3.
Switch
4.
Soft patient support (head bands and support bars)
E
2
D
1
A
4(B)
3
3DMax_package_contents_2.eps
Package 2
C
Package 3 contains:
1.
3.2
Chair
Associated documentation
Install the X-ray unit according to the instructions given in this manual. Perform the
adjustments according to the Technical Manual, and verify the operation of the installed X-ray
unit according to the User’s Manual(s).
All the documentation listed above is supplied with the X-ray unit.
10
Planmeca ProMax 3D Mid
Installation manual
GENERAL VIEW OF THE X-RAY UNIT
4
GENERAL VIEW OF THE X-RAY UNIT
C-arm
3D sensor
Emergency stop
button
Cephalostat
Head band
Patient support
table
Patient handles
Patient
positioning
controls
Control panel
Stationary column
Mid_1.eps
Telescopic column
Chair
(included in delivery)
Installation manual
Planmeca ProMax 3D Mid 11
UNPACKING THE X-RAY UNIT
5
UNPACKING THE X-RAY UNIT
NOTE
The edges of the shipping crate may be sharp. Use gloves when handling the crate.
The X-ray unit is delivered in a wooden shipping crate as shown below.
Remove the screws that secure the cover and two side panels in position. Remove the cover
and panels (1).
Cover
1
3DMax_unpack2.eps
Side panels
1
Remove the protective part (2), column side covers (3), shoulder arm cover (4) and
accessories carton (5).
Pull the support frame slightly off the pallet so that you can lift the X-ray unit up.
5
2
3
3DMax_unpack2.eps
4
Support frame
12
Planmeca ProMax 3D Mid
Installation manual
UNPACKING THE X-RAY UNIT
NOTE Do not remove the support frame until the X-ray unit has been attached to the wall.
NOTE Attach felt pads (included in the delivery) to the underside of the column base plate
before you lift the X-ray unit up.
3DMax_unpack3.eps
Now lift the X-ray unit up.
Units with cephalostat: Remove the cephalostat from its package. Note, that the cephalostat
arm is attached to the package with the parts that you will need when you attach the
cephalostat arm to the X-ray unit column.
Installation manual
Planmeca ProMax 3D Mid 13
INSTALLING THE X-RAY UNIT
6
INSTALLING THE X-RAY UNIT
NOTE The X-ray unit must be installed in a location where the user can freely monitor the
patient during the whole imaging process. For minimum operational space
requirements, see section 2.5 “X-ray unit dimensions” on page 6.
NOTE Make sure that there is a dedicated, grounded power outlet within 2.5 meters (8 feet) of
where the X-ray unit is to be installed.
6.1
Attaching the X-ray unit to the wall
NOTE The wall bracket installation must be able to resist a pull-out force of 5518 N (551.8 kg,
1216 lb).
NOTE For dimensions of the wall bracket, see section 2.6 “Wall bracket dimensions” on page
7. For installation drawing, see section 12 “DIAGRAMS” on page 61.
Use the wall bracket to mark the position of the mounting screws. Either two or four screws
can be used to secure the bracket to the wall. The bracket is positioned approximately 1250
mm (49.2 in.) from the floor. Use a spirit level to ensure that the wall bracket is level.
If the wall is made of concrete or brick, use the 10x70 DIN 571 lag screws and the 14x70
expansion anchors to secure the wall bracket in position. Drill securing holes (ø14mm (0.55
in.), 85 mm (3.3 in.) in depth) and insert the expansion anchors into the holes.
If the wall is made of wood, use the 10x70 DIN 571 lag screws. Do not use expansion
anchors with wooden wall. Drill securing holes (ø7 mm (0.3 in.), 70-75 mm (2.75-3 in.) in
depth) for the mounting screws.
Use four mounting screws (instead of two) if you use smaller anchors and/or screws than
recommended.
1
2
3
4
5
6
If needed, place protective caps (included in the delivery) on the lag screws.
Wall made of concrete or stone
Wooden wall
3DMax_install1.eps
1250mm
14
Planmeca ProMax 3D Mid
Installation manual
INSTALLING THE X-RAY UNIT
Now carefully move the X-ray unit against the wall bracket. Attach the wall bracket to the Xray unit by tightening the screws of the wall bracket clamps. The wall bracket clamps must
press firmly against the guide rails.
3DMax_install2.eps
(view as seen from the side of the wall)
Clamps
NOTE You can attach the wall bracket to the X-ray unit BEFORE attaching the wall bracket to
the wall. Make sure that you position the bracket at the correct height (approx. 1250 mm
(49.2 in.) from the floor).
NOTE If needed, use cover plugs (included in the delivery) to close unneeded holes in the wall
bracket.
Then unscrew the two screws that attach the transport locking bar to the support frame.
Support frame
3DMax_install3.eps
Transport locking bar
Installation manual
Planmeca ProMax 3D Mid 15
INSTALLING THE X-RAY UNIT
You can now remove the support frame (A) and the styrofoam packaging (B).
Unscrew the screws that hold the transport locking bar in position (C).
B
B
3DMax_install4.eps
Styrofoam
packaging
A
B
C
Transport locking bar
Support frame
exp_sw_input_sw.eps
Connect the power supply cable to the terminal on the underside of the stationary column top.
Connect the plug end of the cable to a socket with suitable voltage.
16
Planmeca ProMax 3D Mid
Power supply cable
Installation manual
INSTALLING THE X-RAY UNIT
Switch the X-ray unit on. The on/off switch is located on the underside of the stationary
column top.
Press the up arrow button to move the X-ray unit upwards so that you can remove the
transport locking bar.
Height adjusting buttons:
Down
Up
Mid_53.eps
Remove the screw that attaches the transport locking bar to the column (1). Remove the
transport locking bar (2).
1
2
Installation manual
Planmeca ProMax 3D Mid 17
INSTALLING THE X-RAY UNIT
6.2
Attaching the X-ray unit to the floor
NOTE The X-ray unit must be attached to the wall with at least one wall bracket. If only one wall
bracket is used, the X-ray unit must be attached to the floor as well. If the X-ray unit is
not attached to the floor, a second wall bracket must be used (see section 6.3 “Attaching
the second wall bracket” on page 19).
Use a spirit level to ensure that the column is vertical (A). If you have to make adjustments
move the base of the column. Mark the position of the fastening holes on the floor (B).
If the floor is made of concrete or brick, use the 8x50 DIN 571 lag screws and the 10x50
expansion anchors. Drill two securing holes (ø10 mm (0.4 in.), 45-50 mm (1.9 in.) in depth)
and insert the expansion anchors into the holes.
If the floor is made of wood, use the 8x50 DIN 571 lag screws. Do not use expansion anchors
with wooden floor. Drill two securing holes (ø5 mm (0.2 in.), 45-50 mm (1.9 in.) in depth) for
the mounting screws.
Mid_51.eps
A
B
18
Planmeca ProMax 3D Mid
Installation manual
INSTALLING THE X-RAY UNIT
Ensure that the telescopic column moves smoothly. To do this, move the column from the
lowest position to the uppermost position a couple of times.
Height adjusting buttons:
Down
Up
If needed, adjust the telescopic column position as described in section 6.6 “Adjusting the
telescopic column position” on page 23.
6.3
Attaching the second wall bracket
Use a spirit level to make sure that the column is vertical. If you have to make adjustments
move the base of the column. Mark the position of the wall bracket fastening holes and attach
the second bracket to the wall as described in section 6.1 “Attaching the X-ray unit to the wall”
on page 14.
NOTE Make sure that you position the bracket at the correct height (approx. 150 mm (6 in.)
from the floor).
Mid_52.eps
A
B
150mm
Installation manual
Planmeca ProMax 3D Mid 19
INSTALLING THE X-RAY UNIT
Ensure that the telescopic column moves smoothly. To do this, move the column from the
lowest position to the uppermost position a couple of times.
Height adjusting buttons:
Down
Up
If needed, adjust the telescopic column position as described in section 6.6 “Adjusting the
telescopic column position” on page 23.
6.4
Attaching the 3D Mid sensor
NOTE Make sure that the X-ray unit is switched off.
Mid_40.eps
Push the sensor head onto the connector on the C-arm (1).
1
C-arm
Sensor
20
Planmeca ProMax 3D Mid
Installation manual
INSTALLING THE X-RAY UNIT
Mid_41.eps
Turn the locking knob over the fastening mechanism (1). This will secure the sensor head in
position.
1
Mid_42.eps
Push in the button of the C-arm electrical connector (1) on the other side to secure the sensor
head in position. This will make the electrical connection between the sensor head and C-arm.
1
Installation manual
Planmeca ProMax 3D Mid 21
INSTALLING THE X-RAY UNIT
6.5
Attaching the shoulder arm cover
The shoulder arm cover is attached to the shoulder arm frame with mounting springs. Press
the shoulder arm cover into position so that the mounting springs located on the underside of
the cover hit the screws on the shoulder arm frame.
Shoulder arm cover
(4 springs)
Mid_54.eps
Shoulder arm frame
(4 screws)
22
Planmeca ProMax 3D Mid
Installation manual
INSTALLING THE X-RAY UNIT
6.6
Adjusting the telescopic column position
NOTE Attach the sensor to the C-arm before you adjust the telescopic column position. Refer
to section 6.4 “Attaching the 3D Mid sensor” on page 20.
Use a spirit level to make sure that the telescopic column is positioned parallel with the
stationary column (sideways and in depth) (1). If the columns are not positioned parallel,
adjust the position of the telescopic column as follows.
Switch the X-ray unit on. Use the up arrow button to move the X-ray unit to the position shown
below.
Height adjusting buttons:
Down
Up
To adjust the sideways position, first loosen the two screws (2) on the left side of the column
(as seen from the front). Then turn the nuts (3) located between the columns until the gap on
the left side is the same size as the gap on the right, and the telescopic column is positioned
parallel with the stationary column.
You can then tighten the upper screw.
1
2
1
Mid_55.eps
3
Installation manual
Planmeca ProMax 3D Mid 23
INSTALLING THE X-RAY UNIT
To adjust the column position in depth, loosen the lower screws (1) on both sides of the
stationary column. Use a spirit level to check the column position (2) and manually move the
telescopic column so that it is positioned parallel with the stationary column (3).
Then tighten both screws.
3
2
Mid_56.eps
1
24
Planmeca ProMax 3D Mid
Installation manual
INSTALLING THE X-RAY UNIT
6.7
Attaching the side covers
Starting from the bottom (1), press the back edge of the side cover into the groove in the
stationary column as shown (2). Continue to the top. Then attach the front edge (3).
Mid_57.eps
2
3
1
Installation manual
Planmeca ProMax 3D Mid 25
INSTALLING THE EXPOSURE SWITCH
7
INSTALLING THE EXPOSURE SWITCH
NOTE The exposure switch must be located in a position that satisfies the local radiation
safety regulations with regards to operator safety and the shielding of X-ray equipment.
The exposure switch can be mounted on the wall, or it can be hung from the hook
provided on the stationary column top if a protected area is within reach.
NOTE The wiring options for a remote installation (European and US versions) are shown in
section 12 “DIAGRAMS” on page 61.
CAUTION Only the Planmeca cross connection spiral cable (Planmeca part no. 10001193)
can be used between the X-ray unit and the exposure switch. This cable can be
lengthened with an RJ12 Coupler and a Modular extension cable (6wire with
2xRJ12).
7.1
Movable exposure switch
Use the holder plate to mark the position of the exposure switch.
If the wall is made of concrete or brick, use the 4x30 screws and the 6x30 expansion anchors.
Drill ø6mm (0.23 in.), 20 mm (0.8 in.) in depth, securing holes and place the expansion
anchors into the holes.
If the wall is made of wood, use the 4x30 screws. Do not use the expansion anchors with
wooden wall. Drill ø3 mm (0.11 in.), 20 mm (0.8 in.) in depth, holes for the attachment screws.
Attach the holder plate to the wall with the two attachment screws. The exposure switch can
then be positioned on the holder plate.
B
A
26
Planmeca ProMax 3D Mid
Exp_sw_wall3_wol.eps
Exp_sw_wall2_wol.eps
Holder plate
Installation manual
INSTALLING THE EXPOSURE SWITCH
Connect the exposure switch cable to the right hand side terminal (marked “EXP”) on the
underside of the stationary column top.
exp_sw_input_sw2.eps
C
D
Installation manual
Exp_sw_wall5.eps
Connect the other cable end to the exposure switch.
Planmeca ProMax 3D Mid 27
INSTALLING THE EXPOSURE SWITCH
7.2
Stationary exposure switch
Use the holder plate to mark the position of the exposure switch.
If the wall is made of concrete or brick, use the 4x30 screws and the 6x30 expansion anchors.
Drill ø6mm (0.23 in.), 20 mm (0.8 in.) in depth, securing holes and place the expansion
anchors into the holes.
If the wall is made of wood, use the 4x30 screws. Do not use the expansion anchors with
wooden wall. Drill ø3 mm (0.11 in.), 20 mm (0.8 in.) in depth, holes for the attachment screws.
Make sure that the exposure switch attachment nut is in position at the lower end of the
holder plate. Attach the holder plate to the wall with the two attachment screws.
A
Exp_sw_wall2.eps
Holder plate
Exposure switch attachment nut
Exp_sw_wall4.eps
D
C
Exp_sw_wall3.eps
B
Exp_sw_wall1.eps
Attach the fastening plate to the exposure switch with an EJOT PT 30x8 WN1451 screw. The
exposure switch can now be positioned on the holder plate. Then attach the exposure switch
to the holder plate with an M3x10 DIN 912 screw.
Fastening plate
28
Planmeca ProMax 3D Mid
Installation manual
INSTALLING THE EXPOSURE SWITCH
Connect the exposure switch cable to the right hand side terminal (marked “EXP”) on the
underside of the stationary column top.
exp_sw_input_sw2.eps
E
F
Installation manual
Exp_sw_wall5.eps
Connect the other cable end to the exposure switch.
Planmeca ProMax 3D Mid 29
INSTALLING THE EXTERNAL CONTROL PANEL (OPTIONAL)
8
INSTALLING THE EXTERNAL CONTROL PANEL
(OPTIONAL)
NOTE Make sure that the X-ray unit is switched off before connecting/disconnecting the cable
of the external control panel to the X-ray unit.
Connect the cable of the external control panel (RJ-45 UTP, max. length 15 m) to the middle
terminal (marked “Plancan”) on the underside of the stationary column top.
exp_sw_input_sw3.eps
Cable for
external control panel
8.1
Attaching the control panel to the wall
NOTE If you are using a wall socket, follow the instructions given in section 8.2 “Attaching the
control panel to a wall socket (USA)” on page 33.
Uif1.eps
Use the attachment plate as a template and mark the positions where the holes for the four
attaching screws will be drilled.
4x
Attachment plate
30
Planmeca ProMax 3D Mid
Installation manual
INSTALLING THE EXTERNAL CONTROL PANEL (OPTIONAL)
If the wall is made of concrete or brick, use 4x30 screws and 6x30 expansion anchors. Drill
ø6mm (0.23 in.), 20 mm (0.8 in.) in depth, securing holes and insert the expansion anchors
into the holes.
If the wall is made of wood, use 4x30 screws. Do not use expansion anchors with wooden
wall. Drill ø3 mm (0.11 in.), 20 mm (0.8 in.) in depth, holes for the attachment screws.
Uif2.eps
Attach the plate to the wall with the four screws.
4x
Attach the support plate and the fork to the holder with two M6x12 DIN 7984 screws. Secure
the fork to the support plate with two M3 DIN 934 nuts.
Holder
Support plate
Uif3.eps
Fork
Installation manual
Planmeca ProMax 3D Mid 31
INSTALLING THE EXTERNAL CONTROL PANEL (OPTIONAL)
Attach the control panel to the support plate with four PT 3x12 rst WN1451 torx screws.
Support plate
Uif4.eps
Control panel
Uif5.eps
Slide the control panel onto the attachment plate as shown.
Control panel
Attachment plate
Connect the control panel cable to the terminal (marked “Plancan”) on the underside of the
control panel frame.
NOTE For wiring connections, see section 12 “DIAGRAMS” on page 61.
32
Planmeca ProMax 3D Mid
Installation manual
INSTALLING THE EXTERNAL CONTROL PANEL (OPTIONAL)
8.2
Attaching the control panel to a wall socket (USA)
Uif6.eps
Secure the attachment plate to the wall box with two screws as shown.
Wall box
Attachment plate
Attach the support plate and the fork to the holder with two M6x12 DIN 7984 screws. Secure
the fork to the support plate with two M3 DIN 934 nuts.
Support plate
Holder
Uif3.eps
Fork
Attach the control panel to the support plate with four PT 3x12 rst WN1451 torx screws.
Support plate
Uif4.eps
Control panel
Installation manual
Planmeca ProMax 3D Mid 33
INSTALLING THE EXTERNAL CONTROL PANEL (OPTIONAL)
Uif7.eps
Route the control panel cable through the opening in the attachment plate. Connect the cable
to the terminal (marked “Plancan”) on the underside of the control panel frame.
Control panel cable
Uif5.eps
Slide the control panel onto the attachment plate as shown.
Control panel
Attachment plate
NOTE For wiring connections, see section 12 “DIAGRAMS” on page 61.
34
Planmeca ProMax 3D Mid
Installation manual
CONNECTING THE 3D SYSTEM
9
9.1
CONNECTING THE 3D SYSTEM
Connecting the Ethernet cables
NOTE Make sure that the X-ray unit is switched off before you connect the Ethernet cables.
Connect the cables as follows.
Reconstruction PC
Romexis PC*
* = Not included
in delivery
X-ray unit
a)
Ethernet switch
PoE
10/100/1000 Base-T Ports (1-8) - Ports are Auto - MDIX
In
1
2
3
5
4
6
7
8
Network cable*
b)
c)
a) Use an Ethernet cable to connect the ProMax X-ray unit to the Ethernet switch.
The Ethernet cable is attached to the left terminal (marked “ETHERNET”) on the underside of
the stationary column top.
NOTE Only an Ethernet cable can be connected to the left hand side terminal. Do not connect
any other cables to this terminal.
exp_sw_input_sw.eps
WARNING!
Wrong connection
can cause damage!
Make sure that you
connect the cable to
the connector
marked “ETHERNET”.
Installation manual
Planmeca ProMax 3D Mid 35
CONNECTING THE 3D SYSTEM
b) Use an Ethernet cable to connect the reconstruction PC to the Ethernet switch.
Reconstruction PC
Terminal for
Ethernet cable
(Reconstruction PC Ethernet switch)
c) Use an Ethernet cable to connect the Workstation PC (Romexis PC) to the Ethernet
switch.
36
Planmeca ProMax 3D Mid
Installation manual
CONNECTING THE 3D SYSTEM
9.2
IP Address for reconstruction PC
NOTE The IP address of eth0 card (for 3D Max sensor) should NOT be changed.
The reconstruction PC is equipped with two Ethernet cards. The default IP address of eth1
card (for switch) is 10.0.0.3. If this address needs to be changed, proceed as follows.
Start the Putty.exe program on the Romexis PC. The program is available on the Romexis
DVD (Tools/Putty). Enter the reconstruction PC IP address in the Host Name (or IP address)
field. Set the Port to value 22 and select SSH protocol. Click Open.
Enter the login name root and password adminx.
Type into the Terminal window cd /etc/sysconfig/networking/devices.
Installation manual
Planmeca ProMax 3D Mid 37
CONNECTING THE 3D SYSTEM
Configure the file by writing nano ifcfg-eth1.
Enter the new IP address and save the changes by pressing CTRL+x.
You have to change the address also to the hosts file. On the command row go to the cd /etc
and configure the file by writing nano hosts.
38
Planmeca ProMax 3D Mid
Installation manual
CONNECTING THE 3D SYSTEM
Enter the new IP address and save the changes by pressing CTRL+x.
9.3
Configuring the Ethernet link for ProMax
Switch the X-ray unit on. On the X-ray unit control panel, touch the i field on the main display.
The list of Information displays appears. From the list of Information displays select
Special functions (i400). Then select Network settings on the Special functions display.
The display shown below will appear.
Installation manual
Planmeca ProMax 3D Mid 39
CONNECTING THE 3D SYSTEM
Ethernet (i48.1)
On the Network settings (i480) display, select the option Ethernet (i48.1). The display
shown below appears.
•
MAC Address
MAC (Media Access Control) address is unit specific and it cannot be changed.
•
Network Mode
Touch the Network Mode field to scroll through the available options:
- Auto-negotiation (default setting). The data is transmitted at the highest possible speed
(the Ethernet devices will autonegotiate, i.e. mutually determine, the highest speed they
both support).
- 10/100 Mb Half-duplex. The data is transmitted in both directions on a signal carrier, but
not at the same time.
- 10/100 Mb Full-duplex. The data is transmitted in both directions on a signal carrier at the
same time.
TCP/IP (i48.2)
On the Network settings (i480) display, select the option TCP/IP (i48.2). TCP/IP stands for
Transmission Control Protocol / Internet Protocol. The display shown below appears.
40
•
IP Address - Ethernet interface IP (Internet Protocol) address
•
Netmask - Subnet mask
•
Gateway - Gateway IP address
Planmeca ProMax 3D Mid
Installation manual
CONNECTING THE 3D SYSTEM
NOTE In case the X-ray unit is connected to a 10/100 Base Network, the Gateway, Netmask and
the ProMax IP address have to be static and specified by the local administrator to be
used only for this configuration.
Refer to the IP address example shown in section
network architecture with subnet” on page 5.
“Planmeca ProMax 3D Mid system
The settings can be changed by touching the address field. The following window will appear.
Enter the new address and save it by touching OK. You can use values between
0 - 255.
General (i48.3)
If a Net password has been set for the Ethernet link, it must be removed.
On the Network settings (i480) display, select the option General (i48.3). The display shown
below appears.
First touch the Password Set field. Then enter the password on the display that appears and
touch OK.
Installation manual
Planmeca ProMax 3D Mid 41
CONNECTING THE 3D SYSTEM
Checking ProMax Ethernet link communication
The Ethernet link communication from the Romexis PC to the ProMax can be checked by
opening the Command Prompt and executing the command “ping <ProMax IP address>”,
e.g. ping 10.0.0.1.
ProMax will send a Reply packet back if the Ethernet link is up and running.
Check the connection between Romexis PC and reconstruction PC the same way.
NOTE If you do not receive a reply message (e.g. Time-out signal) the link is not working
properly.
9.4
Installing the Romexis software
Install the software according to the instructions given in the Romexis Installation manual
(publication number 10014600).
9.5
Configuring IP addresses in ProMax3D Tool
The IP addresses for ProMax and reconstruction PC must be configured also in the
ProMax3D Tool program.
Start the ProMax3D Tool program.
Select the option 3D Max from the Settings/ProMax Sensor menu.
42
Planmeca ProMax 3D Mid
Installation manual
CONNECTING THE 3D SYSTEM
Configuring ProMax IP address
Select the option ProMax IP from the Settings menu.
Enter the new IP address in the Configure ProMax IP Address window and save the setting
by clicking Set. The port must be 5000.
Configuring reconstruction PC IP address
Select the option Reconstruction PC from the Settings menu.
Enter the new IP address in the Settings window and save the setting by clicking Save and
Close. The port must be 5000.
Reboot the reconstruction PC and check communication from the Romexis PC to the
reconstruction PC by opening the Command Prompt and executing the command “ping
<reconstruction PC IP address>”.
Installation manual
Planmeca ProMax 3D Mid 43
CONNECTING THE 3D SYSTEM
9.6
Configuring the reconstruction PC IP address in Romexis
Configure the new reconstruction PC IP address also in the Reconstruction Server field in
Romexis software (Admin > Local Settings).
44
Planmeca ProMax 3D Mid
Installation manual
INSTALLING THE CEPHALOSTAT
10 INSTALLING THE CEPHALOSTAT
10.1
Attaching the cephalostat to the X-ray
If the two rear cover plates are attached to the unit remove them. Switch the unit on and drive
the telescopic column to the uppermost position (1). Switch the unit off. Detach the upper
inner corner of the cover plate by carefully pulling it outwards (2). Detach the cover plate by
pushing the cover plate inwards (see small arrows on the figure below) (3).
2
3
1
Mid_58.eps
3
Installation manual
Planmeca ProMax 3D Mid 45
INSTALLING THE CEPHALOSTAT
Unscrew four attachment screws of the patient support carriage cover (1) and pull the cover
away from its position (2).
2
Mid_43.eps
1
Remove the telescopic column upper front panel by pulling it away from the column (1).
Mid_45.eps
1
46
Planmeca ProMax 3D Mid
Installation manual
INSTALLING THE CEPHALOSTAT
Unscrew the six screws of the EMC cover (1) and remove the cover (2).
2
Mid_44.eps
1
The nut of the swing bolt is adjusted to the correct height at the factory. Do not move the nut.
Lift the cephalostat to the front of the telescopic column so that the attachment screws go
through the openings on the column (1). Be careful not to damage the cables.
1
03-J13
03-J13
Swing bolt
03-J2
Mid_60.eps
Cephalostat cables
Installation manual
03-J2
Planmeca ProMax 3D Mid 47
INSTALLING THE CEPHALOSTAT
Mid_61.eps
Place the attachment plate to its position (2) and attach it with the two washers and nuts (3).
Tighten the attachment nuts firmly.
2
3
Connect the cephalostat cable to the connector J13 and the cephalostat data cable to the
connector J2 on the CPU PCB.
J2
HI
LO
Mid_59.eps
J13
48
Planmeca ProMax 3D Mid
Installation manual
INSTALLING THE CEPHALOSTAT
Attach the EMC cover back to its position (1).
Mid_46.eps
1
Make sure that the cephalostat cable (1) and cephalostat data cable (2) are not sharply bent
or squeezed.
2
Mid_47.eps
1
Installation manual
Planmeca ProMax 3D Mid 49
INSTALLING THE CEPHALOSTAT
Select from Technical calibrations the Patient support upper position calibration (i53.2). When
text “Lock” is shown on the field, the motor is released and can be driven.
Mid_48.eps
Carefully drive the telescopic columnt upwards (1) so that you can place the upper front
panel to its position. DO NOT DRIVE THE ARM TO THE MECHANICAL LIMIT! (2) Attach
the upper front panel to its position (3 and 4).
3
1
4
2
NOTE
50
IMPORTANT: After attaching the cover exit the Patient support upper position
calibration mode by touching CANCEL.
Planmeca ProMax 3D Mid
Installation manual
INSTALLING THE CEPHALOSTAT
10.2
Attaching the sensor head adapter to the cephalostat
Cephalostat with movable sensor head - attaching the sensor head adapter
NOTE
If the cephalostat is equipped with fixed sensor head, attach the sensor head adapter to
the cephalostat according to the instructions given in section “Cephalostat with fixed
sensor head - attaching the sensor head adapter” on page 53.
Before attaching the sensor head adapter remove its covers: Unscrew the bottom cover plate
attachment screw with the 4mm Allen key and remove the cover plate (1).
Unscrew the attachment screw of the quick connector mechanism back cover with the 4mm
Allen key and slide the cover away from its position (2).
PXR_Adj_digiceph21.eps
Turn the lock disc approx. 90° counter clockwise. Loosen the attachment screws of the front
cover with the 3mm Allen key and slide the cover away from its position (3).
Lock disk
3
2
1
Installation manual
Front cover
Back cover
Bottom cover plate
Planmeca ProMax 3D Mid 51
INSTALLING THE CEPHALOSTAT
Attach the cephalostat data cable to the connector located on the sensor head adapter. Note
that the connector is attached to the adapter with velcro tape and can be temporarily
detached, if needed.
PXR_Adj_digiceph22.eps
Attach the sensor head adapter tentatively to the cephalostat with three attachment screws
with 3mm Allen key. Do not tighten the screws yet, the position of the adapter must be
checked first.
Adapter attachment screws
Before tightening the adapter attachment screws, perform the adjustment of the sensor head
adapter according to the instructions given in ProMax X-ray unit’s Technical manual,.
NOTE
52
The cephalostat beam alignment must be checked before attaching the second primary
collimator to the cephalostat. Check the beam alignment according to the instructions
given in ProMax X-ray technical manual.
Planmeca ProMax 3D Mid
Installation manual
INSTALLING THE CEPHALOSTAT
Cephalostat with fixed sensor head - attaching the sensor head adapter
NOTE
If the cephalostat is equipped with movable sensor head, attach the sensor head
adapter to the cephalostat according to the instructions given in section “Cephalostat
with movable sensor head - attaching the sensor head adapter” on page 51.
Remove first the sensor head adapter covers:
Remove the locking plate.
Locking plate
Unscrew the bottom cover plate attachment screw with the 4mm Allen key and remove the
cover plate.
Bottom cover plate
Installation manual
Planmeca ProMax 3D Mid 53
INSTALLING THE CEPHALOSTAT
Unscrew the attachment screw of the back cover with the 4mm Allen key (1) and slide the
cover from its position (2).
1
2
Unscrew the two front cover attachment screws with the 3mm Allen key (1) and remove the
cover (2).
1
2
54
Planmeca ProMax 3D Mid
Installation manual
INSTALLING THE CEPHALOSTAT
Attach the cephalostat data cable to the connector located on the sensor head adapter.
Cephalostat data cable
Unscrew one adapter attachment screw from the attachment plate on the cephalostat (1) and
two attachment screws from the sensor head adapter with the 3mm Allen key (2). Attach the
sensor head adapter to the cephalostat with these three attachment screws.
1
2
Installation manual
Planmeca ProMax 3D Mid 55
INSTALLING THE CEPHALOSTAT
Before tightening the adapter attachment screws, perform the adjustment of the sensor head
adapter according to the instructions given in ProMax X-ray unit’s Technical manual.
NOTE
The cephalostat beam alignment must be checked before attaching the second primary
collimator to the cephalostat. Check the beam alignment according to the instructions
given in ProMax X-ray technical manual.
The sensor head is attached to the adapter after the cephalostat alignment has been
checked.
56
Planmeca ProMax 3D Mid
Installation manual
INSTALLING THE CEPHALOSTAT
10.3
Attaching the second primary collimator
NOTE
The cephalostat beam alignment must be checked before attaching the second primary
collimator to the cephalostat. Before the second primary collimator is attached, check
the beam alignment according to the instructions given in ProMax X-ray technical
manual.
Before attaching the second primary collimator remove its covers: Unscrew the collimator
cover attachment screw using the 2mm Allen key and slide the collimator cover from its position. Unscrew the two collimator cover box attachment screws using the 3mm Allen key and
slide the collimator cover box from its position (see figure on next page).
PXR_Adj_digiceph22.eps
Attach the collimator plate tentatively to the cephalostat with three attachment screws by
using 3mm Allen key. Do not tighten the screws yet, the position of the collimator plate must
be checked first.
Collimator attachment screws
Before tightening the collimator attachment screws, check and adjust the position of the
second primary collimator according to the instructions given in ProMax X-ray unit’s Technical
manual.
Installation manual
Planmeca ProMax 3D Mid 57
INSTALLING THE CEPHALOSTAT
Tighten the attachment screws and attach the second primary collimator covers as follows.
Slide the collimator cover box to its position and attach it with the two attachment screws by
using the 4mm Allen key (1).
PXR_Adj_digiceph21.eps
Slide the collimator cover to its position and attach it with the attachment screw by using the
2mm Allen key (2).
Collimator plate
1
2
58
Cover box
Collimator cover
Planmeca ProMax 3D Mid
Installation manual
CHECKING THE ALIGNMENTS
11 CHECKING THE ALIGNMENTS
Perform the adjustments and calibrations according to the instructions given in X-ray unit’s
Technical Manual..
Installation manual
Planmeca ProMax 3D Mid 59
CHECKING THE ALIGNMENTS
60
Planmeca ProMax 3D Mid
Installation manual
DIAGRAMS
12 DIAGRAMS
Installation manual
Planmeca ProMax 3D Mid 61
P roMax
E xpos ure S witch /
R emote connection E U
24.09.2009 LY
Data wall s ocket
connection
Modular J ack
R J -12
E xpos ure s witch
12 3 4 56 7 8
6
1
E XP
+26V
E XP Lamp
R eady Lamp
E xpos ure s witch
10004039
C able MHS 1x5x0.5 C ode 06320032
1 2 3 4 5 6 7 8
E xpos ure S piral
C able 10001193
NOT E
C ros s connected C able
E xpos ure s witch
10004039
C able MHS 1x5x0.5 C ode 06320032
123456 78
1 23456 78
Telephone Cable (RJ12)
Code 10005679
MA
IN S
L/s
E THE R NE T
PLANC AN
N
L
E xpos ure S piral
C able 10001193
Data wall s ocket
as s embly 06001019
WAR NING : Wrong connection
can caus e damage
1 2 3 4 5 6 7 8
E xpos ure E xtens ion
C able 10005679
1
6
2
E xpos ure S piral C able
3
1
P roMax
E xpos ure S witch /
R emote connection US
24.09.2009 LY
Modular J ack
R J -12
E xpos ure
S piral C able
1
4
6
3
1
2
5
6
E xpos ure s witch
6
1
E XP
+26V
E xpos ure s witch
10004039
E XP Lamp
R eady Lamp
E xpos ure S piral
C able 10001193
E xpos ure E xtens ion
C able 10005679
NOT E
C ros s connected C able
C able MHS 1x5x0.5 C ode 06320032
1 --> 1
2 --> 2
5 --> 5
6 --> 6
4
6
2
3
1
E xpos ure C able
10005679
4
6
2
5
3
1
5
MA
E THE R NE T
VOLTAGE
100 - 120V~
220 - 240V~
E xpos ure s witch
10004039
IN S
L/s
E XP.
PLANC AN S WIT C H
FUSE RATINGS
15 AT x 2
10 AT x 2
N
L
WAR NING : Wrong connection
can caus e damage
US Wall T ermination
Unit 10008847
E xpos ure S piral
C able 10001193
P roMax
Double E xpos ure S witch / Lamp
R emote connection E U
24.09.2009 LY
Optional
E xpos ure
Lamp
Ca
M
ble
1x5
HS
x0.
5C
063
ode
200
32
E xpos ure S piral
C able 10001193
NOT E !
E L E C T R IC A L L Y
C R OS S -C ONNE C T E D
E xpos ure S piral
C able 0001193
NOT E ! T he las t E xpos ure s witch
s hould be terminated by jumper J 7
to "ON"-pos ition.
MA
IN S
L/s
E THE R NE T
E XP.
PLANC AN S WIT C H
VOLTAGE
100 - 120V~
220 - 240V~
FUSE RATINGS
15 AT x 2
10 AT x 2
N
L
WAR NING : Wrong connection
can caus e damage
B uzz On
NC
100080481 C OM
E XP OUT
E XP IN
J4
R DY IND
J5
N
E XP
S W.
R L1
L
E XP IND
J6
N
L
2
L
N
2
C able 2x1.00-1.50mm
3
1
2
NO
N
NC
L
F ixed E xpos ure s witch
3
C OM
1 23456 78
NO
NC
L
L (-)
L (+)
N
3
NO
J3
L (+)
2
NC
+26V
L (+)
L (-)
100080481 C OM
L (-)
E XT E R NAL
LAMP
R DY IND <--> 1
E XP IND <--> 2
VC C
<--> 5
E XP IN <--> 6
VC C
- VC C
E XP IN - E XP OUT
R DY IND - R DY IND
E XP IND - E XP IND
Optional
E xpos ure
Lamp
Max 100W
J8
L (-)
B uzz Off
1
F ixed E xposure Assembly
10016800
F ixed E xposure Assembly
10016800
Data Wall S ocket Assembly
06001019
P roMax
Double E xpos ure S witch / Lamp
R emote connection US
24.09.2009 LY
Optional
E xpos ure
Lamp
Ca
ble
x5
S 1
MH
x0.
5C
063
ode
200
32
10008847
E xpos ure S piral
C able 10001193
NOT E !
E L E C T R IC A L L Y
C R OS S -C ONNE C T E D
E xpos ure S piral
C able 10001193
MA
IN S
L/s
E THE R NE T
NOT E ! T he las t F E X
s hould be terminate by jumpper J 7
to "ON"-pos ition.
E XP.
PLANC AN S WIT C H
VOLTAGE
100 - 120V~
220 - 240V~
FUSE RATINGS
15 AT x 2
10 AT x 2
N
L
WAR NING : Wrong connection
can caus e damage
B uzz On
L (-)
L (+)
N
3
NO
NC
100080481 C OM
J3
2
E XP OUT
E XP IN
J4
R DY IND
J5
E XP IND
J6
N
E XP
S W.
R L1
C able 2xAWG 22 ..... AWG 20
White
B lack
Y ellow
B lue
3
1
2
NO
N
NC
3
C OM
NO
NC
4
6
3
1
2
5
L
L
L (-)
L
24V AC
Low V oltage
L (+)
2
NC
+26V
L (+)
100080481 C OM
J8
R DY IND <--> 1
E XP IND <--> 2
VC C
<--> 5
E XP IN <--> 6
L (-)
E XT E R NAL
LAMP
<- VC C ->
E XP IN - E XP OUT
R DY IND - R DY IND
E XP IND - E XP IND
Optional
E xpos ure
Lamp
Max 100W
L (-)
B uzz Off
F ixed E xpos ure s witch
1
F ixed E xposure Assembly
10008100
F ixed E xposure Assembly
10008100
US Wall T ermination
Units 10008847
P roMax
E xpos ure Lamp
R emote connection E U
24.09.2009 LY
Optional
E xpos ure
Lamp
0. 5
x5x
S 1032
H
M
0
ble 6 3 2
C a de 0
o
C
Wall S ocket E XP Lamp C able
10018652
Wall S ocket E XP Lamp C able 10018652
R DY IND <--> 1
E XP IND <--> 2
VC C
<--> 5
E XP IN <--> 6
E xpos ure S piral C able 10001193
Optional
E xposure Lamp
Max 100W
MA
E XP.
PLANC AN S WIT C H
VOLTAGE
100 - 120V~
220 - 240V~
N
N
L
IN S
L/s
E THE R NE T
FUSE RATINGS
15 AT x 2
10 AT x 2
N
L
1 23456 78
L
C able 2x1.00-1.50mm 2
WAR NING : Wrong connection
can caus e damage
N
L
F ixed E xposure Assembly
10016801
Data Wall S ocket Assembly
06001019
P roMax
E xpos ure Lamp
R emote connection US
24.09.2009 LY
Optional
E xpos ure
Lamp
x0
1x5
H S 0032
M
ble 6 3 2
C a de 0
Co
.5
10008847
Wall S ocket E XP Lamp C able
10018652
R DY IND <--> 1
E XP IND <--> 2
VC C
<--> 5
E XP IN <--> 6
White
B lack
Y ellow
B lue
Wall S ocket E XP Lamp C able 10018652
Optional
E xposure Lamp
Max 100W
E xpos ure S piral C able 10001193
4
6
24V AC
Low V oltage
C able 2xAWG 22 ..... AWG 20
N
2
3
1
5
L
F ixed E xposure Assembly
10016799
MA
IN S
L/s
E THE R NE T
E XP.
PLANC AN S WIT C H
VOLTAGE
100 - 120V~
220 - 240V~
FUSE RATINGS
15 AT x 2
10 AT x 2
N
L
WAR NING : Wrong connection
can caus e damage
US Wall T ermination
Units 10008847
P roMax
E xpos ure S witch /
G UI R emote connection
24.09.2009 LY
E xpos ure s witch
R J 12
1
E xpos ure S piral C able
6
G UI or NUI
Interface
6
1
R J 12
E XP
+26V
E XP Lamp
R eady Lamp
10004041 Wall holder plate
E xpos ure s witch
10004039
NOT E
C ros s connected C able
G raphic Us er Interface
LC D 10003609 or
E L 10004236
E xpos ure S piral
C able 10001193
R J -45 UT P C able
max length 15 meters
E xpos ure s witch
10004039
G UI-Wallplate 10004282
G UI- wallfas tener 10004283
P S /2
R S -232
E XP
C ontrol
P lancan
P lancan
R J -45 UT P C able
MA
IN S
L/s
E THE R NE T
E XP.
PLANC AN S WIT C H
N
L
E xpos ure S piral
C able 10001193
WAR NING : Wrong connection
can caus e damage
1
2
3
G UI-Wallplate 10004282
P roMax
E xpos ure S witch / R emote connection
with E xternal Interlock
24.09.2009 LY
Data wall s ocket
connection
Modular J ack
R J -12
1
E xpos ure S piral C able
E xpos ure s witch
6
12 3 4 56 7 8
E XP
+26V
NOT E
C onnection E xample
E xternal
Interlock
E xpos ure s witch
10004039
C able MHS 1x5x0.5 C ode 06320032
NOT E
C ros s connected C able
E xternal
Interlock
NOT E
C onnection E xample
E xpos ure s witch
10004039
C able MHS 1x5x0.5 C ode 06320032
UT P C at5e C able 06320060
123456 78
P roMax/E thernet
1 23456 78
Telephone Cable (RJ12)
Code 10005679
MA
IN S
L/s
E THE R NE T
E xpos ure S piral
C able 10001193
PLANC AN
N
L
WAR NING : Wrong connection
can caus e damage
Data wall s ocket
as s embly 06001019
E xpos ure S piral
C able 10001193
1 2 3 4 5 6 7 8
E xpos ure E xtens ion
C able 10005679
1
1 2 3 4 5 6 7 8
2
1
3
6
E XP Lamp
R eady Lamp
Planmeca Oy | Asentajankatu 6 | 00880 Helsinki | Finland
tel. +358 20 7795 500 | fax +358 20 7795 555 | [email protected] | www.planmeca.com