1
-
Océ
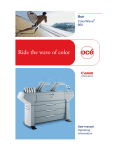
Océ PlotWave™
300
Join the next wave
o
[DRAFT]
User manual
Operating
information
© 2009 Océ.
All rights reserved. No part of this work may be reproduced, copied, adapted, or transmitted
in any form or by any means without written permission from Océ.
Océ makes no representation or warranties with respect to the contents hereof and specifically disclaims any implied warranties of merchantability or fitness for any particular purpose.
Further, Océ reserves the right to revise this publication and to make changes from time
to time in the content hereof without obligation to notify any person of such revision or
changes.
Edition: 2009-04
Trademarks
Trademarks
Océ, Océ PlotWave™ 300 and the Océ Express WebTools are registered trademarks of
Océ-Technologies B.V.
Adobe® and PostScript® 3™ are registered trademarks of Adobe® Systems Incorporated.
Macintosh® is a registered trademark of Apple® Computer, Inc.
Microsoft®, Windows® , Windows NT®, Windows 95/98®, Windows 2000®, Windows
Server® 2003, Windows XP®, Internet Explorer® and Windows Vista® are either registered
trademarks or trademarks of Microsoft® Corporation in the United States and/or other
countries.
AutoCAD® is a registered trademark of Autodesk, Inc.
Mozilla Firefox™ is a registered trademark of The Mozilla Foundation.
Pentium® is a registered trademark of Intel Corporation.
ENERGY STAR® is a registered trademark of the U.S. Environmental Protection
Agency (EPA).
Products in this publication are referred to by their general trade names. In most, if not
all cases, these designations are claimed as trademarks or registered trademarks of their
respective companies.
3
Contents
Contents
Chapter 1
Introduction.........................................................................................................9
Notes for the reader.................................................................................10
Available documentation.........................................................................12
How to use this manual...........................................................................15
The Océ PlotWave™ 300 key concepts..................................................17
User interaction........................................................................................19
Chapter 2
Get to know the printing system....................................................................21
The main components.............................................................................22
Working area [Footprint].........................................................................23
Approved abbreviations..........................................................................24
The Océ PlotWave 300 hardware............................................................25
The components of the printer (front)..............................................25
The components of the printer (left side).........................................27
The components of the printer (back)..............................................28
The components of the scanner (optional)......................................29
The media drawer .............................................................................30
The user panel....................................................................................31
The output delivery............................................................................34
The printing system consumables..........................................................35
Chapter 3
Quick start.........................................................................................................37
Connect the mains supply cable.............................................................38
Switch on the printing system................................................................39
Unpack the media roll..............................................................................41
Load a media roll (position 1).................................................................43
Load a media roll (position 2).................................................................49
The Océ Express WebTools.....................................................................55
The Smart Inbox.......................................................................................56
Easy printing, copying and scanning.....................................................58
Print a file from a USB mass storage device....................................58
Use Océ Publisher Express to send a print job................................59
Print a job from the Smart Inbox......................................................61
®
Use the Océ Windows Printer Driver to send a print job..............62
®
Use the Océ PostScript 3 Driver to send a print job......................64
Make a 1:1 copy of a CAD drawing...................................................66
Make a 1:1 copy of a colour drawing................................................68
4
Contents
Make a scaled copy (50%) of a CAD drawing...................................70
Scan a CAD drawing to TIFF format.................................................72
Scan a CAD drawing to colour PDF..................................................74
Scan a photo to a USB mass storage device...................................76
Switch off the printing system................................................................78
Chapter 4
Define your workflow with the Océ Express WebTools...............................81
Introduction...............................................................................................82
The Océ Express WebTools...............................................................82
The 'Jobs' tab.....................................................................................83
The 'Preferences' tab..........................................................................85
The 'Configuration' tab......................................................................87
The 'Support' tab................................................................................89
The 'System' tab.................................................................................91
Set another language for the Océ Express WebTools....................92
User roles and authorisations...........................................................94
Log in as an authorised user.............................................................95
Log out after your session.................................................................96
Change the password for authorised users.....................................97
How to edit a setting..........................................................................98
View and check the settings............................................................101
Save the settings in a file.................................................................102
Load the settings from a file............................................................103
Restore the factory defaults.............................................................104
The system monitor.........................................................................105
Shut down or restart the system.....................................................107
Configure your printing system............................................................108
Change the regional settings...........................................................108
Configure the sleep mode timer.....................................................109
Configure the network settings in the Océ Express WebTools....110
Configure and manage scan destinations......................................111
Configure scan destinations......................................................111
Configure a local scan destination............................................113
Configure a remote scan destination........................................114
Configure the pen settings..............................................................117
Define your printing system preferences.............................................119
What you need to know about default settings.............................119
Define the system preferences........................................................120
Define the print job preferences......................................................122
Define the default output quality for print jobs.............................124
Define the copy job preferences and copy templates...................125
Define the default output quality for copy jobs.............................128
Define the scan job preferences and scan templates....................130
Define the default output quality for scan jobs..............................133
5
Contents
Manage jobs on your printing system.................................................136
The Smart Inbox and Jobs Queue concept....................................136
Use Smart Inboxes in a multiple-user environment.....................139
Use Smart Inboxes in a repro environment...................................140
Use Smart Inboxes in a multiple-user and repro environment....141
Open or create a Smart Inbox.........................................................142
Delete a Smart Inbox........................................................................143
Chapter 5
Use the printing system.................................................................................145
Pause, resume or delete an active job .................................................146
The job states.........................................................................................147
Clear the system.....................................................................................149
Send print jobs.......................................................................................150
What you need to know before you send your print jobs............150
Use Océ Publisher Express to send a print job..............................151
®
Use the Océ Windows Printer Driver to send a print job............153
®
Use the Océ PostScript 3 Driver to send a print job....................155
Use FTP to send a print job to the Océ PlotWave™ 300...............157
Use LPR to send a print job to the Océ PlotWave™ 300...............158
Print a job from the Smart Inbox....................................................159
Print a file from a USB mass storage device..................................160
Basic copy jobs.......................................................................................161
Introduction to copy jobs.................................................................161
Feed the original...............................................................................162
Use the carrier sheet........................................................................164
Do a basic copy job..........................................................................166
Extended copy jobs................................................................................168
Introduction to copy jobs.................................................................168
Do an extended copy job.................................................................169
Available settings for copy jobs......................................................172
Make multiple sets of copies...........................................................182
Make a copy with a stamp...............................................................184
Scale to another media size.............................................................185
Make a copy on a cut sheet.............................................................187
Make a copy and add a strip............................................................189
Make a copy and remove a strip.....................................................191
Make a copy of a specific area of an original.................................193
Make a copy and delete a specific area of an original..................195
Basic scan jobs.......................................................................................197
Introduction to scan jobs.................................................................197
Feed the original...............................................................................198
Use the carrier sheet........................................................................200
Do a basic scan job...........................................................................202
6
Contents
Extended scan jobs................................................................................204
Introduction to scan jobs.................................................................204
Do an extended scan job.................................................................205
Available settings for scan jobs......................................................208
'File type'...........................................................................................214
Make a scan and remove a strip.....................................................216
Chapter 6
Maintain the printing system........................................................................219
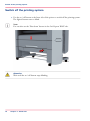
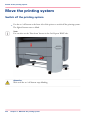
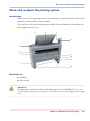
Move the printing system......................................................................220
Switch off the printing system........................................................220
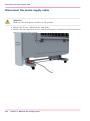
Disconnect the mains supply cable................................................222
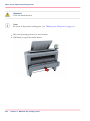
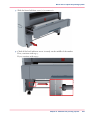
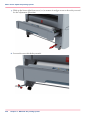
Move and re-adjust the printing system........................................223
Switch on the printing system........................................................230
Replace the media..................................................................................232
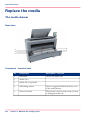
The media drawer ...........................................................................232
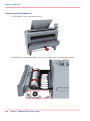
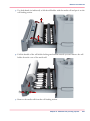
Remove a media roll........................................................................233
Unpack the media roll......................................................................236
Load a media roll (position 1)..........................................................238
Load a media roll (position 2)..........................................................244
Change the media type and media size..........................................250
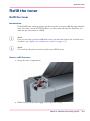
Refill the toner........................................................................................251
Refill the toner..................................................................................251
Replace the residual toner container..............................................253
Maintain the scanner.............................................................................255
Clean the scanner.............................................................................255
Calibrate the scanner.......................................................................259
Upgrade or re-install the system..........................................................260
Introduction.......................................................................................260
Backup the system data...................................................................261
Install the new system software......................................................262
Restore the system data..................................................................263
Chapter 7
Solve problems...............................................................................................265
How to solve problems with jobs.........................................................266
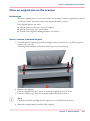
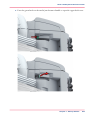
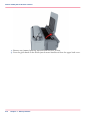
Clear an original jam on the scanner....................................................267
Clear a media jam in the fuser section.................................................268
Clear a media jam in the media bypass section..................................271
Clear a media jam in the roll feed section............................................274
Print a demo print..................................................................................275
Print a test print......................................................................................276
Adjust the print density.........................................................................277
Chapter 8
License management.....................................................................................279
7
Contents
Introduction to managing licenses.......................................................280
The 'Licenses' tab in the Océ Express WebTools................................281
The basic workflow of 'Support' - 'Licenses' activation......................282
Océ License Logic...................................................................................283
The structure of license files and licenses...........................................284
Check your licenses................................................................................286
Save the currently active licenses.........................................................288
Install a new license...............................................................................289
Appendix A
Specifications of the Océ PlotWave 300 ......................................................291
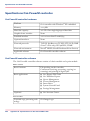
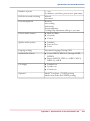
Specifications Océ PowerM controller.................................................292
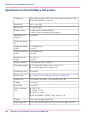
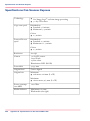
Specifications Océ PlotWave 300 printer ............................................294
Specifications Océ Scanner Express....................................................296
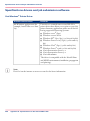
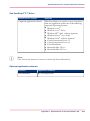
Specifications drivers and job submission software..........................298
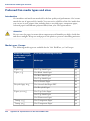
Preferred Océ media types and sizes...................................................300
Appendix B
Reader's comment sheet................................................................................303
Reader's comment sheet ......................................................................304
Appendix C
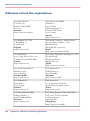
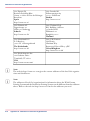
Addresses of local Océ organisations...........................................................307
Addresses of local Océ organisations .................................................308
8
Chapter 1
Introduction
Notes for the reader
Notes for the reader
Introduction
This manual helps you to use the Océ PlotWave™ 300. The manual contains a description
of the product and guidelines to use and operate the Océ PlotWave™ 300.
Definition
Attention Getters
Parts of this manual require your special attention. These parts can provide the following:
■ Additional general information, for example information that is useful when you
perform a task.
■ Information to prevent property damage or personal injuries.
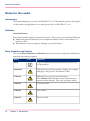
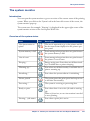
Note, Attention and Caution
The words Note, Attention and Caution draw your attention to important information.
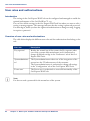
Overview of the attention getters#
Word
10
Icon
Indicates
Note
Tips or additional information about the correct use
of the product.
Attention
Information to prevent property damage, for example
damage to the product, documents or files.
Caution
Information to prevent personal injuries.
The Caution indication has several icons that warn
against various hazards. The icons are shown below.
Caution
General hazard
Caution
Hot surface
Caution
Electric shock
Chapter 1 - Introduction
Notes for the reader
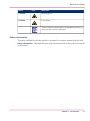
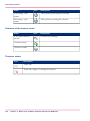
Word
Icon
Indicates
Caution
Moving parts
Caution
Laser beam
The use of heat-resistant gloves is mandatory when you
carry out the actions concerned.
Safety information
The safety information for this product is included in a separate manual with the title
Safety information. This manual is part of the documentation set that you received with
your product.
Chapter 1 - Introduction
11
Available documentation
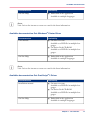
Available documentation
Introduction
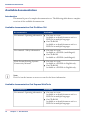
This manual is part of a complete documentation set. The following table shows a complete
overview of the available documentation.
Available documentation Océ PlotWave 300
#
Documentation
Availability
User manual - Operating information
■
■
User manual - Safety information
■
■
Wide-Format Printing Systems Connectivity Manual
■
■
On www.oce.com
Available as an html document and as a
PDF file in multiple languages.
On CD-ROM
Available as an html document and as a
PDF file in multiple languages.
On www.oce.com
Available as a PDF file (multilingual).
On CD-ROM
Available as a PDF file (multilingual).
On www.oce.com
Available as a PDF file in English only.
On CD-ROM
Available as a PDF file in English only.
Note:
Visit Océ on the internet at www.oce.com for the latest information.
Available documentation Océ Express WebTools
#
Documentation
Availability
User manual - Operating information
■
■
12
Chapter 1 - Introduction
On www.oce.com
Available as an html document and as a
PDF file in multiple languages.
On CD-ROM
Available as an html document and as a
PDF file in multiple languages.
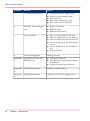
Available documentation
Documentation
Availability
On-line Help
■
Embedded in the application
Available in multiple languages.
Note:
Visit Océ on the internet at www.oce.com for the latest information.
®
Available documentation Océ Windows Printer Driver
#
Documentation
Availability
User manual
■
■
On-line Help
■
On www.oce.com
Available as a PDF file in multiple languages.
On Driver Pack CD-ROM
Available as a PDF file in multiple languages.
Embedded in the application
Available in multiple languages.
Note:
Visit Océ on the internet at www.oce.com for the latest information.
®
Available documentation Océ PostScript 3 Driver
#
Documentation
Availability
Installation manual
■
■
On-line Help
■
On www.oce.com
Available as a PDF file in multiple languages.
On Driver Pack CD-ROM
Available as a PDF file in multiple languages.
Embedded in the application
Available in multiple languages.
Chapter 1 - Introduction
13
Available documentation
Note:
Visit Océ on the internet at www.oce.com for the latest information.
14
Chapter 1 - Introduction
How to use this manual
How to use this manual
Introduction
You can access a topic quickly with the following methods.
■ Refer to the alphabetical index at the end of the manual.
■ Refer to the table of contents at the beginning of this manual.
Before you turn to the complete table of contents, you can also use the following table
to find a topic quickly.
The sections of this manual
The following table gives an overview of how the chapters are arranged logically.
#
Chapters
Section
Topics
1
Introduction
■
■
■
■
2
Get to know the printing
system
■
■
■
■
3
Quick start
■
■
■
■
4
Define your workflow with
the Océ Express WebTools
■
■
■
■
Overview of available documentation.
Explanation regarding the manual and
how to use it.
The Océ PlotWave™ 300 key concepts.
User interaction
The main components.
Working area [Footprint].
The 'Océ PlotWave 300' hardware.
The printing system consumables.
Connect the mains supply cable.
Switch on the printing system.
Load the media
Easy copying, scanning and printing
Introduction.
Configure your printing system.
Define your printing system preferences.
Manage jobs on your printing system.
Chapter 1 - Introduction
15
How to use this manual
Chapters
Section
Topics
5
Use the printing system
■
■
■
■
■
6
Maintain the printing system
■
■
■
7
Solve problems
■
■
■
■
■
■
Replace the media.
Refill the toner.
Maintain the scanner.
How to solve problems with jobs.
Clear an original jam on the scanner.
Clear a media jam in the fuser section.
Clear a media jam in the media bypass
section.
Clear a media jam in the roll feed section.
Print test prints.
8
License management
Manage licenses.
Appendix
A
Specifications of the Océ
PlotWave 300
■
■
■
16
Connect the mains supply cable.
Switch on the printing system.
Send print jobs.
Basic and extended copy jobs.
Basic and extended scan jobs.
System specifications.
Specifications drivers and job submission software.
Supported media types and sizes.
Appendix
B
General information
Reader's comment sheet.
Appendix
C
General information
Addresses of local Océ organisations.
Chapter 1 - Introduction
The Océ PlotWave™ 300 key concepts
The Océ PlotWave™ 300 key concepts
Printer configuration
The Océ PlotWave™ 300 is available in a number of configurations. The minimum
configuration is a one roll printer only version. In the Océ PlotWave 300 multifunction
Express the Océ PlotWave™ 300 printer is combined with a scanner on top.
Copy functionality
The Océ PlotWave 300 multifunction Express offers a large number of copy activities.
A wide variety of original and copy related settings are supported. You can specify particular layout, media, finishing, feeding and quality enhancement options from the user
panel.
Scan functionality
The Océ PlotWave 300 multifunction Express offers a large number of scan activities. A
wide variety of original and scan related settings are supported. You can specify particular
layout and quality enhancement options and you can select a local or remote scan destination from the user panel.
Green button principle
The Océ PlotWave 300 multifunction Express is a very user-friendly system. Basic copy
or scan jobs can be performed by simply pressing the green button on the user panel.
Only if you want to perform more complex copy or scan jobs, you have to change the
default settings with the help of the other settings on the user panel. The templates offer
you extended ease of use because you can use them to store preferred combinations of
settings.
Templates
The user panel offers you a number of customisable templates for the job settings of a
copy or scan job. The templates allow you to store your preferred job settings. To start
a job you simply select a template on the user panel and press the green button. Templates
can be managed in the Océ Express WebTools.
Integrated Océ Express WebTools controller application
The Océ Express WebTools controller application supports a centralised workflow. Only
one application with a transparent and intuitive layout where you can perform many
Chapter 1 - Introduction
17
The Océ PlotWave™ 300 key concepts
tasks based on user role defined access. The jobs tab gives you a full overview and full
control on print and scan job management, but also allows you to manage your templates,
stamps, system preferences and network connectivity settings.
Print and copy jobs
A print and copy job is a job sent to the Océ PlotWave™ 300 printer from a user application (print job) or from the scanner (copy job). A print or copy job can consist of several sets, which in turn may consist of several pages. Sorting of a job can take place based
on sets or on pages.
Job recovery
The Océ PlotWave™ 300 is equipped with a job recovery function that safeguards users
against data loss in case of a printer failure. After a restart, the data submitted to the
printer before the crash will be automatically processed and printed. This means that jobs
do not have to be re-submitted after a printer malfunction, thus saving valuable time for
the users.
18
Chapter 1 - Introduction
User interaction
User interaction
Introduction
The user can communicate with the Océ PlotWave™ 300 from local locations and remote
locations.
User panel
The Océ PlotWave™ 300 offers a user panel that allows you to do the following.
■ Manipulate the machine behaviour.
■ Define the settings for copy and scan jobs.
Integrated Océ Express WebTools controller application
The Océ Express WebTools controller application supports a centralised workflow. Only
one application with a transparent and intuitive layout where you can perform many
tasks based on user role defined access. Separate work spaces give you a full overview and
full control on print and scan job management, but also allows you to manage your
templates, system preferences and network connectivity settings. You can also monitor
the status of your system in this application. You can access the integrated Océ Express
WebTools controller application from any networked workstation.
Printer drivers
With the Océ PlotWave™ 300 the Océ Windows® Printer Driver and the Océ PostScript®
3™ Drivers can be used. With these drivers users in remote locations can print their files
directly from their applications to the Océ PlotWave™ 300. More information about
installing, configuring and using drivers can be found in the documentation provided
with the drivers. All Océ drivers (PostScript® driver not included) can be freely downloaded
from the internet at www.oce.com.
Océ Publisher Express job submission software
Océ provides Océ Publisher Express job submission software that allows you to send print
jobs to your Océ PlotWave™ 300.
Océ Publisher Express is a built-in job submitter in the Océ Express WebTools. You can
open Océ Publisher Express in the jobs tab of the Océ Express WebTools ('Create new
job').
Chapter 1 - Introduction
19
User interaction
20
Chapter 1 - Introduction
Chapter 2
Get to know the printing
system
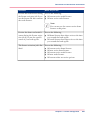
The main components
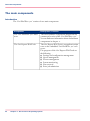
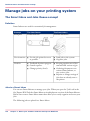
The main components
Introduction
The 'Océ PlotWave 300' consists of two main components.
#
22
Component
Description / Function
The 'Océ PlotWave 300' hardware
The exact hardware components depend on the
commercial version of the 'Océ PlotWave 300'.
You can find more information about the hardware
components in chapter 2.
The Océ Express WebTools
The Océ Express WebTools is an application that
runs on the embedded 'Océ PlotWave 300' web
server.
The purposes of the Océ Express WebTools are
the following.
■ Settings and configuration management
■ Queue management
■ License management
■ System monitoring
■ Scan retrieval
■ Print job submission
Chapter 2 - Get to know the printing system
Working area [Footprint]
Working area [Footprint]
The printing system (with or without the optional 'Océ Scanner Express') requires a floor
space / working area of at least 1710 mm x 1470 mm (67,3 inch x 57,9 inch).
9cm
3.5”
162cm
63.8”
7cm
2.8”
80cm
31.5”
147cm
57.9”
60cm
23.6”
171cm
67.3”
Chapter 2 - Get to know the printing system
23
Approved abbreviations
Approved abbreviations
#
24
Name
Abbreviation
'Océ Express WebTools'
'Océ EWT'
' Océ PlotWave 300 multifunction Express'
' Océ PlotWave 300 MF Express'
Chapter 2 - Get to know the printing system
The components of the printer (front)
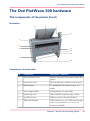
The Océ PlotWave 300 hardware
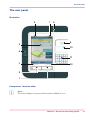
The components of the printer (front)
Illustration
5
6
7
8
4
3
2
9
10
11
1
12
Component - function table
#
Nr
Component
Description / Function
1
lower left front cover
Remove this cover if you want to move the
printer.
2
lower front cover
Door at the front, used for error recovery.
3
media bypass
To manually feed cut-sheets up to 36"
width.
4
toner compartment
Compartment for toner refill.
5
printer top cover
Only available in printer-only version.
6
top delivery tray
Delivery tray for the printed sheets.
7
USB stick interface
USB connector to use a USB mass storage
device to print from or to scan to, if a
scanner is available.
Chapter 2 - Get to know the printing system
25
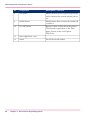
The components of the printer (front)
26
Nr
Component
Description / Function
8
user panel
Allows the user to start copy/scan/print jobs
and to monitor the system and the job status.
9
media drawer
Media drawer that contains the media roll
1 and/or 2.
10
on / off button
Button to start or shut down the printer.
This button is equivalent to the 'Shut
down' button in the Océ Express
WebTools.
11
lower right front cover
12
wheel
Chapter 2 - Get to know the printing system
Swivel wheel with brakes.
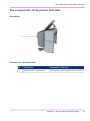
The components of the printer (left side)
The components of the printer (left side)
Illustration
1
Component - function table
#
Nr
Component
Description / Function
1
residual toner compartment
Gives access to the residual toner container.
Chapter 2 - Get to know the printing system
27
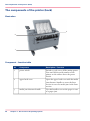
The components of the printer (back)
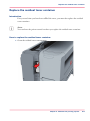
The components of the printer (back)
Illustration
3
2
1
Component - function table
#
28
Nr
Component
Description / Function
1
power switch
Switch to cycle on or off the mains power.
You can find the serial number of the
printer on the sticker above the power
switch.
2
upper back cover
Open the upper back cover with the media
jam clearance handle to access the fuser
section in case of a media jam in the fuser
section.
3
media jam clearance handle
Use this handle to access the paper in case
of a paper jam.
Chapter 2 - Get to know the printing system
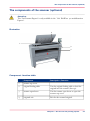
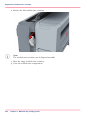
The components of the scanner (optional)
The components of the scanner (optional)
Attention:
The 'Océ Scanner Express' is only available in the ' Océ PlotWave 300 multifunction
Express'.
Illustration
2
1
3
4
Component - function table
#
Component
Description / Function
1
scanner top cover
2
original feeding table
Use the original feeding table to feed the
original into the scanner (face up).
3
scanner open levers
Use the scanner open levers to open the
scanner top cover.
4
originals exit
Exit for the scanned original.
Chapter 2 - Get to know the printing system
29
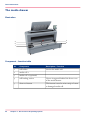
The media drawer
The media drawer
Illustration
4
5
3
2
1
Component - function table
#
30
Nr
Component
Description / Function
1
roll holder
Carries the media roll
2
media roll 1
3
media roll 2 (optional)
4
roll loading station
Groove integrated behind the front cover
of the media drawer.
5
clean cut button
This button is used to trim a strip of a new
or damaged media roll.
Chapter 2 - Get to know the printing system
The user panel
The user panel
Illustration
6
7
8
9
5
10
4
11
3
12
2
1
Component - function table
Note:
The colour display is an option that becomes available in 2010.
Chapter 2 - Get to know the printing system
31
The user panel
#
Nr
Component
Description / Function
1
green button
The button with a green light that allows the
operator to start a scan job, a print job or a
copy job.
The button lights up to attract attention when
it becomes relevant.
2
stop button
The button with a red light that allows the
operator to do the following.
■ Immediately interrupt a scan job.
■ Stop a print job after the page that is being
printed.
The button lights up to attract attention when
it becomes relevant.
3
lower left soft key
Button that allows the operator to select the
option displayed in the lower left corner of
the user panel display.
4
USB flash drive interface
The USB connection is positioned at the left
side of the user panel.
You can insert a USB mass storage device do
the following.
■ Print a file directly from the USB mass
storage device.
■ Scan an original directly to the USB mass
storage device.
Only if a scanner is available.
The green light that illuminates the port and
the icon starts to blink during data transfer
32
5
user panel display
The colour display that displays information
for the operator.
6
upper left soft key
Button that allows the operator to select the
option displayed in the upper left corner of
the user panel display.
7
upper right soft key
Button that allows the operator to select the
option displayed in the upper right corner of
the user panel display.
Chapter 2 - Get to know the printing system
The user panel
Nr
Component
Description / Function
8
status light
Light that gives feedback on the status of the
printer.
■ A green light indicates that the printer is
ready.
■ A green blinking light indicates that the
printer is busy.
■ A red light indicates that an error occurred.
9
confirmation button
Button that allows the operator to do the following.
■ Open a template or a setting.
■ Close and confirm the selected value of a
setting.
10
scroll wheel
Wheel on the right side of the user panel, that
allows the operator to do the following.
■ Scroll through the templates.
■ Scroll through the settings.
■ Scroll through the settings values.
11
numeric buttons
Buttons with the numeric values 0-9, that allow the operator to do the following.
■ Enter a numeric value, for example the
number of copies.
■ Enter a numeric value of a setting.
clear button(C)
With the clear button the operator can delete
the last added numeric value.
lower right soft key
Button that allows the operator to select the
option displayed in the lower right corner of
the user panel display.
12
Chapter 2 - Get to know the printing system
33
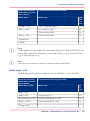
The output delivery
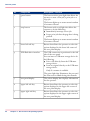
The output delivery
Introduction
The Océ PlotWave 300 is delivered with a top delivery tray to collect your printed output.
The top delivery tray can collect a maximum of 50 plain paper prints with a maximum
length of 48" [1200mm].
Illustration
How to define the output delivery
In the Océ Express WebTools you can define the default 'Sheet delivery' for your printed
output.
■ If you select 'Top Delivery Tray' and you use plain paper, your printed output is by
default delivered in the standard top delivery tray.
If you use a different media type, the printed output is always delivered at the back
of the printer.
■ If you select 'Back output' your printed output is by default delivered at the back of
the printer.
34
Chapter 2 - Get to know the printing system
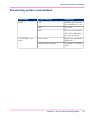
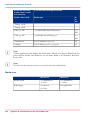
The printing system consumables
The printing system consumables
#
Consumable
Consumable part
Description
media
roll
Roll that caries the media. A roll has a 3" core.
sheet
Cut sheet.
core
The core of the media
roll is the cardboard inner part of the roll.
toner bottle
Bottle that contains the
black toner.
residual toner container
Container for residual
toner.
Océ PlotWave 300
toner
Chapter 2 - Get to know the printing system
35
The printing system consumables
36
Chapter 2 - Get to know the printing system
Chapter 3
Quick start
Connect the mains supply cable
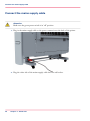
Connect the mains supply cable
Attention:
Make sure the green power switch is in 'off' position.
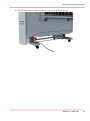
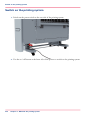
1. Plug in the mains supply cable at the power connection at the back of the printer.
2. Plug the other side of the mains supply cable into the wall socket.
38
Chapter 3 - Quick start
Switch on the printing system
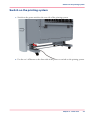
Switch on the printing system
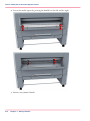
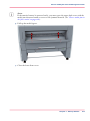
1. Switch on the power switch at the rear side of the printing system.
2. Use the on / off button at the front side of the printer to switch on the printing system.
Chapter 3 - Quick start
39
Switch on the printing system
Note:
You can also use the 'Shut down' button in the Océ Express WebTools.
40
Chapter 3 - Quick start
Unpack the media roll
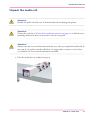
Unpack the media roll
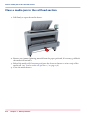
Attention:
Handle the media roll with care. A dented media roll can damage the printer.
Attention:
Please refer to the list of ‘Preferred Océ media types and sizes’ on page 300 to find the corresponding media name that you must select on your user panel.
Attention:
Always write the correct media name inside the core, after you unpack the media roll. In
that case, if you replace a media roll before it is empty and you want to re-use it later,
you will have the correct media information available.
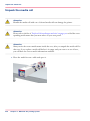
1. Place the media box on a table and open it.
Chapter 3 - Quick start
41
Unpack the media roll
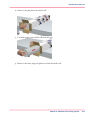
2. Remove the plug from the media roll.
3. Carefully remove the media roll from the box.
4. Remove the other plug and plastic around the media roll.
42
Chapter 3 - Quick start
Load a media roll (position 1)
Load a media roll (position 1)
Note:
When your printing system is equipped with an additional second media roll, it is advised
to load an A0 media roll on position 1 and an A2 media roll on position 2.
Attention:
Handle the media roll with care. A dented media roll can damage the printer.
Attention:
Please refer to the list of ‘Preferred Océ media types and sizes’ on page 300 to find the corresponding media name that you must select on your user panel.
Attention:
Always write the correct media name inside the core, after you unpack the media roll. In
that case, if you replace a media roll before it is empty and you want to re-use it later,
you will have the correct media information available.
Caution:
Watch your fingers when you handle the media roll.
Chapter 3 - Quick start
43
Load a media roll (position 1)
How to load a media roll on position 1
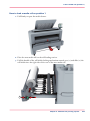
1. Pull firmly to open the media drawer.
2. Place the new media roll on the roll loading station.
3. Pull the handle of the roll holder locking mechanism towards you (1) and slide (2) the
roll holder into the right side of the core of the new media roll.
2
1
44
Chapter 3 - Quick start
Load a media roll (position 1)
4. Align the roll with the centre of the correct size indicator on the roll holder and release
the handle of the locking mechanism.
Note:
If you use a B1 media size (707 mm) you must align the media roll with the A1 indent.
Chapter 3 - Quick start
45
Load a media roll (position 1)
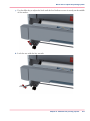
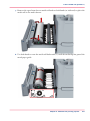
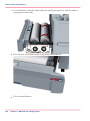
5. Remove the tapes from the new media roll and use both hands (as indicated) to place the
media roll in the media drawer.
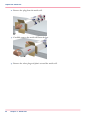
6. Use both hands to turn the media roll backwards (1) until the media flap has passed the
metal paper guide.
1
46
Chapter 3 - Quick start
Load a media roll (position 1)
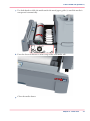
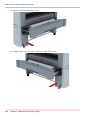
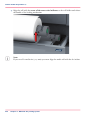
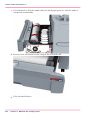
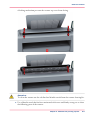
7. Use both hands to slide the media under the metal paper guide (2) until the media is
transported automatically.
2
8. Press the clean cut button to trim a strip of the new media roll.
9. Close the media drawer.
Chapter 3 - Quick start
47
Load a media roll (position 1)
Note:
Do not open the 'Media drawer' during loading.
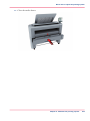
10. The user panel displays the message 'New media detected on roll 1' or 'New media detected on roll 2'. Follow the steps in the wizard to define the correct media type. The
media size is detected automatically.
48
Chapter 3 - Quick start
Load a media roll (position 2)
Load a media roll (position 2)
Note:
When your printing system is equipped with an additional second media roll, it is advised
to load an A0 media roll on position 1 and an A2 media roll on position 2.
Attention:
Handle the media roll with care. A dented media roll can damage the printer.
Attention:
Please refer to the list of ‘Preferred Océ media types and sizes’ on page 300 to find the corresponding media name that you must select on your user panel.
Attention:
Always write the correct media name inside the core, after you unpack the media roll. In
that case, if you replace a media roll before it is empty and you want to re-use it later,
you will have the correct media information available.
Caution:
Watch your fingers when you handle the media roll.
Caution:
If you want to load an A0 media roll on position 2, you must make sure to bend your
knees as indicated below.
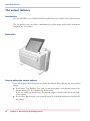
Illustration
[31] Bend your knees when you load an A0 media roll on position 2
Chapter 3 - Quick start
49
Load a media roll (position 2)
How to load a media roll on position 2
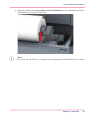
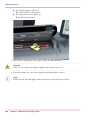
1. Pull firmly to open the media drawer.
2. Place the new media roll on the roll loading station.
3. Pull the handle of the roll holder locking mechanism towards you (1) and slide (2) the
roll holder into the right side of the core of the new media roll.
2
1
50
Chapter 3 - Quick start
Load a media roll (position 2)
4. Align the roll with the centre of the correct size indicator on the roll holder and release
the handle of the locking mechanism.
Note:
If you use a B1 media size (707 mm) you must align the media roll with the A1 indent.
Chapter 3 - Quick start
51
Load a media roll (position 2)
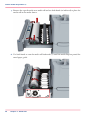
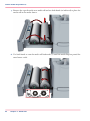
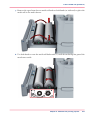
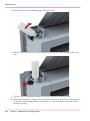
5. Remove the tapes from the new media roll and use both hands (as indicated) to place the
media roll in the media drawer.
6. Use both hands to turn the media roll backwards (1) until the media flap has passed the
metal paper guide.
1
52
Chapter 3 - Quick start
Load a media roll (position 2)
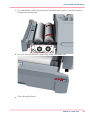
7. Use both hands to slide the media under the metal paper guide (2) until the media is
transported automatically.
2
8. Press the clean cut button to trim a strip of the new media roll.
9. Close the media drawer.
Chapter 3 - Quick start
53
Load a media roll (position 2)
Note:
Do not open the 'Media drawer' during loading.
10. The user panel displays the message 'New media detected on roll 1' or 'New media detected on roll 2'. Follow the steps in the wizard to define the correct media type. The
media size is detected automatically.
54
Chapter 3 - Quick start
The Océ Express WebTools
The Océ Express WebTools
Introduction
The Océ Express WebTools is an application that runs embedded on the Océ PlotWave
300. You can use an Internet browser (Microsoft® Internet Explorer 6.0 (or higher) or
Mozilla Firefox™ 2.0 (or higher) to open the home page of the Océ Express WebTools.
Definition
You can use the Océ Express WebTools to do the following.
■ Send print jobs to your Océ PlotWave™ 300 with Océ Publisher Express.
■ Access the settings to manage the configuration and preferences of the printing system.
To change settings in the Océ Express WebTools you must log in using one of three
predefined user roles because the settings are all password protected. (see ‘User roles
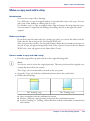
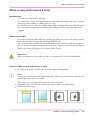
and authorisations’ on page 94)
■ Monitor the status of the printing system.
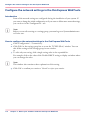
How to access the Océ Express WebTools
To access the Océ Express WebTools do the following.
■ Enter the Océ PlotWave 300 Hostname (for example http://OcePlotWave300) in the
workstation web browser.
or
■ Enter the Océ PlotWave 300 IP address (for example http://134.188.26.173) in the
workstation web browser.
Note:
If the Océ Express WebTools do not appear, contact the network administrator to check
the network parameters. Check if the Océ PlotWave™ 300 network settings have been
registered in the network infrastructure.
Chapter 3 - Quick start
55
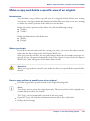
The Smart Inbox
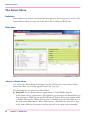
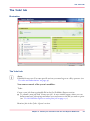
The Smart Inbox
Definition
Smart Inboxes are used for customised job management. You can get an overview of the
Smart Inboxes when you open the 'Jobs' tab in the Océ Express WebTools.
Illustration
Jobs in a Smart Inbox
You can use the Smart Inbox to manage your jobs. Define one or more Smart Inbox
names that allow you to easily organise and access your jobs.
The following jobs are placed in a Smart Inbox.
■ Print jobs, sent via printer drivers, applications or Océ Publisher Express.
In the printer driver, application or job submitter you can select the Smart Inbox you
want tot print to. When you use the Océ Windows® Printer Driver you can also enable
or disable 'Direct print'. When 'Direct print' is enabled your print job will be sent to
the print queue immediately. When 'Direct print' is disabled your print job is kept
in the Smart Inbox and you must send the print job to the print queue manually.
56
Chapter 3 - Quick start
The Smart Inbox
■
■
Scan jobs, if the selected scan destination is set to 'Local to the Smart Inbox'.
If you select a remote scan destination ('Configuration' - 'Scan destinations') it is
possible that the scanned file cannot be delivered to this destination. In that case the
scanned file will also be placed in the 'Scans' Smart Inbox.
Copy jobs
If you want your copy jobs to appear in a Smart Inbox, you must enable the 'Preferences' - 'System settings' - 'Smart Inbox management' - 'Display a Smart Inbox with
all jobs' setting. Your copy job is then displayed in the 'View all' Smart Inbox. The
'Preferences' - 'System settings' - 'Smart Inbox management' - 'Save printed jobs in a
Smart Inbox' - setting determines if copy jobs that have been printed will be kept in
the Smart Inbox for reprint or not.
Chapter 3 - Quick start
57
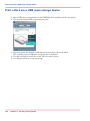
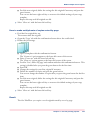
Print a file from a USB mass storage device
Easy printing, copying and scanning
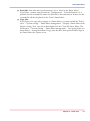
Print a file from a USB mass storage device
1. Insert USB mass storage device in the USB flash drive interface on the user panel.
2. The system automatically selects the print tab.
3. Open the print tab with the confirmation button above the scroll wheel.
The content of your USB mass storage device is displayed.
4. Use the scroll wheel to browse to the job you want to print.
5. Use the green button to start printing.
58
Chapter 3 - Quick start
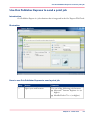
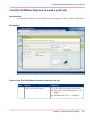
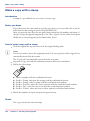
Use Océ Publisher Express to send a print job
Use Océ Publisher Express to send a print job
Introduction
Océ Publisher Express is a job submitter that is integrated in the Océ Express WebTools.
Illustration
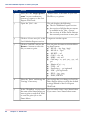
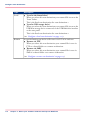
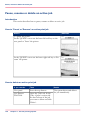
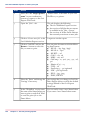
How to use Océ Publisher Express to send a print job
#
Step
Action
Remarks
1
Open your web browser.
Use one of the following web browsers
■ Microsoft® Internet Explorer 6.0 (or
higher)
■ Mozilla Firefox™ 2.0 (or higher)
Chapter 3 - Quick start
59
Use Océ Publisher Express to send a print job
60
Step
Action
Remarks
2
Enter the URL http://'printer
name' in your workstation
browser to connect to the Océ
Express WebTools.
'Printer name' is the name of your Océ
PlotWave 300 printer.
3
Open the 'Jobs' - tab.
This tab displays the following.
■ The Océ Publisher Express section.
■ An overview of all jobs that are currently available in the 'Jobs - Queue'.
■ An overview of all the Smart Inboxes
that currently contain on or more jobs.
4
Click on 'Create new job' in the
Océ Publisher Express section.
A separate window opens.
5
Click on 'Add file' and use the
Browse... button to select the
file you want to print.
You can print documents with the following data formats
■ - HP-GL - .hp, .hpg, .hpgl
■ - HP-GL/2 - .hp2
■ - HP RTL - .rtl
■ - CALS - .cls, .cal
■ - NIRS - .nir, .nif
■ - CalComp - .cc, .906, .907, .951, .crf,
.pci
■ - Edmics (C4) - .c4
■ - TIFF - .tif
■ - PostScript 3 - .ps (optional)
■ - PDF - .pdf (optional)
■ - JPEG - .jpg, .jpeg
■ - DWF, DWF/X
6
Select the 'Preset' and change the
'Settings' if necessary.
Job settings that you change in Océ Publisher Express always overrule the default
settings defined in the Océ Express
WebTools.
7
In the 'Workflow' section enter
the name of the Smart Inbox you
want to print to and click 'Print'
to send the print job to the
Smart Inbox.
You can easily create a new Smart Inbox
if you enter a new Smart Inbox name.
Chapter 3 - Quick start
Print a job from the Smart Inbox
Print a job from the Smart Inbox
How to print a job from the Smart Inbox using the Océ Express WebTools
1. Select the 'Jobs' tab in the Océ Express WebTools.
2. Select the job and click 'Print'. The job is copied into the Job Queue.
Chapter 3 - Quick start
61
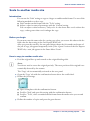
®
Use the Océ Windows Printer Driver to send a print job
®
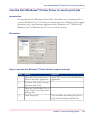
Use the Océ Windows Printer Driver to send a print job
Introduction
Océ provides the Océ Windows® Printer Driver that allows you to send print jobs to
your Océ PlotWave™ 300. This driver is a mixed raster-vector HP-GL/2 printer driver
that allows you to print from any application under Windows 2000®, Windows XP®,
Windows Vista® or Windows Server® 2003 to your Océ printer.
Illustration
®
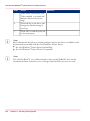
How to use the Océ Windows Printer Driver to send a print job
#
62
Step
Action
Remarks
1
Open the file that you want to
print in the source application.
AutoCAD® 2000 or any other Windows
application
2
From the 'File' menu of the application, click 'Print'.
3
Select the Océ PlotWave™ 300
in the 'Printer' area of the 'Print'
dialogue box.
4
Click 'Properties'.
Chapter 3 - Quick start
You can define the default print job settings in the Océ Express WebTools.
®
Use the Océ Windows Printer Driver to send a print job
Step
Action
5
In the 'Basic' tab activate 'Océ
Ticket enabled' to overrule the
default values for the job settings.
6
Check all tabs in the driver and
change the default settings if
necessary.
7
Click 'OK' to send the print job
to the print queue.
Remarks
Note:
More information about how to install, configure and use the driver is available in the
documentation provided with the Océ Windows® Printer Driver.
■ the Océ Windows® Printer Driver Online Help
■ the Océ Windows® Printer Driver User manual
Note:
The Océ PlotWave™ 300 is delivered with a driver pack CD-ROM. You can also
download the latest Océ drivers, free of charge, from our Web site www.oce.com.
Chapter 3 - Quick start
63
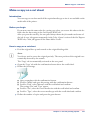
®
Use the Océ PostScript 3 Driver to send a print job
®
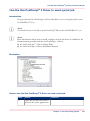
Use the Océ PostScript 3 Driver to send a print job
Introduction
Océ provides the Océ PostScript® 3 Driver that allows you to send print jobs to your
Océ PlotWave™ 300.
Note:
You need a license to be able to print PostScript® files on the Océ PlotWave™ 300.
Note:
More information about how to install, configure and use the driver is available in the
documentation provided with the Océ PostScript® 3 Driver.
■ the Océ PostScript® 3 Driver Online Help
■ the Océ PostScript® 3 Driver Installation manual
Illustration
®
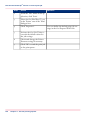
How to use the Océ PostScript 3 Driver to send a print job
#
64
Step
Action
1
Open the file that you want to
print in the source application.
Chapter 3 - Quick start
Remarks
®
Use the Océ PostScript 3 Driver to send a print job
Step
Action
2
From the 'File' menu of the application, click 'Print'.
3
Select the Océ PlotWave™ 300
in the 'Printer' area of the 'Print'
dialogue box.
4
Click 'Properties'.
5
Activate the Océ Job Ticket to
overrule the default values for
the job settings.
6
Check and change the Printer
Features settings if necessary.
7
Click 'OK' to send the print job
to the print queue.
Remarks
You can define the default print job settings in the Océ Express WebTools.
Chapter 3 - Quick start
65
Make a 1:1 copy of a CAD drawing
Make a 1:1 copy of a CAD drawing
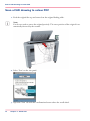
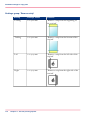
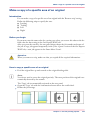
1. Feed the original face up and centred on the original feeding table.
Note:
You do not need to centre the original precisely. The exact position of the original is automatically detected by the scanner.
The 'Copy' tab is automatically activated on the user panel.
66
Chapter 3 - Quick start
Make a 1:1 copy of a CAD drawing
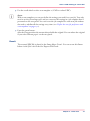
Note:
The description of the first default copy template is displayed ('1:1 copy, CAD drawing').
With a copy template you can pre-define the settings you need for a copy job. You only
need to set the job settings once and you can store the settings in a job template that is
presented on the user panel. You can re-use the job template for each next job without
the need to redefine all the settings every time. (see ‘Define the copy job preferences and
copy templates’ on page 125).
2. Press the green button.
After the scan procedure the scanner always holds the original. You can release the original
if you select 'Release paper' on the user panel.
Chapter 3 - Quick start
67
Make a 1:1 copy of a colour drawing
Make a 1:1 copy of a colour drawing
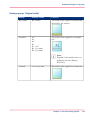
1. Feed the original face up and centred on the original feeding table.
Note:
You do not need to centre the original precisely. The exact position of the original is automatically detected by the scanner.
The 'Copy' tab is automatically activated on the user panel.
2. Open the 'Copy' tab with the confirmation button above the scroll wheel.
68
Chapter 3 - Quick start
Make a 1:1 copy of a colour drawing
3. Use the scroll wheel to select copy template 2 ('1:1 copy, colour drawing').
Note:
With a copy template you can pre-define the settings you need for a copy job. You only
need to set the job settings once and you can store the settings in a job template that is
presented on the user panel. You can re-use the job template for each next job without
the need to redefine all the settings every time. (see ‘Define the copy job preferences and
copy templates’ on page 125).
4. Press the green button.
After the scan procedure the scanner always holds the original. You can release the original
if you select 'Release paper' on the user panel.
Chapter 3 - Quick start
69
Make a scaled copy (50%) of a CAD drawing
Make a scaled copy (50%) of a CAD drawing
1. Feed the original face up and centred on the original feeding table.
Note:
You do not need to centre the original precisely. The exact position of the original is automatically detected by the scanner.
The 'Copy' tab is automatically activated on the user panel.
2. Open the 'Copy' tab with the confirmation button above the scroll wheel.
70
Chapter 3 - Quick start
Make a scaled copy (50%) of a CAD drawing
3. Use the scroll wheel to select copy template 3 ('Reduce copy by 50%').
Note:
With a copy template you can pre-define the settings you need for a copy job. You only
need to set the job settings once and you can store the settings in a job template that is
presented on the user panel. You can re-use the job template for each next job without
the need to redefine all the settings every time. (see ‘Define the copy job preferences and
copy templates’ on page 125).
4. Press the green button.
After the scan procedure the scanner always holds the original. You can release the original
if you select 'Release paper' on the user panel.
Chapter 3 - Quick start
71
Scan a CAD drawing to TIFF format
Scan a CAD drawing to TIFF format
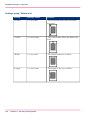
1. Feed the original face up and centred on the original feeding table.
Note:
You do not need to centre the original precisely. The exact position of the original is automatically detected by the scanner.
2. Select 'Scan' on the user panel.
72
Chapter 3 - Quick start
Scan a CAD drawing to TIFF format
Note:
The description of the first default scan template is displayed ('CAD to TIFF'). With a
scan template you can pre-define the settings you need for a scan job. You only need to
set the job settings once and you can store the settings in a job template that is presented
on the user panel. You can re-use the job template for each next job without the need to
redefine all the settings every time. (see ‘Define the scan job preferences and scan templates’
on page 130).
3. Press the green button.
After the scan procedure the scanner always holds the original. You can release the original
if you select 'Release paper' on the user panel.
Result
The scanned TIFF file is placed in the Smart Inbox 'Scans'. You can access this Smart
Inbox via the'Jobs' tab in the Océ Express WebTools.
Chapter 3 - Quick start
73
Scan a CAD drawing to colour PDF
Scan a CAD drawing to colour PDF
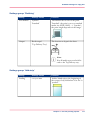
1. Feed the original face up and centred on the original feeding table.
Note:
You do not need to centre the original precisely. The exact position of the original is automatically detected by the scanner.
2. Select 'Scan' on the user panel.
3. Open the 'Scan' tab with the confirmation button above the scroll wheel.
74
Chapter 3 - Quick start
Scan a CAD drawing to colour PDF
4. Use the scroll wheel to select scan template 2 ('CAD to colour PDF').
Note:
With a scan template you can pre-define the settings you need for a scan job. You only
need to set the job settings once and you can store the settings in a job template that is
presented on the user panel. You can re-use the job template for each next job without
the need to redefine all the settings every time. (see ‘Define the scan job preferences and
scan templates’ on page 130).
5. Press the green button.
After the scan procedure the scanner always holds the original. You can release the original
if you select 'Release paper' on the user panel.
Result
The scanned PDF file is placed in the Smart Inbox 'Scans'. You can access this Smart
Inbox via the'Jobs' tab in the Océ Express WebTools.
Chapter 3 - Quick start
75
Scan a photo to a USB mass storage device
Scan a photo to a USB mass storage device
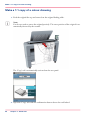
1. Feed the original face up and centred on the original feeding table.
Note:
You do not need to centre the original precisely. The exact position of the original is automatically detected by the scanner.
2. Select 'Scan' on the user panel.
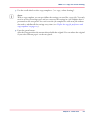
3. Open the 'Scan' tab with the confirmation button above the scroll wheel.
76
Chapter 3 - Quick start
Scan a photo to a USB mass storage device
4. Use the scroll wheel to select scan template 3 ('Photo to USB').
Note:
With a scan template you can pre-define the settings you need for a scan job. You only
need to set the job settings once and you can store the settings in a job template that is
presented on the user panel. You can re-use the job template for each next job without
the need to redefine all the settings every time. (see ‘Define the scan job preferences and
scan templates’ on page 130).
5. Press the green button.
After the scan procedure the scanner always holds the original. You can release the original
if you select 'Release paper' on the user panel.
6. 'Insert USB mass storage device'. This message is displayed on the user panel.
Result
The system creates a sub-directory "scans_x" on the USB mass storage device and stores
the scanned file of the photo in this sub-directory in JPEG format.
Chapter 3 - Quick start
77
Switch off the printing system
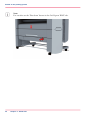
Switch off the printing system
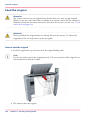
1. Use the on / off button at the front side of the printer to switch off the printing system.
The lighted button starts to blink.
Note:
You can also use the 'Shut down' button in the Océ Express WebTools.
Attention:
Wait until the on / off button stops blinking.
78
Chapter 3 - Quick start
Switch off the printing system
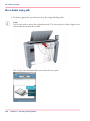
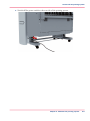
2. Switch off the power switch at the rear side of the printing system.
Chapter 3 - Quick start
79
Switch off the printing system
80
Chapter 3 - Quick start
Chapter 4
Define your workflow
with the Océ Express
WebTools
The Océ Express WebTools
Introduction
The Océ Express WebTools
Introduction
The Océ Express WebTools is an application that runs embedded on the Océ PlotWave
300. You can use an Internet browser (Microsoft® Internet Explorer 6.0 (or higher) or
Mozilla Firefox™ 2.0 (or higher) to open the home page of the Océ Express WebTools.
Definition
You can use the Océ Express WebTools to do the following.
■ Send print jobs to your Océ PlotWave™ 300 with Océ Publisher Express.
■ Access the settings to manage the configuration and preferences of the printing system.
To change settings in the Océ Express WebTools you must log in using one of three
predefined user roles because the settings are all password protected. (see ‘User roles
and authorisations’ on page 94)
■ Monitor the status of the printing system.
How to access the Océ Express WebTools
To access the Océ Express WebTools do the following.
■ Enter the Océ PlotWave 300 Hostname (for example http://OcePlotWave300) in the
workstation web browser.
or
■ Enter the Océ PlotWave 300 IP address (for example http://134.188.26.173) in the
workstation web browser.
Note:
If the Océ Express WebTools do not appear, contact the network administrator to check
the network parameters. Check if the Océ PlotWave™ 300 network settings have been
registered in the network infrastructure.
82
Chapter 4 - Define your workflow with the Océ Express WebTools
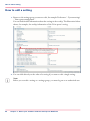
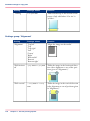
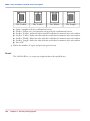
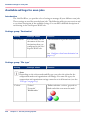
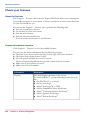
The 'Jobs' tab
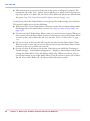
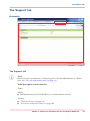
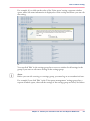
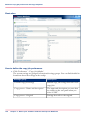
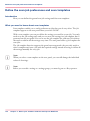
The 'Jobs' tab
Illustration
The 'Jobs' tab
Note:
Editable for any user. For some specific actions you must log on as a Key operator. (see
‘User roles and authorisations’ on page 94)
Your remote control of the system's workflow.
Tasks:
Create a new job from a printable file in the Océ Publisher Express section.
■ To submit a new job click 'Create new job'. A new window opens, where you can
define some basic job settings and where you can browse to the file you want to print.
(see ‘Use Océ Publisher Express to send a print job’ on page 151)
Monitor jobs in the 'Jobs - Queue' section.
Chapter 4 - Define your workflow with the Océ Express WebTools
83
The 'Jobs' tab
■
This section gives an overview of the jobs in the queue, waiting to be printed. The
buttons on top of the 'Jobs - Queue' section allow you to move a selected job to the
top of the queue or to delete the job. If you click 'Delete all' all jobs are deleted from
the queue. (see ‘The Smart Inbox and Jobs Queue concept’ on page 136)
Control your jobs in the 'Smart Inbox' section (group jobs, make settings, start jobs/sets).
This section enables you to do the following.
■ When you click 'Create Smart Inbox' and enter a name, the new Smart Inbox immediately appears in the Smart Inbox overview (see ‘Open or create a Smart Inbox’ on
page 142).
■ Get an overview of all the Smart Inboxes that you created on your system. When you
select a print job in the Smart Inbox you can use the buttons on top of the Smart Inbox
section to print, edit or delete the job. You can also ‘Delete a Smart Inbox’ on page
143.
■ Get an overview of all scan jobs. All scan jobs are placed in the Smart Inbox 'Scans'.
When you select a scan job you can use the buttons on top of the Smart Inbox 'Scans'
section to print, save or delete the scan job.
■ Get an overview of all jobs on the system. Only when you enable the 'Preferences' 'System settings' - 'Smart Inbox management' - 'Display a Smart Inbox with all jobs'
setting, the Smart Inbox 'View all' displays all the jobs. When you select a job you
can use the buttons on top of the Smart Inbox 'View all' section to print, edit or delete
the job. If you click 'Delete all', all jobs are deleted from the system.
84
Chapter 4 - Define your workflow with the Océ Express WebTools
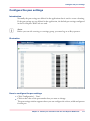
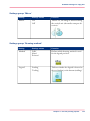
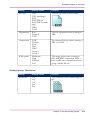
The 'Preferences' tab
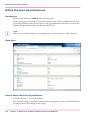
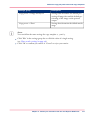
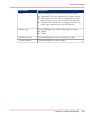
The 'Preferences' tab
Illustration
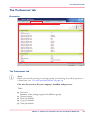
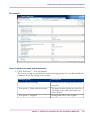
The 'Preferences' tab
Note:
Before you can edit a setting or a settings group, you must log on as a Key operator or
a Power user. (see ‘User roles and authorisations’ on page 94)
Fine tune the system to fit your company's workflow and processes.
Tasks:
■
■
■
■
■
'Overview'
Summary of the settings organised in different groups.
'System settings'
'Print job defaults'
'Copy job defaults'
'Scan job defaults'
Chapter 4 - Define your workflow with the Océ Express WebTools
85
The 'Preferences' tab
(see also ‘What you need to know about default settings’ on page 119)
86
Chapter 4 - Define your workflow with the Océ Express WebTools
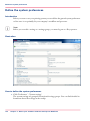
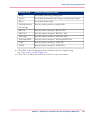
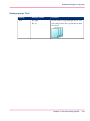
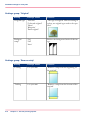
The 'Configuration' tab
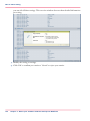
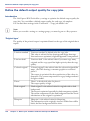
The 'Configuration' tab
Illustration
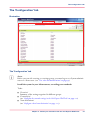
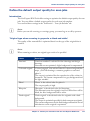
The 'Configuration' tab
Note:
Before you can edit a setting or a settings group, you must log on as a System administrator or a Power user. (see ‘User roles and authorisations’ on page 94)
Install the system in your infrastructure, according your standards.
Tasks:
■
■
■
'Overview'
Summary of the settings organised in different groups.
'Connectivity'
(see ‘Configure the network settings in the Océ Express WebTools’ on page 110)
'Scan destinations'
(see ‘Configure a local scan destination’ on page 113)
Chapter 4 - Define your workflow with the Océ Express WebTools
87
The 'Configuration' tab
■
88
'Pens'
Chapter 4 - Define your workflow with the Océ Express WebTools
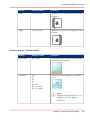
The 'Support' tab
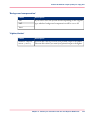
The 'Support' tab
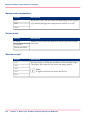
Illustration
The 'Support' tab
Note:
Before you can access licenses you must log on as a System administrator or a Power
user. (see ‘User roles and authorisations’ on page 94)
Tasks that require contact with Océ.
Tasks:
'About'
■ Information about the Océ PlotWave 300 system software version.
'Licenses'
■ ‘Check your licenses’ on page 286
■ ‘Save the currently active licenses’ on page 288
Chapter 4 - Define your workflow with the Océ Express WebTools
89
The 'Support' tab
■
■
90
Information to order a new license
‘Install a new license’ on page 289
Chapter 4 - Define your workflow with the Océ Express WebTools
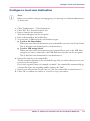
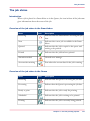
The 'System' tab
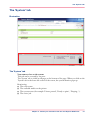
The 'System' tab
Illustration
The 'System' tab
Your remote view on the system.
This tab can be accessed by any user.
The 'System' tab is visible on all pages at the bottom of the page. When you click on the
'System' tab in the lower left corner of the screen, the system monitor pops-up.
Monitoring:
■ The toner status.
■ The available media on the printer.
■ The system status (for example 'Printer paused', 'Ready to print', 'Sleeping...').
■ The active job.
Chapter 4 - Define your workflow with the Océ Express WebTools
91
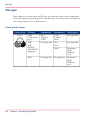
Set another language for the Océ Express WebTools
Set another language for the Océ Express WebTools
Introduction
The language setting of the internet browser you use defines the language in which the
user interface of the Océ Express WebTools is displayed.
Note:
This language setting does not influence the language on the user panel. On the user
panel you can only toggle between the 'First language' and the 'Second language'. You
can define the values for the 'First language' and the 'Second language' in the regional
settings of the Océ Express WebTools (see ‘Change the regional settings’ on page 108).
Note:
If the selected language cannot be supported, the standard user interface language for
the Océ Express WebTools will be US English.
Purpose
Change the language setting of the user interface of the Océ Express WebTools.
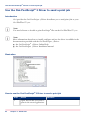
®
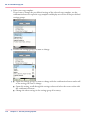
How to change the language setting in Microsoft Internet Explorer
Open Microsoft® Internet Explorer.
Select Tools menu - Internet options. The internet options window appears.
Make sure the General tab is selected.
Click the Languages button in the lower part of the window. Another window opens.
Select the language of your choice. A new language can be added to the list with the Add
button.
6. Move the newly added language up in the list to the top position.
7. Click OK to confirm or Cancel to close both windows again.
8. Click Refresh in the toolbar or open another page. The language of the application will
be changed.
1.
2.
3.
4.
5.
Note:
It is possible that the internet options are put under a different menu, depending on the
Microsoft® Internet Explorer version you use.
92
Chapter 4 - Define your workflow with the Océ Express WebTools
Set another language for the Océ Express WebTools
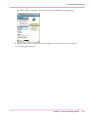
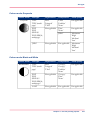
How to change the language setting in Mozilla Firefox™
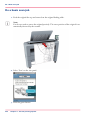
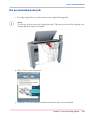
Open Mozilla Firefox™.
Select the Extra menu - Options. The Options window appears.
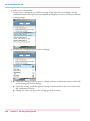
Click the Advanced button and make sure you have selected the General tab.
In the Languages section click the Choose... button. Another window opens.
Select the language of your choice. A new language can be added to the list with the Add
button.
6. Move the newly added language up in the list to the top position.
7. Click OK to confirm or Cancel to close both windows again.
8. Click Reload in the toolbar or open another page. The language of the application will
be changed.
1.
2.
3.
4.
5.
Chapter 4 - Define your workflow with the Océ Express WebTools
93
User roles and authorisations
User roles and authorisations
Introduction
The settings in the Océ Express WebTools can be configured and managed to enable the
optimal performance of the Océ PlotWave™ 300.
You can view all the settings in the Océ Express WebTools but when you want to edit a
setting, a message appears. This message indicates that the setting is password protected.
You must log in, before you have the rights and authorisations to change a setting. Logging
in requires a password.
Overview of user roles and authorisations
The table below displays the different user roles and the authorisations that belong to the
role.
#
User role
Description
'Key operator'
Besides the normal use of the system, the Key operator takes
care of the systems daily maintenance and is authorised to
change all default settings in the 'Preferences' tab of the Océ
Express WebTools.
'System administrator'
The System administrator takes care of the integration of the
system into the IT-infrastructure of the customer.
The System administrator is authorised to change all settings
in the 'Configuration' tab of the Océ Express WebTools.
'Power user'
The Power user is authorised to access all functionality of the
Océ Express WebTools.
Note:
You do not need a password for the normal use of the system.
94
Chapter 4 - Define your workflow with the Océ Express WebTools
Log in as an authorised user
Log in as an authorised user
Purpose
In order to have write access for certain groups of settings, you must log in as an authorised
user. There are 3 user roles, System administrator, Key operator and Power user who have
authorisation to edit specific groups of settings. You do not need to log in before you
start a session. The system will only display a message when you need to log in to perform
an action.
Before you begin
Navigate through the tabs and select the value of a setting you wish to change.
How to log in as an authorised user
1. After you click the value of the setting you want to edit, a log in window appears.
2. You can select a user role from the drop down list.
Note:
The user role with the required authorisation is already selected.
3. Enter the password.
Note:
If the password is entered incorrectly, a message appears. You can enter the password
again.
4. Click 'Ok' to confirm your entry.
Note:
Once you have logged in, the log in lasts for the duration of the browser session. If you
have not been active for more than 30 minutes, the session expires and you need to login
again.
Note:
For security reasons it may be useful to periodically change the password for the 3 access
modes (Key operator, System administrator, Power user) to the Océ Express WebTools.
Chapter 4 - Define your workflow with the Océ Express WebTools
95
Log out after your session
Log out after your session
Purpose
When you have finished the modification of a setting, it is advised to log out again.
How to log out after you have finished your session
1. Click the log out hyperlink in the top right-hand corner of the screen.
or
2. Close the screen of your internet browser.
96
Chapter 4 - Define your workflow with the Océ Express WebTools
Change the password for authorised users
Change the password for authorised users
When to do
For security reasons it is advised to periodically change the password for the 3 access
modes (Key operator, System administrator, Power user) to the Océ Express WebTools.
How to change the password for authorised users
1. Click 'Configuration' - 'Connectivity' - 'Passwords'.
2. Expand the 'Passwords' section.
3. Depending on the password you want to change select 'Key operator password', 'System
administrator password' or 'Power user password'. A secondary window appears.
4. Log in as Key operator to change the key operator password. The default key operator
password is KeyOp.
Log in as System administrator to change the system administrator password. The default
system administrator password is SysAdm.
Log in as Power user to change all the passwords. The default power user password is
PowUsr.
Note:
The passwords are case sensitive. You can enter the following range:
A-Z
a-z
0-9
- _@#$%^*()\?/
You cannot use Chinese, Cyrillic or Japanese characters.
5. Enter the new password twice to confirm your input. The password is hidden.
6. Click 'Ok' to confirm your entries or 'Cancel' to reject your entries.
Chapter 4 - Define your workflow with the Océ Express WebTools
97
How to edit a setting
How to edit a setting
1. Browse to the settings group you want to edit, for example 'Preferences' - 'System settings'
- 'Print queue management'.
You can find detailed information about the settings in the tooltip. The illustration below
shows, for example, the tooltip information of the 'Print queue' setting.
2. You can click directly on the value of a setting if you want to edit a single setting.
Note:
Before you can edit a setting or a settings group, you must log on as an authorised user.
98
Chapter 4 - Define your workflow with the Océ Express WebTools
How to edit a setting
For example, if you click on the value of the 'Print queue' setting a seperate window
opens, where the same information is displayed as in the tooltip and where you can edit
the setting.
or
You can click 'Edit' in the settings group bar to access a window for all settings in the
group if you want to edit more settings in the settings group.
Note:
Before you can edit a setting or a settings group, you must log on as an authorised user.
For example if you click 'Edit' in the 'Print queue management' settings group bar, a
seperate window opens, where all the settings of the settings group are listed, and where
Chapter 4 - Define your workflow with the Océ Express WebTools
99
How to edit a setting
you can edit all these settings. This overview window does not show detailed information
per setting.
3. Modify the setting or settings.
4. Click 'Ok' to confirm you entries or 'Cancel' to reject your entries.
100
Chapter 4 - Define your workflow with the Océ Express WebTools
View and check the settings
View and check the settings
Purpose
View and check the settings and the values that are stored when you save the settings file.
When to do
■
■
Before you save the setting and the values in the Océ Express WebTools.
To check which settings are no longer set to the factory default value.
Note:
Not all settings are stored in the settings file. The network settings and the passwords
for authorised users are excluded from the file for security reasons. License information
is not included in the file either.
How to view and check the settings
1. Click the 'Configuration' tab or the 'Preferences' tab.
2. Click 'View set' in the top-right hand corner of the screen. A secondary window is
opened.
3. Scroll through the list of settings. The first column displays the setting and the second
column displays the values. A "*"indicates that the value of the setting is different from
the original factory default value.
Note:
You can print the information with the standard print function of your browser.
Chapter 4 - Define your workflow with the Océ Express WebTools
101
Save the settings in a file
Save the settings in a file
Purpose
Save the settings and the values that you configured in the Océ Express WebTools in a
file.
When to do
■
Duplicate the settings very easily to another printer of the same type.
Note:
Not all settings are stored in the settings file. The network settings and the passwords
for authorised users are excluded from the file for security reasons. License information
is not included in the file either.
How to save the settings in a file
1. Click the 'Configuration' tab or the 'Preferences' tab.
2. Click 'Save set' in the top-right hand corner of the screen. A secondary window is
opened.
3. Navigate to a location on the network to store the file.
4. Save the settings<hostname of printer><date>.xml file. The file name is not fixed. You
can change the name if required.
5. Click 'Ok' to confirm or 'Cancel' to close the window without storing the settings file.
102
Chapter 4 - Define your workflow with the Océ Express WebTools
Load the settings from a file
Load the settings from a file
Purpose
Load the settings and the values for the Océ Express WebTools from a file.
When to do
■
Duplicate the settings to another printer of the same type.
Attention:
When you are logged in as a Key operator you can only load the Key operator settings.
When you are logged in as a System administrator you can only load the System administrator settings. To load all the settings that are stored in the file you must log in as a
Power user.
Note:
Not all settings are stored in the settings file. The network settings and the passwords
for authorised users are excluded from the file for security reasons. License information
is not included in the file either.
How to load the settings from a file
1. Click the 'Configuration' tab or the 'Preferences' tab.
2. Click 'Open set' in the top-right hand corner of the screen. A secondary window is
opened.
3. Navigate to a location on the network and select the settings file.
4. Click 'Ok' to load the settings file or 'Cancel' to close the window without loading the
settings file.
Result
The values of the settings in the settings file overwrite the current values. The network
configuration settings of the system and the passwords are not restored to prevent connectivity problems and to guarantee the integrity of the passwords.
Chapter 4 - Define your workflow with the Océ Express WebTools
103
Restore the factory defaults
Restore the factory defaults
When to do
■
When you want to restore the factory default settings and values of your Océ Express
WebTools.
Attention:
When you are logged in as a Key operator you can only restore the Key operator settings.
When you are logged in as a System administrator you can only restore the System administrator settings. To restore all the factory default settings you must log in as a Power
user.
How to restore the factory defaults
1. Click the 'Configuration' tab or the 'Preferences' tab.
2. Click 'Restore defaults' in the top-right hand corner of the screen. A secondary window
is opened.
3. Click 'Ok' to restore the factory default settings or 'Cancel' to close the window without
restoring the factory defaults.
104
Chapter 4 - Define your workflow with the Océ Express WebTools
The system monitor
The system monitor
Introduction
You can open the system monitor to get an overview of the current status of the printing
system. When you click on the 'System' tab in the lower left corner of the screen, the
system monitor pops-up.
The system state (for example: 'Printing:') is displayed in the upper right corner of the
system monitor section of the Océ Express WebTools.
Overview of the system states
#
State
Icon
Description
'User intervention required'
The user is requested to go to the printer and follow the instructions displayed on the printer operator panel.
'System memory is full'
Status message when printer does not print because
the system memory is full.
'Out of toner'
Status message when printer does not print because
the printer is out of toner.
'Sleeping...'
Energy saving state: State when not all functionality is available due to printer sleeping.
'Warming up...'
State when not all functionality is available due to
printer warming up.
'Initialising...'
State when the system software is initialising.
'Printer paused'
The system pauses the print queue but keeps access
to all other functionality.
'Processing...'
The system is receiving or processing data.
'Ready to print'
State when there is no active job and no waiting
job.
When a job arrives, no user intervention is needed
to start printing.
'Printing:' <job-name>
State when a print job is active.
Chapter 4 - Define your workflow with the Océ Express WebTools
105
The system monitor
State
Icon
Description
'Processing:' <jobname>
The system is processing the job data.
'Receiving:' <jobname>
The system is receiving the job data.
Overview of the scanner states
#
State
Icon
'User intervention required'
Description
General error message.
'Scanner is busy'
'Scanner is ready'
The toner states
#
Icon
Description
Toner OK
Toner low, empty or cartridge not present.
106
Chapter 4 - Define your workflow with the Océ Express WebTools
Shut down or restart the system
Shut down or restart the system
To remotely shut down the printing system you can click 'Shut down' in the 'Support'
tab.
When the printing system is on, you can also use this button to restart the system.
Chapter 4 - Define your workflow with the Océ Express WebTools
107
Change the regional settings
Configure your printing system
Change the regional settings
Note:
Before you can edit a setting or a settings group, you must log on as System administrator
or Power user.
The regional settings are configured during the installation of your system. If you want
to change the initial configuration, you can do so in the 'Preferences' - 'System settings'
- 'Regional settings'.
Define the following settings.
■ 'First language' and 'Second language' of the user panel.
You can toggle between these two languages on the user panel.
■ 'Measurement unit'
Every time you change the 'Measurement unit', the controller recalculates the values
from millimetre to inches and vice versa. If you reverse to the original value of this
setting a slight calculation difference can occur due to rounding differences.
■ 'Media series'
■ 'Date format'
■ 'Time format'
■ 'Current date and time'
108
Chapter 4 - Define your workflow with the Océ Express WebTools
Configure the sleep mode timer
Configure the sleep mode timer
Introduction
If the printer is idle for a defined period it goes into sleep mode. In sleep mode the
printer uses minimal energy, because the power supply of the printer is turned off. The
power supply of the embedded controller remains on.
The printer enters the sleep mode when the sleep mode timer expires.
You cannot disable the sleep mode, but you can adjust the value of the sleep mode timer
(default value is 60 minutes).
Note:
The printer needs to warm up when it wakes up from the sleep mode.
How to configure the time-out value of the sleep mode timer
1. Click 'Preferences' - 'System settings'.
2. Click 'Edit' in the 'Printer properties' bar or click the value of the 'Sleep mode time-out'
setting.
3. Enter a new value in the Edit window and click 'Ok' to confirm your entries or 'Cancel'
to reject your entries.
Note:
If you access the Edit window by clicking the value of the setting you want to change,
the Edit window displays the minimal and maximal value you can select.
Note:
When the printer is in sleep mode, there are several ways to activate the system.
■ send a print job.
■ insert a USB mass storage device
■ feed an original into the scanner.
■ feed a cut sheet media.
■ press a button on the user panel.
■ open a media drawer
Chapter 4 - Define your workflow with the Océ Express WebTools
109
Configure the network settings in the Océ Express WebTools
Configure the network settings in the Océ Express WebTools
Introduction
Some of the network settings are configured during the installation of your system. If
you want to change the initial configuration or if you want to define more network settings,
you can do so in the 'Configuration' - tab.
Note:
Before you can edit a setting or a settings group, you must log on as System administrator
or Power user.
How to configure the network settings in the Océ Express WebTools
1. Click 'Configuration' - 'Connectivity'.
2. Click 'Edit' in the settings group bar to access the 'TCP/IP (IPv6)' window. You can
edit all the settings of the settings group in one window.
or
3. To edit only one setting, click a single setting value in the expanded list.
For example, click on the value of the 'Enable DHCP' setting to display a window where
you can change the value.
Note:
This window also contains a short explanation of the setting.
4. Click 'Ok' to confirm you entries or 'Cancel' to reject your entries.
110
Chapter 4 - Define your workflow with the Océ Express WebTools
Configure scan destinations
Configure and manage scan destinations
Configure scan destinations
Introduction
When you select the 'Scan' tab on the user panel a list of scan destinations is displayed.
A scan destination is a place where you send your scanned file to for storage.
You can define a maximum number of 10 scan destinations in the 'Configuration' - 'Scan
destinations' tab.
Illustration
Types of scan destinations
You can scan to file to two different types of destination.
Chapter 4 - Define your workflow with the Océ Express WebTools
111
Configure scan destinations
#
Type
Description
Local
■
■
'Local to the Smart Inbox'
When you select this scan destination your scanned file is sent to the
'Scans' Inbox.
This is the fixed scan destination for scan destination 1.
'Local to USB storage device'
When you select this scan destination your scanned file is sent to the
USB Mass storage device connected to the USB flash drive interface
on the user panel.
This is the fixed scan destination for scan destination 2.
(see ‘Configure a local scan destination’ on page 113)
Remote
A scan destination can also be a file server or a PC of an end user.
■ 'Remote via FTP'
When you select this scan destination your scanned file is sent via
FTP to a shared folder on a remote workstation.
■ 'Remote via SMB'
When you select this scan destination your scanned file is sent via
SMB to a shared folder on a remote workstation.
(see ‘Configure a remote scan destination’ on page 114)
112
Chapter 4 - Define your workflow with the Océ Express WebTools
Configure a local scan destination
Configure a local scan destination
Note:
Before you can edit a setting or a settings group, you must log on as System administrator
or Power user.
1. Click 'Configuration' - 'Scan destinations'.
2. Click 'Edit' in a 'Scan destinations' bar.
3. Enter a name for the destination.
This name will appear on the user panel.
4. Place a check mark in the enabled box.
5. You can select 2 different local scan destination types.
■ 'Local to the Smart Inbox'
When you select this scan destination your scanned files are sent to the 'Scans' Inbox.
This is the fixed scan destination for scan destination 1.
■ 'Local to USB storage device'
When you select this scan destination your scanned files are sent to the USB Mass
storage device that is connected to the USB flash drive interface on the user panel.
This is the fixed scan destination for scan destination 2.
6. Enter a file name for your scanned files.
The file extension depends on the scanned file type that you select when you start your
scan job on the user panel.
If you enter a generic name, for example: scan###.*, the scanned files automatically get
a unique file name. An ascending number replaces the "###".
7. Enter a start value for ###. If you enter 001, the first scanned file is named scan001.*.
8. Click 'Ok' to confirm you entries or 'Cancel' to reject your entries.
Chapter 4 - Define your workflow with the Océ Express WebTools
113
Configure a remote scan destination
Configure a remote scan destination
Note:
Before you can edit a setting or a settings group, you must log on as System administrator
or Power user.
Create a web destination with FTP
Create a home directory and a subdirectory on a workstation. For example c:Ftp/Scan
Enable FTP on the workstation
Click 'Configuration' - 'Scan destinations'.
Click 'Edit' in a 'Scan destinations' bar.
Enter a name for the scan destination.
This name will appear on the user panel.
6. Place a check mark in the enabled box.
7. Select 'Remote via FTP'.
8. For access to the directory on the workstation through FTP, a user name and password
is set on the FTP server that runs on the workstation. Enter this 'Remote user name' and
this 'Remote password' in the required fields.
1.
2.
3.
4.
5.
Note:
Make sure the user has write-access privileges on the destination.
9. Enter a path name of the 'Remote folder'.
The path name is the "system-name-of-remote-workstation/subfolder". This is case
sensitive.
Note:
Find the system name of the remote workstation on the control panel of the workstation
(Control panel - Network - Identification - System name)
10. Enter a file name for your scanned files.
The file extension depends on the scanned file type that you select when you start your
scan job on the user panel.
If you enter a generic name, for example: scan###.*, the scanned files automatically get
a unique file name. An ascending number replaces the "###".
11. Enter a start value for ###. If you enter 001, the first scanned file is named scan001.*.
12. Click 'Ok' to confirm your entries or 'Cancel' to reject your entries.
114
Chapter 4 - Define your workflow with the Océ Express WebTools
Configure a remote scan destination
Note:
If for any reason a scanned file cannot be delivered to the remote destination, the file is
sent to the local 'Scans' Inbox.
Create a network destination with SMB
Create a shared folder on a workstation. For example c:\Scan
Click 'Configuration' - 'Scan destinations'.
Click 'Edit' in a 'Scan destinations' bar.
Enter a name for the scan destination.
This name will appear on the user panel.
5. Place a check mark in the enabled box.
6. Select 'Remote via SMB'.
7. If you defined a user name and a password for the shared folder on the remote PC enter
this 'Remote user name' and this 'Remote password' in the required fields.
1.
2.
3.
4.
Note:
Make sure the user has write-access privileges on the destination.
Note:
If the remote workstation uses domains you must enter "domain_name\username" as
the 'Remote user name' and the password for this user in this domain.
8. Enter a path name of the 'Remote folder'.
The path name is the "system-name-of-remote-workstation/subfolder". This is case
sensitive.
Note:
Find the system name of the remote workstation on the control panel of the workstation
(Control panel - Network - Identification - System name)
9. Enter a file name for your scanned files.
The file extension depends on the scanned file type that you select when you start your
scan job on the user panel.
If you enter a generic name, for example: scan###.*, the scanned files automatically get
a unique file name. An ascending number replaces the "###".
10. Enter a start value for ###. If you enter 001, the first scanned file is named scan001.*.
11. Click 'Ok' to confirm your entries or 'Cancel' to reject your entries.
Chapter 4 - Define your workflow with the Océ Express WebTools
115
Configure a remote scan destination
Note:
If for any reason a scanned file cannot be delivered to the remote destination, the file is
sent to the local 'Scans' Inbox.
116
Chapter 4 - Define your workflow with the Océ Express WebTools
Configure the pen settings
Configure the pen settings
Introduction
Normally the pen settings are defined in the application that is used to create a drawing.
If the pen settings are not defined in the application, the default pen settings configured
in the Océ Express WebTools are used.
Note:
Before you can edit a setting or a settings group, you must log on as Key operator.
Illustration
How to configure the pen settings
1. Click 'Configuration' - 'Pens'.
2. Click on the value of the pen number that you want to change.
The pen settings window appears where you can configure the colour, width and pattern
for this pen.
Chapter 4 - Define your workflow with the Océ Express WebTools
117
Configure the pen settings
3. Click 'Ok' to confirm you entries or 'Cancel' to reject your entries.
118
Chapter 4 - Define your workflow with the Océ Express WebTools
What you need to know about default settings
Define your printing system preferences
What you need to know about default settings
Definition
Before you send print jobs to the Océ PlotWave™ 300, remember the following.
The values defined in the Océ Express WebTools are default values for the general system
behaviour. You can define a number of job settings in the Océ printer drivers or the Océ
job submission tools. The settings defined in the printer drivers or the job submission
tools always overrule the settings defined in the Océ Express WebTools.
Chapter 4 - Define your workflow with the Océ Express WebTools
119
Define the system preferences
Define the system preferences
Introduction
Before you start to use your printing system you can define the general system preferences
to fine tune it to optimally fit your company's workflow and processes.
Note:
Before you can edit a setting or a settings group, you must log on as a Key operator.
Illustration
How to define the system preferences
1. Click 'Preferences' - 'System settings'.
The system settings are grouped in functional settings groups. You can find detailed information about the settings in the tooltip.
120
Chapter 4 - Define your workflow with the Océ Express WebTools
Define the system preferences
#
Settings group
Description
'Contact in case of error'
Person to contact in case of error.
'Regional settings'
The regional settings are configured during the
installation of your system. Here you can change
the initial configuration.
Note:
You can toggle between the 'First language' and the 'Second language' on the
user panel.
Note:
Every time you change the 'Measurement
unit', the controller recalculates the values
from millimetre to inches and vice versa.
If you reverse to the original value of this
setting a slight calculation difference can
occur due to rounding differences.
'Print queue management'
Define how jobs are managed in the print queue.
'Smart Inbox management'
Define how jobs are managed in the Smart Inboxes.
'Printer properties'
Define the general printer behaviour.
'Scanner properties'
Define the general scanner behaviour. Only available if a scanner is installed.
'Logging and accounting'
Define logging and accounting data.
'Stamps 1 to 4'
Configure and enable stamps for copy jobs.
'Stamps 5 to 8'
Configure and enable stamps for copy jobs.
'Stamps 9 to 12'
Configure and enable stamps for copy jobs.
2. Click 'Edit' in the settings group bar or click the value of a single setting.
(see ‘How to edit a setting’ on page 98)
3. Click 'Ok' to confirm you entries or 'Cancel' to reject your entries.
Chapter 4 - Define your workflow with the Océ Express WebTools
121
Define the print job preferences
Define the print job preferences
Introduction
Here you can define the default values for print jobs.
If you send a print job using an Océ printer driver or an Océ job submission tool, the
job settings defined in the printer driver or the job submission tool always overrule the
default settings defined in the Océ Express WebTools.
Note:
Before you can edit a setting or a settings group, you must log on as a Key operator.
Illustration
How to define the print job preferences
1. Click 'Preferences' - 'Print job defaults'.
The system settings are grouped in functional settings groups. You can find detailed information about the settings in the tooltip.
122
Chapter 4 - Define your workflow with the Océ Express WebTools
Define the print job preferences
#
Settings group
Contains settings that define
'Image'
the default processing of image data.
'Layout'
the default positioning of the image on the printed output.
'Sheet'
the default media usage.
'General rasterisation settings'
how the printer processes complex files.
'HP-GL'
how the printer interprets 'HP-GL' files.
'HP-GL/2'
how the printer interprets 'HP-GL/2' files.
'CalComp'
how the printer interprets 'CalComp' files.
'PostScript/PDF'
how the printer interprets 'PostScript/PDF' files.
'TIFF'
how the printer interprets 'TIFF' files.
'ASCII'
how the printer interprets 'ASCII' files.
2. Click 'Edit' in the settings group bar or click the value of a single setting.
(see ‘How to edit a setting’ on page 98)
3. Click 'Ok' to confirm you entries or 'Cancel' to reject your entries.
Chapter 4 - Define your workflow with the Océ Express WebTools
123
Define the default output quality for print jobs
Define the default output quality for print jobs
Introduction
The Océ Express WebTools offers 2 settings to optimise the default output quality for
print jobs.
You can find these settings in the 'Preferences' - 'Print job defaults' tab.
Note:
Before you can edit a setting or a settings group, you must log on as a Key operator.
'Print optimisation'
The quality of the printed output is optimised based on the content of the print file.
#
Values
Description
'Standard'
'Standard' is the default value.
'Line/text'
'Line/text' is the advised value for line drawings, because lines
are sharpened.
'Poster or photo'
'Poster or photo' is the advised value for posters and large photo's, because the printed output is optimised for large grey area's.
'Do not make posters and photos lighter'
#
Values
Description
'Enabled'
You can enable this setting if the 'Preferences' - 'System settings'
- 'Printer properties' - 'Print-darkness (toner reduction)' setting
is set to a negative value. In that case the toner reduction will
not be used if you print posters or photos.
'Disabled'
124
Chapter 4 - Define your workflow with the Océ Express WebTools
Define the copy job preferences and copy templates
Define the copy job preferences and copy templates
Introduction
Here you can define the general copy job settings and four copy templates.
What you need to know about copy templates
Copy templates enable you to easily perform copy jobs that you do very often. The job
templates appear on the user panel when you select 'COPY'.
With a copy template you can pre-define the settings you need for a copy job. You only
need to set the job settings once and you can store the settings in a job template that is
presented on the user panel. You can re-use the job template for each next job without
the need to redefine all the settings every time. The user panel offers 4 job templates for
copy jobs.
The job template function supports the green button approach: the user only needs to
select a template and start a job with the required settings instead of having to define all
the settings manually for every job.
Note:
When you select a copy template on the user panel, you can still change the individual
values of al settings.
Note:
Before you can edit a setting or a settings group, you must log on as a Key operator.
Chapter 4 - Define your workflow with the Océ Express WebTools
125
Define the copy job preferences and copy templates
Illustration
How to define the copy job preferences
1. Click 'Preferences' - 'Copy job defaults'.
The system settings are grouped in functional settings groups. You can find detailed information about the settings in the tooltip.
#
126
Settings group
Description
'General copy job settings'
Default copy job settings that refer to all
copy jobs.
'Copy preset 1: Name and description'
The name and description you enter here
are visible on the user panel when you
select 'COPY'.
'Copy preset 1: Original'
Settings that refer to the original.
Chapter 4 - Define your workflow with the Océ Express WebTools
Define the copy job preferences and copy templates
Settings group
Description
'Copy preset 1: Image and layout'
Settings that determine the default processing of image data and the default positioning of the image on the printed
output.
'Copy preset 1: Sheet'
Settings that determine the default media
usage.
Note:
You can define the same settings for copy template 2, 3 and 4.
2. Click 'Edit' in the settings group bar or click the value of a single setting.
(see ‘How to edit a setting’ on page 98)
3. Click 'Ok' to confirm you entries or 'Cancel' to reject your entries.
Chapter 4 - Define your workflow with the Océ Express WebTools
127
Define the default output quality for copy jobs
Define the default output quality for copy jobs
Introduction
The Océ Express WebTools offers 3 settings to optimise the default output quality for
copy jobs. You can define a default output quality for each copy job template.
You can find these settings in the 'Preferences' - 'Copy job defaults' tab.
Note:
Before you can edit a setting or a settings group, you must log on as a Key operator.
'Original type'
The quality of the printed output is optimised based on the type of the original that is
copied.
#
128
Values
Description
'Line/text standard'
'Line/text standard' is default value for copy jobs.
This value is advised for line drawings and design drawings.
Lines and text are optimised, a light background is compensated.
'Line/text draft'
'Line/text draft' is the advised value if you must copy many
originals and the copy speed has higher priority than the copy
quality.
'Colored original'
'Colored original' is the advised value for coloured originals like
maps, 3D-CAD drawings, consumer graphics or rasterised
photo's.
The output is optimised for the reproduction of the colour information. The system compensates for a grey background and
for light wrinkles.
'Photo'
'Photo' is the advised value for photo's.
The output quality is high.
'Dark original'
'Dark original' is the advised value for originals with a dark
background.
The output is optimised especially for dark transparent originals.
The system compensates for the dark background and the actual
information on the original is optimised.
'Blueprint'
'Blueprint' is the advised value for blueprints.
The information on the original is inverted. White lines will be
black, the blue background will be white.
Chapter 4 - Define your workflow with the Océ Express WebTools
Define the default output quality for copy jobs
'Background compensation'
#
Values
Description
'On'
If you select 'Auto' the system decides depending on the original
type whether background compensation will be on or off.
'Off'
'Auto'
'Lighter/darker'
#
Values
Description
Numeric value between -5 and +5
Increase this value if you want your printed output to be darker.
Decrease this value if you want your printed output to be lighter.
Chapter 4 - Define your workflow with the Océ Express WebTools
129
Define the scan job preferences and scan templates
Define the scan job preferences and scan templates
Introduction
Here you can define the general scan job settings and four scan templates.
What you need to know about scan templates
Scan templates enable you to easily perform scan jobs that you do very often. The job
templates appear on the user panel when you select 'SCAN'.
With a scan template you can pre-define the settings you need for a scan job. You only
need to set the job settings once and you can store the settings in a job template that is
presented on the user panel. You can re-use the job template for each next job without
the need to redefine all the settings every time. The user panel offers 4 job templates for
scan jobs.
The job template function supports the green button approach: the user only needs to
select a template and start a job with the required settings instead of having to define all
the settings manually for every job.
Note:
When you select a scan template on the user panel, you can still change the individual
values of al settings.
Note:
Before you can edit a setting or a settings group, you must log on as a Key operator.
130
Chapter 4 - Define your workflow with the Océ Express WebTools
Define the scan job preferences and scan templates
Illustration
How to define the scan job preferences
1. Click 'Preferences' - 'Scan job defaults'.
The system settings are grouped in functional settings groups. You can find detailed information about the settings in the tooltip.
#
Settings group
Description
'General scan job settings'
Default scan job settings that refer to all
scan jobs.
'Scan preset 1: Name and description'
The name and description you enter here
are visible on the user panel when you
select 'SCAN'.
'Scan preset 1: Original'
Settings that refer to the original.
Chapter 4 - Define your workflow with the Océ Express WebTools
131
Define the scan job preferences and scan templates
Settings group
Description
'Scan preset 1: File'
Settings that refer to the destination and
the file type of the scanned file.
You can select on of the scan destination
that you enabled in the 'Configuration' 'Scan destinations' tab.
(see ‘Configure a local scan destination’ on
page 113)
2. Click 'Edit' in the settings group bar or click the value of a single setting.
(see ‘How to edit a setting’ on page 98)
3. Click 'Ok' to confirm you entries or 'Cancel' to reject your entries.
132
Chapter 4 - Define your workflow with the Océ Express WebTools
Define the default output quality for scan jobs
Define the default output quality for scan jobs
Introduction
The Océ Express WebTools offers settings to optimise the default output quality for scan
jobs. You can define a default output quality for each scan job template.
You can find these settings in the 'Preferences' - 'Scan job defaults' tab.
Note:
Before you can edit a setting or a settings group, you must log on as a Key operator.
'Original type when scanning to greyscale or black-and-white'
The quality of the scanned file is optimised based on the type of the original that is
scanned.
Note:
When scanning to colour, no original type needs to be specified
#
Values
Description
'Line/text'
'Line/text standard' is advised for line drawings and design
drawings.
Lines and text are optimised, a light background is compensated.
'Coloured original'
'Colored original' is the advised value for coloured originals like
maps, 3D-CAD drawings, consumer graphics or rasterised
photo's.
The output is optimised for the reproduction of the colour information. The system compensates for a grey background and
for light wrinkles.
'Photo'
'Photo' is the advised value for photo's.
The output quality is high.
'Blueprint'
'Blueprint' is the advised value for blueprints.
The information on the original is inverted. White lines will be
black, the blue background will be white.
'Dark original'
'Dark original' is the advised value for originals with a dark
background.
The output is optimised especially for dark transparent originals.
The system compensates for the dark background and the actual
information on the original is optimised.
Chapter 4 - Define your workflow with the Océ Express WebTools
133
Define the default output quality for scan jobs
'Background compensation'
#
Values
Description
'On'
If you select 'Auto' the system decides depending on the original
type whether background compensation will be on or off.
'Off'
'Auto'
'Colour mode'
#
Values
Description
'Colour'
Define if your scanned file must be in colour, greyscale or blackand-white.
'Greyscale'
'Black-and-white'
'Resolution (dpi)'
#
Values
Description
'100'
Use this setting to define the resolution of the scanned images.
The higher the resolution, the better the image quality.
'200'
'300'
Note:
'400'
A higher resolution increases the file size.
'600'
134
Chapter 4 - Define your workflow with the Océ Express WebTools
Define the default output quality for scan jobs
'File type'
#
Values
Description
'TIFF'
'Compression for
TIFF'
'File organisation
for TIFF'
Use this setting to define the file type of your scanned file.
You can also define the default compression method, file organisation or quality per file type. Depending on the colour mode
and file type you select, the values for the compression mode
and organisation will change. For some file types, the compression and organisation settings cannot be set in all situations.
(see ‘'File type'’ on page 214)
'PDF'
'Compression for
PDF' / 'JPEG
quality for PDF'
'JPEG'
'Quality for JPEG'
'CALS'
'Lighter/darker'
#
Values
Description
Numeric value between -5 and +5
Increase this value if you want your printed output to be darker.
Decrease this value if you want your printed output to be lighter.
Chapter 4 - Define your workflow with the Océ Express WebTools
135
The Smart Inbox and Jobs Queue concept
Manage jobs on your printing system
The Smart Inbox and Jobs Queue concept
Definition
Smart Inboxes are used for customised job management.
#
Concept
The Jobs Queue
The Smart Inbox
Metaphor
Production belt.
Personal mailboxes
User intention
■
Used for
■
■
■
Get the job printed as soon
as possible.
■
Feedback of printer progress.
Cancel requests.
Change priority (local).
■
■
■
■
Send jobs to the system.
Organise jobs.
Keeping together sets of documents from various origin.
Ordening documents over
various Smart Inboxes, to
easy retrieve jobs.
Reprint or change settings of
jobs that are already sent to
the printer.
Jobs in a Smart Inbox
You can use Smart Inboxes to manage your jobs. When you open the 'Jobs' tab in the
Océ Express WebTools the Smart Inbox section displays an overview of the Smart Inboxes.
Define one or more Smart Inbox names that allow you to easily organise and access your
jobs.
The following jobs are placed in a Smart Inbox.
136
Chapter 4 - Define your workflow with the Océ Express WebTools
The Smart Inbox and Jobs Queue concept
Scan jobs, if the selected scan destination is set to 'Local to the Smart Inbox'.
If you select a remote scan destination ('Configuration' - 'Scan destinations') it is possible
that the scanned file cannot be delivered to this destination. In that case the scanned file
will also be placed in the 'Scans' Smart Inbox.
Copy jobs
If you want your copy jobs to appear in a Smart Inbox, you must enable the 'Preferences'
- 'System settings' - 'Smart Inbox management' - 'Display a Smart Inbox with all jobs'
setting. Your copy job is then displayed in the 'View all' Smart Inbox. The 'Preferences'
- 'System settings' - 'Smart Inbox management' - 'Save printed jobs in a Smart Inbox' setting determines if copy jobs that have been printed will be kept in the Smart Inbox
for reprint or not.
Print jobs, sent via printer drivers, applications or Océ Publisher Express.
In the printer driver, application or job submitter you can enter the name of the Smart
Inbox you want tot print to.
When you use the Océ Windows® Printer Driver and the 'Preferences' - 'System settings'
- 'Print queue management' - 'Destination for new print jobs' is set to 'As specified in
the job ticket', you can also enable or disable 'Direct print' . When 'Direct print' is enabled
your print job will be sent to the print queue immediately. When 'Direct print' is disabled
your print job is kept in the Smart Inbox and you must send the print job to the print
queue manually.
Smart Inbox functionality
'View job information'
To view the job information click on the job name in the Smart Inbox.
'Delete'
To delete a job from the Smart Inbox select the job and click 'Delete'.
'Edit' (not for 'Scans' Smart Inbox)
To edit the job settings of a job select the job and click 'Edit'. A window opens where
you can change the 'Number of sets' setting and the 'Collate' setting.
'Print'
To print a job select the job and click 'Print'. The job is copied into the Job Queue when
the 'Preferences' - 'System settings' - 'Print queue management' - 'Print queue' setting is
set to 'On'. The 'Preferences' - 'System settings' - 'Smart Inbox management' - 'Save
printed jobs in a Smart Inbox' - setting determines if jobs that have been printed will be
kept in the Smart Inbox for reprint or not.
'Save' (only for 'Scans' Smart Inbox)
This button allows you to save a scanned file.
Chapter 4 - Define your workflow with the Océ Express WebTools
137
The Smart Inbox and Jobs Queue concept
'Delete all' (only for 'View all' Smart Inbox)
To delete all the jobs from all Smart Inboxes click the 'Delete all' button.
Note:
The icon in front of the job name provides status information about the job. Detailed
information about the status is displayed in the tooltip.
Note:
When a Smart Inbox contains many jobs you can sort the jobs by clicking on a column
name (for example:'Job name' or 'Time created').
Note:
The 'View all' Smart Inbox is only available if you enable the 'Preferences' - 'System
settings' - 'Smart Inbox management' - 'Display a Smart Inbox with all jobs' setting.
Job Queue functionality
'View job information'
To view the job information click on the job name in the queue.
'Top'
To increase the print priority of a job in the queue you can select the job and click 'Top'
to place the job on top of the queue.
'Delete'
To delete a job from the Job Queue select the job and click 'Delete'.
'Delete all'
To empty the Job Queue completely click the 'Delete all' button.
Note:
The icon in front of the job name provides status information about the job. Detailed
information about the status is displayed in the tooltip.
Note:
When a job is printed, the job is removed from the Job Queue.
138
Chapter 4 - Define your workflow with the Océ Express WebTools
Use Smart Inboxes in a multiple-user environment
Use Smart Inboxes in a multiple-user environment
Introduction
A multiple-user environment is a working environment where users directly send jobs to
the printer, collect their own prints and make their own copies and scans. In this environment it is important for a user to have easy access to his personal jobs.
Illustration
How to set up the Smart Inboxes in a multiple-user environment
1. Open the 'Preferences' - 'System settings' tab en select 'Edit' in the 'Smart Inbox management' bar.
2. Enter the following values (example).
#
Setting
Value
'Display a Smart Inbox with all jobs'
'Disabled'
'Allow printing from Smart Inbox'
'Everyone'
'Save printed jobs in a Smart Inbox'
'Enabled'
'Printed jobs in Smart Inbox: job lifetime'
For example: 8 hours
'Printed jobs in Smart Inbox: maximum
number of jobs'
For example: 30
Chapter 4 - Define your workflow with the Océ Express WebTools
139
Use Smart Inboxes in a repro environment
Use Smart Inboxes in a repro environment
Introduction
A repro environment is a working environment where a repro operator handles all the
jobs. In this environment the repro operator can use the Smart Inboxes to organise his
daily work.
Illustration
How to set up the Smart Inboxes in a repro environment
1. Open the 'Preferences' - 'System settings' tab en select 'Edit' in the 'Smart Inbox management' bar.
2. Enter the following values (example).
#
140
Setting
Value
'Display a Smart Inbox with all jobs'
'Disabled'
'Allow printing from Smart Inbox'
'Everyone'
'Save printed jobs in a Smart Inbox'
'Enabled'
'Printed jobs in Smart Inbox: job lifetime'
For example: 8 hours
'Printed jobs in Smart Inbox: maximum
number of jobs'
For example: 100
Chapter 4 - Define your workflow with the Océ Express WebTools
Use Smart Inboxes in a multiple-user and repro environment
Use Smart Inboxes in a multiple-user and repro environment
Introduction
A multiple-user and repro environment is a working environment where both users directly send jobs to the printer, collect their own prints, make their own copies and scans
and the system is also used by a repro operator. In this environment it is important for a
user to have easy access to his personal jobs, but it is also important for the repro operator
to have an overview of all jobs.
Illustration
How to set up the Smart Inboxes in a multiple-user and repro environment
1. Open the 'Preferences' - 'System settings' tab en select 'Edit' in the 'Smart Inbox management' bar.
2. Enter the following values (example).
#
Setting
Value
'Display a Smart Inbox with all jobs'
'Enabled'
'Allow printing from Smart Inbox'
'Login needed'
'Save printed jobs in a Smart Inbox'
'Enabled'
'Printed jobs in Smart Inbox: job lifetime'
For example: 8 hours
'Printed jobs in Smart Inbox: maximum
number of jobs'
For example: 100
Chapter 4 - Define your workflow with the Océ Express WebTools
141
Open or create a Smart Inbox
Open or create a Smart Inbox
Open or create a Smart Inbox in the 'Smart Inbox' section
1. Select the 'Jobs' tab.
2. In the 'Smart Inbox' section click 'Create Smart Inbox'.
3. Click on the blank field to open a drop-down list with all Smart Inboxes available on
your system that contain one or more jobs. You can open an existing Smart Inbox from
the list or you can type the name of a new Smart Inbox.
4. Press Enter or click on 'Smart Inbox'.
The Smart Inbox is now displayed in the 'Smart Inbox' section.
Open or create a Smart Inbox in Océ Publisher Express
1. Select the 'Jobs' tab.
2. Click on 'Create new job' in the Océ Publisher Express section.
3. In the 'Workflow' section click on the Smart Inbox field to open a drop-down list with
all Smart Inboxes available on your system that contain one or more jobs. You can open
an existing Smart Inbox from the list or you can type the name of a new Smart Inbox.
4. Click 'Print' to send the print job to the Smart Inbox.
The Smart Inbox is now displayed in the 'Smart Inbox' section.
142
Chapter 4 - Define your workflow with the Océ Express WebTools
Delete a Smart Inbox
Delete a Smart Inbox
Attention:
When you delete a Smart Inbox, you only delete the view on the Smart Inbox, but not
the content. To permanently delete the jobs from a Smart Inbox you must select the jobs
in the Smart Inbox and click 'Delete'.
How to delete a Smart Inbox
1. Select the 'Jobs' tab.
2. To delete a Smart Inbox click on the X - button at the right side of the 'Smart Inbox'
bar.
Chapter 4 - Define your workflow with the Océ Express WebTools
143
Delete a Smart Inbox
144
Chapter 4 - Define your workflow with the Océ Express WebTools
Chapter 5
Use the printing system
Pause, resume or delete an active job
Pause, resume or delete an active job
Introduction
This section describes how to pause, resume or delete an active job.
How to 'Pause' or 'Resume' an active print job
#
Action
Remarks
To pause the printer:
In the 'QUEUE' screen use the lower left soft key on the
user panel to 'Pause' the printer.
In the 'QUEUE' screen use the lower right soft key to 'Resume' the printer.
How to delete an active print job
#
146
If you use the
Then
Result
User panel
Press the stop button
Océ Express
WebTools
Open the 'Jobs' tab. In the
'Jobs - Queue' section tick
the box in front of the job
you want to delete and click
'Delete'.
The system aborts and deletes
the job immediately.
Chapter 5 - Use the printing system
The job states
The job states
Introduction
When a job is placed in a Smart Inbox or in the Queue, the icon in front of the job name
gives information about the status of the job.
Overview of the job states in the Smart Inbox
#
State
Icon
Description
Receiving
Indicates that the Smart Inbox is receiving the job
data.
New
Indicates that a new job is available in the Smart
Inbox.
Queued
Indicates that the job is copied to the queue and
waiting to be printed.
Printed
Indicates that the job has been printed.
Attention needed
General error message.
Account data missing
State when the account data for the job is missing.
Overview of the job states in the Queue
#
State
Icon
Description
Receiving
Indicates that the Queue is receiving the job data.
Processing
Indicates that the Queue is processing the job data.
Ready to print
Indicates that the job is ready for printing.
Scheduled
Indicates that the job is waiting to be printed.
Printing
Indicates that the job is currently being printed.
Chapter 5 - Use the printing system
147
The job states
State
Icon
Attention needed
148
Chapter 5 - Use the printing system
Description
General error message.
Clear the system
Clear the system
When to do
If you want to remove all the jobs from the system.
How to clear the system
1. From the 'HOME' screen on the user panel select the 'System' tab.
2. Use the scroll wheel to select 'Clear system' and confirm with the confirmation button
(above the scroll wheel).
3. Follow the steps in the wizard.
4. Select 'Home' to return to the 'HOME' screen.
Chapter 5 - Use the printing system
149
What you need to know before you send your print jobs
Send print jobs
What you need to know before you send your print jobs
Definition
Before you send print jobs to the Océ PlotWave 300, remember the following.
■
■
■
150
The values defined in the Océ Express WebTools are default values for the general
system behaviour. You can define a number of job settings in the Océ printer drivers
or the Océ job submission tools. The settings defined in the printer drivers or the job
submission tools always overrule the settings defined in the Océ Express WebTools.
Make sure that you define and load the correct media for your job.
Make sure that you define the correct job settings. For example, orientation, rotation,
and media type.
Chapter 5 - Use the printing system
Use Océ Publisher Express to send a print job
Use Océ Publisher Express to send a print job
Introduction
Océ Publisher Express is a job submitter that is integrated in the Océ Express WebTools.
Illustration
How to use Océ Publisher Express to send a print job
#
Step
Action
Remarks
1
Open your web browser.
Use one of the following web browsers
■ Microsoft® Internet Explorer 6.0 (or
higher)
■ Mozilla Firefox™ 2.0 (or higher)
Chapter 5 - Use the printing system
151
Use Océ Publisher Express to send a print job
152
Step
Action
Remarks
2
Enter the URL http://'printer
name' in your workstation
browser to connect to the Océ
Express WebTools.
'Printer name' is the name of your Océ
PlotWave 300 printer.
3
Open the 'Jobs' - tab.
This tab displays the following.
■ The Océ Publisher Express section.
■ An overview of all jobs that are currently available in the 'Jobs - Queue'.
■ An overview of all the Smart Inboxes
that currently contain on or more jobs.
4
Click on 'Create new job' in the
Océ Publisher Express section.
A separate window opens.
5
Click on 'Add file' and use the
Browse... button to select the
file you want to print.
You can print documents with the following data formats
■ - HP-GL - .hp, .hpg, .hpgl
■ - HP-GL/2 - .hp2
■ - HP RTL - .rtl
■ - CALS - .cls, .cal
■ - NIRS - .nir, .nif
■ - CalComp - .cc, .906, .907, .951, .crf,
.pci
■ - Edmics (C4) - .c4
■ - TIFF - .tif
■ - PostScript 3 - .ps (optional)
■ - PDF - .pdf (optional)
■ - JPEG - .jpg, .jpeg
■ - DWF, DWF/X
6
Select the 'Preset' and change the
'Settings' if necessary.
Job settings that you change in Océ Publisher Express always overrule the default
settings defined in the Océ Express
WebTools.
7
In the 'Workflow' section enter
the name of the Smart Inbox you
want to print to and click 'Print'
to send the print job to the
Smart Inbox.
You can easily create a new Smart Inbox
if you enter a new Smart Inbox name.
Chapter 5 - Use the printing system
®
Use the Océ Windows Printer Driver to send a print job
®
Use the Océ Windows Printer Driver to send a print job
Introduction
Océ provides the Océ Windows® Printer Driver that allows you to send print jobs to
your Océ PlotWave™ 300. This driver is a mixed raster-vector HP-GL/2 printer driver
that allows you to print from any application under Windows 2000®, Windows XP®,
Windows Vista® or Windows Server® 2003 to your Océ printer.
Illustration
®
How to use the Océ Windows Printer Driver to send a print job
#
Step
Action
Remarks
1
Open the file that you want to
print in the source application.
AutoCAD® 2000 or any other Windows
application
2
From the 'File' menu of the application, click 'Print'.
3
Select the Océ PlotWave™ 300
in the 'Printer' area of the 'Print'
dialogue box.
4
Click 'Properties'.
You can define the default print job settings in the Océ Express WebTools.
Chapter 5 - Use the printing system
153
®
Use the Océ Windows Printer Driver to send a print job
Step
Action
5
In the 'Basic' tab activate 'Océ
Ticket enabled' to overrule the
default values for the job settings.
6
Check all tabs in the driver and
change the default settings if
necessary.
7
Click 'OK' to send the print job
to the print queue.
Remarks
Note:
More information about how to install, configure and use the driver is available in the
documentation provided with the Océ Windows® Printer Driver.
■ the Océ Windows® Printer Driver Online Help
■ the Océ Windows® Printer Driver User manual
Note:
The Océ PlotWave™ 300 is delivered with a driver pack CD-ROM. You can also
download the latest Océ drivers, free of charge, from our Web site www.oce.com.
154
Chapter 5 - Use the printing system
®
Use the Océ PostScript 3 Driver to send a print job
®
Use the Océ PostScript 3 Driver to send a print job
Introduction
Océ provides the Océ PostScript® 3 Driver that allows you to send print jobs to your
Océ PlotWave™ 300.
Note:
You need a license to be able to print PostScript® files on the Océ PlotWave™ 300.
Note:
More information about how to install, configure and use the driver is available in the
documentation provided with the Océ PostScript® 3 Driver.
■ the Océ PostScript® 3 Driver Online Help
■ the Océ PostScript® 3 Driver Installation manual
Illustration
®
How to use the Océ PostScript 3 Driver to send a print job
#
Step
Action
1
Open the file that you want to
print in the source application.
Remarks
Chapter 5 - Use the printing system
155
®
Use the Océ PostScript 3 Driver to send a print job
156
Step
Action
2
From the 'File' menu of the application, click 'Print'.
3
Select the Océ PlotWave™ 300
in the 'Printer' area of the 'Print'
dialogue box.
4
Click 'Properties'.
5
Activate the Océ Job Ticket to
overrule the default values for
the job settings.
6
Check and change the Printer
Features settings if necessary.
7
Click 'OK' to send the print job
to the print queue.
Chapter 5 - Use the printing system
Remarks
You can define the default print job settings in the Océ Express WebTools.
Use FTP to send a print job to the Océ PlotWave™ 300
Use FTP to send a print job to the Océ PlotWave™ 300
Introduction
The Océ PlotWave™ 300 supports printing through FTP.
If you send your print job through FTP the default Océ Express WebTools settings are
leading.
How to send a print job via FTP
You can print the files through FTP in the following ways.
■ Via a command line prompt
■ Enter the address ftp://<hostname or IP address> /jobs in your workstation browser.
■ Via a FTP application
■ From a Web browser
The Océ PlotWave™ 300 has a dedicated FTP Jobs folder. You cannot delete or change
this folder. It is created at installation and protected. The most convenient way to print
files through FTP is to drag and drop the files or to copy and paste the files, into this
'Jobs' folder on the FTP site of your Océ PlotWave™ 300 controller. The documents
in the folder are printed on the Océ PlotWave™ 300.
Web browsers that support job submission through FTP
#
Level of functionality
Web browser
Operation
Supports drag and drop of
files
Microsoft Internet Explorer 6.0 (or higher)
Mozilla Firefox™ 1.5 (or
higher)
Drag the jobs into the
'Jobs' folder on the FTP
site of your Océ PlotWave™ 300.
Supports copy and paste
of files.
Microsoft® Internet Explorer 6.0 (or higher)
Mozilla Firefox™ 1.5 (or
higher)
Paste the jobs into the
'Jobs' folder on the FTP
site of your Océ PlotWave™ 300.
®
Chapter 5 - Use the printing system
157
Use LPR to send a print job to the Océ PlotWave™ 300
Use LPR to send a print job to the Océ PlotWave™ 300
Introduction
The Océ PlotWave™ 300 supports printing through LPR.
If you send your print job through LPR the default Océ Express WebTools settings are
leading.
How to send a print job via LPR
Type the following line command after the DOS prompt: lpr -S <hostname or IP address>
-P <print queue name> <file name>.
Note:
You can use any name for <print queue name>, for example jobs.
158
Chapter 5 - Use the printing system
Print a job from the Smart Inbox
Print a job from the Smart Inbox
How to print a job from the Smart Inbox using the Océ Express WebTools
1. Select the 'Jobs' tab in the Océ Express WebTools.
2. Select the job and click 'Print'. The job is copied into the Job Queue.
Chapter 5 - Use the printing system
159
Print a file from a USB mass storage device
Print a file from a USB mass storage device
1. Insert USB mass storage device in the USB flash drive interface on the user panel.
2. The system automatically selects the print tab.
3. Open the print tab with the confirmation button above the scroll wheel.
The content of your USB mass storage device is displayed.
4. Use the scroll wheel to browse to the job you want to print.
5. Use the green button to start printing.
160
Chapter 5 - Use the printing system
Introduction to copy jobs
Basic copy jobs
Introduction to copy jobs
A basic copy job only takes two steps. Feed the original face up and press the green button.
Every other type of copy job is called an extended copy job.
An extended copy job takes some additional steps, where you select a specific copy template
and, if necessary, change the predefined copy job settings on the user panel. The copy
templates are defined in the Océ Express WebTools (see ‘Define the copy job preferences
and copy templates’ on page 125). When you select 'Copy', the user panel shows four copy
templates. The copy templates provide access to the different settings per copy template.
You can use the scroll wheel to see all the predefined settings.
Chapter 5 - Use the printing system
161
Feed the original
Feed the original
Attention:
The scanner can not scan an original that is thicker than 0.65 mm or rigid originals.
When you use the carrier sheet that is available as an option, ensure that the combined
thickness of both the document and carrier sheet does not exceed 0.65 mm. (see ‘Use the
carrier sheet’ on page 200)
Attention:
Do not pull back the original when it is already fed into the scanner. To release the
original press the red stop button on the user panel.
How to feed the original
1. Feed the original face up and centred on the original feeding table.
Note:
You do not need to centre the original precisely. The exact position of the original is automatically detected by the scanner.
2. The scanner takes the original.
162
Chapter 5 - Use the printing system
Feed the original
Note:
After the scan procedure the scanner always holds the original. You can release the original
if you select 'Release paper' on the user panel.
Chapter 5 - Use the printing system
163
Use the carrier sheet
Use the carrier sheet
Introduction
The carrier sheet is available as an option. The use of the carrier sheet depends on the
condition of your original.
When to do
You must use the carrier sheet if you want to copy or scan the following types of originals.
■ An original that is smaller than A4 size.
■ An original that is fragile, damaged or heavy curled.
■ An original that is badly creased.
■ An original that has other pieces of paper attached to it.
Attention:
When handling the carrier sheet, be very careful not to scratch or otherwise damage it.
Note:
If you use the carrier sheet when scanning colour documents, the colours may shift
slightly in some cases.
How to use the carrier sheet
1. Open the carrier sheet and place the original. The printed side of the original must be
visible through the transparent protection sheet.
2. Place the carrier sheet with the original face up and centred on the original feeding table.
Attention:
Make sure that you first feed the sealed side of the carrier sheet into the scanner.
3. Feed the carrier sheet with the original into the scanner.
Note:
The scanner will detect the width of the carrier sheet as the original width.
4. The scanner takes the carrier sheet with the original.
164
Chapter 5 - Use the printing system
Use the carrier sheet
Note:
After the scan procedure the scanner always holds the carrier sheet. You can release the
carrier sheet if you select 'Release paper' on the user panel.
Chapter 5 - Use the printing system
165
Do a basic copy job
Do a basic copy job
1. Feed the original face up and centred on the original feeding table.
Note:
You do not need to centre the original precisely. The exact position of the original is automatically detected by the scanner.
The 'Copy' tab is automatically activated on the user panel.
166
Chapter 5 - Use the printing system
Do a basic copy job
Note:
The description of the first copy template is displayed. A basic copy job uses the settings
defined in the first copy template.
2. Press the green button.
Result
You do a basic copy job in 2 steps. The basic copy job uses the settings of the first copy
template.
Chapter 5 - Use the printing system
167
Introduction to copy jobs
Extended copy jobs
Introduction to copy jobs
A basic copy job only takes two steps. Feed the original face up and press the green button.
Every other type of copy job is called an extended copy job.
An extended copy job takes some additional steps, where you select a specific copy template
and, if necessary, change the predefined copy job settings on the user panel. The copy
templates are defined in the Océ Express WebTools (see ‘Define the copy job preferences
and copy templates’ on page 125). When you select 'Copy', the user panel shows four copy
templates. The copy templates provide access to the different settings per copy template.
You can use the scroll wheel to see all the predefined settings.
168
Chapter 5 - Use the printing system
Do an extended copy job
Do an extended copy job
1. Feed the original face up and centred on the original feeding table.
Note:
You do not need to centre the original precisely. The exact position of the original is automatically detected by the scanner.
The 'Copy' tab is automatically activated on the user panel.
2. Open the 'Copy' tab with the confirmation button above the scroll wheel.
Chapter 5 - Use the printing system
169
Do an extended copy job
3. Select your copy template.
If you want to change the pre-defined settings of the selected copy template, use the
confirmation button to open the copy template and display an overview of the pre-defined
settings groups.
4. Scroll to the settings group you want to change.
5.
■
■
■
170
Open the settings group you want to change with the confirmation button and scroll
to the setting you want to change.
Open this setting, scroll through the settings values and select the correct value with
the confirmation button .
Change the other settings in the settings group if necessary.
Chapter 5 - Use the printing system
Do an extended copy job
■
Select 'OK' to return to the overview of the predefined settings groups.
6. Repeat step 4 and 5 until you have set all the correct values for your copy job.
7. Press the green button.
Chapter 5 - Use the printing system
171
Available settings for copy jobs
Available settings for copy jobs
Introduction
The Océ PlotWave 300 provides a lot of settings to manage all your different copy jobs.
These settings are used for extended copy jobs. The following table gives an overview and
a very short description of the available settings. You can find a detailed description of
each setting in the Océ Express WebTools.
Settings group: 'Original'
#
Setting
Settings values
Function
'Original type'
'Line/text standard'
'Line/text draft'
'Coloured original'
'Photo'
'Blueprint'
'Dark original'
Define the type of original you use
'Backgnd
comp'
'On'
'Off'
'Auto'
Reduce the background noise of the image.
Setting
Settings values
Function
'Custom'
25 - 400 '%'
Scales the image to a custom percentage.
Settings group: 'Scale'
#
172
Chapter 5 - Use the printing system
Available settings for copy jobs
Setting
Settings values
Function
'To fit'
'A0'
'A1'
'A2'
'A3'
'E+ (36")'
'B1 (707 mm)'
'B2 (500 mm)'
Scales the image to fit the selected media
size.
Note:
Depend on the media series you
defined in the Océ Express
WebTools
Settings group: 'Media'
#
Setting
Settings values
Function
'Feed'
'Auto'
'Roll 1' (description of
media type and media
size loaded on roll 1)
'Roll 2' (description of
media type and media
size loaded on roll 2)
'Manual'
Define the media feed to copy or print
on. When you select 'Auto' the printer
automatically selects the media roll.
Settings group: 'Lighter/darker'
#
Setting
Settings values
Function
'Lighter/darker'
-5 to +5
Increase the value for darker prints; decrease for lighter prints.
Chapter 5 - Use the printing system
173
Available settings for copy jobs
Settings group: 'Remove strip'
#
174
Setting
Settings values
Function
'Leading'
0 to 400 mm
'Remove a strip from the beginning of
the original.'
'Trailing'
0 to 400 mm
'Remove a strip from the bottom of the
original.'
'Left'
0 to 914 mm
'Remove a strip from the left side of the
original.'
'Right'
0 to 914 mm
'Remove a strip from the right side of the
original.'
Chapter 5 - Use the printing system
Available settings for copy jobs
Settings group: 'Original width'
#
Setting
Settings values
Function
'By scanner'
'By scanner'
The width of the original is automatically
detected by the scanner.
'Standard'
'A0'
'A1'
'A2'
'A3'
'E+ (36")'
'B1 (707 mm)'
'B2 (500 mm)'
The width of the original is a standard
size.
Note:
Depend on the media series you
defined in the Océ Express
WebTools
'Custom'
210 to 914 mm
The width of the original is a custom size.
Chapter 5 - Use the printing system
175
Available settings for copy jobs
Settings group: 'Delete area'
#
176
Setting
Settings values
Function
'X offset'
0 to 914 mm
'The horizontal offset where the delete
area starts.'
'Y offset'
0 to 6000 mm
'The vertical offset where the delete area
starts.'
'Width'
0 to 914 mm
'The width of the area to delete.'
'Length'
0 to 6000 mm
'The length of the area to delete.'
Chapter 5 - Use the printing system
Available settings for copy jobs
Settings group: 'Finishing'
#
Setting
Settings values
Function
'Cut method'
'Synchro'
'Standard'
'Determines the cut size of the print.
'Standard': the print is cut to a standard
media size (DIN, ANSI, ...). 'Synchro':
the print length depends on the image.'
'Output'
'Back output'
'Top Delivery Tray'
The location to deposit the sheet.
Note:
Not all media types can be delivered to the Top delivery tray.
Settings group: 'Add strip'
#
Setting
Settings values
Function
'Leading'
0 to 400 mm
'Adds a blank strip at the beginning of
the output. Only valid when 'Cut size' is
'synchro'.'
Chapter 5 - Use the printing system
177
Available settings for copy jobs
Setting
Settings values
Function
'Trailing'
0 to 400 mm
'Adds a blank strip at the bottom of the
output. Only valid when 'Cut size' is
'synchro'. '
Settings group: 'Alignment'
#
178
Setting
Settings values
Function
'Alignment'
'Top left'
'Top'
'Top right'
'Left'
'Centre'
'Right'
'Bottom left'
'Bottom'
'Bottom right'
'Aligns the image on the media.'
'Shift horizontal'
- 914 mm to + 914 mm
'Shifts the image in the horizontal direction (after alignment to one of the positions given in 'Alignment').'
'Shift vertical'
- 1219 mm to + 1219
mm
'Shifts the image in the vertical direction
(after alignment to one of positions given
in 'Alignment').'
Chapter 5 - Use the printing system
Available settings for copy jobs
Settings group: 'Mirror'
#
Setting
Settings values
Function
'Mirror'
'On'
'Off'
'When 'on', the image is mirrored along
the vertical axis (the media transport direction).'
Settings group: 'Drawing method'
#
Setting
Settings values
Function
'Method'
'DIN'
'Afnor'
'Ericsson'
Defines which drawing method is used
for the legend position.
'Legend'
'Leading'
'Trailing'
'Defines whether the legend is located at
the top (leading) or the bottom (trailing).'
Chapter 5 - Use the printing system
179
Available settings for copy jobs
Settings group: 'Stamp'
#
180
Setting
Settings values
Function
'Stamp'
None
------
Copy with a stamp
'Position'
'Top'
'Middle'
'Bottom'
'The position of the stamp inside the legend.'
'Size'
'Small'
'Large'
'The size of the stamp.'
'Colour'
'Light grey'
'Grey'
'Dark grey'
'Black'
'The colour of the stamp.'
Chapter 5 - Use the printing system
Available settings for copy jobs
Settings group: 'Sort'
#
Setting
Settings values
Function
'Sort'
'By page'
'By set'
If you want to copy multiple sheet, you
can indicate how the copied sheets must
be sorted.
Chapter 5 - Use the printing system
181
Make multiple sets of copies
Make multiple sets of copies
Introduction
You can use the 'Create set' option to make multiple sets of copies.
Before you begin
If you must enter the same value for a setting very often, you can set this value as the default value for that setting in the Océ Express WebTools.
After you press the start key, the user panel always shows the job number and status of
the job. A copy job appears temporarily in the 'Jobs - Queue' section of the Océ Express
WebTools, a scan job appears in the Smart Inbox 'Scans'.
How to make multiple sets of copies sorted by set
1. Feed the original face up and centred on the original feeding table.
Note:
You do not need to centre the original precisely. The exact position of the original is automatically detected by the scanner.
The 'Copy' tab is automatically activated on the user panel.
2. Open the 'Copy' tab with the confirmation button above the scroll wheel.
3. Define the job settings.
■
■
■
■
■
■
182
Open a template with the confirmation button .
The 'Create set' option appears at the lower left corner of the screen.
Select 'Create set' with the lower left soft key.
The 'Close set' option appears at the lower left corner of the screen.
Scroll to 'Sort', define 'By set' and confirm with the with confirmation button . This
setting is disabled after you press the green button for the first time.
Press'OK'.
Change the settings for your first original if necessary.
Define the number of copies and press the green button.
You can not change the number of copies after you press the green button for the first
time.
Chapter 5 - Use the printing system
Make multiple sets of copies
■
Feed the next original, define the settings for this original if necessary and press the
green button.
You can use the lower right soft key to return to the default settings of your copy
template.
Repeat this step until all originals are fed.
4. Select 'Close set' with the lower left soft key.
How to make multiple sets of copies sorted by page
1. Feed the first original face up.
The scanner takes the original.
2. Open the 'Copy' tab with the confirmation button above the scroll wheel.
3. Define the job settings.
■
■
■
■
■
■
■
Open a template with the confirmation button .
The 'Create set' option appears at the lower left corner of the screen.
Select 'Create set' with the lower left soft key.
The 'Close set' option appears at the lower left corner of the screen.
Scroll to 'Sort', define 'By page' and confirm with the with confirmation button . This
setting is disabled after you press the green button for the first time.
Press'OK'.
Change the settings for your first original if necessary.
Define the number of copies and press the green button.
You can not change the number of copies after you press the green button for the first
time.
Feed the next original, define the settings for this original if necessary and press the
green button.
You can use the lower right soft key to return to the default settings of your copy
template.
Repeat this step until all originals are fed.
4. Select 'Close set' with the lower left soft key.
Result
The Océ PlotWave 300 copies a set of originals sorted by set or by page.
Chapter 5 - Use the printing system
183
Make a copy with a stamp
Make a copy with a stamp
Introduction
A stamp is a pre-defined text you can set on every copy.
Before you begin
If you must enter the same value for a setting very often, you can set this value as the default value for that setting in the Océ Express WebTools.
After you press the start key, the user panel always shows the job number and status of
the job. A copy job appears temporarily in the 'Jobs - Queue' section of the Océ Express
WebTools, a scan job appears in the Smart Inbox 'Scans'.
How to make a copy with a stamp
1. Feed the original face up and centred on the original feeding table.
Note:
You do not need to centre the original precisely. The exact position of the original is automatically detected by the scanner.
The 'Copy' tab is automatically activated on the user panel.
2. Open the 'Copy' tab with the confirmation button above the scroll wheel.
3. Define the job settings.
■
■
■
■
■
■
Open a template with the confirmation button .
Scroll to 'Stamp' and open this setting with the confirmation button .
Scroll to 'Stamp', select a stamp with the scroll wheel and confirm.
Scroll to 'Position', select the correct position with the scroll wheel and confirm.
Scroll to 'Size', select the correct size with the scroll wheel and confirm.
Scroll to 'Colour', select the correct colour with the scroll wheel and confirm.
4. Define the number of copies and press the green button.
Result
The copy contains the selected stamp.
184
Chapter 5 - Use the printing system
Scale to another media size
Scale to another media size
Introduction
You can use the 'Scale' setting to copy to a larger or smaller media format. Use one of the
following methods to scale a copy.
■ Select another media format with the 'To fit' setting.
■ Adjust a value in terms of percentage with the 'Custom' setting.
You can adjust a value between 25 and 400%. A value lower than 100% reduces the
copy, a value greater than 100% enlarges the copy.
Before you begin
If you must enter the same value for a setting very often, you can set this value as the default value for that setting in the Océ Express WebTools.
After you press the start key, the user panel always shows the job number and status of
the job. A copy job appears temporarily in the 'Jobs - Queue' section of the Océ Express
WebTools, a scan job appears in the Smart Inbox 'Scans'.
How to copy to another media size
1. Feed the original face up and centred on the original feeding table.
Note:
You do not need to centre the original precisely. The exact position of the original is automatically detected by the scanner.
The 'Copy' tab is automatically activated on the user panel.
2. Open the 'Copy' tab with the confirmation button above the scroll wheel.
3. Define the job settings.
■
■
■
Open a template with the confirmation button .
Scroll to 'Scale' and open this setting with the confirmation button .
Scroll to 'To fit', select a standard media format from the media series you use and
confirm.
4. Define the number of copies and press the green button.
Chapter 5 - Use the printing system
185
Scale to another media size
Result
The Océ PlotWave 300 copies to another media size.
186
Chapter 5 - Use the printing system
Make a copy on a cut sheet
Make a copy on a cut sheet
Introduction
You can copy on cut sheet media if the required media type or size is not available on the
media rolls of the printer.
Before you begin
If you must enter the same value for a setting very often, you can set this value as the default value for that setting in the Océ Express WebTools.
After you press the start key, the user panel always shows the job number and status of
the job. A copy job appears temporarily in the 'Jobs - Queue' section of the Océ Express
WebTools, a scan job appears in the Smart Inbox 'Scans'.
How to copy on a cut sheet
1. Feed the original face up and centred on the original feeding table.
Note:
You do not need to centre the original precisely. The exact position of the original is automatically detected by the scanner.
The 'Copy' tab is automatically activated on the user panel.
2. Open the 'Copy' tab with the confirmation button above the scroll wheel.
3. Define the job settings.
■
■
■
■
■
Open a template with the confirmation button .
Scroll to 'Media' and open this setting with the confirmation button .
Scroll to 'Feed', select 'Manual' with the scroll wheel and confirm.
The settings 'Size' and 'Type' appear.
Scroll to 'Size', select the correct media size with the scroll wheel and confirm.
Scroll to 'Type', select the correct media type with the scroll wheel and confirm.
4. Define the number of copies and press the green button.
Chapter 5 - Use the printing system
187
Make a copy on a cut sheet
5. Place the cut sheet media on the media bypass of the printer.
Note:
Use the media size indication on the media bypass to align the cut sheet media correctly.
If you use a B1 media size (707 mm) you must align the cut sheet media with the A1
indent.
Result
The Océ PlotWave 300 copies on a cut sheet.
188
Chapter 5 - Use the printing system
Make a copy and add a strip
Make a copy and add a strip
Introduction
You can use a strip to file a drawing.
Use 'Add strip' to copy an original without a strip and add a strip to the copy. You can
add a strip at the leading or trailing side of a copy.
Use 'Remove strip' to copy an original with a strip and remove the strip from the copy.
You can remove a strip from the leading, the trailing, the left or the right side of the
original.
Before you begin
If you must enter the same value for a setting very often, you can set this value as the default value for that setting in the Océ Express WebTools.
After you press the start key, the user panel always shows the job number and status of
the job. A copy job appears temporarily in the 'Jobs - Queue' section of the Océ Express
WebTools, a scan job appears in the Smart Inbox 'Scans'.
How to make a copy and add a strip
1. Feed the original face up and centred on the original feeding table.
Note:
You do not need to centre the original precisely. The exact position of the original is automatically detected by the scanner.
The 'Copy' tab is automatically activated on the user panel.
2. Open the 'Copy' tab with the confirmation button above the scroll wheel.
3. Define the job settings.
#
The 'Leading' strip
■
■
■
The 'Trailing' strip
Open a template with the confirmation button .
Scroll to 'Add strip' and open this setting with the confirmation button .
Scroll to 'Leading' or 'Trailing', define the value with the scroll wheel or numeric keys
and confirm.
Chapter 5 - Use the printing system
189
Make a copy and add a strip
4. Define the number of copies and press the green button.
Result
The Océ PlotWave 300 adds a trailing or leading strip to the copy.
190
Chapter 5 - Use the printing system
Make a copy and remove a strip
Make a copy and remove a strip
Introduction
You can use a strip to file a drawing.
Use 'Add strip' to copy an original without a strip and add a strip to the copy. You can
add a strip at the leading or trailing side of a copy.
Use 'Remove strip' to copy an original with a strip and remove the strip from the copy.
You can remove a strip from the leading, the trailing, the left or the right side of the
original.
Before you begin
If you must enter the same value for a setting very often, you can set this value as the default value for that setting in the Océ Express WebTools.
After you press the start key, the user panel always shows the job number and status of
the job. A copy job appears temporarily in the 'Jobs - Queue' section of the Océ Express
WebTools, a scan job appears in the Smart Inbox 'Scans'.
Attention:
When you remove a strip, make sure that you copied all the required information.
How to make a copy and remove a strip
1. Feed the original face up and centred on the original feeding table.
Note:
You do not need to centre the original precisely. The exact position of the original is automatically detected by the scanner.
The 'Copy' tab is automatically activated on the user panel.
2. Open the 'Copy' tab with the confirmation button above the scroll wheel.
3. Define the job settings.
#
Chapter 5 - Use the printing system
191
Make a copy and remove a strip
The 'Leading' strip
■
■
■
The 'Trailing' strip
The 'Left' strip
The 'Right' strip
Open a template with the confirmation button .
Scroll to 'Remove strip' and open this setting with the confirmation button .
Scroll to 'Leading', 'Trailing', 'Left' or 'Right', define the value with the scroll wheel
or numeric keys and confirm.
4. Define the number of copies and press the green button.
Result
The Océ PlotWave 300 copies the original without a strip. You can also use this setting
to copy a specific area of the original. (see ‘Make a copy of a specific area of an original’ on
page 193).
192
Chapter 5 - Use the printing system
Make a copy of a specific area of an original
Make a copy of a specific area of an original
Introduction
You can make a copy of a specific area of an original with the 'Remove strip' setting.
Define the following strips to specify the area.
■ 'Leading'
■ 'Trailing'
■ 'Left'
■ 'Right'
Before you begin
If you must enter the same value for a setting very often, you can set this value as the default value for that setting in the Océ Express WebTools.
After you press the start key, the user panel always shows the job number and status of
the job. A copy job appears temporarily in the 'Jobs - Queue' section of the Océ Express
WebTools, a scan job appears in the Smart Inbox 'Scans'.
Attention:
When you remove a strip, make sure that you copied all the required information.
How to copy a specific area of an original
1. Feed the original face up and centred on the original feeding table.
Note:
You do not need to centre the original precisely. The exact position of the original is automatically detected by the scanner.
The 'Copy' tab is automatically activated on the user panel.
2. Open the 'Copy' tab with the confirmation button above the scroll wheel.
3. Define the job settings.
#
Chapter 5 - Use the printing system
193
Make a copy of a specific area of an original
The 'Leading' strip
■
■
■
■
■
■
■
■
■
The 'Trailing' strip
The 'Left' strip
The 'Right' strip
Open a template with the confirmation button .
Scroll to 'Remove strip' and open this setting with the confirmation button .
Scroll to 'Leading', define the value with the scroll wheel or numeric keys and confirm.
Scroll to 'Trailing', define the value with the scroll wheel or numeric keys and confirm.
Scroll to 'Left', define the value with the scroll wheel or numeric keys and confirm.
Scroll to 'Right', define the value with the scroll wheel or numeric keys and confirm.
Press 'OK'
Scroll to 'Alignment' and open this setting with the confirmation button .
Scroll to 'Alignment', select 'Centre' with the scroll wheel and confirm.
4. Define the number of copies and press the green button.
Note:
You can use the 'Alignment''Shift horizontal' and 'Shift vertical' to adjust the defined
position of the specified area.
Result
The Océ PlotWave 300 copies a specific area of the original to the specified position on
the copy.
194
Chapter 5 - Use the printing system
Make a copy and delete a specific area of an original
Make a copy and delete a specific area of an original
Introduction
You can make a copy without a specific area of an original with the 'Delete area' setting.
You can use 2 settings to define the dimensions of the delete area and you can use 2 settings
to define the relative position of the delete area on the sheet.
Define the relative position of the delete area with the following settings.
■ 'X offset'
■ 'Y offset'
Define the dimensions of the delete area
■ 'Width'
■ 'Length'
Before you begin
If you must enter the same value for a setting very often, you can set this value as the default value for that setting in the Océ Express WebTools.
After you press the start key, the user panel always shows the job number and status of
the job. A copy job appears temporarily in the 'Jobs - Queue' section of the Océ Express
WebTools, a scan job appears in the Smart Inbox 'Scans'.
Attention:
When you copy without a specific area, make sure that you copied all the required information.
How to copy without a specific area of an original
1. Feed the original face up and centred on the original feeding table.
Note:
You do not need to centre the original precisely. The exact position of the original is automatically detected by the scanner.
The 'Copy' tab is automatically activated on the user panel.
2. Open the 'Copy' tab with the confirmation button above the scroll wheel.
3. Define the job settings.
Chapter 5 - Use the printing system
195
Make a copy and delete a specific area of an original
#
The 'X offset'
■
■
■
■
■
■
■
The 'Y offset'
The 'Width'
Open a template with the confirmation button .
Scroll to 'Delete area' and open this setting with the confirmation button .
Scroll to 'X offset', define the value with the scroll wheel or numeric keys and confirm.
Scroll to 'Y offset', define the value with the scroll wheel or numeric keys and confirm.
Scroll to 'Width', define the value with the scroll wheel or numeric keys and confirm.
Scroll to 'Length', define the value with the scroll wheel or numeric keys and confirm.
Press 'OK'
4. Define the number of copies and press the green button.
Result
The Océ PlotWave 300 copies an original without the specified area.
196
The 'Length'
Chapter 5 - Use the printing system
Introduction to scan jobs
Basic scan jobs
Introduction to scan jobs
A basic scan job only takes three steps. Feed the original face up, select 'Scan' on the user
panel and press the green button. Every other type of scan job is called an extended scan
job.
An extended scan job takes some additional steps, where you select a specific scan template
and, if necessary, change the predefined scan job settings on the user panel. The scan
templates are defined in the Océ Express WebTools (see ‘Define the scan job preferences
and scan templates’ on page 130). When you select 'Scan', the user panel shows four scan
templates. The scan templates provide access to the different settings per scan template.
You can use the scroll wheel to see all the predefined settings. When the scan job is finished, the scanned file is placed in the Smart Inbox 'Scans'.
Chapter 5 - Use the printing system
197
Feed the original
Feed the original
Attention:
The scanner can not scan an original that is thicker than 0.65 mm or rigid originals.
When you use the carrier sheet that is available as an option, ensure that the combined
thickness of both the document and carrier sheet does not exceed 0.65 mm. (see ‘Use the
carrier sheet’ on page 200)
Attention:
Do not pull back the original when it is already fed into the scanner. To release the
original press the red stop button on the user panel.
How to feed the original
1. Feed the original face up and centred on the original feeding table.
Note:
You do not need to centre the original precisely. The exact position of the original is automatically detected by the scanner.
2. The scanner takes the original.
198
Chapter 5 - Use the printing system
Feed the original
Note:
After the scan procedure the scanner always holds the original. You can release the original
if you select 'Release paper' on the user panel.
Chapter 5 - Use the printing system
199
Use the carrier sheet
Use the carrier sheet
Introduction
The carrier sheet is available as an option. The use of the carrier sheet depends on the
condition of your original.
When to do
You must use the carrier sheet if you want to copy or scan the following types of originals.
■ An original that is smaller than A4 size.
■ An original that is fragile, damaged or heavy curled.
■ An original that is badly creased.
■ An original that has other pieces of paper attached to it.
Attention:
When handling the carrier sheet, be very careful not to scratch or otherwise damage it.
Note:
If you use the carrier sheet when scanning colour documents, the colours may shift
slightly in some cases.
How to use the carrier sheet
1. Open the carrier sheet and place the original. The printed side of the original must be
visible through the transparent protection sheet.
2. Place the carrier sheet with the original face up and centred on the original feeding table.
Attention:
Make sure that you first feed the sealed side of the carrier sheet into the scanner.
3. Feed the carrier sheet with the original into the scanner.
Note:
The scanner will detect the width of the carrier sheet as the original width.
4. The scanner takes the carrier sheet with the original.
200
Chapter 5 - Use the printing system
Use the carrier sheet
Note:
After the scan procedure the scanner always holds the carrier sheet. You can release the
carrier sheet if you select 'Release paper' on the user panel.
Chapter 5 - Use the printing system
201
Do a basic scan job
Do a basic scan job
1. Feed the original face up and centred on the original feeding table.
Note:
You do not need to centre the original precisely. The exact position of the original is automatically detected by the scanner.
2. Select 'Scan' on the user panel.
3. Press the green button.
202
Chapter 5 - Use the printing system
Do a basic scan job
Result
You do a basic scan job in 3 steps. The basic scan job uses the settings of the first scan
template.
Chapter 5 - Use the printing system
203
Introduction to scan jobs
Extended scan jobs
Introduction to scan jobs
A basic scan job only takes three steps. Feed the original face up, select 'Scan' on the user
panel and press the green button. Every other type of scan job is called an extended scan
job.
An extended scan job takes some additional steps, where you select a specific scan template
and, if necessary, change the predefined scan job settings on the user panel. The scan
templates are defined in the Océ Express WebTools (see ‘Define the scan job preferences
and scan templates’ on page 130). When you select 'Scan', the user panel shows four scan
templates. The scan templates provide access to the different settings per scan template.
You can use the scroll wheel to see all the predefined settings. When the scan job is finished, the scanned file is placed in the Smart Inbox 'Scans'.
204
Chapter 5 - Use the printing system
Do an extended scan job
Do an extended scan job
1. Feed the original face up and centred on the original feeding table.
Note:
You do not need to centre the original precisely. The exact position of the original is automatically detected by the scanner.
2. Select 'Scan' on the user panel.
3. Open the 'Scan' tab with the confirmation button above the scroll wheel.
Chapter 5 - Use the printing system
205
Do an extended scan job
4. Select your scan template.
If you want to change the pre-defined settings of the selected scan template, use the
confirmation button to open the scan template and display an overview of the pre-defined
settings groups.
5. Scroll to the settings group you want to change.
6.
■
■
■
206
Open the settings group you want to change with the confirmation button and scroll
to the setting you want to change.
Open this setting, scroll through the settings values and select the correct value with
the confirmation button .
Change the other settings in the settings group if necessary.
Chapter 5 - Use the printing system
Do an extended scan job
■
Select 'OK' to return to the overview of the predefined settings groups.
7. Repeat step 5 and 6 until you have set all the correct values for your scan job.
8. Press the green button.
Chapter 5 - Use the printing system
207
Available settings for scan jobs
Available settings for scan jobs
Introduction
The Océ PlotWave 300 provides a lot of settings to manage all your different scan jobs.
These settings are used for extended scan jobs. The following table gives an overview and
a very short description of the available settings. You can find a detailed description of
each setting in the Océ Express WebTools.
Settings group: 'Destination'
#
Setting
Settings values
Function
'Destination'
You can select one of
the names of the scan
destinations that you
configured in the Océ
Express WebTools.
'The destination to put the scans into.'
(see ‘Configure a local scan destination’ on
page 113)
Settings group: 'File type'
#
Setting
Settings values
Function
Note:
Depending on the colour mode and file type you select the values for the
compression mode and organisation will change. For some file types, the
compression and organisation settings cannot be set in all situations. (see also
‘'File type'’ on page 214)
'Colour'
208
'Colour'
'Greyscale'
'Black&white'
Chapter 5 - Use the printing system
'Defines whether a colour, greyscale or
black-and-white scan must be made.'
Available settings for scan jobs
Setting
Settings values
Function
'File type'
'TIFF'
'TIFF (multipage)'
'PDF'
'PDF (PDF/A)'
'PDF (PDF/A, multipage)'
'JPEG'
'CALS'
'The file type of the scanned image.'
'Organisation'
'Raw'
'Stripped'
'Tiled'
'The file organisation when scanning to
TIFF.'
'Compression'
'LZW'
'Packbits'
'None'
'Flate'
'JPEG'
'Group 4'
'Group 3'
The compression type when scanning to
TIFF or to PDF.
'JPEG quality'
'Maximum'
'High'
'Medium'
'Low'
'The image quality when scanning to
PDF with JPEG compression. With a
lower quality, the compression increases
giving a smaller file size.'
Settings group: 'Resolution'
#
Setting
Settings values
Function
'Resolution'
'100'
'200'
'300'
'400'
'600'
'The resolution of the scanned image in
dpi.'
Chapter 5 - Use the printing system
209
Available settings for scan jobs
Settings group: 'Original'
#
Setting
Settings values
Function
'Original type'
'Line/text'
'Coloured original'
'Photo'
'Blueprint'
'Dark original'
'The type of original. When scanning to
colour, no original type needs to be specified.'
'Backgnd
comp'
'On'
'Off'
'Auto'
Reduce the background noise of the image.
Settings group: 'Remove strip'
#
210
Setting
Settings values
Function
'Leading'
0 to 400 mm
'Remove a strip from the beginning of
the original.'
'Trailing'
0 to 400 mm
'Remove a strip from the bottom of the
original.'
Chapter 5 - Use the printing system
Available settings for scan jobs
Setting
Settings values
Function
'Left'
0 to 914 mm
'Remove a strip from the left side of the
original.'
'Right'
0 to 914 mm
'Remove a strip from the right side of the
original.'
Settings group: 'Original width'
#
Setting
Settings values
Function
'By scanner'
'By scanner'
The width of the original is automatically
detected by the scanner.
'Standard'
'A0'
'A1'
'A2'
'A3'
'E+ (36")'
'B1 (707 mm)'
'B2 (500 mm)'
The width of the original is a standard
size.
Note:
Depend on the media series you
defined in the Océ Express
WebTools
Chapter 5 - Use the printing system
211
Available settings for scan jobs
Setting
Settings values
Function
'Custom'
210 to 914 mm
The width of the original is a custom size.
Setting
Settings values
Function
'Mirror'
'On'
'Off'
'When 'on', the image is mirrored along
the vertical axis (the media transport direction).'
Settings group: 'Mirror'
#
Settings group: 'Lighter/darker'
#
212
Setting
Settings values
Function
'Lighter/darker'
-5 to +5
'Increase the value for darker scans; decrease for lighter scans.'
Chapter 5 - Use the printing system
Available settings for scan jobs
Settings group: 'Checkprint'
#
Setting
Settings values
Function
'Checkprint'
'On'
'Off'
'When 'on', a print is made of the
scanned image. When scan-to-colour is
selected, a check-print cannot be made.'
Chapter 5 - Use the printing system
213
'File type'
'File type'
Depending on the colour mode and file type you select the values for the compression
mode and organisation will change. For some File types, the Compression and Organisation settings cannot be set in all situations.
Colour mode: Colour
#
'Colour' mode
'Colour'
214
'File type'
'Organisation'
'Compression'
'JPEG quality'
'TIFF'
'TIFF (multipage)'
'Raw'
'Stripped'
'Tiled'
'LZW'
'Packbits'
'None'
Not applicable
'PDF'
'PDF
(PDF/A)'
'PDF (PDF/A,
multipage)'
Not applicable
'Flate'
'None'
Not applicable
'JPEG'
'Maximum'
'High'
'Medium'
'Low'
'JPEG'
Not applicable
Not applicable
'Maximum'
'High'
'Medium'
'Low'
Chapter 5 - Use the printing system
'File type'
Colour mode: Greyscale
#
'Colour' mode
'Greyscale'
'File type'
'Organisation'
'Compression'
'JPEG quality'
'TIFF'
'TIFF (multipage)'
'Raw'
'Stripped'
'Tiled'
'LZW'
'Packbits'
'None'
Not applicable
'PDF'
'PDF
(PDF/A)'
'PDF (PDF/A,
multipage)'
Not applicable
'Flate'
'None'
Not applicable
'JPEG'
'Maximum'
'High'
'Medium'
'Low'
'JPEG'
Not applicable
Not applicable
'Maximum'
'High'
'Medium'
'Low'
Colour mode: Black and White
#
'Colour' mode
'File type'
'Organisation'
'Compression'
'JPEG quality'
'Black&white'
'TIFF'
'TIFF (multipage)'
'Raw'
'Stripped'
'Tiled'
'Group 4'
'Group 3'
'Packbits'
'None'
Not applicable
'PDF'
'PDF
(PDF/A)'¹
'PDF (PDF/A,
multipage)'¹
Not applicable
'Group 4'
'Flate'
'None'
Not applicable
'CALS'
Not applicable
Not applicable
Not applicable
Chapter 5 - Use the printing system
215
Make a scan and remove a strip
Make a scan and remove a strip
Introduction
Use 'Remove strip' to scan an original with a strip and remove the strip from the scanned
file. You can remove a strip from the leading, the trailing, the left or the right side of the
original.
Before you begin
If you must enter the same value for a setting very often, you can set this value as the default value for that setting in the Océ Express WebTools.
After you press the start key, the user panel always shows the job number and status of
the job. A copy job appears temporarily in the 'Jobs - Queue' section of the Océ Express
WebTools, a scan job appears in the Smart Inbox 'Scans'.
Attention:
When you remove a strip, make sure that you scan all the required information.
How to make a scan and remove a strip
1. Feed the original face up and centred on the original feeding table.
Note:
You do not need to centre the original precisely. The exact position of the original is automatically detected by the scanner.
2. Select 'Scan' on the user panel.
3. Open the 'Scan' tab with the confirmation button above the scroll wheel.
4. Define the job settings.
#
The 'Leading' strip
■
■
216
The 'Trailing' strip
The 'Left' strip
The 'Right' strip
Open a template with the confirmation button .
Scroll to 'Remove strip' and open this setting with the confirmation button .
Chapter 5 - Use the printing system
Make a scan and remove a strip
■
Scroll to 'Leading', 'Trailing', 'Left' or 'Right', define the value with the scroll wheel
or numeric keys and confirm.
5. Press the green button.
Result
The Océ PlotWave 300 scans the original without a strip.
Chapter 5 - Use the printing system
217
Make a scan and remove a strip
218
Chapter 5 - Use the printing system
Chapter 6
Maintain the printing system
Switch off the printing system
Move the printing system
Switch off the printing system
1. Use the on / off button at the front side of the printer to switch off the printing system.
The lighted button starts to blink.
Note:
You can also use the 'Shut down' button in the Océ Express WebTools.
Attention:
Wait until the on / off button stops blinking.
220
Chapter 6 - Maintain the printing system
Switch off the printing system
2. Switch off the power switch at the rear side of the printing system.
Chapter 6 - Maintain the printing system
221
Disconnect the mains supply cable
Disconnect the mains supply cable
Attention:
Make sure the main power switch is in 'off' position.
1. Remove the 'Power' cable form the wall socket.
2. Remove the other side of the 'Power' cable from the power connection on the 'Connection
panel' at the back of the printer.
222
Chapter 6 - Maintain the printing system
Move and re-adjust the printing system
Move and re-adjust the printing system
Introduction
When you move the printing system to a new location you must check if it needs re-adjustment to ensure the best output quality.
You need two tools for the adjustment procedure. You can find these tools behind the
lower right front cover (14).
5
6
7
8
4
3
2
9
10
11
1
12
Required tool
■
■
Allen key
Key wrench
Attention:
If connected you must first switch off and disconnect the Océ PlotWave™ 300. (see
‘Switch off the printing system’ on page 220 and ‘Disconnect the mains supply cable’ on page
222).
Chapter 6 - Maintain the printing system
223
Move and re-adjust the printing system
Attention:
Close the media drawers.
Note:
Be aware of the printer working area. (see ‘Working area [Footprint]’ on page 23).
1. Move the printing system to its new location.
2. Pull firmly to open the media drawer.
224
Chapter 6 - Maintain the printing system
Move and re-adjust the printing system
3. Slide the lower left front cover (1) to remove it.
4. Check if the level indicator arrow is exactly on the middle of the marker.
If no, continue with step 5.
If yes, continue with step 9.
Chapter 6 - Maintain the printing system
225
Move and re-adjust the printing system
5. Slide up the lower right front cover (11) to remove it and get access to the tools you need
for the adjustment procedure.
6. Loosen the nut with the key wrench.
226
Chapter 6 - Maintain the printing system
Move and re-adjust the printing system
7. Use the Allen key to adjust the level until the level indicator arrow is exactly on the middle
of the marker.
8. Lock the nut with the key wrench.
Chapter 6 - Maintain the printing system
227
Move and re-adjust the printing system
9. Replace the lower left front cover.
10. Replace the tools and replace the lower right front cover.
228
Chapter 6 - Maintain the printing system
Move and re-adjust the printing system
11. Close the media drawer.
Chapter 6 - Maintain the printing system
229
Switch on the printing system
Switch on the printing system
1. Switch on the power switch at the rear side of the printing system.
2. Use the on / off button at the front side of the printer to switch on the printing system.
230
Chapter 6 - Maintain the printing system
Switch on the printing system
Note:
You can also use the 'Shut down' button in the Océ Express WebTools.
Chapter 6 - Maintain the printing system
231
The media drawer
Replace the media
The media drawer
Illustration
4
5
3
2
1
Component - function table
#
232
Nr
Component
Description / Function
1
roll holder
Carries the media roll
2
media roll 1
3
media roll 2 (optional)
4
roll loading station
Groove integrated behind the front cover
of the media drawer.
5
clean cut button
This button is used to trim a strip of a new
or damaged media roll.
Chapter 6 - Maintain the printing system
Remove a media roll
Remove a media roll
Attention:
Handle the media roll with care. A dented media roll can damage the printer.
Attention:
Do not open the media drawer during the print process.
Caution:
Watch your fingers when you handle the media roll.
Caution:
If you want to remove an A0 media roll from position 2, you must make sure to bend
your knees as indicated below.
Illustration
[220] Bend your knees when you remove an A0 media roll from position 2
Chapter 6 - Maintain the printing system
233
Remove a media roll
How to remove a media roll
1. Pull firmly to open the media drawer.
2. Roll back the media manually to remove the media from the metal paper guide.
1
234
Chapter 6 - Maintain the printing system
Remove a media roll
3. Use both hands (as indicated) to lift the roll holder with the media roll and put it on the
roll loading station.
4. Pull the handle of the roll holder locking mechanism towards you and remove the roll
holder from the core of the media roll.
2
1
5. Remove the media roll from the roll loading station.
Chapter 6 - Maintain the printing system
235
Unpack the media roll
Unpack the media roll
Attention:
Handle the media roll with care. A dented media roll can damage the printer.
Attention:
Please refer to the list of ‘Preferred Océ media types and sizes’ on page 300 to find the corresponding media name that you must select on your user panel.
Attention:
Always write the correct media name inside the core, after you unpack the media roll. In
that case, if you replace a media roll before it is empty and you want to re-use it later,
you will have the correct media information available.
1. Place the media box on a table and open it.
236
Chapter 6 - Maintain the printing system
Unpack the media roll
2. Remove the plug from the media roll.
3. Carefully remove the media roll from the box.
4. Remove the other plug and plastic around the media roll.
Chapter 6 - Maintain the printing system
237
Load a media roll (position 1)
Load a media roll (position 1)
Note:
When your printing system is equipped with an additional second media roll, it is advised
to load an A0 media roll on position 1 and an A2 media roll on position 2.
Attention:
Handle the media roll with care. A dented media roll can damage the printer.
Attention:
Please refer to the list of ‘Preferred Océ media types and sizes’ on page 300 to find the corresponding media name that you must select on your user panel.
Attention:
Always write the correct media name inside the core, after you unpack the media roll. In
that case, if you replace a media roll before it is empty and you want to re-use it later,
you will have the correct media information available.
Caution:
Watch your fingers when you handle the media roll.
238
Chapter 6 - Maintain the printing system
Load a media roll (position 1)
How to load a media roll on position 1
1. Pull firmly to open the media drawer.
2. Place the new media roll on the roll loading station.
3. Pull the handle of the roll holder locking mechanism towards you (1) and slide (2) the
roll holder into the right side of the core of the new media roll.
2
1
Chapter 6 - Maintain the printing system
239
Load a media roll (position 1)
4. Align the roll with the centre of the correct size indicator on the roll holder and release
the handle of the locking mechanism.
Note:
If you use a B1 media size (707 mm) you must align the media roll with the A1 indent.
240
Chapter 6 - Maintain the printing system
Load a media roll (position 1)
5. Remove the tapes from the new media roll and use both hands (as indicated) to place the
media roll in the media drawer.
6. Use both hands to turn the media roll backwards (1) until the media flap has passed the
metal paper guide.
1
Chapter 6 - Maintain the printing system
241
Load a media roll (position 1)
7. Use both hands to slide the media under the metal paper guide (2) until the media is
transported automatically.
2
8. Press the clean cut button to trim a strip of the new media roll.
9. Close the media drawer.
242
Chapter 6 - Maintain the printing system
Load a media roll (position 1)
Note:
Do not open the 'Media drawer' during loading.
10. The user panel displays the message 'New media detected on roll 1' or 'New media detected on roll 2'. Follow the steps in the wizard to define the correct media type. The
media size is detected automatically.
Chapter 6 - Maintain the printing system
243
Load a media roll (position 2)
Load a media roll (position 2)
Note:
When your printing system is equipped with an additional second media roll, it is advised
to load an A0 media roll on position 1 and an A2 media roll on position 2.
Attention:
Handle the media roll with care. A dented media roll can damage the printer.
Attention:
Please refer to the list of ‘Preferred Océ media types and sizes’ on page 300 to find the corresponding media name that you must select on your user panel.
Attention:
Always write the correct media name inside the core, after you unpack the media roll. In
that case, if you replace a media roll before it is empty and you want to re-use it later,
you will have the correct media information available.
Caution:
Watch your fingers when you handle the media roll.
Caution:
If you want to load an A0 media roll on position 2, you must make sure to bend your
knees as indicated below.
Illustration
[235] Bend your knees when you load an A0 media roll on position 2
244
Chapter 6 - Maintain the printing system
Load a media roll (position 2)
How to load a media roll on position 2
1. Pull firmly to open the media drawer.
2. Place the new media roll on the roll loading station.
3. Pull the handle of the roll holder locking mechanism towards you (1) and slide (2) the
roll holder into the right side of the core of the new media roll.
2
1
Chapter 6 - Maintain the printing system
245
Load a media roll (position 2)
4. Align the roll with the centre of the correct size indicator on the roll holder and release
the handle of the locking mechanism.
Note:
If you use a B1 media size (707 mm) you must align the media roll with the A1 indent.
246
Chapter 6 - Maintain the printing system
Load a media roll (position 2)
5. Remove the tapes from the new media roll and use both hands (as indicated) to place the
media roll in the media drawer.
6. Use both hands to turn the media roll backwards (1) until the media flap has passed the
metal paper guide.
1
Chapter 6 - Maintain the printing system
247
Load a media roll (position 2)
7. Use both hands to slide the media under the metal paper guide (2) until the media is
transported automatically.
2
8. Press the clean cut button to trim a strip of the new media roll.
9. Close the media drawer.
248
Chapter 6 - Maintain the printing system
Load a media roll (position 2)
Note:
Do not open the 'Media drawer' during loading.
10. The user panel displays the message 'New media detected on roll 1' or 'New media detected on roll 2'. Follow the steps in the wizard to define the correct media type. The
media size is detected automatically.
Chapter 6 - Maintain the printing system
249
Change the media type and media size
Change the media type and media size
Introduction
When you load a new type of media, the system automatically detects the new media and
asks you to enter the correct media type and the media size. When the media type or the
media size defined on the system is not correct you can change these settings.
Change the media type and size
1.
2.
3.
4.
5.
250
From the'HOME' screen select the 'System' tab.
Open the 'Media' section with the confirmation button .
Use the scroll wheel to select 'Roll 1' or 'Roll 2' or 'Manual feed' and press 'Next > '.
Use the scroll wheel to select the correct media type and press 'Next > '.
Use the scroll wheel to select the correct media size and press 'Finish'.
Chapter 6 - Maintain the printing system
Refill the toner
Refill the toner
Refill the toner
Introduction
If the ‘Refill toner’ message appears on the user panel, you must refill the toner immediately. Use only 1 bottle of Océ PlotWave 300 toner each time the Océ PlotWave 300
indicates the toner must be refilled.
Note:
Every second time you have refilled the toner, you must also replace the residual toner
container. (see ‘Replace the residual toner container’ on page 253).
Note:
You can leave the printer turned on when you refill the toner.
How to refill the toner
1. Open the toner compartment.
2. Shake the toner bottle thoroughly. Leave the bottle closed.
Chapter 6 - Maintain the printing system
251
Refill the toner
3. Place the bottle on the refill opening of the toner unit.
4. Pull the slider towards you to open both the bottle and the refill opening of the toner
unit.
5. Tap the toner bottle gently (sideways) to let the toner flow from the bottle.
6. When the toner bottle is empty, return the slider of the toner unit to the original position
to close the refill opening and the toner bottle. You can now remove the toner bottle
from the opening.
252
Chapter 6 - Maintain the printing system
Replace the residual toner container
Replace the residual toner container
Introduction
Every second time you have have refilled the toner, you must also replace the residual
toner container
Note:
You can leave the printer turned on when you replace the residual toner container.
How to replace the residual toner container
1. Open the residual toner compartment.
Chapter 6 - Maintain the printing system
253
Replace the residual toner container
2. Remove the full residual toner container.
Note:
The residual toner container can de disposed normally.
3. Place the empty residual toner container.
4. Close the residual toner compartment.
254
Chapter 6 - Maintain the printing system
Clean the scanner
Maintain the scanner
Clean the scanner
Introduction
#
Component
Description / Function
1
originals exit
Exits originals for reception into the front
original tray.
2
original size ruler
Use this ruler to measure the original.
3
original feed rollers
4
scanner top cover
5
scanner open levers
6
original support rollers
7
scanner top cover rollers
8
original sensors
9
transparent contact plates
Cover of the image sensors.
10
original feeding table
Use this table is you feed the original into
the scanner.
Chapter 6 - Maintain the printing system
255
Clean the scanner
When to do
The copy and scan quality can decrease if
■ the transparent contact plates (9) are dirty or static.
■ The original support rollers are dirty and you use transparent originals.
In that case you must clean the scanner to ensure top quality output.
How to clean the scanner
1. Use both hands to push up the left and right scanner open levers (5) to fully open the
scanner top cover (4).
256
Chapter 6 - Maintain the printing system
Clean the scanner
A locking mechanism prevents the scanner top cover from closing.
Attention:
To clean the scanner use the soft lint-free Masslin towels from the scanner cleaning kit.
2. Use a Masslin towel that has been moistened with water and firmly wrung out to clean
the following parts of the scanner.
Chapter 6 - Maintain the printing system
257
Clean the scanner
■
■
the original support rollers (6)
Rotate the rollers to clean them.
the transparent contact plates (9)
Wipe off any soiled areas.
3. Wipe all the cleaned parts once again using a dry Masslin towel.
Caution:
Take care not to get your fingers caught in the scanner top cover.
4. Press the scanner top cover down gently with both hands to close it.
Note:
Check that the left and right scanner open levers are locked into position.
258
Chapter 6 - Maintain the printing system
Calibrate the scanner
Calibrate the scanner
Introduction
You can calibrate the scanner when you are not satisfied with the copy or scan quality.
Use the calibration wizard to calibrate the scanner.
Before you begin
Clean the scanner before you start the calibration procedure. Dirty parts of the scanner
causes a decreased copy and scan quality. (see ‘Clean the scanner’ on page 255).
Attention:
Handle the calibration sheet with care.
Attention:
Do not touch the black area of the calibration sheet with your fingers.
Attention:
Before you use the calibration sheet wipe off any dust from the calibration sheet.
How to calibrate the scanner
1. From the 'HOME' screen select the 'System' tab.
2. Use the scroll wheel to go to the 'Scanner calibration' section and open this section with
the confirmation button .
3. Insert the scanner calibration sheet as instructed in the wizard.
4. Press the green button to start the scanner calibration.
The message 'Calibrating, please wait... do not open the scanner.' appears.
Note:
'Calibrating the scanner takes between 5 to 10 minutes.'
Chapter 6 - Maintain the printing system
259
Introduction
Upgrade or re-install the system
Introduction
When to do
■
■
If new system software is available.
If you must re-install the system software.
Before you begin
Create a USB installation key with the UKC Software v3.x (USB Key Creator software).
For a detailed description of the procedure to create this USB installation key, please refer
to the user documentation of the USB Key Creator software.
Required tool
■
■
1 USB installation key
1 USB backup key
How to upgrade the system
To upgrade or re-install the system you must do the following.
1. ‘Backup the system data’ on page 261
2. ‘Install the new system software’ on page 262
3. ‘Restore the system data’ on page 263
260
Chapter 6 - Maintain the printing system
Backup the system data
Backup the system data
When to do
Before you upgrade or re-install the system software you must create a backup file of the
system data.
Required tool
■
1 USB backup key
Note:
Not all settings are stored in the backup file. The passwords for authorised users are excluded from the file for security reasons.
How to backup the system data
1. From the 'HOME' screen on the user panel select the 'System' tab.
2. Use the scroll wheel to select 'Hardware and software' and confirm with the confirmation
button (above the scroll wheel).
3. Use the upper right soft key to 'Edit' the current system configuration.
4. Select 'Backup/upgrade system'.
5. Press 'Next > '.
6. Follow the steps in the wizard.
7. Select 'Home' to return to the 'HOME' screen.
Chapter 6 - Maintain the printing system
261
Install the new system software
Install the new system software
When to do
If you must upgrade or re-install the system software.
Before you begin
■
■
Backup the system data ( see ‘Backup the system data’ on page 261).
Create a USB installation key with the UKC Software v3.x (USB Key Creator software).
For a detailed description of the procedure to create this USB installation key, please
refer to the user documentation of the USB Key Creator software.
Required tool
■
1 USB installation key
How to install the new system software
1. Insert the USB installation key in the USB flash drive interface of the user panel.
2. Reboot the complete system to start the system upgrade procedure.
3. When the system upgrade procedure is finished, remove the USB installation key.
262
Chapter 6 - Maintain the printing system
Restore the system data
Restore the system data
When to do
After you upgraded or re-installed the system software you must restore the backup file
with the system data.
Required tool
■
1 USB backup key
Note:
Not all settings are stored in the backup file. The passwords for authorised users are excluded from the file for security reasons.
How to restore the system data
1. From the 'HOME' screen on the user panel select the 'System' tab.
2. Use the scroll wheel to select 'Hardware and software' and confirm with the confirmation
button (above the scroll wheel).
3. Use the upper right soft key to 'Edit' the current system configuration.
4. Select 'Restore backup'.
5. Press 'Next > '.
6. Follow the steps in the wizard.
7. Select 'Home' to return to the 'HOME' screen.
Chapter 6 - Maintain the printing system
263
Restore the system data
264
Chapter 6 - Maintain the printing system
Chapter 7
Solve problems
How to solve problems with jobs
How to solve problems with jobs
1. If there is a problem with a job, the colour of the green 'Jobs - Queue' bar in the Océ
Express WebTools turns red.
The System Monitor section of the Océ Express WebTools displays the message: 'User
intervention required'.
The job that has the problem remains in the queue as an active job, displayed in bold
fonts.
2. On the user panel detailed information about the problem is displayed. You can use this
information to help you to solve the problem.
Note:
If a media jam occurs often you can perform the following checks.
■ Is the media loaded correctly?
■ Did you use the correct media? (see ‘Preferred Océ media types and sizes’ on page 300
■ Did you remove all the pieces of media from the paper path?
Note:
If an error occurs that you cannot solve, please remember the error code displayed on
the user panel and contact the Océ Helpdesk for assistance.
266
Chapter 7 - Solve problems
Clear an original jam on the scanner
Clear an original jam on the scanner
Introduction
When an original jam occurs on the scanner, the message 'Scanner original jam' appears
on the user panel. You must remove the original from the scanner.
If an original jam occurs often:
■ Check if you use the correct type of original.
■ Check if you must use a carrier sheet.
■ Check if the original is damaged before you insert it.
How to remove a jammed original
1. Use both hands to push up the left and right scanner open levers (5) to fully open the
scanner top cover (4).
A locking mechanism prevents the scanner top cover from closing.
2. Remove the original.
Pull the original from the scanner or from the originals exit at the front.
3. Press the scanner top cover down gently with both hands to close it.
Note:
Check that the left and right scanner open levers are locked into position.
4. Make the original smooth and feed the original.
Chapter 7 - Solve problems
267
Clear a media jam in the fuser section
Clear a media jam in the fuser section
Attention:
During normal use the fuser must be closed. Only open it to remove the media after a
media jam.
1. Wait a few moments to let the fuser cool down.
268
Chapter 7 - Solve problems
Clear a media jam in the fuser section
2. Press the green knob on the media jam clearance handle to open the upper back cover.
Chapter 7 - Solve problems
269
Clear a media jam in the fuser section
3. Remove any jammed printing material from the fuser section.
4. Press the green knob on the media jam clearance handle and close the upper back cover.
270
Chapter 7 - Solve problems
Clear a media jam in the media bypass section
Clear a media jam in the media bypass section
1. Open the lower front cover.
Chapter 7 - Solve problems
271
Clear a media jam in the media bypass section
2. Lower the media bypass by pressing the handles on the left and the right.
3. Remove any jammed media.
272
Chapter 7 - Solve problems
Clear a media jam in the media bypass section
Note:
If the material cannot be removed easily, you must open the upper back cover with the
media jam clearance handle to access to the jammed material. (see ‘Clear a media jam in
the fuser section’ on page 268).
4. Pull up the media bypass.
5. Close the lower front cover.
Chapter 7 - Solve problems
273
Clear a media jam in the roll feed section
Clear a media jam in the roll feed section
1. Pull firmly to open the media drawer.
2. Remove any jammed printing material from the paper path and, if necessary, pull back
the media and rewind it.
3. Reload the media roll if necessary and press the clean cut button to trim a strip of the
media roll. (see ‘Load a media roll (position 1)’ on page 238)
4. Close the media drawer.
274
Chapter 7 - Solve problems
Print a demo print
Print a demo print
When to do
You can print a demo print to check if the Océ PlotWave 300 works correctly.
How to print a demo print
1. From the 'HOME' screen on the user panel select the 'System' tab.
2. Use the scroll wheel to select 'Test prints' and confirm with the confirmation button
(above the scroll wheel).
3. Use the scroll wheel to select 'Demo print'.
4. Use the lower right soft key or press the green button to start printing.
5. Select 'Home' to return to the 'HOME' screen.
Chapter 7 - Solve problems
275
Print a test print
Print a test print
When to do
Print a test print from roll 1 or from roll 2 at the request of the Océ Helpdesk. The test
print can provide information to solve quality problems.
How to print a test print
1. From the 'HOME' screen on the user panel select the 'System' tab.
2. Use the scroll wheel to select 'Test prints' and confirm with the confirmation button
(above the scroll wheel).
3. Use the scroll wheel to select 'Test print from roll 1' or 'Test print from roll 2'.
4. Use the lower right soft key or press the green button to start printing.
5. Select 'Home' to return to the 'HOME' screen.
276
Chapter 7 - Solve problems
Adjust the print density
Adjust the print density
When to do
To influence the toner usage of your Océ PlotWave™ 300 you can print the blackness
chart and adjust the blackness offset. A negative value reduces the toner usage, a positive
value increases the toner usage.
How to adjust the print density
1. From the 'HOME' screen on the user panel select the 'System' tab.
2. Use the scroll wheel to select 'Blackness' and confirm with the confirmation button (above
the scroll wheel).
3. Press the green button to print the blackness chart.
4. Refer to the blackness chart, use the scroll wheel to select the preferred blackness offset
and confirm with the confirmation button .
5. Press 'Next > '.
6. Select 'Home' to return to the 'HOME' screen.
Chapter 7 - Solve problems
277
Adjust the print density
278
Chapter 7 - Solve problems
Chapter 8
License management
Introduction to managing licenses
Introduction to managing licenses
Introduction
The Océ applications and options are protected against unauthorised use. You need to
activate the license to enable an application or option for use. The 'Support' - 'Licenses'
tab in the Océ Express WebTools enables you to manage the licenses very easily.
This section describes the following.
■ The basic concept of the licenses.
■ How to manage the licenses.
280
Chapter 8 - License management
The 'Licenses' tab in the Océ Express WebTools
The 'Licenses' tab in the Océ Express WebTools
Introduction
The 'Support' - 'Licenses' tab has the following possibilities.
Possibilities
■
■
■
■
View the current active licenses
Get the host id of the Océ system
Save the active licenses
You can activate new licenses or saved licenses.
Chapter 8 - License management
281
The basic workflow of 'Support' - 'Licenses' activation
The basic workflow of 'Support' - 'Licenses' activation
Introduction
Before you can work with licenses, you must access to the Océ Express WebTools. The
following workflow describes per step when to use which possibility.
The workflow
1. View the current active licenses.
You can make a list of new options you need and make a list of license numbers. Océ
needs the list of new options and the license numbers to create a new license file.
2. Get the host id of the Océ system.
Océ needs the host id of your Océ system to create a new license file.
3. Send the list of new options you need, the list of license numbers and the host id to Océ.
Océ creates and delivers one or more new license files.
4. Create a back-up of the current active licenses if necessary.
Save the current active licenses to do so.
5. Activate the licenses.
The license activation job guides you through the following steps.
■ 1. Locate the license file
■ 2. Preview the new active licenses
■ 3. Accept the end user license agreement
■ 4. Finish the license activation job
■ 5. Restart the Océ system.
282
Chapter 8 - License management
Océ License Logic
Océ License Logic
Introduction
When you navigate to the 'Support' - 'Licenses' tab in the Océ Express WebTools, you
get access to the Océ License Logic application.
Overview Océ License Logic functionality
#
Function
Description
View the current active licenses.
You can make a list of new options you
need and make a list of license numbers.
Océ needs the list of new options and the
license numbers to create a new license
file.
Get the host id of the Océ system.
Océ needs the host id of your Océ system
to create a new license file.
Create a back-up of the current active licenses if necessary.
Save the current active licenses to do so.
Activate the licenses.
Perform a license activation job to do so.
The license activation job guides you
through the following steps.
■ 1. Locate the license file
■ 2. Preview the new active licenses
■ 3. Accept the end user license agreement
■ 4. Finish the license activation job
■ 5. Restart the Océ system.
Note:
Perform the license activation job
for each license file.
Chapter 8 - License management
283
The structure of license files and licenses
The structure of license files and licenses
Introduction
A license file contains a license per option of your Océ system. You can view the current
active licenses with Océ 'Support' - 'Licenses' tab in the Océ Express WebTools. You can
preview the new active licenses during the license activation job.
A license file contains licenses of the same license-type
A license file you receive from Océ contains only licenses of the same license-type. The
following license types are possible.
■
■
Demo
Resale.
If you order demo and resale licenses, you receive 2 license files.
What you see per situation
What you see per situation depends on the license file you use.
What you see depends on the situation#
Situation
What do you see
View the current active licenses. You see the following.
■ All current active demo licenses
■ All current active resale licenses
■ All current other not active options.
Océ delivered one or more license files.
You see one of the following options.
■ A demo license file
■ A resale license file
■ A demo license file and a resale license file.
Preview the demo licenses during You see the following.
the license activation job if you ■ All current active demo licenses
use the license file with demo li- ■ All new active demo licenses.
censes.
Note:
You can not see the current active resale
licenses at this point.
284
Chapter 8 - License management
The structure of license files and licenses
Situation
What do you see
Preview the resale licenses during You see the following.
the license activation job if you ■ All current active resale licenses
use the license file that contains ■ All new active resale licenses.
the resale licenses.
Note:
You can not see the current active demo
licenses at this point.
Preview the demo and resale licenses during the license activation job if you use the saved licenses of your back-up file.
You see the following.
■ All demo licenses that where active at the time
you created the back-up file
■ All resale licenses that where active at the time
you created the back-up file
The license activation job is fin- You see the following.
■ All current active demo licenses
ished.
■ All new active demo licenses
■ All current active resale licenses
■ All new resale licenses
■ All current other not active options.
Chapter 8 - License management
285
Check your licenses
Check your licenses
About the licenses
The 'Support' - 'Licenses' tab in the Océ Express WebTools allows you to manage the
licenses that are active on your system. A license is needed to activate certain functions
on your Océ PlotWave 300.
You can use the 'Support' - 'Licenses' tab to perform the following tasks.
■ View the current active licenses.
■ Get the host id of the Océ system.
■ Save the active licenses.
■ Perform a license activation job.
You can activate new licenses or saved licenses.
License information overview
Click 'Support' - 'Licenses' to view the available licenses.
You can view the license information for the following purposes.
■ Check the active licenses on license state, license type and license duration.
■ Check how long a demo license is valid.
■ View all options available for your Océ system.
The list of options depends on the type and version of the Océ system.
■ Make a list of new options you need.
■ Make a list of license numbers.
#
286
Information
Description
'Option'
This field displays the name of the option.
For Océ PlotWave™ 300 the following licenses are available.
■ Océ PlotWave™ 300 license
■ Océ Account Logic
■ Adobe® PostScript®® 3 / PDF
■ Adobe® Simplified Chinese PostScript®
■ Adobe® Traditional Chinese PostScript®
■ Adobe® Japanese PostScript®
■ Adobe® Korean PostScript®
Chapter 8 - License management
Check your licenses
Information
Description
'State'
This field displays one of the following license states.
■ 'Authorised'. You are authorised to use the function.
■ 'Not authorised'. You are not authorised to use the
function, you need to get a license for the function.
■ 'Expired'. Your license was a temporary license. You
need to get a new license to use the function.
'License type'
This field displays one of the following license types.
■ 'Resale'.
■ 'Demo'.
'Duration in days'
This field displays the time your license is valid.
'License number'
This field displays a license number.
Chapter 8 - License management
287
Save the currently active licenses
Save the currently active licenses
Introduction
You can save all current active licenses of different licenses types into one single file.
Purpose
Save the current active licenses for the following purposes.
■
■
Collect and save all active licenses of different types into one single file
Create a back-up file before you start a license activation job.
When to do
Save the current active licenses before you start a license activation job or to save the
current license situation.
How to save the license information
1. Click 'Support' - 'Licenses' to display the license information page.
2. You need to log on as System administrator or Power user if you are not logged on already.
3. Click the 'Save' button.
The 'Save licenses' window opens.
4. Select a directory, enter the file name and click the 'Save' button to back-up the currently
active licenses.
Result
All currently active resale and demo licenses are stored into one single file.
288
Chapter 8 - License management
Install a new license
Install a new license
Introduction
The Océ applications and optional functions are protected against unauthorised use. You
need to activate the license to enable an application or optional function for use. The
'Licenses' tab enables you to upload new license files to activate a license.
Purpose
■
■
Upload a new license file.
Extend the existing license on your Océ PlotWave™ 300.
Note:
After the license is uploaded you must restart your system to activate the license file.
How to get a new license file
Click 'Support' - 'Licenses' to display the license information page.
The login window appears. Log on as System administrator or Power user.
Click the host id hyperlink to display the host id information.
Copy the id and send the host id information to your Océ representative together with
a list of options that you require.
5. After receiving the license file(s), store the file(s) on the network.
1.
2.
3.
4.
Attention:
It is advised to store the license information of the currently active license files in a backup file before you activate a new license file. Use the 'Save' button to store the current
license files information.
Upload a new license
Click 'Activate' to open a browser window to search for the license file on the network.
Log on as System administrator or Power user.
Browse the network and select the license file.
Click 'Ok' to start the activation of the license file. A message is displayed when the process
is completed.
5. Restart the system to activate the changes.
1.
2.
3.
4.
Chapter 8 - License management
289
Install a new license
Result
■
■
290
If you have updated an expired license, the new license file overwrites the previous license file.
If you have uploaded a new license, the license state in the overview is changed from
'Not authorised' to 'Authorised'.
Chapter 8 - License management
Appendix A
Specifications of the Océ
PlotWave 300
Specifications Océ PowerM controller
Specifications Océ PowerM controller
Océ PowerM controller hardware
#
Platform
Océ controller with Windows® XP embedded
Memory
1024 Mb
Hard disc capacity
160 Gb. One single high speed hard disc
Graphical user interface
None
Standard interface
10/100/1000 BaseT with RJ45
Optional interfaces
None
Network protocols
TCP/IP, NetBios over TCP/IP, FTP, LPD, SMB
(Scan To File only), IPV4&IPV6, SNMP
Network environment
Novell® NDPS (Novell Distributed Print Services)
Applicable software
Océ PowerM controller software
Océ PowerM controller software
The Océ PowerM controller software consists of a basic module and a print module.
Basic module#
Basic functions
File spooling on the controller.
Concurrent receiving, processing, copying (or
scanning) and printing of digital jobs.
Basic applications
■
■
Océ Express WebTools
Océ Publisher Express
Queue Management
License Management
Smart Inbox
System Control Panel
Settings Management
■
Océ Account Center.
■
■
■
■
■
Optional
Print module#
Scan and copy processing technology
292
Océ Image Logic
Appendix A - Specifications of the Océ PlotWave 300
Specifications Océ PowerM controller
Number of prints
1 - 999
Set memory: send once, process once, print many
Roll selection and switching
Manual
Automatic
Print manipulation
Rotation
Auto-scaling
Positioning
Pen management
Trailing strip adjustment; add up to 400 mm
Colour modes scanner
■
■
■
Quality modes printer
■
■
■
Black & White
Greyscale
Colour
Standard
Lines & Text
Poster
Language sensing
Automatic Language Sensing (ALS)
Standard file formats
■
■
Cut length
■
■
■
Optional
Vector: HPGL, HPGL/2, Calcomp, DWF,
DWF/X
Raster: HP-RTL, TIFF 6.0, NIFF, CALS-I,
NIRS, C4, ASCII
Standard cut
Synchro cut
Custom cut
Adobe® PostScript 3™ PDF printing
Adobe Asian Fonts for PS/PDF printing
Appendix A - Specifications of the Océ PlotWave 300
293
Specifications Océ PlotWave 300 printer
Specifications Océ PlotWave 300 printer
#
Technology
Electrophotography (LED) with organic photoconductor (OPC)
drum and closed toner system.
Resolution
600 x 1200 dpi
Print speed
2.3 A0s p/min.
Media sources
1 roll version with manual feed
2 roll version with manual feed (option)
Minimum pen
thickness
0.08 mm
Media core diameter
3"
Minimum media
width
279 millimetres
11 inch
Maximum media
width
914 millimetres
36 inch
Maximum roll
length
200 metres
650 feet
Output delivery
'Top delivery tray' (standard)
Drawing margins
■
■
Width detection
Automatic
Media types
■
Dimensions
1527 mm x 800 mm x 1495 mm (W x D x H)
Voltage
100-240 V
Frequency
50/60 Hz
Power consumption
■
■
■
■
294
Leading and trailing strip: 3 mm / 0.12"
Left and right sides: 3 mm / 0.12"
‘Preferred Océ media types and sizes’ on page 300
Off: 0 W
Ready: 79 W
Active: 1,2 kW
EPA ENERGY STAR®: Sleep mode 42 W
Weight
180 kg (excluding media roll)
Safety approvals
TüV GS, CETECOM, CE, UL, (c)UL, CB, FCC Class A
Appendix A - Specifications of the Océ PlotWave 300
Specifications Océ PlotWave 300 printer
Other
EPA ENERGY STAR® compliant, FEMP
Appendix A - Specifications of the Océ PlotWave 300
295
Specifications Océ Scanner Express
Specifications Océ Scanner Express
#
Technology
■
■
Copy scan speed
Océ Image Logic® real-time image processing
5 x A4 CIS sensors
Black&white
■ Standard: 3.8 m/min
■ Maximum: 7.4 m/min
Colour
■ 2.5 m/min
Scan-to-file scan
speed
Black&white
■ Standard: 2.9 m/min
■ Maximum: 11.7 m/min
Colour
■ 2.5 m/min
Resolution
600 dpi
Camera
5 x A4 CIS sensors
22000 Pixels
24 bits colour
Illumination: LED (R/G/B)
Scan width
914.4 mm
Original feed
Centre aligned
Original size
Minimum
■ 208 mm x 208 mm (L x W)
Maximum
■ 16000 mm x 965 mm (L x W)
296
Power consumption MFD
1200 Watt
Media thickness
Maximum 0.65 mm
Weak media (not rigid)
Appendix A - Specifications of the Océ PlotWave 300
Specifications Océ Scanner Express
Scale method
■
■
■
Input mode
■
■
Scale to format
Scale range 25% - 400% (0.1% fixed step interval)
Custom scale
Scale range 10% - 1000% (0.1% fixed step interval)
Exact (1 to 1)
No scaling.
Single sheet
Set
Number of copies
1 - 999 (scan once print many)
Colour space
sRGB
Image quality
■
■
■
Image editing
■
■
■
Other functionalities
■
■
■
■
■
■
■
Original type selection
Colour selection (Black&White / Grayscale / Colour)
Brightness lighter/darker
Remove strips (leading/trailing/left/right)
Mirroring horizontal
Delete area
Pre-programming of next job
Programmable default settings
Synchro cut mode or standard size cut
Leading and trailing strip adjustment (0 mm - 400 mm)
Concurrent scanning and printing
Scan to file Black&White / Grayscale / Colour
Scan to JPEG / PDF / TIFF / CALS
Appendix A - Specifications of the Océ PlotWave 300
297
Specifications drivers and job submission software
Specifications drivers and job submission software
®
Océ Windows Printer Driver
#
Software environment
Remarks
All Windows applications (for
This driver is a mixed raster-vector HP-GL/2
®
example, AutoCAD 2000 fam- printer driver that allows you to print to your Océ
printer from any application under one of the folily)
lowing supported Operating Systems.
■ Windows 2000® (Sp4)
■ Windows 2000® Server
■ Windows XP® (Sp2, Sp3) (32-bit and 64-bit)
■ Windows Server® 2003 (Sp2) (32-bit and 64bit)
■ Windows Vista® (Sp1) (32-bit and 64-bit)
■ Windows Server® 2008 (32-bit and 64-bit)
■ Citrix Presentation Server 3.x
■ Citrix Presentation Server 4.x
■ Citrix Metaframe
The driver is compatible with the Novell iPrint
and NDPS environments (installation, propagation
and printing).
Note:
Visit Océ on the internet at www.oce.com for the latest information.
298
Appendix A - Specifications of the Océ PlotWave 300
Specifications drivers and job submission software
®
Océ PostScript 3™ Driver
#
Software environment
Remarks
Graphical application software
This driver allows you to print to your Océ printer
from any application under one of the following
supported Operating Systems.
■ Windows 2000®
■ Windows 2000® Server
■ Windows XP® (x86), without signature
■ Windows Server® 2003 (x86)
■ Windows Vista®, without signature
■ Citrix Presentation Server 3.x
■ Citrix Presentation Server 4.x
■ Citrix Metaframe
■ Macintosh Mac OS 9.x
■ Macintosh Mac OS 10.x
Note:
Visit Océ on the internet at www.oce.com for the latest information.
Optional application software
#
Function
Application software
Job submission
■
Océ Repro Desk
Appendix A - Specifications of the Océ PlotWave 300
299
Preferred Océ media types and sizes
Preferred Océ media types and sizes
Introduction
Océ machines and media are matched for the best quality and performance. Océ recommends the use of approved Océ media. You can receive a full list of the Océ media that
you can use in your printer (that includes plain or recycled paper, transparent paper,
coloured papers and different polyester films) from your Océ representative.
Attention:
Do not store the paper in rooms where temperature and humidity are high. Avoid dust
and direct sunlight. Wrap not used paper in the plastic to prevent it absorbing moisture.
Media types - Europe
The following media types are available for the 'Océ PlotWave 300' in Europe:
#
Select the following
media name on your
user interface
If you use the following Océ media
Media name
Media type
g/m,
mil
or
mu
'Paper 64 g'
'Océ Top Label Paper'
60
'Paper 75 g'
'Océ Black Label Paper'
75
'Océ Red Label Paper'
75
'Océ Top Label Paper'
75
'Océ Coloured Paper'
80
'Océ Green Label Paper FSC'
80
'Océ Recycled Paper'
80
'Océ Top Color Paper'
90
'Océ Top Label Paper'
90
'Océ Fluorescent Paper'
90
'Transp. 75 g'
'Océ Transparent Paper'
80
'Transp. 90 g'
'Océ Transparent Paper'
90
'Recycled pap. 80 g'
'Paper 90-110 g'
300
Appendix A - Specifications of the Océ PlotWave 300
2
Preferred Océ media types and sizes
Select the following
media name on your
user interface
If you use the following Océ media
Media name
Media type
g/m,
mil
or
mu
'Transp. 110 g'
'Océ Transparent Paper'
110
'Film 3.5 mil'
'Océ Polyester Film'
88
'Océ Antistatic Film'
88
'Océ Contrast Film'
123
'Film 4.5 mil'
2
'Translucent'
'Vellum'
Note:
* Other applications that display the media name, like the Océ Express WebTools, the
printer drivers and the job submitters, use the name 'Paper 75-80 g' instead of 'Paper
75 g' or 'Recycled pap. 80 g'.
Note:
Visit Océ on the internet at www.oce.com for the latest information.
Media types - USA
The following media types are available for the 'Océ PlotWave 300' in the USA:
#
Select the following
media name on your
user interface
If you use the following Océ media
Media name (USA)
Media type
lb
or
mil
'Bond 20 lb'*
'Océ Bond 45111'
20
'Recycled bond 20 lb'*
'Océ Recycled Bond 45111R'
20
'Bond 24-28 lb'
'Océ Premium Bond 45800'
24
'Bond 17 lb'
'Transp. 20 lb'
Appendix A - Specifications of the Océ PlotWave 300
301
Preferred Océ media types and sizes
Select the following
media name on your
user interface
If you use the following Océ media
Media name (USA)
Media type
lb
or
mil
'Film 3.5 mil'
'3.5 mil Double matte film 44632'
3.5
mil
'Film 4.5 mil'
'4.0 Double matte film 44542'
4.0
mil
'Translucent'
'Océ Translucent 450018'
18
'Vellum'
'Océ Vellum 459000 or 459020'
20
'Transp. 24 lb'
'Transp. 28 lb'
Note:
* Other applications that display the media name, like the Océ Express WebTools, the
printer drivers and the job submitters, use the name 'Bond 20 lb' instead of 'Recycled
bond 20 lb'.
Note:
Visit Océ on the internet at www.oce.com for the latest information.
Media sizes
#
302
Maximum
Minimum
Media width
914 millimetres
36 inch
279 millimetres
11 inch
Roll length
200 metres
650 feet
Not applicable
Appendix A - Specifications of the Océ PlotWave 300
Appendix B
Reader's comment sheet
Reader's comment sheet
Reader's comment sheet
Questions
Have you found this manual to be accurate?
O Yes
O No
Were you able to operate the product, after reading this manual?
O Yes
O No
Does this manual provide sufficient background information?
O Yes
O No
Is the format of this manual convenient in size, readability and arrangement (page layout,
chapter order, etc.)?
O Yes
O No
Could you find the information you were looking for?
O Always
O Most of the times
O Sometimes
O Not at all
What did you use to find the required information?
O Table of contents
O Index
Are you satisfied with this manual?
O Yes
O No
Thank you for evaluating this manual.
If you have other comments or concerns, please explain or suggest improvements overleaf
or on a separate sheet.
Comments:
-------------------------------------------------------------------------------------------------------------------------------------------------------------------------------------------------------------------------------------------------------------------------------------------------------------------------------------------------------------------------------------------------------------------------------------
304
Appendix B - Reader's comment sheet
Reader's comment sheet
------------------------------------------------------------------------------------------------------------------------------Date:
This reader's comment sheet is completed by:
(If you prefer to remain unknown, please do fill in your occupation)
Name:
Occupation:
Company:
Phone:
Address:
City:
Country:
Please return this sheet to:
Océ-Technologies B.V.
For the attention of ITC User Documentation.
P.O. Box 101,
5900 MA Venlo
The Netherlands
Send your comments by E-mail to: [email protected]
For the addresses of local Océ organisations see: http://www.oce.com
Appendix B - Reader's comment sheet
305
Reader's comment sheet
306
Appendix B - Reader's comment sheet
Appendix C
Addresses of local Océ
organisations
Addresses of local Océ organisations
Addresses of local Océ organisations
#
308
Océ-Australia Ltd.
P.O. Box 363
Ferntree Gully MDC
Vic 3165
Australia
http://www.oce.com.au/
Océ-Österreich GmbH
Postfach 95
1233 Vienna
Wienerbergstrasse 11
Vienna Twin Tower
1100 Vienna
Austria
http://www.oce.at/
Océ-Belgium N.V./S.A.
J. Bordetlaan 32
1140 Brussel
Belgium
http://www.oce.be/
Océ-Brasil Comércio e Indústria Ltda.
Av. das Nações Unidas, 11.857
Brooklin Novo
São Paulo-SP 04578-000
Brasil
http://www.oce-brasil.com.br/
Océ-Canada Inc.
4711 Yonge Street, Suite 1100
Toronto, Ontario M2N 6K8
Canada
http://www.oce.ca/
Océ Office Equipment (Beijing) Co., Ltd.
Xu Mu Cheng
Chaoyang District
Beijing 100028
China
http://www.oce.com.cn/
Océ-Czech Republic ltd.
Babická 2329/2
149 00 Praha 4
Czech Republic
http://www.oce.cz/
Océ-Danmark a/s
Vallensbækvej 45
2605 Brøndby
Denmark
http://www.oce.dk/
Océ Finland OY
Niittyrinne 7
02270 Espoo
Finland
http://www.oce.fi/
Océ-France S.A.
32, Avenue du Pavé Neuf
93882 Noisy-le-grand, Cedex
France
http://www.oce.fr/
Océ-Deutschland GmbH
Solinger Straße 5-7
45481 Mülheim/Ruhr
Germany
http://www.oce.de/
Océ-Hong Kong and China head office
12/F 1202 The Lee Gardens
33 Hysan Avenue
Causeway Bay
Hong Kong
http://www.oce.com.hk/
Appendix C - Addresses of local Océ organisations
Addresses of local Océ organisations
Océ-Hungaria Kft.
1241 Budapest
Pf.: 237
Hungary
http://www.oce.hu/
Océ-Ireland Ltd.
3006 Lake Drive
Citywest Business Campus
Saggart
Co. Dublin
Ireland
http://www.oce.ie/
Océ-Italia S.p.A.
Strada Padana Superiore 2/B
20063 Cernusco sul Naviglio (MI)
Italia
http://www.oce.it/
Océ Japan Corporation
3-25-1, Nishi Shinbashi
Minato-Ku
Tokyo 105-0003
Japan
http://www.ocejapan.co.jp/
Océ-Belgium S.A.
Rue Astrid 2/A
1143 Luxembourg-Belair
http://www.oce.lu/
Océ Malaysia Sdn. Bhd.
#3.01, Level 3, Wisma Academy
Lot 4A, Jalan 19/1
46300 Petalig Jaya
Selangor Darul Ehsan
Malaysia
http://www.ocemal.com.my/
Océ-Mexico S.A. de C.V.
Prolongación Reforma 1236,
4to Piso
Col. Santa Fé, Del. Cuajimalpa
C.P. 05348
México, D.F.
México
http://www.oceusa.com/
Océ-Norge A.S.
Postboks 4434 Nydalen
Gjerdrums vei 8
0403 Oslo
Norway
http://www.oce.no/
Océ-Poland Ltd. Sp.z o.o.
ul. Bitwy Warszawskiej 1920 r. nr. 7
02-366 Warszawa
Poland
http://www.oce.com.pl/
Océ-Portugal Equipamentos Gráficos S.A.
Av. José Gomes Ferreira, 11 Piso 2 - Miraflores
1497-139 Algés
Portugal
http://www.oce.pt/
Océ Singapore Pte Ltd.
P.O. Box 1024
MacPherson Road
Singapore 913410
Appendix C - Addresses of local Océ organisations
309
Addresses of local Océ organisations
Océ España SA
Business Park Mas Blau
Osona, 2 08820 El Prat de Llobregat
Barcelona
Spain
http://www.oce.es/
Océ-Svenska AB
Sollentunavägen 84
191 27 Sollentuna
Sweden
http://www.oce.se/
Océ-Schweiz AG
Sägereistrasse 10
CH8152 Glattbrugg
Schweiz
http://www.oce.ch/
Océ (Thailand) Ltd.
B.B. Building 16/Floor
54 Asoke Road
Sukhumvit 21
Bangkok 10110
Thailand
Océ-Nederland B.V.
P.O.Box 800
5201 AV 's-Hertogenbosch
The Netherlands
http://www.oce.nl/
Océ (UK) Limited
Océ House
Chatham Way
Brentwood, Essex CM14 4DZ
United Kingdom
http://www.oce.co.uk/
Océ North America Inc.
100 Oakview Drive
Trumbull, CT 06611
USA
http://www.oceusa.com/
Note:
The web site http://www.oce.com gives the current addresses of the local Océ organisations and distributors.
Note:
The addresses of local Océ organisations for information about the Wide Format
Printing Systems and the Production Printing Systems can be different from the addresses
above. Refer to the web site http://www.oce.com for the addresses you need.
310
Appendix C - Addresses of local Océ organisations
Index
Index
Abbreviations
Océ EWT .......................................................24
Océ PlotWave 300 MF Express ......................24
Active job
delete ............................................................146
pause ............................................................146
resume ..........................................................146
stop ..............................................................146
Add a strip
description ....................................................177
leading ..........................................................189
trailing ..........................................................189
Adjust
print density .................................................277
Alignment
description ....................................................178
Authorisations
Océ Express WebTools ...................................94
Available documentation
Océ Express WebTools ...................................12
Océ PlotWave 300 .........................................12
Océ PostScript® 3 Driver ..............................13
Océ Windows® Printer Driver .......................13
B
Back output
description ......................................................34
Background compensation
description ...........................................129, 134
Backup
system data ...................................................261
Basic
copy job .......................................................166
scan job ........................................................202
Blackness chart
print .............................................................277
C
Calibrate the scanner
description ....................................................259
Calibration
sheet .............................................................259
wizard ...........................................................259
Carrier sheet
description ...........................................164, 200
Change
a setting in the Océ Express WebTools ...........98
passwords in the Océ Express WebTools ........97
the language of the Océ Express WebTools .....92
the media type or media size .........................250
the regional settings ......................................108
Check
the settings in the Océ Express WebTools .....101
your licenses .................................................286
Checkprint
description ....................................................213
Clean cut button
description .............................................30, 232
Clean the scanner
description ....................................................256
Clear
an original jam .............................................267
button ............................................................31
the system .....................................................149
Colour mode
black and white ............................................215
colour ...........................................................214
description ....................................................134
greyscale .......................................................215
Components media drawer
clean cut button .....................................30, 232
media roll 1 ...........................................30, 232
media roll 2 (optional) ...........................30, 232
roll holder ..............................................30, 232
roll loading station .................................30, 232
Components printer
lower front cover .............................................25
lower left front cover .......................................25
lower right front cover ....................................25
media bypass ...................................................25
media drawer ..................................................25
media jam clearance handle ............................28
on / off button ................................................25
power switch ...................................................28
printer top cover .............................................25
residual toner compartment ............................27
toner compartment .........................................25
top delivery tray ..............................................25
upper back cover .............................................28
USB stick interface .........................................25
user panel .......................................................25
wheel ..............................................................25
Components scanner
311
Index
original feeding table ......................................29
originals exit ...................................................29
scanner open levers .........................................29
scanner top cover ............................................29
Components user panel
clear button ....................................................31
confirmation button .......................................31
green button ...................................................31
lower left soft key ............................................31
lower right soft key .........................................31
numeric buttons .............................................31
scroll wheel .....................................................31
status light ......................................................31
stop button .....................................................31
upper left soft key ...........................................31
upper right soft key .........................................31
USB flash drive interface .................................31
user panel display ............................................31
Concept
copy functionality ...........................................17
default settings ..............................................119
green button principle ....................................17
job recovery ....................................................18
Océ Express WebTools controller application
........................................................................17
print and copy jobs .........................................18
printer configuration ......................................17
scan functionality ............................................17
Smart Inbox and Jobs Queue ........................136
templates ........................................................17
Configuration
sleep mode ....................................................109
Configuration tab
Océ Express WebTools ...................................87
Configure
local scan destinations ...................................113
network settings ...........................................110
remote scan destinations ...............................114
the pen settings .............................................117
the regional settings ......................................108
Confirmation button
description ......................................................31
Connect
mains supply cable ..........................................38
Consumables
Consumables ..................................................35
Controller
hardware specifications .................................292
software specifications ..................................292
Copy example
312
1:1 copy of a CAD drawing ............................66
1:1 copy of a colour drawing ...........................68
a specific area of an original ..........................193
add a strip ....................................................189
delete a specific area of an original ................195
multiple sets .................................................182
on a cut sheet ...............................................187
remove a strip ...............................................191
scale to another media size ............................185
scaled copy (50%) of a CAD drawing .............70
with a stamp .................................................184
Copy jobs
basic .............................................................166
clear an original jam .....................................267
default output quality ...................................128
defaults .........................................................125
description ...........................................161, 168
extended .......................................................169
settings overview ...........................................172
Copy quality
problem ........................................................259
Copy templates
description ....................................................125
Create
a network destination with SMB ..................115
a web destination with FTP ..........................114
Smart Inbox .................................................142
Current date and time
description ....................................................108
Cut sheet
description ....................................................187
D
Date format
description ....................................................108
Default output quality
for copy jobs .................................................128
for print jobs ................................................124
for scan jobs .................................................133
Default passwords
Océ Express WebTools ...................................97
Default settings
copy jobs ......................................................125
print jobs ......................................................122
scan jobs .......................................................130
system ..........................................................120
Default settings concept
Default settings concept ...............................119
Define
Index
media type or media size ...............................250
the copy job preferences and copy templates ..125
the default output quality for copy jobs ........128
the default output quality for print jobs ........124
the default output quality for scan jobs .........133
the print job defaults ....................................122
the scan job preferences and copy templates ..130
the system defaults ........................................120
Define the delete area dimensions
length ...........................................................195
width ............................................................195
x offset ..........................................................195
y offset ..........................................................195
Delete
active job ......................................................146
Smart Inbox .................................................143
Delete a specific area
description ....................................................195
Delete area
description ....................................................176
Demo print
print .............................................................275
Destination
description ....................................................208
Dimensions
printer ..........................................................294
Disconnect
mains supply cable ........................................222
Do not make posters and photos lighter
description ....................................................124
Drawing method
description ....................................................179
Driver
Océ PostScript® 3™ Driver ........................299
Océ Windows® Printer Driver ....................298
E
Edit a setting
Océ Express WebTools ...................................98
Error codes
description ....................................................266
Extended
copy job .......................................................169
scan job ........................................................205
F
Factory default
restore ..........................................................104
Feed the original
description ...........................................162, 198
File type
description ...........................................135, 208
scan to file ....................................................214
Finishing
description ....................................................177
First language
description ....................................................108
Footprint
printing system ...............................................23
FTP
FTP ..............................................................157
G
Green button
description ......................................................31
I
Icons
job states ......................................................147
scanner states ................................................106
system states .................................................105
toner states ...................................................106
Install
system software .............................................262
Install a new license
Install a new license ......................................289
J
Job
delete ............................................................146
pause ............................................................146
resume ..........................................................146
stop ..............................................................146
Job states
Queue ..........................................................147
Smart Inbox .................................................147
Job submission
description ....................................................150
FTP ..............................................................157
LPR ..............................................................158
Océ Windows ® Printer Driver .............62, 153
Jobs Queue
concept .........................................................136
Jobs tab
Océ Express WebTools ...................................83
313
Index
K
Key operator
description ......................................................94
L
License
demo ............................................................284
resale ............................................................284
Licenses
Licenses ........................................................280
activation ......................................................282
check ............................................................286
install ...........................................................289
overview .......................................................283
save ..............................................................288
upload ..........................................................289
Lighter/darker
description .........................129, 135, 173, 212
Load
Media roll (position 1) ...........................43, 238
Media roll (position 2) ...........................49, 244
settings from a file ........................................103
Local scan destination
configure ......................................................113
description ....................................................111
Log in
Océ Express WebTools ...................................95
Log out
Log out ...........................................................96
Lower front cover
description ......................................................25
Lower left front cover
description ......................................................25
Lower left soft key
description ......................................................31
Lower right front cover
description ......................................................25
Lower right soft key
description ......................................................31
LPR
LPR ..............................................................158
M
Main components
Océ PlotWave 300 .........................................22
Mains supply cable
314
connect ...........................................................38
disconnect ....................................................222
Make a copy
and add a strip ..............................................189
and delete a specific area of an original .........195
and remove a strip ........................................191
of a specific area of an original ......................193
on a cut sheet ...............................................187
Make a scan
and remove a strip ........................................216
Make multiple sets of copies
description ....................................................182
Managing licenses
Managing licenses .........................................280
Measurement unit
description ....................................................108
Media
bypass .............................................................25
description ....................................................173
drawer ............................................................25
Media jam
in the fuser section ........................................268
in the media bypass section ...........................271
in the roll feed section ..................................274
Media jam clearance handle
description ......................................................28
Media roll
remove .........................................................233
replace ..........................................................233
unpack ...................................................41, 236
Media roll (position 1)
load .......................................................43, 238
replace ...................................................43, 238
Media roll (position 2)
load .......................................................49, 244
replace ...................................................49, 244
Media roll 1
description .............................................30, 232
Media roll 2 (optional)
description .............................................30, 232
Media series
description ....................................................108
Media sizes
specifications ................................................302
Media type or media size
define ...........................................................250
Media types Océ
preferred (Europe) ........................................300
preferred (USA) ............................................301
Message
Index
user intervention required .............................266
Mirror
description ...........................................179, 212
Move the printing system
description ....................................................223
N
Network settings
configure ......................................................110
Numeric buttons
description ......................................................31
O
Océ EWT
definition ........................................................24
Océ Express WebTools
change the language ........................................92
change the regional settings ..........................108
configure the network settings ......................110
edit a setting ...................................................98
introduction ...................................................55
load the settings from a file ...........................103
log in ..............................................................95
passwords .......................................................97
restore factory defaults ..................................104
save the settings in a file ................................102
the configuration tab ......................................87
the jobs tab .....................................................83
the preferences tab ..........................................85
the support tab ...............................................89
the system tab .................................................91
user roles and authorisations ...........................94
view and check the settings ...........................101
Océ License Logic
access ............................................................283
Océ media types
preferred (Europe) ........................................300
preferred (USA) ............................................301
Océ PlotWave 300
footprint .........................................................23
main components ...........................................22
Océ PlotWave 300 MF Express
definition ........................................................24
Océ PostScript® 3 Driver
print ......................................................64, 155
Océ PostScript® 3™ Driver
specifications ................................................299
Océ PowerM controller
hardware specifications .................................292
Océ Publisher Express
print ......................................................59, 151
Océ Scanner Express
Specifications ................................................296
Océ Windows ® Printer Driver
Océ Windows ® Printer Driver .............62, 153
Océ Windows® Printer Driver
specifications ................................................298
On / off button
description ......................................................25
Open
Smart Inbox .................................................142
the system monitor .......................................105
Optional application software
specifications ................................................299
Original
description ...........................................172, 210
feed .....................................................162, 198
Original feeding table
description ......................................................29
Original jam
description ....................................................267
Original type
description ....................................................128
Original type when scanning to greyscale or blackand-white
description ....................................................133
Original width
description ...........................................175, 211
Originals exit
description ......................................................29
Output delivery
back output ....................................................34
top delivery tray ..............................................34
Output quality
for copy jobs .................................................128
for print jobs ................................................124
for scan jobs .................................................133
Overview
available documentation .................................12
copy job settings ...........................................172
scan job settings ............................................208
scanner states ................................................106
system states .................................................105
toner states ...................................................106
P
Paper jam
315
Index
in the fuser section ........................................268
in the media bypass section ...........................271
in the roll feed section ..................................274
Passwords
Océ Express WebTools ...................................97
Pause
active job ......................................................146
Pen settings
configure ......................................................117
Power consumption
printer ..........................................................294
Power switch
description ......................................................28
Power user
description ......................................................94
Preferences
copy jobs ......................................................125
default output quality for copy jobs ..............128
default output quality for print jobs ..............124
default output quality for scan jobs ...............133
print jobs ......................................................122
scan jobs .......................................................130
system ..........................................................120
Preferences tab
Océ Express WebTools ...................................85
Preferred Océ media types
Europe .........................................................300
USA .............................................................301
Print
blackness chart .............................................277
demo print ...................................................275
from a USB mass storage device ......................58
from Océ Publisher Express ...................59, 151
from the Océ PostScript® 3 Driver .......64, 155
from the Smart Inbox ............................61, 159
resolution .....................................................294
speed ............................................................294
test print .......................................................276
Print density
adjust ...........................................................277
Print job submission
description ....................................................150
Print jobs
default output quality ...................................124
defaults .........................................................122
Print optimisation
description ....................................................124
Printer
specifications ................................................294
working area ...................................................23
316
Printer top cover
description ......................................................25
Printing system
footprint .........................................................23
move ............................................................223
re-adjust .......................................................223
switch off ...............................................78, 220
switch on ...............................................39, 230
Problems with jobs
solve .............................................................266
Q
Quality
copy jobs ......................................................128
print jobs ......................................................124
problem ........................................................259
scan jobs .......................................................133
Queue
job states ......................................................147
R
Re-adjust the printing system
description ....................................................223
Re-install the system
description ....................................................260
Refill
toner .............................................................251
Regional settings
change ..........................................................108
Remote scan destination
configure ......................................................114
description ....................................................111
Remove
all jobs from the system ................................149
media roll .....................................................233
Remove a strip
description ...........................................174, 210
leading .................................................191, 216
left .......................................................191, 216
right ....................................................191, 216
trailing .................................................191, 216
Replace
media roll .....................................................233
Media roll (position 1) ...........................43, 238
Media roll (position 2) ...........................49, 244
the residual toner container ..........................253
Residual toner compartment
description ......................................................27
Index
Residual toner container
replace ..........................................................253
Resolution
description ...........................................134, 209
printer ..........................................................294
Restart
description ....................................................107
Restore
factory defaults .............................................104
system data ...................................................263
Resume
active job ......................................................146
Roll holder
description .............................................30, 232
Roll loading station
description .............................................30, 232
S
Safety approvals
printer ..........................................................294
Save
settings in a file .............................................102
Save active licenses
Save active licenses ........................................288
Scale
description ....................................................172
Scale to another media size
description ....................................................185
Scan destinations
local .....................................................111, 113
remote ..........................................................111
remote via FTP .............................................114
remote via SMB ...........................................114
Scan example
CAD drawing to colour PDF ..........................74
CAD drawing to TIFF format ........................72
photo to USB mass storage device ...................76
remove a strip ...............................................216
Scan jobs
basic .............................................................202
clear an original jam .....................................267
default output quality ...................................133
defaults .........................................................130
description ...........................................197, 204
extended .......................................................205
settings overview ...........................................208
Scan quality
problem ........................................................259
Scan templates
description ....................................................130
Scan to file
colour mode: black and white .......................215
colour mode: colour .....................................214
colour mode: greyscale ..................................215
compression method ....................................214
file type ........................................................214
organisation ..................................................214
Scanner
calibration ....................................................259
clean .............................................................256
Specifications ................................................296
Scanner calibration sheet
description ....................................................259
Scanner open levers
description ......................................................29
Scanner original jam
description ....................................................267
Scanner states
overview .......................................................106
Scanner top cover
description ......................................................29
Scroll wheel
description ......................................................31
Second language
description ....................................................108
Send print jobs
description ....................................................150
Sets
copy .............................................................182
Settings
change ............................................................98
view and check .............................................101
Settings file
load ..............................................................103
save ..............................................................102
Settings overview
copy jobs ......................................................172
scan jobs .......................................................208
Sheet delivery
back output ....................................................34
top delivery tray ..............................................34
Shut down
description ....................................................107
Sleep mode
configuration ................................................109
Smart Inbox
concept ..................................................56, 136
create ............................................................142
delete ............................................................143
317
Index
job states ......................................................147
multiple-user and repro environment ...........141
multiple-user environment ...........................139
open .............................................................142
print ......................................................61, 159
repro environment ........................................140
Software controller
specifications ................................................292
Solve media jam
in the fuser section ........................................268
in the media bypass section ...........................271
in the roll feed section ..................................274
Solve problems
with jobs ......................................................266
Sort
description ....................................................181
Specific area
description ....................................................193
Specifications
Controller software .......................................292
media sizes ....................................................302
Océ PostScript® 3™ Driver ........................299
Océ PowerM controller ................................292
Océ Windows® Printer Driver ....................298
optional application software ........................299
printer ..........................................................294
scanner .........................................................296
Speed
printer ..........................................................294
Stamp
description ...........................................180, 184
Status light
description ......................................................31
Stop
active job ......................................................146
Stop button
description ......................................................31
Strip
add a leading strip ........................................189
add a trailing strip ........................................189
remove a leading strip ..........................191, 216
remove a left strip ................................191, 216
remove a right strip ..............................191, 216
remove a trailing strip ..........................191, 216
Supply cable
disconnect ....................................................222
Support tab
Océ Express WebTools ...................................89
Switch off
description .............................................78, 220
318
Switch on
description .............................................39, 230
System
defaults .........................................................120
shut down or restart .....................................107
System administrator
description ......................................................94
System data
backup .........................................................261
restore ..........................................................263
System monitor
description ....................................................105
System software
install ...........................................................262
System states
overview .......................................................105
System tab
Océ Express WebTools ...................................91
System upgrade
description ....................................................260
T
Templates
for copy jobs .................................................125
for scan jobs .................................................130
Test print
print .............................................................276
Time format
description ....................................................108
Toner
refill ..............................................................251
Toner compartment
description ......................................................25
Toner states
overview .......................................................106
Top delivery tray
description ...............................................25, 34
U
Unpack
media roll ..............................................41, 236
Upgrade the system
description ....................................................260
Upload
licenses .........................................................289
Upper back cover
description ......................................................28
Upper left soft key
Index
description ......................................................31
Upper right soft key
description ......................................................31
USB backup key
description ....................................................263
USB flash drive interface
description ......................................................31
USB installation key
description ....................................................262
USB mass storage device
print ...............................................................58
USB stick interface
description ......................................................25
User interaction
Océ Express WebTools ...................................19
Océ Publisher Express ....................................19
printer drivers .................................................19
user panel .......................................................19
User intervention required
message ........................................................266
User panel
description ......................................................25
User panel display
description ......................................................31
User roles
key operator ....................................................94
Océ Express WebTools ...................................94
power user ......................................................94
system administrator .......................................94
V
View the settings
Océ Express WebTools .................................101
W
Weight
printer ..........................................................294
Wheel
description ......................................................25
Working area
printing system ...............................................23
319
-
Beyond the Ordinary
o
Printing for
Professionals
Océ helps the people who make our world. Companies
everywhere use Océ technical documentation systems in
manufacturing, architecture, engineering and
construction. High speed Océ printing systems produce
millions of transaction documents each week, such as
bank statements and utility bills. And in offices around
the world, people use Océ professional document systems
to keep the wheels of business and government turning.
Océ is also at work in publishing on demand, newspaper
production and wide format colour for spectacular
display graphics.
©
2009 Océ. Illustrations and specifications do not necessarily apply to
products and services offered in each local market. Technical
For more information visit us at:
specifications are subject to change without prior notice. All other
trademarks are the property of their respective owners.
Beyond the Ordinary
www.oce.com
GB