1
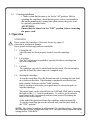
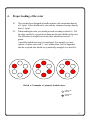
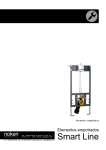
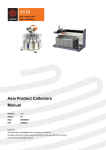
INSTRUCTION MANUAL
FOR
THE
Z100-A
CLINICAL
CENTRIFUGE
C0100-A
January 2005
INDEX
PAGE
1.
General Information ........................................................................................
1.1 Description ............................................................................................
1.2 Safety precautions to be observed before operating the centrifuge ......
1.3 Technical data........................................................................................
1.4 Accessories ...........................................................................................
1.5 Warranty ................................................................................................
2
2
2
2
3
3
2.
Installation .......................................................................................................
2.1 Unpacking the centrifuge .......................................................................
2.2 Required space ......................................................................................
2.3 Cushion Installation ...............................................................................
2.4 Centrifuge Installation ............................................................................
3
3
3
3
4
3.
Operation ........................................................................................................
3.1 Closing the lid........................................................................................
3.2 Lid release .............................................................................................
3.3 Lid lock ................................................................................................
3.4 Starting the centrifuge ............................................................................
4
4
4
4
4
4.
Proper use of the Rotor
4.1 Overloading the rotor ............................................................................ 5
4.2 Balancing the rotor ................................................................................ 5
5.
Service and Maintenance ................................................................................
5.1 Service of centrifuge .............................................................................
5.2 Cleaning the centrifuge ..........................................................................
5.3 Disinfection ...........................................................................................
5.4 Cleaning the centrifuge after breakage of glass tubes or bottles ...........
5.5 Replacing fuses .....................................................................................
6.
Troubleshooting guide .................................................................................... 7
7.
Chart for determining RCF (g-value) .............................................................. 8
6
6
6
6
6
6
1
1.
General Information - This manual is intended for use with the Z100-A
(C0100-A) Centrifuge.
1.1
Description
The Z100-A is a small bench top centrifuge designed for
sedimentation of various samples. The Z100-A has a
built in angle rotor capable of running up to to 4,000 rpm (1,900 x g.)
This product is for research only.
1.2
Safety precautions to be observed before operating the centrifuge
!
Do not operate if:
- The centrifuge has not been installed correctly.
- The centrifuge is partly dismantled.
- Service has been attempted by non-authorized or non-qualified
personnel.
- Rotors and accessories are not part of the standard range of accessories
or have been obtained without the prior permission of the
manufacturer.
Exception: tubes and bottles made of glass or plastic normally available
in the laboratory, and designed for centrifugation.
- The centrifuge is to be used in explosive atmospheres.
- You intend to centrifuge combustible and explosive materials.
- You intend to centrifuge materials which are chemically reactive.
If the equipment is used in a manner not specified by the manufacturer, the
protection provided by the equipment may be impaired.
1.3 Technical Data
Model No.
C0100-A
Dimensions:
Width
Depth
Height
Weight
Max. speed
Max. volume
Max. RCF
Maximum Admiss. density
Rotor radius
Timer
295mm (11.6 inch)
348mm (13.7 inch)
101mm (10.1 inch)
5.5 kg / 12 lbs
4,000 rpm
90 ml (6 x 15ml)
1,900 x g
1.2 kg/dm3
10.62 cm
0 to 30 minutes or continuos
Electrical ratings
120 V/50-60 Hz, 1 Amp
The manufacturer reserves the right to make technical modifications
2
1.4
1.5
Accessories
Accessories supplied with each centrifuge unit:
- One 6 x 15ml rotor - One Instruction manual
- One Warranty card - Six Rubber Cushions
Aditional accessories available:
C0200-17A - Combination adapters for 5ml and 7ml tubes, (6pk.)
C0230-17A - Combination adapters for 5ml and 7ml tubes, (4pk.)
Warranty
This centrifuge has been subject to thorough testing and quality control.
In the unlikely event of any manufacturing faults occuring, our one
year warranty (from date of delivery) covers the centrifuge and the
rotors. This warranty becomes void in case of incorrect operation, use
of non-appropriate spare parts or accessories and non-authorized
modification of the rotor or the centrifuge.
2. Installation
2.1
Unpacking the centrifuge
The centrifuge is delivered in a carton with two or more formed foam
blocks. Please retain the carton and the blocks until it has been
established that your unit is working properly.
The accessories supplied with the centrifuge should be kept with the
instruction manual near the centrifuge's place of installation.
2.2
Required space
The centrifuge should be installed on a rigid, even surface. The Z100-A
should only be operated on a stable laboratory table/bench etc.
To guarantee sufficient ventilation, please ensure that the centrifuge has
at least 15 cm free space on all sides, including the rear.
It is recommended that the centrifuge is not situated in a location
subject to excessive heat, e.g. strong sunlight, radiators etc. as heat-buildup can occur within the centrifuge bowl.
2.3
Cushion Installation
Before inserting any tubes into the centrifuge the rubber cushions must
first be properly installed. To install the cushions turn a 10 or 15ml round
bottom tube upside down and place the cushion on top. Then remove the
rotor sheild and place it on top of the tube while pushing the cushion into
the end of the sheild. Then reinsert the shield.
3
2.4
Centrifuge Installation
1. Make certain that the timer is set for the "off" position. Before
operating the centrifuge, check that the power source corresponds to
that on the manufacturer's rating label, then connect the power cord
to a properly grounded outlet
ATTENTION:
Ensure that the timer is in the "OFF" position, before connecting
the power cord.
3. Operation
!
ATTENTION:
Never operate the centrifuge if the rotor shows any signs of
corrosion or mechanical damage.
Never operate with strongly corrosive materials.
3.1
Closing the lid
After the rotor has been properly loaded, close the centrifuge
lid.
3.2
Lid release
The "lid" button must be pushed to open the lid after a centrifuge run
has been completed.
3.3
Lid lock
The centrifuge can only be started with the lid closed. Do not attempt to
open the lid until the rotor comes to a complete stop.
3.4
Starting the centrifuge
To start the centrifuge select the desired run time by turning the time knob
in a clockwise direction. If performing a continuous run turn the time
knob counter clockwise into the "hold" position.
Once a run time is selected a given speed must be selected in order to
start the centrifuge.
The speed (rpm) can be selected between 1,000 and 4,000 rpm by turning
the knob to the 1, 2, 3 and 4 speed marks. To select a speed, turn the
speed knob to the 2 posistion to activate, then proceed by turning the
knob to the desired speed.
At the end of the preselected time, the centrifuge stops automatically.
To stop the centrifuge prior to the selected time, turn the timer knob to
the "OFF" position.
NOTE: The clinical centrifuge is calibrated at 120 volts line voltage. Operating
the centrifuge at a line voltage other than 120V can significantlly impact the speed
settings below 2,000 RPM.
4
4.
Proper loading of the rotor
4.1
The rotor has been designed to handle samples with a maximum density
of 1.2g/ml. Tubes should not be run with any substance having a density
above 1.2g/ml.
4.2
When loading the rotor you should proceed according to sketch A. Fill
the tubes equally by eye and insert them into the tube shields of the rotor.
The difference in weight between the tubes should not exceed 2 - 3
grams.
A partially loaded rotor may be centrifuged. For example, you may
operate a 6-place rotor with 2, 3 or 4 loaded tubes, but it is important
that the occupied tube shields are symetrically arranged. (see sketch A).
Sketch A: Examples of properly loaded rotors.
empty tube
shields
loaded tube
shields
5
5.
Service and Maintenance
5.1
Service of centrifuge
Ther is no routine maintenance or service required on the centrifuge other
than occasional cleaning.
5.2
General cleaning of the centrifuge
Always keep the centrifuge housing, rotor, and rotor accessories clean
by wiping down with a damp cloth. Do not use harsh cleaners or
detergants on the lid or housing surfaces as it may affect the plastic.
After cleaning, ensure that all parts are dried thoroughly by hand or in a
warm-air-cabinet (max. temp. +50°C).
5.3
Disinfection
The centrifuge should be disinfected periodically and before shipping the
unit for service. The centrifuge rotor area and rotor shields should be
wiped with alcohol or other disinfecting agents. Do not allow the alcohol
or disinfectant to sit on the units lid or housing, as it may affect or
discolor the plastic.
5.4
Cleaning the centrifuge after breakage of glass tubes or bottles
With high g-values, there is a possibility that tube breakage can occur.
Should this happen the centrifuge rotor must be thoroughly cleaned
and all broken particles removed. If this is not done, damage could
result to the centrifuge.Be sure to remove the rotor shields and clean
thoroughly. If glass or other material has gotten into the centrifuge
enclosure, the enclosure must be removed for cleaning.
5.5
Replacing fuses
Check the fuse when it is recommended in the "Troubleshooting Guide".
The fuse holder is located underneath the unit. Unplug the unit. Unscrew
the fuse holder and remove the fuse.
Replace a blown fuse with a fuse of equivalant rating and type.
6
6.
Troubleshooting guide
Centrifuge will not start
Possible reason:
Solution:
No power supply.
Check main power supply and centrifuge fuse.
Possible reason:
Solution:
Blown fuse.
Check fuse and replace if necessary (see 5.5)
Lid cannot be released:
Possible reason:
Solution:
Lid lock is jammed.
Push front of lid down while pushing release button.
Centrifuge cannot be started, although power is on:
Possible reason:
Solution:
Lid not closed correctly.
Close lid correctly, push down on front of lid.
Possible reason:
Solution:
No speed or time has been selected.
Check and set the time or speed.
Possible reason:
Solution:
Blown fuse.
Check fuse and replace if necessary (see 5.5).
Should you have any questions about the centrifuge and its accessories, or require
service, please contact the Labnet International Service Department at 1-888 5226381. Please have the unit’s serial number (located on the back panel of the instrument) available when calling. Do not send in a unit for service without first calling to
obtain a repair authorization number and a decontamination form. Should the centrifuge need service be sure to decontaminate it and enclose the decontamination
from. The unit should be properly packed to avoid damage. Any damage resulting
from improper packing shall be the responcibility of the user.
7
7.
Chart for determining g-values
See section 1.3 for the correct radius of your rotor. Note the use of tube adapters will change
this radius..
To determine the relative centrifugal force (RCF - value).
This value is the multiplier to the gravitational pull of the earth (g)
8