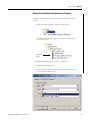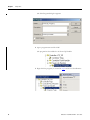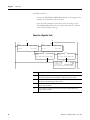
1
Logix5000 Controllers Major, Minor, and
I/O Faults
Catalog Numbers 1756 ControlLogix, 1756 GuardLogix,
1768 Compact GuardLogix, 1768 CompactLogix, 1769 CompactLogix,
1789 SoftLogix, PowerFlex with DriveLogix
Programming Manual
Important User Information
Solid state equipment has operational characteristics differing from those of electromechanical equipment. Safety Guidelines
for the Application, Installation and Maintenance of Solid State Controls (publication SGI-1.1 available from your local Rockwell
Automation sales office or online at http://www.rockwellautomation.com/literature/) describes some important differences
between solid state equipment and hard-wired electromechanical devices. Because of this difference, and also because of the
wide variety of uses for solid state equipment, all persons responsible for applying this equipment must satisfy themselves that
each intended application of this equipment is acceptable.
In no event will Rockwell Automation, Inc. be responsible or liable for indirect or consequential damages resulting from the use
or application of this equipment.
The examples and diagrams in this manual are included solely for illustrative purposes. Because of the many variables and
requirements associated with any particular installation, Rockwell Automation, Inc. cannot assume responsibility or liability for
actual use based on the examples and diagrams.
No patent liability is assumed by Rockwell Automation, Inc. with respect to use of information, circuits, equipment, or software
described in this manual.
Reproduction of the contents of this manual, in whole or in part, without written permission of Rockwell Automation, Inc., is
prohibited.
Throughout this manual, when necessary, we use notes to make you aware of safety considerations.
WARNING
Identifies information about practices or circumstances that can cause an explosion in a hazardous environment,
which may lead to personal injury or death, property damage, or economic loss.
IMPORTANT
Identifies information that is critical for successful application and understanding of the product.
ATTENTION
Identifies information about practices or circumstances that can lead to personal injury or death, property damage,
or economic loss. Attentions help you identify a hazard, avoid a hazard, and recognize the consequence
SHOCK HAZARD
Labels may be on or inside the equipment, for example, a drive or motor, to alert people that dangerous voltage may
be present.
BURN HAZARD
Labels may be on or inside the equipment, for example, a drive or motor, to alert people that surfaces may reach
dangerous temperatures.
Allen-Bradley, Rockwell Automation, Rockwell Software, ControlLogix, GuardLogix, CompactLogix, DH+, PLC-5, DriveLogix, SLC 500, RSNetWorx, RSNetWorx for ControlNet, FLEX I/O, SoftLogix, FlexLogix,
PowerFlex, Logix5000, RSLogix 5000, and TechConnect are trademarks of Rockwell Automation, Inc.
Trademarks not belonging to Rockwell Automation are property of their respective companies.
Summary of Changes
This manual contains new and updated information. Changes throughout this
revision are marked by change bars, as shown to the right of this paragraph.
New and Updated
Information
3Publication 1756-PM014D-EN-P - June 2010
This table contains the changes made to this revision.
Topic
Page
Moved the Major Faults content to Chapter 1.
9
Added a table of contents to the beginning of each chapter for ease-of-use.
9
35
41
Changed the title of section Major Fault State from the previously-published
title of Introduction.
9
Added a section titled Placement of Fault Routines to illustrate where in the
project fault routines can be used.
10
Updated the steps and graphics in the sections Create a Fault Routine for a
Program, Create a Routine for the Controller Fault Handler, and Create a
Routine for the Power-Up Handler to show changes to the program and
routine property dialog boxes.
11
Updated the appropriate Major Fault Codes to reference ’memory cards’
because CompactFlash cards and SD cards are now available for use with
controllers.
29
Added user-defined fault codes (Type 4, Codes 990…999) to the list of Major
Fault Codes.
31
Added CIP Motion major fault codes, that is type 18 major faults, to the list of
Major Fault Codes.
33
Changed the title of section Identifying Minor Faults from the
previously-published title of Introduction.
35
Added Chapter 3, I/O Fault Codes, that describes where I/O faults are
indicated and lists commonly-experienced fault codes with descriptions.
41
3
Summary of Changes
Notes:
4
Publication 1756-PM014D-EN-P - June 2010
Table of Contents
Preface
Introduction . . . . . . . . . . . . . . . . . . . . . . . . . . . . . . . . . . . . . . . . . . . . . . . 7
Chapter 1
Major Faults
Major Fault State . . . . . . . . . . . . . . . . . . . . . . . . . . . . . . . . . . . . . . . . . . . 9
Placement of Fault Routines . . . . . . . . . . . . . . . . . . . . . . . . . . . . . . 10
Choose Where to Place the Fault Routine . . . . . . . . . . . . . . . . . . . 11
Create a Fault Routine for a Program . . . . . . . . . . . . . . . . . . . . . . . . . . 11
Change the Fault Routine Assignment of a Program . . . . . . . . . . 13
Create a Routine for the Controller Fault Handler. . . . . . . . . . . . . . . . 14
Create a Routine for the Power-Up Handler . . . . . . . . . . . . . . . . . . . . 17
Programmatically Clear a Major Fault . . . . . . . . . . . . . . . . . . . . . . . . . . 20
Create a Data Type to Store Fault Information . . . . . . . . . . . . . . . 20
Get the Fault Type and Code . . . . . . . . . . . . . . . . . . . . . . . . . . . . . 21
Check for a Specific Fault . . . . . . . . . . . . . . . . . . . . . . . . . . . . . . . . 22
Clear the Fault . . . . . . . . . . . . . . . . . . . . . . . . . . . . . . . . . . . . . . . . . 23
Clear a Major Fault During Prescan . . . . . . . . . . . . . . . . . . . . . . . . . . . 23
Identify When the Controller is in Prescan . . . . . . . . . . . . . . . . . . 24
Get the Fault Type and Code . . . . . . . . . . . . . . . . . . . . . . . . . . . . . 24
Check for a Specific Fault . . . . . . . . . . . . . . . . . . . . . . . . . . . . . . . . 25
Clear the Fault . . . . . . . . . . . . . . . . . . . . . . . . . . . . . . . . . . . . . . . . . 26
Test a Fault Routine . . . . . . . . . . . . . . . . . . . . . . . . . . . . . . . . . . . . . . . . 26
Create a User-Defined Major Fault . . . . . . . . . . . . . . . . . . . . . . . . . . . . 27
Create a Fault Routine for the Program . . . . . . . . . . . . . . . . . . . . . 27
Configure the Program to Use the Fault Routine . . . . . . . . . . . . . 28
Jump to the Fault Routine. . . . . . . . . . . . . . . . . . . . . . . . . . . . . . . . 28
Major Fault Codes . . . . . . . . . . . . . . . . . . . . . . . . . . . . . . . . . . . . . . . . . 29
Chapter 2
Minor Faults
Identifying Minor Faults . . . . . . . . . . . . . . . . . . . . . . . . . . . . . . . . . . . . 35
Minor Fault Codes . . . . . . . . . . . . . . . . . . . . . . . . . . . . . . . . . . . . . . . . . 38
Chapter 3
I/O Fault Codes
Indications of I/O Faults. . . . . . . . . . . . . . . . . . . . . . . . . . . . . . . . . . . . 41
I/O Fault Codes. . . . . . . . . . . . . . . . . . . . . . . . . . . . . . . . . . . . . . . . . . . 43
Index
5Publication 1756-PM014D-EN-P - June 2010
5
Table of Contents
Notes:
6
Publication 1756-PM014D-EN-P - June 2010
Preface
Introduction
This manual shows how to monitor and handle major and minor
controller faults. It also provides lists of major, minor, and I/O fault
codes that can be used when troubleshooting your system.
This manual is one of a set of related manuals that show common
procedures for programming and operating Logix5000 controllers. For
a complete list of common procedures manuals, see the
Logix5000 Controllers Common Procedures Programming Manual,
publication 1756-PM001.
The term Logix5000 controller refers to any controller that is based on
the Logix5000 operating system, including these controllers:
•
•
•
•
•
7Publication 1756-PM014D-EN-P - June 2010
CompactLogix
ControlLogix
DriveLogix
FlexLogix
SoftLogix5800
7
Preface
Notes:
8
Publication 1756-PM014D-EN-P - June 2010
Chapter
1
Major Faults
Topic
Page
Major Fault State
9
Placement of Fault Routines
10
Choose Where to Place the Fault Routine
11
Create a Fault Routine for a Program
Change the Fault Routine Assignment of a
Program
13
Create a Routine for the Controller Fault Handler
14
Create a Routine for the Power-Up Handler
17
Programmatically Clear a Major Fault
20
Create a Data Type to Store Fault Information
20
Get the Fault Type and Code
21
Check for a Specific Fault
22
Clear the Fault
23
Clear a Major Fault During Prescan
23
Identify When the Controller is in Prescan
24
Get the Fault Type and Code
24
Check for a Specific Fault
25
Clear the Fault
26
Test a Fault Routine
26
Create a User-Defined Major Fault
27
Create a Fault Routine for the Program
27
Configure the Program to Use the Fault Routine
28
Jump to the Fault Routine
28
Major Fault Codes
Major Fault State
11
29
If a fault condition occurs that is severe enough, the controller generates a
major fault, stops the execution of logic, and switches to Program mode.
Depending on your application, you may not want all major faults to
shut down your entire system. In those situations, you can use a fault
routine to clear a specific fault and let at least some of your system
continue to operate.
IMPORTANT
9Publication 1756-PM014D-EN-P - June 2010
Do not use fault routines to continually clear all faults on the
controller. Program the fault routine to be selective in the types
and number of faults cleared.
9
Chapter 1
Major Faults
EXAMPLE
In a system that uses recipe numbers as indirect addresses, an
incorrectly typed number could produce a major fault, such as
type 4, code 20.
To keep the entire system from shutting down in the event of
this fault, a fault routine can be programmed to clear type 4,
code 20, major faults.
IMPORTANT
When a instruction errors due to a fault, for example, a COP
with an indirect addressing programming error, the instruction
is skipped and not executed. This occurs with all instructions.
Placement of Fault Routines
A fault routine lets you program logic to take specific action after a fault, such
as clearing the fault and resuming execution. Fault routines can be configured
specific to a program, controller, or to the Power-Up Handler.
Program Fault Routine
Controller Fault Routine
Power-Up Fault Handler Routine
10
Publication 1756-PM014D-EN-P - June 2010
Major Faults
Chapter 1
Choose Where to Place the Fault Routine
Where you place the routine depends on the type of fault that you want to
handle. Use this table to determine where in the project your fault routine
should be configured.
Determine Response to Major Faults
If you want take specific action/clear the fault when
Do this
Page
Condition
Fault Type
The execution of an instruction faults
4
Create a Fault Routine for a Program
11
Communication with an I/O module fails
3
Create a Routine for the Controller Fault Handler
14
Watchdog timer for a task expires
6
A motion axis faults
11
The controller powers up in Run/Remote Run
mode
1
Create a Routine for the Power-Up Handler
17
Create a Fault Routine for a
Program
Complete these steps to create a fault routine.
1. Open the project in the RSLogix 5000 software.
2. In the Controller Organizer, right-click the MainProgram and choose
New Routine.
Publication 1756-PM014D-EN-P - June 2010
11
Chapter 1
Major Faults
The New Routine dialog box appears.
3. Specify the properties in the New Routine dialog box.
Property
Description
Name
Enter the name of the routine.
Description
Enter a description of the routine (optional).
Type
Use the default of Ladder Diagram for creating a fault routine.
In Program or Phase
Use the default of Main Program.
Open Routine
Check the box if you want to immediately open the ladder logic
program.
Assignment
Choose Fault.
TIP
If you are creating a fault routine for the Power-Up Handler or
Controller Fault Handler, you can specify the program name of
either program for the In Program or Phase property.
4. Click OK.
12
Publication 1756-PM014D-EN-P - June 2010
Major Faults
Chapter 1
Change the Fault Routine Assignment of a Program
Complete these steps to change what routine is assigned as the fault
routine.
1. In the Controller Organizer, expand the Main Task.
If a fault routine has already been created, it is included in the
the main program.
Current Fault
Routine
2. Right-click MainProgram, and choose Properties.
3. Click the Configuration tab.
4. From the Fault pull-down menu, choose the routine you want to
be the program’s fault routine.
Publication 1756-PM014D-EN-P - June 2010
13
Chapter 1
Major Faults
5. Click Apply and OK.
The program you specified in step 4 is now indicated as the fault routine
in the main program.
New Fault Routine
for Program
Create a Routine for the
Controller Fault Handler
This section provides steps for creating a fault routine to operate as the
controller fault handler. Program tags are automatically created during this
process.
IMPORTANT
When you program the fault handler, remember that any
instruction that is skipped as part of the fault-handling program
is not executed when the main tasks and associated programs
are executed.
For example, if your fault handler skips a JSR instruction that is
causing a major fault, then that JSR instruction, including all of
the programming within the subroutine, is not executed.
When a instruction errors due to a fault, for example, a COP
with an indirect addressing programming error, the instruction
is skipped and not executed. This occurs with all instructions.
1. In the Controller Organizer, right-click Controller Fault Handler and
choose New Program.
14
Publication 1756-PM014D-EN-P - June 2010
Major Faults
Chapter 1
The New Program dialog box appears.
2. Enter a program name and verify that Schedule in is set to Controller
Fault Handler.
3. Click OK.
4. Right-click the program you created in step 2 and choose New Routine.
Publication 1756-PM014D-EN-P - June 2010
15
Chapter 1
Major Faults
The New Routine dialog box appears.
5. Enter a name for the routine.
6. For Assignment, leave the setting to the default of Main.
TIP
Even though you can choose Fault from the Assignment
pull-down menu, assigning the routine as a fault routine within
the Controller Fault Handler is not necessary.
7. Click OK.
The fault routine is created in the Controller Fault Handler program.
8. Double-click the newly-created routine to edit it.
16
Publication 1756-PM014D-EN-P - June 2010
Major Faults
Create a Routine for the
Power-Up Handler
Chapter 1
The Power-Up Handler is an optional task that executes when the controller
powers up in Run or Remote Run modes.
To
Do this
Prevent the controller from returning to
Run/Remote mode
Leave the routine for the Power-Up Handler empty. When power is restored, a major fault
(type 1, code 1) occurs and the controller enters the faulted state.
Have the controller take specific actions then
resume normal operation when power is
restored
In the Power-Up Handler fault routine, complete these steps.
1. Clear the major fault (type 1, code 1).
2. Execute the appropriate logic for the specific actions required.
IMPORTANT
IMPORTANT
Do not use fault routines to continually clear all faults on the
controller. Program the fault routine to be selective in the types
and number of faults cleared.
When a instruction errors due to a fault, for example, a COP
with an indirect addressing programming error, the instruction
is skipped and not executed. This occurs with all instructions.
Complete these steps to create a fault routine for the Power-Up Handler in
RSLogix 5000 software.
1. In the Controller Organizer, right-click Power-Up Handler and choose
New Program.
Publication 1756-PM014D-EN-P - June 2010
17
Chapter 1
Major Faults
The New Program dialog box appears.
2. Type a program name and click OK.
The program has been added to the Power-Up Handler.
3. Right-click the program you created in step 2 and choose New Routine.
18
Publication 1756-PM014D-EN-P - June 2010
Major Faults
Chapter 1
The New Routine dialog box appears.
4. Type the name of the routine.
5. For Assignment, leave the setting to the default of Main.
TIP
Even though you can choose Fault from the Assignment
pull-down menu, assigning the routine as a fault routine within
the Power-Up Handler is not necessary.
6. Click OK.
The fault routine is added to the Power-Up Handler.
7. Double-click the newly-created routine to edit it.
Publication 1756-PM014D-EN-P - June 2010
19
Chapter 1
Major Faults
Programmatically Clear a
Major Fault
To clear a major fault that occurs during the execution of your project,
complete these actions in the appropriate routine:
• Create a Data Type to Store Fault Information
• Get the Fault Type and Code
• Check for a Specific Fault
• Clear the Fault
IMPORTANT
IMPORTANT
Do not use fault routines to continually clear all faults on the
controller. Program the fault routine to be selective in the types
and number of faults cleared.
When a instruction errors due to a fault, for example, a COP
with an indirect addressing programming error, the instruction
is skipped and not executed. This occurs with all instructions.
Create a Data Type to Store Fault Information
Logix5000 controllers store system information in objects. Unlike PLC-5 or
SLC 500 controllers, there is no status file.
• To access system information, you use a Get System Value (GSV) or Set
System Value (SSV) instruction.
• For status information about a program, you access the PROGRAM
object.
• For fault information, you access these attribute of the PROGRAM
object.
Attribute
Data Type
Instruction
Description
MajorFaultRecord
DINT[11]
GSV
Records major faults for this program.
SSV
Specify the program name to determine which PROGRAM object
you want. (Or specify THIS to access the PROGRAM object for the
program that contains the GSV or SSV instruction.)
To simplify access to the MajorFaultRecord attribute, create this user-defined
data type.
20
Publication 1756-PM014D-EN-P - June 2010
Major Faults
Chapter 1
1. In the organizer of RSLogix 5000 software, right-click User-Defined and
choose New Data Type.
2. Enter the data type information as shown in this table.
Data Type: FAULTRECORD
Name
FAULTRECORD
Description
Stores the MajorFaultRecord attribute or MinorFaultRecord
attribute of the PROGRAM object.
Members
Name
Data
Type
Style
Description
Time_Low
DINT
Decimal
Lower 32 bits of the fault
timestamp value
Time_High
DINT
Decimal
Upper 32 bits of the fault
timestamp value
Type
INT
Decimal
Fault type (program, I/O, and so
forth)
Code
INT
Decimal
Unique code for the fault
Info
DINT[8]
Hex
Fault specific information
Get the Fault Type and Code
42372
Publication 1756-PM014D-EN-P - June 2010
21
Chapter 1
Major Faults
The GSV instruction:
• accesses the MAJORFAULTRECORD attribute of this program. This
attribute stores information about the fault.
• stores the fault information in the major_fault_record tag (of type
FAULTRECORD). When you enter a tag that is based on a structure,
enter the first member of the tag.
Check for a Specific Fault
1
1
2
EQU
Equal
Source A major_fault_record.Type
EQU
Equal
Source A major_fault_record.Code
Source B
Source B
0
fault_type
Move
Source
0
fault_code
MOV
0
Dest major_fault_record.Type
2
3
0
Move
Source
MOV
0
Dest major_fault_record.Code
0
SSV
Set system value
4
CIP Object class
PROGRAM
CIP Object name
THIS
Attribute name
MAJORFAULTRECORD
Source major_fault_record.Time_Low
0
42372
22
Item
Description
1
The first EQU instruction checks for a specific type of fault, such as program, I/O.
In Source B, enter the value for the type of fault that you want to clear.
2
The second EQU instruction checks for a specific fault code. In Source B, enter
the value for the code that you want to clear.
3
The first CLR instruction sets to zero the value of the fault type in the
major_fault_record tag.
4
The second CLR instruction sets to zero the value of the fault code in the
major_fault_record tag.
Publication 1756-PM014D-EN-P - June 2010
Major Faults
Chapter 1
Clear the Fault
42372
The SSV instruction writes:
• new values to the MAJORFAULTRECORD attribute of this program.
• the values contained in the major_fault_record tag. Because the Type
and Code member are set to zero, the fault clears and the controller
resumes execution.
Clear a Major Fault During
Prescan
If the controller faults immediately after you switch it to the Run mode, then
examine the prescan operation for the fault. Depending on the revision of
your controller, an array subscript that is beyond the range of the array (out of
range) during prescan may or may not produce a fault.
If controller is revision
Then
11.x or earlier
During prescan, an array subscript that is beyond the range of the array (out of range)
produces a major fault.
12.x
See the release notes for the firmware of your controller.
13.0 or later
During prescan, the controller automatically clears any faults due to an array subscript that is
beyond the range of the array (out of range).
Complete these procedures to clear a major fault that occurs during prescan.
•
•
•
•
Identify When the Controller is in Prescan, see page 24.
Get the Fault Type and Code, see page 24.
Check for a Specific Fault, see page 25.
Clear the Fault, see page 26.
IMPORTANT
Publication 1756-PM014D-EN-P - June 2010
It is good programming practice to check for a specific fault
before clearing that fault.
23
Chapter 1
Major Faults
Identify When the Controller is in Prescan
In the main routine of your program, enter this rung as the first rung in the
main routine of the program.
The fault routine of this program uses the status of this bit to determine if the
fault occurred during prescan or normal scan of the logic.
• During prescan, this bit is off. (During prescan, the controller resets
all bits that are referenced by OTE instructions.)
• Once the controller begins to execute the logic, the CPU_scanning
bit is always on.
Get the Fault Type and Code
Enter this rung in the fault routine for the program.
The GSV instruction:
• accesses the MAJORFAULTRECORD attribute of this program. This
attribute stores information about the fault.
• stores the fault information in the major_fault_record (of type
FAULTRECORD) tag. When you enter a tag that is based on a
structure, enter the first member of the tag.
24
Publication 1756-PM014D-EN-P - June 2010
Major Faults
Chapter 1
Check for a Specific Fault
Enter this rung in the fault routine for the program.
1
2
3
4
Publication 1756-PM014D-EN-P - June 2010
5
Item
Description
1
During prescan the bits of all OTE instructions are off and this instruction is true.
Once the controller begins to execute the logic, this instruction is always false.
2
The first EQU instruction checks for a fault of type 4, which means that an
instruction in this program caused the fault.
3
The second EQU instruction checks for a fault of code 20, which means that
either an array subscript is too large, or a POS or LEN value of a CONTROL
structure is invalid.
4
The first CLR instruction sets to zero the value of the fault type in the
major_fault_record tag.
5
The second CLR instruction sets to zero the value of the fault code in the
major_fault_record tag.
25
Chapter 1
Major Faults
Clear the Fault
Enter this rung in the fault routine for the program.
The SSV instruction:
• begins during prescan with the bits of all OTE instructions off and this
instruction is true. Once the controller begins to execute the logic, this
instruction is always false.
• writes new values to the MAJORFAULTRECORD attribute of this
program.
• writes the values contained in the major_fault_record tag. Because the
Type and Code member are set to zero, the fault clears and the
controller resumes execution.
Test a Fault Routine
You can use a JSR instruction to test the fault routine of a program without
creating an error (simulate a fault).
1. Create a BOOL tag that you will use to initiate the fault.
2. In the main routine or a subroutine of the program, enter this rung.
EXAMPLE
Test a fault routine.
When test_fault_routine is on, a major fault occurs and the controller executes Fault_Routine.
26
Where
Is the
test_fault_routine
Tag that you will use to initiate the fault
Fault_Routine
Fault routine of the program
Publication 1756-PM014D-EN-P - June 2010
Major Faults
Create a User-Defined
Major Fault
Chapter 1
If you want to suspend (shut down) the controller based on conditions in your
application, create a user-defined major fault. With a user-defined major fault:
• the fault type = 4.
• you define a value for the fault code. Choose a value between 990…999.
These codes are reserved for user-defined faults.
• the controller handles the fault the same as other major faults:
– The controller changes to the Program mode and stops executing the
logic.
– Outputs are set to their configured state or value for faulted mode.
EXAMPLE
When Tag_1.0 = 1, produce a major fault and generate a fault
code of 999.
Complete these procedures to create a user-defined major fault:
• Create a Fault Routine for the Program, see page 27.
• Configure the Program to Use the Fault Routine, see page 28.
• Jump to the Fault Routine, page 28.
Create a Fault Routine for the Program
Does a fault routine already exist for the program?
If
Then
Yes
Go to Jump to the Fault Routine on page 28.
No
Refer to the following steps.
1. In the Controller Organizer, right-click the program and choose
New Routine.
2. In the name box, type a name for the fault routine.
3. From the Type menu, choose Ladder.
4. Click OK.
Publication 1756-PM014D-EN-P - June 2010
27
Chapter 1
Major Faults
Configure the Program to Use the Fault Routine
1. In the Controller Organizer, right-click the program and choose
New Routine.
2. Click the Configuration tab.
3. From the Fault menu, choose the fault routine.
4. Click OK.
Jump to the Fault Routine
In the main routine of the program, enter this rung.
Conditions when the
controller should shut
down
EXAMPLE
Where
Is the
Fault_Routine
Name of the fault routine for the program
999
Value for the fault code
Create a User-Defined Major Fault.
When Tag_1.0 = 1, execution jumps to name_of_fault_routine. A major fault occurs and the controller enters the faulted
mode. Outputs go to the faulted state. The Controller Properties dialog box, Major Faults tab, displays the code 999.
28
Publication 1756-PM014D-EN-P - June 2010
Major Faults
Major Fault Codes
Chapter 1
The type and code correspond to the type and code displayed in these
locations:
• Controller Properties dialog box, Major Faults tab
• PROGRAM object, MAJORFAULTRECORD attribute
Major Fault Codes
Type
Code
Cause
Recovery Method
1
1
The controller powered on in Run mode.
Execute the power-loss handler.
1
16
I/O communication configuration fault detected. Reconfigure the number of communication modules on the 1768
(CompactLogix 1768-L4x controllers only.)
bus side of the controller:
• 1768-L43 has a maximum of two modules
• 1768-L45 has a maximum of four modules
– Up to four Sercos modules
– Up to two NetLinx communication modules
1
60
For a controller with no memory card installed,
the controller:
• detected a non-recoverable fault.
• cleared the project from memory.
1. Clear the fault.
2. Download the project.
3. Change to Remote Run/Run mode.
Follow these steps if the fault persists.
1. Before you cycle power to the controller, record the state of the
OK and RS232 status indicators.
2. Contact Rockwell Automation support.
See the back of this publication for contact information.
1
61
For a controller with a memory card installed,
the controller:
• detected a non-recoverable fault.
• wrote diagnostic information to the memory
card.
• cleared the project from memory.
1
62
For a controller with a Secure Digital (SD) card
installed, the controller:
1. Clear the fault.
2. Download the project.
3. Change to Remote Run/Run mode.
If the fault persists, contact Rockwell Automation support. See the
back of this publication for contact information.
1. Clear the fault.
2. Download the project.
• detected a nonrecoverable fault.
• wrote diagnostic information to the memory
card.
When in this state, the controller will not open
any connections or allow a transition to Run
mode.
Publication 1756-PM014D-EN-P - June 2010
3. Change to Remote Run/Run mode.
If the fault persists, contact Rockwell Automation Technical
Support. See the back of this publication for contact information.
29
Chapter 1
Major Faults
Major Fault Codes
Type
Code
Cause
Recovery Method
3
16
A required I/O module connection failed.
Check:
• the I/O module is in the chassis.
• the electronic keying requirements.
• the controller properties Major Fault tab and the Module
Properties Connection tab for more information about the fault.
3
20
21
Possible fault with the chassis.
Not recoverable - replace the chassis.
3
23
At least one required connection was not
established before going to Run mode.
Wait for the controller I/O light to turn green before changing to
Run mode.
4
16
Unknown instruction encountered.
Remove the unknown instruction. This probably happened due to a
program conversion process.
4
20
Array subscript too big, control structure .POS
or .LEN is invalid.
Adjust the value to be within the valid range. Don’t exceed the
array size or go beyond dimensions defined.
4
21
Control structure .LEN or .POS < 0.
Adjust the value so it is > 0.
4
31
The parameters of the JSR instruction do not
match those of the associated SBR or RET
instruction.
Pass the appropriate number of parameters. If too many
parameters are passed, the extra ones are ignored without any
error.
4
34
A timer instruction has a negative preset or
accumulated value.
Fix the program to not load a negative value into timer preset or
accumulated value.
4
42
JMP to a label that did not exist or was deleted. Correct the JMP target or add the missing label.
4
82
A sequential function chart (SFC) called a
subroutine and the subroutine tried to jump
back to the calling SFC. Occurs when the SFC
uses either a JSR or FOR instruction to call the
subroutine.
Remove the jump back to the calling SFC.
4
83
The data tested was not inside the
required limits.
Modify value to be within limits.
4
84
Stack overflow.
Reduce the subroutine nesting levels or the number of parameters
passed.
4
89
In a SFR instruction, the target routine does not
contain the target step.
Correct the SFR target or add the missing step.
4
90
Using a safety instruction outside a safety task. Place the safety instruction inside the safety task.
4
91
Equipment Phase instruction is being called
from outside an Equipment Phase program.
30
Only use the instruction in an Equipment Phase program.
Publication 1756-PM014D-EN-P - June 2010
Major Faults
Chapter 1
Major Fault Codes
Type
Code
Cause
4
990
4
991
User-defined major fault. See Create a
User-Defined Major Fault on page 27 for more
information.
4
992
4
993
4
994
4
995
4
996
4
997
4
998
4
999
6
1
Task watchdog expired.
User task has not completed in the specified
period of time. A program error caused an
infinite loop, or the program is too complex to
execute as quickly as specified, or a higher
priority task is keeping this task from finishing.
7
40
Store to nonvolatile memory failed.
Recovery Method
Increase the task watchdog, shorten the execution time, make the
priority of this task ‘higher’, simplify higher priority tasks, or move
some code to another controller.
1. Try again to store the project to nonvolatile memory.
2. If the project fails to store to nonvolatile memory, replace the
memory card.
If you are using a 1756-L7x controller, verify that the SD card is
unlocked.
7
41
Load from nonvolatile memory failed due to
controller type mismatch.
Change to a controller of the correct type or download the project
and store it on the memory card.
7
42
Load from nonvolatile memory failed because
the firmware revision of the project in
nonvolatile memory does not match the
firmware revision of the controller.
Update the controller firmware to the same revision level as the
project that is in nonvolatile memory.
7
43
Load from nonvolatile memory failed due to bad Contact Rockwell Automation support. See the back of this
publication.
checksum.
7
44
Failed to restore processor memory.
Contact Rockwell Automation support. See the back of this
publication.
8
1
Attempted to place controller in Run mode with
keyswitch during download.
Wait for the download to complete and clear fault.
11
1
Actual position has exceeded positive
overtravel limit.
Move axis in negative direction until position is within overtravel
limit and then execute Motion Axis Fault Reset.
11
2
Actual position has exceeded negative
overtravel limit.
Move axis in positive direction until position is within overtravel
limit and then execute Motion Axis Fault Reset.
11
3
Actual position has exceeded position error
tolerance.
Move the position within tolerance and then execute Motion Axis
Fault Reset.
11
4
Encoder channel A, B, or Z connection is broken. Reconnect the encoder channel then execute Motion Axis Fault
Reset.
Publication 1756-PM014D-EN-P - June 2010
31
Chapter 1
Major Faults
Major Fault Codes
Type
Code
Cause
Recovery Method
11
5
Encoder noise event detected or the encoder
signals are not in quadrature.
Fix encoder cabling then execute Motion Axis Fault Reset.
11
6
Drive Fault input was activated.
Clear Drive Fault then execute Motion Axis Fault Reset.
11
7
Synchronous connection incurred a failure.
First execute Motion Axis Fault Reset. If that doesn’t work, pull
servo module out and plug back in. If this does not work, replace
servo module.
11
8
Servo module has detected a serious
hardware fault.
Replace the module.
11
9
Configuration fault has occurred.
See the AttributeErrorCode or AttributeErrorID axis tags to identify
which attribute was rejected and why.
The motion module or drive has rejected the
update of one of the axis attributes.
11
10
Motor fault has occurred.
See the DriveFaults axis tag for more information.
11
11
Motor thermal fault has occurred.
See the DriveFaults axis tag for more information.
11
12
Drive thermal fault has occurred.
See the DriveFaults axis tag for more information.
11
13
SERCOS ring fault has occurred.
Verify the integrity of the SERCOS fiber-optic ring network and the
devices on it.
11
14
Drive enable input fault has occurred.
Re-enable the drive enable input and clear the fault.
11
15
Drive phase loss fault has occurred.
Restore full power connection to the drive and clear the fault.
11
16
Drive guard fault has occurred.
See the GuardFaults axis tag for more information.
11
32
The motion task has experienced an overlap.
The group’s course update rate is too high to maintain correct
operation. Clear the group fault tag, raise the group’s update rate,
and then clear the major fault.
12
32
A disqualified secondary controller cycled
power and no partner chassis or controller was
found upon powerup.
Verify that:
12
33
• a partner chassis is connected.
• power is applied to both redundant chassis.
• partnered controllers have the same:
– catalog number.
– slot number.
– firmware revision.
An unpartnered controller has been identified in Either:
in the new primary chassis after a switchover.
• remove the unpartnered controller and troubleshoot the cause
of the switchover.
• add a partner controller to the secondary chassis,
troubleshoot the cause of the switchover, and synchronize the
system.
12
34
Just after a switchover occurs, the keyswitch
positions of the primary and secondary
controllers are mismatched.
The old primary controller is in Program mode
and the new primary controller is in Run mode.
32
Either:
• change the keyswitches from Run to Program to Run mode
twice to clear the fault.
• use RSLogix 5000 software to go online with the controllers.
Then, clear the faults and change the both the controllers’
modes to Run.
Publication 1756-PM014D-EN-P - June 2010
Major Faults
Chapter 1
Major Fault Codes
Type
Code
Cause
Recovery Method
14
1
Safety Task watchdog expired.
Clear the fault.
User task has not completed in a specified
period of time. A program error caused an
infinite loop, the program is too complex to
execute as quickly as specified, a higher priority
task is keeping this task from finishing, or the
safety partner has been removed.
If a safety task signature exists, safety memory is re-initialized and
the safety task begins executing.
If a safety task signature does not exist, you must re-download the
program to allow the safety task to run.
Reinsert the safety partner, if it was removed.
14
2
An error exists in a routine of the safety task.
Correct the error in the user-program logic.
14
3
Safety partner is missing.
Install a compatible safety partner.
14
4
Safety partner is unavailable.
Install a compatible safety partner.
14
5
Safety partner hardware is incompatible.
Install a compatible safety partner.
14
6
Safety partner firmware is incompatible.
Update the safety partner so that the firmware major and minor
revision matches the primary controller.
14
7
Safety task is inoperable.
Clear the fault.
This fault occurs when the safety logic is
invalid, for example a mismatch in logix exists
between the primary controller and safety
partner, a watchdog timeout occurred, or
memory is corrupt.
If a safety task signature exists, safety memory is re-initialized via
the safety task signature and the safety task begins executing.
If a safety task signature does not exist, you must download the
program again to allow the safety task to run.
14
8
Coordinated system time (CST) not found.
Clear the fault. Configure a device to be the CST master.
14
9
Safety partner nonrecoverable controller fault.
Clear the fault and download the program. If the fault persists,
replace the safety partner.
18
1
The CIP Motion drive has not initialized
correctly.
To determine corrective action, see the CIP Initialization attribute
for details about the type of fault that occurred.
For more information about the CIP Initialization attribute, see the
CIP Motion Configuration and Startup User Manual, publication
MOTION-UM003.
18
18
2
3
The CIP Motion drive has not initialized
correctly.
To determine the corrective action, see the CIP Initialization Fault Mfg attributes for details about the fault that occurred.
This fault is indicated when a
manufacturer-specific initialization fault has
occurred.
For more information about the CIP Initialization Fault - Mfg
attribute, see the CIP Motion Configuration and Startup User
Manual, publication MOTION-UM003.
The Physical Axis Fault bit is set, indicating a
fault on the physical axis.
To determine corrective action, see the CIP Axis Fault attributes for
details about the fault that occurred.
For more information about the CIP Axis Fault attributes, see the
CIP Motion Configuration and Startup User Manual, publication
MOTION-UM003.
Publication 1756-PM014D-EN-P - June 2010
33
Chapter 1
Major Faults
Major Fault Codes
Type
Code
Cause
Recovery Method
18
4
The Physical Axis Fault bit is set, indicating a
fault on the physical axis.
To determine corrective action, see the CIP Axis Fault - Mfg
attributes for details about the fault that occurred.
This fault is indicated when a
manufacturer-specific axis fault has occurred.
For more information about the CIP Axis Fault -Mfg attributes, see
the CIP Motion Configuration and Startup User Manual, publication
MOTION-UM003.
A motion fault occurred.
To determine corrective action, see the Motion Fault attribute and
Motion Fault bits for details about the fault that occurred.
18
5
For more information about the Motion Fault attribute and Motion
Fault bits, see the CIP Motion Configuration and Startup User
Manual, publication MOTION-UM003.
18
18
18
6
7
8
A CIP Motion Drive fault has occurred.
Reconfigure the faulted motion module to correct the fault.
Usually the fault affects all the axis associated
with the module and all of the associated axes
are shutdown.
For more information about the Module Fault attribute and Module
Fault bits, see the CIP Motion Configuration and Startup User
Manual, publication MOTION-UM003.
A motion group fault has occurred.
Reconfigure the entire motion subsystem to correct the fault.
Usually the fault affects all of the axes
associated with a motion group.
See the Group Fault attribute if details about the fault are needed.
A fault has occurred during the configuration of
a CIP Motion Drive.
To determine the corrective action, see the Configuration Fault in
the Attribute Error Code and Attribute Error ID attributes associated
with the motion or 1756-ENxT module.
Typically, this fault occurs after an attempt to
update an axis configuration attribute of a CIP
Motion Drive was unsuccessful.
18
9
An Absolute Position Recovery (APR) fault has
occurred and the absolute position of the axis
cannot be recovered.
To determine the corrective action, see the APR Fault attributes to
determine the cause of the fault.
For more information about the APR Fault attributes, see the CIP
Motion Configuration and Startup User Manual, publication
MOTION-UM003.
18
18
34
10
128
An Absolute Position Recovery (APR) fault has
occurred and the absolute position of the axis
cannot be recovered.
To determine the corrective action, see the APR Fault - Mfg
attributes to determine the cause of the fault.
This fault is indicated when a
manufacturer-specific APR fault has occurred.
For more information about the APR Fault - Mfg attributes, see the
CIP Motion Configuration and Startup User Manual, publication
MOTION-UM003.
A fault specific to the Guard Motion safety
function has occurred.
To determine the corrective action, see the Guard Motion attributes
and Guard Status bits to determine the cause of the fault.
This fault is applicable only when a drive with
Guard Safety functionality is used.
For more information about the Guard Motion attributes and Guard
Status bits, see the CIP Motion Configuration and Startup User
Manual, publication MOTION-UM003.
Publication 1756-PM014D-EN-P - June 2010
Chapter
2
Minor Faults
Topic
Page
Identifying Minor Faults
35
Minor Fault Codes
38
The table explains how to use relay ladder logic to monitor
information about common minor faults.
Identifying Minor Faults
Methods of Monitoring for Minor Faults
To check for a
Task overlap
Do this
1. Enter a GSV instruction that gets the FAULTLOG object, MinorFaultBits attribute.
2. Monitor bit 6.
Load from nonvolatile
memory
Serial port fault
1. Enter a GSV instruction that gets the FAULTLOG object, MinorFaultBits attribute.
2. Monitor bit 7.
1. Enter a GSV instruction that gets the FAULTLOG object, MinorFaultBits attribute.
2. Monitor bit 9.
Low battery / energy storage
status
1. Enter a GSV instruction that gets the FAULTLOG object, MinorFaultBits attribute.
Instruction-related fault
1. Create a user-defined data type that stores the fault information. Name the data type FaultRecord and
assign these members.
2. Monitor bit 10.
Name
Data Type
Style
TimeLow
DINT
Decimal
TimeHigh
DINT
Decimal
Type
INT
Decimal
Code
INT
Decimal
Info
DINT[8]
Hex
2. Create a tag that will store the values of the MinorFaultRecord attribute.
3. From the Data Type pull-down menu in step 1 of this instruction, choose the data type.
4. Monitor S:MINOR.
5. Use a GSV instruction to get the values of the MinorFaultRecord attribute if S:MINOR is on.
6. Reset S:MINOR if you want to detect a minor fault that is cause by another instruction.
S:MINOR remains set until the end of the scan.
35Publication 1756-PM014D-EN-P - June 2010
35
Chapter 2
Minor Faults
This example checks for a low battery warning.
EXAMPLE
Check for a minor fault.
Minor_fault_check times for 1 minute (60000 ms) and then automatically restarts itself.
Every minute, minor_fault_check.DN turns on for one scan. When this occurs, the GSV instruction gets the value of the
FAULTLOG object, MinorFaultBits attribute, and stores it in the minor_fault_bits tag. Because the GSV instruction only
executes once every minute, the scan time of most scans is reduced.
If minor_fault_bits.10 is on, then the battery is low or ESM minor fault.
36
Publication 1756-PM014D-EN-P - June 2010
Minor Faults
Chapter 2
This example checks for a minor fault that is caused by a specific
instruction.
EXAMPLE
Check for a minor fault that is caused by an instruction.
Multiply value_a by 1000000 and check for a minor fault, such as a math overflow.
•
•
•
•
To make sure that a previous instruction did not produce the fault, the rung first clears S:MINOR.
The rung then executes the multiply instruction.
If the instruction produces a minor fault, the controller sets S:MINOR.
If S:MINOR is set, the GSV instruction gets information about the fault and resets S:MINOR.
42373
Publication 1756-PM014D-EN-P - June 2010
37
Chapter 2
Minor Faults
Minor Fault Codes
Minor faults are indicated in these locations:
• Controller Properties dialog box, Minor Faults tab
• PROGRAM object, MINORFAULTRECORD attribute
This tables identifies the type, code, and suggested recovery method
when applicable.
Minor Faults
Type
Code
1
15
Cause
• A 1769 power supply is connected directly to the
controller’s 1768 CompactBus, with an invalid
configuration.
• The 1768 power supply powering the controller has
failed.
Recovery Method
• Remove the power supply from the 1768
CompactBus and cycle power to the system.
• Replace the power supply.
4
4
An arithmetic overflow occurred in an instruction.
Fix program by examining arithmetic operations (order)
or adjusting values.
4
5
In a GSV/SSV instruction, the specified instance was
not found.
Check the instance name.
4
6
In a GSV/SSV instruction, either:
Check the Class name and Attribute name.
• specified Class name is not supported.
• specified Attribute name is not valid.
4
7
The GSV/SSV destination tag was too small to hold all
of the data.
Fix the destination so it has enough space.
4
30
Bad parameters passed through to the ASCIII port.
Verify the ASCII configuration settings.
4
35
PID delta time ≤ 0.
Adjust the PID delta time so that it is > 0.
4
36
PID setpoint out of range.
Adjust the setpoint so that it is within range.
4
51
The LEN value of the string tag is greater than the DATA
size of the string tag.
1. Check that no instruction is writing to the LEN
member of the string tag.
2. In the LEN value, enter the number of characters
that the string contains.
4
52
The output string is larger than the destination.
Create a new string data type that is large enough for
the output string. Use the new string data type as the
data type for the destination.
4
53
The output number is beyond the limits of the
destination data type.
Either:
• reduce the size of the ASCII value.
• use a larger data type for the destination.
4
56
The Start or Quantity value is invalid.
1. Check that the Start value is between 1 and the
DATA size of the Source.
2. Check that the Start value plus the Quantity value is
less than or equal to the DATA size of the Source.
4
57
The AHL instruction failed to execute because the serial Either:
port is set to no handshaking.
• change the Control Line setting of the serial port.
• delete the AHL instruction.
38
Publication 1756-PM014D-EN-P - June 2010
Minor Faults
Chapter 2
Minor Faults
Type
Code
Cause
Recovery Method
6
2
Periodic task overlap.
Make changes such as simplifying programs,
lengthening the period, or raising the relative priority.
Periodic task has not completed before it is time to
execute again.
6
3
Event task overlap.
Event task has not completed before it is time to
execute again.
6
4
Virtual adapter task overlap. (CompactLogix 1769-L2x
and 1769-L3x controllers only.)
Make changes such as simplifying programs,
lengthening the period, raising the relative priority, or
slowing the triggering event.
Increase the RPI for the CompactBus.
Virtual adapter has not completed running at the rate
specified by the RPI when it executed again.
7
49
Project loaded from nonvolatile memory.
9
0
Unknown error while servicing the serial port.
9
1
The CTS line is not correct for the current configuration. Disconnect and reconnect the serial port cable to
the controller.
Contact Rockwell Automation Technical Support. See
the back of this publication.
Make sure the cable is wired correctly.
9
2
Poll list error.
A fault was detected with the DF1 master’s poll list,
such as specifying more stations than the size of the
file, specifying more then 255 stations, trying to index
past the end of the list, or polling the broadcast address
(STN #255).
Check for these errors in the poll list:
• Total number of stations is greater than the space in
the poll list tag.
• Total number of stations is greater than 255.
• Current station pointer is greater than the end of the
poll list tag.
• A station number greater than 254 was encountered.
9
3
The RS232 DFI Master Active Station tag is unspecified. Specify a tag to be used for the Active Station Tag in the
System Protocol tab of the Controller Properties.
9
5
DF1 slave poll timeout.
Determine and correct delay for polling.
The poll watchdog has timed out for slave. The master
has not polled this controller in the specified amount of
time.
9
9
Modem contact was lost.
Correct modem connection to the controller.
DCD and/or DSR control lines are not being received in
proper sequence and/or state.
9
10
Data has been dropped or lost from the serial port.
Slow down the rate at which the initiator is
sending data.
10
10
Battery not detected or needs to be replaced.
Install new battery.
10
11
Safety partner battery not detected or needs to be
replaced.
Install new battery.
Publication 1756-PM014D-EN-P - June 2010
39
Chapter 2
Minor Faults
Minor Faults
Type
Code
Cause
Recovery Method
10
12
The ESM of a 1756-L7x controller is not installed.
Install an ESM in the controller.
If the controller is powered-down, the WallClockTime
attribute and program are not maintained.
10
13
The ESM installed on the 1756-L7x controller is not
compatible with the controller.
Replace the installed ESM with one that is compatible
with the controller.
10
14
The ESM needs to be replaced due to a hardware fault.
Replace the ESM.
It is not capable of maintaining the WallClockTime
attribute or controller program at powerdown.
10
15
The ESM cannot store enough energy in the ESM to
maintain the WallClockTime attribute or the controller
program at powerdown.
Replace the ESM.
17
1…n
An internal controller diagnostic has failed.
Contact Rockwell Automation Technical Support with
the fault type and fault code logged. See the back of
this publication.
40
Publication 1756-PM014D-EN-P - June 2010
Chapter
3
I/O Fault Codes
Indications of I/O Faults
Topic
Page
Indications of I/O Faults
41
I/O Fault Codes
43
I/O faults are indicated by these means:
• The I/O indicator of the controller (shown in examples below)
flashes green or red.
1756-L6x
RUN
FORCE
BAT
1756-L2x
RUN
FORCE
BATT
I/O
RS232
I/O
OK
DCH 0
OK
• I/O fault messages are indicated on the controller status display.
1756-L7x
Logix557x
Status Display
RUN FORCE SD
41Publication 1756-PM014D-EN-P - June 2010
OK
41
Chapter 3
I/O Fault Codes
• The I/O status indicator and message in the controller status
area of RSLogix 5000 software.
I/O indicator flashes green or red
and the corresponding status
message indicates an error.
• A yellow warning symbol appears on the module in the
I/O Configuration tree of RSLogix 5000 software.
Faulted I/O
Module
• A module fault code and description is indicated in the
Connection tab of the Module Properties dialog box.
42
Publication 1756-PM014D-EN-P - June 2010
I/O Fault Codes
I/O Fault Codes
Chapter 3
Depending on where the fault code is indicated, the code format
contains either the full Hexidecimal number (for example, 16#000A)
or the last characters of the code (for example, #000A).
This table lists commonly-experienced I/O fault codes and a
corresponding description and recovery method when applicable.
Each code is listed by the last characters of the full Hexidecimal
number (that is, #XXXX).
I/O Fault Codes and Interpretations
Code
Interpretation
#0001
A connection to a module failed.
#0002
Either:
• there are not enough connections available either for the controller or for the communication module being used to connect
through.
Check the connection use of the controller or communication module. If all of the connections are used, try to free some of
the used connections or add another module to route the errant connection through.
• the I/O memory limits of the controller are exceeded.
Check the I/O memory available and make program or tag changes if needed.
• the I/O module targeted does not have enough connections available.
Check the number of controllers making a connection to this I/O module and verify that the number of connections is within
the limits of the I/O module.
#0005
The controller is attempting to make a connection to the module and has received an error.
Either:
• the configured address for the connection to the module is incorrect.
• the module in use (that is, the physical module) is different than the module specified in the I/O configuration tree and is
therefore causing the connection or service to fail.
The fault may occur even when the module passed the electronic keying test. This may result when Disable Keying or
Compatible Keying options were used in the module configuration instead of the Exact Match option.
Despite passing the electronic keying test, the module being connected to does not have the same features or settings as
the module specified in the I/O configuration tree and does not support the connection or service being attempted.
Check the module in use and verify that it exactly matches the module specified in the I/O configuration tree of RSLogix 5000
software.
For more information about electronic keying, see the user manual for the module you are using.
If you are using a 1756-DHRIO module, verify that the Channel type selected in the software (DH+ or remote I/O network)
matches the module’s rotary switch settings.
Publication 1756-PM014D-EN-P - June 2010
43
Chapter 3
I/O Fault Codes
I/O Fault Codes and Interpretations
Code
Interpretation
#0006
Either:
• the response buffer is too small to handle the response data.
• the module in use (that is, the physical module) is different than the module specified in the I/O configuration tree and is
therefore causing the connection or service to fail.
The fault may occur even when the module passed the electronic keying test. This may result when Disable Keying or
Compatible Keying options were used in the module configuration instead of the Exact Match option.
Despite passing the electronic keying test, the module being connected to does not have the same features or settings as
the module specified in the I/O configuration tree and does not support the connection or service being attempted.
Check the module in use and verify that it exactly matches the module specified in the I/O configuration tree of RSLogix 5000
software.
For more information about electronic keying, see the user manual for the module you are using.
#0007
A service request is unconnected, but should be connected.
#0008
The controller has requested a service which is not implemented on the target module.
#0009
The configuration for the module is invalid. The module configuration may have been changed in the Data Monitor or
programmatically.
Access the Connections tab of the Module Properties dialog box for the additional fault code. The additional fault code indicates
the configuration parameter that is causing the fault. You may have to correct multiple parameters before this fault is cleared
and connection is properly established.
Verify that the configuration is valid by using the module configuration software to validate your configuration. Consult the
module documentation for a list of fault codes to determine the configuration parameter that is in error.
#000A
Either:
• a connection is being created where the connection type is invalid.
• an object attribute or tag value is invalid.
If an object attribute or tag is invalid, export the RSLogix 5000 file, then re-import it. Reschedule the ControlNet network after
re-importing if applicable.
#000C
The controller is attempting to request a service from the module and has received an error. First, verify that the module is not
faulted.
For an I/O module, this may indicate that the module has one of these conditions:
• Limited communication, but has a Major Fault
• A firmware update needs to be completed or is currently being completed.
Refer to the Module Info tab to determine the exact cause.
#000D
An I/O map instance is created where the instance is already in use.
#000E
A MSG instruction is configured to change an attribute that cannot be changed.
#000F
A MSG instruction has been configured to delete a map object that cannot be deleted.
#0010
The state of the device prevents a service request from being handled.
#0011
The reply to a message has a data size that is too large for the destination.
Change the destination to a tag that can handle the data size and type being returned.
44
Publication 1756-PM014D-EN-P - June 2010
I/O Fault Codes
Chapter 3
I/O Fault Codes and Interpretations
Code
Interpretation
#0013
The configuration for the module is invalid - not enough configuration data was sent.
Verify that the correct module is being targeted.
#0014
A MSG instruction is configured to change an attribute that does not exist.
#0015
The configuration for the module is invalid - too much configuration data was sent.
Verify that the correct module is being targeted.
#0100
The connection being accessed is already in use.
Either:
• the controller is attempting to make a specific connection to a module and the module cannot support more than one of
these connections.
• the target of a connection recognizes that the owner is attempting to remake a connection that is already running.
#0103
Either:
• the controller is requesting services not supported by the module.
• the module in use (that is, the physical module) is different than the module specified in the I/O configuration tree and is
therefore causing the connection or service to fail.
The fault may occur even when the module passed the electronic keying test. This may result when Disable Keying or
Compatible Keying options were used in the module configuration instead of the Exact Match option.
Despite passing the electronic keying test, the module being connected to does not have the same features or settings as
the module specified in the I/O configuration tree and does not support the connection or service being attempted.
Check the module in use and verify that it exactly matches the module specified in the I/O configuration tree of RSLogix 5000
software.
For more information about electronic keying, see the user manual for the module you are using.
#0106
An ownership conflict occurred for the connection.
One of these conditions exists:
• The Connection Request to this module has been rejected due to an Ownership conflict with another Owner (for example,
another Controller). This may occur with modules, such as output modules, that allow only a single Owner to configure and
control its outputs.
This fault may also occur if the module is configured as Listen Only and supports only one connection.
• If the Owner is connected to the module with a Unicast connection over EtherNet/IP network, other connections to the
module may fail because the Owner controls the one connection.
If the Owner is connected to the module with a Multicast connection over EtherNet/IP network, Unicast connections to the
module may fail because the Owner controls the one connection.
Configure both the Owner and the Listen Only connection as Multicast.
#0107
A connection being accessed was not found.
Publication 1756-PM014D-EN-P - June 2010
45
Chapter 3
I/O Fault Codes
I/O Fault Codes and Interpretations
Code
Interpretation
#0108
An invalid connection type was used.
One of these conditions exists:
• The controller is requesting a connection type not supported by the module.
• The module in use (that is, the physical module) is different than the module specified in the I/O configuration tree and is
therefore causing the connection or service to fail.
• The fault may occur even when the module passed the electronic keying test. This may result when Disable Keying or
Compatible Keying options were used in the module configuration instead of the Exact Match option.
Despite passing the electronic keying test, the module being connected to does not have the same features or settings as
the module specified in the I/O configuration tree and does not support the connection or service being attempted.
Check the module in use and verify that it exactly matches the module specified in the I/O configuration tree of RSLogix 5000
software.
For more information about electronic keying, see the user manual for the module you are using.
• You have configured a consumed tag or module to use a Unicast connection over EtherNet/IP network, but the producer does
not support Unicast connections.
#0109
The connection size is inconsistent with that expected.
Either:
• the controller is attempting to set up a connection with the module and cannot - the size of the connection is invalid.
• the controller may be attempting to connect to a tag in a producing controller whose size does not match the tag in this
controller.
• the module in use (that is, the physical module) is different than the module specified in the I/O configuration tree and is
therefore causing the connection or service to fail.
• the fault may occur even when the module passed the electronic keying test. This may result when Disable Keying or
Compatible Keying options were used in the module configuration instead of the Exact Match option.
Despite passing the electronic keying test, the module being connected to does not have the same features or settings as
the module specified in the I/O configuration tree and does not support the connection or service being attempted.
Check the module in use and verify that it exactly matches the module specified in the I/O configuration tree of RSLogix 5000
software.
For more information about electronic keying, see the user manual for the module you are using.
If the module is a 1756 ControlNet module, verify that the chassis size is correct.
For remote I/O adapters, verify that the rack size and/or rack density is correct.
#0110
46
The controller is attempting to set up a Listen Only connection with the module and cannot - the module has not been configured
and connected to by an Owner (for example, another controller). This controller is not an Owner of this module because it is
attempting to establish a Listen Only connection, which requires no module configuration. It cannot connect until an Owner
configures and connects to the module first.
Publication 1756-PM014D-EN-P - June 2010
I/O Fault Codes
Chapter 3
I/O Fault Codes and Interpretations
Code
Interpretation
#0111
Either:
• the Requested Packet Interval (RPI) specified is invalid for this module or for a module in the path to this module.
• the module in use (that is, the physical module) is different than the module specified in the I/O configuration tree and is
therefore causing the connection or service to fail.
The fault may occur even when the module passed the electronic keying test. This may result when Disable Keying or
Compatible Keying options were used in the module configuration instead of the Exact Match option.
Despite passing the electronic keying test, the module being connected to does not have the same features or settings as
the module specified in the I/O configuration tree and does not support the connection or service being attempted.
Check the module in use and verify that it exactly matches the module specified in the I/O configuration tree of RSLogix 5000
software.
For more information about electronic keying, see the user manual for the module you are using.
• for Listen Only connections: the RPI set by the owner of this module is slower than the one requested. Either increase the
requested RPI or decrease the RPI the owner controller is using.
See the Connection tab for valid RPI values.
#0114
The Product Code of the actual module hardware does not match the Product Code of the module created in the software.
Electronic Keying failed for this module. You may have a mismatch between the module created in the software and the actual
module hardware.
#0115
The Product Type of the actual module hardware does not match the Product Type of the module created in the software.
Electronic Keying failed for this module. You may have a mismatch between the module created in the software and the actual
module hardware.
#0116
The Major and/or Minor revisions of the module do not match the Major and/or Minor revisions of the module created in the
software.
Verify that you have specified the correct Major and Minor Revision if you have chosen Compatible Module or Exact Match
keying
Electronic Keying failed for this module. You may have a mismatch between the module created in the software and the actual
module hardware.
Publication 1756-PM014D-EN-P - June 2010
47
Chapter 3
I/O Fault Codes
I/O Fault Codes and Interpretations
Code
Interpretation
#0117
The connection is to an invalid port or port that is already in use.
One of these conditions exists:
• Another controller owns this module and has connected with a Communications Format different than the one chosen by this
controller. Verify that the Communications Format chosen is identical to that chosen by the first owner controller of the
module.
• The module in use (that is, the physical module) is different than the module specified in the I/O configuration tree and is
therefore causing the connection or service to fail.
The fault may occur even when the module passed the electronic keying test. This may result when Disable Keying or
Compatible Keying options were used in the module configuration instead of the Exact Match option.
Despite passing the electronic keying test, the module being connected to does not have the same features or settings as
the module specified in the I/O configuration tree and does not support the connection or service being attempted.
Check the module in use and verify that it exactly matches the module specified in the I/O configuration tree of RSLogix 5000
software.
For more information about electronic keying, see the user manual for the module you are using.
• the controller may be attempting to connect to a nonexistent tag in a producing controller.
#0118
An invalid configuration format is used.
One of these conditions exists:
• The configuration class specified does not match the class supported by the module.
• The connection instance is not recognized by the module.
• The path specified for the connection is inconsistent.
• The module in use (that is, the physical module) is different than the module specified in the I/O configuration tree and is
therefore causing the connection or service to fail.
The fault may occur even when the module passed the electronic keying test. This may result when Disable Keying or
Compatible Keying options were used in the module configuration instead of the Exact Match option.
Despite passing the electronic keying test, the module being connected to does not have the same features or settings as
the module specified in the I/O configuration tree and does not support the connection or service being attempted.
Check the module in use and verify that it exactly matches the module specified in the I/O configuration tree of RSLogix 5000
software.
For more information about electronic keying, see the user manual for the module you are using.
#0119
The controlling connection is not open.
Where a Listen Only connection is requested, the controlling connection is not open.
#011A
The controller is attempting to set up a connection with the module and cannot - resources required are unavailable.
If the module is a 1756 ControlNet module, up to five controllers can make Rack Optimization connections to the module. Verify
that this number has not been exceeded.
If the module is a 1794-ACN15, 1794-ACNR15, or 1797-ACNR15 adapter, only one controller can make a Rack Optimization
connection to the module. Verify that this number has not been exceeded.
48
Publication 1756-PM014D-EN-P - June 2010
I/O Fault Codes
Chapter 3
I/O Fault Codes and Interpretations
Code
Interpretation
#0203
The owner or originator recognizes that the target device is on the network or backplane, however, I/O data and messages are
not being responded to. In other words, the target can be reached, but its response is not as expected. For example, this fault
may be indicated where multicast Ethernet packets are not returned.
When this fault occurs, the controller usually attempts to continuously remove and remake the connection.
Also, if you are using FLEX I/O modules, verify that you are using the correct terminal device.
#0204
The controller is attempting to make a connection, however, the target module is not responding.
The device also appears to be missing from the backplane or network.
To recover, take these actions:
• Verify that the module has not been removed and is still functioning and receiving power.
• Verify that the correct slot number has been specified.
• Verify that the module is properly connected to the network.
If you are using FLEX I/O modules, verify that the correct terminal block is in use.
#0205
Either:
• the controller is attempting to set up a connection with the module and has received an error - a parameter is in error.
• the module in use (that is, the physical module) is different than the module specified in the I/O configuration tree and is
therefore causing the connection or service to fail.
The fault may occur even when the module passed the electronic keying test. This may result when Disable Keying or
Compatible Keying options were used in the module configuration instead of the Exact Match option.
Despite passing the electronic keying test, the module being connected to does not have the same features or settings as
the module specified in the I/O configuration tree and does not support the connection or service being attempted.
Check the module in use and verify that it exactly matches the module specified in the I/O configuration tree of RSLogix 5000
software.
For more information about electronic keying, see the user manual for the module you are using.
#0206
Either:
• the controller is attempting to set up a connection with the module and has received an error - the request size is too large.
Verify that the path to this module is sufficiently close to the controller.
• the module in use (that is, the physical module) is different than the module specified in the I/O configuration tree and is
therefore causing the connection or service to fail.
The fault may occur even when the module passed the electronic keying test. This may result when Disable Keying or
Compatible Keying options were used in the module configuration instead of the Exact Match option.
Despite passing the electronic keying test, the module being connected to does not have the same features or settings as
the module specified in the I/O configuration tree and does not support the connection or service being attempted.
Check the module in use and verify that it exactly matches the module specified in the I/O configuration tree of RSLogix 5000
software.
For more information about electronic keying, see the user manual for the module you are using.
Publication 1756-PM014D-EN-P - June 2010
49
Chapter 3
I/O Fault Codes
I/O Fault Codes and Interpretations
Code
Interpretation
#0301
One of these conditions may exist:
• The controller is attempting to set up a connection with the module and has received an error - a module in the path is out of
memory.
• The controller may be attempting to connect to a tag in a producing controller that is not marked as being produced.
• The controller may be attempting to connect to a tag in a producing controller. That tag may not be configured to allow
enough consumers.
• Reduce the size or number of connections through this module.
• One of the network modules between the module and the controller may be out of memory. Check network configuration of
the system.
• The module may be out of memory. Check system configuration and capabilities of module.
• The module in use (that is, the physical module) is different than the module specified in the I/O configuration tree and is
therefore causing the connection or service to fail.
The fault may occur even when the module passed the electronic keying test. This may result when Disable Keying or
Compatible Keying options were used in the module configuration instead of the Exact Match option.
Despite passing the electronic keying test, the module being connected to does not have the same features or settings as
the module specified in the I/O configuration tree and does not support the connection or service being attempted.
Check the module in use and verify that it exactly matches the module specified in the I/O configuration tree of RSLogix 5000
software.
For more information about electronic keying, see the user manual for the module you are using.
#0302
The controller is attempting to set up a connection with the module and has received an error - a module in the path has
exceeded its communication bandwidth capacity.
Increase the Requested Packet Interval (RPI) and reconfigure your network with RSNetWorx software.
Distribute the load on another bridge module.
#0303
The controller is attempting to set up a connection with the module and has received an error - a module in the path has
exceeded its communication bandwidth capacity.
Distribute the load on another bridge module.
#0304
The ControlNet module is not scheduled to send data. Use RSNetWorx for ControlNet software to schedule or reschedule the
ControlNet network.
#0305
The ControlNet configuration in the controller does not match the configuration in the bridge module. This may occur because a
ControlNet module was changed after the network was scheduled, or because a new control program has been loaded into the
controller.
Use RSNetWorx for ControlNet software to reschedule the connections.
#0306
The ControlNet Configuration Master (CCM) cannot be found. The 1756-CNB module and PLC-5 ControlNet processor are the
only devices capable of being a CCM and the CCM must be node number 1.
Verify that a 1756-CNB modules or PLC-5 ControlNet processor is at node number 1 and is functioning properly.
This fault may temporarily occur when the system is powered up and will be cleared when the CCM is located.
#0311
The controller is attempting to set up a connection with the module and has received an error.
Verify that all modules in the I/O Configuration tree are the correct modules.
50
Publication 1756-PM014D-EN-P - June 2010
I/O Fault Codes
Chapter 3
I/O Fault Codes and Interpretations
Code
Interpretation
#0312
The controller is attempting to set up a connection with the module and has received an error - an invalid link address has been
specified. A link address can be a slot number, a network address, or the remote I/O chassis number and starting group.
Verify that the chosen slot number for this module is not greater than the size of the rack.
Verify that the ControlNet node number is not greater than the maximum node number configured for the network in RSNetWorx
for ControlNet software.
#0315
The segment type or route is invalid.
Either:
• the controller is attempting to set up a connection with the module and has received an error - the connection request is
invalid
• the module in use (that is, the physical module) is different than the module specified in the I/O configuration tree and is
therefore causing the connection or service to fail.
The fault may occur even when the module passed the electronic keying test. This may result when Disable Keying or
Compatible Keying options were used in the module configuration instead of the Exact Match option.
Despite passing the electronic keying test, the module being connected to does not have the same features or settings as
the module specified in the I/O configuration tree and does not support the connection or service being attempted.
Check the module in use and verify that it exactly matches the module specified in the I/O configuration tree of RSLogix 5000
software.
For more information about electronic keying, see the user manual for the module you are using.
#0317
The controller is attempting to set up a ControlNet connection with the module and has received an error.
Use RSNetWorx for ControlNet software to schedule or reschedule the connection to this module.
#0318
The controller is attempting to set up a connection with the module and has received an error - the link address is invalid.
Verify that the associated ControlNet module has the correct slot and/or node number selected.
#0319
The controller is attempting to set up a connection with the module and has received an error - the redundant module does not
have the necessary resources to support the connection.
Reduce the size or number of connections through this module or add another controller or ControlNet module to the system.
#0322
A connection point mismatch has occurred.
Either:
• a new connection requested does not match the existing connection. Check the controllers that are using the connection and
verify that all the configurations are identical.
• the connection requested is not a listener or a controlling connection type.
#031E
The controller is attempting to connect to a tag in a producing controller and has received an error.
The controller is attempting to connect to a tag in a producing controller and that tag has already been used by too many
consumers. Increase the maximum number of consumers on the tag.
#031F
No SC (servicing controller) connection object was found that corresponds to a symbol instance.
#0800
No interpretation available.
#0801
No interpretation available.
Publication 1756-PM014D-EN-P - June 2010
51
Chapter 3
I/O Fault Codes
I/O Fault Codes and Interpretations
Code
Interpretation
#0814
Invalid connection status information was found.
#FD01
I/O map object attributes were found to be invalid. A fault has occurred while clearing memory.
#FD02
No error code is supplied by an I/O module to describe an I/O fault.
#FD03
The controller is attempting to set up a connection with the module and has received an error - this module requires a particular
set of connections and connection types, and one of those connection types is missing.
#FD04
The module requires a CST master in the chassis.
Configure a module (typically a controller) in this chassis to be the CST master.
#FD05
The module requires an axis or group table assigned.
Assign a Group or Axis.
#FD06
The controller command to transition the SERCOS ring to a new phase returned an error from the module. Check for duplicate
Drive Nodes.
#FD07
An attempt to configure the SERCOS ring failed. The baud rate for all devices must be the same and supported by the drives and
the SERCOS module.
#FD08
Mainly two sets of faults may cause this fault, physical and interface faults.
Possible sources of physical faults include these conditions:
• Broken ring
• Loose connector
• Fiber optics not clean
• Electrical noise due to improper drive grounding
• Too many nodes on the ring
• Interface errors are encountered when you are configuring third party drives. Potential interface errors include the following:
• No SERCOS MST (Protocol Error).
• Missed AT (drive did not send data when expected).
• SERCOS timing error in phase 3.
• Error in drive data returned to SERCOS module.
#FD09
An attempt by the controller to configure the node for cyclic operation returned an error.
#FD0A
A bad response was received from a motion module.
#FD1F
An error occurred adding the safety network segment to a route.
#FD20
No safety task appears to be running.
#FE01
An invalid configuration format was encountered.
#FE02
The Requested Packet Interval (RPI) specified is invalid for this module.
See the Connection tab for valid RPI values.
#FE03
The input connection point has not been set.
#FE04
The controller is attempting to set up a connection with the module and has received an error.
52
Publication 1756-PM014D-EN-P - June 2010
I/O Fault Codes
Chapter 3
I/O Fault Codes and Interpretations
Code
Interpretation
#FE05
Either:
• the controller is attempting to set up a connection with the module and has received an error.
• the module in use (that is, the physical module) is different than the module specified in the I/O configuration tree and is
therefore causing the connection or service to fail.
The fault may occur even when the module passed the electronic keying test. This may result when Disable Keying or
Compatible Keying options were used in the module configuration instead of the Exact Match option.
Despite passing the electronic keying test, the module being connected to does not have the same features or settings as
the module specified in the I/O configuration tree and does not support the connection or service being attempted.
Check the module in use and verify that it exactly matches the module specified in the I/O configuration tree of RSLogix 5000
software.
For more information about electronic keying, see the user manual for the module you are using.
#FE06
The input force pointer has not been set.
#FE07
The output connection point has not been set.
#FE08
The controller is attempting to set up a connection with the module and has received an error.
#FE09
Either:
• the controller is attempting to set up a connection with the module and has received an error.
• the module in use (that is, the physical module) is different than the module specified in the I/O configuration tree and is
therefore causing the connection or service to fail.
The fault may occur even when the module passed the electronic keying test. This may result when Disable Keying or
Compatible Keying options were used in the module configuration instead of the Exact Match option.
Despite passing the electronic keying test, the module being connected to does not have the same features or settings as
the module specified in the I/O configuration tree and does not support the connection or service being attempted.
Check the module in use and verify that it exactly matches the module specified in the I/O configuration tree of RSLogix 5000
software.
For more information about electronic keying, see the user manual for the module you are using.
#FE0A
A connection has been opened without the output force pointer being set.
#FE0B
Either:
• the tag to be consumed on this module is invalid. Verify that the tag is marked as being produced.
• the module in use (that is, the physical module) is different than the module specified in the I/O configuration tree and is
therefore causing the connection or service to fail.
The fault may occur even when the module passed the electronic keying test. This may result when Disable Keying or
Compatible Keying options were used in the module configuration instead of the Exact Match option.
Despite passing the electronic keying test, the module being connected to does not have the same features or settings as
the module specified in the I/O configuration tree and does not support the connection or service being attempted.
Check the module in use and verify that it exactly matches the module specified in the I/O configuration tree of RSLogix 5000
software.
For more information about electronic keying, see the user manual for the module you are using.
Publication 1756-PM014D-EN-P - June 2010
53
Chapter 3
I/O Fault Codes
I/O Fault Codes and Interpretations
Code
Interpretation
#FE0C
The controller is attempting to set up a connection with the PLC-5 controller and has received an error.
Verify that the instance number specified has been properly specified in the PLC-5 controller.
#FE0D
The symbol instance number was found to not be set.
#FE0E
The module is currently being updated.
#FE0F
Firmware supervisor has attempted to update an unsupported module.
#FE10
The firmware file to update the module cannot be found.
#FE11
The firmware file is corrupted.
#FE12
An error has occurred while updating the module.
#FE13
An active connection could not be made to the target module.
#FE14
The firmware file is currently being read.
#FE22
The target-to-originator netparams connection type is invalid.
#FE23
The target-to-originator netparams connection does not specify whether unicast is allowed.
#FF00
The controller is attempting to set up a connection with the module and has received an error.
Verify that the physical module is the same module type (or is a compatible module) as created in the software.
If the module is a 1756-DHRIO module in a remote chassis (connected via a ControlNet network), verify that the network has
been scheduled with RSNetWorx software.
Even after the network has been scheduled with RSNetWorx for ControlNet software, if you are online and if the 1756-DHRIO
module is configured for DH+ network only, a #ff00 Module Fault (no connection instance) may occur. The module is properly
communicating even though Faulted is displayed as its Status on the Module Properties dialog box. Disregard the error message
and fault status and continue.
#FF01
The controller is attempting to set up a connection with the module and has received an error.
Verify that the path to this module is a valid length.
#FF04
The controller’s map instance attempted to access a connection while being in an invalid state.
#FF08
The controller is attempting to set up a connection with the module and has received an error.
Verify that the path to this module is a valid length.
54
Publication 1756-PM014D-EN-P - June 2010
I/O Fault Codes
Chapter 3
I/O Fault Codes and Interpretations
Code
Interpretation
#FF0B
Either:
• the configuration for the module is invalid.
• the module in use (that is, the physical module) is different than the module specified in the I/O configuration tree and is
therefore causing the connection or service to fail.
The fault may occur even when the module passed the electronic keying test. This may result when Disable Keying or
Compatible Keying options were used in the module configuration instead of the Exact Match option.
Despite passing the electronic keying test, the module being connected to does not have the same features or settings as
the module specified in the I/O configuration tree and does not support the connection or service being attempted.
Check the module in use and verify that it exactly matches the module specified in the I/O configuration tree of RSLogix 5000
software.
For more information about electronic keying, see the user manual for the module you are using.
#FF0E
The controller is attempting to set up a connection with the module and has received an error.
Publication 1756-PM014D-EN-P - June 2010
55
Chapter 3
I/O Fault Codes
Notes:
56
Publication 1756-PM014D-EN-P - June 2010
Index
Numerics
1756-L2x
I/O fault indicator 41
1756-L6x
I/O fault indicator 41
1756-L7x
codes on status display 41
C
check
specific fault 22
CIP Motion
major fault codes 33
clear
major fault 9, 20
codes
I/O faults 41, 43
major fault 29
minor fault 38
controller
shut down 27
status in RSLogix 5000 42
suspend 27
when in prescan 24
create
data type
store fault information 20
fault routine 11
routine for Fault Handler 14
routine for Power-Up Handler 17
F
fault
clear 9
codes, I/O 43
codes, major 29
codes, minor 38
create user-defined 27
develop routine to clear fault 9
during prescan 23
I/O 43
indirect address 23
monitor minor 35
routine, create 11
shown in Module Properties 42
test a fault routine 26
Fault Handler
Publication 1756-PM014D-EN-P - June 2010
create routine 14
I
I/O 43
configuration warning 42
I/O faults
indication of 41
indicator
I/O fault 41
indirect address 23
instruction causing minor fault 37
L
low battery
warning 36
M
major fault
codes 29
create user-defined 27
develop fault routine 9
how to cleare 20
major faults
CIP Motion 33
minor fault
codes 38
logic 35
Module Properties
fault in 42
motion
major faults 33
P
Power-Up Handler
create a routine 17
prescan
clear a major fault 23
program
create fault routine 11
R
routine 11
create fault 11
Fault Handler 14
Power-Up Handler, create 17
57
Index
S
shut down the controller 27
status
controller in RSLogix 5000 42
store faults
create data type 20
suspend
controller 27
T
test a fault routine 26
W
warning
low battery 36
58
Publication 1756-PM014D-EN-P - June 2010
Rockwell Automation Support
Rockwell Automation provides technical information on the Web to assist you in using its products.
At http://www.rockwellautomation.com/support/, you can find technical manuals, a knowledge base of FAQs, technical and
application notes, sample code and links to software service packs, and a MySupport feature that you can customize to make the
best use of these tools.
For an additional level of technical phone support for installation, configuration, and troubleshooting, we offer TechConnect
support programs. For more information, contact your local distributor or Rockwell Automation representative,
or visit http://www.rockwellautomation.com/support/.
Installation Assistance
If you experience a problem within the first 24 hours of installation, review the information that is contained in this manual.
You can contact Customer Support for initial help in getting your product up and running.
United States or Canada
1.440.646.3434
Outside United States or
Canada
Use the Worldwide Locator at http://www.rockwellautomation.com/support/americas/phone_en.html, or contact
your local Rockwell Automation representative.
New Product Satisfaction Return
Rockwell Automation tests all of its products to ensure that they are fully operational when shipped from the manufacturing facility.
However, if your product is not functioning and needs to be returned, follow these procedures.
United States
Contact your distributor. You must provide a Customer Support case number (call the phone number above to obtain
one) to your distributor to complete the return process.
Outside United States
Please contact your local Rockwell Automation representative for the return procedure.
Documentation Feedback
Your comments will help us serve your documentation needs better. If you have any suggestions on how to improve this document,
complete this form, publication RA-DU002, available at http://www.rockwellautomation.com/literature/.
Rockwell Otomasyon Ticaret A.Ş., Kar Plaza İş Merkezi E Blok Kat:6 34752 İçerenköy, İstanbul, Tel: +90 (216) 5698400
Publication 1756-PM014D-EN-P - June 2010 60
Supersedes Publication 1756-PM014C-EN-P - October 2009
Copyright © 2010 Rockwell Automation, Inc. All rights reserved. Printed in the U.S.A.