1
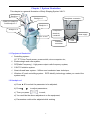
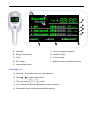
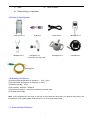
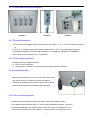
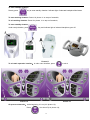
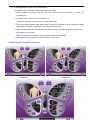
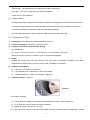
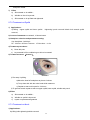
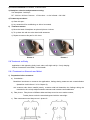
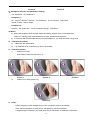
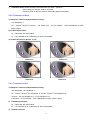
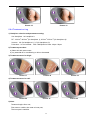
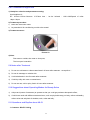
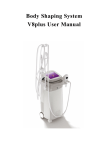
Body Shaping Beauty Equipment V8-C1 User Manual 1 Contents Chapter 1 System Illustration............................................................................................................ 4 1.1Equipment Illustration……………………………………………………………………………………………4 1.2 Handpiece 1...........................................................................................................................................................4 1.3 Handpiece 2...........................................................................................................................................................5 1.4 Handpiece 4...........................................................................................................................................................6 1.5 Parts of Host System............................................................................................................................................. 7 1.6 Working Conditions.............................................................................................................................................. 7 1.7 Technical Specifications....................................................................................................................................... 7 Chapter 2 Safety................................................................................................................................. 9 2.1 Optic Safety...........................................................................................................................................................9 2.2 Safety Designation Illustration............................................................................................................................. 9 Chapter 3 Operation......................................................................................................................... 10 3.1 Parts Installation..................................................................................................................................................10 3.2 To Install and Discharge Handpiece................................................................................................................... 11 3.2.1 To Install Handpiece........................................................................................................................................ 11 3.2.2 To Discharge Handpiece.................................................................................................................................. 11 3.3 To Install Earth Wire........................................................................................................................................... 11 3.4 To Turn on the Equipment...................................................................................................................................11 3.5 Functions of Handpiece and Default Parameters............................................................................................... 12 3.6 Operation Procedure........................................................................................................................................... 13 3.7 To Issue and Use Wireless IC Card.................................................................................................................... 16 3.7.1 IC Card...........................................................................................................................................................16 3.7.2 To Issue User Card...................................................................................................................................... 16 3.7.3 To Start Function of User Card.................................................................................................................. 17 3.7.4 To Issue Unblock Card................................................................................................................................ 17 3.7.5 To Stop Function of IC Card....................................................................................................................... 18 3.7.6 To Use Wireless IC Card.............................................................................................................................18 3.8 Warning for Handpiece Detection...................................................................................................................... 19 3.9 To Turn off Equipment........................................................................................................................................20 Chapter 4 Maintenance and Troubleshooting...............................................................................20 4.1 Troubleshooting.................................................................................................................................................. 20 Chapter 5 Clinical Guide.................................................................................................................. 21 5.1 Treatment Principle.............................................................................................................................................21 2 5.2 Indications...........................................................................................................................................................21 5.3 Contraindications................................................................................................................................................ 21 5.4 Notes for Cavitation Treatment...........................................................................................................................22 5.5 To Set Course of Treatment:............................................................................................................................... 22 5.6 Complications..................................................................................................................................................... 22 5.7 Notes................................................................................................................................................................... 22 5.7.1 Treatment on Face....................................................................................................................................... 23 5.7.2 Treatment on Eyelid.....................................................................................................................................24 5.7.3 Treatment on Neck.......................................................................................................................................24 5.8 Treatment on Body..............................................................................................................................................25 5.8.1 Treatment on Stomach and Waist............................................................................................................. 25 5.8.2 Treatment on Back....................................................................................................................................... 27 5.8.3 Treatment on Hip..........................................................................................................................................27 5.8.4 Treatment on Leg......................................................................................................................................... 28 5.8.5 Treatment on Upper Arm.............................................................................................................................29 5.9 Notes after Treatment..........................................................................................................................................29 5.10 Suggestions about Operating Modes for Beauty Salon....................................................................................29 5.11 Questions and Replies about V8-C1................................................................................................................. 29 5.12 Questions about Treatment on Face..................................................................................................................32 5.13 Questions about Treatment on Eye................................................................................................................... 33 Beijing Anchorfree Technology Co.,Ltd. Introduction……………………………...…………………………35 3 Chapter 1 System Illustration This chapter is a general illustration of Body Shaping System V8-C1. Handpiece 2 Handpiece 3 Stands for handpiece 2 and handpiece 3 Handpiece connection Handpiece 1 Handpiece 4 Power switch Unexpected electricity conductor Footswitch connection Power supply Fuse 1.1 Equipment Illustration a) Controlling system: 12″ TFT Color Touch screen, power switch, micro-computer etc; b) Endermologie and roller system; c) RF(Radio Frequency):High power output radio frequency system; d) CAVIT: Cavitation system e) Near-infrared laser system:940nm semi-conductor laser technique; f) Wireless IC card controlling system:RFID identify technology makes you control the system easily. 1.2 Handpiece 1 a) Press ▲ ▼ to select the parameter to be adjusted; b) Press c) Then you press to adjust parameters; to work; d) You could do the above adjustment on the equipment; e) Parameters could not be adjusted while working 4 : A C B D E F H I G A:Standby; F:Level of negative pressure; B:Ready for treatment; G:Speed of roller; C:Time; H:Time of pulse; D:RF energy; I:Absolute value of negative pressure E:Near-infrared laser; 1.3 Handpiece 2 a) Press ▲ b) Press ▼ to select the one to be adjusted; to adjust parameters; c) Then you press to work; d) You could do the above adjustment on the equipment; e) Parameters could not be adjusted while working. 5 : A C B D E F G H A:Standby; F:Level of negative pressure; B:Ready for treatment; G: Absolute value of negative pressure; C:Time; H:Time of pulse; D:RF energy; 1.4 Handpiece 4 a) Press ▲ ▼ to select the parameter to be adjusted; b) Press to adjust parameters; c) Then you press “O” to work; d) You could do the above adjustment on the equipment; e) Parameters could not be adjusted while working. : A C D E B G A:Standby; B:Ready for treatment; F F:Level of negative pressure; G: Absolute value of negative pressure; 6 C:Time; H:Time of pulse; D:Output energy of cavitation; 1.5 Parts of Host System Host system×1 Handpiece 2×1 Eyecup×1 Power line×1 Handpiece 3×1 (three tips: tip 3,tip4, tip5) Handpiece 4×1 Handpiece1×1 Footswitch×1 Earthing line 1.6 Working Conditions 1)Environmental temperature for operation :10ºC—30ºC; 2) Environmental temperature for keeping: 0—50ºC; 3) Relative humidity:≤70%; 4) Air pressure:860hPa~1060hPa; 5) Environment request:avoid direct radiation of intense light ; 6) To avoid intense light. Note: If the temperature in the room is too low or the instrument have been not used for many days, the temperature of the whole system shall recover to 10 ºC or higher before start. 1.7 Technical Specifications 7 Items LCD Specifications 1) Display screen of host: 12″ TFT Touch Color Screen 2) Display screen on handpiece: i)Display screen on handpiece 1:2.4″ ii)Display screen on handpiece 2: 1.9″ iii)Display screen on handpiece 6: 2.5″ Working Mode Pulse Pulse width: Negative pressure 0.5s-7.5s 1. Absolute value: 90kPa-25kPa(68.4cmHg -19cmHg); 2. Relative value: 10kPa -75kPa(7.6cmHg -57cmHg); Speed of roller Working mode for roller Safety checking RF frequency 0-36 rpm 2 types Real time on line 1MHz RF energy density Max: 60J/cm3 Laser wavelength 940nm Laser power Cavitation frequency Cavitation power Number of handpiece Treatment area Management system Rated input power Mode of power supply 20W (max) 40kHz 60W (max) 4 4mmx7mm 、 6mmx13mm 、 8mmx25mm 、 30mmx44mm、40mmx66mm、90mmx120mm Wireless IC card 850VA AC230V±10%,50Hz±1Hz Host’s weight 46kg Accessory’s weight 11kg Physical dimension 480mm×410mm×1015mm 8 Chapter 2 Safety This chapter shows the safet y measures need to be consider ed when you us e V8- C1. The operators and maintain personnel should be familiar with the safety requirements and procedures when they use the equipment. 2.1 Optic Safety 1) Do not look directly into the delivery outlet of laser; 2) Be sure that rated input voltage written on the label is coincident with the supply in the location; 3) The maint ain pr ocess can only be carr ied out ten minut es af t er the pow er has been shut off and the elect ric line has been unplugged. Ot herw ise, ther e is danger to the per sonnel or the machine; 4) Ther e is danger ous high-v olt age in the machine. So no one is allow ed to disassemble any par t s of the machine ex cept the technical per sonnel appoint ed by our company; 5) Good earthing is very important to operation safety. This equipment has good earthing by yellow and green wires in power line. (Picture A). Picture A 2.2 Safety Designation Illustration means connect the yellow line to conduct unexpected electricity; shows high voltage here is dangerous, and do not touch it; “AC230V 50Hz”or “AC110V 60Hz” shows the identifier of input power supply.(optional); “BGXP” shows the type of the fuse and rating “AC250V 10A”or“AC110V 15A” shows the rating of the fuse. (optional); is sign for laser. 9 Chapter 3 Operation 3.1 Parts Installation 1) To install handpiece stand Picture 1 Picture 2 Picture 3 Install A (in picture 1) in relative place like picture 1 shows and install two screws for fixing (B in picture 1); Install the stand of handpiece 1(picture 2) Install the stand of handpiece 2 and handpiece 3 with 4 screws (picture 3) Put handpieces on the relative place Install the lines of handpiece 1, handpiece 2 and handpiece 4 on the top of the stand (the stand is A in picture 1) Put the other tips of handpiece 3 respectively on the relative place of the stand (D in picture 3) 10 3.2 To Install and Discharge Handpiece Picture 4 Picture 5 Picture 6 3.2.1 To Install Handpiece 1) The number of handpiece shall correspond with the number “1, 2, 3, 4” on the equipment (picture 4); 2) “A, B, C” on handpiece (picture 5) shall correspond with “A, B, C” on the equipment (picture 6); 3) Installation handpiece from left to right: handpiece 1, handpiece 2, handpiece 3, handpiece 4; 4) Fix 3 screws (a in picture 6) in a, b, c (picture 5). 3.2.2 To Discharge Handpiece Discharge the four handpiece like this: 1) Do turn off the equipment; 2) Take down the 3 screws (a in picture 6) and take down handpiece directly. 3.3 To Install Earth Wire Before using equipment, you must connect the earth wire as A A right picture shows. One side of the earth line shall be connected to equipment and the other side be connected to metal touching earth (such as radiator and water pipe). 3.4 To Turn on the Equipment 1) Well insert the power line and press the power switch under display screen; 2) The display screen illumines after 1s. Then it enters initialization interface(picture 9); 3) As well as initialization, the system checks connection of the four handpiece in turn; After that the system enters main interface(version number: Ver-GZV8pulse-E2-1) 11 Picture 8 3.5 Functions of Handpiece and Default Parameters Form 1: Functions of handpiece Handpiece Power of near-infrared laser Handpiece 1 0~20W Speed roller of RF energy 0~36rpm Cavitation energy Negative pressure *Level Pulse time *s - 1~9 1s ~8s - 1~9 1s ~8s 0~60J/cm3 Handpiece 2 0~20W - Handpiece 3 0~10W - 0~50J/cm3 - 1~7 1s ~6s Handpiece 4 - - - 0~60W 1~9 1s ~4s Form 2: Default parameters Handpiece Power of near-infrared laser Speed of roller Cavitation Negative pressure *Level Pulse time *s Handpiece 1 14W 0~36rpm 25J/cm3 - 3 3s Handpiece 2 14W - 25J/cm3 - 3 3s Handpiece 3 6W - 20J/cm3 - 1 2s Handpiece 4 - - - 30W 3 2s RF energy 12 Form 3: Default handpiece for different body parts Body parts Default handpiece Body parts Stomach Back Thigh Default handpiece Body parts Default handpiece Face Neck Handpiece 3 with tip 3 or tip 5 Eyelid Handpiece 3 with tip 4 Calf Handpiece 1 Hip Waist Arm Handpiece 2 Note: When you select handpiece 4, stomach interface is defaulted 3.6 Operation Procedure Note:Default handpiece is handpiece 1; The following procedure is taking treatment on back for example. Interface of main menu: After initialization(Picture 7), the system enters main menu interface(Picture 8) Interface of main operation: Press A in picture 9 and the system enters main operation interface (picture 10) A B Picture 9 (main menu) C E Picture 10 (main operation) A in picture 10: This part shows treatment manner on human body; Press to stop it; Press to start it. B in picture 10: Handpiece selection:Press handpiece you want and E in picture 10 would show it; To set working time:In main operation interface (default working time is 20 minutes): Press and it turns green; 13 D Press “+” or “-” in E to adjust it (adjustment scope: 0-60 minutes, 1 minute/press) C in picture 10: To adjust energy of infrared laser: In main operation interface, press and the parameter would turn green; Press “+” or “-” in E to adjust it. To adjust output RF energy: Press and the parameter would turn green; Press “+” or “-” in E to adjust it. To adjust output energy of Cavitation energy: Note: If you select handpiece 4, you shall press and the parameter would turns green; Press “+” or “-” in E to adjust it. To adjust speed of roller: Press and the parameter would turn green; Press “+” or “-” in E to adjust it. D in picture 10: To adjust vacuum: Press and the parameter would turns green; Press “+” or “-” in E to adjust it. To set duration of pulse: Press and the parameter would turn green; Press “+” or “-” in E to adjust it. 14 To enter standby situation: Directly press key to enter standby situation. Indicator light of selected handpiece illuminates. To enter working situation: Press A in picture 11 or step on footswitch; To exit working situation: Press A in picture 11 or step on footswitch; To enter standby situation: Under ready situation, press key and indicator light of selected handpiece goes off. A Picture 11 To exit main operation interface:In main menu interface, press Picture 12 to exit it Picture 13 Air pressure detection:At the beginning, it is on (A in picture 12); Press . , it is shut off (A in picture 13); 15 Note: If there is something wrong with air pressure, you shall shut off air pressure detection. And contact with our company. 3.7 To Issue and Use Wireless IC Card 3.7.1 IC Card IC card contains key card, user card and unblock key card. Picture 14 3.7.2 To Issue User Card Picture 15(to issue card) Picture 16(succeed) 16 Picture 17(failed) 1) After turning on the equipment,put key card on A in picture 14 and system shows picture 15; 2) To set issuing time:Touch “+” or “-” to adjust issuing time. The system adds or reduces 100 minutes after each press. Adjustment scope: 0-99900 minutes; 3) Put blank card on A in picture 16 and the system would issue user card automatically; If successful, it shows “Issue OK!”(Picture 16); Or it shows “Issue Error!”(Picture 17); 4) Repeat the above operation step and you could issue more card; 5) In issuing interface, the system would exit issuing or main operation interface automatically in 60s; 6) To finish setting:press 3.7.3 To Start Function of User Card Picture 18(to start function of user card) Picture 19 (to issue unblock card) 1) After turning on equipment, insert the user card (picture 14) and could hear warning tone; Then A in picture 18 would be showed and the digital (such as “14400”) is the left time. 2) If there is no time left in IC card, after touching could not enter “Ready” situation. 3.7.4 To Issue Unblock Card 17 in main operation interface, system Picture 20(succeed) Picture 21(failed) 1) In picture 15, press “Unblock Card” key to issue unblock card; 2) Put blank card on A in picture 14 and the system would issue unblock card automatically; If successful, it shows “Issue OK!”(Picture 20) ; Or it shows “Issue Error!”(Picture 21); 3) Repeat the above operation step and you could issue more card; 4) The system would get back to main operation interface in 60s automatically; 5) To finish issuing: Press key to quit from issuing interface. 3.7.5 To Stop Function of IC Card After turning on the equipment, you put unblock card on A in picture 14 and could hear warning tone; Then A in picture 18 would disappear; Equipment with no IC card function could be used with no user card. 3.7.6 To Use Wireless IC Card 1. Agent 1) Agent wants to rent the equipment and take charge according to time; 2) The equipment works for 8 hours per day, 30 days/month and the total time is 14,400 minutes (8 hours/day*30 days*60 minutes). The agents take charge once and take following measures to manage: Enter interface of issuing card with key card and set time:14,400 minutes; Put blank card or user card on A in picture 14; The sound you hear shows succeed in issuing user card; Exit from issuing interface, make issued user card touch A in picture 14. Give user card and equipment to customer(The agent keeps the key card); The user must insert user card into slot (on the top of the back of equipment) when he uses the equipment; If there is no time left, the equipment is locked on; After user giving payment to agent, the agent would issue a user card with 14,400 minutes again and give it to user; If user wants to buy the equipment, the agent could give key card to user after receiving payment. 2. Beauty salon 1) The beauty salon take charge by renting card and taking count of treatment course and treatment times; 18 2) 10 times/treatment course and 30 minutes/time; The beauty salon could take following measures to manage: Enter interface of issuing card with key card and set time:300 minutes (10 times *30 minutes/time); Put blank card or user card on A in picture 14; The sound you hear shows succeed in issuing user card; Exit from issuing interface, make issued user card touch A in picture 14. Give customer card and equipment to customer(The beauty salon keeps the key card); When use the equipment, must insert user card into slot (on the top of the back of equipment); Set the time: 30 minutes; After 30 minutes, the equipment stops working and make two sounds; After treatment, the customer could take away the user card. 3.8 Warning for Handpiece Detection Picture 22 Picture 23 19 Picture 24 Main operation interface would show “Please check the handpiece” (picture 24) if following situations happens: 1) A in picture 22 (no handpiece is selected); 2) A in picture 23 (handpiece isn’t installed). 3.9 To Turn off Equipment Under standby condition, press Press the power supply button. , exit from main operation interface to main menu interface; Chapter 4 Maintenance and Troubleshooting Warning : Ten minutes later turn off the equipment, you draw the pin of power supply to vindicate the machine. Do not leave the machine with the cover board opened up and no attendance. Or it can har m human being or the machine it self. 4.1 Troubleshooting Tr ou b le Reaso n s Measur es Trouble with power switch Change power switch Didn’t insert power line well Insert power line well Blown fuse indicator Change fuse Trouble with control board Change control board Trouble with switch power supply Change switch power supply Key on handpiece has no response Trouble with control system 1. Shut off power switch and start-up again; 2. Contact with authorized stuff No response of touch screen Trouble with touch screen Contact with authorized stuff Trouble with vacuum pump Change vacuum pump Trouble with AC contactor Change vacuum pump Trouble with electromagnetic valve Change electromagnetic valve Trouble with 24V switch power supply Change switch power supply Trouble with air connection Change socket connector Trouble with handpiece Check the handpiece RF level is 0 Increase level Trouble with PA board Change PA board Start-up failure Something wrong with negative pressure No RF No laser Trouble with chip of barometer on control Change chip board Trouble with control board Change control board Trouble with relay for exchanging RF Change interposer Trouble with inner parts of handpiece Check the handpiece Laser level is 0 Add to level Trouble with inner parts of handpiece Check the handpiece Trouble with on control board Change control board 20 Speed of roller is 0 Roller doesn’t work Add to level Poor contact in handpiece or trouble with Check the handpiece motor Trouble with control board The equipment works, Cavitation is 0 but cavitation has Power of cavitation is broken trouble Change control board Increase it Change the power and contact with us Chapter 5 Clinical Guide 5.1 Treatment Principle a) Infrared laser reduces skin impedance by heating skin and RF energy penetrates deeply into connective tissue; The synergistic combination of infrared laser and conducted RF energies increase the oxygen intracellular diffusion by heating the skin b) Vacuum plus specially designed rollers manipulate leads RF penetration to be even 5-15mm. At the same time, vacuum and roller mechanical tissue manipulation nips and stretches fibrillar connective tissue, effectively breaks down subcutaneous fat as well as extruded capillary vessel, Increase lymphatic drainage, promotes metabolism and reduces or shrinks the size of the actual fat chamber and greatly improved body contouring effect. c) The technology that vacuum folds skin makes RF energy penetrate a specific folded skin, greatly improve effect and safety, even for the upper eyelid treatment. d) Cavitation with 40kHz low frequency shakes fat cells violently, which effectively treats with the hard fat cells; During the shaking, there is exchange of positive and negative. Thus the fat cells get pressure unevenly, as a result they blast 5.2 Indications 1) Black circle around eyelid removal, wrinkle around eyelid improvement and pouch improvement; 2) Upper eyelid lifting and wrinkle removal; 3) Body contouring after birth; 4) Body re-shaping, reduce fat of waist ; 5) Generalized obesity, localized adiposity, fat dissolving, skin tightening ( arm, leg, shoulder and back, mountaineering shoe, buttocks); 6) Alleviate arthritis pain and whole body physical therapy; 7) Stretch mark improvement 8) Effectively decrease the time for losing weight 5.3 Contraindications 1) Pacemaker and defibrillator in body; 21 2) Metal under treated skin; 3) With skin diseases or cancer history; 4) With other serious disease, such as heart disease or diabetes; 5) Gestation period and breast-feed; 6) With thermal stimulus history; 7) Openness wound; 8) Light-sensitiveness; 9) Bronzer skin because of solarization; 10) Menses. 5.4 Notes for Cavitation Treatment 1)When you do the treatment, shall move the tip, instead of treating on the same skin all the time or stop somewhere; 2)After treating 10 minutes, increase the treatment speed gradually; 3)There shall be enough cooling gel on the treated skin, or skin will feel pain; 4)The customer shall not wear metal; 5)Do not use this equipment with television, cell phone and so on; 6)Do not treat on uterus; 7) Do not do the treat on customer with menstrual; 8) Do not treat with same skin part more than 30 minutes each day; 9) After treatment, use warm towel to clean the cooling gel on skin and the cavitation tip 5.5 To Set Course of Treatment: 1) 2) 3) Face: 30 minutes / treatment, 1 treatment /week,10 times/course; Eyelid: 15 minutes / treatment, one treatment / week, 10 times/course; Whole body : 45-60 minutes/treatment,local treatment:15 minutes Twice treatments / week, 10 times/course; 5.6 Complications Normally there are no complications and discomfort. 5.7 Notes: 1) Things preparation: Camera, facial treatment cleanser, essential oil for conditioning and alcohol swab 2) Preparation before treatment: To illustrate the function of the equipment and the feeling during treatment for customer; Don’t use hormonal drugs one week before treatment(prednisone); Don’t wear metal; 3) Take photo to keep record and the background and light of background shall be the same Treatment procedures: First step:Use warm water and towel to clean skin to be treated; 22 Second step:Lay essential oil for conditioning on skin to be treated; Third step:Turn on the equipment and adjust parameters; Fourth step: Do the treatment 4) Treatment skills: During the treatment, usually ask the feeling of customer, the strength, the heat received and comfort; To observe whether the skin turns red and adjust parameters and energy according to response of customer for making sure what skin area can be treated repetitively; You can reduce parameters when you treat on ribs and inguinal and thinner skin. 5.7.1 Treatment on Face 1) Applications: Face lifting/ skin tightening/wrinkle removal; 2) Course of treatment: once/week, 10 times/course 3) Handpiece selection and parameters setting: Use handpiece 3; RF:25J/cm3~35J/cm3/ Vacuum:1~3/ Pulse time:1s~2s/ Infrared:6W~10W When you use tip 3 and tip 5 to treat on eyes, do not start infrared light 4) Notes: Reduce 1-2 energy level (RF and vacuum) when you treat on forehead, cheekbone and cheen, because skin of these parts is too thin to touch head of handpiece completely. 5) 6) Treatment procedures: a) Clean skin(Exfoliate it if necessary); b) Lay essential oil for conditioning on skin to be treated; c) Treatment sequence: Cheek----Forehead----Upper lip; Treatment manner(Picture 1) Picture 1 i) First step: Up-lifting a) Pull up head of handpiece according to dermatoglyph as picture 1 shows (picture 1); b) To up draw skin with the other hand while treatment; c) Repeat to treat on this part for 3-4 times ii) To get best result: repeat to treat on special parts, such as nasolabial folds, forehead lines, wrinkle 23 and pores visible. 7) Effect a) Skin treated on is reddish; b) Wrinkle on face is improved; c) Skin treated on is up-lifted and tightened 5.7.2 Treatment on Eyelid 1) Applications: Up-lifting ( upper eyelid and lower eyelid ) / tightening/ pouch removal/ black circle around eyelid removal; 2) Course of treatment: once/week, 10 times/course 3) Handpiece selection and parameters setting: Use handpiece 3 with tip 4; RF:20J/cm3~25J/cm3/ Vacuum:1/ Pulse time:1s~2s 4) Treatment procedures: b) Clean this part; c) Lay essential oil for conditioning on skin to be treated 5) Treatment manner(picture 2) Picture 2 i) First step: Up-lifting a)Move the head of handpiece as picture 2 shows; b) To up draw skin with the other hand while treatment; c) Repeat to treat on this part for 3-4 times ii) To get best result: repeat to treat on upper eyelid, lower eyelid, wrinkle and pouch 6) Effect a) Skin treated on is reddish; b) Wrinkle on eyelid is improved; c) Eyelid is up-lifted and tightened 5.7.3 Treatment on Neck 1) Applications: Up-lifting/ skin tightening/wrinkle removal 24 2) Course of treatment: once/week, 10 times/course 3) Handpiece selection and parameters setting: Use handpiece 3 with tip 3; RF:20J/cm3~30J/cm3/ Vacuum:1/ Pulse time:1s~2s/ Infrared:6W~10W 4) Treatment procedures: a) Clean this part; b) Lay essential oil for conditioning on skin to be treated; 5) Treatment manner: a) Move the head of handpiece as picture 3/picture 4 shows; b) To up draw skin with the other hand while treatment; c) Repeat to treat on this part for 2-3 times Picture 3 Picture 4 5.8 Treatment on Body Applications: skin tightening (belly, back, waist, calf, thigh and hip)/body shaping; Course of treatment: twice/week, 10 times/week 5.8.1 Treatment on Stomach and Waist 1) Preparation before treatment: a) Consultation: Beautician introduces to customer the applications, feelings during treatment and contraindication (beautician could refer to 5.10 in Chapter 5); Ask customer take down metallic jewelry; customer shall tell beautician the feelings during the treatment in time to help adjust treatment manners and increase comfortableness. b) Take photos:Take photos of different sides and keep record so as to make contrast; To take photos under the same background with the same light c) Take measurement and keep record(picture 5) 25 Picture 5 Picture 6 2)Handpiece selection and parameters setting: Use handpiece 1 or handpiece 4; Handpiece 1: RF:40J/cm3~60J/cm3/ Vacuum:3-8/ Pulse time:2s~3s/ Infrared:10W~20W/ Speed of roller: 1 8rpm~30rpm Handpiece 4: Vacuum:2-8/ Pulse time:2s~5s/ Cavitation energy:30W~60W 3)Notes: a) During the treatment, ask customer about the feeling, strength, heat, comfortableness; Reduce 1-2 energy level while treatment on waist, stomach and lateral rib; b) 4) 5) If customer feel uncomfortable when you use handpiece 4, you shall decrease energy level Treatment procedure: a) Clean skin with warm water; b) Lay essential oil for conditioning on skin to be treated; Treatment manner: i) treatment on belly three kinds of manners: picture 7,8,9 Picture 7 ii) Picture 8 Picture 9 treatment on waist (picture 10) Picture 10 6) Notes: Before treatment, make handpiece touch skin completely without air leakage; Then step on footswitch or press key on handpiece to start the treatment; If stop during the treatment, you could press key on handpiece or release the footswitch 26 7) Treatment skills: Divide the skin to be treated into four parts(picture 6); After treating on one part, treat on next one; Repeat to treat on the four parts to make belly absorb heat evenly 5.8.2 Treatment on Back 1) Handpiece selection and parameters setting: Use handpiece 1; RF : 40J/cm3~60J/cm3/ Vacuum : 4-8/ Pulse time : 2s~3s/ Infrared : 10W~20W/Speed of roller: 18rpm~30rpm 2) Treatment procedure: a) Clean skin with warm water; b) Lay essential oil for conditioning on skin to be treated; 3) Treatment manners (picture 11-14): Picture 11 Picture 12 Picture 13 Picture 14 5.8.3 Treatment on Hip 1) Handpiece selection and parameters setting: Use handpiece 1 or handpiece 2; RF:40J/cm3~60J/cm3 (for handpiece 1); 35J/cm3~55J/cm3/ (for handpiece 2)/ Vacuum:4-8 (for handpiece 1); 3-7 (for handpiece 2)/ Pulse time:2s~3s/ Infrared:10W~18W/Speed of roller: 18rpm~30rpm 2) Treatment procedure: a) Clean skin with warm water; b) Lay essential oil for conditioning on skin to be treated 3) Treatment manner 27 Picture 15 Picture 16 5.8.4 Treatment on Leg 1) Handpiece selection and parameters setting: Use handpiece 1 or handpiece 2; RF:40J/cm3~60J/cm3 (for handpiece 1); 35J/cm3~55J/cm3/ (for handpiece 2)/ Vacuum:4-8 (for handpiece 1); 3-7 (for handpiece 2)/ Pulse time:2s~3s/ Infrared:10W~18W/Speed of roller: 18rpm~30rpm 2) Treatment procedure: a) Clean skin with warm water; b) Lay essential oil for conditioning on skin to be treated 3) Treatment manner for thigh: Picture 17 Picture 18 Picture 19 4) Treatment manner for calf: Picture 20 Picture 21 5) Note: Treatment begins from root; First treat on outside, then treat on inner part; The inner part is sensitive 28 Picture 22 5.8.5 Treatment on Upper Arm 1) Handpiece selection and parameters setting: Use handpiece 2; RF: 35J/cm3~55J/cm3/Vacuum: 3-7/Pulse time : 2s~3s/ Infrared : 10W~18W/Speed of roller: 18rpm~30rpm 2) Treatment procedure: a) Clean skin with warm water; b) Lay essential oil for conditioning on skin to be treated 3) Treatment manner: Picture 23 4) Note: First treat on outside, then treat on inner part; The inner part is sensitive 5.9 Notes after Treatment 1) Do not use cold water to clean treated area in 8 hours after treatment(except face); 2) Do not do massage on relative skin; 3) Avoid solarization in the first week after treatment; 4) Could lay milky skin care on treated area; 5) Do not eat raw, cold or spicy food in 8 hours after treatment 5.10 Suggestions about Operating Modes for Beauty Salon 1) Adopt card (course of treatment) to operate so that you could get persistent therapeutic effect ; 2) Could issue cards with different treatment items, such as physical therapy on body, relieve subhealthy, relieve ache and ankylosis of shoulder, neck, waist and belly. 5.11 Questions and Replies about V8-C1 1. Customer: What’s V8-C1? 29 Hairdresser:V8-C1 is a kind of body contouring equipment. It adopts four kinds of technology: bipolar RF, near-infrared laser 940nm, endermologie, pluse mechanical tissue manipulation. The four kinds of technology could effectively promote metabolize of lipocyte and fiber cells so that we get result of body contouring and cellulite removal. 2. Customer:How to set course of treatment of the equipment? Hairdresser: Body: twice per week, 30 minutes each treatment, one course of treatment contains ten treatments; Eye: once per week, 5 minutes each treatment, one course of treatment contains ten treatments 3. Customer: How long does one treatment take?When does the effect appear? Hairdresser:Whole body : 45-60 minutes,local treatment:15 minutes One course of treatment contains ten treatments; Distinct treatment effect would appear 1~2 months later. Tigh would decrease 1~5cm and waistline would decrease 2~6cm (normally circumference would decrease 2~3cm). The firming extent would get to 50-75%. 4. Customer:Is there fatalness when we use this equipment?What’s the feeling of customer? Hairdresser:Because this equipment is designed according to medical hairdressing technology, so it is safe to use it. Customer would feel very comfortable during the treatment. 5. Customer:What’s the condition of customer after treatment? Hairdresser: After accepting a complete comfortable treatment, the customer’s urinary output would increase. Since V8 could promote metabolize of adipose tissue. The dissolved lipocytes are absorbed by lybph system. 6. Customer: Why does the customer have sense of hotness from inside? Hairdresser:This equipment adopts bipolar RF technology. The working depth would be 5mm-15mm subcutaneous. Heat elimination is slower. If the operation is perfect, the sense of hotness would last half an hour to one hour. 7. Customer :What’s the notes after treatment? Hairdresser:Avoid intense sun bath. 8. Customer:Shall customer during menses accept treatment? Hairdresser:Their feeling of pain, nerve is sensitive now and their resistance is weak. So they shall not 30 accept treatment at this time. 9. Customer:Any body could operate this equipment? Hairdresser:The operation o f V8 is very easy. So any person well trained could operate it. 10. Customer:What’s the effect after using this equipment? Hairdresser : 65% of the deeper tissue and the upper layers of the skin is removed or improved. Hip shrinks more than 3.2 centimeters. So many clinical cases proved that we could get body contouring effect soon after the very comfortable treatment. 11. Customer:Why can this equipment treat deeper tissue and the upper layers of the skin? Hairdresser: Handpiece of this equipment adopts four kinds of technology: bipolar RF, near-infrared laser 940nm, endermologie, pulse mechanical tissue manipulation. When we use handpiece to help skin’s movement, the deeper tissue and the upper layers of the skin is heated. Besides, the four kinds of technology could effectively promote metabolize of lipocyte and fiber cells so that we get result of body contouring and cellulite removal during comfortable relax. 12. Customer:What’s treatment principles of this equipment? Hairdresser:V8-C1 Shape& Smooth features revolutionary combination of Bipolar Radio Frequency, Near-infrared laser, Endermologie, pulse mechanical tissue manipulation. Subcutaneous tissue got heated and metabolism is promoted. As a result, we get the result of skin tightening, upper canthus lifting, black circle around eyes removal, body contouring and so on. 13. Customer:What’s the details about body contouring and skin tightening? Hairdresser: A. Body curve: Near-infrared laser 940nm could enhance flexibility of skin, rebirth collagen and spandex; RF energy could heat subcutaneous fat to shrink lipocytes; Endermologie add blood flux and promotes metabolize of fat. B .To remove deeper tissue and the upper layers of the skin: Trolley rubdown with endermologie could increase oxygen content of blood. C .Face lifting: Near-infrared laser 940nm could rebirth collagen and elastic fibers to improve wrinkle; 31 RF give heat to subcutaneous fat and drives lymph movements with negative pressure. 14. Customer:What’s the effect can this equipment give? Hairdresser: (1)Skin tightening, black circle around eyes and pouch removal; (2) Adiposis universalis, localized adiposity, wrinkle removal, lipolysis and body shaping(arm, leg, shoulder, waist, twist and hip); (3) Renovation for post partum; (4) Improve deeper tissue and the upper layers of the skin, body contouring (5) Improve stretch marks; (6) Relax pain of muscle and whole body’s physical therapy 5.12 Questions about Treatment on Face 1.Is there different effect according to different skin? Reply:Normally it is. Usually the effect of oily skin is more obvious than that of dry skin; Fiber of dry skin shrinks badly. So make water replenishing to dry skin before and after treatment to heighten an effect. 2.How long does the effect of once treatment on face last? Reply:Normally 3-7 days. 3.Can customer with golden thread implantation accept the treatment? Reply:To try on small area and observe for a time 4.Can customer with jectable fillers in face accept the treatment? Reply:These materials could not stand high temperature, so they shall not accept the treatment 5. Can customer with silica gel fillers accept the treatment? Reply: No, they can’t. That’s because silica is easy out of shape when it absorbs heat. 6. Can customer with porcelain accept the treatment? Reply: It depends on the endurance capacity of customer. 7. Can customer with metal tooth accept the treatment? Reply:It depends on the endurance capacity of customer; Many people with strong endurance capacity could accept it when you put cotton piece on treated area. 8.Can customer with allergic skin accept the treatment? 32 Reply: They shall not accept the treatment. 9.Why can’t people with facial neuritis accept the treatment? Reply: Such people could not stand any simulation. 10.Can customer accept treatment on face with this equipment and IPL treatment at the same time? Reply:It’s better to accept treatment with this equipment 1 or 2 days before IPL treatment or 7days after IPL treatment. 11.When can customer accept treatment after wound heals up? Reply:It depends on the depth of wound:normally one to three months after knife edge on belly; Though the epidermal wound heals up, the deeper muscle still needs a time to heal up. 5.13 Questions about Treatment on Eye 1.What’s feeling during treatment on eye? Reply:The eye has sense of hot. This sense would disappear in 20 minutes. 2.What’s the result after treatment on eye? Reply:Usually the black circle around eyes and wrinkle of canthus are improved. Canthus is lifted. Few people have mild edema. This is normal situation and it disappears in 2-3 days. 3.What’s the effect after treating congenital black circle around eyes? Reply:The effect is not obvious. It needs many times’ treatment. 4.What’s the effect after treating pouch? Reply:Pouch contains fatty, edematous, slack ones. The effect of fatty pouch is more slowly and effect of edematous pouch is the fastest and most obvious. The obvious result appears after one to three times’ treatment. 5.Can we do treatment on wrinkle on upper eyelid? Reply:Yes, we can. This is the biggest advantage of this equipment. What’s more, the effect is very good. 33