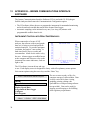
1
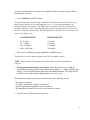
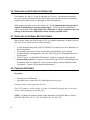
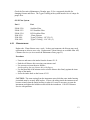
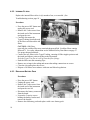
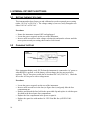
JEROME 631-X
HYDROGEN SULFIDE ANALYZER
Operation Manual
July 1997
Arizona Instrument LLC
1912 W 4th Street
Tempe, AZ 85281
(602) 470-1414
(800 )235-3360
Fax (602) 470-1888
http://www.azic.com
email:
[email protected] - General
[email protected] - International
[email protected] - Customer Support
Part Number SS-087
Doc #6J21-0002, Rev B
JEROME 631-X
Hydrogen Sulfide Analyzer
Operation Manual
PROPRIETARY RIGHTS NOTICE
This manual contains valuable information and material developed by Arizona Instrument
LLC for use with the Jerome 631-X Hydrogen Sulfide Analyzer. No part of this manual
can be reproduced or transmitted in any form or by any means, electronic, mechanical or
otherwise. This includes photocopying and recording or in connection with any information
storage or retrieval system without the express written permission of Arizona Instrument
LLC.
ALL RIGHTS RESERVED
© Copyright 1997, Arizona Instrument LLC
Resisorb™ is a registered trademark of J.T. Baker Chemical Company.
Tygon™ is a registered trademark of Norton.
iii
iv
TABLE OF CONTENTS
FOR THOSE WHO CAN'T WAIT TO USE YOUR JEROME 631-X BEFORE READING
THIS MANUAL . . . . . . . . . . . . . . . . . . . . . . . . . . . . . . . . . . . . . . . . . . . . . . . . . . . . . . vii
1
INTRODUCTION . . . . . . . . . . . . . . . . . . . . . . . . . . . . . . . . . . . . . . . . . . . . . . . . . . . . . . . 1
2
PRINCIPLE OF OPERATION . . . . . . . . . . . . . . . . . . . . . . . . . . . . . . . . . . . . . . . . . . . . . 2
3
INSTRUMENT OPERATION . . . . . . . . . . . . . . . . . . . . . . . . . . . . . . . . . . . . . . . . . . . . . 4
3.1
DIGITAL METER DISPLAY CODES . . . . . . . . . . . . . . . . . . . . . . . . . . . . . . . . . . . . . . 4
3.2
DAILY OPERATIONS . . . . . . . . . . . . . . . . . . . . . . . . . . . . . . . . . . . . . . . . . . . . . . . . 5
3.3
SENSOR REGENERATION PROCEDURE . . . . . . . . . . . . . . . . . . . . . . . . . . . . . . . . . . 6
3.4
SAMPLE MODE . . . . . . . . . . . . . . . . . . . . . . . . . . . . . . . . . . . . . . . . . . . . . . . . . . . . 7
3.5
SURVEY MODE . . . . . . . . . . . . . . . . . . . . . . . . . . . . . . . . . . . . . . . . . . . . . . . . . . . . 8
3.6
OPERATING ON AC POWER OR GENERATOR . . . . . . . . . . . . . . . . . . . . . . . . . . . . . 10
3.7
OPERATING ON INTERNAL BATTERY POWER . . . . . . . . . . . . . . . . . . . . . . . . . . . . 10
3.8
CHARGING BATTERIES . . . . . . . . . . . . . . . . . . . . . . . . . . . . . . . . . . . . . . . . . . . . . 10
3.9
OBTAINING MAXIMUM BATTERY LIFE . . . . . . . . . . . . . . . . . . . . . . . . . . . . . . . . . 11
4
MAINTENANCE . . . . . . . . . . . . . . . . . . . . . . . . . . . . . . . . . . . . . . . . . . . . . . . . . . . . . . 12
4.1
PREVENTIVE MAINTENANCE CALENDAR . . . . . . . . . . . . . . . . . . . . . . . . . . . . . . . 12
4.2
FLOW SYSTEM . . . . . . . . . . . . . . . . . . . . . . . . . . . . . . . . . . . . . . . . . . . . . . . . . . . 12
4.2.1 .25MM FRITWARE . . . . . . . . . . . . . . . . . . . . . . . . . . . . . . . . . . . . . . . . . . . . . . . . . 13
4.2.2 INTERNAL FILTERS . . . . . . . . . . . . . . . . . . . . . . . . . . . . . . . . . . . . . . . . . . . . . . . . 14
4.2.3 REPLACING BATTERY PACK . . . . . . . . . . . . . . . . . . . . . . . . . . . . . . . . . . . . . . . . . 14
5
INTERNAL DIP SWITCH SETTINGS . . . . . . . . . . . . . . . . . . . . . . . . . . . . . . . . . . . . . 16
5.1
SETTING THE INPUT VOLTAGE . . . . . . . . . . . . . . . . . . . . . . . . . . . . . . . . . . . . . . . 16
5.2
CHANGING THE FUSE . . . . . . . . . . . . . . . . . . . . . . . . . . . . . . . . . . . . . . . . . . . . . . 16
6
CALIBRATION . . . . . . . . . . . . . . . . . . . . . . . . . . . . . . . . . . . . . . . . . . . . . . . . . . . . . . . . 17
6.1
VERIFICATION OF CALIBRATION AND QUALITY CONTROL . . . . . . . . . . . . . . . . . . 17
7
631-X TROUBLESHOOTING . . . . . . . . . . . . . . . . . . . . . . . . . . . . . . . . . . . . . . . . . . . . 18
8
JEROME 631-X TECHNICAL SPECIFICATIONS . . . . . . . . . . . . . . . . . . . . . . . . . . . . 22
8.1
OPTIONAL “COMMUNICATIONS” VERSION . . . . . . . . . . . . . . . . . . . . . . . . . . . . . 23
8.2
INSTRUMENT I/O INTERFACE . . . . . . . . . . . . . . . . . . . . . . . . . . . . . . . . . . . . . . . . 23
9
ACCESSORIES & MAINTENANCE PARTS . . . . . . . . . . . . . . . . . . . . . . . . . . . . . . . . 25
9.1
631-X FLOW SYSTEM . . . . . . . . . . . . . . . . . . . . . . . . . . . . . . . . . . . . . . . . . . . . . . 26
9.2
REPLACEMENT PARTS . . . . . . . . . . . . . . . . . . . . . . . . . . . . . . . . . . . . . . . . . . . . . 26
v
10
MATERIAL SAFETY DATA SHEET . . . . . . . . . . . . . . . . . . . . . . . . . . . . . . . . . . . . . . 27
10.1 RESISORB . . . . . . . . . . . . . . . . . . . . . . . . . . . . . . . . . . . . . . . . . . . . . . . . . . . . . . . 27
10.2 NICKEL CADMIUM BATTERY . . . . . . . . . . . . . . . . . . . . . . . . . . . . . . . . . . . . . . . . 28
11
APPENDIX A - 631-X FUNCTIONAL TEST MODULE . . . . . . . . . . . . . . . . . . . . . . . 29
12
APPENDIX B - JEROME COMMUNICATIONS INTERFACE SOFTWARE . . . . . . 30
13
APPENDIX C - INTERNAL DIP SWITCH SETTINGS . . . . . . . . . . . . . . . . . . . . . . . . 32
14
APPENDIX D - JEROME 631-X OPTION BOARD . . . . . . . . . . . . . . . . . . . . . . . . . . . 33
14.1 DC POWER ADAPTOR KIT . . . . . . . . . . . . . . . . . . . . . . . . . . . . . . . . . . . . . . . . . . 33
14.2 AUTO-ZERO . . . . . . . . . . . . . . . . . . . . . . . . . . . . . . . . . . . . . . . . . . . . . . . . . . . . . 35
14.3 DC POWER OPERATION . . . . . . . . . . . . . . . . . . . . . . . . . . . . . . . . . . . . . . . . . . . . 35
14.4 TIMED REGENERATION . . . . . . . . . . . . . . . . . . . . . . . . . . . . . . . . . . . . . . . . . . . . 35
14.5 AUTO-SAMPLE . . . . . . . . . . . . . . . . . . . . . . . . . . . . . . . . . . . . . . . . . . . . . . . . . . . 36
14.6 4-20 MA ANALOG OUTPUT . . . . . . . . . . . . . . . . . . . . . . . . . . . . . . . . . . . . . . . . . 36
14.7 FRESH AIR SOLENOID . . . . . . . . . . . . . . . . . . . . . . . . . . . . . . . . . . . . . . . . . . . . . . 37
14.8 DC POWER MODE ENABLE . . . . . . . . . . . . . . . . . . . . . . . . . . . . . . . . . . . . . . . . . . 39
14.9 INSTRUMENT ZEROING . . . . . . . . . . . . . . . . . . . . . . . . . . . . . . . . . . . . . . . . . . . . . 39
15
APPENDIX E: CALCULATION/DYNACALIBRATOR H2S CONCENTRATION . . 41
16
WARRANTY . . . . . . . . . . . . . . . . . . . . . . . . . . . . . . . . . . . . . . . . . . . . . . . . . . . . . . . . . 42
vi
FOR THOSE WHO CAN'T WAIT TO USE YOUR JEROME 631-X
BEFORE READING THIS MANUAL
Remember to read the manual for added details that will optimize the results and the life of your
instrument. Also refer to the manual for complete details on operation, maintenance and
troubleshooting, special voltage inputs or data output.
The Jerome 631-X is easy to operate and ready for use upon receipt from the factory. Follow
these brief steps to use your instrument:
1. Remove the instrument from the packing material. Check for any damage and confirm
receipt of all parts on your packing list. Contact Arizona Instrument Customer Service at
(800) 235-3360 or (602) 470-1414 if you have any questions.
2. Press the ON button. In less than one second the display should read .000. Note that a LO
BATT message appears briefly in the upper left corner. (If the LO BATT light persists, it is
necessary to charge the battery. See page 10 for details.)
3. Check the voltage setting (110 or 220 VAC) on the back of the instrument. Ensure that it is
set to the correct voltage. (If the voltage must be changed, turn the knob.
4. Perform a sensor regeneration by following these steps:
C Plug the line cord into the instrument using the plug in the back and to an AC power outlet.
C Power the instrument ON and press the REGEN button. The instrument will begin a 10
minute regeneration cycle, indicated by .H.H.H flashing on the display. Do not interrupt
this cycle. (For a complete description of this process, see page 6.) If any error message,
such as .P.P.P or .L.L.L appears on the display, see the Troubleshooting section on page 18.
C Adjust the sensor zero by pressing the ZERO button and turning the zero adjust screw
located under the handle. Adjust until the display reads 0.
5. The instrument is now ready to sample. Note that as the instrument measures hydrogen
sulfide, the ZERO will display H. Do not adjust the ZERO after the instrument has
measured hydrogen sulfide and before the next regeneration. (Occasionally the ZERO
may drop to L (for low) between the initial zeroing and the first sample. It is OK to readjust
the ZERO if the instrument has not measured hydrogen sulfide.)
6. The instrument is designed for ambient air monitoring. Press the SAMPLE button to start a
10 second sampling cycle. DO NOT allow the probe or the instrument’s intake to come
in contact with liquids. Note that the instrument is not explosion proof.
7. After the day’s survey, again perform a sensor regeneration.
8. Before each day’s use, once again perform a sensor regeneration and re-zero the instrument.
Call AZI Customer Service, or your Technical Sales Representative, at (800) 235-3360
or (602) 470-1414 if you have any questions.
vii
THE JEROME 631-X
HYDROGEN SULFIDE ANALYZER
1 INTRODUCTION
The Jerome 631-X Hydrogen Sulfide Analyzer is designed for the easy and accurate analysis
of hydrogen sulfide in the ambient air. The 631-X is easy to operate and has few
maintenance requirements. However, please take a moment to read this manual before
attempting operation.
The Jerome 631-X is an ambient air analyzer with a range of 0.003 ppm to 50 ppm (parts per
million). If you have any questions about your application or operation, please call AZI
Customer Service at (800) 235-3360 or (602) 470-1414 for assistance.
Features of the 631-X, include:
C Automatic sensor regeneration when equipped with the communications option and used
with the Jerome Communications Interface Software (JCI) program and the Jerome data
logger.
C Survey mode can be locked in.
The Jerome 631-X can be operated from 100-120 or 200-240 VAC. To change the default
voltage range, refer to Setting the Input Voltage, page 16.
CAUTION: The Jerome 631-X is intended for vapor use only. DO NOT allow the probe
or the instrument's intake to come in contact with liquids, dust or other foreign material.
1
2 PRINCIPLE OF OPERATION
A thin gold film, in the presence of hydrogen sulfide, undergoes an increase in electrical
resistance proportional to the mass of hydrogen sulfide in the sample.
When the SAMPLE button is pressed, an internal pump pulls ambient air over the gold film
sensor for a precise period of time. The sensor adsorbs and integrates the hydrogen sulfide
and displays the measured concentration of detected hydrogen sulfide in ppm (parts per
million). During normal sampling, the ambient air sample is diluted in the flow system at a
ration of 100:1. When sampling in Range 0, (where low levels of hydrogen sulfide are
expected) undiluted air samples are drawn across the gold film sensor.
The instrument’s microprocessor automatically re-zeroes the digital meter at the start of each
sample cycle and freezes the meter reading until the next sample cycle is activated, thus
eliminating drift between samples.
During the sample mode cycle, bars on the digital meter represent the percentage of sensor
saturation. Depending on the concentrations, 50 to 500 samples may be taken before the
sensor reaches saturation. At that point, a 10 minute heat cycle is manually activated to
remove the accumulated hydrogen sulfide from the sensor. During the sensor regeneration
cycle, both solenoids are closed, causing the air to pass through a scrubber filter to provide
clean air for the regeneration process. The flow system’s final scrubber prevents
contamination of the environment.
The sensor may exhibit some low level thermal drift after the regeneration cycle, due to heat
generated during the sensor regeneration. Wait 30 minutes after a sensor regeneration to
ensure maximum sample accuracy.
Gas Flow Schematics
2
3
3 INSTRUMENT OPERATION
3.1 DIGITAL METER DISPLAY CODES
METER DISPLAY
EXPLANATION
000
Ready to sample
.000
No hydrogen sulfide reading
.8.8.8
Sensor saturated-regeneration needed (refer to page 6)
.H.H.H
Sensor regeneration in progress (.H.H.H flashes)
.L.L.L
Re-zero needed (refer to page 6)
.P.P.P
Power cord required or low line power, <100 VAC (or 200 VAC)
(see page 16, Changing the Fuse, if .P.P.P remains on after the
cord is connected.)
.LO BAT
Recharge batteries (refer to page 10)
.E.E.E
Same as LO BAT, automatically shuts off
.HL
High level, sample exceeded range
DURING SAMPLING
.-
0-25% sensor saturation
.--
25-50% sensor saturation
.---
50-75% sensor saturation
-.---
75-100% sensor saturation
DURING SAMPLING
-
USING THE SURVEY MODE
Survey sampling (minus sign flashes continuously)
WHEN ZERO IS
DEPRESSED
Adjust to 0 only after sensor regeneration. It is normal for the
display to read H after sampling has started.
0
Zero, ready to sample
H
High, turn Zero pot counterclockwise
L
Low, turn Zero pot clockwise
4
3.2 DAILY OPERATIONS
Before each day's use of the Jerome 631-X, perform the following steps to verify proper
instrument operation:
Procedure:
C
Press the power ON button.
The digital meter displays 000. (Disregard the digital meter's initial momentary
reading.) Recharge or replace the battery pack if the LO BAT indicator REMAINS ON.
Refer to pages 10 and/or 14 for the procedure.
To ensure the instrument's electronics have stabilized, allow a 1 minute warm up before
beginning the next step.
C
Perform a sensor regeneration. Refer to page 6 for the procedure. Thirty minutes after
sensor regeneration is complete, re-zero the instrument.
NOTE: For maximum accuracy, such as when testing with the Functional Test
Module, wait thirty minutes after the sensor regeneration cycle to rezero the unit. For
immediate use the unit can be re-zeroed immediately after sensor regeneration
C
Press the SAMPLE button.
During the sample cycle, the digital
meter displays a bar (-) which
indicates the amount of sensor
saturation.
C
At the end of the sampling cycle, read
the digital meter.
The number shown on the digital
meter is the hydrogen sulfide
concentration in ppm. This value
remains on the display until the next
sample is taken. The digital meter
automatically zeroes at the start of
each sample.
C
At the end of each day's use perform a sensor regeneration. DO NOT ALLOW
HYDROGEN SULFIDE TO STAY ON FILM OVERNIGHT.
5
3.3 SENSOR REGENERATION PROCEDURE
A sensor regeneration is needed to clear the 631-X sensor of any accumulated hydrogen
sulfide. This simple procedure should be done:
C
C
C
At the beginning of the day on which the instrument is to be used.
During the hydrogen sulfide survey, if the sensor becomes saturated.
At the end of the day’s survey, before storage.
AC power must be between 100-120 VAC or 200-240 VAC, depending on the power
source to clean and protect the sensor.
CAUTION: Once a sensor regeneration is initiated, DO NOT interrupt the cycle.
Procedure:
C
C
C
Attach the power cord to the 631-X and plug it into AC power. AC power is required
to thermally regenerate the sensor.
Press the power ON button.
Press the REGEN button.
The digital meter flashes .H.H.H for the duration of the 10 minute cycle and displays .0.0.0
when the cycle is completed.
DO NOT INTERRUPT THIS CYCLE.
Wait until the cycle is completed before
continuing with the next step.
NOTE: The digital meter will read
.P.P.P after REGEN is activated if the
power cord is not plugged in or if the
instrument's fuse needs replacing. Plug
in the power cord, or if necessary,
replace the fuse according to the
procedure on page 16.
C
While pressing the ZERO button, turn the ZERO ADJUST potentiometer using the
trimmer tool until the digital meter reads 0.
If the meter reads H, turn the ZERO ADJUST counter-clockwise;
If the meter reads L, turn the ZERO ADJUST clockwise.
See the illustration above for the location of the ZERO ADJUST potentiometer.
6
NOTE: A minimum 30 minute wait after the sensor regeneration cycle is complete ensures
maximum sample accuracy. The unit can be used immediately following the sensor
regeneration if necessary. When the sensor regeneration is complete, press ZERO and
adjust the ZERO ADJUST pot until 0 appears on the display. Install the zero air filter in
the intake and take several samples or lock the instrument into survey mode (see page 8).
After approximately one minute, stop sampling and check the ZERO. Adjust to 0. Repeat
sampling through the zero air filter until sensor remains on 0.
NOTE: Depending upon internal configuration, a number between 00 and 100 may appear
on the display, instead of H, L, or O when ZERO is pressed. See Internal Dip Switch
Settings, page 32, for details. IMPORTANT: Do not turn the ZERO ADJUST
potentiometer between samples. Turn the ZERO ADJUST only after a sensor
regeneration cycle otherwise invalid readings will result.
C
C
Press the power OFF button and disconnect the power cord.
The Jerome 631-X is ready for sampling.
3.4 SAMPLE MODE
This mode, used for standard operation, produces optimum accuracy with the Jerome
631-X.
Range 0:
Range 1:
Range 2:
Range 3:
± 0.003ppm at 0.050ppm H2S
± 0.03ppm at 0.50ppm H2S
± 0.3ppm at 5.0ppm H2S
± 2ppm at 25ppm H2S
Procedure:
C
Press the power ON button.
The digital meter displays 000. Disregard the digital meter's initial momentary readings.
Recharge or replace the battery pack if the LO BAT indicator REMAINS ON. Refer to
pages 10 and/or 14 for the procedure.
To ensure the instrument's electronics have stabilized, allow a 1 minute warm up before
beginning the next step.
C
Press the SAMPLE button.
During the sampling cycle, the bar (or bars) shown on the digital display indicate the
current percentage of sensor saturation. (Refer to Meter Display Codes, page 4, for code
descriptions.)
7
C
At the end of the sampling cycle, read the digital meter. The length of the sample cycle
depends on the concentration of hydrogen sulfide.
CONCENTRATION
RESPONSE TIME
10 - 50 ppm
1.0 - 9.9 ppm
0.10 - 0.99 ppm
0.001 - 0 .099 ppm
13 seconds
16 seconds
25 seconds
30 seconds
The number shown on the digital meter is the hydrogen sulfide concentration in ppm. As
the instrument auto-ranges, the decimal point moves to the correct position to show the
concentration. This value remains displayed until the next sample is taken. The digital
meter automatically zeroes at the start of each sample.
When the sensor is completely saturated, the digital meter displays .8.8.8 instead of a
value. No further operation is possible until a sensor regeneration is performed. (Refer to
page 6 for the Sensor Regeneration procedure.)
C
Press the power OFF button when not in use.
SAMPLING NOTES:
The Jerome 631-X operates a minimum of 6 hours on a fully charged battery.
CAUTION: The Jerome 631-X is intended for vapor use only. DO NOT allow the probe
or the instrument's intake to come in contact with liquids, dust or other foreign material.
Moisture or liquids drawn into the instrument can damage the sensor and flow system.
3.5 SURVEY MODE
The survey mode takes samples every 3 - 20 seconds automatically. Use this mode to
locate the source of hydrogen sulfide, such as a leak or hot spot or to assess areas of
potentially high hydrogen sulfide concentrations. After the survey mode is activated, the
631-X takes continuous samples. The length of time varies with the hydrogen sulfide
concentration.
Procedure:
C
Press the power ON button.
The digital meter displays 000. (Disregard the digital meter's initial momentary readings.)
Recharge or replace the battery pack if the LO BAT indicator REMAINS ON. Refer to
pages 10 and/or 14 for the procedure.
8
To ensure the instrument's electronics have stabilized, allow a 1 minute warm-up before
beginning the next step.
C
Press and hold the SAMPLE button.
The instrument takes a normal sample, displays the concentration at the end of the cycle
and then goes into the survey mode sampling every 3 - 20 seconds depending on the
hydrogen sulfide concentration. The higher the concentration, the more frequently the
instrument updates. As the instrument autoranges, the decimal point moves to the correct
position to show the concentration. The display flashes the measured concentrations at the
end of each sample cycle.
C
CONCENTRATION
RESPONSE TIME
10 - 50 ppm
1.0 - 9.9 ppm
0.10 - 0.99 ppm
0.001 - 0.099 ppm
3 seconds
6 seconds
15 seconds
20 seconds
When you are finished surveying, release the SAMPLE button.
The final survey value remains displayed until the next sample is taken.
NOTE: Approximately 100 samples may be taken before a sensor regeneration is
required.
C
To lock the instrument in the survey mode, follow the first two steps. Hold the
SAMPLE button down until the sensor status indicator bar(s) "_" begins flashing on the
display. Press the ZERO button, then release the SAMPLE button. The pump should
continue to run and the display should update every survey cycle.
The instrument remains in the survey mode until one of the following occurs:
- The sensor is saturated.
- A LO BAT (low battery) signal is encountered.
- An HL (high hydrogen sulfide level) is encountered.
- The instrument is turned OFF to take it out of the survey mode.
C
Press the power OFF button when not in use.
9
3.6 OPERATING ON AC POWER OR GENERATOR
For stationary use, the 631-X may be operated on AC power. Operating the instrument
only on AC power eliminates the need for the battery pack and its necessary maintenance.
If preferred, the battery may be unplugged or removed completely.
When using a generator to power the Jerome 631-X, it is important that the generator is
capable of maintaining a constant voltage output. This is especially true during the
sensor regeneration. Use a high quality line conditioner or voltage regulator to prevent
damage to the electronic components and the sensitive gold film sensor.
3.7 OPERATING ON INTERNAL BATTERY POWER
Battery power allows use of the Jerome 631-X as a portable instrument. If battery power is
necessary for use, please be aware of the following:
C
C
C
C
C
A fully charged battery pack (AZI P/N 2400-0907) provides power for a minimum of 6
hours of operation.
For operating more than 6 hours, an extra fully charged battery pack is needed.
Complete battery recharging takes 14 hours. Refer to page 10, Charging Batteries for
the procedure.
The 631-X uses a rechargeable NiCad battery. Dispose of properly when replaced.
External battery power: A special version of the Jerome 631-X is available that can
be operated from a secondary DC source, such as a battery used in conjunction with
solar panels. Contact AZI for additional information.
3.8 CHARGING BATTERIES
Procedure:
C
C
Press the power OFF button.
Attach the power cord to the 631-X and plug it into AC power.
Complete battery recharging takes 14 hours.
The 631-X contains a trickle charger so it may be continually plugged into an AC power
source without damaging the battery pack.
NOTE: To charge the batteries outside of the instrument, use the IDC Battery Charger
(AZI P/N 4000-1011, for 115 VAC, P/N 4000-1012, for 230 VAC).
10
3.9 OBTAINING MAXIMUM BATTERY LIFE
There are certain inherent limitations to NiCad (Nickel Cadmium) batteries. The primary
limitation is a memory effect that occurs when the batteries are partially discharged and
then recharged, repeatedly. This memory leads to a drastic reduction in the usable battery
life. To prevent this memory effect, periodically allow the battery pack to discharge
completely, then recharge the battery pack.
For maximum battery life, follow these 3 steps:
C
C
C
At least once a month wait until LO BAT appears on the digital meter before recharging
the battery pack.
Charge the battery pack when the LO BAT indicator comes on. Excessive discharge
can damage the battery pack.
Before storing the instrument verify the power is OFF.
When batteries fail to hold a charge, the battery pack should be replaced. Battery life under
normal usage is approximately 1 year, depending on the number of charge and discharge
cycles.
11
4 MAINTENANCE
4.1 PREVENTIVE MAINTENANCE CALENDAR
To keep the Jerome 631-X operating at peak performance, follow the maintenance schedule
below. Use this schedule as a guideline only, as maintenance is more a function of
application and amount of use, rather than time.
MAINTAINED
PART/COMPONENT
MAINTENANCE CYCLE
REFER
TO
PAGE
Charge batteries
At least once per month, after 1 month's storage,
or when LO BAT appears
page 10
Change .25mm fritware
Weekly or as needed
page 13
Change internal filters and
tubing
After 6 months of use or as needed
page 14
Replace zero air filter*
Annually
page 14
Factory calibration
Every 6 months
page 17
Calibration check
Monthly or as needed
Appendix
A, page 29
Replace batteries
Annually or as needed.
The battery pack contains NiCad batteries.
Dispose of properly.
page 14
NOTE: Install the zero air filter into the instrument's intake during storage.
* Zero air filters, LFS and LFD scrubber filters contain Resisorb™. For safety
information, see the Material Safety Data Sheets included in this manual starting on page
27. Dispose of all filters properly.
4.2 FLOW SYSTEM
The Jerome 631-X's flow system is the crucial link between the sensor and the sample. For
the instrument to perform correctly, the flow system must be properly maintained. The
user maintainable components of this system are the intake filter (.25 mm fritware), two
scrubber filters and connecting tubing.
12
Check the Preventive Maintenance Calendar, page 12, for a suggested schedule for
changing fritware and filters. The Tygon™ tubing in the system must be free of crimps for
proper flow.
631-X Flow System
Part #
Part
Z2600-3930
Z2600-3933
Z2600-3934
2600-3039
2500-3001
2500-3002
Scrubber Filter
LFS Scrubber Filter
LFD Scrubber Filter
.25mm Fritware
Tygon™ Tubing - 1/8" I.D. (1')
Tygon™ Tubing - 1/16" I.D. (1')
4.2.1 .25MM FRITWARE
Replace the .25mm fritware once a week. In dusty environments, the fritware may need
replacement as often as once a day. Replacement .25mm fritware are available from AZI,
Customer Service (see Accessories & Maintenance Parts, page 25).
Procedure:
C Unscrew and remove the intake from the Jerome 631-X.
C Push the old fritware disc out using your trimmer tool.
C Use tweezers to insert the new fritware.
Avoid touching the new fritware disc with fingers.
C Use the blunt end of the trimmer tool to seat the fritware disc firmly against the inner
ledge of the intake.
C Screw the intake back on the Jerome 631-X.
CAUTION: The stem coming from the instrument onto which the outer intake housing
is attached must be securely held in place. If loose, the tubing inside the instrument can
become twisted when the intake housing is replaced. It may be necessary to open the
instrument and tighten the hold-down nuts inside the instrument. Call AZI Customer
Service with questions.
13
4.2.2 INTERNAL FILTERS
Replace the internal filters after six (6) months of use, or as needed. (See
Troubleshooting section, page 18.)
Procedure:
C Press the power OFF button and
unplug the power cord.
C Remove the 2 side screws from
the intake end of the instrument
and open the case.
C Carefully disconnect the
Tygon™ tubing from both ends
of the filters and discard the old
filters.
CAUTION: Old filters,
especially the scrubber filter may contain hydrogen sulfide. Scrubber filters contain
Resisorb™. For safety information see the Material Safety Data Sheets on page 27.
Use proper disposal methods.
C Connect the new filters to the Tygon™ tubing, ensuring all filter nipples point toward
the intake and elbows point according to the illustration.
Push the Tygon™ as far as it will go onto the filter fittings.
C Push the filters into the mounting clips.
C Remove any crimps in the tubing and ensure that tubing connections are secure.
C Close the case and replace the screws.
C Dispose of all filters in accordance with state and federal regulations.
4.2.3 REPLACING BATTERY PACK
Procedure:
C Press the power OFF button.
C Unplug the power cord.
C Remove the 2 side screws from
the intake end of the instrument
and open the case lid.
C Disconnect the battery connector
from the board.
C Loosen the 2 captive screws
holding the battery bracket and
remove the bracket.
C Remove the old battery pack and replace with a new battery pack.
14
C
C
C
C
Replace the battery bracket and tighten the captive screws.
Connect the new battery connector to the board.
Close the case and replace the screws.
Dispose of the old NiCad battery properly (in accordance with state and federal
regulations).
15
5 INTERNAL DIP SWITCH SETTINGS
5.1
SETTING THE INPUT VOLTAGE
This instrument has been factory set and calibrated to use the requested power setting
(either 110 VAC or 220 VAC). The voltage setting is, however, easily changed to use
either 110 VAC or 220 VAC.
Procedure:
C Ensure the instrument is turned OFF and unplugged.
C Locate the power receptacle on the rear of the instrument.
C Insert a small screwdriver in the voltage selection slot and turn the selector until the
arrow points toward your setting choice and a click is heard.
5.2
CHANGING THE FUSE
POWER
RECEPTACLE
VOLTAGE SELECTION
SLOT
FUSE COMPARTMENT
SLOT
If the instrument display reads .P.P.P when the instrument is connected to AC power or
when REGEN is pressed, or if the battery will not charge, the fuse may need to be
replaced. The AC line power could also be less than 100 VAC (220 VAC). Check the
fuse or the AC line power with a voltage meter.
Procedure:
C Locate the power receptacle on the rear of the instrument.
C Insert a small screwdriver in the slot (see figure above) and gently slide the fuse
compartment out.
C Remove and discard the fuse held in the open sided clip and replace it with the spare
fuse held in the boxed spare fuse compartment.
C Replace the fuse compartment in the power receptacle.
C Replace the spare fuse with another 1A 250V Fast-Blo fuse (AZI P/N 51001012).
16
6
CALIBRATION
The Jerome 631-X's gold film sensor is inherently stable and does not require frequent
calibration. The interval between calibrations depends upon the application and frequency
of use; however, the recommended interval is every 6 months.
The Jerome 631-X has been factory calibrated using NIST traceable permeation tubes.
These permeation tubes have a rated accuracy of +/- 2%. In order to calibrate the Jerome
631-X, a sophisticated calibration system is required that ensures stability of the calibration
gas source, eliminates any pressure in the calibration gas stream and controls the
temperature of the calibration environment. Calibration also requires special proprietary
software.
We strongly recommend you take advantage of our calibration and maintenance service at
Arizona Instrument. Call Customer Service at (800) 235-3360 or (602) 470-1414 to arrange
re-calibration. A certificate of calibration is issued from AZI when your instrument is
factory calibrated.
6.1 VERIFICATION OF CALIBRATION AND QUALITY CONTROL
The Functional Test Module (AZI p/n Z2600-0918) is used to determine if your instrument
is within calibration tolerances between recommended semi-annual factory calibrations. It
allows you to have complete confidence in the sample results. This test verifies proper
instrument operation through the introduction of a known concentration of hydrogen sulfide
into the Jerome analyzer.
If your application requires frequent verification of instrument function, this test
demonstrates the unit’s operation, calibration, and function. Recording Functional Test
Module results in an instrument log provides a quality control/quality assurance record of
instrument function between regular calibrations. If test results fall within the expected
range, you may assume the instrument is functioning correctly. THIS TEST DOES NOT
CALIBRATE THE INSTRUMENT.
See page 29 in Appendix A, for complete Functional Test Module procedures.
To order the module, contact your AZI Sales Representative at (800) 390-1414 or (602) 4701414.
17
7 631-X TROUBLESHOOTING
Symptom
Possible Cause
Solution
Unit does not turn ON. Unit
turns on when power cord is
plugged in. LCD displays 000
when connected to power cord
and ON button is pressed.
Dead battery.
Recharge battery
(minimum 14 hours),
refer to page 10.
Unit does not turn on when
connected to AC power cord.
Fuse.
Replace fuse, refer to
page 16.
Insufficient power.
Be sure there is power to
the AC outlet using a
volt meter.
Internal component failure.
Call AZI Customer
Service for information.
Power Problems
Replace battery, refer to
page 14.
Regeneration & Zero Problems
LCD displays .8.8.8.
Sensor saturated.
Do not attempt to
rezero. Unit must be
regenerated. See page 6
for information.
LCD displays .L.L.L when
taking first sample.
Changes in temperature.
Readjust zero pot. See
page 6 for information.
LCD displays H at finish of
sensor regeneration when zero is
pressed.
Internal contamination may
redeposit hydrogen sulfide
from flow system onto gold
film sensor.
Remove and replace
intake filter disk and
Tygon™ tubing (see
page 13). Check tubing
for kinks or crimps.
Repeat regeneration
cycle. See page 6 for
information.
18
Symptom
Possible Cause
Solution
Zero adjust pot cannot be
adjusted to 0.
Pot not turned sufficiently.
Turn zero adjust up to
20 times to reach the
end. Pot will “click”
softly.
Display still unchanged.
Sensor may be ruptured or pot
may be broken.
Turn pot slowly in
opposite direction till
display reads 0. If still
unchanged, call AZI
Customer Service at
(800) 235-3360.
Air flow is restricted during the
sensor regeneration cycle,
causing possible permanent
damage.
Kinks and crimps in the
Tygon™ tubing.
Periodically check the
Tygon™ tubing inside
the instrument (see page
13).
High erratic results.
Internal hydrogen sulfide
contamination.
1. Install zero air filter in
intake and tighten intake
nut. Press SAMPLE
button. After 3
samples, if readings are
over 0.003 ppm, replace
intake filters and Tygon
tubing (see page 14).
Sampling Problems
2. Perform a REGEN
with zero air filter in
intake. See page 6 for
information. Retest if
necessary. Replace
intake filters and
Tygon™ tubing (see
page 14).
19
Symptom
Possible Cause
Solution
High/erratic results
Intake and internal filters may
get clogged and need
replacement when sampling in
a dusty or humid area.
Open instrument to
check for pinched,
crimped or disconnected
internal tubing. In
extreme conditions an
additional particle filter
may be installed on
intake.
High/erratic results
Readings vary more than 0.003
ppm when in survey mode.
Film connection.
Press and hold
SAMPLE button in
clean area or with zero
air filter in intake to
lock in survey mode.
Move the unit from side
to side, or up and down
during sample cycle.
Low response or erratic readings
after a long period of non-use.
May need a second
regeneration cycle.
Wait 30 minutes
between regeneration
cycles. Test with FTM.
See page 29 for
information. If still
unresponsive, call AZI
Customer Service at
(800) 235-3360.
False readings, may go to .8.8.8
or .L.L.L.
Extremely cold or extremely
warm air sampled into unit.
If sampling under these
conditions, install zero
air filter in intake.
Sample until display
reads 0.003 ppm or less.
This equilibrates sensor
temperature with the
temperature of the
sample air stream.
Remove filter and take
samples.
20
Symptom
Possible Cause
Solution
Power cord not attached.
Check power cord for
connection
Blown fuse.
Replace fuse. See page
16 for information.
Line voltage less than 100
VAC (or less than 200 VAC
for 220 unit).
Check line voltage
settings. See page 16
for information.
Cycles dipswitch set
incorrectly.
Check input cycle
settings. See page 16
for information.
Miscellaneous Problems
Display reads .P.P.P when
regeneration is attempted.
If fuse and line voltage
are OK, it may be
circuit board adjustment
or component, call AZI
Customer Service for
information.
Display reads .E.E.E
Very low battery.
Recharge battery. See
page 10 for information.
Replace battery. See
page 14 for information.
.
21
8 JEROME 631-X TECHNICAL SPECIFICATIONS
Range
0.003ppm (3ppb) to 50ppm H2S
Sensitivity
0.003ppm H2S
Precision
5% relative standard deviation
Accuracy
Range 0:
Range 1:
Range 2:
Range 3:
± 0.003ppm at 0.050ppm H2S
± 0.03ppm at 0.50ppm H2S
± 0.3ppm at 5.0ppm H2S
± 2ppm at 25ppm H2S
Response time-sample mode
10 to 50 ppm
1.0 to 9.9 ppm
0.10 to 0.99 ppm
0.001 to 0.099 ppm
13 seconds
16 seconds
25 seconds
30 seconds
Response time-survey mode
10 to 50 ppm
1.0 to 9.9 ppm
0.10 to 0.99 ppm
0.001 to 0.099 ppm
3 seconds
6 seconds
15 seconds
20 seconds
Flow rate
150cc/min (0.15 liters/min)
Power requirements
115 VAC (or 230 VAC) 115 watts maximum
Batteries
Rechargeable Nickel Cadmium
Fuse
1A 250V 5 X 20 Fast Blo
Construction
Aluminum alloy
Dimensions
15 cm x 33 cm x 10 cm (6" w x 13" l x 4" h)
Weight
3.18 kilos (7 pounds)
Digital meter
Liquid crystal display (LCD)
Operating environment
0E - 40EC, non-condensing, non-explosive
22
8.1 OPTIONAL “COMMUNICATIONS” VERSION
Alarm output
30V DC, 100mA
Data output
1. Digital, Serial, RS232, Baud Rate 1200 for use with
Data Logger, and/or JCI program software.
2. Digital, Serial, RS232 data format, but with driver for
20mA capability and 0 & 20mA logic levels; Baud
Rate 1200 (special industrial applications).
"OPTION BOARD" - See page 33.
Data output
0 - 2V or 4 - 20 mA
Auto sample interval
5, 15, 30, 60 minutes
Auto regeneration interval
6, 24 or 72 hours
8.2 INSTRUMENT I/O INTERFACE
The 631-X I/0 port (25 pin D-sub) has six functions:
C Serial communication channel, RS-232
Interface type: RS-232C full duplex, DCE
Communication parameters - 1200 Baud, 1 start bit, 8 data bits, 2 stop bits, no parity
Pin assignments:
Pin 1
Protective ground
Pin 2
Data in
Pin 3
Data out
Pin 7
Data ground
C Serial communication channel, 20mA current loop
Interface type: 20mA current loop, full duplex
Communication parameters - 1200 Baud, 1 start bit, 8 data bits, 2 stop bits, no parity
Pin assignments:
Pin 1
Protective ground
Pin 4
Data out (+)
Pin 5
Data in (+)
Pin 14
Data out (-)
Pin 16
Data in (-)
23
C Alarm output
Maximum voltage
Maximum current
Pin assignments:
Pin 9
Pin 10
Pin 7
Pin 23
30 VDC
100mAmp
Switched battery+
Alarm output (open collector, active low)
Battery ground
Battery ground
C Switched battery connection for data logger
Pin assignments:
Pin 9
Battery +
Pin 7
Battery ground
Pin 23
Battery ground
C Unswitched battery connection for external battery pack pin assignments
Pin assignments:
Pin 15
Battery +
Pin 19
Battery +
Pin 7
Battery ground
Pin 23
Battery ground
NOTE: Pins 6, 8, 11, 17, 18, 20 and 21 are non-standard and should not be connected.
24
9 ACCESSORIES & MAINTENANCE PARTS
PART #
ITEM DESCRIPTION
Y631-0901
631 Accessory Kit
Includes: zero air filter (1), .25mm fritware (20), trimmer tool (1), probe
(1), tubing adapter (1)
Z2600-0918
631 Functional Test Module
Includes: 1/8 x 3/16 reducer (1), tubing adapter (1), Allen wrench (1), 1
foot of 1/8" I.D. Tygon tubing, 1 foot if 3/16" I.D. Tygon tubing, filter cap
(1), 1 pound desiccant, guide pins - (2), 115 VAC line cord (1), Permeation
tube assembly (1), Functional Test Module Operation Manual (1)
Y631-0903
631 Maintenance Kit
Includes: .25 mm fritware (60), 021 battery pack (1), LFS scrubber filter
(1), LFD scrubber filter (1), 1 foot Tygon™ tubing - 1/8" I.D. (1') &
Tygon™ tubing - 1/16" I.D. (2')
Y6100-0057
JCI Data Logger
Y6100-0054
JCI Software Kit
Y411-0904
031/411 Carrying Case Assembly
Includes: case & die cut foam rubber Holds: Jerome 631-X,
personal hydrogen sulfide & accessories
1400-0052
001 Field Carrying Case Assembly
25
9.1 631-X FLOW SYSTEM
Z2600-3933
Z2600-3934
Z2600-3930
Z2600-3905
1400-3010
1400-3009
PS-151
2600-3039
2500-3001
2500-3002
LFS scrubber filter
LFD scrubber filter
Scrubber filter
Zero air filter
Tubing adapter
Intake Nozzle
Tube Nut
.25mm fritware
Tygon™ tubing - 1/8" I.D. (1 foot)
Tygon™ tubing - 1/16" I.D. (1 foot)
9.2 REPLACEMENT PARTS
Z4000-0907
Z2600-3905
1400-3010
4000-1011
4000-1012
1300-0025
2300-0001
6000-4003
5100-1012
6100-1055
021 Battery pack assembly
Zero air filter
Tubing adapter
IDC battery charger - 115 VAC
IDC battery charger - 230 VAC
1/8" - 1/16" Tubing Adapter
Trimmer tool
Line Cord
Spare Fuse
Interface (I/O) Cable
For current prices and delivery information, call AZI Customer Service at (800) 2353360 or (602) 470-1414.
FACTORY CALIBRATION SERVICE
Service includes filter replacement, component check and calibration and instrument
calibration to NIST traceable standards.
For authorization & scheduling, call AZI Customer Service at (800) 235-3360 or (602)
470-1414.
26
10 MATERIAL SAFETY DATA SHEET
Date of Issue 04/95
10.1 RESISORB
J.T. Baker Chemical Company
ARIZONA INSTRUMENT LLC
1912 W 4th Street
Tempe, AZ 85281
INFORMATION HOTLINE (800) 235-3360
Product Identification:
PRODUCT NAME: Resisorb - Hydrogen Sulfide
absorbent
FORMULA CAS NO.: 00000-00-0
MOLECULAR WEIGHT: 0.00
CHEMICAL FORMULA: Proprietary mixture
Section 1 - Physical Data
APPEARANCE & ODOR: Black solid with halogenlike odor
BOILING POINT: N/A
MELTING POINT: N/A
VAPOR PRESSURE: N/A
SPECIFIC GRAVITY: N/A
Section 2 - Fire and Explosion Hazard Data
FIRE: Combustible, keep away from heat, sparks,
flame.
EXPLOSION: Contact with strong oxidizers may
cause explosion.
FIRE HAZARD: Use water spray to soak, class A
extinguisher, gull protective clothing & NIOSH
approved self-contained breathing apparatus, move
exposed containers from fire area if it can be done
without risk, if not, use water to keep fire-exposed
containers cool.
Section 3 - Reactivity Data
STABILITY: Stable, no hazardous polymerization
CONDITIONS TO AVOID: Heat, flame, sources of
ignition
INCOMPATIBILITIES: Strong oxidizing agents,
nitric acid, ammonia, alkali metals, strong reducing
agents
Section 4 - Leak/Spill Disposal Information
PRODUCT CLEAN-UP: Protective clothing &
respiratory protection, scoop up spilled material,
avoid dusting, flush spill area with water.
DISPOSAL: Transfer to clean, dry container &
dispose of in accordance with local, state & federal
environmental regulations.
Section 5 - Health Hazard Information
EXPOSURE/HEALTH EFFECTS:
INHALATION: May cause tightness & chest pain,
coughing & difficulty in breathing.
INGESTION: May cause nausea, vomiting,
headaches.
SKIN AND EYES: Dust may irritate skin and/or
eyes.
FIRST AID:
INGESTION: get medical attention, if conscious,
immediately induce vomiting.
SKIN AND EYES: Immediately flush with water for
15 minute minimum; remove contaminated clothing.
Section 6 - Special Protection Information
Use adequate general or local ventilation to keep
fume or dust levels as low as possible. If airborne
concentration is high, use respirator or dust mask.
Wear rubber gloves & eye protection.
Section 7 - Storage and Special Information
Keep in tightly closed container, in cool, dry
ventilated area, away from heat, sparks or flame;
isolate from incompatible substances.
The information and recommendations set forth herein are
presented in good faith and believed to be correct as of the
date hereof. Arizona Instrument LLC, however,
makes no representations as to the completeness or
accuracy thereof and information is supplied upon the
condition that the persons receiving same will make their
own determination as to its suitability for their purposes
prior to use. In no event will Arizona Instrument
LLC be responsible for damages of any nature
whatsoever resulting from the use of or reliance upon this
information.
27
MATERIAL SAFETY DATA SHEET
Section 5 - Health Hazard Information
10.2 NICKEL CADMIUM BATTERY
MATSUSHITA BATTERY INDUSTRIAL CO
1 Matsushita-Cho
Moriguchi Osaka 570 JAPAN
EMERGENCY TELEPHONE 201-392-6703
INFORMATION TELEPHONE 714-373-7538
Product Identification:
PRODUCT NAME: Nickel Cadmium Battery
HAZARDOUS INGREDIENTS: Ni(OH)2, NiOOH,
Cd, Cd(OH)2, KOH or NaOH, LiOH
CHEMICAL FORMULA: NiCd
Section 1 - Physical Data
APPEARANCE & ODOR: None
BOILING POINT: Approximately 170EC
MELTING POINT: N/A
VAPOR PRESSURE: N/A
SPECIFIC GRAVITY: 2.6
Section 2 - Fire and Explosion Data
FIRE HAZARD: Under normal charging and
discharging, no fire hazard exists.
EXPLOSION: Under normal charging and
discharging, no explosion hazard exists.
Section 3 - Reactivity Data
STABILITY: Extremely stable
INCOMPATIBILITIES: N/A
Section 4 - Leak/Spill Disposal Information
PRODUCT CLEAN-UP: Non-toxic in normal use
DISPOSAL METHOD: DO NOT incinerate.
Dispose of in discharged state to avoid shorting.
28
EXPOSURE/HEALTH EFFECTS:
INHALATION: N/A
INGESTION: N/A
SKIN AND EYES: May irritate if contact is made
with the electrolyte (alkaline).
FIRST AID:
INHALATION: N/A
INGESTION: N/A
SKIN AND EYES: Immediately flush affected area
with cool water. If contact is made with the eyes or
mucous membranes, immediately flush with water
and get medical assistance.
Section 6 - Special Protection Information
No special protection required in normal usage.
Section 7 - Storing and Special Information
No special precautions required for storing.
The information and recommendations set forth
herein are presented in good faith and believed to be
correct as of the date hereof. Arizona Instrument
LLC, however, makes no representations as
to the completeness or accuracy thereof and
information is supplied upon the condition that the
persons receiving same will make their own
determination as to its suitability for their purposes
prior to use. In no event will Arizona Instrument
LLC be responsible for damages of any
nature whatsoever resulting from the use of or
reliance upon this information.
11 APPENDIX A - 631-X FUNCTIONAL TEST MODULE
The Jerome Hydrogen Sulfide Functional Test Module provides a fast and easy method of
verifying that Jerome 631-X Hydrogen Sulfide Analyzers are within specifications.
The Functional Test Module is beneficial:
C
C
C
C
in applications where frequent verification of functionality is required, such as ISO
9000 documentation;
to verify proper instrument operation when unexpected readings are obtained in
normal sampling;
as part of a weekly maintenance routine; and
to determine if analyzer calibration is needed.
Simple Operation
The Functional Test Module includes a permeation tube containing hydrogen sulfide.
When activated the test module releases this H2S from the permeation tube at a specific,
known concentration. The H2S flows over the gold film sensor of the Jerome analyzer,
which then measures the amount of exposure to the gas. The flow rate and temperature of
this release are factory set to provide a concentration of approximately 250 ppb (0.250
ppm) ± 20%. The user then compares the reading on the Jerome analyzer with the known
concentration of the release from the module. If the H2S level shown on the analyzer’s
display falls within the expected range (approximately 250 ppb), the instrument is
functioning properly. If the level is not in the expected range, it should be returned to the
factory for NIST-traceable calibration.
Hydrogen Sulfide Functional Test Module Components
The following components are included with the H2S Functional Test Module:
C
C
C
C
C
C
C
C
C
C
C
1/8 x 3/16 Reducer (p/n 1300-0031)
Tubing adapter (p/n 1400-3010
Allen wrench (p/n 2300-0003
1 foot of 1/8" I.D. Tygon tubing (p/n 2500-3001
1 foot if 3/16" I.D. Tygon tubing (p/n 2500-3001)
Filter cap (p/n 2600-3010)
1 pound desiccant (p/n 2600-3055)
Guide pins - 2 (p/n 2800-2044)
115 VAC line cord (p/n 6000-4003)
Permeation tube assembly (p/n Z2600-3939)
Functional Test Module Operation Manual (p/n SS-112)
The Functional Test Module carries a limited one-year warranty to be free from defects or
workmanship, except for the permeation tube, which is warranted for 90 days. Refer to
the operation manual for complete warranty information.
29
12
APPENDIX B - JEROME COMMUNICATIONS INTERFACE
SOFTWARE
The Jerome Communications Interface Software (JCI) is used with 631-X Hydrogen
Sulfide Analyzers that feature the Communications Configuration option.
C The JCI software allows the user to program the instrument for unattended monitoring
and to down-load recorded data stored in the Jerome Data Logger.
C Automatic sampling can be initiated every one (1) to sixty (60) minutes with
programmable audible alarm levels.
INSTRUMENT CONTROL WITH REAL-TIME GRAPHICS
When connected to a Jerome 631-X
analyzer, the software collects and graphs
data as it is being received and performs
statistical analysis. To provide maximum
resolution, the graph is “auto-scaling” in
both time (hours, days or weeks) and
concentration. Alarm levels can be set by
the user. Alarms trigger an audible buzzer
at the computer and activate a relay on the
instrument for remote indicators, such as a
light or fan.
The JCI software is menu-driven and easy
to use. Each display screen is designed for clarity with self-explanatory menu options.
Select menu options using the arrow keys and the “Enter” key.
Jerome Communications Interface Program
[Main]
Operate Instrument
Display Stored Data
Program/Read Data Logger
Configure
Exit Program
89=Move * 5=Select * <ESC>=Exit Menu
30
The user creates records, or files, for
computer storage of collected data. Data
is easily retrieved for later viewing,
graphing, printing, editing with
spreadsheet or word processing software
(not provided). Data can be used for
ongoing record keeping or for fulfilling
local regulatory requirements.
JCI KIT CONTENTS
C One 5 1/4" and one 3 ½" disk containing the JCI software
C Instrument-Data Logger-PC Interface cable (AZI p/n #6000-1056)
C User’s manual
SYSTEM REQUIREMENTS
C Instrument: Jerome 631-X with the Communications Option. These Jerome
instruments have a 25 pin- “D” connector and related internal hardware and “firmware.”
C Computer: IBM (or compatible) PC, XT, AT, 286, 386, 486 or Pentium
C Operating System: MSDOS or PCDOS 2.1 or higher
C Video: CGA, EGA or Hercules-compatible monochrome (VGA operates as EGA).
Install MSHERC.COM (provided) before using Hercules monochrome.
C Memory: 512 K bytes or larger
C Interface: Serial interface card
C Printer: IBM, Epson or HP Laserjet Series II graphics compatible
The software can run off the program floppy or off the computer’s hard drive. Before
using the software, familiarization with the Jerome Hydrogen Sulfide Analyzer and user’s
manual is important.
DATA LOGGER OPTION
The software can also program the
Jerome Data Logger (AZI p/n 61000010) used with the Jerome analyzer.
The computer programs the data logger
which then attaches to the instrument.
The data logger initiates automatic
sampling, triggers alarms and stores
data. This optional accessory enables
portable automatic sampling without a
dedicated computer.
O
DATA
LOGGER
31
13 APPENDIX C - INTERNAL DIP SWITCH SETTINGS
The DIP switch is located at the top,
center of the circuit board (SW2).
SW2
NOTE: Switch instrument power OFF
before changing DIP switch settings.
DIP Switch Settings:
32
1
ON
AUTORANGE
DISABLED (SEE DIP SWITCHES 5 & 6)
1
OFF
AUTORANGE
ENABLED
2
X
NOT USED
3
X
NOT USED
4
ON
ZERO DISPLAY:
00-99
4
OFF
ZERO DISPLAY:
L-O-H
5
6
RANGE
SAMPLE TIME
ON
ON
0 (.000 - .099PPM)
14 SECONDS
ON
OFF
1 (0.10 - 0.99 PPM)
20 SECONDS
OFF
ON
2 (01.0 - 09.9 PPM)
14 SECONDS
OFF
OFF
3 (10 - 50 PPM)
13 SECONDS
14 APPENDIX D - JEROME 631-X OPTION BOARD
Proper use of this board assumes that the base instrument is set correctly for the intended
operation. Please refer to the main instrument manual for that information.
S101
NOTE: IF R101 IS
MOVED FROM THE
FACTORY SET
POSITION, CALL
CUSTOMER SERVICE
AT (800) 235-3360 OR
(602) 470-1414.
R101
SW100
SW101
14.1 DC Power Adaptor Kit
The DC power adaptor kit consists of an interface board and a specially modified DC to AC
power inverter. This kit works with AZI/Jerome instruments with installed option boards.
The combination of the option board and DC power adaptor kit allows operation, including
sensor regeneration, from 12 volt battery systems.
INSTALLATION:
C Ensure that the instrument’s option board switches are set correctly. Especially note that
the option board’s dip switch (SW100) #6 must be set to “ON” for DC operation.
C Mount the interface board to the rear of the instrument. Tighten the mounting screws.
C Place or mount the DC/AC power inverter in a secure position near the instrument.
C Connect the cable from the DC/AC power inverter to the matching connecter on the
interface board. Note that the connectors are keyed to prevent improper connection.
C Plug the instrument’s AC power cord into the power inverter and connect it to the
instrument.
C NOTE that the inverter’s power switch is in the “OFF” position. LEAVE the power
switch in the “OFF” position at all times. The interface board will activate the inverter
when necessary. If the inverter power switch is placed in the “ON” position, it will cause
a continuous drain on the external 12 volt power system.
C Remove the rear cover of the inverter by first removing the two screws at the rear top of
the inverter, then sliding the cover sideways and away from the inverter.
33
C Connect cables from the external 12 volt power source to the appropriate (NEG and POS)
terminals on the back of the inverter. It is suggested that the provided cable restraints be
used.
C Reinstall the cover. If the external 12 volt lines are not powered, power them now.
C Turn the instrument “ON.”
C Press the “REGEN” switch on the instrument. Inverter operation can be verified in either
of two ways:
a.
Immediately after pressing “REGEN” the inverter will intermittently “sing.” This
tone slowly becomes nearly continuous and then ends after 64 seconds.
If the area is noisy, use the following method:
b.
Use a volt meter or test lamp to verify that approximately 115 volts is present for
about 64 seconds, starting when the “REGEN” switch is pressed.
C Allow the instrument to complete its regeneration before turning it off.
C With the instrument turned off, complete the installation (i.e. connect data logger,
communications cables, or other devices and ensure that the instrument, option board and
dip switches are correctly set.
USER SUPPLIED CABLES TO
JEROME 431X/631X
NOTE: KEEP SWITCH IN
"OFF" POSITION.
WITH
COMMUNICATION
CAPABILITIES
POWER INVERTER
DC POWER
INTERFACE
BOARD
AZI p//n 10000094
AC POWER CABLE
NOTE CONNECTOR
IS KEYED.
POWER INVERTER INTERFACE CABLE
A DATALOGGER
OR OTHER DEVICE CAN
BE MOUNTED TO REAR
CONNECTOR.
34
AZI p/n 6000-1093
14.2
AUTO-ZERO
With the option board installed, the 631-X has a limited auto-zero function. This
function cannot be disabled and is transparent to the user. The instrument can be
manually zeroed as described on page 6. However, if the instrument is to be operated by
personnel not familiar with the procedure or if it is operated unattended, the auto-zero
function should satisfactorily zero the unit after each sensor regeneration.
14.3
DC POWER OPERATION
The 631-X may be operated from almost any +12VDC source if the option board and a
Power Inverter Kit are installed. (Refer to the Power Inverter Kit Operating Instructions
for details.)
To work with the Power Inverter Kit, place SW100 dip switch 6 to the ON position.
14.4
TIMED REGENERATION
If the unit is to be operated unattended for extended periods, AZI recommends that the
sensor be regenerated regularly. While operation under JCI or data logger control
automatically regenerates saturated sensors. Regeneration will not occur as shown when
sample streams have a very low concentration of H2S. The option board controls
regeneration on a regular basis, every 6, 24 or 72 hours.
The regeneration intervals are set through a combination of switch settings as shown in
the following table:
------- SW100---------
REGENERATION
Switch #1
Switch #2
Interval (Hrs.)
OFF
OFF
OFF
ON
OFF
6
OFF
ON
24
ON
ON
72
35
14.5
AUTO-SAMPLE
If a data logger is connected and operating in the manual sampling mode, or a data
logger is not connected, the following automatic sampling rates may be selected with
SW100 dip switch settings:
Dip switch settings
Sampling frequency
3
4
4
ON
ON
ON
No automatic sampling
OFF
ON
ON
5 minutes
OFF
OFF
ON
15 minutes
OFF
ON
OFF
30 minutes
OFF
OFF
OFF
1 hour
This auto-sample function will not function if a data logger is connected and operating in
automatic sampler mode programmed through the JCI.
14.6
4-20 MA ANALOG OUTPUT
The analog output signal at pin 18 of the 25 pin connector can be configured to provide
the instrument's native mode 0-2 Volt output or the optional 4-20 mA output by setting
the option board jumper (SW101) to the "V" position for voltage, or the "I" position for
current. (Pin 23 is the ground pin for the analog output function. Pin 18 is positive with
respect to the ground pin).
C
C
The 0-2 Volt output circuit can drive loads of 10 k ohms or higher.
The 4-20 mA output is a passive transmitter and requires the connected receiver to
supply between 10 and 28 volts of excitation potential.
Note that neither analog output circuit is floating. Both circuits' negative terminals are
connected to the instrument's common ground buss.
SW101 Functions:
36
V=
0-2V analog output
I=
4-20 ma analog output
Figure 1
Figure 2
Figure 3
Jerome 631-X instruments shipped after early 1995, are capable of providing 0-2 volts
analog output. Instruments shipped before that time can be upgraded by a firmware
update and adjustment.
Instruments that are capable of 0-2 volt output can be upgraded to 4-20 mA output with
the addition of an option board upgrade. This must be installed at the factory.
CONNECTION AND SETUP:
C
C
C
C
C
14.7
0-2 volt devices connect as shown in Figure 1. If the instrument includes an option
board, be sure its analog jumper (SW101) is set to the “V” position.
4-20 mA active receivers connect as shown in Figure 2. Note that an active receiver
contains a voltage source to power the loop current. Note that the receiver must have
an isolated input circuit. That is, it must not be connected to ground or to a voltage
source referenced to ground. Be sure that SW101 is set to the “I” position before
power is applied.
4-20 mA passive receivers do not contain a voltage source to power the loop current.
They require the addition of a separate isolated power supply. Typically a supply
that delivers 15 to 20 volts DC at 50 mA is sufficient. Wire these as in Figure 3.
Note that some 12 volt DC wall transformers (as used on portable equipment) may
deliver 15 to 20 volts when they are lightly loaded. The CUI/Stack #AD-1220M is a
commonly available example of a 12 volt 200mA supply that will deliver around 18
volts nominal when loaded below 20 mA.
Be sure that the power supply used, and the passive receiver are both floating. If
either is not floating, the circuit will not work and damage may occur.
Ensure that SW101 is set to the “I” position before power-up.
FRESH AIR SOLENOID
An external three way solenoid can be used to provide an alternate source of fresh air to
the instrument during regeneration. This may be necessary if the sample stream lacks
molecular oxygen. A low current six volt DC solenoid, connected between pins 19 and
11 of the 25 pin rear panel connector, will be energized during the regeneration cycle if
the option board SW100 switch 6 is placed in the OFF position.
37
SW100
Switch Functions:
Switch
Function
1
Regeneration enable and time
2
Regeneration enable and time
3
Auto sample enable
4
Auto sample time
5
Auto sample time
6
D.C. Power mode enable.
Application Note
The following sample handling hardware, external to the Jerome instrument can be used
to provide fresh air or conditioned air during sensor regeneration. This configuration
should only be needed in the case of oxygen depleted sample streams.
Note that to support this external hardware, the Jerome 631-X must have the option
board assembly installed at the factory.
1/8" TUBE
1/16" TUBE
1/16" TUBE
TO SAMPLE
SOURCE
TO INSTRUMENT
1/16" TUBE
TO FRESH AIR
SOURCE
PIN 1
REAR OF CONNECTOR,
CONNECT TO PINS 11 AND 19
MOST INSTRUMENTS
38
PIN 1
REAR OF CONNECTOR,
CONNECT TO PINS 19 AND 21
631-X SHIPPED IN 1994 ONLY
Required Parts:
Suggested Part
Similar AZI P/N
1 six volt three way solenoid
1/8" to 1/16" tubing adaptor
1/2" clamp, adhesive mount
1/8" tube to instrument adaptor
Angar P/N 407569
Any
Any
Make
1300-1004
1300-0025
6000-0013
1400-3010
3" 1/8" tubing
A/R 1/16" tubing
1 25 pin male DB-25 connector
Solder-cup style
1 connector hood
Tygon Formula R3603
Tygon Formula R3603
AMP 747912-2
2500-3001
2500-3002
None *
AMP 749626-2
None *
* These are types not stocked by AZI, but should be available overnight from many
AMP stocking distributors such as Digi-Key Corporation. There are multiple suitable
alternatives such as Radio Shack’s 276-1547 and 276-1549.
14.8
DC POWER MODE ENABLE
Instruments with the 631-X option board modification can be used with any +12 VDC
source for continuous operation, if the AZI DC-AC power inverter kit is installed. The
instrument requires 115 volts AC for regeneration. To preserve the life of the DC power
source, the DC-AC inverter is switched on automatically for the regeneration only. The
external switch on the inverter should always be OFF to preserve battery life during
normal sampling.
When the instrument starts a regeneration and when DIP #6 is ON, the instrument sends
a signal to close the relay on the 631-X data logger interface board mounted between the
data logger and the instrument. This switches the inverter ON using the inverter’s
internal switch.
NOTE: When this mode is enabled, the instrument does NOT check for 115 VAC for
the regeneration. If there is no AC power to the instrument, and a regeneration is
initiated, the instrument will flash .H.H.H (rather than .P.P.P), however the sensor will
not heat, nor will the sensor clean.
14.9 INSTRUMENT ZEROING
The Jerome 631-X has essentially three zeros at the option board configuration:
C The instrument automatically rezeroes between samples and each sample is a unique
reading. To take a sample, simply press the SAMPLE button.
C The zero on the membrane switch is used to re-establish a baseline between the
reference and sensor gold film after a sensor regeneration. This zero is manually
adjusted by pressing the ZERO button and turning the potentiometer on the top of the
instrument until the display reads 0. Adjust only after sensor regeneration; it is
normal for H to be displayed after sampling.
C The 631-X option board provides an auto-zero feature following regeneration that is
invisible to the user. In some cases, the instrument cannot resume sampling after a
regeneration. .L.L.L appears on the display when the ZERO button is pressed and the
error message “manual bridge adjust needed” is added to the notes column of the JCI
text file when the JCI software is used. If this problem persists, it may be necessary to
re-set the auto-zero.
39
When necessary to re-adjust the auto zero point:
C Turn instrument off.
C Note original DIP switch settings on option board.
C On option board, turn DIP switch 4 on red DIP box to ON.
C Set the switches on the option board’s blue DIP box to 1,2,6 OFF; 3,4,5 ON.
C Turn the instrument ON.
C Switch option board DIP #1 OFF and ON three times, leaving it ON.
C While pressing the ZERO button, turn the potentiometer on the option board until the
numbers increase (maximum of 20). Note the display will flicker one digit.
C Return all switches to original position.
NOTE: The higher the auto-zero number, the lower the sensor capacity and the more
sensor regenerations are needed.
40
15 APPENDIX E: CALCULATION OF DYNACALIBRATOR H2S
CONCENTRATION
UNIT DEFINITIONS
mole / 6.02@1023 molecules
ngm '
gm
109
PPMv / 10-6
CALCULATIONS
(molar volume @ 25EC) ( (tube permeation rate)
(molecular weight of H2S)
(total gas flow rate)
' PPMvolume/volume
Ltr
mole
ngm
@(5090@
)
gm
min
34.07@
mole
' 0.512@PPMv
mL
7138@
min
24.45@
Mole units divide out, as do mass units, leaving volume per minute in both the numberator
and the denominator. This leaves a unitless quantity scaled by 1 x 10⁶ in the denominator
which is the definition of PPM.
41
16 WARRANTY
Arizona Instrument LLC (seller) warrants to buyer that Jerome products delivered pursuant
to this Agreement shall, at the time of delivery, and for a period of one (1) year thereafter (the
Internal Battery Pack, where applicable, is warranteed for a period of ninety [90] days only), be free
from defects in material or workmanship and shall conform to seller's specifications or such other
specifications as seller has agreed to in writing. Seller's obligations with respect to claims under
this warranty shall be limited, at seller's option, either to the replacement of defective or nonconforming product or to an appropriate credit for the purchase price thereof subject to the
provisions of seller's Warranty Policy as amended from time to time, said Policy being incorporated
herein by reference.
Returned products under warranty claims will be shipped to seller’s plant by buyer at buyer's
expense and shall be accompanied by a statement of the reason for the return and an approved
Return Material Authorization Number issued by seller. Buyer remains responsible for payment for
products not accepted for warranty adjustment and freight and handling costs associated therewith.
Notwithstanding the foregoing, no warranty shall be enforceable in the event that product has been
subjected to environmental or stress testing by buyer or any third party without written approval of
seller prior to such testing. Further, no warranty shall be enforceable if the alleged defect is found
to have occurred as a result of misuse, neglect, improper installation, repair, alteration, accident, or
improper return handling procedure by buyer.
Discontinued product is warranteed only for a credit or replacement at seller's option.
THE EXPRESS WARRANTIES GRANTED ABOVE SHALL EXTEND DIRECTLY TO BUYER
AND NOT TO BUYER'S CUSTOMERS, AGENTS, OR REPRESENTATIVES AND, EXCEPT
FOR WARRANTY OF TITLE, IS IN LIEU OF ALL OTHER WARRANTIES, WHETHER
EXPRESSED OR IMPLIED, INCLUDING ANY IMPLIED WARRANTIES OF FITNESS FOR A
PARTICULAR PURPOSE AND MERCHANTABILITY, SUCH OTHER WARRANTIES BEING
SPECIFICALLY DISCLAIMED BY SELLER. IN NO EVENT SHALL EITHER PARTY'S
LIABILITY FOR ANY BREACH OR ALLEGED BREACH OF THIS AGREEMENT EXCEED
THE TOTAL EXTENDED PRICE OR PRICES SHOWN ON UNFILLED ORDERS, NOR SHALL
EITHER PARTY BE LIABLE FOR ANY SPECIAL, INCIDENTAL OR CONSEQUENTIAL
DAMAGES RESULTING FROM BREACH OR ALLEGED BREACH.
Notwithstanding the foregoing, if any product covered by order(s) placed hereunder is designated as
“developmental,” “prototype” or “experimental,” no warranty whatsoever except a warranty of title
to component materials, will be applicable thereto and buyer shall indemnify seller for any claims
for liability asserted seller in connection therewith.
The foregoing state the entire liability of seller in connection with products supplied hereunder.
42
TRADEMARK AND COPYRIGHT PROTECTION
Jerome Instrument, Arizona Instrument, AZI and the stylized AZI are all registered trademarks of
Arizona Instrument LLC.
Copyright 1990-1997, Arizona Instrument LLC. All Rights Reserved.
Resisorb™ is a registered trademark of J.T. Baker Chemical Company
Tygon™ is a registered trademark of Norton.
Arizona Instrument LLC
Jerome 631-X Hydrogen Sulfide Analyzer Operation Manual
Part Number SS-087
Revision B
July 1997
If you have any questions regarding the operation of this instrument, please call our toll free
number (800) 235-3360. Internationally, call (602) 470-1414 or fax (602) 470-1888.
Arizona Instrument LLC
1912 W 4th Street
Tempe, Arizona 85281 USA
http://www.azic.com
email:
[email protected] - General
[email protected] - International
[email protected] - Customer Support
43