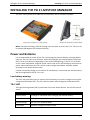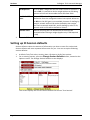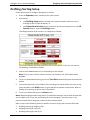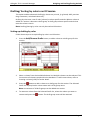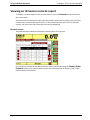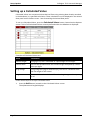
1
LIVESTOCK MANAGER
TSi 2
Instructions
PUBLISHED BY
Gallagher Group Limited
181 Kahikatea Drive, Private Bag 3026
Hamilton, New Zealand
www.gallagher.com
Copyright © Gallagher Group Limited 2015
All rights reserved
Gallagher TSi 2 Livestock Manager User Manual
3E3222 - Edition 4 - September 2015
NEW ZEALAND
Gallagher Group Ltd
181 Kahikatea Drive
Private Bag 3026
Hamilton, New Zealand
Tel: +64 7 838 9800
Fax: +64 7 838 9801
UNITED KINGDOM
Gallagher UK Ltd
Curriers Close, Canley
Coventry CV4 8AW
United Kingdom
Tel: 0870 2010101
Fax: 08700 111 545
AUSTRALIA
Gallagher Australia Pty Ltd
14 Somerton Park Drive
Campbellfield, Victoria, 3061
Australia
Tel: +61 3 9308 7722
Fax: +61 9308 7028
USA
Gallagher Power Fence Inc (USA)
5005 NW 41st Street
Riverside, MO 64168
Missouri, USA
Tel: +1 877 560 6308
Fax: +1 877 421 3392
CANADA
Gallagher Power Fencing Systems Inc
2090 20th Avenue East
Owen Sound
Ontario, N4K 5R1
Canada
Tel: +1 519 371 2141
Fax: +1 519 371 2336
DISCLAIMER Whilst every effort has been made to
ensure accuracy, neither Gallagher Group Limited nor
any employee of the company, shall be liable on any
ground whatsoever to any party in respect of
decisions or actions they may make as a result of
using this information.
In accordance with the Gallagher policy of continuing
development, design and specifications are subject
to change without notice.
Developed and manufactured by Gallagher Group
Limited, an ISO 9001:2000 Certified Supplier.
Table of Contents
Introduction ....................................................................................................................... ii
Installing the TSi 2 Livestock Manager ................................................................................. 5
Power and Batteries ........................................................................................................................ 5
Getting Started ................................................................................................................... 7
Sessions.............................................................................................................................10
Creating an ID Session ................................................................................................................... 11
Creating a Mixed ID Session .......................................................................................................... 12
Creating a Non ID Session ............................................................................................................. 12
Session Options ............................................................................................................................. 13
Setting up ID Session defaults ....................................................................................................... 14
Weighing and Drafting/Sorting Animals .............................................................................16
Weighing modes ........................................................................................................................... 16
Weight and Gain Graph................................................................................................................. 16
Weight Gain Calculations .............................................................................................................. 17
Weighing in an ID Session ............................................................................................................. 18
Procedure for drafting animals in an ID Session ........................................................................... 20
Weighing in a Non ID Session ........................................................................................................ 21
Drafting by weight in a Non ID Session ......................................................................................... 22
Drafting /Sorting Setup ................................................................................................................. 23
Using Individual Animal ID .................................................................................................33
Identifying animals ........................................................................................................................ 33
Recording Animal information ...................................................................................................... 35
Viewing animal history .................................................................................................................. 39
Viewing an animal's pedigree ....................................................................................................... 40
Viewing an ID Session statistics report ......................................................................................... 41
Viewing an ID Session records report ........................................................................................... 42
Setup Options ....................................................................................................................43
Visual Tag Entry Options ............................................................................................................... 43
Connecting Equipment.................................................................................................................. 45
Setting up a Trait ........................................................................................................................... 46
Setting up an Activity .................................................................................................................... 50
Setting up a Life Data Field............................................................................................................ 51
Customising the Animal Data panel .............................................................................................. 51
Setting up a Location..................................................................................................................... 53
Setting up a Group ........................................................................................................................ 53
Setting up a Calculated Value ....................................................................................................... 54
Setting up a Session Type .............................................................................................................. 59
Setting up Sounds and Alerts ........................................................................................................ 60
Setting up Printer Options ............................................................................................................ 61
Set up Regional Settings ................................................................................................................ 62
Setting up Wireless Options .......................................................................................................... 63
Database Options ..............................................................................................................64
Troubleshooting ................................................................................................................65
Glossary of Terms ..............................................................................................................67
INTRODUCTION
Thank you for purchasing the TSi 2 Livestock Manager. Since the 1930's Gallagher have
provided animal management systems that have earned a reputation for quality equipment
that withstands demanding agricultural conditions.
The Gallagher range of weighing systems is simple, tough, innovative and reliable and have
been specifically designed to accurately weigh live animals.
Kit contents
The Gallagher TSi 2 Livestock Manager box contains:
•
Carry case
•
User manual
•
TSi 2 Livestock Manager
•
Battery care instructions
•
230v Power supply
•
Screen cleaning cloth
•
12v Power cable
•
APS Professional installation CD
•
Memory stick
•
TSi 2 Livestock Manager wall bracket
Care and maintenance
The TSi 2 Livestock Manager is a tough and reliable product designed for use in typical
livestock environments. Proper care and maintenance can extend its life.
Listed below are guidelines for keeping the TSi 2 in good condition.
•
Don't submerge the TSi 2 in any liquid.
•
Store the TSi 2 in a cool, dry place. Avoid storing it in direct sunlight.
•
After use, clean the TSi 2 with a damp cloth. Take care not to scratch the display.
•
Fit the connector caps to keep the connections clean and dry.
•
Backup the database regularly.
Features of APS Professional
Gallagher Animal Performance Software (APS) Professional is a valuable accessory to your
TSi 2.
With APS you can perform the following functions:
Page ii
•
View, Edit or Record animal: Life Data, Traits, Activities and Notes
•
View Weight Gain graphs, Trait or Activity graphs
•
Filter animals, to show selected animals
•
Import and export animal data
•
Create a Planned Draft List
•
National Traceability compliance
•
Prepare advanced reports using animal data imported from the TSi 2.
Components of the TSi 2 Livestock Manager
Most data recorded on the TSi 2 is stored into a session.
Sessions
Typically one session represents one days work on the farm, or one specific group of
animals.
A session can optionally have 'Defaults' which define the way in which the session works.
For example; traits, activities, life data or notes to record within the session.
It is possible to copy a session setup from a previous session via the Copy Session Defaults
button when starting a new session.
Sessions will automatically have their creation date recorded.
The type of data you want to record in a session determines the type of session you will
want to create.
Session Type
Description
ID Session
Each animal is individually identified within the session.
Mixed ID
Session
Some animals will be individually identified, but others will not.
Non ID Session
No animals are identified. Mob statistics are created only.
Note: An animal can only be identified once per day, per session. If an animal is identified
more than once, the animal's previous data is shown then overwritten.
Page iii
Types of Animal Data
Data can be recorded for each animal that is identified at the TSi 2. When data has been
recorded for an animal, this data is stored within the TSi 2's database as an animal record.
Data Type
Description
Life Data
Life data fields typically do not change over the life of the animal,
(e.g. sex, breed, colour).
Traits
Trait fields describe the current state of the animal. An animal can
have several trait values over its life time. The TSi 2 can display all
values recorded over the history of the animal.
Examples of animal traits are weight, condition, pregnancy status.
Page iv
Activities
An activity is something that happens to an animal, (e.g. a drug
treatment, weaning).
Notes
A Note is a short text description recorded for an animal. Multiple
Notes can be recorded for each animal, with a history of all notes
viewable on the TSi 2.
Gallagher TSi 2 Livestock Manager
Installing the TSi 2 Livestock Manager
INSTALLING THE TSI 2 LIVESTOCK MANAGER
The TSi 2 can be placed on a table top or mounted on the TSi 2 bracket supplied.
Note: If bracket mounting, slide the locking clips into place to secure the TSi 2. The unit can
be rotated 180 degrees for bracket mounting.
Power and Batteries
It is recommended to switch off the TSi 2 and charge the internal battery overnight before
each use. This can take up to 10 hours. When fully charged, the internal battery will power
the TSi 2 for up to 8 hours (depending on the level of backlighting). If the TSi 2 is to be left
on for a time unattended, 'Suspend' mode can be used to turn off the display and conserve
power. When awakened, the TSi 2 will be read to weigh immediately. Suspend mode is
accessed via the power button menu.
If either the battery charger or an external 12 volt battery is connected, the internal battery
will be charged while the TSi 2 is in use.
Low battery warning
The TSi 2 will triple beep every 2 minutes and the battery icon colour changes to red, when
charge level falls below 20%. The TSi 2 will shut down when charge level falls below 10%.
TSi 2 LED
The Light Emitting Diode (LED) is positioned next to the Power button. The LED has several
states:
LED
TSi 2 Status
Flashes Green
A charger is connected and is charging the internal battery.
Is solid Green
A charger is connected and the internal battery is now fully charged.
Flashes Orange
The TSi 2 is in Suspend Mode.
Is solid Red
Indicates a weight has been locked.
Page 5
Installing the TSi 2 Livestock Manager
Gallagher TSi 2 Livestock Manager
Battery charge status
During operation, the battery icon on the Status Bar indicates visually, the amount of
charge left in the battery.
To view the battery charge status, press the Power button when the TSi 2 is on. The Power
Button Menu displays the percentage of charge left in the battery.
Page 6
Gallagher TSi 2 Livestock Manager
Getting Started
GETTING STARTED
The Power Button Menu
To open the Power Button Menu, press the Power button.
This table explains the parts of the Power Button Menu.
Part
Function
Flip Screen
Press to rotate the displayed information 180 degrees, for use on a wall
mounting bracket. Press again to return the display to its original position.
Clean
Screen
Press to disable the screen. The screen will not respond to touch for
approximately 15 seconds, at which time the screen can be wiped clean.
Full/Low
Backlight
and
buttons to adjust the amount of backlight. The
Press the
brighter the backlight, the more power the TSi 2 will consume.
Turn Off
Press to shut down the TSi 2.
Suspend
Press to enter Suspend mode.
Note: When the Power button menu is displayed, the TSi 2 is in WiFi discoverable mode.
TSi 2 screens
The TSi 2 provides several screen options via the buttons down the right side of the screen.
These are as follows:
Session screens
Use the screens described on the following page to record and view animal data during a
session:
Page 7
Getting Started
Gallagher TSi 2 Livestock Manager
Screen
Function
Collect
•
identify animals
•
weigh animals
•
record animal data
Refer to Recording animal data (p 35).
Stats
Records
•
view session statistics for the current session
Refer to Viewing an ID Session statistics report (p 41).
•
view records recorded in the current session for each animal.
Refer to Viewing an ID Session records report (p 42).
Animal History screens
Use the following screens to view a history of data recordings for each animal:
Screen
Function
Trait History
•
view a history of Trait records for the currently identified animal
Refer to Viewing animal history (p 39).
Activity History
•
view a history of Activity records for the currently identified animal
Refer to Viewing animal history (p 39).
Notes History
•
view a history of Note records for the currently identified animal
Refer to Viewing animal history (p 39).
Pedigree
•
view the progeny and percentage for the currently identified animal
and the relationship between each generation.
Refer to Viewing an animal's pedigree (p 40).
Option screens
Use the following screens to setup, change or review data in the database:
Screen
Function
Options
Shows the following menus:
•
Session Options
Refer to Sessions (p iii)
•
Database Options
Refer to Database Options (p 64)
•
Setup Options
Refer to Setup of Animal Data (p 43)
Press the Back button to return to the TSi 2 screens.
Office
Opens APS Professional on the TSi 2.
Refer to the APS Professional User Manual.
Page 8
Gallagher TSi 2 Livestock Manager
Getting Started
The Status Bar
The Status Bar is located at the bottom of the TSi 2 screens and displays as follows:
This table explains the parts of the Status Bar.
Part
Function
1
Displays the number of animals in the current session.
2
Displays the order of the current animal seen in the current session.
3
or
button, to navigate back or forward. The
Navigation arrows. Press the
previous or next animal will be displayed on the Collect screen. Press the
button, to navigate directly to the last animal seen in the session.
4
Displays the title of the screen you are currently on, or
Displays a weighing status message, (e.g. 'A new animal has been identified').
5
Displays the weighing mode for the current session. 'A' Automatic or 'M'
Manual.
6
Displays 'M' if the TSi 2 memory is full.
7
Displays 'D' if the TSi 2 database is full.
8
Displays the Wireless connection status.
9
Displays the Bluetooth connection status. This icon can be pressed to reconnect
the last paired device.
10
Displays the amount of charge left in the TSi 2 battery.
Page 9
Sessions
Gallagher TSi 2 Livestock Manager
SESSIONS
Sessions are:
ID Session
Mixed ID Session
In these sessions you can record:
•
An EID, Tag Number and/or NLIS Number for each animal.
•
A Weight for each animal.
•
Traits for each animal.
•
Activities for each animal.
•
Notes for each animal.
•
A Draft decision for each animal.
•
Life Data values for each animal.
In these sessions for an animal with ID you can record:
•
An EID, Tag Number and/or NLIS Number for each animal.
•
A Weight for each animal.
•
Traits for each animal.
•
Activities for each animal.
•
Notes for each animal.
•
A Draft decision for each animal.
•
Life Data values for each animal.
In these sessions for an animal without ID you can record:
Non ID Session
•
A Weight for each animal.
•
A Condition Score for each animal.
•
Notes for each animal.
•
A Draft decision for each animal.
In these sessions you can:
•
Record a weight for each animal.
•
Draft animals according to their weight.
A Non ID Session is operated via the Statistics or Records screen not
the Collect screen. This feature enables you to view animal records
and stats while weighing.
Page 10
Gallagher TSi 2 Livestock Manager
Sessions
Creating an ID Session
Animals are identified and the data recorded in this session is added to the animal's history.
Follow these steps to create an ID Session:
1.
Press the Options button, located on the Yard screens.
2.
Press the Create New Session button, located on the Options screen.
3.
Press the Full session with animal identification button. The Create New Session
screen displays.
4.
To enter a session name, press the Enter Session Name button (optional).
5.
To configure session options such as weight lock speed and EID requirements, press
the Enter Session Options button (optional). Refer to Session Options (p 13) for
further details.
6.
Session defaults can be copied from a previous session (optional):
To do this, press the Copy Session Defaults button and select the relevant session
from the list.
Note: When copying session defaults, Draft by List settings will not be copied.
7.
Edit session defaults (optional). Refer to Setting up ID Session defaults (p 14).
8.
Press the OK button to save this session.
•
To cancel creating this session, press the Cancel button.
Once you have pressed the OK button, you will be transferred to the Collect screen for this
session. This session date and name displays in the Session panel.
Page 11
Sessions
Gallagher TSi 2 Livestock Manager
Creating a Mixed ID Session
A mixed ID Session enables you to process both identified and unidentified animals in a
session.
Press No to EID Required, from the Enter Session Options button. Electornic
identification will not be reuired for this session. See Session Options (p 13) for further
details.
Note: If drafting has been set up for this session, you can change the draft gate release
time (default 5 seconds) from the session options screen. The draft gate will not be
released until after this period of time for those animals with No EID present.
Creating a Non ID Session
Follow these steps to create a Non ID Session:
1.
Press the Options button, located on the Yard screens.
2.
Press the Create New Session button, located under Session Options. Press the
Stats only session with no animal identification button.
3.
To have the TSi 2 announce the animal's weight, press the Read out Weight Turn ON
button. Ensure sound is turned on to enable this option, refer to Setting up Sounds (p
60).
4.
To enable Drafting, press the Drafting by Weight Turn ON button. The TSi 2 will draft
each animal according to weight. This can be set up on the next screen.
Page 12
Gallagher TSi 2 Livestock Manager
Sessions
Session Options
1.
From the Options menu;
•
select Create New Session, then select the type of session and press the
Enter Session Options button.
•
OR, press Change Session Options.
The Change Session Options screen displays.
2.
Press the session options buttons as required for the session.
Session Type:
determines an event to be recorded for the animals in this
session. For example: if the session type is 'Cull Session', a
'Death' event will be recorded and the status of the animals
within this session will change to 'Dead'. Refer to Setting up a
Session Type (p 59) for more information.
Select a Session Type from the pick-list or add a new one.
Weigh Mode:
allows selection of weight locking preference.
Max accuracy (default) takes around 3-5 seconds to lock a
weight once it has become stable. Max speed (sheep only)
takes around 1.5 seconds but is less accurate.
Record Weight:
defines how much of the animals weight has to be removed
from the load bars before the record is stored on the database
and new weight can be locked. Default 30%. This value is
configurable in increments of 5% between 5% and 95%.
Weight Lock
Mode:
can be set to either Manual (must press a button to weigh
each animal) or Automatic. This may be automatically set if a a
drafter/sorter is connected. Refer to Weighing Modes (p 16)
for more information.
Page 13
Sessions
3.
Gallagher TSi 2 Livestock Manager
EID Required:
if set to YES, a weight will not lock unless an EID is received. If
set to NO, it is possible to lock a weight without an EID being
present and this will also enable the No-EID Gate fields.
Enable No-EID
Gate:
if set to YES, a ‘No EID’ gate is enabled for an animal to be
drafted to once the configured timeout has expired. When set
to NO, the 'No EID' gate is not available, however if drafting by
weight, animals with no EID can be drafted by their weight,
the same as animals with EID’s, and if drafting by rules or list,
animals with no EID will be drafted to ‘Others’.
Release Time:
defines how long the TSi2 should wait for an EID to be
received before locking a weight (applies only if EID Required
= NO)
Press the OK button to save the session options and exit this screen.
Setting up ID Session defaults
Session defaults reduce the amount of information you have to enter for each animal.
Session defaults will enter repeated information for you. You can set up the following
session defaults:
•
A default Trait/Trait value, Activity, Note, Life data or Draft/ Sort options.
1.
For an existing session, press the Change Session Defaults button, located on the
Options screen. The Change Session Defaults screen displays.
This screen displays the current session defaults for session "First Session".
Page 14
Gallagher TSi 2 Livestock Manager
Sessions
•
To set up a default Life Data value/Note, refer to Adding a session default Life Data
value or Note.
•
To set up a default Trait value, refer to Adding a session default Trait value.
•
To set up a default Activity, refer to Adding a session default Activity.
•
To set up a default draft option, refer to Turning on a draft option (p 23).
Copy session defaults
You can copy defaults from an existing session. For example if you created a drafting setup
in a previous session, you may want to copy this setup to a new session. Use the Copy
Session Defaults button.
Deleting a session
Deleting a session will remove all details associated with the session from the database.
Details include: Tag Numbers, Traits, Weights, Activities, Notes and session date, time and
name.
Note: If the session deleted is the active session, a new session will be created and become
the active session.
Page 15
Weighing and Drafting/Sorting Animals
Gallagher TSi 2 Livestock Manager
WEIGHING AND DRAFTING/SORTING ANIMALS
Weighing modes
The TSi 2 can be operated in one of the Weight Locking Modes:
Manual
Automatic
The operator must press the Weigh button to lock a weight.
The weight is locked automatically by the TSi 2 once stable.
•
To change the weighing mode, press the weighing mode button in the status bar of the
Collect screen until the desired weighing mode is displayed.
•
After the weight has been locked, the LED illuminates red and the TSi 2 announces and
displays the locked weight.
•
When the animal leaves the platform, the TSi 2 attempts to compensate for the weight
of any accumulation of mud or dung left on the platform and then displays a Zero icon.
•
The operator can optionally restore zero by pressing the Zero button.
•
During a weighing session, if the TSi 2 consistently does not restore to zero, check that
there are no obstructions under or around the platform or crate.
Weight and Gain Graph
Selecting the Graph button
, will
display historic weight and gain values
for the current animal selected in the
Collect screen.
Selecting the Change Trait button, will
display a pick-list containing all numeric
traits, which can also be graphed for the
animal.
Page 16
Gallagher TSi 2 Livestock Manager
Weighing and Drafting/Sorting Animals
Weight Gain Calculations
The weight gain calculations are performed by the TSi 2 when an animal is weighed. These
calculations are displayed by default at the bottom of the Animal Data panel on the Collect
screen.
Part
Function
Current ADG
Displays the average daily weight gain between the animal's most
recently recorded weight and the weight recorded immediately prior to
that.
Overall ADG
Displays the average daily weight gain between the animal's first
recorded weight and the most recently recorded weight.
Page 17
Weighing and Drafting/Sorting Animals
Gallagher TSi 2 Livestock Manager
Weighing in an ID Session
Before you begin
Before you begin this procedure, you will need to:
•
Connect the loadbar cables to the TSi 2.
•
If using an Electronic ID reader, connect the reader to the TSi 2, refer to Connect
Equipment (p 45).
•
If using an auto drafter, connect the drafter to the TSi 2, refer to Connect Equipment (p
45).
•
Create a new ID Session, refer to Creating an ID Session (p 11).
•
If you want to set up session defaults, refer to Setting up ID Session defaults (p 14).
•
Select a weighing mode. Press the Weighing Mode button to change the weighing
mode to M (Manual) or A (Automatic).
Note: If an auto drafter is connected, the weighing mode will be automatically set.
•
Check that the displayed weight is zero. Press the Zero button to tare off any weight
left on the platform.
Procedure
1.
Identify the animal.
Record the animal's Electronic ID, Tag Number or NLIS Number. An ID can be recorded
at any time before or while the animal is on the platform.
If this is the first time you have scanned the Electronic ID and you want to enter an
associated Tag Number, you can enter it now. If you cannot scan the Electronic ID,
enter a Tag Number for the animal.
2.
3.
Page 18
When an Electronic ID, Tag Number or NLIS Number has been recorded:
•
The Electronic ID, Tag Number or NLIS Number displays on screen;
•
The recorded on date and time displays on screen;
•
If sound is on 'tag okay' and the Tag Number is announced. If the Tag Number is
new to the database 'new tag' and the Tag Number is announced;
•
Life Data for the animal displays on screen;
•
ADG displays on screen, if a previous weight has been recorded for the animal;
•
The session count increases by one (unless the animal has been seen previously
in this session today).
You can optionally record data about the animal being weighed using the Animal and
Life Data, Traits, Activities or Note panels. You can record this information before the
next animal is weighed or identified.
Weighing and Drafting/Sorting Animals
Gallagher TSi 2 Livestock Manager
To record...
a Trait value
Refer to Recording a Trait (p 36).
an Activity
Refer to Recording an Activity. (p 37)
a Life Data value
Refer to Recording Life Data (p 37).
a Note
Refer to Recording a Note. (p 38)
4.
Load the animal onto the platform. Ensure the animal is completely on the platform.
5.
Weigh the animal.
Follow the instructions for the weighing mode you have selected.
•
Manual Mode: Press the Weigh button to weigh the animal. When the TSi 2
has determined an accurate weight for the animal it locks onto the weight.
•
Automatic Mode: When the TSi 2 has determined an accurate weight for the
animal it locks onto a weight without user input.
Note: The time taken to lock onto a weight varies depending on the movement of the
animal.
6.
7.
When the TSi 2 has locked onto a weight;
•
the TSi 2 beeps; the LED illuminates red; and OK is shown in the Weight panel.
•
the weight value displays in the Weight panel;
•
the recorded weight value displays in the Traits panel.
If you want to reweigh the animal, press the Reweigh button. The TSi 2 reweighs the
animal and locks a new weight. This new weight replaces the original weight. For
example: If the animal was not completely on the weighing platform or two animals
were on the platform when the weight locked, the TSi 2 may have automatically locked
onto an incorrect weight.
You do not need to re-enter the Tag Number, Life Data values, Traits, Activities or Note
if you have reweighed the animal.
Page 19
Weighing and Drafting/Sorting Animals
Gallagher TSi 2 Livestock Manager
Procedure for drafting animals in an ID Session
Once the animal has been identified (EID scanned) and all the Traits have a non-blank entry
(which can be a default entry), then the draft decision is calculated.
1.
Draft the animal.
Follow the instructions for the drafting mode you have selected.
Automatic Mode
•
Ensure 'Automatically opening the draft gate' is turned ON, refer to Draft rules,
and the appropriate gate is opened by the auto drafter. If sound is on, the sound
associated with this draft group will be announced by the TSi 2. The draft group
displays in the draft panel on the Collect screen. For example:
Note: If any data for the animal (Life Data, Traits or Activities) is subsequently
edited, the draft decision is re-calculated and a new draft decision displays.
Note: If the animal meets the criteria for more than one draft group (draft
collision) then a pick-list displays. Select the draft group you want the animal to
be drafted to.
Manual Mode
•
•
Ensure 'Automatically opening the draft gate' is turned OFF, refer to Draft rules.
If sound is on, the sound associated with this draft group will be announced by
the TSi 2. The draft group displays in the draft panel on the Collect screen. For
example:
Select either:
Open Gate:
If an auto-drafter is connected to the TSi 2, press the Open Gate button, to
open the gate associated with the current draft group.
If an auto drafter is NOT connected to the TSi 2, you will need to manually open
and close the gate, corresponding to this draft group.
OR:
Change Draft:
Press Change Draft, to change the draft decision. A pick-list of draft groups
(defined in the session set up as weight limits) is displayed.
Select a new draft group. The draft decision will be changed and the animal will
be drafted with the newly selected draft group. The draft panel on the Collect
screen will be updated to display the new draft decision.
Note: If any Life Data, Trait or Activity recordings for this animal are changed, the
draft decision will be re-calculated. If the animal meets the criteria for more than
Page 20
Gallagher TSi 2 Livestock Manager
Weighing and Drafting/Sorting Animals
one draft group (draft collision) then a pick-list displays. Select the draft group
you want the animal to be drafted to.
2.
The animal leaves the platform.
3.
The TSi 2 will automatically zero off any weight left on the platform (e.g. dirt or
manure). When this occurs the zero icon is displayed on the screen. If the zero icon
does not display, press the Zero button.
The TSi 2 does not need to return to zero before the next animal is loaded onto the
platform. Once the weight has dropped by 30% (default) or the configured %, the
weight will unlock ready for the next animal to be loaded onto the platform.
Weighing in a Non ID Session
These are sessions where individual animal's identities are not recorded. Weights can be
recorded but data is not held in individual animal records. Non ID Sessions are useful for
working with groups of animals without Electronic ID Tags.
Before you begin, you will need to:
•
Connect the loadbar cables to the TSi 2.
•
If using an auto drafter, connect the drafter to the TSi 2, refer to Connect Equipment (p
45).
•
Create a new Non ID Session, refer to Creating a Non ID Session (p 12).
•
Check that the displayed weight is zero. Press the Zero button to zero off any weight
(e.g. dirt or manure) left on the platform.
Note: If an auto drafter is connected, the weighing mode will be automatically set.
Procedure
1.
Load the animal onto the platform. Ensure the animal is contained on the platform
(e.g. no hooves off the platform and no one holding the animal).
2.
Follow the instructions for the weighing mode you have selected.
•
Manual Mode: Press the Weigh button to weigh the animal. When the TSi 2
has determined an accurate weight for the animal it locks onto the weight.
•
Automatic Mode: When the TSi 2 has determined an accurate weight for the
animal it locks onto the weight.
Note: The time taken to lock onto a weight varies depending on the movement of the
animal.
3.
When the TSi 2 has locked onto a weight:
•
the TSi 2 beeps; the LED illuminates red; and OK is shown in the Weight panel.
•
the weight value displays in the Weight panel;
•
the recorded weight value displays in the Traits panel.
•
If you are on the Statistics screen, weight statistics will be updated to include this
weight;
•
OR, if you are on the Records screen, the weight will be displayed at the top of
the list.
Page 21
Weighing and Drafting/Sorting Animals
Gallagher TSi 2 Livestock Manager
4.
If you want to reweigh the animal, press the Reweigh button. The TSi 2 reweighs the
animal and locks a new weight. This new weight replaces the original weight. For
example: If the animal was not completely on the weighing platform or two animals
were on the platform when the weight locked, the TSi 2 may have locked onto an
incorrect weight.
5.
The animal leaves the platform.
6.
The TSi 2 will automatically zero off any weight left on the platform (e.g. dirt or
manure). When this occurs the zero icon is displayed on the screen. If the zero icon
does not display, press the Zero button.
Drafting by weight in a Non ID Session
In a Non ID Session animals can be drafted by weight. An animal must be weighed before it
can be drafted.
Draft groups are set up as weight ranges. You can specify the weight range for each draft
group. If an animal's weight falls within a specified weight range the animal will be drafted
to this group, if an animal's weight falls between two weight ranges the animal will be
drafted to the lower weight range.
If an auto drafter is connected, the TSi 2 can be set to automatically open the correct gate.
Refer to Drafting/ Sorting by Weight (p 24) for how to set up Draft by Weight for a session.
Page 22
Gallagher TSi 2 Livestock Manager
Weighing and Drafting/Sorting Animals
Drafting /Sorting Setup
Follow these steps to configure drafting for a session:
1.
Press the Options button, located on the Yard screens.
2.
Press either:
•
the Drafting Setup button, located in the Session Options menu to turn on
drafting for the current ID Session, or
•
the Create New Session button, located in the Session Options menu, the ID
Session button, then the Drafting button.
The Change Session Draft: Screen 1 of 3 displays as follows:
This screen displays the draft options for the current session. If this is a new session
'No Drafting' is selected by default.
3.
Press a Draft Mode button to turn on drafting for the session.
Note: If the current session contains animals, the 'Draft by List' draft mode will be
disabled.
4.
To turn on Automated Drafting, press the Turn ON Automatically open the Draft Gate
button.
5.
To draft animals that are in a WHP or ESI according to the draft mode you have set up,
press the WHP or ESI Draft button. A grace period can also be entered here. Refer to
Setting up an Activity (p 50) for more information.
6.
To set up a draft mode, press the Next button.
Note: When drafting animals using the TSi 2, the default setting is not to draft animals that
are in a WHP or ESI. If you are pre-drafting for future slaughter, you may enter a race
period. Animals within the grace number of days will be drafted.
Refer to one of the following topics for detail on how to set up your chosen draft mode:
•
Drafting/ Sorting by weight (p 24)
•
Drafting/ Sorting by list (p 25)
•
Drafting/ Sorting by rules (p 27)
Page 23
Weighing and Drafting/Sorting Animals
Gallagher TSi 2 Livestock Manager
Drafting/ Sorting by weight
When drafting by weight an animal is weighed and then drafted according to how heavy it
is. Draft groups are set up as weight ranges, defined by lower and upper weight limits.
Note: In an ID Session, the 'Others' draft group cannot be removed, however it can be
renamed. Animals in a WHP or ESI, are drafted to the 'Others' draft group.
1.
To change the number of draft groups (draft ways):
a)
2.
3.
Press the Drafting button and select the desired draft ways number (maximum
nine ways).
To rename a draft group: (ID Session only)
a)
Press the Name for the draft group you want to change and enter a new draft
group name (maximum 20 characters).
b)
Press the Enter button to confirm your rename.
To change or assign a draft gate:
a)
Press the Gate button for the draft group whose gate you want to change and
select a draft gate number (maximum of nine gates are available).
Note: More than one draft group can share the same gate number.
Note: A draft gate must be chosen for each draft group to enable the Next button.
4.
It is possible to change the sound file that is read out as a draft decision is made. To do
this:
a)
Press the Sound button for the draft group whose sound you want to change,
then;
b)
Press the button for the draft sound file you want to play.
5.
Choose a weight limit for each draft group (it is recommended that you set the highest
weight limit first then work backwards to the lowest weight limit).
6.
Once all Settings have been configured, to view a summary of the draft settings, press
the Next button.
Note: In an ID Session, the Draft Summary enables you to assign the following
parameters to a draft group: Event, Group, Farm, Property or Area by selecting a draft
group and pressing Edit Draft.
Page 24
Gallagher TSi 2 Livestock Manager
Weighing and Drafting/Sorting Animals
Drafting/sorting by list in an ID Session
A draft list enables you to specify, using Electronic ID's, a specific group of animals to be
drafted off during a session. The list must first be configured in APS. Refer to Creating a
Planned Draft List, in the APS Professional User Manual.
Notes:
1.
•
You cannot add a draft list to a session that already contains animals.
•
All animals not defined within a draft group will be drafted to the 'Others' draft
group.
Press the Draft List button (this button initially displays as blank) to add a draft list to
this session.
Press the button for the draft list you want to add as a draft group for this session. You
will be returned to the Draft By List screen. This screen displays your newly added draft
list/group.
2.
To change a draft gate:
a)
Press the Gate button for the draft group whose gate you want to change and
then;
b)
Press a draft gate number (maximum of nine gates are available). A draft gate
must be chosen for each draft group to enable the Next button.
Note: More than one draft group can share the same gate number.
3.
It is possible to change the sound file that is read out as a draft decision is made. To do
this:
a)
Press the Sound button for the draft group whose sound you want to change,
then;
b)
Press the button for the draft sound file you want to play.
Page 25
Weighing and Drafting/Sorting Animals
4.
Gallagher TSi 2 Livestock Manager
Once all Settings have been configured, to view a summary of the draft settings, press
the Next button.
The Draft Summary enables you to assign the following parameters to a draft group:
Event, Group, Farm, Property or Area by selecting a draft group and pressing Edit
Draft.
Page 26
Gallagher TSi 2 Livestock Manager
Weighing and Drafting/Sorting Animals
Drafting/ Sorting by rules in an ID Session
This option enables advanced drafting by almost any criteria, (e.g. Breed, ADG, previous
drug treatments, calculated values etc).
Drafting by rules uses a set of rules (ruleset) to select specific animals. When a ruleset is
added to a session it becomes a draft group. A draft group selects specific animals that
meet the ruleset criteria.
Note: Drafting/Sorting by rules can only be used on ID Sessions.
Setting up drafting by rules
Follow these steps to set up drafting by rules in an ID Session:
1.
Press the Add/Remove Drafts button, to add a ruleset as a draft group for this
session.
2.
Select a ruleset from the Available Rulesets list. Multiple rulesets can be selected. This
list contains all rulesets stored within the database. To add a new ruleset, refer to
Creating a ruleset (p 30) for further detail.
3.
button to add a ruleset as a draft group for this session. The Selected
Press the
Drafts list displays both a ruleset name and a draft group name.
Note: A maximum of 20 draft groups can be added to a session.
4.
To remove a ruleset from the Selected Drafts list, select the ruleset you want to
remove and press the
button. The draft group name will be removed.
Page 27
Weighing and Drafting/Sorting Animals
Gallagher TSi 2 Livestock Manager
5.
Press the OK button, to confirm your draft groups for this session.
6.
You will now need to choose a draft gate and optionally a draft sound for each draft
group then press the Next button.
7.
Once all Settings have been configured, to view a summary of the draft settings, press
the Next button.
The Draft Summary enables you to assign the following parameters to a draft group:
Event, Group, Farm, Property or Area by selecting a draft group and pressing Edit
Draft.
Notes:
Page 28
•
A draft gate is required for each draft group. To enter or change a draft gate
number, press the Gate button for the draft group whose gate you want to
change, then press a draft gate number (maximum of nine gates are available).
•
Draft names and sound files can be changed as detailed in Drafting/ Sorting by
Weight (p 24).
Gallagher TSi 2 Livestock Manager
Weighing and Drafting/Sorting Animals
Drafting by rules - example
Case Study: Drafting by Rules
These examples give you a better understanding of how to draft by rules.
Objective
A farmer wants to select specific animals from a herd, to be sold.
The buyer's requirements are:
•
All animals must be male.
•
Each animal’s weight must be greater than 550kg.
•
All animals must not have received a drug treatment within the last 30 days (this is
determined using a calculated value).
Method
The farmer creates a ruleset containing these rules. These rules match the buyer’s
requirements.
Result
When the farmer adds the ruleset to a session it becomes a draft group. The farmer names
the draft group 'SOLD'. The animals that meet the rule criteria are drafted to the 'SOLD'
draft group. The animals that do not meet the rule criteria are drafted to the 'OTHERS' draft
group.
Page 29
Weighing and Drafting/Sorting Animals
Gallagher TSi 2 Livestock Manager
Creating a custom ruleset
Follow these steps to create a ruleset:
1.
Open the Add/Remove Drafts screen, refer to Setting up drafting by rules (p 27) for
further detail, then press the Add New Ruleset button.
2.
Press the Ruleset Name button and enter a Ruleset Name.
3.
Press the Add Rule button, a new row is added to the table.
4.
Choose a Draft Field Type:
5.
a)
Press the Edit Field button. The 'Choose Draft Field Type' pick-list displays.
b)
Select a field from each list displayed. You will be returned to the Change Ruleset
screen. Your chosen Draft Field Type displays in this screen.
Choose a Rule Type:
a)
6.
Page 30
−
is
−
is not
−
contains
−
is greater than
−
is less than
−
is greater than or equal to
−
is less than or equal to
Choose a Rule Value:
a)
7.
Press the Edit Rule Type button and select a Rule Type. The options presented
in this pick-list depend on your chosen Field Type, but may be one of the
following:
Press the Edit Value button and choose or enter a value. You will be returned to
the Change Ruleset screen. Your value displays in this screen.
Press the OK button, to save this ruleset.
Gallagher TSi 2 Livestock Manager
Weighing and Drafting/Sorting Animals
You will be returned to the Add/Remove Drafts screen, where you can add this ruleset
as a selected draft for this session.
•
To continue adding rules to this ruleset, repeat this procedure from step 4.
•
To discard your changes, press the Cancel button.
Creating a ruleset - examples
The following two examples detail how to create a rule, using different Field Types:
Field Type: Life Data Value
Follow these steps to create a rule specifying Sex is Male:
1.
Press the Add Rule button.
2.
Press the Edit Field button. The 'Choose Draft Field Type' pick-list displays.
3.
Press the Life Data Value button. The second 'Choose Draft Field Type' pick-list
displays.
4.
Press the Sex button.
5.
Press the Edit Rule Type button. The 'Choose Rule Type' pick-list displays.
6.
Press the is button.
7.
Press the Edit Value button. The 'Choose Sex' pick-list displays.
8.
Press the Male button then press the OK button.
Field Type: Last Trait Value
Follow these steps to create a rule specifying the Last Condition Score of an animal as
greater than 4.5.
1.
Press the Add Rule button.
2.
Press the Edit Field button. The 'Choose Draft Field Type' pick-list displays.
3.
Press the Last Trait Value button. The second 'Choose Draft Field Type' pick-list
displays.
4.
Press the Condition Score button.
5.
Press the Edit Rule Type button. The 'Choose Rule Type' pick-list displays.
6.
Press the is greater than button.
7.
Press the Edit Value button. The numeric keypad displays.
Page 31
Weighing and Drafting/Sorting Animals
8.
Page 32
Type in 4.5 then press the Enter button.
Gallagher TSi 2 Livestock Manager
Gallagher TSi 2 Livestock Manager
Using Individual Animal ID
USING INDIVIDUAL ANIMAL ID
Identifying animals
The TSi 2 is able to identify an animal by any of the following:
•
Electronic ID
•
Visual Tag Number / Management Tag
•
NLIS Number (often used for unique national traceability ID)
Finding a Tag Number
Use this function to find an animal within the TSi 2's database. This function can also be
used to create an animal in the TSi 2's database.
1.
Press the Find Tag button. The alphanumeric keypad displays.
2.
Enter the animal's Tag Number.
•
To find an animal's NLIS Number, press the Change to NLIS Number entry
button and enter the animal's NLIS Number.
If the animal already exists in the database, the animal will be displayed on the Collect
screen. If not then a new animal is created with this ID.
Visual Tag Numbers
A default tag prefix can be added and new visual tag numbers can be automatically
incremeted, to all newly identifed animals . See Visual Tag Entry Options (p 43) for more
information.
Change or Assign an Animal ID
The TSi 2 maintains a cross-reference table that links an animal's Electronic ID with a Tag
Number and/or NLIS Number. Once it makes this link, the TSi 2 remembers the Tag Number
and/or NLIS Number and retrieves it the next time the Electronic ID is scanned.
If your supplier of Electronic ID Tags has provided a Tag Bucket file you can save time
during animal induction by pre-loading the Electronic ID's and Visual Tag Numbers into the
database using APS software on the PC. Once imported, transfer the database from APS to
the TSi 2. In the yard each time you scan an Electronic ID the Tag Number for this animal
will be automatically displayed. Refer to Importing Tag Bucket Files in the APS Standard
User Manual for more information.
1.
Identify the animal by either scanning its Electronic ID or entering a Visual Tag Number
using the Find Tag button.
Page 33
Using Individual Animal ID
Gallagher TSi 2 Livestock Manager
If no Visual Tag Number has been assigned, the digits of the Electronic ID are displayed
in the Tag Number panel, at the top left of the Collect screen, preceded by a colon.
2.
Press the Change Tag button to display the following screen:
3.
Select the appropriate button for the ID to be changed or assigned.
4.
Enter the new ID information for the animal.
Label printing
A label printer can be connected to the TSi 2 via the serial port. This must be configured
from the Options > Connect Equipment button. Refer to Setting up Printer Options (p 61).
Page 34
Using Individual Animal ID
Gallagher TSi 2 Livestock Manager
Recording Animal information
All data recorded for an animal is entered via the Collect screen. The Collect screen is
divided into a number of panels. The purpose of each panel is to collect a specific piece of
data.
The Collect screen
The image below identifies the various panels that make up the Collect screen.
Parts of the Collect screen
The following table explains the panels that make up the Collect screen.
Panel
Title
Function
1
Session panel
Displays the current session name and creation date.
Displays the date this animal was identified. The colour of
this text is used to indicate the following:
Black:
This animal was identified at the TSi 2 on the
current day.
Red:
This animal was identified at the TSi 2 on a
different date prior to the current day.
Green:
This animal is new to the database (i.e. not
previously known within the database).
2
Traits panel
Displays the Traits recorded for this animal.
3
Activities panel
Displays the Activities recorded for this animal.
4
Custom Animal Data
panel
Displays the selected Animal Data values for this animal.
5
Weight Gain
Displayed at the base of the Custom Animal panel is the
Page 35
Using Individual Animal ID
Panel
Title
Gallagher TSi 2 Livestock Manager
Function
Current and Overall Average Daily Gain for this animal.
6
Note panel
Displays the last Note recorded for this animal and the
date of entry.
7
Draft panel
Displays the last Draft decision for this animal.
8
Delete
Deletes an animal from the session and all associated
records except life data. Previous records are not deleted.
A new animal will be completely removed from database.
Recording a Trait
When you record a Trait (measurement) for an animal you will choose a Trait from the list
stored within the TSi 2's database. If the Trait that you want to add is not in the pick-list,
you can add this Trait to the list.
1.
Press the Traits Add button, located in the Traits panel on the Collect screen. A picklist 'Traits to Add' displays. For example:
2.
Press the pick-list button of the Trait you want to record against the selected animal,
OR
To add a new Trait, press the Add New Trait button. Refer to Setting up a Trait (p
46).
The selected trait displays in the Traits panel on the Collect screen.
3.
Press the button displaying the current Trait value (which may be blank). This button is
located below the Trait name in the Traits panel.
4.
Enter or select a Trait value and press OK to return to the Collect screen.
Page 36
Gallagher TSi 2 Livestock Manager
Using Individual Animal ID
Recording an Activity
When you record an Activity for an animal you will choose an Activity from the 'Activities to
Add' pick-list stored within the TSi 2's database. If the Activity that you want to add is not in
the pick-list, you can add this Activity to the list.
1.
Press the Activities Add button, located in the Activities panel on the Collect screen. A
pick-list 'Activities to Add' displays.
2.
Select and press the Activity button you want to add, OR
To add a new Activity, press the Add New Activity button. Refer to Setting up an
Activity (p 50).
This activity displays in the Activities panel on the Collect screen.
Recording Life Data
When you record a Life Data value for an animal you will either: enter a value or select a
value from a list of values. If the value you want to select is not in the list, you can add this
value to the list for the selected Life Data value. Refer to Setting up a Life Data field (p 51).
1.
Press the Life Data Change button, located in the Animal Data panel on the Collect
screen.
The Collect screen will be replaced by the Change Life Data panel. A blank button
means a Life Data value has not yet been recorded for this field.
2.
Press the button of the Life Data value you want to change. Enter or select a Life Data
value.
3.
Press the Collect button to return to the Collect screen.
Page 37
Using Individual Animal ID
Gallagher TSi 2 Livestock Manager
Recording a Note
A Note consists of a short description (maximum 30 characters) and the date on which the
Note was recorded.
The last Note recorded for the current animal is displayed in the Note panel, located on the
Collect screen. To view a history of Note records recorded for an animal, identify the animal
and press the Notes button located on the Yard screens.
1.
Press the Add Note button, located in the Note panel on the Collect screen. The
alphanumeric keypad displays.
2.
Enter your Note.
•
If the note is to popup as an alert when the animal tag is next read, press the Is
Alert button.
Note: There can only be 1 alert on an animal. You will be warned if setting an alert will
override any existing alerts.
3.
Press the Enter button to confirm your entry. You will be returned to the Collect
screen, your new Note will be displayed in the Note panel.
Deleting an animal from a session
When an animal is deleted from a session, all records (excluding life data) captured for this
animal within the session are deleted. Previous records are not deleted.
If a new animal (previously not known within the database) is deleted from a session, then
this animal will be removed completely from the database.
Page 38
Gallagher TSi 2 Livestock Manager
Using Individual Animal ID
Viewing animal history
The history of the animal information can be accessed via the History pane:
To display a history of Trait records for the currently identified animal, press the Trait
button located on the Yard screens. To display Trait records for a different animal, navigate
to another animal or enter the animal's Tag Number using the Find Tag button, then press
the Trait button.
The example below shows a Trait history report for animal: GAB10.
Note: Draft decisions are recorded as ‘Traits’ and are therefore included in this screen.
The records in the history report can be re-ordered using the
the column headers.
•
To display Activity History records press Activity.
•
To display Note History records press Note.
and
buttons above
Page 39
Using Individual Animal ID
Gallagher TSi 2 Livestock Manager
Viewing an animal's pedigree
You can view the progeny, parents, grandparents and great grandparents of an animal if
that data has been captured by the TSi 2.
To display the pedigree for the currently identified animal, press the Pedigree button
located on the Yard screens.
The pedigree for any animal on the chart can be viewed by pressing on the animal box to
select it, making it the main animal.
Change the animal data displayed
To change the animal data displayed:
1.
2.
Press the ID Field to display selected data on the animal. A pick-list will display the
following ID fields:
•
Tag Number
•
Electronic ID
•
NLIS number
Press the Extra Field button to display a pick-list of extra fields like Life Data, Custom
Life Data, Traits, Activities etc.
The Pedigree chart will update and display the selected fields.
3.
Page 40
Press Close to exit the Pedigree screen and return to the Yard screen.
Gallagher TSi 2 Livestock Manager
Using Individual Animal ID
Viewing an ID Session statistics report
To display a statistics report for the current session, press the Stats button located on the
Yard screens.
Statistics screen
The example below shows an ID Session statistics report for a session and the Selected
Trait: Live Weight.
When you first enter the Statistics screen the All Animals table displays. This table reports
the overall 'Selected Trait' statistics for the current session.
If you have recorded information for Sex, Sire, Breed, Draft, Group or Trait for the animals
in the session, buttons for each of these categories are displayed at the bottom of the
screen. Press a button to display statistics for each category.
To remove a category from view press the category button again or select another
category.
Note: When the Statistics screen is viewed from a PC, a print button
this button to print a report of the statistics displayed onscreen.
is displayed. Select
Page 41
Using Individual Animal ID
Gallagher TSi 2 Livestock Manager
Viewing an ID Session records report
To display a records report for the current session, press the Records button located on
the Yard screens.
Animal records are displayed in the order the animals were seen (scanned), with the most
recently seen animal at the top of the list. If the animal has been seen twice in the same
session, the latest time the animal was seen will be displayed.
Records screen
The example below shows an ID Session records report for a session:
It is possible to customise the data shown for each animal by pressing the Display Other
Columns button. You are then able to select the information to be shown in the 3 righthand columns of the report.
Page 42
Gallagher TSi 2 Livestock Manager
Setup Options
SETUP OPTIONS
Traits, Activities, Life Data fields can be set up from the Setup Options menu on the
Options screen.
Note: To access the Engineering menu
a pin number is required. This menu should
only be accessed by or under the guidance of a Gallagher representative.
Visual Tag Entry Options
Select Tag Number in the Options screen to configure the following Visual Tag options for
the system.
Setting up a tag prefix
A tag prefix is a series of characters at the start of a Visual Tag Number, for example: the
tag prefix for Tag Number 'DFR0001' is 'DFR'. Once a tag prefix has been set up this prefix is
automatically added to all newly identified animals.
Page 43
Setup Options
Gallagher TSi 2 Livestock Manager
Setting up auto increment
New Visual Tag Numbers can be automatically generated using auto increment. New Tag
Numbers will be incremented by one. You will need to specify the auto increment settings
to enable this feature.
1.
Press the Auto Increment Turn On button.
2.
If you want your Tag Numbers to have leading zeros, for example: 00034, press the
Length of Number button.
3.
The Next Number button sets the starting point for auto increment.
•
Page 44
Optionally set an end point for auto increment via the Last Number button. Tags
will not be auto generated beyond this number.
Gallagher TSi 2 Livestock Manager
Setup Options
Connecting Equipment
The following devices can be connected to the TSi 2:
•
Reader
•
Drafter / Sorter
•
Printer
•
Data Logger
•
Pregnancy Scanner
To connect a device to the TSi 2, you will need to open the Connect Equipment screen.
1.
Press the Options button, located on the Yard screens.
2.
Press the Connect Equipment button, located in the Setup Options menu.
The Connect Equipment screen displays the current port configuration. By default,
Bluetooth and RS232 Port 2 are both set to 'Unused' and RS232 Port 1 is set to 'EID
Standard Reader'.
The Connect equipment screen allows the following ports to be configured:
Serial Cable Connections
When connecting a device via a serial cable, connections are made to either Port 1 or Port
2. These ports are located on the back of the TSi 2. Once you have attached the device to a
port, you will need to tell the TSi 2 what device is connected to each port.
Bluetooth Connections
When connecting a device via Bluetooth, you will need to configure the port with your
selected device. Bluetooth allows wireless communication from the TSi 2. The TSi 2 has
Bluetooth Class 1 communications (range approximately 100 m/330').
Note: Next time the TSi 2 is turned on or re-activated from suspend mode it will
automatically attempt to connect to the configured Bluetooth device.
Connecting a device
To connect a device, select the Change button for the appropriate communication port,
then select from the options presented to specify the type of device that is connected.
Page 45
Setup Options
Gallagher TSi 2 Livestock Manager
Setting up a Trait
To open the Traits screen, press the Traits button, located on the Options screen.
The Traits screen displays a list of all Traits currently defined within the database.
1.
Press the Add button. The alphanumeric keypad displays.
2.
Enter the name of your new Trait and press the Enter button.
The screen will enable you to choose a Trait Type. By choosing a Trait Type you are
selecting the type of measurement you want to collect for your Trait.
3.
Page 46
Refer to one of the following topics for further detail, on how to create your chosen
Trait Type.
•
Creating a List of Values Trait (p 47).
•
Creating a Numeric Trait (p 47).
•
Creating a Weight Numeric Trait. (p 48)
•
Creating a Free Text Trait (p 48).
•
Creating a Date Trait (p 49).
Gallagher TSi 2 Livestock Manager
Setup Options
Creating a List of Values Trait
Follow these steps to create a List of Values Trait:
1.
In the Add New Trait screen, press the List of Values button. The List of Values panel
displays.
2.
Press the Add Value button. The alphanumeric keypad displays.
3.
Enter a value (maximum of 20 characters). You may want to enter additional values.
Each value entered is displayed in the list and ordered alphabetically.
4.
Press the OK button, to confirm your changes.
Note: Multiple values can be entered in a single visit to this screen, although values cannot
be renamed or deleted until the current changes have been saved.
Creating a Standard Numeric Trait
Numeric traits can either be Standard (independent of any other trait) or Weight type.
Follow these steps to create a Standard Numeric Trait:
1.
In the Create New Trait screen, press the Numeric button. The Numeric panel
displays.
2.
Select Standard.
3.
Specify the Minimum, Maximum, Units and Precision, then press OK.
Page 47
Setup Options
Gallagher TSi 2 Livestock Manager
Creating a Weight Numeric Trait
A Weight type trait is like any other
numeric trait but has the added
functionality of being able to store the
Live Weight received from an attached
load bar. You can specify whether this
weight should be used in ADG
calculations or not.
Follow these steps to create a Standard
Numeric Trait:
1.
In the Create New Trait screen, press the Numeric button. The Numeric
panel displays.
2.
Press the Weight button.
3.
Select whether the ADG is to be included in the trait.
4.
•
If set to YES, the weight will contribute to the animal's ADG calculation
(e.g. when used to record a 100 day weight trait).
•
If set to NO, the weight will not contribute to the animal's ADG
calculation (e.g. when used to record a sheep's fleece weight).
Press OK to save the trait.
Creating a Free Text Trait
Follow these steps to create a Free Text Trait:
1.
In the Add New Trait screen, press the Free Text button. The Free Text panel displays
the character limit for your Free Text Trait.
2.
Press the Maximum Characters button. The numeric keypad displays.
3.
Enter a maximum character limit. The maximum number of characters you want your
description to be (number of characters must be between 1 and 20).
4.
Press the Enter button, to confirm you maximum character limit. You will be returned
to the Add New Trait screen.
Note: If you reduce the 'maximum number of characters' for an existing Trait, the
change is applied to any data recorded for this trait from this point on. Existing data is
not truncated.
5.
Page 48
Press the OK button, to confirm your changes.
Gallagher TSi 2 Livestock Manager
Setup Options
Creating a Date Trait
Follow these steps to create a Date Trait:
1.
In the Add New Trait screen, press the Date button. The Date panel displays.
This screen enables you to setup your Date Trait.
2.
Configure the date parameters, as required. By default all parameters are set to Yes.
3.
Press the OK button, to confirm your changes.
Editing a Trait
If you edit a Trait, any existing Trait recordings in the database will remain un-altered with
the exception of the List of Values traits.
1.
To edit a trait, select Edit from the Options > Traits screen.
Note: If you edit a Trait that is used within a draft ruleset, then it is important to
update the ruleset to implement the edited Trait. Refer to Draft by Rules (p 27).
Page 49
Setup Options
Gallagher TSi 2 Livestock Manager
Setting up an Activity
To open the Activities screen, press the Activities button, located on the Options screen.
The Activities screen displays a list of all Activities currently defined within the database.
Follow these steps to set up an Activity:
1.
Press the Add button.
2.
Enter the name of your new Activity and press the Enter button.
3.
Optionally enter a Withholding Period or Export Slaughter Interval, then press OK.
Notes:
•
When drafting animals using the TSi 2 the default setting is not to draft animals
that are in a WHP or ESI. If you are pre-drafting for future slaughter, you may
enter a grace period. A grace period allows drafting of animals that are about to
exit a withholding period.
•
When an animal that is in a WHP or ESI
is identified, a large alert icon appears
in the Tag Number panel, for
approximately one second.
•
If an animal is in a WHP/ESI, press the WHP/ESI alert icon. An information dialog
box is displayed listing the activities causing the alert. The activity name is shown
followed by the date the WHP/ESI ends, in brackets.
•
An animal's WHP/ESI expiry dates are shown at the bottom of the Activity History
screen.
Page 50
Gallagher TSi 2 Livestock Manager
Setup Options
Setting up a Life Data Field
1.
From the Options screen, press the Life Data button.
The Life Data screen displays a list of all Life Data Fields currently defined within the
database.
2.
Press the Add button. The alphanumeric keypad displays.
3.
Type in the name of your new Life Data Field.
4.
Press the Enter button.
5.
Select the type of Life Data that is being setup, by pressing the Numeric, Free Text
or List of Values button.
6.
Press the OK button.
•
If 'Numeric' or 'Free Text' was selected, your new Life Data Field will be added to
the list of Life Data Fields currently defined in the database.
Alternatively:
•
If List of Values was selected, the 'Update the List of Values' screen will display
to allow you to add the values for your list before the Life Data Field is added to
the database.
Customising the Animal Data panel
The panel located to the right of the Collect screen can be customised to show animal data
or calculations that are of interest. You can choose which fields to display and re-order the
fields shown.
Page 51
Setup Options
Gallagher TSi 2 Livestock Manager
The custom Animal Data panel
Note: Spaces between the fields can be made by missing out Custom Panel Field buttons.
To customise the Animal Data panel, open the Options screen and press Customise
View from the Setup Options menu. A list of all fields that can be customised will be
displayed.
When first opened all 11 grid buttons will display their default descriptions to customise.
1.
Press the Custom Panel Field button that you wish to customise. The Select Field Type
screen displays.
2.
Select the type of data to be displayed or removed.
3.
Select the field name from the list,
OR:
Press the Clear Field Type button to remove the animal from the display panel.
Page 52
Gallagher TSi 2 Livestock Manager
Setup Options
Setting up a Location
Locations enable you to identify the physical location (farm or paddock) where a particular
group of animals are held.
To open the Locations screen, press the Locations button, located on the Options screen.
A list of all Locations currently defined within the database is displayed.
Follow these steps to set up a Location:
1.
Press the Add button.
2.
Enter the name of your new Location and press the Enter button. The Location Type
screen displays.
3.
Select your Location Type, either: Farm, Property or Area.
4.
Press the OK button. Your new Location will be added to the list of Locations currently
defined in the database.
Setting up a Group
Groups allow you to identify grouping (herds) of animals. An animal can belong to only one
group at a time, however the animal can be associated with many groups over time.
To open the Groups screen, press the Groups button, located on the Options screen.
A list of all Groups currently defined within the database is displayed.
Follow these steps to set up a Group:
1.
Press the Add button. The alphanumeric keypad displays.
2.
Type in the name of your new Group and press the Enter button.
Page 53
Setup Options
Gallagher TSi 2 Livestock Manager
Setting up a Calculated Value
Calculated values are customised values derived from using existing data already recorded
in the database, in a specified calculation. These calculations can be displayed in the Animal
Data panel on the Collect screen. See Customising the Animal Data panel.
To set up a Calculated Value, press the Calculated Values button, located on the Options
screen. A list of all Calculated Values currently defined within the database is displayed.
Examples of Calculated Values are:
Value
Calculation
Carcass weight
Using kg or lb, this is calculated as a percentage of live weight.
Carcass value
This can be calculated from the carcass weight multiplied by a dollar
value per kg/lb.
Drug dosage
Using milligrams (mg) or millilitres (ml), this can be calculated from
the live weight of the animal.
Drug cost
This is a dollar value calculated from the drug dosage and cost per mg
or ml.
Follow these steps to set up a Calculated Value:
1.
Page 54
Press the Add button, located on the Calculated Values screen.
The alphanumeric keypad displays.
Setup Options
Gallagher TSi 2 Livestock Manager
2.
Type in the name of your new Calculated Value and press the Enter button.
The Calculated Value Formula Builder displays.
3.
Pressing an operation button will add a value to the formula builder. Options for data
fields to reference in the calculation are:
•
Trait - to add trait values to the calculation.
A pick-list box containing different tenses will open.
Trait Tense
Description
Session
takes its value from the current session
Previous
takes its value from the most recent session before
the current session with a value recorded against it
First
takes its trait value from the oldest trait value in the
database. i.e. the first one added
Latest
takes its value from the current session, if the trait
has a value in that session, otherwise from the most
recent session before the current session that
contains a value for that trait
Select a tense to display a list of all numeric and date traits. Select a trait to add
to the formula display. The trait is shown in square brackets with the tense in
front of it. e.g. Latest[Live Weight].
•
Calc Value - to add a Calculated Value to the formula.
•
Today - to add today's date to the formula.
4.
The format of the resultant calculated value can be configured by selecting a Unit and
Decimal Place.
5.
The result of the calculated value can optionally be stored into a trait against the
animal identified. This will force the calculated value to be recalculated whenever the
trait is added to an animal. This could be on the collect screen (added manually or via a
session default) or on the Office View/Edit animal screen. If the calculated value result
is to be saved in a trait, press Store Result in Trait to open the trait pick-list. Select
a trait from the list and it will be displayed as the button caption.
Page 55
Setup Options
6.
Gallagher TSi 2 Livestock Manager
Press the OK button to save your calculation. A validation check is made of the
formula, if no error exists, the formula will be added to the list of Calculated Values on
the Calculated Values screen.
Examples of Calculated Values
The following examples detail how to create a calculated field. This feature enables you to
display additional data on the collect screen by using the customised Animal Data pane.
Example 1. Carcass Weight and Value
In this example the following fields are going to be setup and used in the calculation.
Kill Out %
Estimated conversion from liveweight to carcass weight
SellRate1
Price paid per kg/lb of carcass weight
SellPrice1
Live Weight x Kill Out % x Sell Rate
1.
Go to Options > Calculated Values.
2.
Select KillOut, press Edit. Change the value for Kill Out to be the percentage you
want e.g. 52%. Use the % sign in the Units box and press OK.
3.
Press Add to add another calculated value: type in SellRate1and press Enter, then
type in a value (e.g. 2.00) with unit $. Press OK.
4.
Press Add to add another calculated value: type in SellPrice1 and press Enter, then
enter the calculation details as follows:
Page 56
•
press Trait > Session Value > Live Weight to specify that the session
liveweight will be referenced in the calculation;
•
select symbol '*' to specify a multiplication operation;
•
press Calc Value > Kill Out so that the kill out factor is used in the calculation;
•
select symbol '*' to specify a multiplication operation;
•
press SellRate1 so the kill out factor is used in the calculation;
•
select a Unit symbol for the result as '$', then press OK.
Gallagher TSi 2 Livestock Manager
5.
Setup Options
Press Back to go to the Options menu.
You can optionally show the result of these calculations on the Animal Data pane of the
collect screen. To do this...
1.
Press Customise View.
2.
Select the field location where you wish the data to display,( e.g. Life Data: Sex) and
press Calculated Values > Carcass Weight.
3.
Select another field location, then press Calculated Values > SellPrice1.
4.
Press OK > Back, to return to the Collect screen.
The new values will now appear in the Animal Data pane on the Collect screen.
Example 2. # of days for animal to reach a nominated target weight
In this example the following fields are going to be setup and used in the calculation.
TargetWt
=
Target Weight to achieve for each animal
TargetGap =
Target Weight less the Current Live Weight
TargetDays =
Target Gap ÷ Current ADG
1.
Go to Options > Calculated Values.
2.
Press Add to add a calculated value: Type in TargetWt and press Enter. Define your
target weight e.g. 575 and press OK.
3.
Press Add to add another calculated value: Type in TargetGap and press Enter, then
enter the calculation details as follows:
•
press Calc Value > TargetWt to specify the animal target weight to be
referenced in the calculation;
•
select symbol '–' to specify a subtraction operation;
•
press Trait > Session Value > Live Weight to specify that the session Live
Weight will be referenced in the calculation and press OK.
It will be displayed as: [TargetWt] – Session[Live Weight]
Page 57
Setup Options
4.
5.
Page 58
Gallagher TSi 2 Livestock Manager
Press Add to another another calculated value: Type in TargetDays and press Enter,
then enter the calculation details as follows:
•
press Calc Value > TargetGap to specify the gap weight the animal has to
grow to achieve the target weight;
•
select symbol '÷' to specify a division operation;
•
press Calc Value > Current ADG to specify the Current ADG to be referenced
in the calculation and press OK.
Press Back to go to the Options menu and Customise View if field to be displayed
in Animal Data pane. See Example 1.
Gallagher TSi 2 Livestock Manager
Setup Options
Setting up a Session Type
You can optionally assign a Session Type to any session in the database. An event is
assigned to each Session Type to describe what is happening to the animals within the
session. For example: If a 'Cull Session' type is selected, a 'Death' event will be recorded for
all animals seen in the session. The status of each animal will then be set to 'Dead'.
To open the Session Types screen, press the Session Types button, located on the
Options screen.
The Session Types screen displays a list of all Session Types currently defined within the
database.
Follow these steps to set up a Session Type:
1.
Press the Add button. The alphanumeric keypad displays.
2.
Enter the name of your new Session Type and press the Enter button. The Event
screen displays.
3.
Select the Event for this Session Type, either: Birth, Seen, Transfer Out, Death,
Purchase, Transfer In or Sale.
4.
Press the OK button. Your new Session Type will be added to the list of Session Types
currently defined in the database.
Page 59
Setup Options
Gallagher TSi 2 Livestock Manager
Setting up Sounds and Alerts
The TSi 2 is equipped with stereo sound for providing audio readout of animal ID's, weights,
draft decisions. It will also emit a series of beeps that repeat when an alert is displayed on
the screen. Small loudspeakers are built into the base of the TSi 2 and an audio output jack
is provided for connection to an amplified loudspeaker system.
To open the Setup Sounds and Alerts screen, press the Sounds & Alerts button located
on the Options screen. The Setup Sounds & Alerts screen displays the current sound
settings for the TSi 2.
This table explains the parts of the Setup Sounds & Alerts screen.
Part
Function
Sound options
Turn a sound option on or off by pressing the Turn ON button or the
Turn OFF button. If the Sound button is turned off all other sound options
are disabled.
Sound volume
Alert options
Page 60
or
arrow buttons. This
To adjust the volume press either the
volume setting controls the volume sent from the TSi 2 to the speakers and
audio output.
If Alerts are turned on, any note alerts will pop up as the animal is scanned.
If turned off then note alerts will be ignored.
Setup Options
Gallagher TSi 2 Livestock Manager
Setting up Printer Options
To open the Printer Options screen, press the Printer button located on the Options
screen.
Note: The TSi 2 is only compatible with a Zebra QL Series printer. Refer to Connect
Equipment (p 45).
The Printer Options screen displays the current settings for the TSi 2.
Automatic
Print
OFF
Nothing printing related will happen when the animal is
identified.
ON
The default number of labels is printed when an animal is
identified.
PROMPT
A numeric entry screen is shown each time an animal is identified
and allows a number of labels to be printed between 1 and 99,
with the default number displayed.
When a printer is connected the print icon
on the TSi 2.
will be displayed in the Tag Number panel
Page 61
Setup Options
Gallagher TSi 2 Livestock Manager
Set up Regional Settings
Regional Settings allows the selection of Language, Time Zone and the Date and Time that
the TSi 2 is to be operated in.
To open the Regional Settings screen, press the Regional Settings button located on the
Options screen.
The current language, timezone and date the TSi 2 is in, will be displayed on the respective
buttons.
1.
Press the current displayed button of the option to be changed.
•
If Language or Time Zone was selected:
a) Press the ‘Select’ button to choose your option.
−
b)
•
2.
Page 62
If time zone was selected, press Next and select the required time zone.
Press OK to return to the Regional Settings screen.
If Date and Time was selected:
a) Press the Date and/or Format buttons and make your required selections.
b)
Press the up and down arrow buttons to alter the time.
c)
Press OK to return to the Regional Settings screen.
Press the Finish button when all necessary changes have been made. The TSi 2 will
restart applying the new settings.
Gallagher TSi 2 Livestock Manager
Setup Options
Setting up Wireless Options
Connecting to a wireless network from the TSi 2, enables data sharing to take place. This
could be the transfer of data for a national identification system for animals or transferring
data to a Cloud for data sharing.
1.
From the Options screen, press Wireless. The WiFi Connection screen will be
displayed.
2.
If the Wireless function has not previously been used, press the is Enabled button.
The Tsi 2 will start searching for available networks.
When the search is complete a list of the available networks will be displayed.
The TSi 2 will connect to the strongest network that has a password entered. Any other
networks that have been connected to and have a password entered will display as
Preferred in the Status column.
3.
If connecting to a network for the first time:
•
Select the required network and press the Connect button. An entry box will
display, if a password is required to access the network. The password will
remain until the network is dropped using the Forget key.
Notes:
Once connected to a Wireless network, the Wifi icon
will display in the status bar.
If returning to a pre-set Wireless network, press the Power button to enter discoverable
mode from any screen.
4.
Press Close to exit the WiFi Connection screen.
Note: Access points with WPA/ WPAPSK security are not supported and cannot be
connected to.
Page 63
Database Options
Gallagher TSi 2 Livestock Manager
DATABASE OPTIONS
The database can be copied from:
•
the TSi 2 to the USB Memory stick (Backup database)
•
the USB Memory stick to the TSi 2 (Restore database)
•
the TSi 2 to APS/Device (Synchronise database)
1.
From the Options screen, select Copy Database to perform one of the above
functions.
2.
Press the From; button to select where the database is to be copied from.
3.
Press the To: button to select where the database is to be copied to.
4.
Follow the on-screen instructions to complete the backup.
Backup:
Backing up the database saves a copy of the database to the USB
memory stick. To help prevent accidental loss of data, you should
backup the database after each session.
Restore:
Restoring the database replaces the existing database with the
selected backup from the USB memory stick. This is done when data
has been added/modified in APS and needs to be copied back to the
TSi 2.
Synchronise: Copies the data on the TSi 2 directly to APS via a WiFi connection.
Notes:
Performing a Copy Database operation will copy over all data currently on the TSi 2. It
is recommended that a backup is performed prior, if data is at risk of being lost
because of this.
The five most recent backups are stored on the memory stick. Each time a new backup
is created the oldest backup is deleted.
Page 64
Gallagher TSi 2 Livestock Manager
Troubleshooting
TROUBLESHOOTING
Q:
The Electronic ID reader is not responding.
A:
Ensure the reader is attached securely to a port on the back of the TSi 2. Ensure that the port the
reader is attached to has been configured for a reader. Refer to Connect Equipment (p 45) for
more details on connecting a device.
Q:
The TSi 2 is not responding.
Q:
The TSi 2 is not turning on.
Q:
What do the TSi 2 beeps mean?
A:
A:
A:
Perform a hard reset. A hard reset may cause loss of data and should only be performed under the
guidance of a Gallagher representative. To perform a hard reset, hold down the power button for
10 seconds, then wait for the TSi 2 to shutdown. Start the TSi 2 in the usual manner.
Ensure a power supply is attached to the TSi 2. Ensure the power supply is on and is charging the
TSi 2. The TSi 2 LED will blink green when the battery is charging.
Single beep:
•
A weight lock has occurred, or
•
Gallagher Standard Loadbars have been attached.
Double beep:
•
Gallagher Heavy Loadbars or Super Heavy Duty Loadbars have been attached.
Triple beep:
•
A weight has locked but no animal has been identified, or
•
An animal meets the draft criteria for more than one draft group, (draft collision), or
•
The battery is less than 20% full, or
•
The database is full, or
•
The memory is low, or
•
The Power button is pressed in the Office screen and the Power Button Menu cannot be
displayed, or
•
A Gallagher Suspension Cell has been attached.
Page 65
Gallagher TSi 2 Livestock Manager
GLOSSARY OF TERMS
Life Data
Life information about an animal
such as: Sex, Date of Birth, Sire, Dam,
Breed, Colour and Original PIC.
Activity
A treatment applied to an animal,
such as weaned, mated or a drug
treatment.
Loadbar
The device that detects the weight of
the load and transfers this to the TSi
2. Typically installed in pairs under a
race or handler.
Alert
A note set to alert, which appears
when a tag is read.
NAIT
National Animal Identification &
Tracking.
Backup database
Copying the database to the USB
memory stick.
NLIS
National Livestock Identification
System.
Calculated Values
The process of calculating carcass
weight and to make other
calculations for an animal.
Note
A short statement recorded for an
animal or for future reference.
Database
Where all recorded data is stored.
Record
A record is a piece of data relating to
an animal. One animal may have
many associated records.
Draft rule
Criteria used to draft animals into a
draft group.
Draft ruleset
Restore database
Copy the database from the USB
memory stick back to the device or
PC.
A set of draft rules.
EID
Electronic Identification. The
electronic code in an ear tag or bolus
that can be scanned to identify an
individual animal.
Rule
Criteria used to identify specified
parameters.
Session
ESI
Export Slaughter Interval. The
number of days after a drug
treatment before the animal can be
slaughtered for export.
Grouping
Allows the user to identify the
physical location (paddock) or
grouping (herds or mobs) of an
animal.
A continuous series of animals seen
in one sitting.
Session default
A Life data value, Trait, Activity, Note
or Draft rule applied to all animals
seen within a session.
Session draft
A draft ruleset when added to a
session becomes a session draft. A
session draft selects specific animals
that meet the ruleset criteria.
Page 67
Gallagher TSi 2 Livestock Manager
Tag Bucket File
Supplied with custom ordered
Electronic ID Tags. This file can be
imported into the connected device,
saving time when inducting animals
with new Tags.
Tag Number
A tag number is the combination of
letters and/or numbers printed on
the ear tag to enable visual
recognition of an individual animal or
group of animals.
Trait
A value or measurement including
live weight.
TSi2
The touch sensitive display unit that
is installed in the yard.
WHP
Withholding Period.
Page 68