1
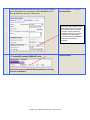
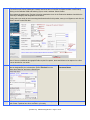
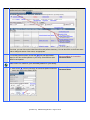
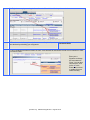
Reference guide for New Users
Hands-on Training for
Velos Study-Setup
Procedures
Name: ______________________
Unique Name: ________________
Phone: ______________________
Prerequisite:
Velos 100: Introduction to Velos eResearch for UM New Users.
Learning Objective: Take advantage of the UM Velos TRAINING instance to learn Velos using a self-guided, hands-on
approach. At the end of this exercise, you will have completed all of the minimum process steps necessary to manage a clinical
trial using Velos including:
•
Create a study,
•
Copy a Clinical Report Forms (CRF) into the study from the Forms Library and modify it,
•
Copy a patient study calendar into the study from the Calendar Library and modify it,
•
Enroll registered patients into your study,
•
Enter data for enrolled patients,
•
Explore some reporting functions to report on the data for patient management and tracking.
This checklist is a high-level reference guide to help you sequentially work through the process steps to achieve these learning
objectives. This exercise should be supplemented with additional, parallel training from the Velos Customer Corner web site and
reference to the Velos Corporation User Manuals. The successful completion of this exercise is a prerequisite for acquiring
access to the UM Velos production database instance.
To create a report of the patient form data, contact [email protected] to enroll in Velos 500: Introduction to Ad-Hoc
Queries an e-learning course
Please fax the last page of this document to: 734-998-7546, Attention: MICHR CRIC Operational Support
1. Create a study in the UM Velos training database. Use your Unique Name as study number.
A. Logon to Velos training database, click Manage Protocols Æ New
Check mark/Date of Completion
Comments/ Notes
B. Enter data for all mandatory fields (depicted by *) in the Study
Summary tab. Enter your e-signature and click on the ‘Submit’ button at
the bottom of the Study Summary data entry screen to save your data.
Check mark/Date of Completion
Comments/ Notes
Avoid
Selecting
yourself as
the Principal
Investigator
for this study.
Note,
Principal
Investigator is
NOT a
mandatory
field.
[Version 5.0]
Released August 2010 Page 1 of 23
C. On the left menu bar, navigate to the Velos homepage and notice the
presence of your study record. Use the ‘S’ icon to access Study
Administration area of your study.
D. Click on the ‘S’ icon and navigate to the Study Team tab. Notice that
Velos has automatically added you to the study team as Data Manager.
Click on the ‘Access Rights’ link to discover the full range of privileges to
the study data afforded the Data Manager Role. To maintain your full
rights to your study, do not change your role on the study team.
OPTIONAL:
Practice adding study team members and assigning roles to
your study team by clicking on the ‘Add/Edit Study Team
Members’ link. Adding study team members allows other users
to see your study from their Velos homepage and access your
study data.
Check mark/Date of Completion
Comments/ Notes
Check mark/Date of Completion
Comments/ Notes
To learn more about adding study team members, assigning
roles and access rights to study data, please consult the Velos
User Manual and query on ‘Study Team Tab.’
To learn more about Study Access Rights, refer to ‘HH10—
Study Access Rights Table’ in the Velos User Manual.
2.
Define basic study setup infrastructure by establishing the adverse event dictionary (if
needed), method of patient study ID generation, and patient enrollment process for your
study.
A. Navigate to the Study Setup tab, and then click on VIEW/EDIT
DICTIONARIES AND SETTINGS link.
[Version 5.0]
Check mark/Date of Completion
Comments/ Notes
Released August 2010 Page 2 of 23
B. In the Dictionaries and Settings window, choose the AE dictionary,
method of Patient Study ID generation (select manual), and the
study enrollment process (as shown). Submit the data by entering
your valid e-Signature to save your data.
3.
Check mark/Date of Completion
Comments/ Notes
Develop Patient Case Report Forms for data entry in your study. (For this exercise,
copy a ‘blank’ form from the library into your study, then add fields to it.)
Copy a form from the Form Library and edit the form:
A. Start by copying a “blank” form into your study from the library. From
the Study Setup Tab, click on ‘SELECT A FORM FROM YOUR LIBRARY’ link.
B. Enter ‘Blank’ into ‘Form Name’ field, click on the ‘Search’ button,
select the blank form, and click on the downward arrow.
[Version 5.0]
Check mark/Date of Completion
Comments/ Notes
Check mark/Date of Completion
Comments/ Notes
Released August 2010 Page 3 of 23
C. Scroll to the bottom of the screen and select the appropriate radio
buttons for Display Form Link and Characteristics.
a.
Choose the ‘patient-level’ option,
b.
Choose the ‘once-only editable’ option.
Enter your e-Signature, and click on the ‘Submit button’ to copy this
blank form into your study from the library.
Check mark/Date of Completion
Comments/ Notes
D. Under the ‘Study Setup’ tab, under ‘Associated Forms’ notice the
existence of the form you just pulled into your study. Note the status is
work in progress and that the form is linked to the patient level.
Check mark/Date of Completion
Comments/ Notes
Click on the blank form link to begin developing the form in your study.
E. Start by renaming your form (optional: you may also designate if an eSignature is required for data entry).
[Version 5.0]
Check mark/Date of Completion
Comments/ Notes
Released August 2010 Page 4 of 23
F. Then, navigate to the ‘Add Fields’ tab where you will see various form
development tools across the top of the screen and the form elements
listed below in table format.
Check mark/Date of Completion
Comments/ Notes
Note that the blank form comes with a single date field (required in all
Velos forms) to capture the data entry date. This field can be (and is in
this case) set to default to the current date. In addition to this Velos
required date field, we recommend creating a second date field to
capture the date of visit.
[Version 5.0]
Released August 2010 Page 5 of 23
G. Add a Visit Date Field to your from:
1. Click on the Edit Box tool :
2. In the subsequent screen that pops up, select Date for ‘Edit Box
Type.’ Then fill out the details of your new date field as shown below.
(Note: you can add and rename sections to your form as well as change
the sequence of each field.) All mandatory fields designated with * must
be completed. Other details such as field validations and help text can
be completed at your discretion.
Please note, you can specify that
the new field appears on the
same line as the previous field or
object.
NUMBER and DATE fields can also
be defined using the ‘Edit Box’
field type.
NUMBER FIELDS: In order to
specify a range of values that can
be allowed, for example 0.0 999.9, you would use the
'Response Should Be' option and
fill in the min (>0.0) and max
(</= 999.9) values as needed.
To specify a format mask for the
number, use the 'For Number
Field' option. For example, if you
specify ###.# as the format
mask, you must enter the number
1.2 as 001.2.
3. When you have completed designating the new field attributes, enter
your e-signature and click submit.
[Version 5.0]
Released August 2010 Page 6 of 23
H. Now you will notice the addition of your new date field. Please note
the Field Name is what is displayed in your data entry form whereas
Field ID is the corresponding name of the variable in the database.
Use ‘Preview’ link to view the results as you add fields and work on the
form layout.
I. Additional tools to complete your form creation are as follows:
Check mark/Date of Completion
Comments/ Notes
1. Edit Box: choose text, number or date field
2. Multiple Choice: choose Drop down list (single response
possible), Check Box (multiple responses allowed), or Radio
Button (single response)
3. Comment: not a variable for data entry, this is a text box that
can be used for labeling purposes in your form.
4. Line Break: not a variable for data entry, helpful for ‘look and
feel’ organization of form layout.
5. New Section: you can divide your form into sections for
organizational purposes
6. Datamap: IMPORTANT! Before your form is made active and
thus ready for data entry, you may create your metadata table
with this link. Metadata is exportable to excel for easy review.
7. Space Break**: used to control the vertical spacing in the form
layout, its usage is well defined on page 77 of the Velos Form
Manual. (Accessible via the Velos Customer Corner)
[Version 5.0]
Released August 2010 Page 7 of 23
**The Space Break is a powerful tool used to refine the layout of the
form. See the image below for details of how this tool can be utilized.
Source: Velos Form Manual, page 77.
J. Once you are satisfied with your form, finalize the form by updating
the form status to ‘Active’. To do this, go to the Study Setup tab, click
on Work in Progress link in the Form Status column.
Check mark/Date of Completion
Comments/ Notes
For each form, change Form Status to Active and submit:
[Version 5.0]
Released August 2010 Page 8 of 23
4.
Copy a Basic Patient Study Calendar from the
Calendar Library into your Study and modify
appropriately:
A. In the Study Setup tab, scroll DOWN to Associated Calendars;
click on SELECT A CALENDAR FROM YOUR LIBRARY link.
Check mark/Date of Completion
Comments/ Notes
B. Search for and select ‘My Study Calendar’ in the Training category
type. This provides a basic calendar template with 3 Visits which you
can use for this particular study and evaluation.
Check mark/Date of Completion
Comments/ Notes
C. Velos copies this calendar into your study as shown.
Check mark/Date of Completion
Comments/ Notes
To view the details of the calendar, click on the calendar name as shown
above.
[Version 5.0]
Released August 2010 Page 9 of 23
D. The details of the calendar are viewable and editable through three
tabs: ‘Define the Calendar’, ‘Select Events’, ‘Schedule and
Customize’ which comprises the 3 step wizard for calendar creation.
Check mark/Date of Completion
Comments/ Notes
NOTE: There can be multiple events for each visit.
To modify the visits or events in the calendar, click on the respective
links under ‘Visit Name’ and ‘Event’. Refer to the ‘Velos eResearch 8.0
Calendar Manual’ for details.
5. Link Patient forms (CRFs) to the Events in the Calendar
A. Under the ‘Schedule and Customize’ tab, click on the event name to
access the event details screens.
[Version 5.0]
Check mark/Date of Completion
Comments/ Notes
Released August 2010 Page 10 of 23
B. Navigate to the ‘CRF Details’ tab :
[Version 5.0]
Check mark/Date of Completion
Comments/ Notes
Released August 2010 Page 11 of 23
C. Click on the ‘Link Forms’ and then select your active forms to be linked
to the specific event:
Check mark/Date of Completion
Comments/ Notes
Scroll down to the bottom of the screen, where you can optionally link
forms to all events in this visit, or link forms to all events in the calendar
to save time.
Enter your e-Signature and click on the ‘Submit’ button to save your
work.
Velos verifies the inclusion of the forms linked to the event.
Repeat these steps 5.A through 5.C for linking the appropriate forms to
the appropriate events in the calendar.
6. Finalize the Calendar and change status to Active.
Please note that you can still link additional forms to your Calendar after the status is changed to
Active.
[Version 5.0]
Released August 2010 Page 12 of 23
A. Navigate to the ‘Associated Calendars’ section with the Study Setup
Tab and click on the ‘Work In Progress’ link under the status column.
Check mark/Date of Completion
Comments/ Notes
B. Select ‘Active’ from the dropdown box, complete the mandatory fields,
enter your e-Signature and click on the ‘Submit’ button.
Check mark/Date of Completion
Comments/ Notes
7. Update Study Status to ‘Active.’
A. From the Study Setup tab, navigate to the Study Status tab. Click on the ADD NEW STATUS link.
[Version 5.0]
Released August 2010 Page 13 of 23
B. Complete all mandatory fields in the Study Status screen, enter your
e-Signature and click on the ‘Submit’ button.
Check mark/Date of Completion
Comments/ Notes
C. Notice the presence of the
Check mark/Date of Completion
Comments/ Notes
icon when the current study status is
‘Active/Enrolling.’ The
icon provides a navigation link to enroll and
manage patients on your study.
8. Enroll Patients in your Study.
(Search for existing patients, register new patients, enroll registered patients.)
A. Click on the
icon and then the Patient Search tab.
Check mark/Date of Completion
Comments/ Notes
A large patient pool has already been registered into the ‘Training
Organization’ in UM Velos training database.
[Version 5.0]
Released August 2010 Page 14 of 23
B. Search for an existing patient by entering criteria such as first & last name,
birth date, or CPI number in the Patient ID field. (The CPI number is the
UM Hospital unique patient identifier.) In this example, training data is used.
NOTE: In the UM Velos Production database, for patients affiliated with the UM organization, PATIENT ID is a
unique number designated by the patient CPI number. Velos is a patient-centric database. This means that a
unique patient and demographics data only needs to be entered once into Velos. It is extremely important
not to add a patient into Velos that actually already exists. Duplicate patients will result in the need for a timeconsuming technical intervention to correct, and always results in the need to re-enter data for that patient.
C. IF the patient you are looking for already exists and you have verified the CPI number, click on
Patient ID link and select your study number from the drop-down list.
To screen / enroll an existing Velos patient into a
new study, select the study and Patient
organization from the drop-down box.
[Version 5.0]
Released August 2010 Page 15 of 23
In the Patient Study Status window which pops-up, enter all mandatory
data as designated by the red asterisks. Select ‘Enrolled’ from the
Status drop-down list, and enter a Status Date.
Check mark/Date of Completion
Comments/ Notes
Note that Patient Study ID is prepopulated with the CPI number.
This number can be changed
manually, after the patient is
enrolled. However, if you had
selected AUTO Generated,
Velos would have populated this
field with the format you
specified.
D. IF patient/CPI number DOES NOT exist,
Check mark/Date of Completion
Comments/ Notes
create a new patient, and REGISTER that patient to the Training
University organization.
[Version 5.0]
Released August 2010 Page 16 of 23
Click on Manage PatientsÆNew on the menu bar and enter data for the Patient Demographics form. This includes
the Patient ID field, which at Michigan is always defined as the CPI number! Complete the data of birth field by
clicking on the Calendar ICON and selecting a year, month, and date. Select Gender.
Then register the patient to the Training University organization (note: in the Production database it would be the
University of Michigan) and designate survival status.
Finally, select your study to enter screening/enrollment details for this patient, enter your e-Signature, and click the
‘Submit’ button to save this data.
Note: If there are additional demographic fields required for capture, these would have to be captured on a form
that you develop for your study.
In the Patient Study Status window which pops-up, enter all mandatory
data as designated by the red asterisks. Select ‘Enrolled’ from the
Status drop-down list, and enter a Status Date.
Check mark/Date of Completion
Comments/ Notes
E. Repeat the patient search, Velos registration, and enrollment process
until at least 3 patients have been enrolled in your study.
[Version 5.0]
Released August 2010 Page 17 of 23
9. Link Your Enrolled Patients to the Study Calendar.
This links all forms in your study calendar to your patient. Therefore the Patient ID will automatically be associated
with each form.
Check mark/Date of Completion
A. From My Homepage, click on the
icon and then click on the
Comments/ Notes
patient study ID link of one of the patients whom you’ve enrolled in
your study.
B. To link an enrolled patient to the study Calendar, click on the
Edit/Calendar/Date link to select the protocol calendar in your study and
designate a patient start date.
Check mark/Date of Completion
Comments/ Notes
Then, generate a patient schedule by completing/saving the following
data entry screen:
Be sure to select a Date from the Calendar to designate this patient’s
DAY1 date, which is the date from which the entire schedule for this
patient will be generated.
[Version 5.0]
Released August 2010 Page 18 of 23
C. Upon submission of the form, Velos links the patient to the calendar and generates the patient schedule, as
represented in the following screen:
From here, you can click on the Linked forms links and perform data entry. You can also Click on the Event status
links to change the status of the events, as appropriate.
D. From the previous screen, click on the
icon and repeat these
steps for all of the enrolled patients in your study. Select different start
dates for each patient.
Check mark/Date of Completion
Comments/ Notes
10. Enter CRF data for your enrolled patients in your study.
A. Click on the
icon for your study, to access the patient enrollment
roster; then click on the patient ID link.
[Version 5.0]
Check mark/Date of Completion
Comments/ Notes
Released August 2010 Page 19 of 23
B. Begin data entry by accessing the forms from the Form Links within the patient calendar:
C. Enter data on the form, update the form status to ‘Completed’, and
save the data by submitting your e-Signature.
Check mark/Date of Completion
Comments/ Notes
D. Upon completing the last form within an event, Velos provides an opportunity to enter your e-Signature to mark
the event as ‘Done.’
Enter your eSignature to change
the event status to
‘Done’. You can also
close this box, click
on the ‘C’ in the
Event status column
to update the event
status manually.
[Version 5.0]
Released August 2010 Page 20 of 23
E. Perform data entry on at least several visits worth of forms for at least
2 of your patients to get a feel for how data entry is managed using a
study calendar.
Check mark/Date of Completion
Comments/ Notes
Please note that it is not mandatory to use a calendar in your study. To
enter patient data without using a calendar, access the patient forms via
the ‘Forms’ link, as shown:
HOWEVER, if you DO use a patient calendar in your study, it is
important to ALWAYS enter data via the form link within the patient
schedule.
[Do NOT mix data entry methods by sometimes entering data via the
form link and sometimes entering data via the form link in the patient
calendar. This practice will result in unwanted and confusing multiple
records.]
11. Explore a few patient management reports.
For each report that you explore, export report results to excel and save the files to your
computer. When you have completed this step, email the data reports to [email protected] with your UNIQUE NAME / VELOS HOMEWORK in the subject line.
Generate Patient Management/Tracking Reports:
A. In your study, click on the
icon and click on a patient
study ID link of the patient in your study for whom you have
linked to a calendar and entered data.
Check mark/Date of Completion
Comments/ Notes
B. Click on the Reports tab.
Check mark/Date of Completion
Comments/ Notes
C. Under All Patient Reports, Select Patient Form Tracking,
enter appropriate filters, click the Display Report button, and
export report to excel. Name the excel file
STUDYNAME_Patient Form Tracking and save it to a
folder on your computer.
Check mark/Date of Completion
Comments/ Notes
D. Under Patient Specific Reports, Select Patient Timeline,
enter appropriate filters (select a patient who was linked to
your study calendar), click the Display Report button, and
export report to excel. Name the excel file
STUDYNAME_Patient Timeline and save it to a folder on
your computer.
Check mark/Date of Completion
Comments/ Notes
E. Under Patient Specific Reports, Select Patient Visit
Calendar, enter appropriate filters (select a patient who was
linked to your study calendar), click the Display Report
button, and export report to excel. Name the excel file
STUDYNAME_Patient Visit Calendar and save it to a
folder on your computer.
Check mark/Date of Completion
Comments/ Notes
[Version 5.0]
Released August 2010 Page 21 of 23
F. Under Study Specific Reports, Study Visit Calendar, enter
appropriate date filters, Display Report, and export report to
excel. Name the excel file STUDYNAME_Study Visit
Calendar and save it to a folder on your computer.
Email your excel output files of the 4 reports to: [email protected] with your UNIQUE NAME / VELOS
Training in the subject line.
[Version 5.0]
Check mark/Date of Completion
Comments/ Notes
Check mark/Date of Completion
Comments/ Notes
Released August 2010 Page 22 of 23
Please fax this page with your signature to: 734-998-7546, Attention: MICHR SUPPORT
Record of COMPLETION
Hands-on Training for New Users:
Velos Study-Setup Procedures
PLEASE PRINT:
I have successfully completed the Velos Study Setup Procedures
outlined in this reference guide using the UM Velos Training instance.
I understand that it is my responsibility to keep up-to-date copies of
my Velos training record, and pursue additional Velos training
opportunities in the future.
UNIQUE NAME
FIRST NAME
LAST NAME
DATE
YOUR SIGNATURE
The procedures outlined in this reference guide were to be conducted in conjunction with additional Velos
training available on the Velos Customer Corner web site. Please include your Velos ‘Record of Training
Completion’ with your application for an account in the UM Velos Production instance. These forms are
available on the MICHR Velos web site: http://www.michr.umich.edu/programs/velos_training.html. Please
FAX these signed/dated documents to MICHR Support (FAX: 734-998-7546) or, scan and e-mail them to
[email protected].
Thank you!
[Version 5.0]
Released August 2010 Page 23 of 23