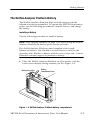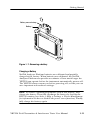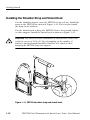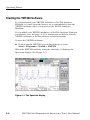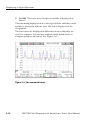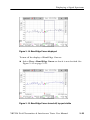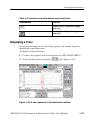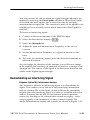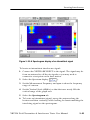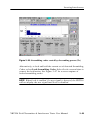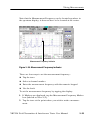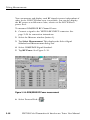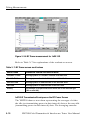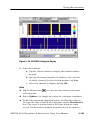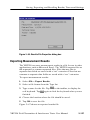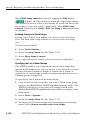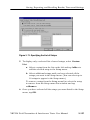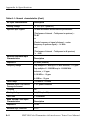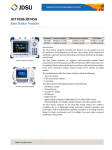
1
User Manual
YBT250
NetTekR Field Transmitter &
Interference Tester
071-0856-09
This document supports firmware version 1.4xx
and above.
www.tektronix.com
Copyright © Tektronix, Inc. All rights reserved.
Tektronix products are covered by U.S. and foreign patents, issued and
pending. Information in this publication supercedes that in all previously
published material. Specifications and price change privileges reserved.
Tektronix, Inc., P.O. Box 500, Beaverton, OR 97077
TEKTRONIX, TEK, and NETTEK are registered trademarks of Tektronix, Inc.
WARRANTY
Tektronix warrants that the products that it manufactures and sells will be free from
defects in materials and workmanship for a period of one (1) year from the date of
purchase from an authorized Tektronix distributor. If any such product proves
defective during this warranty period, Tektronix, at its option, either will repair the
defective product without charge for parts and labor, or will provide a replacement in
exchange for the defective product. Batteries are excluded from this warranty.
In order to obtain service under this warranty, Customer must notify Tektronix of the
defect before the expiration of the warranty period and make suitable arrangements
for the performance of service. Customer shall be responsible for packaging and
shipping the defective product to the service center designated by Tektronix, shipping
charges prepaid, and with a copy of customer proof of purchase. Tektronix shall pay
for the return of the product to Customer if the shipment is to a location within the
country in which the Tektronix service center is located. Customer shall be
responsible for paying all shipping charges, duties, taxes, and any other charges for
products returned to any other locations.
This warranty shall not apply to any defect, failure or damage caused by improper use
or improper or inadequate maintenance and care. Tektronix shall not be obligated to
furnish service under this warranty a) to repair damage resulting from attempts by
personnel other than Tektronix representatives to install, repair or service the product;
b) to repair damage resulting from improper use or connection to incompatible
equipment; c) to repair any damage or malfunction caused by the use of
non-Tektronix supplies; or d) to service a product that has been modified or integrated
with other products when the effect of such modification or integration increases the
time or difficulty of servicing the product.
THIS WARRANTY IS GIVEN BY TEKTRONIX WITH RESPECT TO THE
LISTED PRODUCTS IN LIEU OF ANY OTHER WARRANTIES, EXPRESS
OR IMPLIED. TEKTRONIX AND ITS VENDORS DISCLAIM ANY
IMPLIED WARRANTIES OF MERCHANTABILITY OR FITNESS FOR A
PARTICULAR PURPOSE. TEKTRONIX’ RESPONSIBILITY TO REPAIR
OR REPLACE DEFECTIVE PRODUCTS IS THE SOLE AND EXCLUSIVE
REMEDY PROVIDED TO THE CUSTOMER FOR BREACH OF THIS
WARRANTY. TEKTRONIX AND ITS VENDORS WILL NOT BE LIABLE
FOR ANY INDIRECT, SPECIAL, INCIDENTAL, OR CONSEQUENTIAL
DAMAGES IRRESPECTIVE OF WHETHER TEKTRONIX OR THE
VENDOR HAS ADVANCE NOTICE OF THE POSSIBILITY OF SUCH
DAMAGES.
Table of Contents
General Safety Summary . . . . . . . . . . . . . . . . . . . . . . . . . . . .
ix
Preface . . . . . . . . . . . . . . . . . . . . . . . . . . . . . . . . . . . . . . . . . . . .
About this Manual . . . . . . . . . . . . . . . . . . . . . . . . . . . . . . . . . . .
Additional Information . . . . . . . . . . . . . . . . . . . . . . . . . . . . . . .
Conventions . . . . . . . . . . . . . . . . . . . . . . . . . . . . . . . . . . . . . . . .
Software Version . . . . . . . . . . . . . . . . . . . . . . . . . . . . . . . . . . . .
Contacting Tektronix . . . . . . . . . . . . . . . . . . . . . . . . . . . . . . . . .
xiii
xiii
xiv
xiv
xiv
xv
Getting Started
Product Description . . . . . . . . . . . . . . . . . . . . . . . . . . . . . . . . . .
Standard Accessories . . . . . . . . . . . . . . . . . . . . . . . . . . . . . .
Installing a YBT250 Module . . . . . . . . . . . . . . . . . . . . . . . . . . .
Removing a YBT250 Module . . . . . . . . . . . . . . . . . . . . . . . . . .
The NetTek Analyzer Platform Battery . . . . . . . . . . . . . . . . . .
Installing the Battery . . . . . . . . . . . . . . . . . . . . . . . . . . . . . .
Removing a Battery . . . . . . . . . . . . . . . . . . . . . . . . . . . . . . .
Charging a Battery . . . . . . . . . . . . . . . . . . . . . . . . . . . . . . . .
Optimizing Battery Life . . . . . . . . . . . . . . . . . . . . . . . . . . . .
Transporting Lithium-Ion Batteries . . . . . . . . . . . . . . . . . . .
Connecting External Power Supplies . . . . . . . . . . . . . . . . . . . .
Setting Up the Tilt Stand . . . . . . . . . . . . . . . . . . . . . . . . . . . . . .
Installing the Shoulder Strap and Strand Hook . . . . . . . . . . . . .
Powering On the Instrument . . . . . . . . . . . . . . . . . . . . . . . . . . .
How the Software Loads . . . . . . . . . . . . . . . . . . . . . . . . . . .
Calibrating the Touch-Screen Display . . . . . . . . . . . . . . . . . . .
Setting the stylus sensitivity . . . . . . . . . . . . . . . . . . . . . . . .
Setting the stylus centering . . . . . . . . . . . . . . . . . . . . . . . . .
Powering Off the Instrument . . . . . . . . . . . . . . . . . . . . . . . . . . .
Suspend Mode . . . . . . . . . . . . . . . . . . . . . . . . . . . . . . . . . . .
Shutdown . . . . . . . . . . . . . . . . . . . . . . . . . . . . . . . . . . . . . . .
Restart (Software Reset) . . . . . . . . . . . . . . . . . . . . . . . . . . .
Front-Panel Power Switch . . . . . . . . . . . . . . . . . . . . . . . . . .
YBT250 Field Transmitter & Interference Tester User Manual
1-- 1
1-- 3
1-- 3
1-- 6
1-- 7
1-- 7
1-- 10
1-- 11
1-- 12
1-- 12
1-- 13
1-- 14
1-- 16
1-- 17
1-- 17
1-- 18
1-- 18
1-- 18
1-- 18
1-- 18
1-- 19
1-- 19
1-- 20
i
Table of Contents
Preventing Personal Injury from the Effects of Lightning . . . .
Before connecting this product to any source . . . . . . . . . . .
Do not connect this product to any source which
might be subject to the effects of lightning . . . . . . . . . .
Be alert and aware of the effects of lightning . . . . . . . . . . .
1-- 20
1-- 20
1-- 21
1-- 21
Operating Basics
ii
Overview . . . . . . . . . . . . . . . . . . . . . . . . . . . . . . . . . . . . . . . . . .
Identifying Front-Panel Controls and Indicators . . . . . . . . . . . .
YBT250 Inputs . . . . . . . . . . . . . . . . . . . . . . . . . . . . . . . . . . . . .
Getting Help . . . . . . . . . . . . . . . . . . . . . . . . . . . . . . . . . . . . . . .
Navigating the Desktop . . . . . . . . . . . . . . . . . . . . . . . . . . . . . . .
Icons . . . . . . . . . . . . . . . . . . . . . . . . . . . . . . . . . . . . . . . . . . .
Taskbar . . . . . . . . . . . . . . . . . . . . . . . . . . . . . . . . . . . . . . . . .
Starting the YBT250 Software . . . . . . . . . . . . . . . . . . . . . . . . .
Setting the YBT250 Software to Load at Startup . . . . . . . .
Elements of the Display . . . . . . . . . . . . . . . . . . . . . . . . . . . . . . .
Shared Control Area . . . . . . . . . . . . . . . . . . . . . . . . . . . . . .
Command Bar Area . . . . . . . . . . . . . . . . . . . . . . . . . . . . . . .
Tuning Control Area . . . . . . . . . . . . . . . . . . . . . . . . . . . . . .
Instrument Area . . . . . . . . . . . . . . . . . . . . . . . . . . . . . . . . . .
Using the Touch Screen . . . . . . . . . . . . . . . . . . . . . . . . . . . . . . .
Using the Knob . . . . . . . . . . . . . . . . . . . . . . . . . . . . . . . . . .
Using the Numeric Keypad . . . . . . . . . . . . . . . . . . . . . . . . .
YBT250 Menus . . . . . . . . . . . . . . . . . . . . . . . . . . . . . . . . . . . . .
Entering Text . . . . . . . . . . . . . . . . . . . . . . . . . . . . . . . . . . . . . . .
Powering Off the YBT250 . . . . . . . . . . . . . . . . . . . . . . . . . . . . .
Suspend Mode . . . . . . . . . . . . . . . . . . . . . . . . . . . . . . . . . . .
Shutdown . . . . . . . . . . . . . . . . . . . . . . . . . . . . . . . . . . . . . . .
Restart (Software Reset) . . . . . . . . . . . . . . . . . . . . . . . . . . .
2-- 1
2-- 2
2-- 3
2-- 4
2-- 5
2-- 6
2-- 6
2-- 8
2-- 9
2-- 10
2-- 11
2-- 12
2-- 13
2-- 14
2-- 14
2-- 14
2-- 14
2-- 15
2-- 20
2-- 21
2-- 21
2-- 22
2-- 22
Connecting a Signal . . . . . . . . . . . . . . . . . . . . . . . . . . . . . . . . .
RF Signal Input Parameters . . . . . . . . . . . . . . . . . . . . . . . . . . . .
Connecting an RF Signal . . . . . . . . . . . . . . . . . . . . . . . . . . . . . .
Connecting a Timing Reference
(cdmaOne/cdma2000 /1xEV-- DO Only) . . . . . . . . . . . . . . .
Connecting an External Frequency Reference . . . . . . . . . . . . .
Improving Frequency Accuracy . . . . . . . . . . . . . . . . . . . . . . . .
2-- 23
2-- 23
2-- 24
2-- 26
2-- 26
2-- 29
YBT250 Field Transmitter & Interference Tester User Manual
Table of Contents
Changing Instrument Settings . . . . . . . . . . . . . . . . . . . . . . . .
Enabling Signal Standards . . . . . . . . . . . . . . . . . . . . . . . . . . . . .
Setting Display Preferences . . . . . . . . . . . . . . . . . . . . . . . . . . . .
Setting Up the Channel Table . . . . . . . . . . . . . . . . . . . . . . . . . .
Customizing the Channel Table . . . . . . . . . . . . . . . . . . . . . . . .
Creating a Custom Channel Table . . . . . . . . . . . . . . . . . . . .
Specifying the Signal Type . . . . . . . . . . . . . . . . . . . . . . . . .
How Channel Frequencies are Calculated . . . . . . . . . . . . . .
Changing Settings for Saved Files . . . . . . . . . . . . . . . . . . . . . .
Where to Set File Options . . . . . . . . . . . . . . . . . . . . . . . . . .
Setting the Filename Prefix . . . . . . . . . . . . . . . . . . . . . . . . .
Setting the Technician Name . . . . . . . . . . . . . . . . . . . . . . . .
Entering Notes for Saved Results . . . . . . . . . . . . . . . . . . . .
Setting Up a GPS Receiver . . . . . . . . . . . . . . . . . . . . . . . . .
Setting Default File Type . . . . . . . . . . . . . . . . . . . . . . . . . . .
Setting Default File Location for Automatically
Saving and Exporting Spectrograms and Codograms . .
Saving GPS Coordinates with your Results . . . . . . . . . . . . . . .
Selecting a Compatible GPS Receiver . . . . . . . . . . . . . . . .
Enabling Your GPS Receiver . . . . . . . . . . . . . . . . . . . . . . . .
Troubleshooting Your GPS Receiver . . . . . . . . . . . . . . . . . .
vxHpc Software . . . . . . . . . . . . . . . . . . . . . . . . . . . . . . . . . .
2-- 33
2-- 33
2-- 35
2-- 36
2-- 40
2-- 41
2-- 44
2-- 44
2-- 45
2-- 45
2-- 46
2-- 47
2-- 47
2-- 48
2-- 48
2-- 49
2-- 50
2-- 50
2-- 50
2-- 51
2-- 52
Reference
Displaying a Signal Spectrum . . . . . . . . . . . . . . . . . . . . . . . . .
The Spectrum Display Area . . . . . . . . . . . . . . . . . . . . . . . . . . .
Displaying a Trace . . . . . . . . . . . . . . . . . . . . . . . . . . . . . . . . . . .
Setting Trace Display Options . . . . . . . . . . . . . . . . . . . . . . .
Setting the Trace Type . . . . . . . . . . . . . . . . . . . . . . . . . . . . .
Changing the Vertical Scale of the Spectrum Display . . . .
Changing the Vertical Position of the Trace . . . . . . . . . . . .
Changing the Horizontal Position of the Trace . . . . . . . . . .
Changing the Reference Level . . . . . . . . . . . . . . . . . . . . . .
Disabling Tap/Drag Operation . . . . . . . . . . . . . . . . . . . . . . .
Saving Traces . . . . . . . . . . . . . . . . . . . . . . . . . . . . . . . . . . . . . . .
Displaying a Saved Trace . . . . . . . . . . . . . . . . . . . . . . . . . . . . .
Comparing Traces . . . . . . . . . . . . . . . . . . . . . . . . . . . . . . . . . . .
Defining Trace 2 . . . . . . . . . . . . . . . . . . . . . . . . . . . . . . . . .
Comparing Two Trace Results Files . . . . . . . . . . . . . . . . . . . . .
YBT250 Field Transmitter & Interference Tester User Manual
3-- 1
3-- 1
3-- 5
3-- 6
3-- 7
3-- 9
3-- 10
3-- 10
3-- 11
3-- 11
3-- 12
3-- 13
3-- 13
3-- 13
3-- 15
iii
Table of Contents
iv
Displaying Markers . . . . . . . . . . . . . . . . . . . . . . . . . . . . . . . . . .
Specifying Units for Marker Display . . . . . . . . . . . . . . . . . .
Measuring Frequency and Level Differences
on a Single Trace . . . . . . . . . . . . . . . . . . . . . . . . . . . . . .
Measuring Frequency and Level Differences
Between Two Traces . . . . . . . . . . . . . . . . . . . . . . . . . . .
Markers and Mask Testing . . . . . . . . . . . . . . . . . . . . . . . . . . . . .
Band Edge Cursor . . . . . . . . . . . . . . . . . . . . . . . . . . . . . . . . . . .
Displaying a Spectrogram . . . . . . . . . . . . . . . . . . . . . . . . . . . . .
Setting the Spectrogram Update Rate . . . . . . . . . . . . . . . . . . . .
Automatically Saving and Exporting the
Spectrogram Display . . . . . . . . . . . . . . . . . . . . . . . . . . . . . .
Creating a Mask . . . . . . . . . . . . . . . . . . . . . . . . . . . . . . . . . . . . .
Defining a Mask . . . . . . . . . . . . . . . . . . . . . . . . . . . . . . . . . . . .
Performing a Mask Test . . . . . . . . . . . . . . . . . . . . . . . . . . . . . . .
Mask Testing and Markers . . . . . . . . . . . . . . . . . . . . . . . . . .
3-- 17
3-- 19
Locating Interference . . . . . . . . . . . . . . . . . . . . . . . . . . . . . . .
The Interference Display Area . . . . . . . . . . . . . . . . . . . . . . . . .
Displaying a Trace . . . . . . . . . . . . . . . . . . . . . . . . . . . . . . . . . . .
Identifying a Signal . . . . . . . . . . . . . . . . . . . . . . . . . . . . . . . . . .
Locating an Interfering Signal . . . . . . . . . . . . . . . . . . . . . . . . . .
Demodulating an Interfering Signal . . . . . . . . . . . . . . . . . . . . .
Measuring the Noise Floor . . . . . . . . . . . . . . . . . . . . . . . . . . . .
Locating Intermittent Interference . . . . . . . . . . . . . . . . . . . . . .
Analyzing W-CDMA Scrambling Codes . . . . . . . . . . . . . . . . .
W-CDMA Scrambling Code Results . . . . . . . . . . . . . . . . . .
Sorting or Locking the Current Set of Scrambling Codes . .
3-- 35
3-- 35
3-- 37
3-- 38
3-- 39
3-- 41
3-- 43
3-- 44
3-- 47
3-- 48
3-- 48
Taking Measurements . . . . . . . . . . . . . . . . . . . . . . . . . . . . . . .
The Measure Window Display . . . . . . . . . . . . . . . . . . . . . . . . .
Setting the Measurement Frequency . . . . . . . . . . . . . . . . . . . . .
What Measurements are Available . . . . . . . . . . . . . . . . . . . . . .
3-- 51
3-- 51
3-- 52
3-- 55
3-- 20
3-- 21
3-- 22
3-- 22
3-- 24
3-- 25
3-- 26
3-- 27
3-- 32
3-- 33
3-- 33
YBT250 Field Transmitter & Interference Tester User Manual
Table of Contents
Limit Testing . . . . . . . . . . . . . . . . . . . . . . . . . . . . . . . . . . . . . . .
Analog Limit Test Measurements . . . . . . . . . . . . . . . . . . . .
cdmaOne/cdma2000 Limit Test Measurements . . . . . . . . .
GSM Limit Test Measurements . . . . . . . . . . . . . . . . . . . . . .
GSM/EDGE Limit Test Measurements . . . . . . . . . . . . . . . .
NADC IS-136 Limit Test Measurements . . . . . . . . . . . . . .
W-CDMA Limit Test Measurements . . . . . . . . . . . . . . . . . .
cdma2k 1xEV-- DO Limit Test Measurements . . . . . . . . . . .
Enabling Limit Testing . . . . . . . . . . . . . . . . . . . . . . . . . . . .
Setting the Scrambling Code Detection . . . . . . . . . . . . . . . . . .
Changing the Setting . . . . . . . . . . . . . . . . . . . . . . . . . . . . . .
How the Scrambling Code Setting is Indicated
in Displays . . . . . . . . . . . . . . . . . . . . . . . . . . . . . . . . . . .
Measuring RF Power . . . . . . . . . . . . . . . . . . . . . . . . . . . . . . . . .
Measuring GSM/EDGE RF Power . . . . . . . . . . . . . . . . . . . . . .
Setting GSM/EDGE BCCH Frame Sync Modes . . . . . . . . .
Channel and Frequency Setting Interactions . . . . . . . . . . . .
Setting GSM/EDGE RF Channel Power Modes . . . . . . . . .
Measuring cdma2000 1xEV-DO RF Power . . . . . . . . . . . . . . .
1xEV-DO Transmission Envelopes
on the RF Power Screen . . . . . . . . . . . . . . . . . . . . . . . . .
Measuring GSM/EDGE Power vs Time . . . . . . . . . . . . . . . . . .
Setting GSM/EDGE Power vs Time parameters . . . . . . . . .
Measuring Peak to Average Power Ratio . . . . . . . . . . . . . . . . .
Measuring Carrier Frequency . . . . . . . . . . . . . . . . . . . . . . . . . .
Measuring Occupied Bandwidth . . . . . . . . . . . . . . . . . . . . . . . .
Measuring cdmaOne and cdma2000 Signal Quality . . . . . . . . .
Measuring W-CDMA Signal Quality . . . . . . . . . . . . . . . . . . . .
Measuring cdma2k 1xEV-DO Signal Quality . . . . . . . . . . . . . .
Waveform Quality (Rho) . . . . . . . . . . . . . . . . . . . . . . . . . . .
Error Vector Magnitude (EVM) . . . . . . . . . . . . . . . . . . . . . .
Data Constellation Type . . . . . . . . . . . . . . . . . . . . . . . . . . . .
PN Offset . . . . . . . . . . . . . . . . . . . . . . . . . . . . . . . . . . . . . . .
Pilot Time Alignment Error (Tau) . . . . . . . . . . . . . . . . . . . .
Measuring GSM/EDGE Signal Quality . . . . . . . . . . . . . . . . . .
Phase Error . . . . . . . . . . . . . . . . . . . . . . . . . . . . . . . . . . . . . .
Error Vector Magnitude (EVM) . . . . . . . . . . . . . . . . . . . . . .
Origin Offset . . . . . . . . . . . . . . . . . . . . . . . . . . . . . . . . . . . .
Carrier to Interference Ratio (C/I) . . . . . . . . . . . . . . . . . . . .
YBT250 Field Transmitter & Interference Tester User Manual
3-- 55
3-- 56
3-- 56
3-- 56
3-- 57
3-- 57
3-- 57
3-- 58
3-- 59
3-- 61
3-- 62
3-- 63
3-- 63
3-- 65
3-- 67
3-- 70
3-- 70
3-- 72
3-- 74
3-- 76
3-- 79
3-- 80
3-- 81
3-- 83
3-- 85
3-- 86
3-- 88
3-- 90
3-- 90
3-- 90
3-- 91
3-- 91
3-- 91
3-- 93
3-- 93
3-- 93
3-- 93
v
Table of Contents
Measuring cdmaOne Code Power . . . . . . . . . . . . . . . . . . . . . . .
Measuring cdma2000 Code Power . . . . . . . . . . . . . . . . . . . . . .
Code Domain Power Readouts . . . . . . . . . . . . . . . . . . . . . .
Measuring W-CDMA Code Power . . . . . . . . . . . . . . . . . . . . . .
Code Domain Power Readouts . . . . . . . . . . . . . . . . . . . . . .
Measuring cdma2k 1xEV-- DO Code Power . . . . . . . . . . . . . . .
Code Domain Power Readouts . . . . . . . . . . . . . . . . . . . . . .
Displaying a cdmaOne Codogram . . . . . . . . . . . . . . . . . . . . . . .
Displaying a cdma2000 Codogram . . . . . . . . . . . . . . . . . . . . . .
Displaying a W-CDMA Codogram . . . . . . . . . . . . . . . . . . . . . .
Displaying a cdma2k 1xEV-- DO Codogram . . . . . . . . . . . . . . .
Automatically Saving the cdmaOne, cdma2000,
1xEV-- DO, and W-CDMA Codogram Displays . . . . . . . . .
Measuring cdmaOne and cdma2000 Pilot Power . . . . . . . . . . .
Measuring W-CDMA Pilot Power and Sync Powers . . . . . . . .
Measuring W-CDMA ACLR . . . . . . . . . . . . . . . . . . . . . . . . . . .
Taking and Displaying Multiple Measurements at Once
Using the Sequencer (Button 4) . . . . . . . . . . . . . . . . . . . . . .
Saving, Exporting, and Recalling Results, Traces,
and Settings . . . . . . . . . . . . . . . . . . . . . . . . . . . . . . . . . . . . .
Saving Measurement Results . . . . . . . . . . . . . . . . . . . . . . . . . . .
What is Saved in a Measurement Results File . . . . . . . . . .
Recalling Measurement Results . . . . . . . . . . . . . . . . . . . . . . . .
Exporting Measurement Results . . . . . . . . . . . . . . . . . . . . . . . .
Exporting a Screen . . . . . . . . . . . . . . . . . . . . . . . . . . . . . . . . . . .
Saving a Trace . . . . . . . . . . . . . . . . . . . . . . . . . . . . . . . . . . . . . .
Recalling a Trace . . . . . . . . . . . . . . . . . . . . . . . . . . . . . . . . . . . .
Exporting a Trace . . . . . . . . . . . . . . . . . . . . . . . . . . . . . . . . . . .
Differences Between Exported Screens and Traces . . . . . . . . .
Saving Setups . . . . . . . . . . . . . . . . . . . . . . . . . . . . . . . . . . . . . . .
Recalling Setups . . . . . . . . . . . . . . . . . . . . . . . . . . . . . . . . . . . .
Customizing the Setup menu . . . . . . . . . . . . . . . . . . . . . . . . . . .
Preventing Changes to Saved Setups . . . . . . . . . . . . . . . . . .
Enabling Changes to Saved Setups . . . . . . . . . . . . . . . . . . .
Specifying the List of Saved Setups . . . . . . . . . . . . . . . . . .
vi
3-- 93
3-- 95
3-- 97
3-- 98
3-- 100
3-- 101
3-- 103
3-- 104
3-- 106
3-- 108
3-- 110
3-- 112
3-- 115
3-- 117
3-- 118
3-- 119
3-- 123
3-- 124
3-- 124
3-- 125
3-- 127
3-- 128
3-- 129
3-- 130
3-- 131
3-- 131
3-- 133
3-- 134
3-- 135
3-- 135
3-- 136
3-- 136
YBT250 Field Transmitter & Interference Tester User Manual
Table of Contents
Appendices
Appendix A: Specifications . . . . . . . . . . . . . . . . . . . . . . . . . . .
A-- 1
Appendix B: Accessories . . . . . . . . . . . . . . . . . . . . . . . . . . . . .
Standard Accessories . . . . . . . . . . . . . . . . . . . . . . . . . . . . . . . . .
Optional Accessories . . . . . . . . . . . . . . . . . . . . . . . . . . . . . . . . .
B-- 1
B-- 1
B-- 2
Appendix C: Options . . . . . . . . . . . . . . . . . . . . . . . . . . . . . . . .
C-- 1
Appendix D: Installing Options and Upgrading Software . .
Before Installing Options . . . . . . . . . . . . . . . . . . . . . . . . . . . . . .
Installing Options . . . . . . . . . . . . . . . . . . . . . . . . . . . . . . . . . . . .
Upgrading/Reinstalling the YBT250 Software . . . . . . . . . . . . .
D-- 1
D-- 1
D-- 2
D-- 5
Appendix E: Functional Verification Procedure . . . . . . . . .
Self Tests . . . . . . . . . . . . . . . . . . . . . . . . . . . . . . . . . . . . . . . . . .
Equipment Required . . . . . . . . . . . . . . . . . . . . . . . . . . . . . .
Prerequisite . . . . . . . . . . . . . . . . . . . . . . . . . . . . . . . . . . . . . .
Functional Tests . . . . . . . . . . . . . . . . . . . . . . . . . . . . . . . . . . . . .
Equipment Required . . . . . . . . . . . . . . . . . . . . . . . . . . . . . .
Prerequisite . . . . . . . . . . . . . . . . . . . . . . . . . . . . . . . . . . . . . .
Section 1: Check RF attenuation . . . . . . . . . . . . . . . . . . . . .
Section 2: External Reference . . . . . . . . . . . . . . . . . . . . . . .
E-- 1
E-- 1
E-- 1
E-- 1
E-- 3
E-- 3
E-- 3
E-- 3
E-- 4
Appendix F: Supported Signal Standards . . . . . . . . . . . . . . .
F-- 1
Appendix G: Channel Table . . . . . . . . . . . . . . . . . . . . . . . . . .
About the Signal Type . . . . . . . . . . . . . . . . . . . . . . . . . . . . . . . .
G-- 1
G-- 1
Glossary
Index
YBT250 Field Transmitter & Interference Tester User Manual
vii
Table of Contents
viii
YBT250 Field Transmitter & Interference Tester User Manual
General Safety Summary
Review the following safety precautions to avoid injury and prevent
damage to this product or any products connected to it. To avoid
potential hazards, use this product only as specified.
Only qualified personnel should perform service procedures.
While using this product, you may need to access other parts of the
system. Read the General Safety Summary in other system manuals
for warnings and cautions related to operating the system.
WARNING. Do not connect to any source which may be subject to the
effects of lightning.
To Avoid Fire or Personal Injury
Use Proper Power Cord. Use only the power cord specified for this
product and certified for the country of use.
Connect and Disconnect Properly. Do not connect or disconnect probes
or test leads while they are connected to a voltage source.
Observe All Terminal Ratings. To avoid fire or shock hazard, observe all
ratings and markings on the product. Consult the product manual for
further ratings information before making connections to the product.
The common terminal is at ground potential. Do not connect the
common terminal to elevated voltages.
Replace Batteries Properly. Replace batteries only with the proper type
and rating specified.
Recharge Batteries Properly. Recharge batteries only as specified.
Use Proper AC Adapter. Use only the AC adapter specified for this
product.
Do Not Operate Without Covers. Do not operate this product with
covers or panels removed.
Wear Eye Protection. Wear eye protection if exposure to high-intensity
rays or laser radiation exists.
YBT250 Field Transmitter & Interference Tester User Manual
ix
General Safety Summary
Do Not Operate With Suspected Failures. If you suspect there is damage
to this product, have it inspected by qualified service personnel.
Do Not Operate in an Explosive Atmosphere.
Safety Terms and Symbols
Terms in This Manual. These terms may appear in this manual:
WARNING. Warning statements identify conditions or practices that
could result in injury or loss of life.
CAUTION. Caution statements identify conditions or practices that
could result in damage to this product or other property.
Terms on the Product. These terms may appear on the product:
DANGER indicates an injury hazard immediately accessible as you
read the marking.
WARNING indicates an injury hazard not immediately accessible as
you read the marking.
CAUTION indicates a hazard to property including the product.
Symbols on the Product. These symbols may appear on the product:
CAUTION
Refer to Manual
x
YBT250 Field Transmitter & Interference Tester User Manual
General Safety Summary
Battery Recycling
This product contains a Lithium Ion battery, which must be recycled
or disposed of properly. For the location of a local battery recycler in
the U.S. or Canada, please contact:
RBRC
Rechargeable Battery Recycling Corp.
P.O. Box 141870
Gainesville, Florida 32614
(800) BATTERY
(800) 227-7379
www.rbrc.com
YBT250 Field Transmitter & Interference Tester User Manual
xi
General Safety Summary
xii
YBT250 Field Transmitter & Interference Tester User Manual
Preface
The YBT250 Field Transmitter & Interference Tester is part of the
NetTek Base Transceiver Station (BTS) Field Tool family: a high
performance, portable, field-ready tester optimized for fast trouble
resolution and easy BTS performance verification. It is based on the
familiar and easy-to-use Windows CE operating system, so you will
spend less time learning the instrument and more time troubleshooting the network.
The YBT250 verifies the most important RF transmit functions of
cdmaOne/cdma2000/1xEV-- DO, TDMA IS-136, GSM/EDGE,
W-CDMA (UMTS), and Analog base stations. The YBT250 Field
Transmitter & Interference Tester has powerful analysis tools to
enable you to locate and identify interfering signals quickly. With its
built-in spectrum analysis display, the YBT250 enables you to easily
see signal problems. The spectrogram display makes it easier than
ever to spot intermittent signal problems.
About this Manual
This manual is divided into four sections: Getting Started, Operating
Basics, Reference, and Appendices.
The Getting Started section describes how to start using your
YBT250 Field Transmitter & Interference Tester.
The Operating Basics section shows you how to operate the
YBT250.
The Reference section explains how to perform specific tests with the
YBT250.
The Appendices contain reference information such as specifications,
a functional verification procedure, and other information that you
might need occasionally.
YBT250 Field Transmitter & Interference Tester User Manual
xiii
Preface
Additional Information
The YBT250 Field Transmitter & Interference Tester contains online
help to enable you to quickly get explanations of how to use your
YBT250. The online help is the first place you should look for
information about operating the YBT250.
The YBT250 Field Transmitter & Interference Tester is based on the
NetTek Analyzer Platform. Important information about configuring
and operating the NetTek Analyzer Platform is contained in the
Getting Started section of this manual. There is also extensive online
help available on the NetTek Analyzer Platform.
Conventions
This manual uses the following convention. The statement Start >
Help is requesting that you open the Start menu and select Help. To
do this, tap the Start button in the toolbar at the bottom of the
desktop window; then tap Help in the resulting menu.
Software Version
This manual supports YBT250 Field Transmitter & Interference
Testers running software version 1.4xx. To verify your software
version, select Tools > Software Info when the YBT250 is running.
xiv
YBT250 Field Transmitter & Interference Tester User Manual
Preface
Contacting Tektronix
Phone
1-800-833-9200*
Address
Tektronix, Inc.
Department or name (if known)
14200 SW Karl Braun Drive
P.O. Box 500
Beaverton, OR 97077
USA
Web site
www.tektronix.com
Sales
support
1-800-833-9200, select option 1*
Service
support
1-800-833-9200, select option 2*
Technical
support
Email: [email protected]
1-800-833-9200, select option 3*
6:00 a.m. - 5:00 p.m. Pacific time
*
This phone number is toll free in North America. After office
hours, please leave a voice mail message.
Outside North America, contact a Tektronix sales office or
distributor; see the Tektronix web site for a list of offices.
YBT250 Field Transmitter & Interference Tester User Manual
xv
Preface
xvi
YBT250 Field Transmitter & Interference Tester User Manual
Getting Started
Getting Started
This section contains a description of the YBT250 Field Transmitter
& Interference Tester and basic information you need to start using
your module.
Product Description
Figure 1- 1: YBT250 Field Transmitter & Interference Tester
The YBT250 Field Transmitter & Interference Tester is an RF tester
optimized for field testing cellular basestations. The YBT250 is a
modular test instrument based on the NetTek Analyzer Platform. The
standard YBT250 actually consists of two parts: the instrument
module and the NetTek Analyzer Platform.
YBT250 Field Transmitter & Interference Tester User Manual
1- 1
Getting Started
The instrument module contains the hardware and software that does
the RF analysis. The YBT250 can also be purchased as just an
instrument module that can be added to a NetTek Analyzer Platform
that you already have.
You can attach up to three instrument modules onto the NetTek
Analyzer Platform to expand the instrument’s test capabilities.
Instrument modules communicate with the platform through the
internal bus and to the Base Station or device under test through their
own input and output connectors.
The NetTek Analyzer Platform is the “computer” that runs the
instrument module software, and is based on the Windows CE
operating system.
NetTek Analyzer Platform product features include the following:
H Display with touchscreen interface
H Ruggedized package
H Removable battery packs
H I/O ports
H Software applications and utilities that support communications,
power management, instrument configuration, text editing, web
browsing, and more.
1- 2
YBT250 Field Transmitter & Interference Tester User Manual
Getting Started
Standard Accessories
The tables below provide a list of the standard accessories supplied
with the YBT250 Module.
For a complete list of standard and optional accessories, see
Appendix B, beginning on page B-- 1.
Table 1- 1: Standard module accessories
N Connector Plastic Cover. Used to protect the RF Input
connector.
BNC Plastic Cover. Used to protect the External Timing and
Frequency Reference Inputs.
User Manual. Contains information on setup, basic operations,
and taking measurements.
CD-ROM. Contains instrument software and an Adobe Acrobat
PDF version of the user manual.
Installing a YBT250 Module
If you purchased a YBT250 module for use on a NetTek Analyzer
Platform you already have, use the following procedure to install a
YBT250 module onto the NetTek Analyzer Platform or to attach a
YBT250 module onto another module.
CAUTION. To prevent damage to the NetTek Analyzer Platform or
YBT250 module, you must power down the NetTek Analyzer Platform
before installing a YBT250 module.
YBT250 Field Transmitter & Interference Tester User Manual
1- 3
Getting Started
Use the following procedure to install a YBT250 module on a
NetTek Analyzer Platform:
1. Select Start > Shutdown.
2. In the Shut Down dialog box, select Shutdown.
3. Disconnect all cables to the NetTek Analyzer Platform.
4. Place the NetTek Analyzer Platform face down on a flat
uncluttered surface. The NetTek Analyzer Platform should be
supported only by its four corner bumpers.
5. Remove the bus door from the rear of the NetTek Analyzer
Platform or instrument module. See Figure 1-- 2.
Bus door
Bus connector
NetTek Analyzer Platform
Figure 1- 2: Removing the bus door
6. Carefully lower the YBT250 module onto the NetTek Analyzer
Platform to engage the bus connectors. See Figure 1-- 3.
1- 4
YBT250 Field Transmitter & Interference Tester User Manual
Getting Started
Bus door
Thumb screw (4)
YBT250 module
NetTek Analyzer
Platform
Bus connector
Figure 1- 3: Attaching the YBT250 module
7. Press down firmly to seat the connector and ensure contact.
8. Locate the thumb screws. See Figure 1-- 3.
9. For each thumb screw, push down on the head and turn it 1/4 turn
in a counter-clockwise direction and let it pop up to extend the
length.
10. Tighten the screws by pressing in just slightly and turning them
in a clockwise direction. Use the coin slot in the top of the thumb
screw if you require additional torque. Be sure to tighten all
screws evenly, but do not overtighten.
YBT250 Field Transmitter & Interference Tester User Manual
1- 5
Getting Started
11. To recess the thumb screw heads, push and turn each screw head
1/4 turn in a clockwise direction.
12. To maintain the enclosure seal integrity, reinstall the bus door
into the rear of the YBT250 module.
Removing a YBT250 Module
Use the following procedure to remove a YBT250 module from a
NetTek Analyzer Platform:
1. Select Start > Shutdown to shut down the NetTek Analyzer
Platform.
2. Disconnect all cables to the NetTek Analyzer Platform.
3. Place the NetTek Analyzer Platform face down on a flat
uncluttered surface. The NetTek Analyzer Platform should be
supported only by its four corner bumpers.
4. To release the thumb-screw heads, push and turn each screw head
1/4 turn in a counter-clockwise direction.
5. Disengage all four screws by turning them in a counter clockwise
direction. A tool or coin may be required if the screws were
tightened with a coin or other tool.
6. Pull up on the YBT250 module to remove it.
7. To maintain enclosure seal integrity, reinstall the bus door into
the rear of the NetTek Analyzer Platform.
1- 6
YBT250 Field Transmitter & Interference Tester User Manual
Getting Started
The NetTek Analyzer Platform Battery
The NetTek Analyzer Platform ships from the factory with the
lithium-ion battery uninstalled. To operate the YBT250 from battery
power, use the following procedures to install, remove, and charge
the battery.
Installing a Battery
Use the following procedure to install a battery.
NOTE. See Charging a Battery on page 1-- 11 before using the NetTek
Analyzer Platform on battery power for the first time.
The NetTek Analyzer Platform comes standard with a single
lithium-ion battery. You can add a second battery to increase the
operating time. Replace a battery with the correct type only. Contact
Tektronix customer support to purchase a battery.
1. Place the NetTek Analyzer Platform on a flat surface with the
touch-screen display facing towards you. See Figure 1-- 4.
Battery door latch
Battery
compartment door
Figure 1- 4: NetTek Analyzer Platform battery compartment
YBT250 Field Transmitter & Interference Tester User Manual
1- 7
Getting Started
2. Push the battery door latch towards the rear of the analyzer and
open the battery compartment door.
3. Locate the battery retainer and battery retainer tab. (See
Figure 1-- 5.)
4. Push down on the retainer tab with your finger to release the
battery retainer.
5. Lift up the battery retainer and rotate it towards the rear of the
analyzer. You must hold the retainer out of the way to install the
battery.
Battery retainer
Battery retainer tab
Figure 1- 5: Battery retainer tab
1- 8
YBT250 Field Transmitter & Interference Tester User Manual
Getting Started
6. Position the battery as shown in Figure 1-- 6. The battery
electrical contacts, on the bottom of the battery, must face in the
direction shown in Figure 1-- 6.
Battery removal strap
Battery retainer in
open position
Figure 1- 6: Installing a battery
7. Lower the battery into the battery compartment and apply firm
pressure to seat its electrical contacts.
8. Close the battery retainer, then press down until you hear the
battery retainer tab click.
9. Close and latch the battery compartment door.
YBT250 Field Transmitter & Interference Tester User Manual
1- 9
Getting Started
Removing a Battery
Use the following procedure to remove a battery for external
charging or replacement:
1. Power off the NetTek Analyzer Platform and disconnect any test
cables.
2. Place the NetTek Analyzer Platform on a flat surface with the
touch-screen display facing towards you and the battery
compartment door facing up. See Figure 1-- 6 for component
locations.
3. Push the battery compartment door latch towards the rear of the
NetTek Analyzer Platform and open the battery compartment
door.
4. Push down and back on the battery retainer tab to release the
battery retainer.
5. Lift up the battery retainer and rotate it towards the rear of the
instrument. You must hold the retainer out of the way to remove
a battery.
6. Locate the battery removal strap located on the top of the battery.
7. Pull up on the battery removal strap to remove the battery. See
Figure 1-- 7. If the strap is not accessible, place your hand over the
battery compartment and tilt the NetTek Analyzer Platform
upside down. The battery should come out of the compartment.
Be careful to not to drop the battery.
8. Follow the procedure on page 1-- 9, steps 6 through 9,, to install
a new or freshly charged battery.
1- 10
YBT250 Field Transmitter & Interference Tester User Manual
Getting Started
Battery removal strap
Battery 1
Figure 1- 7: Removing a battery
Charging a Battery
NetTek Analyzer Platform batteries are calibrated and partially
charged at the factory. When batteries are calibrated, the NetTek
Analyzer Platform can provide an estimate of how much longer the
YBT250 can operate before the instrument automatically powers off.
The YBT250 always warns you before powering off, so that you can
save important test results or settings.
NOTE. To achieve optimum performance from a new battery, fully
charge the battery. Then fully discharge the battery by leaving the
YBT250 running (see Start > Help > Settings > Power Management
for information on how to disable the power saver function). Finally,
fully charge the battery again.
YBT250 Field Transmitter & Interference Tester User Manual
1- 11
Getting Started
To verify the battery charge status at any time:
1. Select Start > Settings > Control Panel.
2. Open (double-tap) the Power Management icon. The Batteries
tab lists the status of each battery.
If the battery charge is low, recharge the battery or batteries as
follows:
1. Select Start > Shutdown to shut down the NetTek Analyzer
Platform.
2. Disconnect all cables to the NetTek Analyzer Platform.
3. Connect the Desktop power supply as shown in Figure 1-- 8.
4. Plug the Desktop power supply into an 110-240 VAC power
source. The front-panel Batteries indicator should glow green.
5. Let the battery charge for eight hours.
Optimizing Battery Life
For tips on how to maximize battery operating time, as well as other
battery-related topics, refer to the NetTek Analyzer Platform online
help. Select Start > Help > Settings > Power Management.
Transporting Lithium-Ion Batteries
Regulations regarding transportation of lithium-ion batteries on
passenger aircraft may subject this product to special handling
restrictions. Consult your air carrier for applicability and determination of any special lithium-ion battery transportation requirements.
The NetTek Analyzer Platform lithium-ion battery pack contains less
than 8 grams of lithium, with individual cells each containing less
than 1.5 grams of lithium, as measured by International Civil
Aviation Organization (ICAO) standards.
1- 12
YBT250 Field Transmitter & Interference Tester User Manual
Getting Started
Connecting External Power Supplies
To recharge NetTek Analyzer Platform batteries, or power the
NetTek Analyzer Platform from AC mains or DC vehicle voltage,
connect the Desktop Power Supply or the In-Vehicle Adapter to the
NetTek Analyzer Platform as shown in Figure 1-- 8. The Desktop
Power Supply operates from 110 to 240 VAC mains.
Power adapter connector
(under bottom of strap)
Figure 1- 8: External power supplies
YBT250 Field Transmitter & Interference Tester User Manual
1- 13
Getting Started
Setting Up the Tilt Stand
For floor or desktop use, attach the tilt stand to the NetTek Analyzer
Platform and fold into place. See Figure 1-- 9.
Attach tilt stand with
thumb screws (3)
Tilt stand
Stylus holders
Bottom thumb screw
located under Velcro flap
Figure 1- 9: NetTek Analyzer Platform tilt stand
1- 14
YBT250 Field Transmitter & Interference Tester User Manual
Getting Started
To install the tilt stand when two or more instrument modules are
attached, use the provided storage pack spacers as shown in
Figure 1-- 10.
Spacer(s)
Velcro fastener
Tilt stand
Instrument
module
Additional
instrument module
Figure 1- 10: Installing the tilt stand on multiple instrument modules
YBT250 Field Transmitter & Interference Tester User Manual
1- 15
Getting Started
Installing the Shoulder Strap and Strand Hook
Use the shoulder strap to carry the YBT250 to the job site. Install the
strap on the YBT250 as shown in Figure 1-- 11. You can also install
the strap on the softcase.
Use the Strand hook to hang the YBT250 from a wire strand, ladder,
or other support. Install the strand hook as shown in Figure 1-- 11.
CAUTION. The YBT250 Field Transmitter & Interference Tester can
weigh in excess of 12 kg (25 lbs), depending on the number of
batteries and instrument modules installed. Use caution when
hanging the YBT250 from any support.
Figure 1- 11: YBT250 shoulder strap and strand hook
1- 16
YBT250 Field Transmitter & Interference Tester User Manual
Getting Started
Powering On the Instrument
To power on the YBT250 Field Transmitter & Interference Tester,
press the large blue oval front-panel switch in the lower-left corner.
The green status indicator to the right of the switch will light and the
system begins its power-on process. The touch-screen display and
human interface are described in the Operating Basics section.
How the Software Loads
When you press the power switch on the front panel, the NetTek
Analyzer Platform powers on and runs its startup diagnostics (if
enabled). Once the NetTek Analyzer Platform has completed its
power-on sequence, the YBT250 software begins to load.
If there is enough flash memory available, the software loads into
flash memory. If there is not enough flash memory available, then
the YBT250 software loads into volatile memory (this happens only
with user-installed modules; if your YBT250 was purchased already
installed on a NetTek Analyzer Platform the software was loaded
into flash memory at the factory).
If the software is loaded into flash memory, the time required for the
YBT250 to startup each time the instrument is powered on is much
shorter. If the software is not loaded in flash memory, the software
must be loaded into the NetTek Analyzer Platform each time the
instrument is powered on, resulting in a longer start up time. Note
that the software load process is automatic, there are no user
decisions required or settings available that affect the software load
process.
YBT250 Field Transmitter & Interference Tester User Manual
1- 17
Getting Started
Calibrating the Touch-Screen Display
For the touch-screen display to respond correctly to your taps, you
must set the stylus centering and double-tap speed.
Setting the stylus sensitivity
1. Select Start > Settings > Control Panel.
2. Open (double-tap) the Stylus icon.
3. In the Double-Tap tab, double-tap the checkerboard grid at a
comfortable speed with your stylus or finger. This sets the tap
rate.
4. Double-tap the clapboard to verify your settings.
Setting the stylus centering
1. Select Start > Settings > Control Panel.
2. Open the Stylus icon.
3. In the Calibration tab, select Recalibrate.
4. Follow the on-screen instructions to set the location and amount
of pressure needed for the touch-screen to respond to your taps.
Apply pressure to the touch-screen for approximately 5 seconds
at each position, until the target moves.
5. Select OK to close the dialog box and save your settings.
Powering Off the Instrument
The YBT250 Field Transmitter & Interference Tester has separate,
but related, standby and power off functions.
Suspend Mode
The Suspend mode places the YBT250 in a suspended (standby or
sleep) state. This is the typical power down mode that allows the
YBT250 software to remain in volatile memory. If the YBT250
remains in Suspend mode for an extended time (approximately two
hours), it automatically enters Shutdown mode.
1- 18
YBT250 Field Transmitter & Interference Tester User Manual
Getting Started
To suspend analyzer operation, choose one of the following methods:
H Press the front-panel power switch.
H Select Start > Shutdown. In the Shut Down dialog box, select
Suspend.
To cancel Suspend mode and wake up the YBT250, press the
front-panel power switch. The YBT250 will return to the state that
existed before suspend mode was invoked.
Shutdown
To completely power down the YBT250, do the following:
1. Select Start > Shutdown.
2. In the Shut Down dialog box, select Shutdown.
A shutdown clears volatile memory, including the YBT250 software
if it is loaded in volatile memory, user setups, and measurement data
not saved to nonvolatile memory. For information on how to save
these items to nonvolatile memory, refer to the online help. Select
Start > Help. In the Help window select Tektronix Basics; then
select Store Data in Nonvolatile Memory.
If the YBT250 software was loaded in volatile memory, the next
time you press the front-panel power switch, the YBT250 will cycle
through the complete power-on process taking about 2 to 3 1/2
minutes to completely power on. If the YBT250 software is loaded
in non-volatile memory, it will take less time to power on.
Restart (Software Reset)
If the YBT250 stops responding, try performing a restart to clear the
problem.
To restart the YBT250, do the following:
1. Select Start > Shutdown.
2. In the Shut Down dialog box, select Restart.
The display blanks for approximately five seconds. The YBT250
software will reload and start. Restarting does not empty volatile
memory.
YBT250 Field Transmitter & Interference Tester User Manual
1- 19
Getting Started
If this procedure doesn’t work, use a pen or paperclip to press the
recessed front-panel RESET button. Resetting will empty volatile
memory.
Front-Panel Power Switch
Depending on the current state of the YBT250, pressing the
front-panel power switch performs one of the following functions:
H If the YBT250 is shutdown: powers on the instrument.
H If the YBT250 is operating: initiates Suspend mode.
H If the YBT250 is in Suspend mode: cancels Suspend mode and
activates the YBT250.
H If the analyzer is in PowerSaver mode (touch-screen display off):
activates the display.
Preventing Personal Injury from the Effects of Lightning
WARNING. To prevent personal injury from the effects of lightning,
exercise the following precautions when using this product.
Before connecting this product to any source
H Check your local weather forecast for the possibility of
thunderstorms or lightning.
H If weather conditions could allow thunderstorms or lightning to
develop, be sure to visually check the sky and weather conditions
in your area frequently.
H If you can hear thunder or if you see lightning, do not connect
this product to any source which may be exposed to the effects of
lightning.
H Use your own good judgement and common sense. You must
protect yourself from the effects of lightning.
1- 20
YBT250 Field Transmitter & Interference Tester User Manual
Getting Started
H You must assume that hazardous voltages will be present on
exposed surfaces of this product if it is connected to a source
exposed to lightning. The insulation of this product will not
protect you from these hazardous voltages.
Do not connect this product to any source which might be subject to
the effects of lightning
If thunderstorms or lightning are in your vicinity:
H When weather conditions that could lead to lightning activity
exist in your area, you could be at risk of a lightning strike
before the cloud is close enough for you to hear thunder or see
lightning.
H When lightning strikes a structure or facility, current travels
through the rebar, concrete, pipes, cables, vent stacks, and
electrical system.
H Lightning can induce electric and magnetic fields into structures
and portions of wiring. The length of a conductor affected by the
magnetic field of a lightning strike may exceed two miles.
Be alert and aware of the effects of lightning
H When lightning strikes a conductor, which in turn introduces the
current into an area some distance from the ground strike point,
equipment can be damaged and personnel injured if they
become an indirect path in the completion of the ground circuit.
H Conductors such as the braided shields of cables or unshielded
wires will have significant transient currents flowing in them in
regions exposed to the electric field effect of lightning.
H Induced voltages may cause breakdown of insulation in wiring at
connectors and in electrical components or breakdown of air.
YBT250 Field Transmitter & Interference Tester User Manual
1- 21
Getting Started
1- 22
YBT250 Field Transmitter & Interference Tester User Manual
Operating Basics
Operating Basics
This section explains the essential things you need to know to
operate the YBT250 Field Transmitter & Interference Tester.
Overview
The YBT250 is a member of the Tektronix NetTek Series of modular
instruments that are based on the NetTek Analyzer Platform. A
NetTek Series instrument consists of a hardware module, application
software, and the NetTek Analyzer Platform. A NetTek Series
instrument, such as the YBT250 Field Transmitter & Interference
Tester, can be purchased with or without a NetTek Analyzer
Platform. Because a NetTek Analyzer Platform can support four
instrument modules, it is a highly flexible instrument that can be
reconfigured to meet your changing needs.
The NetTek Analyzer Platform is a specialized Windows CE-based
computer. The NetTek Analyzer Platform provides the power source
and display for NetTek Series instruments. Each NetTek Series
instrument provides the circuitry and the software necessary for
signal measurement and analysis.
The NetTek Analyzer Platform comes with a touchscreen and stylus.
Use the stylus as you would a mouse on your desktop computer. You
can select an object by tapping it, move it by dragging it or activate
(“open”) it by double-tapping it with your finger or a stylus.
CAUTION. Only use soft objects, such as plastic or your finger, to tap
the touch-screen display. Do not use metal or other abrasive
materials, as they will damage the display surface.
YBT250 Field Transmitter & Interference Tester User Manual
2- 1
Operating Basics
Identifying Front-Panel Controls and Indicators
The front-panel controls power the YBT250 Field Transmitter &
Interference Tester on and off, reset the instrument, and indicate
status. See Figure 2-- 1.
1
2
3
4
Figure 2- 1: Front-panel controls and indicators
1. Power/Suspend Switch. Push on; push off. See pages 1--17 and 2--21 for
additional information.
2. Reset Switch. Push to perform a hardware reset if a lock-up occurs.
Programs and data loaded into volatile memory since startup will be lost.
3. Status Indicator. Green indicates power on. Amber indicates display off.
4. Batteries Indicator. Green indicates the instrument is connected to an
external power source and charging an installed battery. Red indicates low
battery.
2- 2
YBT250 Field Transmitter & Interference Tester User Manual
Operating Basics
YBT250 Inputs
Figure 2-- 2 identifies the YBT250 Field Transmitter & Interference
Tester inputs. For identification of the NetTek Analyzer Platform
inputs, outputs and storage devices, please refer to the appropriate
user documentation.
1
2
3
Figure 2- 2: YBT250 inputs, outputs, and storage devices.
1. Timing Input. Connect to an external timing reference (such as an even
second clock).
2. Frequency Reference Input. Connect to external frequency reference
(for example, 10 MHz Reference).
3. RF Input. Connect to signal source.
CAUTION. To prevent damage to the YBT250, continuous input
signals should not exceed 1 Watt. If a signal between 1 Watt and
50 Watts is connected to the RF INPUT, the input protection circuitry
displays a warning and halts operation until the input overload is
corrected. Input signals over 50 Watts will damage the input
circuitry.
YBT250 Field Transmitter & Interference Tester User Manual
2- 3
Operating Basics
The input signal-level requirements for measurement accuracy
depend on the selected measurement and the installed options. Refer
to the specifications in Appendix A for the appropriate input signal
levels for specific combinations of measurements and installed
options.
Getting Help
To open the Help window and obtain general information on
YBT250 topics, select Start > Help and select YBT250.
There are three ways to display Help when you are running the
YBT250 software:
icon in the upper-right corner of the
H First, you can tap the
YBT250 display. This displays the top level of the YBT250 help.
H Second, you can tap underlined text on the screen. This displays
the Help topic for the item selected.
H Third, you can display Help from some dialog boxes by tapping
the Help button in the bottom-right corner of the dialog box.
The Help Window
Table 2-- 1 explains how to use the Help window buttons.
Table 2- 1: Help window buttons
Tap this button
To
All Topics
Display the main table of contents.
Back
Return to the previous help screen.
Contents
Display the current program or local table of contents.
Display full-screen help text.
Display the help text in its own window. Drag the Help
window title bar to move the window.
Minimize the Help window. To restore the window, tap
the Help button in the taskbar.
2- 4
YBT250 Field Transmitter & Interference Tester User Manual
Operating Basics
Table 2- 1: Help window buttons (Cont.)
Tap this button
To
Close the Help window and quit help.
Display information farther up the window.
Display information farther down the window.
Navigating the Desktop
The NetTek Analyzer Platform desktop is your primary workspace.
Use the desktop to configure hardware and software, adjust settings,
establish communications, and access built-in applications.
Desktop
Icon
Taskbar
YBT250 Field Transmitter & Interference Tester User Manual
2- 5
Operating Basics
Icons
Double-tap desktop icons to open folders or to start programs.
Taskbar
The Taskbar contains the Start menu, buttons to identify the
programs you are running, a status area, and a desktop icon.
Start menu
Desktop button
Program button
Status area
Start Menu. Use the Start menu to load and run other instrument
modules and other programs, access settings, open documents, and
obtain help. Select (tap) Start to open the menu; then select the entry
you want.
Tap Start to display the menu
Program Buttons. To hide a program that is running, tap its taskbar
button. To restore the program, tap the button again.
2- 6
YBT250 Field Transmitter & Interference Tester User Manual
Operating Basics
Status Area. Icons and buttons appearing in this area indicate status,
activate features, or open settings windows. Double-tap the icons for
further information.
Table 2-- 2 explains the function of some common status icons. For a
complete list and explanation of all status area icons, refer to the
NetTek Analyzer Platform online help. Select Start > Help. In the
Help window select Windows CE Basics; then select Understanding Taskbar Icons.
Table 2- 2: Status area icons
Tap this
icon
To
Details
Double-tap to open the Power
Management utility.
The analyzer is operating
on external AC power.
Double-tap to open the Power
Management utility.
The analyzer is charging
batteries.
Double-tap to open the Power
Management utility.
The analyzer is operating
on battery power. Also
indicates charge level.
Double-tap to open the Backlight
utility.
Adjust the backlight brightness.
Single-tap to open the Input
Panel soft keyboard.
Single-tap to close the
keyboard.
Double-tap to open the Date/Time Set the date and time.
utility.
Single-tap to minimize all windows and display the desktop.
Tap again to restore all
windows.
YBT250 Field Transmitter & Interference Tester User Manual
2- 7
Operating Basics
Starting the YBT250 Software
If you purchased your YBT250 installed on NetTek Analyzer
Platform, it comes from the factory set to automatically start the
YBT250 software when you power on the NetTek Analyzer
Platform.
If you added your YBT250 module to a NetTek Analyzer Platform
you already own, see page 2-- 9 for instructions on how to start the
YBT250 software or set the software to load at startup.
To start the YBT250 software:
H Double-tap the YBT250 icon on the desktop or select
Start > Programs > NetTek > YBT250
When the YBT250 software starts the first time, it displays the
Spectrum display. See Figure 2-- 3.
Figure 2- 3: The Spectrum display
2- 8
YBT250 Field Transmitter & Interference Tester User Manual
Operating Basics
Setting the YBT250 Software to Load at Startup
If you purchased your YBT250 as a module to use on an existing
NetTek Analyzer Platform, you can set the YBT250 to load at
startup.
To set the YBT250 as the startup application:
1. Select Start > Programs > Tektronix Utilities > System
Configuration.
2. On the Software tab, select the StartUp checkbox for the
YBT250. See Figure 2-- 4.
3. Close the System Configuration window.
The next time the NetTek Analyzer Platform is powered on, the
YBT250 software starts up automatically.
Figure 2- 4: Setting the StartUp Application
YBT250 Field Transmitter & Interference Tester User Manual
2- 9
Operating Basics
Elements of the Display
Figure 2-- 5 shows an example YBT250 Field Transmitter &
Interference Tester display.
Tuning controls
Instrument area
Command bar area
Shared
control area
Figure 2- 5: YBT250 display elements
The YBT250 display is made up of four areas:
H Command Bar Area: This area contains the menu bar and some
instrument control buttons. This area is always visible.
H Tuning Controls Area: This area contains the controls used to
specify the signal standard and measurement frequency. This area
is always visible.
2- 10
YBT250 Field Transmitter & Interference Tester User Manual
Operating Basics
H Shared Control Area: This is where the instrument function
buttons appear and the input box appears. This area is always
visible.
H Instrument Area: This is where the waveforms are displayed and
measurement results appear. The appearance of this area changes
depending on the instrument function.
Shared Control Area
Table 2-- 3 describes the Shared Control Area elements.
Table 2- 3: Shared control area buttons and icons
Button
Function
Displays Measure window. (only if RF
Measurement or Demodulation Option is
installed)
Displays Spectrum window.
Displays Interference window (only if
Interference Option (IN1) or W--CDMA
Scrambling Code Analyzer Option (WS1)
are installed).
Displays measurement results in the
Sequencer window. This window sequences
through the measurements selected in the
Selected Measurements dialog box.
The Knob is used to change the value of the
assigned control.
This area shows the control assigned to the
knob and the value of that control.
The Keypad button enables you to enter
numbers using an on-screen numeric
keypad.
YBT250 Field Transmitter & Interference Tester User Manual
2- 11
Operating Basics
Table 2- 3: Shared control area buttons and icons (Cont.)
Button
Function
These icons show whether the internal
frequency reference is in use or an external
reference is being used.
These icons indicate an external attenuator
or amplifier is in use. If neither is specified,
the icon does not appear.
Command Bar Area
Table 2-- 4 describes the elements of the Command Bar Area of the
display.
Table 2- 4: Command bar area buttons and icons
Button/Icon
Function
These are the application menus.
Pressing this button enables you to save
measurement results to a file.
Pressing this button displays the Setup
window, which enables you to edit the
YBT250 setup.
Pressing this button pauses measurements
(freezes measurements).
Pressing this button restarts measurements.
The Running indicator shows that the
YBT250 is running.
The Folder icon is shown when displaying
recalled data.
The Stopped icon is shown when the
measurements are paused.
2- 12
YBT250 Field Transmitter & Interference Tester User Manual
Operating Basics
Table 2- 4: Command bar area buttons and icons (Cont.)
Button/Icon
Function
The Timestamp Readout appears when
measurements are not running.
Selecting this button displays the YBT250
Online Help.
Tuning Control Area
Table 2-- 5 describes the elements of the Tuning Control Area of the
display.
Table 2- 5: Tuning control area buttons and icons
Button
Function
This drop-down list selects the signal
standard and channel table.
This button changes the Freq (MHz) setting
to the forward link (downlink) frequency for
the selected channel, or, in the case of
W-CDMA, selects the corresponding
forward channel.
This button changes the Freq (MHz) setting
to the reverse link (uplink) frequency for the
selected channel, or, in the case of WCDMA, selects the corresponding reverse
channel.
This button is used to set the Channel
number. The frequency will be set to the
appropriate value for the selected channel.
Tap the button to use the numeric keypad;
tap the box to use the knob.
This button is used to set the Measurement
Frequency. Tap the button to use the
numeric keypad; tap the box to use the
knob.
YBT250 Field Transmitter & Interference Tester User Manual
2- 13
Operating Basics
Instrument Area
Icons and buttons in the Instrument Area of the display change
depending on the selected function:
H For descriptions of Spectrum display buttons and icons, see
page 3-- 2.
H For descriptions of Interference display buttons and icons, see
page 3-- 36.
H For descriptions of Measure display buttons and icons, see
page 3-- 52.
Using the Touch Screen
To select items on the display, just touch them. For example, to
display a signal spectrum, simply touch the Spectrum button at the
middle right of the display (labeled with a 2).
Using the Knob
To assign the knob to a control, tap the control to be changed.
Change the value by:
H tapping the left/right arrows on the bottom half of the control
knob make small changes
H tapping to the left or right of the small circle (on the top half) to
make larger changes
H placing a finger inside the “circle” and dragging it until the
control is set to the desired value
Using the Numeric Keypad
To change a value using the numeric keypad:
1. Tap the control whose value is to be changed (to assign the value
to the numeric keypad).
2. Tap the numeric keypad button above the control knob.
3. Type the new value, including units when present.
4. Tap OK, when present, to accept the new value.
2- 14
YBT250 Field Transmitter & Interference Tester User Manual
Operating Basics
YBT250 Menus
The YBT250 menu bar has four menus. These menus are File, View,
Setup, and Tools. Some menu commands have keyboard shortcuts
for use when an optional keyboard is attached to the NetTek
Analyzer Platform, but not all menu commends have keyboard
shortcuts.
There are three menu commands in the File menu that change
depending on the displayed window. The commands are Save
Trace/Results, Save Trace/Results As, and Export Trace/Results.
Save Trace, Save Trace As and Export Trace commands appear
when the Spectrum and Interference windows are displayed (that is,
when a signal spectrum is displayed). Save Results, Save Results As
and Export Results commands appear when the Measure window is
displayed (that is, when measurements are displayed). See
Tables 2-- 6 and 2-- 7.
YBT250 Field Transmitter & Interference Tester User Manual
2- 15
Operating Basics
Table 2- 6: The File menu (Measure window)
Menu item
Description
Open
Ctrl + O
Displays Open Results dialog.
Save Results
Ctrl + S
Save measurement results to a file.
The file is automatically named and
stored in \BuiltInDisk\YBT250\AppData\Results.
Save Results As
------
Save measurement results to a file;
displays Save dialog so you can
name the file and specify where it is
saved.
Compare Saved
------
Display two saved results for visual
comparison. (Disabled)
Export Results As
------
Save measurement results in a file
format that can be used by word
processing or spreadsheet applications.
Export Screen As
------
Store an image of the display that
can be used by word processing or
image editing applications.
Ctrl + P
Prints the displayed window’s data.
Results Properties
------
Displays a dialog that shows
information saved with a results file.
Exit
------
Quits the YBT250 program.
Print
2- 16
Control key
YBT250 Field Transmitter & Interference Tester User Manual
Operating Basics
Table 2- 7: The File menu (Spectrum/Interference windows)
Menu item
Control key
Description
Open
Ctrl + O
Displays Open Results dialog
Save Trace
Ctrl + S
Saves a Trace to a file. The file is
automatically named and stored in
\BuiltInDisk\YBT250\AppData\Results.
Save Trace As
------
Store Trace in a file; displays Save
dialog to enable you to name the
file and specify where it is saved.
Compare Saved
------
Display two saved results for visual
comparison.
Export Trace As
------
Store Trace in a file format that can
be used by word processing or
spreadsheet applications.
Export Screen As
------
Store an image of the display that
can be used by word processing or
image editing applications.
Ctrl + P
Prints the displayed window’s data.
Results Properties
------
Displays a dialog that shows
information saved with a results file.
Exit
------
Quits the YBT250 program.
Print
YBT250 Field Transmitter & Interference Tester User Manual
2- 17
Operating Basics
Table 2-- 8 describes the elements of the View menu.
Table 2- 8: The View menu
Menu item
Control key
Description
Trace 2
------
Displays/Hides second trace.
Rotate Trace Order
------
Changes the order of traces in the
graph (front versus back).
Define Trace 2
------
Displays the Trace 2 & Mask tab of
the Setup window, enabling you to
specify the source of Trace 2.
Mask
------
Enables Mask Testing.
Define Mask
------
Displays the Trace 2 & Mask tab of
the Setup window, enabling you to
specify the mask file to use for
mask testing and any action to
perform on mask failure.
Ctrl + M
Displays/Hides marker controls and
readouts.
------
Displays/Hides band edge cursors.
Markers
Band Edge Cursor
M1 Trace 1,
M2 Trace 2
Places marker M1 on Trace 1, and
places marker M2 on Trace 2 (only
with Trace 2 enabled).
Both on front trace
Places both markers on the front
trace (only with Trace 2 enabled).
Both on Trace 1
Places both markers on Trace 1
(only with Trace 2 enabled).
Both on Trace 2
Places both markers on Trace 2
(only with Trace 2 enabled).
Table 2-- 9 describes the elements of the Setup menu.
2- 18
YBT250 Field Transmitter & Interference Tester User Manual
Operating Basics
Table 2- 9: The Setup menu
Menu item
Edit..
Control key
Ctrl + T
Description
Displays the Setup window.
Open...
------
Displays the Open Setup dialog.
Save...
------
Saves current setup to a file.
Preset
Ctrl + A
<Saved Setup 1--N>
Recalls defaults except for Signal
Standard, Channel and Frequency;
sets the span to cover the selected
Signal Standards frequency range.
Name of most recently used setup
files or files specified in Tools>Options>Settings Menu. Up to 10 files
can be displayed.
Table 2-- 10 describes the elements of the Tools menu.
Table 2- 10: The Tools menu
Menu item
Control key
Description
Options...
------
Displays the Options window.
Keyboard
Ctrl + K
Displays/Hides the soft keyboard.
Touchscreen
Calibration
------
Displays the Windows CE Stylus
utility.
Mask Maker
------
Displays the Mask Maker utility.
Frequency Correction
------
Displays the utility for improving
frequency measurement accuracy.
Factory Reset
------
Resets all YBT250 settings to
original factory values; overwrites
existing settings.
Upgrade Software
------
Displays the utility for enabling
software options or installing a new
version of the YBT250 application.
YBT250 Field Transmitter & Interference Tester User Manual
2- 19
Operating Basics
Table 2- 10: The Tools menu (Cont.)
Menu item
Control key
Description
Technical Support
------
Displays technical support contact
information.
Software Info
------
Displays the SW Properties
window which lists, among other
things, the installed options,
Options key, and software version.
Hardware Info
------
Displays the HW Properties
window which lists, among other
things, serial number, hardware
versions, and Global ID.
Entering Text
Use the Input Panel soft keyboard, see Figure 2-- 6, to type characters
into text boxes or address fields without using an external keyboard.
Figure 2- 6: The Soft Keyboard
2- 20
YBT250 Field Transmitter & Interference Tester User Manual
Operating Basics
To open the soft keyboard:
1. Tap the
icon in the toolbar status area.
2. Tap the Input Panel keys to enter text.
3. Tap
(RETURN) to wrap text or execute a command.
4. Tap the
icon again to close the keyboard.
To set soft keyboard properties, select Start > Settings > Control
Panel. Open the Input Panel icon, and then select Options.
Special Characters
The soft keyboard includes characters not visible on the startup
keyboard.
CAP Key. Tap the CAP key to create all capital letters and common
characters.
Shift Key. Tap the Shift key to create one capital letter or other
common character.
Key. Tap this key to create special characters.
Powering Off the YBT250
The YBT250 has separate, interrelated standby and power off
functions similar to a laptop PC.
Suspend Mode
To suspend YBT250 operation, choose one of the following
methods:
H Press the front-panel power switch.
H Select Start > Shutdown. In the Shut Down dialog box, select
Suspend.
YBT250 Field Transmitter & Interference Tester User Manual
2- 21
Operating Basics
Suspend mode places the YBT250 in a suspended (standby or sleep)
state. This is the typical power off mode that allows the YBT250
software to remain in volatile memory. If the YBT250 remains in
Suspend mode for an extended time (approximately two hours), it
will automatically enter Shutdown mode and the contents of volatile
memory will be lost.
To activate the YBT250 following Suspend, press the front-panel
power switch. The YBT250 will return to the software and setup
state that existed before the user invoked suspend.
Shutdown
To completely power down the YBT250:
1. Select Start > Shutdown.
2. In the Shut Down dialog box, select Shutdown.
A shutdown clears volatile memory, including the YBT250 software
(if it is not loaded into flash memory) and measurement data not
saved to nonvolatile memory. For information on how to save these
items to nonvolatile memory, refer to the NetTek Analyzer Platform
online help. Select Start > Help. In the Help window select
Tektronix Basics; then select Store Data in Nonvolatile Memory.
The next time you press the front-panel power switch following a
shutdown, the YBT250 does the complete power up process taking
about 2 to 3 minutes for the YBT250 to become functional.
Restart (Software Reset)
To restart the YBT250, do the following:
1. Select Start > Shutdown.
2. In the Shut Down dialog box, select Restart.
The display blanks for approximately five seconds, then the YBT250
software reloads. A Restart does not empty volatile memory.
2- 22
YBT250 Field Transmitter & Interference Tester User Manual
Connecting a Signal
This section explains how to connect an RF signal, a timing
reference and a frequency reference to the YBT250 Field Transmitter & Interference Tester.
RF Signal Input Parameters
The YBT250 has a single, RF signal input. The input impedance is
50 Ω. The input frequency range is 30 MHz to 2500 MHz. The
maximum continuous input power is 1 W. Figure 2-- 7 shows the
location of the RF Input connector.
Figure 2- 7: Input connectors
Depending on whether you want to display a spectrum or take
measurements, you may need to attach an attenuator or an external
amplifier to the RF signal before connecting it to the YBT250. See
page 2-- 24 for instructions on using an attenuator or an external
amplifier with the YBT250.
The input signal-level requirements for measurement accuracy
depend on the selected measurement and the installed options. Refer
to the specifications in Appendix A for the appropriate input signal
levels for specific combinations of measurements and installed
options.
YBT250 Field Transmitter & Interference Tester User Manual
2- 23
Connecting a Signal
Connecting an RF Signal
Connect a signal from a base station transmitter test port to the
YBT250 RF INPUT connector.
If there is no test port, do the following:
1. Disconnect the transmitter cable from the antenna.
2. If the transmitter output signal level is too high (refer to the
specifications in Appendix A), connect the transmitter output
signal to an attenuator, and then connect the output of the
attenuator to the RF Input connector.
CAUTION. To prevent damage to the YBT250, continuous input
signals should not exceed 1 Watt. If a signal between 1 Watt and
50 Watts is connected to the input, the input protection circuitry
displays a warning and halts operation until the input overload is
corrected. Input signals over 50 Watts will damage the input
circuitry.
3. If the transmitter output signal level is too low (see the
specifications in Appendix A), connect the transmitter output
signal to an external amplifier, and then connect the output of the
amplifier to the RF Input connector.
4. Set or verify that the YBT250 input settings are properly set. The
YBT250 adjusts its measurement readouts and graphic displays
to account for the use of an external attenuator or amplifier.
a. Tap the Edit button (
window.
). This displays the Setup
b. Tap the Inputs tab. See Figure 2-- 8.
c. If no external attenuation or amplification is used, verify
that the No external attenuation or amplification setting
is selected.
2- 24
YBT250 Field Transmitter & Interference Tester User Manual
Connecting a Signal
d. If an external attenuator is used, select External
attenuator connected. Tap the numeric keypad and enter
the attenuator loss value. For example, if you are using a
20 dB attenuator, tap 20 on the numeric keypad, and then
tap OK.
e. If an external amplifier is used, select External amplifier
connected. Tap the numeric keypad and enter the value of
the amplifier gain. For example, if the amplifier has a
20 dB gain, tap 20 on the numeric keypad, and then tap
OK.
f. Once you have finished verifying the settings, tap OK at
the bottom of the window.
Figure 2- 8: Changing input settings
YBT250 Field Transmitter & Interference Tester User Manual
2- 25
Connecting a Signal
Connecting a Timing Reference
(cdmaOne/cdma2000 /1xEV- DO Only)
To properly measure PN Offset and Tau/Pilot Time Alignment Error
(requires Option CD1, CD2, or CDE), you must connect an external
Even Second Clock to the YBT250. Figure 2-- 7 on page 2-- 23 shows
the location of the timing reference input connector.
To connect an Even Second Clock to the YBT250, connect the Even
Second Clock signal to the TIMING INPUT connector. The signal
will be automatically detected by the YBT250.
Connecting an External Frequency Reference
To minimize the frequency variation between the YBT250 and the
BTS, you can connect an external frequency reference to the
YBT250. Table 2-- 11 shows the acceptable frequencies for an
external frequency reference. The external reference must have an
accuracy better than ±1 ppm. The acceptable signal level is
- 15 dBm to + 15 dBm. Figure 2-- 7 shows the location of the
frequency reference input connector. The input impedance is 50 Ω.
Table 2- 11: Accepted external frequency reference signals
External reference
frequency
Transmitter/Frequency reference
1 to 15 MHz, in 1 MHz steps
2- 26
4.8 MHz
For Nortel BTS equipment.
10 MHz
Standard frequency for WWV and other
high-accuracy references.
13 MHz
For GSM systems.
15 MHz
For Lucent W-CDMA.
1 MHz, 2 MHz, 5 MHz
Along with 10 MHz, these are standard for
Rubidium and other high-accuracy References.
19.6608 MHz
For Motorola, Qualcomm, and newer Nortel.
Used for CDMA only.
YBT250 Field Transmitter & Interference Tester User Manual
Connecting a Signal
Table 2- 11: Accepted external frequency reference signals (Cont.)
External reference
frequency
Transmitter/Frequency reference
1.2288 MHz, 2.4576 MHz,
4.9152 MHz, 9.8304 MHz
These are also multiples of the CDMA chip rate.
2.048 MHz
For Ericsson BTS equipment with E1 reference
source
To connect an external frequency reference to the YBT250:
1. Connect the frequency reference signal to the FREQUENCY
REFERENCE INPUT connector. The signal will be automatically detected by the YBT250.
Whenever a valid external frequency reference is present, it will
be used as the frequency (time base) reference.
You can verify that the YBT250 recognizes the frequency
reference signal by displaying the Setup window.
2. Tap the EDIT button. This displays the Setup window.
3. Tap the Inputs tab. See Figure 2-- 9.
YBT250 Field Transmitter & Interference Tester User Manual
2- 27
Connecting a Signal
Figure 2- 9: Inputs tab
When the YBT250 recognizes the frequency reference, the
External Frequency Reference Input box displays an icon with
the letters EXT and displays the text:
Frequency locked to external reference signal: XXXX.XXX MHz
where XXX.XXX is the frequency of the reference.
If the YBT250 does not recognize the frequency reference, the
External Frequency Reference Input box displays an icon with
the letters INT and displays the text:
No valid external reference signal found. Using internal frequency
reference.
Check the connections and verify that the frequency reference is
within the correct frequency range and level.
2- 28
YBT250 Field Transmitter & Interference Tester User Manual
Connecting a Signal
Improving Frequency Accuracy
If you plan to use your YBT250 at a site where a high-accuracy
frequency reference source is not available, you may be able to
improve frequency measurement accuracy in some instances by
creating your own “custom” correction factors using the frequency
correction utility. This utility compares the YBT250 internal
frequency reference to an external reference and calculates
correction values to align the internal frequency reference with the
external reference. You can then choose to use either the newly
generated correction values or the original factory-generated values
when at a remote site.
You should run the Frequency Correction utility only if you have a
known high-quality Reference source available to use. The
Reference source frequency accuracy directly affects the accuracy of
the frequency correction values. A poorly calibrated Reference
source can result in correction values that degrade measurement
results. You must also allow the YBT250 to warm up for at least
10 minutes before running the Frequency Correction utility.
To run the frequency correction utility:
1. Connect a frequency reference signal to the FREQUENCY
REFERENCE INPUT.
2. Select Tools > Frequency Correction. This displays the
Frequency Correction dialog shown in Figure 2-- 10.
YBT250 Field Transmitter & Interference Tester User Manual
2- 29
Connecting a Signal
Figure 2- 10: The Frequency Correction dialog
3. To calculate new frequency correction values, tap Run New
Correction. This displays the dialog shown in Figure 2-- 11.
Figure 2- 11: Ready to calculate new correction values
2- 30
YBT250 Field Transmitter & Interference Tester User Manual
Connecting a Signal
If the reference frequency is detected, the frequency will appear
in the dialog box. If the reference frequency is not detected, “-- - ”
will be displayed instead of a frequency. If the reference
frequency is not displayed within 15 seconds, check the
connection to the external frequency reference.
4. If the reference frequency is detected, tap Finish > to calculate
new frequency correction values.
If the calculation of new frequency correction values is
successful, the dialog shown in Figure 2-- 12 appears.
Figure 2- 12: New frequency correction values calculated successfully
5. Tap Close. This displays the initial frequency correction dialog
shown in Figure 2-- 13.
YBT250 Field Transmitter & Interference Tester User Manual
2- 31
Connecting a Signal
Figure 2- 13: The Frequency Correction dialog
6. To use the new frequency correction values, select Use
Corrected Values, then tap OK.
2- 32
YBT250 Field Transmitter & Interference Tester User Manual
Changing Instrument Settings
Before you can fully utilize the YBT250 you need to set some
instrument settings. For example, the YBT250 displays measurements only for enabled signal standards. If the signal standard used
in your system is not enabled, you will not be able to take measurements for your system until you enable the Signal Standard.
Enabling Signal Standards
The currently selected signal standard controls the channels available
for measurements and which measurements are available. Before
you begin using the YBT250, you must ensure that the standard for
your system has been enabled. Signal standards are enabled from the
Options window.
To enable a signal standard:
1. Select Tools > Options to display the Options window, shown in
Figure 2-- 14.
YBT250 Field Transmitter & Interference Tester User Manual
2- 33
Changing Instrument Settings
Figure 2- 14: The Options window
The standards supported in your YBT250 are shown in the list on
the left side of the window.
NOTE. If you need to test a standard that does not appear in the list
of supported standards, you can create a custom channel table file
for the standard. See page 2-- 40.
2. To enable a signal standard, tap the name of the standard you
wish to enable and then tap Add>>.
3. When you have enabled all the standards you will be testing, tap
OK.
Only enabled standards are selectable from the signal standards
list that appears in the tuning controls area of the display. When
you take measurements with the YBT250, you can only take
measurements on enabled standards. You will probably want to
limit the number of standards enabled to just those you test
regularly to speed up the act of a selecting standard from the
Signal Standard drop down list.
2- 34
YBT250 Field Transmitter & Interference Tester User Manual
Changing Instrument Settings
Setting Display Preferences
The YBT250 enables you to change the color scheme used in the
display. There are three color schemes,one monochrome scheme, and
a color scheme optimized for black and white printouts. Color
schemes specified in the YBT250 do not affect standard Windows
CE screen items. The YBT250 color schemes affect only measurement graphs and results readouts in the YBT250 display.
To specify the color scheme used by the YBT250:
1. Select Tools > Options.
2. Select the Preferences tab. This displays the window shown in
Figure 2-- 15.
Figure 2- 15: Preferences tab showing available color schemes
3. To display a list of the available color schemes, tap the Color
Scheme list box. Available color schemes are Indoor Viewing,
Outdoor Viewing, Dark on white, Monochrome grays, and Black
on White for Printer.
YBT250 Field Transmitter & Interference Tester User Manual
2- 35
Changing Instrument Settings
4. To select a color scheme, tap the name of the desired color
scheme.
a. To change the Windows CE display properties, tap Take
Me There. This displays the Windows CE Display
Properties window, where you can set the display
background and window color scheme.
5. Tap OK to save the change.
6. To view the changed color scheme, quit the YBT250 program
and restart it.
Setting Up the Channel Table
Before taking measurements, you must set the measurement
frequency. You set the measurement frequency either by entering the
appropriate frequency or by selecting a channel. It is quicker to
select a channel than to enter a frequency. Selecting a channel to set
the measurement frequency can save you valuable time and
minimizes entry errors.
A quick way to set a channel number is to use the knob. By tapping
the left and right arrows on the knob, you can quickly change the
selected channel and thus, the measurement frequency. The channels
that are selectable using the knob are set by the Quick Select List.
The channels listed in the Quick Select List are specified by the
Channel Table.
You set up the Channel Table by enabling channels individually or
by using the Channel Wizard. If you want to enable a large number
of channels, use the Channel Wizard to save time.
To set up the Channel Table by enabling channels individually:
1. Select the Edit button or choose Setup> Edit.
2. Select the Channel Table tab.
This displays the window shown in Figure 2-- 16.
2- 36
YBT250 Field Transmitter & Interference Tester User Manual
Changing Instrument Settings
Figure 2- 16: The Channel Table
Channels are enabled according to the signal standard. Thus,
before you enable channels, you must specify the signal standard.
3. Select the desired signal standard from the Signal Standard list.
4. To enable a channel:
a. Tap the box in the Mark column next to the desired
channel. Enabled channels are marked with an X.
b. You can mark all channels by tapping the Mark All
Channels button.
Enabled channels are added to the Quick Select List. The
Quick Select List determines which channels can be selected
by the knob. For example, suppose only channels 1, 2, 5, and
6 are enabled. If channel 1 is the current channel and you tap
the right arrow (on the bottom half) on the knob, the next
channel selected will be channel 2. If you tap the knob again,
the next channel selected will be 5. Tap the right arrow once
more and channel 6 will be selected. If you tap the right
YBT250 Field Transmitter & Interference Tester User Manual
2- 37
Changing Instrument Settings
arrow once more, the channel selected will not change,
because there are no channels enabled after 6.
5. To disable a selected channel:
a. Tap the box in the Mark column next to the enabled
channel so that the box is empty.
b. You can disable or “unmark” all channels by tapping the
Clear All Channels button.
6. When you have marked all the channels you wish to enable, tap
OK to save your changes.
To set up the Channel Table using the Channel Wizard:
1. Select the Edit button or choose Setup> Edit.
2. Select the Channel Table tab.
Channels are enabled by signal standard. Thus, before you enable
channels, you must specify the signal standard.
3. Select the desired signal standard from the Signal Standard list.
4. To enable channels using the Channel Wizard:
a. Tap the Channel Wizard... button. This displays the
window shown in Figure 2-- 17.
2- 38
YBT250 Field Transmitter & Interference Tester User Manual
Changing Instrument Settings
Figure 2- 17: The Channel Wizard
The Channel Wizard needs three numbers to determine which
channels should be enabled. The first number needed is the first
channel that should be enabled. The second number needed is the
last channel to be enabled. The third number is the interval
between enabled channels.
5. To set the first channel number:
a. Tap the numeric keypad button next to the First Channel
box.
b. Tap the appropriate numbers to set the first channel
number.
c. Tap OK when finished.
6. To set the last channel number:
a. Tap the numeric keypad button next to the Last Channel
box.
YBT250 Field Transmitter & Interference Tester User Manual
2- 39
Changing Instrument Settings
b. Tap the appropriate numbers to set the last channel
number.
c. Tap OK when finished.
7. To set the interval between enabled channels:
a. Tap the numeric keypad button next to the Interval box.
Next, tap the appropriate number for the interval.
For example, to enable every channel, set the interval to 1.
To enable every other channel, set the interval to 2. To
enable every third channel, set the interval to 3.
b. To add the specified channels to the existing channel
table, select Add these channels to the current table.
c. To replace the current channel table with the specified
selections, select Replace the current table with these
channels.
d. Tap OK when finished.
8. Tap OK to close the Setup window.
Customizing the Channel Table
The Channel Table is a file used by the YBT250 to specify the
characteristics of the channels assigned to a signal standard. You can
customize the Channel Table to suit the specific needs of your
system. For example, if you have set the bandwidth of your channels
to be wider than the standard bandwidth, you can specify the wider
bandwidth in a customized Channel Table. Because the channel
bandwidth is used in some measurements, if your system’s channel
bandwidth is non-standard and the YBT250 is using the standard
Channel Table, a measurement based on the standard channel
bandwidth will not be accurate for your system.
The YBT250 looks for a file named userstandards.txt in the
\BuiltInDisk folder when it starts up. If it does not find the file, the
YBT250 then looks for the standard channel table file, signalstandards.txt, in the NetTekApps\YBT250 folder. If that file is not found,
a dialog box will be displayed informing you that no standards file
2- 40
YBT250 Field Transmitter & Interference Tester User Manual
Changing Instrument Settings
was found, so a new channel table will be generated using internal
default values.
Creating a Custom Channel Table
To create a custom channel table:
1. Locate the existing signalstandards.txt file in either the
\BuiltInDisk\NetTekApps\YBT250 folder or
\NetTekApps\YBT250 folder (only if the application software is
loaded into volatile memory instead of flash memory).
2. Copy the signalstandards.txt file to the \BuiltInDisk folder.
The YBT250 will look only in the \BuiltInDisk folder for a
custom channel table.
3. Rename signalstandards.txt to userstandards.txt.
4. Edit the contents of the file to suit your systems settings.
When editing your userstandards.txt file, it is safer to copy a row and
then edit the copied row to meet your requirements than to modify
an existing row.
Table 2-- 12 lists the elements of the Channel Table file.
YBT250 Field Transmitter & Interference Tester User Manual
2- 41
Changing Instrument Settings
Table 2- 12: Channel table file contents
Column heading
Description
Standard Name
The text string used to identify the standard. This name is
what appears in the Signal Standard list.
Each line in the channel table should describe a single
group of channels for a standard. If a standard is made up
of multiple groups or blocks of channels then you should
make an entry for each group. When multiple groups are
required, they should be ordered in channel number
sequence and contiguous. To tie the groups together, the
Unique Standard ID must be the same for each group.
Forward Base Frequency
Forward base frequency for each signal standard. The
actual frequency for each channel is calculated.
For signal standards that specify a single frequency for each
channel (for example, the UTRA/FDD scheme used by
W-CDMA (UMTS)), each row in the file will describe a
group of forward or a group of reverse channels. The row
that describes forward channels should specify zero for the
reverse base frequency. The row that describes reverse
channels should specify zero for the forward base
frequency.
Reverse Base Frequency
Reverse base frequency for each signal standard. The
actual frequency for each channel is calculated.
For signal standards that specify a single frequency for each
channel (for example, the UTRA/FDD scheme used by
W-CDMA (UMTS)), each row in the file will describe a
group of forward or a group of reverse channels. The row
that describes forward channels should specify zero for the
reverse base frequency. The row that describes reverse
channels should specify zero for the forward base
frequency.
Signal Bandwidth
The signal bandwidth. If the signal to be measured is 100
kHz wide but the channels are spaced 200 kHz apart then
this field should contain 100000.
Starting Channel Number
The starting channel number for a block of channels.
Ending Channel Number
The ending channel number for a block of channels.
2- 42
YBT250 Field Transmitter & Interference Tester User Manual
Changing Instrument Settings
Table 2- 12: Channel table file contents (Cont.)
Column heading
Description
Channel Increment Amount
If the channels increment by 1, then a 1 goes in here. If by
2, then a 2 goes in here. If by 5...
Channel Spacing
Sets the spacing between channels. For instance, if you
have a standard that has signals that are 100 kHz wide but
the channels in you system are spaced 200 kHz apart, then
this field should contain 200000.
Channel Offset
Offset applied to channel number before calculating the
channel frequency from the channel number.
Unique Standard ID
Must be between 0 and 400. It is used to tie multiple blocks
of channels together into a single standard. A block of
channels is a single row in the channel table file.
Signal Type
1 = CDMAOne
2 = AMPS
3 = TDMA IS136
4 = GSM/EDGE
5 = W-CDMA (UMTS)
6 = CDMA 2000
10 = CDMA 2000 1xEV--DO
998 = NO_MEAS_ANALOG
999 = NO_MEAS_DIGITAL
Forward / Reverse
frequency separation
190000000 for W-CDMA (UMTS)
For signal standards that specify a single frequency for each
channel (for example, the UTRA/FDD scheme used by
W-CDMA (UMTS)), this entry specifies the difference in
frequency between a forward channel and its corresponding
reverse channel. For signal standards that specify forward
and reverse frequencies for each channel (most standards),
this entry is left blank.
YBT250 Field Transmitter & Interference Tester User Manual
2- 43
Changing Instrument Settings
Specifying the Signal Type
The Channel Table file contains a field that defines the type of signal
for the named signal standard. For example, the standard named
GSM 900 is designated as a Signal Type 4. The Signal Type is used
by the Signal Identification function to suggest possible sources of
interference.
Although the YBT250 will make measurements only on the first
seven signal types listed in Table 2-- 12, you can define a signal
standard that is based on other signal types. For example, you could
create an FM signal standard of signal type 998 (Analog signal, no
measurements available) and define channels within the FM radio
band. This would allow you to tune to “channels” within the FM
band, although you could not take measurements with the YBT250.
The reason for creating a signal standard is that the Signal Identification function uses the Channel Table to determine possible types of
signals, and if you have defined a signal standard, then it will appear
as a possible source in the Signal Identification function.
The signal types 998 and 999 are included in the Channel Table to
enable you to create a custom signal standard for analog or digital
signals that do not match the other signal types (such as an “FM”
standard noted previously). Though no measurements would be
made on channels of a standard based on either 998 or 999, the
standard they are assigned to would be used by the Signal Identification function.
How Channel Frequencies are Calculated
The frequency for a specific channel is calculated with a formula
based on the current channel number, the base frequency, the channel
spacing and the channel offset:
If (Channel Offset ≥ 0)
Chan Freq = ( (Chan Num - Channel Offset) × Channel Spacing) + Base Frequency
If (Channel Offset < 0)
Chan Freq= Base Frequency - ( ( - Channel Offset - Chan Num) × Channel Spacing)
2- 44
YBT250 Field Transmitter & Interference Tester User Manual
Changing Instrument Settings
Where:
Base Frequency: Either forward or reverse base frequency depending
on current user selection, from the Channel Table file (userstandards.txt when present or signalstandards.txt).
Chan Num: The current user selected channel number.
Chan Freq: The frequency associated with the Chan Num.
Channel Spacing: The distance between channels, from the Channel
Table file.
Channel Offset: From the Channel Table file.
Changing Settings for Saved Files
The YBT250 enables you to specify default settings for saving files.
H filename prefixes
H name of a technician making a test
H notes to be included in saved results files
H format of exported screens
H the format of saved or exported results files
H location to which files will be saved or exported during
Spectrogram and Codogram Auto Save
The headings that follow provide additional information on how to
set these defaults.
Where to Set File Options
The Save & Export tab is where you specify saved file options.
To display the Save & Export tab:
1. Select Setup > Edit.
2. Tap the Save & Export tab. See Figure 2-- 18.
YBT250 Field Transmitter & Interference Tester User Manual
2- 45
Changing Instrument Settings
Figure 2- 18: The Save & Export tab
Setting the Filename Prefix
The YBT250 allows you to save a file, such as a results file, with a
name you enter each time you save a file or you can allow the
YBT250 to automatically name files for you. When files are saved
without a specified prefix, the filename is simply a number, for
example: 0004.r01.
However, you can specify a prefix for automatically named files so
that you can more easily identify saved files. Actual filenames will
consist of the prefix you enter attached to a number, which is
generated when the file is saved. For example, if you are testing Site
5 you could set the prefix to s5, resulting in a filename of
s50004.r01.
2- 46
YBT250 Field Transmitter & Interference Tester User Manual
Changing Instrument Settings
NOTE. The length of a filename is variable, depending on the length
of the path (where the file is located). The limit of the path and
filename is 256 characters. The shorter the path to the file, the
longer the filename can be.
To specify the filename prefix:
1. Select Setup > Edit. This displays the Setup window.
2. Tap the Save & Export tab. See Figure 2-- 18.
3. Tap the box after File Prefix:.
4. Enter text (using the soft keyboard or an external keyboard) to
use as the prefix of filenames.
5. Tap OK to save your changes.
Setting the Technician Name
The YBT250 allows you to store the name of the technician
performing a test in the results file for the test.
To specify the technician’s name:
1. Select Setup > Edit. This displays the Setup window.
2. Tap the Save & Export tab. See Figure 2-- 18.
3. Tap the box after Technician:.
4. Enter text (using the soft keyboard or an external keyboard) for
the technician name. Of course, you can also use this space for
additional test information instead of a technician name.
5. Tap OK to save the technician name.
When viewing a saved results file, you can view any saved notes,
including Technician Name, by selecting File > Results Properties.
Entering Notes for Saved Results
The YBT250 allows you to enter note text to be saved in results
files. Thus, if there are any special conditions about a test, you can
save notes within the results file. You can enter up to 254 characters
in the notes field.
YBT250 Field Transmitter & Interference Tester User Manual
2- 47
Changing Instrument Settings
To specify notes for saved results:
1. Select Setup > Edit. This displays the Setup window.
2. Tap the Save & Export tab. See Figure 2-- 18.
3. Tap the box after Notes for saved results:.
4. Enter text (using the soft keyboard or an external keyboard) for
the note.
5. Tap OK to save the notes you entered.
When viewing a saved results file, you can view any saved notes by
selecting File > Results Properties.
Setting Up a GPS Receiver
Refer to page 2-- 50 for information about selecting and setting up a
Global Positioning System Receiver so that you can save GPS
coordinates with your results.
Setting Default File Type
You can set the default file type for exported screens. You can also
set the default file type for saved and exported results files.
To specify default file types:
1. Select Setup > Edit. This displays the Setup window.
2. Tap the Save & Export tab. See Figure 2-- 18.
3. In the drop down box Default format for exported screens:,
select a file extension:
H PNG files (*.png)
H JPEG files (*.jpg)
H Bitmap files (*.bmp)
NOTE. An exported screen cannot be displayed by the YBT250; it can
be opened only by a program that can display graphic images.
2- 48
YBT250 Field Transmitter & Interference Tester User Manual
Changing Instrument Settings
4. In the drop down box Default format for exported results:,
select a file extension:
H Tab-separated (*.txt)
H Comma-separated (*.csv)
Setting Default File Location for Automatically Saving and Exporting
Spectrograms and Codograms
You can set the default location to which you save and export
screens and results files for spectrograms and codograms. This
feature can be useful when, for example, you are saving many
spectrograms and codograms to a memory card.
To specify the location to which spectrograms and codograms are
automatically saved or exported:
1. Select Setup > Edit. This displays the Setup window.
2. Tap the Save & Export tab. See Figure 2-- 18.
3. In the field Codogram/Spectrogram Auto Saves, look at the
icon to open the Input Panel to use the arrows
path. Tap the
on the Input Panel to view the whole path.
4. Enter a new path using the Input Panel, or tap the Browse...
button to navigate to the location to which you want files saved.
NOTE. Changes you make to the default location for auto saving and
exporting spectrograms and codograms will persist when you next
power-on the instrument.
This control only sets the location of codogram and spectrogram
auto saves. It does not set the default location for other saves or
exports. When you start the YBT250 application, the default location
for all saves and exports (except codogram and spectrogram auto
save) is always \BuiltInDisk\YBT250\AppData\Results; after you
have saved a file, the default location will be whatever location you
used most recently.
YBT250 Field Transmitter & Interference Tester User Manual
2- 49
Changing Instrument Settings
Saving GPS Coordinates with your Results
You can connect a GPS receiver to your NetTek Analyzer to collect
location coordinates which are saved with your measurement results
when you save or export the results. At the time that you save or
export your results, the most recent position read from the GPS
receiver is included with your results.
NOTE. For correct coordinates when using the GPS function, save or
export your results while the GPS receiver is at the location where
you made the test. (If you make a measurement, move the instrument,
and then save your results, you will not be saving the coordinates of
where you took the test. You will be saving the coordinates of your
new location.)
Selecting a Compatible GPS Receiver
You can use any GPS receiver that supports NMEA 0183 V2.0.
Specifically, the GPS must output the $GPRMC sentence on a
regular basis.
The GPS position is read from the GPS receiver once per second by
the YBT250 application, or at the rate the GPS receiver sends the
$GPRMC sentence, whichever is slower.
Connecting through the Serial Port. The GPS receiver can connect to
the serial port (4800 baud rate). The Garmin GPS III and Garmin
GPS III Plus have been tested with the YBT250 application.
Connecting through the PCMCIA Slot. The GPS receiver can connect
through the PCMCIA slot and emulate a serial port on COM4. The
Teletype GPS WorldNavigator (product #1351) has been tested with
the YBT250 application.
Enabling Your GPS Receiver
To enable the GPS feature:
1. Set your GPS receiver to output NMEA sentences regularly.
2. Connect the GPS receiver (by cable or through the PCMCIA slot)
to the NetTek Analyzer Platform.
2- 50
YBT250 Field Transmitter & Interference Tester User Manual
Changing Instrument Settings
3. In the YBT250 application, tap the Edit button and then the
Save & Export tab.
4. From the drop down list box, select the correct GPS receiver
interface type (Serial or PCMCIA) for your GPS.
If your GPS receiver is connected and is outputting the $GPRMC
sentence, after a short pause, the latitude and longitude will be
displayed just to the right of the drop down list box. Tap the Refresh
button to update the coordinates displayed here.
You can also view the latest GPS position in the Results Properties
dialog box (File > Results Properties). When you open a saved
results file, the Results Properties will show information about the
results file, including the GPS position at the time the results file was
saved.
Troubleshooting Your GPS Receiver
After you have selected the GPS receiver type in the Save & Export
dialog box, a position should be read out immediately to the right of
the list box.
Error Message: Invalid Position. If, after you select the GPS receiver
type in the Save & Export dialog, the message “Invalid Position”
appears, then the communication connection to the receiver has been
successfully established, and the $GPRMC sentence is being
successfully read from the receiver, but the position supplied in that
sentence is not valid. In this case, check your GPS receiver to see if
it does have a valid position, and, if not, refer to the GPS receiver
documentation to resolve this problem.
Error Message: Unable to Read Position Information If, after you select
the GPS receiver type in the Save & Export dialog, an error dialog
box appears indicating that the application was unable to read
position information from the GPS receiver, then do the following:
H Make sure the cable from the receiver to the serial port is
connected or that the PCMCIA card is firmly seated.
H Ensure that the receiver is set to output NMEA sentences
regularly.
If you have purchased the vxHpc terminal emulator, you can
view the NMEA sentences being sent.
YBT250 Field Transmitter & Interference Tester User Manual
2- 51
Changing Instrument Settings
Open the vxHpc terminal emulator by tapping Start > Programs
> Communication > vxHpc.
To view the NMEA sentences being sent, you need to set up
vxHpc to connect to the correct port:
H For a serial port GPS receiver, set up vxHpc to connect to
COM1.
H For the Teletype WorldNavigator, set up vxHpc to connect to
Teletype_1358.
Configure the port the as follows:
4800 baud
8 data bits
No parity
1 stop bit
No flow control
If you then open the session, you should see NMEA sentences
being displayed from the GPS receiver.
If you do not see NMEA sentences, either they are not being sent
by the GPS receiver or the connection to the GPS receiver is not
passing them (check the cables again). Refer to your GPS
receiver documentation to find out how to output NMEA
sentences regularly.
vxHpc Software
The NetTek Analyzer includes a 30-- day evaluation version of the
vxHpc High Performance Serial and Telnet Communications
Software from Cambridge Computer Corporation. vxHpc provides
more sophisticated and powerful communications capability than the
built-- in Windows CE Terminal program. vxHpc provides a broad
range of terminal emulations, includes telnet (TCP/IP) communications capability, terminal emulation over the serial port, file transfer
and scripting. The vxHpc software is fully functional for 30 days
after its first use, after which you will have to purchase a license
from Cambridge Computer Corporation. For registration information, see the vxHpc online help: follow the Tips for using vxHpc link
on the first page or go to http://www.cam.com.
2- 52
YBT250 Field Transmitter & Interference Tester User Manual
Reference
Displaying a Signal Spectrum
You can use the YBT250 Field Transmitter & Interference Tester to
display the spectrum of a signal and a spectrogram of a signal. The
spectrum display shows the signal level at different frequencies, all
at once. The spectrogram display shows how the signal level varies
over time. A spectrogram shows the history of the signal. The
spectrogram display is accessible only if the Interference option is
installed (Option IN1, Interference Analyst).
The Spectrum Display Area
There are several buttons located in the Spectrum area display.
Figure 3-- 1 shows a typical spectrum display (with Interference
option installed).
Spectrum display area
Figure 3- 1: A typical Spectrum display
YBT250 Field Transmitter & Interference Tester User Manual
3- 1
Displaying a Signal Spectrum
Table 3-- 1 lists each of the buttons that can appear in the spectrum
display and explains what each button does.
Table 3- 1: Spectrum and Spectrogram window buttons and
icons
Button
Function
This tab selects the normal spectrum display.
This tab selects the spectrogram
display (requires Option IN1,
Interference Analyst).
This drop-down list specifies the
trace type. See Table 3--2.
This button clears the trace and
restarts acquisition when Trace is
set to Average, Min, Max, or Min &
Max Hold. Present in both the
Spectrum and Spectrogram displays. This button also clears and
restarts the spectrogram.
Adjusts the internal gain and /or
attenuation (Ref Level) to provide
an optimized waveform display and
prevent overload conditions.
Moves the measurement frequency
to the horizontal center of the
display.
Decreases the span (frequency
width) of the spectrum and spectrogram displays.
Increases the span of the spectrum
and spectrogram displays.
Rotate trace order: Moves the front
trace to the back or enables Trace 2
if not displayed.
3- 2
YBT250 Field Transmitter & Interference Tester User Manual
Displaying a Signal Spectrum
Table 3- 1: Spectrum and Spectrogram window buttons and
icons (Cont.)
Button
Function
Indicates the current Reference
Level (top of the display in spectrum
windows).
Displays current vertical scale
setting.
Indicates the Start frequency (the
lowest displayed frequency).
Indicates the Center frequency (the
middle displayed frequency).
Indicates the Stop frequency (the
highest displayed frequency).
Undo Tap moves the waveform in
the display back to its previous
position or resets the value of the
last item touched in the graph.
Present only when an action can be
undone.
Allows the user to alter settings by
tapping in the graph area. When
visible, the waveform in the display
can be moved and markers can be
placed by tapping the graph.
YBT250 Field Transmitter & Interference Tester User Manual
3- 3
Displaying a Signal Spectrum
Table 3- 1: Spectrum and Spectrogram window buttons and
icons (Cont.)
Button
Function
Prevents the waveform in the
display from being moved accidentally. When visible, the waveform in
the display cannot be moved and
markers cannot be placed by
tapping the graph (they can still be
moved using other controls).
Indicates how to interpret the power
values of channel data in the
Spectrogram.
3- 4
YBT250 Field Transmitter & Interference Tester User Manual
Displaying a Signal Spectrum
Displaying a Trace
To display a spectrum trace:
1. Connect a signal (see page 2-- 23) from a test port to the YBT250
RF INPUT connector.
2. If there is no test port:
a. Verify the transmitter is not transmitting power to the
antenna.
b. Disconnect the transmitter cable from the antenna.
c. Attach an attenuator to the cable output (this will prevent
overpowering the input of the YBT250).
CAUTION. If the input of the YBT250 is accidentally overpowered, it
will trip an internal protection switch. A dialog box will inform you
that to continue using the YBT250, you must disconnect the input
cable or reduce the input power and then press OK.
d. Connect the attenuator to the YBT250 input connector.
3. Select the Signal Standard.
4. Select the Channel.
5. Select Forward (
) or Reverse Link (
).
6. Select the Spectrum display (button 2). See Figure 3-- 2.
YBT250 Field Transmitter & Interference Tester User Manual
3- 5
Displaying a Signal Spectrum
Figure 3- 2: A spectrum trace with markers displayed
Setting Trace Display Options
You can change how a trace is displayed to make it easier to analyze.
There are five trace types you can choose from. See Table 3-- 2.
Table 3- 2: Trace display options
3- 6
Trace type
Description
Normal
Each point in the trace represents a single acquisition. Updates
display with each new acquisition.
Average
Each point in the trace represents an average of a number of
acquisitions. The number of acquisitions averaged is set on the
Spectrum tab of the Settings page.
Min Hold
Each point in the trace represents the minimum amplitude
measured at that frequency since the acquisition was started.
Acquisition can be restarted by tapping the restart button.
Updates displayed point only if new point < old point.
YBT250 Field Transmitter & Interference Tester User Manual
Displaying a Signal Spectrum
Table 3- 2: Trace display options (Cont.)
Trace type
Description
Max Hold
Each point in the trace represents the maximum amplitude
measured at that frequency since the acquisition was started.
Acquisition can be restarted by tapping the restart button.
Updates displayed point only if new point > old point.
Min/Max Hold This is a combination of Min Hold and Max Hold. Each point in
the trace has both a minimum and maximum value that
correspond, respectively, to the minimum and maximum values
measured at that frequency since the acquisition was started.
Acquisition can be restarted by tapping the restart button.
Draws a vertical line between Max Hold and Min Hold points.
Setting the Trace Type
The usual trace type is Normal. However, you can set the trace type
to any of the other four trace types.
To specify the trace type:
H Select the desired trace type from the drop-down list. See
Figure 3-- 3.
YBT250 Field Transmitter & Interference Tester User Manual
3- 7
Displaying a Signal Spectrum
Select Trace type from this list
Figure 3- 3: Setting the trace type
You can also set the trace type in the Setup window:
1. Select Setup > Edit. This displays the Setup window.
2. Tap the Spectrum tab. See Figure 3-- 4.
3. Select the desired trace type from the drop-down list.
If you select Average, you can also set the number of traces
averaged together to create the trace display. The default number
of averages is 5. This number applies to both Trace 1 and 2.
a. To set the number of averages, tap the keypad next to the
number of averages.
b. Enter the number of traces to average and then tap OK.
4. Tap OK to save your changes.
3- 8
YBT250 Field Transmitter & Interference Tester User Manual
Displaying a Signal Spectrum
Figure 3- 4: The Spectrum tab
Changing the Vertical Scale of the Spectrum Display
To change the vertical scale of the display (dB/div):
1. Tap the Vertical Scale label to assign Vertical Scale to the knob.
2. Change the vertical scale by:
a. Tapping the numeric entry keypad button and entering a
new value, or
b. Tapping the left/right arrows below the knob to change the
vertical scale value, or
c. Dragging the top portion of the knob to set the new value.
When the vertical scale is set to a value that causes the trace to
expand beyond the display area, a scroll bar appears at the right side
of the trace display. You can change the position of the trace by
dragging the scroll bar or tapping the scroll bar’s arrows.
YBT250 Field Transmitter & Interference Tester User Manual
3- 9
Displaying a Signal Spectrum
Changing the Vertical Position of the Trace
The vertical position of the trace can be changed only when the
vertical scale is <10 dB/div.
To change the vertical position of the trace:
H Drag the vertical scroll bar (only visible when the vertical scale
is <10 dB/div) or tap the arrows at the ends of the scroll bar. See
Figure 3-- 5.
Display scroll bar
Figure 3- 5: How the display appears with a small vertical scale value
Changing the Horizontal Position of the Trace
To change the horizontal position of the trace:
H Touch inside the graph, and keeping your finger on the screen,
drag the trace to the desired position. You do not have to touch
the trace itself.
If you just tap the waveform and remove your finger, the trace will
not move. If Markers are on, the position of the selected Marker will
change to the location you tapped. If Markers are off, when you tap
3- 10
YBT250 Field Transmitter & Interference Tester User Manual
Displaying a Signal Spectrum
the waveform, the measurement frequency will change to the
frequency at the point you tapped.
Changing the Reference Level
The Reference Level is the level displayed at the top of spectrum
windows.
To change the Reference Level:
1. Tap the Ref Lvl label to assign the knob to Reference Level.
2. Change the Reference Level by:
a. Tapping the numeric keypad button and entering a new
value, or
b. Tap the left/right arrows on the bottom half of the knob to
change the Reference Level value, or
c. Drag the circle on the top half of the knob to set the new
value.
Disabling Tap/Drag Operation
You can prevent the accidental change of settings or movement of
the trace by disabling Tap/Drag actions within the trace area of the
display.
To disable tap/drag action:
H Tap the Tap/Drag Enabled button
.
When Tap/Drag action is disabled, the icon changes to
.
To enable tap/drag action:
H Tap the Tap/Drag Disabled button
.
YBT250 Field Transmitter & Interference Tester User Manual
3- 11
Displaying a Signal Spectrum
Saving Traces
You can save a trace for later recall. For example, you can save an
example of a good trace for comparison with a live trace later.
To save a trace with an automatically generated filename:
H Select File > Save Trace.
When you start the application, traces are saved in the \BuiltInDisk\YBT250\AppData\Results directory by default. Refer to
Changing Settings for Saved Files on page 2-- 45 for information on
changing the default directory and setting other defaults for saved
files. You can also change the directory for future save operations by
selecting a different path in the Save Trace As window, but the
default will return to the \BuiltInDisk\YBT250\AppData\Results
directory when you restart the application.
NOTE. Only traces saved within the BuiltInDisk folder (or on a
removable storage device such as a PC memory card) are stored in
non-volatile memory. Traces saved outside the BuiltInDisk folder are
lost when the YBT250 is shutdown.
To save a trace with a name and location you specify:
1. Select File > Save Trace As. The Save As dialog box appears.
2. Enter a name and location for the file and tap OK.
NOTE. Traces are saved with the settings in effect at the time the
trace is saved.
You can save GPS coordinates with your results. Refer to page 2-- 50
for information about selecting and setting up a Global Positioning
System Receiver.
3- 12
YBT250 Field Transmitter & Interference Tester User Manual
Displaying a Signal Spectrum
Displaying a Saved Trace
You can display a previously saved trace for review or comparison
with another trace.
To display a saved trace:
1. Select File > Open. The Open dialog box appears.
2. Locate the saved trace, tap the name of the trace and then tap
OK.
NOTE. Traces are saved with the settings in effect at the time the
trace is saved. When a saved trace is displayed, the stored settings
values will be shown for reference, though no actual instrument
to return to making
settings will change. As soon as you press
new acquisitions, the settings will be restored to what they were
before the saved trace was opened.
Comparing Traces
The YBT250 provides the ability for you to visually compare the
current trace against a reference trace. The reference trace, called
Trace 2, can be another current trace or a saved trace.
To display a second trace:
H Select View>Trace 2.
or
H Select the Rotate Traces icon
.
If Trace 2 is not enabled, selecting the Rotate Trace icon enables the
Trace 2 display.
Defining Trace 2
Trace 2 can be a live trace (for example, an averaged display of the
latest acquisitions) or a saved trace.
YBT250 Field Transmitter & Interference Tester User Manual
3- 13
Displaying a Signal Spectrum
To define Trace 2:
1. Select View>Define Trace 2... The Settings window appears
with the Trace 2 & Mask tab selected. See Figure 3-- 6.
Figure 3- 6: Defining Trace 2
2. To set Trace 2 to a version of the live trace, select Live Trace in
the Trace 2 box.
You can set the trace display options for Trace 2 with the
drop-down list. You can choose Normal, Average, Min Hold,
Max Hold, or Min/Max Hold.
3. To set Trace 2 to a saved trace, select Saved Trace. Enter the
path to the saved trace in the input box, or tap Browse to display
the Open dialog box.
3- 14
YBT250 Field Transmitter & Interference Tester User Manual
Displaying a Signal Spectrum
Comparing Two Trace Results Files
To compare two saved results:
1. Select File > Compare Saved.... The Open dialog appears. See
Figure 3-- 7. For the first result selected, the dialog is labeled
Select first result file to compare.
Figure 3- 7: Selecting the first result file
2. Select the first result file you wish to compare.
3. Tap OK. The trace stored in this file is displayed as Trace 1.
4. After you select the first result, use the Select second result file
to compare dialog box (shown in Figure 3-- 8) to select the
second trace file.
Figure 3- 8: Selecting the second result file
YBT250 Field Transmitter & Interference Tester User Manual
3- 15
Displaying a Signal Spectrum
5. Tap OK. The trace stored in this second file is displayed as
Trace 2.
The timestamp displayed next to the Open Folder indicator on the
toolbar is associated with the trace file that is displayed in the
foreground.
The two traces are displayed in different colors so that they are
easier to compare. You can use markers on the saved traces to
compare points on the traces. See Figure 3-- 9.
Figure 3- 9: Two compared traces
3- 16
YBT250 Field Transmitter & Interference Tester User Manual
Displaying a Signal Spectrum
Displaying Markers
The YBT250 Field Transmitter & Interference Tester uses markers to
measure differences in the frequency and level of the displayed
trace.
To display the markers:
H Select View>Markers.
The markers will be displayed as shown in Figure 3-- 10.
NOTE. Markers can be viewed only in the Spectrum display. Markers
are not available in any of the Interference or Measure windows.
Figure 3- 10: Display with markers
YBT250 Field Transmitter & Interference Tester User Manual
3- 17
Displaying a Signal Spectrum
There are four readouts associated with markers. See Figure 3-- 11.
H Measurement Frequency level and frequency
H Marker 1 (M1) frequency and level
H Marker 2 (M2) frequency and level
H Difference in frequency and level between M1 and M2 (M1-- M2)
(when mask testing is not enabled) OR
H Difference in level between M1 and a Mask and M2 and a Mask
(when mask testing is enabled)
Marker 1 readout
Measurement
Frequency
readout
M1-- M2 readout
Marker 2 readout
Figure 3- 11: The four readouts of the Markers display
The units for the frequency and level readouts are located at the right
side of each segment of the marker display (for example, MHz and
dBm). The elements of each marker display are shown in
Figure 3-- 12.
3- 18
YBT250 Field Transmitter & Interference Tester User Manual
Displaying a Signal Spectrum
The symbol on the trace display
associated with this readout
Identifies function of readout
(Measurement Frequency,
Marker 1 or 2, or difference
between M1 and M2)
Frequency of trace at
Marker (in MHz)
Level of trace at Marker
(in dBm or Watts)
Figure 3- 12: Parts of the Marker readout
Specifying Units for Marker Display
The units displayed in the marker readouts for level can be set to
either dBm or Watts.
To change the marker readout units for level:
1. Tap the Edit button or select Setup > Edit. This displays the
window shown in Figure 3-- 13.
2. To set the units for level in the marker readouts, tap dBm or
Watts in the Markers box.
3. Tap OK after setting the units.
YBT250 Field Transmitter & Interference Tester User Manual
3- 19
Displaying a Signal Spectrum
Figure 3- 13: Changing Units for Marker Level
Measuring Frequency and Level Differences on a Single Trace
To measure the difference in frequency and level between two points
on a single trace:
1. Display the markers by selecting View>Markers.
2. Tap the M1 readout. This assigns the marker to the knob and to
the touch screen in the display area.
3. Tap the display where you want to place the marker. You can also
use the knob to position the marker.
4. Tap the M2 readout. This assigns the marker to the knob and to
the touch screen in the display area.
5. Tap the display where you want to place the marker. You can also
use the knob to position the marker.
6. Read the difference in frequency and level at the right side of the
marker display.
3- 20
YBT250 Field Transmitter & Interference Tester User Manual
Displaying a Signal Spectrum
Measuring Frequency and Level Differences Between Two Traces
When Trace 2 is displayed, you can measure the difference in
frequency and level between points on two traces:
1. If Trace 2 is not displayed, select View > Trace 2.
2. Display the markers by selecting View > Markers.
3. Specify the location of the markers by choosing one of the menu
selections shown in Table 3-- 3 from the View menu.
Table 3- 3: Marker placement
Menu selection
Location of markers
M1 Trace 1, M2 Trace 2
Assigns M1 to Trace 1 and M2 to Trace 2
(rotating the trace order does not change the
marker assignment).
Both on front trace
Both markers are assigned to the front trace,
which changes when the trace order
changes.
Both on Trace 1
Both markers remain on Trace 1 (rotating the
trace order does not change the marker
assignment).
Both on Trace 2
Both markers remain on Trace 2 (rotating the
trace order does not change the marker
assignment).
4. Tap the M1 readout. This assigns the marker to the control knob
and to the touch screen in the display area.
5. Tap the display where you want to place the marker. You can also
use the knob to position the marker.
6. Tap the M2 readout. This assigns the marker to the knob and to
the touch screen in the display area.
YBT250 Field Transmitter & Interference Tester User Manual
3- 21
Displaying a Signal Spectrum
7. Tap the display where you want to place the marker. You can also
use the knob to position the marker.
8. Read the difference in frequency and level at the right side of the
marker display.
Markers and Mask Testing
Markers are available when mask testing is enabled. There are two
things to note about markers when mask testing is enabled:
H Markers cannot be placed on a mask.
H When mask testing is enabled, the marker difference readout
displays the difference between the marker and the mask.
Refer to page 3-- 33 for more information about mask testing and
markers.
Band Edge Cursor
The Band Edge cursors identify the start and stop frequencies for the
transmit or receive bands of the selected standard. See Figure 3-- 14.
(Transmit or receive band is selected using the Uplink and Downlink
buttons.) There are two parts to the cursors, the main part appears in
the main trace display and the second part appears along the top
edge of the graph. The portion in the main display can be switched
off, but the part along the top edge of the graph is always visible. See
Figure 3-- 15.
To turn on the display of Band Edge Cursors:
H Select View > Band Edge Cursor so that it is checked. See
Figure 3-- 14 on page 3-- 23.
3- 22
YBT250 Field Transmitter & Interference Tester User Manual
Displaying a Signal Spectrum
Figure 3- 14: Band Edge Cursor displayed
To turn off the display of Band Edge Cursors:
H Select View > Band Edge Cursor so that it is not checked. See
Figure 3-- 15 on page 3-- 23.
Figure 3- 15: Band Edge Cursor turned off; top part visible
YBT250 Field Transmitter & Interference Tester User Manual
3- 23
Displaying a Signal Spectrum
Displaying a Spectrogram
Requires Option IN1, Interference Analyst
A spectrogram displays the record of signal level over time. This
history of the signal levels enables you to see changes in the signal
that cannot be seen in any other way. See Figure 3-- 16.
Figure 3- 16: A spectrogram
To display a spectrogram:
1. Select the Spectrum display (button 2).
2. Set the Frequency, Span, Reference Level and Vertical Scale to
show the signal(s) of interest in the graph.
3. Select the Spectrogram tab.
Remember the following while viewing a spectrogram:
H Select the Restart icon to clear the trace history and restart
collecting data ( ).
3- 24
YBT250 Field Transmitter & Interference Tester User Manual
Displaying a Signal Spectrum
H Select Updates... to change how often the spectrogram is
updated.
H You can determine when an anomaly occurred in the spectrogram
by displaying a cursor. To display the cursor, enter the number of
a data record (1-- 80) in the Data Record box at the bottom of the
display. The cursor is a white band of the same height as a data
record. Use the knob or numeric keypad to move the cursor so
that it covers up the data record of interest. The time and date the
data was recorded is displayed to the right of the Data Record
box.
H To create a spectrogram that uses the full range of colors, adjust
the Vertical Scale and vertical position in the spectrum display so
that the trace fills at least eight vertical divisions.
H A banner “Input Overrange: Reduce input signal level” will
appear below the spectrogram when input levels are too high. A
red mark also appears to the right of a spectrogram record to
indicate that the spectrum was acquired during an Input
Overrange condition. When a Spectrogram is acquired during an
Input Overrange condition, the resulting trace data may still be
valid, but it may also contain IM (Inter-Modulation Distortion)
products that are internally generated.
The Input Overrange information is saved with and exported with
the results.
See Locating Intermittent Interference on page 3-- 44, for more
information on using the Spectrogram window.
Setting the Spectrogram Update Rate
The YBT250 allows you to set the rate at which a spectrogram is
updated. Setting the spectrogram update rate specifies how often the
Spectrogram display receives a new trace.
To specify the spectrogram update rate:
1. Select Setup > Edit. This displays the Setup window.
2. Tap the Spectrum tab. See Figure 3-- 17.
YBT250 Field Transmitter & Interference Tester User Manual
3- 25
Displaying a Signal Spectrum
Figure 3- 17: The Spectrum tab
3. Specify the full-screen data collection time by selecting either
Minutes, Hours or Days.
4. Adjust the slider control to set the data collection time (that is,
the time used to fill the spectrogram display). You change the
data collection time by moving the slider, tapping the left/right
arrow buttons, or typing in the number with the soft keyboard.
Automatically Saving and Exporting the Spectrogram
Display
You can set YBT250 to save or export the spectrogram display each
time 80 records are accumulated. Files are automatically named as
they are saved, enabling unattended operation.
For a general discussion of saving and exporting, refer to Saving,
Exporting, and Recalling Results, Traces, and Settings on
page 3-- 123. For a general discussion of how to set defaults for
3- 26
YBT250 Field Transmitter & Interference Tester User Manual
Displaying a Signal Spectrum
saving or exporting files, refer to Changing Settings for Saved Files
on page 2-- 45.
To automatically save or export the spectrogram display every 80
records:
1. Select Setup > Edit. This displays the Setup window.
2. Tap the Spectrum tab. See Figure 3-- 17.
3. To automatically save and / or export, tap the check boxes next to
Auto Save and / or Auto Export.
4. Tap OK to save your changes.
The YBT250 will save or export the spectrogram display to a
new file each time 80 data records are accumulated. The time
required to accumulate 80 records depends on the spectrogram
update rate. The size of a full, saved spectrogram file is about
43 kilobytes. The size of a full, exported spectrogram file is
about 160 kilobytes.
Creating a Mask
Mask testing is used to determine if a signal exceeds specified levels.
The YBT250 can perform several actions when an input signal
exceeds limits defined by a mask. The default action is to display an
) to the right of the graph (which cannot be switched off)
icon (
and sound a beep (which can be switched off). A trace that exceeds
limits can trigger additional actions such as pausing the display,
exporting a screen and saving results to a file.
Masks are created with the Mask Maker utility. A mask consists of
one or more traces. Each trace consists of at least one point.
To create a mask:
1. Select the Spectrum display.
2. Set the measurement frequency to the center of the spectrum
).
graph by tapping the move to center icon (
3. From the Tools menu, select Mask Maker. This displays the
Mask Maker utility. See Figure 3-- 18.
YBT250 Field Transmitter & Interference Tester User Manual
3- 27
Displaying a Signal Spectrum
Figure 3- 18: The Mask Maker utility
If Mask testing was already enabled for the Spectrum display, the
selected mask is displayed in the Mask Maker window. If Mask
testing was not enabled, a new default mask (the pulse-shaped trace)
is displayed.
To add a point to a trace:
1. If more than one trace is displayed, select the desired trace by
) on the trace
tapping on it or tap the down arrow (
selector and select the desired trace from the list.
2. Tap the add points option button above the graph.
3. Tap the graph at the desired point.
To move a trace point:
1. If more than one trace is displayed, select the desired trace by
tapping on it or tap the down arrow (
) on the trace
selector and select the desired trace from the list.
3- 28
YBT250 Field Transmitter & Interference Tester User Manual
Displaying a Signal Spectrum
2. Tap the edit points option button above the graph.
3. Touch the desired point and drag it to the new location.
Alternately, you can move points by using the keypad or the cursor
keys:
1. Tap the value in the table (the number in either the x(MHz)
column or the y(dBm) column) you want to adjust.
2. If the cursor arrows are displayed above the table, tap the keypad
icon (
) to display the keypad.
3. Use the keypad to type the new value for the point and tap Enter
when finished.
NOTE. If you want to adjust a vertical value, you can tap the desired
point in the graph and its vertical value will be selected in the table.
or:
4. Tap the point to be moved so it is selected (point indicator
changes to a circle).
5. If the keypad is displayed above the table, tap the cursor arrows
) to display the cursor arrows. Tap one of the cursor
icon (
arrows to move the selected point in the desired direction.
To delete a point from a trace:
1. If more than one trace is displayed, tap the down arrow
) on the trace selector. Select the desired trace
(
from the list.
2. Tap the point to be deleted so it is selected (point indicator
changes to a circle).
3. Tap the delete point button (
).
YBT250 Field Transmitter & Interference Tester User Manual
3- 29
Displaying a Signal Spectrum
To add a trace to the mask:
H Tap one of the Add new trace buttons. A trace of the selected
shape will appear on the graph.
To delete a trace from a mask:
) on the trace selector.
1. Tap the down arrow (
2. Select the trace to delete from the list.
If the edit points option button is selected, you can also select a
trace by touching it near one of its points.
3. Tap the delete trace button (
).
To specify how a mask violation is determined:
1. Tap the down arrow (
) on the trace selector.
2. Select the desired trace from the list.
3. Tap High limit to indicate a violation when a signal trace has a
value higher than the mask trace.
4. Tap Low limit to indicate a violation when a signal trace has a
value lower than the mask trace.
Hints
H The selected point on a mask trace is indicated by a circle. Other
points are indicated by a square.
H You can add as many points as you want to a mask trace.
H You can place as many traces on a mask as you want.
H If you place points outside the visible area of the graph, tap the
) to bring all points into view.
rescale button (
H If you accidentally delete a point or a trace, you can undo the last
delete action by tapping the Undo Delete button (
3- 30
)
YBT250 Field Transmitter & Interference Tester User Manual
Displaying a Signal Spectrum
H Tap the numeric keypad (
) to switch to the numeric keypad
from the cursor keys.
H Tap the cursors keys button (
) to switch to the cursor keys
from the numeric keypad.
Table 3- 4: Mask maker buttons and icons
Button/Icon
Description
Creates a new mask.
Opens an existing mask for editing.
Saves changes to the current mask.
Save changes to the current mask with a different
name or to a different location.
Cursor arrows button. Tap to display the cursor
arrows.
Cursor arrow. Tap to move the selected point in the
desired direction.
Keypad button. Tap to display the numeric keypad.
Done. Tap to exit the Mask Maker utility.
Rescale button. Tap to scale the current mask so all
points are visible in the graph.
Delete Point. Tap to delete the selected point from
the mask.
Delete Trace. Tap to delete the selected trace from
the mask.
Trace Select list box. Tap to select which trace to
edit.
Undo Delete. Tap to undo the last Delete Point or
Delete Trace action.
YBT250 Field Transmitter & Interference Tester User Manual
3- 31
Displaying a Signal Spectrum
Table 3- 4: Mask maker buttons and icons (Cont.)
Button/Icon
Description
Flat Trace button. Tap to add a 2-point trace to the
mask.
Rising Trace button. Tap to add a 4-point trace to
the mask.
Falling Trace button. Tap to add a 4-point trace to
the mask.
Positive Pulse button. Tap to add a 6-point trace to
the mask.
Negative Trace button. Tap to add a 6-point trace to
the mask.
Defining a Mask
Before you can perform a mask test, you must define the mask to be
used. If you have not yet created a mask, see Creating a Mask on
page 3-- 27.
To define a mask:
1. Select View > Define Mask. This displays the Trace 2 & Mask
tab of the Setup window.
2. In the Mask section of the tab, tap Browse and select the mask
you want to use for your mask test.
3. Tap the Enable Mask Testing check box.
4. To have the YBT250 perform an action (in addition to displaying
the violation icon) when a mask violation occurs, tap the
appropriate check box:
H Tap Beep to sound an alarm when a violation occurs (this is
selected by default).
H Tap Pause to cause the YBT250 to pause when a violation
occurs.
3- 32
YBT250 Field Transmitter & Interference Tester User Manual
Displaying a Signal Spectrum
H Tap Export Screen to save the screen as a graphics file when
a violation occurs.
H Tap Save Results to cause the YBT250 to save the measurements results to a file when a violation occurs.
5. Tap OK to accept your changes.
Mask testing is enabled with the defined mask displayed.
Performing a Mask Test
To perform a mask test:
H Select View > Mask so that there is a check mark next to Mask.
The defined mask is displayed, with the mask centered on the current
Measurement Frequency.
If the signal trace exceeds the mask, the violation icon (
) will
appear on the right side of the spectrum graph and the violated mask
trace will change color (the specific color depends on the selected
color scheme.
A mask trace does not have to cover the entire frequency range of a
graph. Signal points at frequencies that don’t have associated mask
points are not tested for violations. This allows you to check only
those parts of the signal that are critical to your specific measurement, for example the attenuation in adjacent channels.
Mask Testing and Markers
When Mask testing is enabled, the marker difference readout
displays the difference between the marker and the mask. A positive
value indicates a “pass.” A negative value indicates a “fail.” A
positive value for an upper limit means that the signal level is lower
than the mask level at the marker frequency. A negative value means
the signal level is higher than the mask level, thus violating the
mask. For a lower limit mask, a positive difference means the signal
level is higher than the mask level and a negative difference means
the signal level is lower than the mask level.
YBT250 Field Transmitter & Interference Tester User Manual
3- 33
Displaying a Signal Spectrum
The YBT250 calculates the difference between the marker and the
mask using the above rule to determine the sign of the difference.
The YBT250 calculates the difference between the signal level and
the level of each of the traces in the mask. The YBT250 then
displays the worst case difference between the signal level and all
the traces in the mask.
For example, suppose there are two traces in a mask; one is an upper
limit and the other is a lower limit. The upper limit mask trace level
at the marker frequency is 0 dBm, the signal level is - 10 dBm and
the lower limit mask trace level is - 30 dBm. Thus, the difference
between the upper limit and the signal level is 10 dB, and the
difference between the signal level and the lower limit is 20 dB. The
YBT250 displays the M1 marker difference as 10 dB because the
signal is closer to the upper limit than it is to the lower limit.
As another example, assume the upper limit mask trace level is
0 dBm, the signal level is - 30 dBm and the lower limit mask trace
level is - 25 dBm. Therefore, the difference between the upper limit
and the signal is 30 dB and the difference between the signal level
and the lower limit is - 5 dB. The YBT250 displays the M1 marker
difference as - 5 dB because the signal is closer to the lower limit
than it is to the upper limit. And because the signal is lower than the
lower limit, the signal fails the mask test.
If the YBT250 displays dashes (-- - - - ) for the marker difference
instead of a number, it means there is no mask defined at the marker
frequency.
3- 34
YBT250 Field Transmitter & Interference Tester User Manual
Locating Interference
To locate interference, you need Option IN1 Interference Analyst or
Option WS1 W-- CDMA Scrambling Code Analyzer).
The YBT250 Field Transmitter & Interference Tester provides
several methods to locate and identify many types of interfering
signals. The YBT250 can identify interference signals, demodulate
AM or FM audio signals, assess the strength of an interfering signal,
and measure the noise floor on receive channels.
The Interference Display Area
Requires Option IN1, Interference Analyst
There are several tabs, buttons and icons located in the Interference
display area. Figure 3-- 19 shows a typical Interference display.
Interference display area
Figure 3- 19: The Interference Strength display
YBT250 Field Transmitter & Interference Tester User Manual
3- 35
Locating Interference
Table 3-- 5 lists each of the buttons/icons that can appear in the
Interference display and it explains what each button does.
Table 3- 5: Interference window buttons and icons
Buttons/Icon
Function
This button starts the automatic
identification function (Identify window
only).
This scrollbar is used to adjust the
volume of the speaker when listening
to demodulated signals (Strength and
Audio Demod windows only).
This drop-down list specifies the trace
type
This button restarts trace acquisition
when Trace is set to Average, Min,
Max or Min/Max.
Adjusts the Reference Level to provide
an optimized waveform display and
prevent overload conditions.
Moves the trace so the measurement
frequency is at the horizontal center of
the spectrum graph.
Decreases the span of the trace
display.
Increases the span of the trace
display.
Undo reverses the most recent tap or
drag action. Only visible after a tap or
drag action. Displayed in graph area
only.
3- 36
YBT250 Field Transmitter & Interference Tester User Manual
Locating Interference
Table 3- 5: Interference window buttons and icons (Cont.)
Buttons/Icon
Function
Enables Tap or Drag actions (graph
area only).
Disables Tap or Drag actions (graph
area only).
Displaying a Trace
To begin searching for an interfering signal, you usually begin by
displaying a spectrum trace.
To display a spectrum trace:
1. Connect the signal from an antenna to the YBT250 RF INPUT.
2. Select the Interference display (
). See Figure 3-- 20.
Figure 3- 20: A trace spectrum in the Interference window
YBT250 Field Transmitter & Interference Tester User Manual
3- 37
Locating Interference
3. Select the Signal Standard.
4. Select the Channel.
5. Select Forward (
) or Reverse (
) Link.
Identifying a Signal
Requires Option IN1, Interference Analyst
Once you can see a signal that you think may be interfering, you can
use the automated identification function to identify the signal. The
YBT250 will make an estimate of the signal type, choosing between
GSM, cdmaOne/cdma2000/1xEV-- DO, W-CDMA, IS-136, and
analog FM signal types.
1. In the Interference display (button 3), tap the Identify tab if
needed.
2. Look at the spectrum display to locate the suspected interfering
signal. Tap the trace at the frequency of the interfering signal to
set the measurement frequency. Try to set the Measurement
Frequency to the center of the signal.
3. Look at the Assignments for this Freq. readout at the lower left
of the display. See Figure 3-- 20.
This readout displays the signal standard (more than one might
be displayed) that has channels defined at the measurement
frequency. The YBT250 first looks at the list of preferred signals
and then looks at the global channel reference to check for a
match. If the Measurement Frequency does not match with a
supported standard, Not Found is displayed.
4. Select Measure to invoke the Identify function.
The YBT250 will perform a series of measurements to identify
which signal standard the signal’s characteristics most closely
match. The results of the Identify function are displayed in the
Measurements suggest results box. The signals are sorted by
frequency, with the signal that most closely matches the
measurement frequency listed first. See Figure 3-- 21.
3- 38
YBT250 Field Transmitter & Interference Tester User Manual
Locating Interference
Figure 3- 21: Results of an identification test
Locating an Interfering Signal
Requires Option IN1, Interference Analyst
By attaching a directional antenna to the YBT250, you can locate the
source of an interfering signal by measuring the strength of the
interfering signal. Figure 3-- 22 shows an example of a signal strength
display.
YBT250 Field Transmitter & Interference Tester User Manual
3- 39
Locating Interference
Figure 3- 22: Example of a signal strength display
The Measurement Bandwidth, shown below the graph area in
Figure 3-- 22, is the frequency range that fits within one horizontal
division around the Measurement Frequency. You can change the
span to adjust the Measurement bandwidth.
The YBT250 indicates signal strength two ways. One indicator is the
Strength graph located at the bottom-right of the results display
area. The second indicator is an audible tone or beep.
The Strength graph indicates the signal power detected within the
Measurement Bandwidth. As the signal strength increases, the bar on
the Strength graph rises.
The audible tone changes pitch as the signal strength changes. The
higher the pitch, the stronger the signal. The audible tone is switched
on and off by selecting On or Off, below the trace display. You can
change the volume of the audible tone using the slider control at the
bottom-left of the results display area.
The Beep causes the audible tone to switch on and off at a rate that
varies with the signal strength. The faster the audible tone beeps, the
stronger the signal. The Beep is activated by selecting the Beep
checkbox located at the bottom-center of the results display area.
3- 40
YBT250 Field Transmitter & Interference Tester User Manual
Locating Interference
You can increase the rate at which the signal strength indicators are
updated by selecting the Fast Update checkbox. When Fast Update
is checked, the trace update rate is slowed so that the strength
measurement can speed up. The variation in pitch of the audible tone
(and Beep if it is selected) occurs much faster when Fast Update is
enabled.
To locate an interfering signal:
1. Connect a directional antenna to the YBT250 input.
2. Select the Interference display (
).
3. Select the Strength tab.
4. Adjust the span and Measurement Frequency to the area of
concern.
5. Set the Measurement Frequency to a signal of interest on the
trace.
6. To locate an interfering signal, point the directional antenna in
different directions.
As you change the direction of the antenna, you will hear a change
in the audible tone and beep (if switched on) and see a change in the
Strength bar. The source of the signal is located in the direction that
results in the highest signal strength.
Demodulating an Interfering Signal
Requires Option IN1, Interference Analyst
One method to identify an interfering signal is to demodulate the
signal. This enables you to listen for any identifying information,
such as a station ID, in the signal. A station ID can be particularly
helpful when the interfering signal is a radio or broadcast television
station. You may also be able to discriminate between possible
sources by listening to the characteristic sounds of paging , video,
control signals or the harmonics of other common signals. The
Audio Demodulation display and controls are shown in Figure 3-- 23.
YBT250 Field Transmitter & Interference Tester User Manual
3- 41
Locating Interference
Figure 3- 23: Example of an Audio Demod display
To demodulate the audio of an interfering signal:
1. Select the Interference display (
).
2. Select the Audio Demod tab.
3. Display the trace of the interfering signal.
4. Tap the trace at the peak of the suspected interfering signal to set
the measurement frequency.
5. Select a demodulation type and bandwidth from the Demodulation box on the lower-right of the results area. The YBT250 will
play the demodulated signal through the speaker. While the audio
plays, the trace display is frozen briefly.
NOTE. To conserve power, the YBT250 will not demodulate a signal
continuously, even if plugged into an external power source. The
demodulation will cycle on and off. It will be on for four seconds, off
for one second and then repeats the cycle.
3- 42
YBT250 Field Transmitter & Interference Tester User Manual
Locating Interference
6. If the audio doesn’t sound right, select another demodulation type
or bandwidth.
Measuring the Noise Floor
Requires Option IN1, Interference Analyst
Noise Floor measures all the RF Power coming into the receive
antenna within the frequency band of the selected channel. The
Noise Floor is the power integrated across the selected channel. To
make an accurate measurement, the Noise Floor must be measured
on a disabled channel (that is, a channel that is not carrying live
traffic). Larger numbers indicate more noise. Figure 3-- 24 shows an
example of a Noise Floor measurement.
Figure 3- 24: Example of a Noise Floor measurement
YBT250 Field Transmitter & Interference Tester User Manual
3- 43
Locating Interference
To measure the noise floor:
1. Connect a signal (see page 2-- 23) from a receiver test port to the
YBT250 RF INPUT connector.
2. If there is no test port:
a. Disconnect the receiver cable from the transmitter.
b. Connect the receiver cable to the RF INPUT connector.
3. Select the Interference display (
).
4. Select the Noise tab.
5. Select the Signal Standard.
6. Select the Channel.
7. Select Reverse Link (
).
The Noise Floor measurement is displayed below the trace
display. Noise Floor is displayed in dBm, with a resolution of
0.1 dB. The two vertical lines in the trace display indicate the
upper and lower frequencies of the channel being measured.
Locating Intermittent Interference
Requires Option IN1, Interference Analyst
Intermittent interference can be difficult to identify. The YBT250
Spectrogram display is ideal for spotting intermittent interference. A
spectrogram displays how a signal changes over time, in addition to
frequency and level. Because the spectrogram displays signals over a
period of time, signals that are intermittent are easy to spot. See
Figure 3-- 25.
3- 44
YBT250 Field Transmitter & Interference Tester User Manual
Locating Interference
Figure 3- 25: A Spectrogram display of an intermittent signal
To locate an intermittent interference signal:
1. Connect the YBT250 RF INPUT to the signal. The signal may be
from an antenna for off-the-air signals or you may need to
connect to a test point on the base station.
2. Select the Spectrum display (
).
3. Set the Measurement Frequency and span to show the frequency
range of concern.
4. Set the Vertical Scale (dB/div) so that the trace nearly fills the
vertical range of the graph area.
5. Select the Spectrogram tab.
6. To locate an intermittent signal, sweep the antenna along the
horizon and then vertically, while looking for bursts matching the
interfering signal on the spectrogram.
YBT250 Field Transmitter & Interference Tester User Manual
3- 45
Locating Interference
Time in the spectrogram display runs from the bottom to the top,
with the most recent data at the bottom of the display. Continuous
signals display an uninterrupted vertical line (although the signal
level can vary). Intermittent signals will show up as a discontinuous
vertical line. Signals of varying frequency will appear as a slanted or
crooked line through the display.
To determine the date and time when an intermittent signal occurred:
1. Locate the Data Record cursor at a discontinuous point on the
vertical line located at a frequency of interest.
a. Tap the Data Record box to assign the knob to the Data
Record.
b. Use the knob to change the position of the data record
cursor ( the cursor value can vary from 1 to 80). Each
record will display the date and time it was recorded to
the right of the Data Record box.
2. The date and time indicates when the selected data record was
acquired.
To achieve the best spectrogram display:
H Tap the Restart icon (
collecting data.
) to clear the trace history and restart
H Select Updates... to change how often the spectrogram is
updated.
H Ensure the Trace Interval is long enough when the trace type is
set to Average. If the Trace Interval is too short, you will not see
the effect of averaging when a spectrogram is displayed. The
spectrogram update rate (set by Trace Interval) must allow time
for the averaging function to produce an averaged spectrum. For
example, if the YBT250 requires 10 seconds to average the trace,
a Trace Interval shorter than 10 seconds will not show the effect
of averaging.
3- 46
YBT250 Field Transmitter & Interference Tester User Manual
Locating Interference
H For the best spectrogram display, first adjust the Spectrum graph
as follows: decrease the dB/div setting and move the graph up or
down (by adjusting the reference level or vertical scroll bars
when present) until the trace covers at least eight vertical
divisions.
Analyzing W-CDMA Scrambling Codes
Requires Option WS1, W- CDMA Scrambling Code Analyzer
The W-- CDMA Scrambling Code Analyzer (SCA) detects the
scrambling code and pilot power level of each received W-- CDMA
downlink signal when multiple signals are present. The SCA is
intended for off-air reception using an antenna, and measures only
downlink signals.
The maximum number of signals that can be detected is ten.
To make accurate measurements of the downlink signals, you should
use a receive antenna with frequency response and bandwidth
appropriate for the channel you want to measure. You should also
use a high quality, low-loss Band Pass Filter (BPF) to reject signals
outside the signal band. If you take measurements near a high power
transmitter such as commercial TV or radio, the BPF may be
necessary to allow the SCA to produce useable results.
To use the Scrambling Code Analyzer:
1. Connect the antenna and filter (if used) to the RF input using
high quality cabling.
2. Select the Interference display (
).
3. Select the Scr Code tab.
4. Select the Signal Standard.
5. Select the Channel.
6. Select Forward Link (
).
7. If you know the attenuation of the antenna, filter, and connecting
cable, you may account for it. Select the Edit button > Input tab
and enter the value in the Attenuator Loss field.
YBT250 Field Transmitter & Interference Tester User Manual
3- 47
Locating Interference
W- CDMA Scrambling Code Results
Io is the received power in the W-- CDMA signal bandwidth, in dBm.
(Io is also known as No or RSSI.)
Scrambling Code is the Primary Scrambling Code number of each
detected downlink signal.
Ec/Io is the energy per chip in a downlink pilot channel code,
normalized to the received power, in dB. Essentially, it is the ratio of
the power of each detected pilot channel code to the total received
power. An Ec/Io value of - 10 dB indicates that pilot code contributes
one tenth of the total received power.
Ec is the absolute power level of each detected pilot channel code, in
dBm. (Ec is also known as RSCP.)
In the graph, look for only one or two signals to have high Ec/Io
(>-- 10 dB). Any other detected signals should have Ec/Io of 5 to
10 dB less than these to avoid interference. If there are three or more
signals of high and approximately equal level, one or more of the
transmitters may need adjustment to prevent excessive interference
in that location.
Results are normally displayed in descending order of Ec/Io level in
both the graph and table. As Ec/Io varies, codes may change order or
disappear from the result.
Sorting or Locking the Current Set of Scrambling Codes
You can either sort or lock the current set of scrambling codes.
To sort the results, select one of the following choices:
H Power (Ec) to sort by descending Ec level. (See Figure 3-- 26.)
H Scrambling Code (SC) to sort by ascending Scr Code index.
3- 48
YBT250 Field Transmitter & Interference Tester User Manual
Locating Interference
Figure 3- 26: Scrambling codes sorted by descending power (Ec)
Alternatively, to lock and hold the current set of detected Scrambling
Codes, select Lock Scrambling Codes. Select Lock a second time to
remove the hold action. See Figure 3-- 27 for a screen capture of
locked scrambling codes.
NOTE. When Lock is enabled, if a new signal is detected, the YBT250
will not display the new signal until Lock is disabled.
YBT250 Field Transmitter & Interference Tester User Manual
3- 49
Locating Interference
Figure 3- 27: Locked scrambling codes
3- 50
YBT250 Field Transmitter & Interference Tester User Manual
Taking Measurements
The YBT250 provides measurement capabilities to quickly and
easily determine the condition of a transmitter. Measurements are
available to measure power, spectral response and modulation.
The Measure Window Display
The Measure window display is where readouts for the selected
measurement appear. Figure 3-- 28 shows a typical Measure display.
Figure 3- 28: A Measure window display
Table 3-- 6 lists the buttons and icons that can appear in the Measure
window display and it explains what each button or icon represents.
YBT250 Field Transmitter & Interference Tester User Manual
3- 51
Taking Measurements
Table 3- 6: Measure window buttons and icons
Button
Function
This button appears in the Channel
Power measurement. It sets the
horizontal range to one channel width
plus half a channel on either side
This button appears in the Channel
Power measurement. It sets the
horizontal range to just over five
channels.
This button appears in the Channel
Power measurement. It sets the
horizontal range to 10 MHz or
10 channel widths, whichever is
greater.
This arrow is a Fail indicator. It
appears when a measurement
exceeds the upper limit.
This arrow is a Fail indicator. It
appears when a measurement falls
below the lower limit.
Setting the Measurement Frequency
Measurements are made at a specific frequency. The frequency at
which measurements are made is called the Measurement Frequency.
Before making a measurement, you must ensure the Measurement
Frequency is properly set.
The measurement frequency is indicated on the spectrum display two
ways. One indicator is the Freq (MHz) readout. For example, in
Figure 3-- 29 the Freq (MHz) readout shows a measurement
frequency of 878.4900 MHz. The second measurement frequency
indicator is the small triangle and circle that appears on the trace
display.
3- 52
YBT250 Field Transmitter & Interference Tester User Manual
Taking Measurements
Note that the Measurement Frequency can be located anywhere in
the spectrum display; it does not have to be located at the center.
Measurement Frequency Indicator
Figure 3- 29: Measurement Frequency indicator
There are four ways to set the measurement frequency:
H Tap the trace
H Select a channel number
H Enter the measurement frequency with the numeric keypad
H Use the knob
To set the measurement frequency by tapping the display:
1. If Markers are displayed, tap the Measurement Frequency Marker
box (labeled as Trace 1/2).
2. Tap the trace at the point where you wish to make a measurement.
YBT250 Field Transmitter & Interference Tester User Manual
3- 53
Taking Measurements
H To increase the precision of where the frequency is set, tap
) to change the horizontal
the decrease span button (
scale of the display.
To set the measurement frequency using the numeric keypad:
1. Tap the Freq (MHz) button. This displays the input keypad. See
Figure 3-- 30.
Figure 3- 30: Entering the measurement frequency with the keypad
2. Enter the specific frequency at which you want to make
measurements by tapping the keypad.
You enter a frequency by tapping a number followed by a
multiplier. You must include the multiplier (GHz, MHz, kHz, or
Hz) to complete your input.
H For example, to enter a frequency of 370 MHz, tap
3 7 0 MHz.
3- 54
YBT250 Field Transmitter & Interference Tester User Manual
Taking Measurements
H To enter a frequency of 370.330 MHz, tap 3 7 0 . 3 3 0 MHz.
To correct a mistyped number, tap the backspace button. If you
enter a number that is outside the frequency range of the
instrument, the measurement frequency is set to the maximum or
minimum, depending on the value you entered.
To set the measurement frequency using the knob:
1. Tap the box displaying the measurement frequency (not the Freq
(MHz) button). This assigns the knob to the measurement
frequency. The label above the knob display will change to
Freq (MHz).
2. Tap the knob to change the measurement frequency.
H Tap the top half of the knob to make large changes to the
measurement frequency. Tapping the knob to the right of the
circle increases the frequency. Tapping the knob to the left of
the circle decreases the frequency.
H Tapping the arrow buttons on the lower half of the knob
makes smaller changes than tapping the top half.
What Measurements are Available
The measurements available depend on the selected signal standard
and which options are installed. Some measurements, such as
cdmaOne Code Domain Power, are not available for all standards.
All measurements require options to be installed. The option
required depends on the type of measurement and signal standard.
For information on the available measurement options, see
Appendix C.
Limit Testing
The YBT250 can be set to display indicators or perform an action
when a measurement exceeds specified limits. The following
paragraphs list the measurements for which limit tests are available.
YBT250 Field Transmitter & Interference Tester User Manual
3- 55
Taking Measurements
Analog Limit Test Measurements
H RF Channel Power
H RF Channel Power Difference vs. Reference Power
H Frequency Error (in kHz and ppm)
H Occupied Bandwidth
H FM Deviation
cdmaOne/cdma2000 Limit Test Measurements
H RF Channel Power
H RF Channel Power Difference vs. Reference Power
H Peak/Average Power
H Pilot Power
H Pilot Difference
H Frequency Error (in kHz and ppm)
H Occupied Bandwidth
H PN Offset
H Rho (Waveform Quality)
H Tau
H EVM (Error Vector Magnitude)
H Carrier Feedthrough
H Code Power
GSM Limit Test Measurements
H RF Burst Power
H Frequency Error (in kHz or ppm)
H Occupied Bandwidth
3- 56
YBT250 Field Transmitter & Interference Tester User Manual
Taking Measurements
GSM/EDGE Limit Test Measurements
H RF Channel Power (absolute or relative)
H Carrier to Interference (C/I)
H Error vector magnitude (EVM)
H Frequency Error (in kHz or ppm)
H Occupied Bandwidth
H Origin offset
H Phase error
NADC IS-136 Limit Test Measurements
H RF Channel Power
H RF Channel Power Difference vs. Reference Power
H Peak/Average Power
H Frequency Error (in kHz and ppm)
H Occupied Bandwidth
W-CDMA Limit Test Measurements
H RF Channel Power
H RF Channel Power Difference
H Peak/Average Power
H Frequency Error (in kHz and ppm)
H EVM (Error Vector Magnitude)
H Carrier Feedthrough
H Occupied Bandwidth
H OVSF Code Power
YBT250 Field Transmitter & Interference Tester User Manual
3- 57
Taking Measurements
H P-CPICH Power
H ACLR Lower 1 and Lower 2
H ACLR Upper 1 and Upper 2
cdma2k 1xEV- DO Limit Test Measurements
H Pilot/MAC Power
H Non-- idle Total Power
H Non-- idle Data Power
H Idle Data Power
H Non-- idle Transmission Envelope Mask Test
H Idle Transmission Envelope Mask Test
H Frequency Error (in kHz and ppm)
H PN Offset
H Rho (Pilot)
H Rho (Overall-- 1)
H EVM (Pilot)
H EVM (Overall-- 1)
H Pilot Time Alignment
H Occupied Bandwidth
H Data Code Power (minimum)
H Data Code Power (maximum)
3- 58
YBT250 Field Transmitter & Interference Tester User Manual
Taking Measurements
Enabling Limit Testing
To enable limit testing:
1. Tap the Edit button at the top of the display. This displays the
Setup window.
2. Tap the Limits tab. See Figure 3-- 31.
Figure 3- 31: Enabling limit testing
3. Select the signal standard from the list at the top of the window.
4. Tap the appropriate box in the Enable column at the left side of
the window to enable or disable a limit test.
a. To enable limit testing for a specific measurement, tap the
box in the Enable column so that an X appears in the box.
b. To disable limit testing for a specific measurement, tap the
box so that there is no X in the box.
YBT250 Field Transmitter & Interference Tester User Manual
3- 59
Taking Measurements
c. To enable limit testing for all the measurements, tap the
Enable All button.
d. To disable limit testing for all the measurements, tap the
Disable All button.
5. To change the limits for a measurement:
a. Tap the limit you want to change. This highlights the limit
value of the measurement.
b. Tap the numeric keypad to enter a new value for the limit.
Tap OK to complete the change.
c. You can disable either the Low Limit or High Limit test
for a measurement by clearing the contents of the cell.
Disabling one test limit does not disable the other test
limit.
For example, suppose you wish to test the High Limit for
RF Power, but are not interested in testing the Low Limit.
To enable testing for the High Limit, you must enable the
limit test for RF Power. To disable the Low Limit test for
RF Power, tap the Low Limit cell for RF Power and clear
the contents of the cell (using the backspace key on the
numeric keypad).
d. To reset the limits for all measurements to factory default
values, tap Defaults.
6. To specify what the YBT250 should do when a limit is exceeded:
a. Tap the check box for Beep to cause the YBT250 to make
a beep sound when a limit is exceeded.
b. Tap the check box for Pause to cause the YBT250 to
pause and display a message box when a limit is
exceeded.
3- 60
YBT250 Field Transmitter & Interference Tester User Manual
Taking Measurements
c. Tap the check box for Export Screen to cause the
YBT250 to export the screen display when a limit is
exceeded. (The name for the exported screen will be
automatically generated.)
d. Tap the check box for Save Results to cause the YBT250
to save the measurement results to a file when a limit is
exceeded. The name for the saved file is automatically
generated when the file is created.
7. When you are finished setting up the measurement limits, tap
OK.
NOTE. The YBT250 automatically optimizes the reference level, span
and bandwidth filters to provide the most accurate results when
making measurements.
Setting the Scrambling Code Detection
Requires Option WD1, Demodulation for W-CDMA
The YBT250 enables you to specify how it detects the scrambling
code of a W-CDMA signal for demodulated measurements. There
are two settings for the scrambling code control: Auto and Manual.
The default setting is Auto.
H In Auto mode, the YBT250 automatically detects the scrambling
code by using the P-SCH and S-SCH codes to determine the code
group, then searches only for the scrambling codes within that
code group. If multiple signals are present, the scrambling code
of the signal with the highest power P-SCH and S-SCH will be
detected.
H In Manual mode, the YBT250 bypasses the SCH codes and
searches only for the signal with the specified scrambling code.
The Manual setting is primarily used in off-air testing in areas where
there are multiple transmitters and there is a need to make measurements on a specific transmitter.
YBT250 Field Transmitter & Interference Tester User Manual
3- 61
Taking Measurements
NOTE. If you receive an error message stating CDMA Sync Not
Found, check that the Scrambling Code setting is properly set. If it is
set to Manual and the code is set wrong, the YBT250 will indicate
that it cannot find a signal. This is because it is looking only for a
signal with the specified scrambling code. Signals with different
scrambling codes are ignored. This error message can occur with the
following measurements: Carrier Frequency, Signal Quality, Code
Power, Codogram, and Pilot Power.
Changing the Setting
To change the scrambling code setting:
1. Select the W-CDMA Signal Standard.
2. Tap the Edit button to display the Setup window.
3. Tap the Meter tab. See Figure 3-- 32.
Figure 3- 32: Setting the scrambling code
4. Tap Auto or Manual to change the setting.
3- 62
YBT250 Field Transmitter & Interference Tester User Manual
Taking Measurements
5. To set the scrambling code in Manual mode, tap the numeric
keypad and enter the scrambling code for the transmitter on
which you wish to make measurements. The acceptable range for
codes is 0-- 511.
6. Tap OK to accept the setting change.
How the Scrambling Code Setting is Indicated in Displays
The way the scrambling code is displayed changes depending on the
scrambling code setting. When the scrambling code setting is Auto,
the words Scrambling Code are used in the display. When the
scrambling code setting is Manual, the words Scr Code (Manual)
are used in the display.
Measuring RF Power
Requires a Measurement Option
RF Power can be measured by itself and/or compared to a specified
Reference Channel.
To measure RF Power:
1. Connect a signal to the YBT250 RF INPUT connector. See
page 2-- 24 for connection instructions.
2. Select the Measure window (button 1).
3. Tap Select Measurement. This displays the Select Signal
Standard and Measurement dialog box.
4. Select the Signal Standard.
5. Tap RF Power. See Figure 3-- 33.
YBT250 Field Transmitter & Interference Tester User Manual
3- 63
Taking Measurements
Figure 3- 33: RF Power measurement for CDMA
6. Select Forward Link (
).
7. Select the Channel:
a. Tap the Channel box. This assigns the knob and numeric
keypad to Channel.
b. Tap the numeric keypad to enter the channel number
directly or use the knob to change the channel number.
The vertical bars in the display represent the upper and lower
frequency limits of the specified channel. You can change
horizontal range (span) of the display by selecting one of the
three buttons in the lower-left corner of the display:
to change the horizontal range to one channel
H Select
width plus half a channel or either side.
H Select
channels.
to change the horizontal range to just over five
to set the horizontal range to 10 MHz or
H Select
10 channel widths, whichever is greater.
3- 64
YBT250 Field Transmitter & Interference Tester User Manual
Taking Measurements
To compare the power level against another channel (only for
non-bursted signal types), such as a reference channel:
1. Tap the Reference Channel box.
H Use the numeric keypad or the knob to set the Reference
Channel number.
2. Tap the Update Reference button any time you want to remeasure
the Reference Channel’s power.
NOTE. Ref Chan Power is the power of the Reference Channel
measured when you tap the Update Reference button. The reference
power is the power at the forward frequency of the reference channel
(unless you are using W-CDMA, in which case it is the power at the
reference channel).
Difference is the measured difference in power between the selected
channel and the reference channel.
When GSM is the selected signal standard for RF Channel Power
measurements, the YBT250 attempts to locate and measure an RF
power burst during the active burst. If no burst is found, the
measurement defaults to a continuous power measurement on the
selected channel, and displays a dialog stating that no RF burst was
found.
Measuring GSM/EDGE RF Power
Requires RF Measurement Option EM1
The GSM/EDGE RF Power measurement measures the average RF
power transmitted during the useful part of a GSM timeslot.
The measurement can, at your option, use a specified BCCH channel
to acquire timeslot frame sync, enabling identification and
measurement of individual GSM frame timeslots (0-- 7).
YBT250 Field Transmitter & Interference Tester User Manual
3- 65
Taking Measurements
You can measure and display each RF timeslot power independent of
other levels. If BCCH frame sync is available, you can also display
the RF power as a difference value, relative to the BCCH Slot 0
power level.
To measure GSM/EDGE RF Channel Power:
1. Connect a signal to the YBT250 RF INPUT connector. See
page 2-- 24 for connection instructions.
2. Select the Measure window (button 1).
3. Tap Select Measurement. This displays the Select Signal
Standard and Measurement dialog box.
4. Select GSM/EDGE Signal Standard.
5. Tap RF Power. See Figure 3-- 34.
Figure 3- 34: GSM/EDGE RF Power measurement
6. Select Forward Link (
3- 66
).
YBT250 Field Transmitter & Interference Tester User Manual
Taking Measurements
7. Tap the Channel box and enter a valid channel number for the
current standard.
The GSM/EDGE RF Power screen displays the following:
H The BCCH slot 0 signal source. Valid signal sources are None,
On Meas Chan/Freq, On Channel xxx, and On Freq xx.xxx,
where xxx and xx.xxx are the numeric values for a channel or
frequency, respectively.
H The BCCH slot 0 average power value. The BCCH slot 0 power
measurement value is always in dBm (absolute).
NOTE. The BCCH Slot 0 Power value is displayed only if the BCCH
Frame Sync control is not set to OFF, a valid BCCH channel is
present, and frame sync is acquired.
H A Restart button that clears all multi-slot averaged measurement
and count values and then restarts the averaging process.
H A Limit Test indicator that shows whether any measurements are
outside the defined limit test values. See page 3-- 59 for
information on enabling limit testing.
H The current power value and modulation type for each slot.
H The average power reading and number of acquisitions averaged
(count) for GMSK signals for each slot. See page 3-- 70 for
information on setting the number of acquisitions to average.
H The average power reading and number of acquisitions averaged
(count) for 8-- PSK signals for each slot. See page 3-- 70 for
information on setting the number of acquisitions to average.
Setting GSM/EDGE BCCH Frame Sync Modes
To set the GSM/EDGE RF Channel Power BCCH Frame Sync mode:
1. Tap the Edit button at the top of the display. This displays the
Setup window.
2. Tap the Meter tab. See Figure 3-- 35.
YBT250 Field Transmitter & Interference Tester User Manual
3- 67
Taking Measurements
Figure 3- 35: GSM/EDGE RF Power measurement parameters
3. Select a GSM/EDGE signal standard from the list at the top of
the window.
4. Select a BCCH Frame Sync mode:
H Off (no frame sync): Turns off BCCH frame sync, causing the
YBT250 to attempt to acquire slot sync by using the power
envelope ramps (edges) of the received signal. The YBT250
then measures one randomly-chosen slot. Figure 3-- 36 shows
a typical RF Power measurement with BCCH set to Off.
3- 68
YBT250 Field Transmitter & Interference Tester User Manual
Taking Measurements
Figure 3- 36: GSM/EDGE RF Power with BCCH turned off
H On Measurement Channel/Frequency: Sets the YBT250 to
frame sync on slot 0 of the currently measured channel/frequency, which is displayed in the Channel and Freq (MHz)
fields at the top of the measurement display.
H On Specified Channel: Sets the YBT250 to frame sync on
slot 0 of the specified channel. Tap the keypad icon to enter a
channel number.
H On Specified Frequency: Sets the YBT250 to frame sync on
slot 0 of the specified frequency. Tap the keypad icon to enter
a frequency value.
5. Tap OK to accept the selections, close the Setup window, and
return to the RF Power display. Tap Cancel to close the Setup
window without taking any action.
When any of the BCCH Frame Sync On modes are selected, the
YBT250 attempts to detect the FCCH and SCH bursts on the
specified Frame Sync channel. If it detects the bursts, the YBT250
YBT250 Field Transmitter & Interference Tester User Manual
3- 69
Taking Measurements
establishes frame timing and can then measure any of the slots (0..7)
within the frame. If the YBT250 does not detect the sync bursts, it
attempts to find slot timing by using the power envelope ramp edges
of the signal on the measurement frequency or channel.
Channel and Frequency Setting Interactions
When you enter a value in the On Specified Channel field, the value
in On Specified Frequency updates to reflect the frequency
associated with the channel number for the current measurement
standard.
When you enter a value in the On Specified Frequency field, the
value in the On Specified Channel field also updates as follows:
H If the specified frequency has an associated channel number for
the current measurement standard, then the On Specified Channel
field displays the channel number.
H If the specified frequency is within the range of a channel of the
current measurement standard, but does not align exactly with a
channel number, then the On Specified Channel field displays the
nearest channel number in reverse video (white/gray text on a
black background).
H If the specified frequency is outside the range of a channel of the
current measurement standard, then the On Specified Channel
field displays dashes in reverse video (white/gray text on a black
background).
H When On Specified Channel is selected, changing to a different
GSM measurement standard can cause the channel number to
change to a valid channel number in the new standard. The On
Specified Frequency value also changes to display the frequency
for the new channel and standard.
Setting GSM/EDGE RF Channel Power Modes
To set the GSM/EDGE RF Channel Power mode:
1. Tap the Edit button at the top of the display. This displays the
Setup window.
2. Tap the Meter tab. See Figure 3-- 35.
3- 70
YBT250 Field Transmitter & Interference Tester User Manual
Taking Measurements
3. Select a GSM/EDGE signal standard from the list at the top of
the window.
4. Select an RF Channel Power mode:
H Absolute: displays all slot power measurement values as
absolute. Measurement values are displayed in dBm units.
Figure 3-- 37 shows a typical RF Power measurement with RF
Channel Power set to Absolute.
Figure 3- 37: GSM/EDGE Absolute RF Power measurement
H Relative (to BCCH slot 0): displays all slot power measurement values relative to the BCCH Slot 0 power measurement.
Measurement values are displayed in dB units. Figure 3-- 38
shows a typical RF Power measurement with RF Channel
Power set to Relative.
YBT250 Field Transmitter & Interference Tester User Manual
3- 71
Taking Measurements
Figure 3- 38: GSM/EDGE Relative RF Power measurement
H Slot Averages: Sets the number of acquisitions over which to
average slot power measurements. Tap the keypad icon to
enter a value from 1 to 200 (the default is 200).
5. Tap OK to accept the selections, close the Setup window, and
return to the RF Power display. Tap Cancel to close the Setup
window without taking any action.
Measuring cdma2000 1xEV-DO RF Power
Requires CRE Measurement Option
You can measure the RF Power of a 1xEV-- DO signal within a
selected forward channel. A basestation using 1xEV-- DO signals can
transmit at idle and non-idle power levels depending on the use of
the individual slots for carrying data at that time. The YBT250
distinguishes between idle and non-idle slots and performs power
measurements on each type of slot.
3- 72
YBT250 Field Transmitter & Interference Tester User Manual
Taking Measurements
Look at the graph to see whether the waveform power remains
within the green lines of the mask. Look at the readouts to see the
average power.
To measure RF Power:
1. Connect a signal to the YBT250 RF INPUT connector. See
page 2-- 24 for connection instructions.
2. Select the Measure window (button 1).
3. Tap Select Measurement. This displays the Select Signal
Standard and Measurement dialog box.
4. Select a 1xEV-- DO standard.
5. Tap RF Power. See Figure 3-- 33.
6. Select Forward Link (
).
7. Tap the Channel box and enter a valid channel number for the
current standard.
8. Tap the Idle or Non-- Idle button.
Refer to Figure 3-- 39.
YBT250 Field Transmitter & Interference Tester User Manual
3- 73
Taking Measurements
Figure 3- 39: RF Power measurement for 1xEV- DO
Refer to Table 3-- 7 for explanations of the readouts on screen.
Table 3- 7: RF Power screen result values
Result name
Waveform interval included in result
Pilot/MAC Power
Average power of Pilot/MAC intervals of all half-slots
Non-Idle Total
Average power of entire half-slot of non-idle half-slots
Non-Idle Data
Average power of data intervals of non-idle half--slots
Idle Data
Average power of data intervals of idle half--slots
Activity
Percentage of acquired half-slots which are of the selected type
(idle or non-idle)
1xEV-DO Transmission Envelopes on the RF Power Screen
The YBT250 draws a waveform representing the averages of either
the idle (not transmitting power in data interval) slots or the non-- idle
(transmitting power in data interval) slots. The averaging smooths
3- 74
YBT250 Field Transmitter & Interference Tester User Manual
Taking Measurements
out the more extreme bumps in the waveforms. Idle slots and
non-- idle slots are averaged separately.
The horizontal axis of the graph is in chips, and the first and last chip
of each data interval is marked.
If the waveform strays outside the green lines of the mask, the mask
test result will display Fail, and the section(s) of the mask where the
failure occurred will turn from green to red. There are mask sections
for each data interval, each mac interval, and for the pilot interval.
You can enable or disable the Mask test by tapping View > Mask. To
set alarm actions (such as beeping), select Setup > Edit > Limits.
Mask for Idle Slots. Select the Idle button. In the graph area, you will
see a time-- domain mask represented by green lines within which
you want to see a square waveform representing the Pilot/MAC
signal. If the waveform strays outside the mask, the Mask Test
results will display Fail.
Mask for Non-Idle Slots. Select the Non-- idle button. In the graph area,
you will see a time-- domain mask represented by green lines within
which you want to see a long, relatively flat waveform representing
the data-interval part of the signal. If the waveform strays outside the
mask, the Mask Test results will say Fail.
Troubleshooting. A test may take a long time to run if the basestation
is not currently transmitting very many of the type of slot you are
trying to measure.
The YBT250 will try to collect 100 half slots of the selected slot
type (idle or non-idle) before giving a result. If the YBT250 cannot
collect 100 half-slots of the selected type to make the measurement
after collecting 1000 total half-slots, it will display the average
waveform for as many half-slots as it could collect, and it will report
“* Waveform not fully averaged *”. If no half-slots of the requested
type could be collected during the attempt, it will display “* No
non-idle(idle) half slots found *”.
To speed up the measurement rate, switch to the other slot type by
pressing the appropriate button (Idle or Non-Idle) at the bottom of
the screen. This will increase the measurement update rate, and the
numeric power results will still be valid.
YBT250 Field Transmitter & Interference Tester User Manual
3- 75
Taking Measurements
Measuring GSM/EDGE Power vs. Time
Requires RF Measurement Option EM1
The Power vs. Time measurement (GSM/EDGE signals) compares
the RF power burst envelope for the specified slot against a mask
defined by the selected signal standard and measured modulation
type. The comparison determines whether the burst envelope power
and timing constraints are within the mask constraints for that slot
and modulation type. This test verifies that the transmitter ramps up,
maintains RF power, and turns off completely within the time
envelope defined for the standard and modulation type.
To measure GSM/EDGE Power vs. Time:
1. Connect a signal to the YBT250 RF INPUT connector. See
page 2-- 24 for connection instructions.
2. Select the Measure window (button 1).
3. Tap Select Measurement. This displays the Select Signal
Standard and Measurement dialog box.
4. Select a GSM/EDGE Signal Standard.
5. Tap Power vs. Time. See Figure 3-- 40.
6. Select Forward Link (
).
7. Tap the Channel or Frequency box and enter a valid channel or
frequency value.
8. Tap the Slot field keypad icon and enter a slot number to
measure.
3- 76
YBT250 Field Transmitter & Interference Tester User Manual
Taking Measurements
Figure 3- 40: GSM/EDGE Power vs. Time measurement
9. Tap the Modulation field to select the modulation type to detect.
The GSM/EDGE Power vs. Time screen displays the following:
H The BCCH slot 0 signal source. Valid signal sources are None,
On Meas Chan/Freq, On Channel xxx, and On Freq xx.xxx,
where xxx and xx.xxx are the numeric values for a channel or
frequency, respectively. See page 3-- 67 for information on setting
the BCCH signal source (frame sync mode).
H A graph that shows the specified slot signal and the mask limits
against which the signal is compared. The graph vertical units are
the measured slot power, in dB, relative to the computed average
power. The graph horizontal units can be either symbols or time.
See page 3-- 79 for information on setting the graph units.
The mask used for testing is determined by the GSM/EDGE
standard and the detected modulation type.
YBT250 Field Transmitter & Interference Tester User Manual
3- 77
Taking Measurements
H The Avg Power, Max Power, and Min Power fields, which
display the slot average, maximum, and minimum power values,
in dBm. The Avg, Max and Min power values are computed only
for the useful part of the burst.
H The Detected Mod Type field, which lists the actual measured
signal modulation type. The YBT250 first searches for a valid
signal for the modulation type selected in the Modulation list. If
that modulation type is not detected, the YBT250 then searches
for the other modulation type. If neither modulation type is
detected, this field shows dashes (-- - - - ).
H The Mask Test field, which indicates the pass or fail status of the
mask test. The mask used for testing is based on the GSM
standard and the detected modulation type. Figure 3-- 41 shows a
failed Power vs. Time mask test.
Figure 3- 41: GSM/EDGE Power vs. Time mask fail example
3- 78
YBT250 Field Transmitter & Interference Tester User Manual
Taking Measurements
NOTE. To search for the modulation type in all slots, instead of only
the specified slot, set the BCCH Frame Sync control to Off.
Setting GSM/EDGE Power vs. Time parameters
To set the GSM/EDGE Power vs. Time graph horizontal units:
1. Tap the Edit button at the top of the display. This displays the
Setup window.
2. Tap the Meter tab. See Figure 3-- 35.
3. Select a GSM signal standard from the list at the top of the
window.
4. Select the Power vs. Time Graph parameters:
H Symbols: Sets the graph horizontal units to symbols.
H Secs: Sets the graph horizontal units to microsecond time
units.
H Limit mask test to the current slot: Enables use of a truncated
version of the mask (the horizontal portions are omitted from
the beginning and ending of the mask) to allow signals that
contain active slots adjacent to the slot being tested to pass
the mask test. The default value is not enabled (not checked),
which corresponds to using the complete mask as defined by
the current standard and modulation type.
5. Tap OK to accept the selections, close the Setup window, and
return to the Power vs. Time display. Tap Cancel to close the
Setup window without taking any action.
YBT250 Field Transmitter & Interference Tester User Manual
3- 79
Taking Measurements
Measuring Peak to Average Power Ratio
Requires an RF Measurement Option
The YBT250 enables you to check transmitter headroom by
measuring the Peak to Average Power Ratio.
To measure the Peak to Average Power Ratio:
1. Connect a signal to the YBT250 RF INPUT connector. See
page 2-- 24 for connection instructions.
2. Select the Measure window (button 1).
3. Tap Select Measurement.
4. Tap Peak/Average. See Figure 3-- 42.
Figure 3- 42: A typical Peak to Average Power Ratio display
5. Select Forward Link (
).
6. Select the Signal Standard.
3- 80
YBT250 Field Transmitter & Interference Tester User Manual
Taking Measurements
7. Select the Channel:
a. Tap the Channel box. This assigns the numeric keypad
and knob to Channel.
b. Tap the numeric keypad to enter the channel number
directly or use the knob to change the channel number.
Measuring Carrier Frequency
Requires an RF Measurement Option
The Carrier Frequency measurement actually displays three
measurements: carrier frequency and frequency error expressed in
frequency and parts per million (ppm). In addition, if a valid external
reference frequency is present (see page 2-- 26), the frequency of the
external reference is also displayed.
The Carrier Frequency is the actual measured frequency for the
selected channel. If the measurement frequency is not within the
selected channel (indicated by a black background in the Channel
box), a warning is displayed.
Frequency Error is the difference in frequency between the measured
frequency of the selected channel and the frequency assigned to the
channel in the Channel Table file. Excessive frequency error can
prevent demodulation of the received signal. The Frequency Error
measurement can only be made on channels in the current Channel
Table. If a carrier is not detected close to the Measurement
Frequency, the measurement cannot be made and an error message is
displayed.
To measure the carrier frequency:
1. Connect a signal to the YBT250 RF INPUT connector. See
page 2-- 24 for connection instructions.
2. If desired, connect a cable from the BTS transmitter External
Frequency Reference signal (see page 2-- 26 for a list of
acceptable frequencies) to the FREQUENCY REFERENCE
INPUT on the YBT250.
3. Select the Measure window (button 1).
YBT250 Field Transmitter & Interference Tester User Manual
3- 81
Taking Measurements
4. Tap Select Measurement.
5. Tap Carrier Frequency. See Figure 3-- 43.
6. Select Forward Link (
).
7. Select the Signal Standard.
8. Select the Channel:
a. Tap the Channel box. This assigns the numeric keypad
and knob to Channel.
b. Tap the numeric keypad to enter the channel number
directly or use the knob to change the channel number.
Figure 3- 43: A Carrier Frequency display
NOTE. If the YBT250 indicates there is no signal when the Signal
Standard is set to W-CDMA, verify that the Scrambling Code setting
is correct. If it is set to Manual and the wrong value is entered for the
scrambling code, the YBT250 will not find a signal. The YBT250 will
not show signals with other scrambling codes when the scrambling
code is set to Manual.
3- 82
YBT250 Field Transmitter & Interference Tester User Manual
Taking Measurements
Measuring Occupied Bandwidth
Requires an RF Measurement Option
One way to check the spectral response of the transmitter is to
measure the Occupied Bandwidth. The YBT250 enables you to
check the signal width of the selected signal using the Occupied
Bandwidth measurement.
The Occupied Bandwidth is the frequency range where 99% of the
power transmitted in a single channel lies. This measurement can be
properly made only if the channel being measured has no active
channels adjacent to it. If there is a signal in either channel adjacent
to the selected channel, the signal will add power to the measurement, thus resulting in an inaccurate measurement.
To measure the Occupied Bandwidth:
1. Connect a signal to the YBT250 RF INPUT connector. See
page 2-- 24 for connection instructions.
2. Select the Measure window (button 1).
3. Tap Select Measurement.
4. Tap Occupied Bandwidth. See Figure 3-- 44.
5. Select Forward Link (
).
6. Select the Signal Standard.
7. Select the Channel:
a. Tap the Channel box. This assigns the numeric keypad
and knob to Channel.
b. Tap the numeric keypad to enter the channel number
directly or use the knob to change the channel number.
YBT250 Field Transmitter & Interference Tester User Manual
3- 83
Taking Measurements
Figure 3- 44: A typical Occupied Bandwidth display
The two markers indicate the left and right edges of the
measurement.
The vertical bars in the display represent the upper and lower
limits of the specified channel. You can change the horizontal
range of the display by selecting one of the three buttons in the
lower-left corner of the display:
to change the horizontal range to one channel
H Select
width plus half a channel or either side.
H Select
channels.
to change the horizontal range to just over five
to set the horizontal range to 10 MHz or
H Select
10 channel widths, whichever is greater.
3- 84
YBT250 Field Transmitter & Interference Tester User Manual
Taking Measurements
Measuring cdmaOne and cdma2000 Signal Quality
Requires Option CD1, Demodulation for cdmaOne or Option CD2,
Demodulation for cdma2000
For cdmaOne and cdma2000 signal quality, the measurements
performed are: Waveform Quality (Rho), Error Vector Magnitude,
Pilot time Alignment, PN Offset and Carrier Feedthrough.
To measure signal quality:
1. Select the appropriate CDMA Signal Standard.
2. Connect a signal to the YBT250 RF INPUT connector. See
page 2-- 24 for connection instructions.
3. Select the Measure window (button 1).
4. Tap Select Measurement.
5. Tap Signal Quality.
6. Select the Method to use for measuring Signal Quality:
H Select Pilot only, no other codes active on input signal for
Pilot-only signals.
H Select Auto detect active codes for an in-service signal
quality measurement.
7. Select Forward Link (
).
8. Connect the BTS transmitter Even Second Clock to the TIMING
INPUT connector on the YBT250.
9. Select the Channel:
a. Tap the Channel box. This assigns the numeric keypad
and knob to Channel.
b. Tap the numeric keypad to enter the channel number
directly or use the knob to change the channel number.
See Figure 3-- 45.
YBT250 Field Transmitter & Interference Tester User Manual
3- 85
Taking Measurements
Figure 3- 45: A Signal Quality display
NOTE. True signal quality, Rho, should be measured only on a
pilot-only signal. If the YBT250 detects active codes in the signal
and Autodetect Active codes is selected, it will make the Estimated
Rho measurement.
Measuring W-CDMA Signal Quality
Requires Option WD1, Demodulation for W-CDMA
For W-CDMA signal quality, the measurements performed are: Error
Vector Magnitude, Carrier Feedthrough, and Scrambling Code.
To measure signal quality:
1. Select the appropriate W-CDMA Signal Standard.
2. Connect a signal to the YBT250 RF INPUT connector. See
page 2-- 24 for connection instructions.
3. Select the Measure window (button 1).
3- 86
YBT250 Field Transmitter & Interference Tester User Manual
Taking Measurements
4. Tap Select Measurement.
5. Tap Signal Quality.
6. Select Forward Link (
).
7. Select the Channel:
a. Tap the Channel box. This assigns the numeric keypad
and knob to Channel.
b. Tap the numeric keypad to enter the channel number
directly or use the knob to change the channel number.
See Figure 3-- 46.
Figure 3- 46: A Signal Quality display
The EVM measurement will be most accurate when using the
conformance test model for EVM, Test Model 4. Test Model 4
specifies that the only active channels are the P-CCPCH and SCH
channels, with the P-CPICH channel present as an option. The
P-CPICH must be present for the YBT250 to make an EVM
measurement.
YBT250 Field Transmitter & Interference Tester User Manual
3- 87
Taking Measurements
The EVM measurement can be made on signals other than Test
Model 4, but the result will be an estimate of the true EVM value.
The YBT250 will attempt to determine the spreading factor of all
active codes and the power levels during one time slot. Changing
power levels or codes with low power levels will decrease the
accuracy of the EVM estimate.
The EVM measurement is an average of the last ten data points.
When you change a setting, the queue of the last ten data points is
flushed. While the queue is filling, the help link text includes “**”
and the message “**EVM result being averaged - please wait” is
displayed. This message goes away after ten data points are available
to average (this might require several seconds). Until this averaging
is completed, the EVM result will exhibit more variation.
Measuring cdma2k 1xEV-DO Signal Quality
Requires Option CDE, Demodulation for cdma2k 1xEV-DO
For W-CDMA signal quality, the measurements performed are: Error
Vector Magnitude, Carrier Feedthrough, and Scrambling Code.
The YBT250 provides several measurements of signal quality for
cdma2000 1xEV-- DO signals.
The measurements performed are:
H Waveform Quality (Rho)
H Error Vector Magnitude (EVM)
H Data Constellation Type
H PN Offset (PNOS)
H Pilot Time Alignment Error (Tau)
You must have an appropriate Timing Reference input (Even Second
Clock) to measure PNOS and Timing Error.
3- 88
YBT250 Field Transmitter & Interference Tester User Manual
Taking Measurements
To measure signal quality:
1. Select the appropriate 1xEV-- DO Signal Standard.
2. Connect a signal to the YBT250 RF INPUT connector. See
page 2-- 24 for connection instructions.
3. Select the Measure window (button 1).
4. Tap Select Measurement.
5. Tap Signal Quality.
6. Select Forward Link (
).
7. Select the Channel:
a. Tap the Channel box. This assigns the numeric keypad
and knob to Channel.
b. Tap the numeric keypad to enter the channel number
directly or use the knob to change the channel number.
See Figure 3-- 47.
Figure 3- 47: Signal Quality display for 1xEV- DO
YBT250 Field Transmitter & Interference Tester User Manual
3- 89
Taking Measurements
Pilot Rho and Pilot EVM are measured on the Pilot interval of 20
half-- slots. Since Pilot is always transmitted, these results are
available on every signal measurement attempt.
Overall-- 1 Rho and Overall-- 1 EVM are measured on one complete
non-idle slot (two half-slots). If a non-idle slot cannot be found in the
acquired signal, the Overall-- 1 measurements are not made, and will
be marked ”-- - - - ” for that result update.
Waveform Quality (Rho)
The Waveform Quality measurement is an indication of how similar
the transmitted signal is to a perfect signal. Rho can vary between
0.0 and 1.0, where 1.0 represents a perfect signal. There are two Rho
measurements computed on a 1xEV-- DO signal. Pilot Rho is only
computed on chips in the Pilot intervals of the waveform, similar to
Pilot-- only Rho of cdmaOne and cdma2000. Overall-- 1 Rho is
computed on all chips of one non-- idle (active data) slot waveform,
including pilot, MAC, and data intervals. Overall-- 1 Rho is only
computed when a non-- idle slot is detected in the input signal.
Error Vector Magnitude (EVM)
Error Vector Magnitude is the RMS value of all the vectors that
extend from the ideal constellation points to the received signal
constellation points in a record of demodulated CDMA symbols,
divided by the RMS value of the signal. This result is multiplied by
100 to give a final value in percent. An EVM value of 0.0%
represents a perfect signal.
There are two EVM measurements computed on a 1xEV-- DO signal:
H Pilot EVM is only computed on chips in the Pilot intervals of the
waveform.
H Overall-- 1 EVM is computed on all chips of one non-idle (active
data) slot waveform, including pilot, MAC, and data intervals.
Overall-- 1 EVM is only computed when a non-idle slot is
detected in the input signal.
Data Constellation Type
Data Constellation Type identifies the constellation type used to
encode the user data bits in the data interval of a non-- idle slot.
Constellation type can be QPSK, 8PSK or 16QAM.
3- 90
YBT250 Field Transmitter & Interference Tester User Manual
Taking Measurements
PN Offset
PN Offset is the time difference, measured in 64 PN-- chip intervals,
between the Even Second Clock pulse and the first chip of the next
complete short-- code PN spreading sequence in the signal, as
observed at the YBT250 RF input port. PN Offset values are integer
numbers with a range of 0 to 511.
Pilot Time Alignment Error (Tau)
The Pilot Time Alignment Error measures the difference between an
ideal signal with PN timing exactly aligned to a PN Offset location,
and the received signal as observed at the YBT250 RF input port.
The difference is the residual timing error of the received signal
from the nearest legal PN Offset. The error is expressed in both
microseconds and equivalent number of chips.
Measuring GSM/EDGE Signal Quality
Requires Option EM1
For GSM/EDGE signal quality, the measurements performed are:
Phase Error, Error Vector Magnitude, Origin Offset, and Carrier to
Interference ratio (C/I).
To measure signal quality:
1. Select the appropriate GSM standard.
2. Connect a signal to the YBT250 RF INPUT connector. See
page 2-- 24 for connection instructions.
3. Select the Measure window (button 1).
4. Tap Select Measurement.
5. Tap Signal Quality. See Figure 3-- 48.
YBT250 Field Transmitter & Interference Tester User Manual
3- 91
Taking Measurements
Figure 3- 48: GSM/EDGE Signal Quality measurement
6. Select Forward Link (
).
7. Select the Channel:
a. Tap the Channel box. This assigns the numeric keypad
and knob to Channel.
b. Tap the numeric keypad to enter the channel number
directly or use the knob to change the channel number.
8. Tap the Slot field keypad icon to enter the slot number to
measure.
9. Tap the Modulation field to select the modulation type to detect.
NOTE. To search for the modulation type in all slots, instead of only
the specified slot, set the BCCH Frame Sync control to Off.
3- 92
YBT250 Field Transmitter & Interference Tester User Manual
Taking Measurements
Phase Error
Phase Error is the RMS value of the differences (in degrees) between
the phase angles of the received signal and those of an ideal
reconstructed reference signal of the specified slot.
Error Vector Magnitude (EVM)
Error Vector Magnitude is the RMS value (in percent) of all the
vectors that extend from the ideal constellation points to the received
signal constellation points in a record of demodulated GSM/EDGE
symbols, divided by the RMS value of the signal. An EVM value of
0.0% represents a perfect signal.
Origin Offset
Origin Offset is the ratio (in dBs) of unmodulated signal power to
modulated signal power. The measurement name refers to the offset
of the signal constellation center that is caused by the unmodulated
signal component.
Carrier to Interference Ratio (C/I)
Carrier to Interference ratio (C/I) is the ratio of desired signal
(carrier) power to undesired signal (interference) power, in dB units.
The NetTek C/I value is derived from the EVM result, and gives an
estimate of the power-- based C/I value.
Measuring cdmaOne Code Power
Requires Option CD1, Demodulation for cdmaOne
The Code Domain Power measurement displays a graph that
indicates the power on each Walsh Code in the channel. The Code
Domain Power graph highlights the Pilot, Paging, and Sync channels
for easy identification. The graph also highlights active code
channels based on a - 27 dB (relative to total power) threshold. You
can use the cursor to display the exact power on any one specified
code.
YBT250 Field Transmitter & Interference Tester User Manual
3- 93
Taking Measurements
To display the Code Domain Power:
1. Connect a signal to the YBT250 RF INPUT connector. See
page 2-- 24 for connection instructions.
2. Select the Measure window (button 1).
3. Set the Signal Standard to the appropriate CDMA standard.
4. Tap Select Measurement. This displays the Select Signal
Standard and Measurement dialog box.
5. Tap Code Power. See Figure 3-- 49.
Figure 3- 49: cdmaOne Code Domain Power display
6. Select the Channel:
a. Tap the Channel button to display the channel number
keypad.
b. Specify the channel number. To display a list of all the
available channels for the selected standard, tap List.
3- 94
YBT250 Field Transmitter & Interference Tester User Manual
Taking Measurements
c. From the Select Channel dialog box, select the channel to
display and tap OK.
7. To select which Code to measure:
H Tap the Code box to assign the numeric keypad and knob to
Code. Use the numeric keypad or knob to set the number of the
Code to be measured.
H Or tap in the graph on the Code of interest.
Measuring cdma2000 Code Power
Requires Option CD2, Demodulation for cdma2000
The Code Domain Power measurement for cdma2000 standards
displays graphs that indicate the power on each code in the signal.
Code Domain Power is displayed on two graphs, the Walsh Code
graph and the Bit-reversed graph. The YBT250 displays the exact
power on any specified code relative to the Total Power or the Pilot
Power. You specify which signal to use as a reference for the Code
Power on the Meter tab of the Setup window.
To display the Code Domain Power:
1. Connect a signal to the YBT250 RF INPUT connector. See
page 2-- 24 for connection instructions.
2. Select the Measure window (button 1).
3. Set the Signal Standard to the appropriate cdma2000 standard.
4. Tap Select Measurement. This displays the Select Signal
Standard and Measurement dialog box.
5. Tap Code Power. See Figure 3-- 50.
YBT250 Field Transmitter & Interference Tester User Manual
3- 95
Taking Measurements
Figure 3- 50: cdma2000 Code Domain Power display
6. Select the Channel:
a. Tap the Channel button to display the channel number
keypad.
b. Specify the channel number. To display a list of all the
available channels for the selected standard, tap List.
c. From the Select Channel dialog box, select the channel to
display and tap OK.
3- 96
YBT250 Field Transmitter & Interference Tester User Manual
Taking Measurements
7. To select which Code to measure:
a. Tap the text box corresponding to either Mother or
Daughter code readout to assign the knob to the desired
graph.
Or tap the Walsh Code graph or Bit-reversed graph to
assign the knob to the desired graph.
b. Set the number of the Code to be measured using the knob
or the numeric keypad.
Or tap in the appropriate graph on the Code of interest.
NOTE. To display the power for a specific code, you may find it
easier to tap the Code: box and select a code by using the knob
rather than tapping the graph.
Code Domain Power Readouts
Mother. Displays the detected spreading factor and base code for the
selected Walsh code.
Daughter. Displays the spreading factor and code index for the
selected Walsh code at maximum spreading factor.
Code Power. Displays the measured power for the selected code, with
0.1 dB resolution. Note that there are two power readouts: one for
the Mother code and one for the Daughter code. The Mother code
power readout displays the total power for the selected code at its
actual spreading factor. The Daughter code power readout displays
the power in the selected code at the maximum spreading factor.
Symbol Rate. Displays a calculated number equal to the chip rate
divided by the spreading factor.
PN Offset. Displays the “coarse” timing difference between the pilot
channel and the even-second clock.
Type. Indicates the purpose of the selected code. See the following
table.
YBT250 Field Transmitter & Interference Tester User Manual
3- 97
Taking Measurements
Table 3- 8: cdma2000 channel types
Displayed type
Spreading factor
Codes(s)
Description
Forward Pilot
64
0
May appear as W128(0)
Tx Diversity Pilot/Traffic
128
16
Sync/Traffic
64
32
Paging/Traffic
64
1-7
Quick Paging/Traffic
128
48, 80, 112
Traffic
4-128
0-127
Any active code not matching above Spreading Factors or code numbers
Inactive
128
0-127
Power below threshold
May appear as W128(32)
Measuring W-CDMA Code Power
Requires Option WD1, Demodulation for W-CDMA
The Code Domain Power measurement for W-CDMA displays
graphs that indicate the power on each Orthogonal Variable
Spreading Factor (OVSF) code in the signal. Code Domain Power is
displayed in two graphs. The bottom graph shows the Code Domain
Power in all OVSF codes; the top graph shows a zoomed in Code
Domain Power display of one fourth of the OVSF codes.
The horizontal scroll bar below the lower graph indicates the zoom
range of the upper graph; you can drag the horizontal scroll bar to
change the zoomed range of the upper graph. Also, you can tap a
point in either graph to move the marker to that point. If that point is
not shown in the zoom range, the zoom range will recenter around
that point.
The YBT250 displays the exact power on any specified code relative
to the Total Power or the Pilot Power (power in the P-CPICH
channel). You specify which signal to use as a reference for the Code
Power on the Meter tab of the Setup window. The maximum
spreading factor is also selected in the Setup window.
3- 98
YBT250 Field Transmitter & Interference Tester User Manual
Taking Measurements
To display the Code Domain Power graph:
1. Connect a signal to the YBT250 RF INPUT connector. See
page 2-- 24 for connection instructions.
2. Select the Measure window (button 1).
3. Select the appropriate W-CDMA Signal Standard.
4. Tap Select Measurement. This displays the Select Signal
Standard and Measurement dialog box.
5. Tap Code Power. See Figure 3-- 51.
Figure 3- 51: W-CDMA Code Domain Power display
6. Select the Channel:
a. Tap the Channel button to display the channel number
keypad.
b. Specify the channel number. To display a list of all the
available channels for the selected standard, tap List.
YBT250 Field Transmitter & Interference Tester User Manual
3- 99
Taking Measurements
c. From the Select Channel dialog box, select the channel to
display and tap OK.
7. To select which Code to measure:
a. Tap the text box by the OVSF code readout to assign the
knob to OVSF code selection.
b. Or tap the full or zoomed graph to assign the knob to both
graphs.
c. Set the number of the Code to be measured using the knob
or the numeric keypad.
d. Or tap in the appropriate graph on the Code of interest.
Code Domain Power Readouts
Marker. Indicates and controls the position of the marker in the code
display graphs.
OVSF. Displays the detected spreading factor and code index for the
OVSF code selected by the marker.
Power. Displays the measured power for the selected code based on
the detected spreading factor.
Scrambling Code. The detected primary scrambling code number.
Symbol Rate. Displays a calculated number equal to the chip rate
divided by the spreading factor.
Type. Indicates the purpose of the selected code. See the following
table.
Table 3- 9: cdma2000 channel types
Displayed type
Spreading factor
Codes(s)
Description
Primary Pilot
256
0
May appear as 512(0). This
is the P-CPICH channel.
Primary Control
256
1
This is the P-CCPCH channel.
3- 100
YBT250 Field Transmitter & Interference Tester User Manual
Taking Measurements
Table 3- 9: cdma2000 channel types (Cont.)
Displayed type
Spreading factor
Codes(s)
Description
Traffic
4--512
0--511
Any active code not matching above Spreading Factors or code numbers
Inactive
512
0--511
Power below threshold
NOTE. To display the power for a specific code, you may find it
easier to tap the Marker: box and select a code by using the knob
rather than tapping the graph.
In W-CDMA mode, the synchronization channels (P-SCH and
S-SCH) are not assigned OVSF codes and therefore they will not
appear in the Code Domain Power display. To see the power in the
sync channels, see Measuring W-CDMA Pilot Power and Sync
Powers on page 3-- 117.
Measuring cdma2k 1xEV- DO Code Power
Requires Option CDE, Demodulation for W-CDMA
The Code Domain Power measurement for 1xEV-- DO displays a
graph showing the power in each of the 64 MAC code channels,
relative to the total power of the signal. The display shows the MAC
index number in the horizontal axis, and the power of each code
channel level by the height of the corresponding bar.
In addition to the MAC Code Domain Power graph, numeric
readouts of the minimum and maximum Data interval Code Domain
Power values are displayed, when a slot with non-idle data content is
detected in the acquired signal. Data CDP minimum and maximum
levels can be compared to limits to detect signal errors. If no
non-idle half-- slots are detected in an acquisition, Data Code Power
results are set to ”-- - - - - ”. ”
YBT250 Field Transmitter & Interference Tester User Manual
3- 101
Taking Measurements
To display the MAC Code Domain Power graph and Data Code
Domain Power results:
1. Connect a signal to the YBT250 RF INPUT connector. See
page 2-- 24 for connection instructions.
2. Select the Measure window (button 1).
3. Select the 1xEV-- DO Signal Standard.
4. Tap Select Measurement. This displays the Select Signal
Standard and Measurement dialog box.
5. Tap Code Power. See Figure 3-- 52.
Figure 3- 52: 1xEV- DO Code Domain Power display
6. Select the Channel:
a. Tap the Channel button to display the channel number
keypad.
b. Specify the channel number. To display a list of all the
available channels for the selected standard, tap List. See
Figure 3-- 53.
3- 102
YBT250 Field Transmitter & Interference Tester User Manual
Taking Measurements
Figure 3- 53: Displaying a list of the available channels
c. Select the channel to display and tap OK.
7. To select which MAC Channel Code to measure:
a. Tap the text box by the MAC Index readout to assign the
knob to MAC channel code selection. (Or tap the graph to
assign the knob to the graph.)
b. Set the number of the Code to be measured using the knob
or the numeric keypad. (Or tap in the graph on the Code
of interest.)
Code Domain Power Readouts
PN Offset. The “coarse” timing difference between the pilot channel
and the even-- second clock.
MAC Index. Displays the MAC index number of the selected code.
MAC Code Power. Displays the measured power for the selected code
with 0.1 dB resolution.
YBT250 Field Transmitter & Interference Tester User Manual
3- 103
Taking Measurements
Data Code Power Min and Max. Show the the minimum and maximum
code domain power values (of both real and imaginary components,
relative to total signal power) in the set of 16 Walsh codes used in
the data portions of non-idle half slots.
NOTE. To display the power for a specific code, you may find it
easier to tap the Code box and select a code by using the knob rather
than tapping the graph.
Displaying a cdmaOne Codogram
Requires Option CD1, Demodulation for cdmaOne
A codogram displays how code levels change over time. Because the
codogram displays how code power changes over time, the
codogram makes it easier to spot faults and monitor traffic and
hand-off activity over time.
To display a CDMA codogram.
1. Connect a signal to the YBT250 RF INPUT connector. See
page 2-- 24 for connection instructions.
2. Select the Measure window (button 1).
3. Set the Signal Standard to the appropriate CDMA standard.
4. Tap Select Measurement. This displays the Select Signal
Standard and Measurement dialog box.
5. Tap Codogram. See Figure 3-- 54.
3- 104
YBT250 Field Transmitter & Interference Tester User Manual
Taking Measurements
Figure 3- 54: cdmaOne Codogram display
6. Select the Channel:
a. Tap the Channel button to display the channel number
keypad.
b. Specify the channel number. To display a list of all the
available channels for the selected standard, tap List.
c. In the Select Channel dialog box, select the channel to
display and tap OK.
Hints
H Tap the Restart icon (
collecting data.
) to clear the trace history and restart
H Select Updates... to change how often the codogram is updated.
H To find the timestamp (displayed next to the Data Record box)
for a specific data record in the Codogram, tap the Data Record
box. The cursor is a white band of the same height as a data
record. Use the knob or numeric keypad to move the cursor so
YBT250 Field Transmitter & Interference Tester User Manual
3- 105
Taking Measurements
that it covers up the data record of interest. The time and date the
data was recorded is displayed to the right of the Data Record
box.
H You can save a codogram to a file every 80 records, by setting
the option on the Meter tab of the Setup window.
Displaying a cdma2000 Codogram
Requires Option CD2, Demodulation for cdma2000
A Codogram displays how code levels change over time. Because
the Codogram displays how code power changes over time, the
Codogram makes it easier to spot faults and interference. For
cdma2000 standards, the YBT250 displays two codograms, one by
Walsh Code and one by bit-reversed code.
To display a CDMA codogram.
1. Connect a signal to the YBT250 RF INPUT connector. See
page 2-- 24 for connection instructions.
2. Select the Measure window (button 1).
3. Set the Signal Standard to the appropriate cdma2000 standard.
4. Tap Select Measurement. This displays the Select Signal
Standard and Measurement dialog box.
5. Tap Codogram. See Figure 3-- 55.
3- 106
YBT250 Field Transmitter & Interference Tester User Manual
Taking Measurements
Figure 3- 55: cdma2000 Codogram display
6. Select the Channel:
a. Tap the Channel button to display the channel number
keypad.
b. Specify the channel number. To display a list of all the
available channels for the selected standard, tap List.
c. Select the channel to display and tap OK.
Hints
H Tap the Restart icon (
collecting data.
) to clear the trace history and restart
H Select Updates... to change how often the codogram is updated.
H To find the timestamp (displayed next to the Data Record box)
for a specific data record in the Codogram, tap the Data Record
box. The cursor is a white band of the same height as a data
record. Use the knob or numeric keypad to move the cursor so
that it covers up the data record of interest.
YBT250 Field Transmitter & Interference Tester User Manual
3- 107
Taking Measurements
The time and date the data was recorded is displayed to the right
of the Data Record box.
H You can save a codogram to a file every 80 records, by setting
the option on the Meter tab of the Setup window.
Displaying a W-CDMA Codogram
Requires Option WD1, Demodulation for W-CDMA
The Codogram display shows changes in code power levels over
time. You can use it to monitor activity and spot faults and
interference during time intervals that you define.
For W-CDMA standards, the YBT250 displays two codograms, one
of all the OVSF codes and one zoomed in showing one-fourth of the
possible codes.
The horizontal scroll bar below the lower graph indicates the zoom
range of the upper graph; you can drag the horizontal scroll bar to
change the zoomed range of the upper graph. Also, you can tap a
point in either graph to move the marker to that point. If that point is
not shown in the zoom range, the zoom range will recenter around
that point.
To display a W-CDMA codogram.
1. Connect a signal to the YBT250 RF INPUT connector. See
page 2-- 24 for connection instructions.
2. Select the Measure window (button 1).
3. Set the Signal Standard to the appropriate cdma2000 standard.
4. Tap Select Measurement. This displays the Select Signal
Standard and Measurement dialog box.
5. Tap Codogram. See Figure 3-- 56.
3- 108
YBT250 Field Transmitter & Interference Tester User Manual
Taking Measurements
Figure 3- 56: W-CDMA Codogram display
6. Select the Channel:
a. Tap the Channel button to display the channel number
keypad.
b. Specify the channel number. To display a list of all the
available channels for the selected standard, tap List.
c. Select the channel to display and tap OK.
Hints
H Tap the Restart icon (
collecting data.
) to clear the trace history and restart
H Select Updates... to change how often the codogram is updated.
H To find the timestamp (displayed next to the Data Record box)
for a specific data record in the Codogram, tap the Data Record
box. The cursor is a white band of the same height as a data
record. Use the knob or numeric keypad to move the cursor so
YBT250 Field Transmitter & Interference Tester User Manual
3- 109
Taking Measurements
that it covers up the data record of interest. The time and date the
data was recorded is displayed to the right of the Data Record
box.
H You can save a codogram to a file every 80 records, by setting
the option on the Meter tab of the Setup window.
Displaying a cdma2k 1xEV- DO Codogram
Requires Option CDE, Demodulation for cdma2k 1xEV- DO
A Codogram displays changes in code levels over time, making it
easier to spot and record intermittent faults and interference. For
1xEV-- DO signals, the YBT250 displays a codogram of the MAC
channel codes.
To display a 1xEV-- DO codogram:
1. Connect a signal to the YBT250 RF INPUT connector. See
page 2-- 24 for connection instructions.
2. Select the Measure window (button 1).
3. Set the Signal Standard to cdma2k 1xEV-- DO.
4. Tap Select Measurement. This displays the Select Signal
Standard and Measurement dialog box.
5. Tap Codogram. See Figure 3-- 57.
3- 110
YBT250 Field Transmitter & Interference Tester User Manual
Taking Measurements
Figure 3- 57: 1xEV- DO codogram display
6. Select the Channel:
a. Tap the Channel button to display the channel number
keypad.
b. Specify the channel number. To display a list of all the
available channels for the selected standard, tap List.
c. In the Select Channel dialog box, select the channel to
display and tap OK.
Hints
H Tap the Restart icon (
collecting data.
) to clear the trace history and restart
H Select Updates... to change how often the codogram is updated.
H To find the timestamp (displayed next to the Data Record box)
for a specific data record in the Codogram, tap the Data Record
box. The cursor is a white band of the same height as a data
record. Use the knob or numeric keypad to move the cursor so
that it covers up the data record of interest.
YBT250 Field Transmitter & Interference Tester User Manual
3- 111
Taking Measurements
The time and date the data was recorded is displayed to the right
of the Data Record box.
H You can save a codogram to a file every 80 records, by setting
the option on the Meter tab of the Setup window.
Automatically Saving the cdmaOne, cdma2000, 1xEV- DO,
and W-CDMA Codogram Displays
You can set the YBT250 to automatically save the cdmaOne/
cdma2000, 1xEV-- DO, and W-- CDMA codogram displays each time
80 records are accumulated. Files are automatically named as they
are saved, enabling unattended operation.
To automatically save the codogram display every 80 records:
1. Select Setup > Edit. This displays the Setup window.
2. Tap the Meter tab. See Figure 3-- 58.
Figure 3- 58: Meter tab of the setup window
3- 112
YBT250 Field Transmitter & Interference Tester User Manual
Taking Measurements
3. To automatically save or export after you’ve taken 80 records,
tap the check box next to Auto Save or Auto Export.
4. Tap OK to save your changes.
The YBT250 will save the codogram display to a new file each
time 80 data records are accumulated. The time required to
accumulate depends on the codogram update rate. Refer to
Table 3-- 10 for the approximate file sizes for codograms.
Table 3- 10: Typical codogram file sizes
Signal standard
Typical saved file size
Typical exported file size
cdmaOne
cdma2k
1xEV--DO
8.5 kilobytes
25 kilobytes
cdma2000
40 kilobytes
124 kilobytes
W-CDMA1
92 kilobytes
317 kilobytes
1
These are typical file sizes for a maximum spreading factor of
512, the highest possible setting.
Printing Trace Screens
While the Outdoor Viewing or Indoor Viewing color schemes are
well suited for viewing a trace screen on a color display (see
Figure 3-- 59), if you want to print a trace screen on a black and white
printer (for example, a laser printer), you should select either the
Monochrome grays or Black on White for printer color scheme
(Tools > Options > Preferences) for a better printout. When the
Monochrome grays or Black on White for printer color scheme is
used, a trace screen will appear with colors that are optimized for
printing on black and white printers.
YBT250 Field Transmitter & Interference Tester User Manual
3- 113
Taking Measurements
Figure 3- 59: Codogram displayed with Bright on White color scheme
After you have set the color scheme for Monochrome grays or
Black on White for printer, the trace screen will appear with
altered colors. Figure 3-- 60 is the same codogram as Figure 3-- 59
except the color scheme has been set to Monochrome grays. Note
that in the Monochrome grays color scheme, the highest signal
level is the lightest color. But in the Dark on white color scheme,
the lightest color is not the highest signal level. This distinction is
easily seen in the printed version of this manual, though not in the
PDF version which shows what a color display would look like.
3- 114
YBT250 Field Transmitter & Interference Tester User Manual
Taking Measurements
Figure 3- 60: Codogram displayed with Monochrome grays color
scheme
Measuring cdmaOne and cdma2000 Pilot Power
Requires Option CD1, Demodulation for cdmaOne or Option CD2,
Demodulation for cdma2000
The Pilot Power measurement displays the amount of transmitted
power in the CDMA pilot code (Walsh code 0). It can be measured
on signals with any combination of active codes. The YBT250
displays the Pilot Power, Channel Power and the difference between
pilot and total.
To measure Pilot Power:
1. Connect a signal to the YBT250 RF INPUT connector. See
page 2-- 24 for connection instructions.
2. Select the Measure window (button 1).
3. Set the Signal Standard to the appropriate CDMA standard.
4. Tap Select Measurement.
YBT250 Field Transmitter & Interference Tester User Manual
3- 115
Taking Measurements
5. Tap Pilot Power. See Figure 3-- 61.
Figure 3- 61: A typical Pilot Power display
6. Select Forward Link (
).
7. Select the Channel:
a. Tap the Channel box. This assigns the numeric keypad
and knob to Channel.
b. Tap the numeric keypad to enter the channel number
directly or use the knob to change the channel number.
3- 116
YBT250 Field Transmitter & Interference Tester User Manual
Taking Measurements
Measuring W-CDMA Pilot Power and Sync Powers
Requires Option WD1, Demodulation for W-CDMA
Pilot power is the power in the P-CPICH channel. Sync power is
power in the P-SCH and S-SCH channels.
To measure Pilot Power and Sync Powers:
1. Connect a signal to the YBT250 RF INPUT connector. See
page 2-- 24 for connection instructions.
2. Select the Measure window (button 1).
3. Set the Signal Standard to the appropriate W-CDMA standard.
4. Tap Select Measurement.
5. Tap Pilot Power. See Figure 3-- 62.
Figure 3- 62: A typical W-CDMA Pilot Power display
YBT250 Field Transmitter & Interference Tester User Manual
3- 117
Taking Measurements
6. Select the Channel:
a. Tap the Channel box. This assigns the numeric keypad
and knob to Channel.
b. Tap the numeric keypad to enter the channel number
directly or use the knob to change the channel number.
Measuring W-CDMA ACLR
Requires Option WR1, RF Measurements for W-CDMA
ACLR (Adjacent Channel Leakage Ratio) is the ratio of the mean
signal power in the assigned channel (5 MHz bandwidth) to the
mean power in an adjacent channel of equal bandwidth. To simulate
the filter response of a receiver, a Root Raised Cosine (RRC) filter
response with an equivalent noise bandwidth of 3.84 MHz is applied
before computing the mean power of each channel.
Four adjacent channels, the two closest on either side of the assigned
channel, are measured: the Upper1/Lower1 adjacent channels are
centered 5 MHz above and below the assigned channel center, and
the Upper2/ Lower2 channels are 10 MHz above and below the
assigned channel center.
Each ACLR result is computed by subtracting the corresponding
adjacent channel filtered power value from the assigned channel
filtered power. The ACLR measurement page displays the four
ACLR results for the Lower and Upper adjacent channels, as well as
the filtered channel power for the assigned channel and the adjacent
channels. ACLR values increase with improved signal leakage
suppression, so larger positive values are better.
To measure ACLR:
1. Connect a signal to the YBT250 RF INPUT connector. See
page 2-- 24 for connection instructions.
2. Select the Measure window (button 1).
3. Set the Signal Standard to the appropriate W-CDMA standard.
3- 118
YBT250 Field Transmitter & Interference Tester User Manual
Taking Measurements
4. Tap Select Measurement.
5. Tap ACLR. See Figure 3-- 63.
Figure 3- 63: A typical ACLR display
Taking and Displaying Multiple Measurements at Once
Using the Sequencer (Button 4)
On the Sequencer screen (tap button 4), you can view the current
readouts for multiple measurements at the same time. These
measurements include the numeric results that you could otherwise
view one at a time on the Measurement screen (button 1). The
YBT250 application sequences through each of the measurements
that you designate and it summarizes the results on the Sequencer
screen. See Figure 3-- 64.
YBT250 Field Transmitter & Interference Tester User Manual
3- 119
Taking Measurements
Figure 3- 64: Sequencer display
To select which measurements to take and display on the Sequencer
screen:
1. From the drop-down box, select the standard of interest.
2. Tap the Select Measurements button. The Select Measurements
dialogue box appears. The list of measurements possible depends
on the standard you selected.
3. Select or clear the measurements in the list to display only the
measurements of interest to you.
4. Tap OK.
The Sequencer screen shows each measurement type you selected
(such as RF Power and Carrier Frequency) in a gray bar. Beneath
each measurement type, the measurement readouts are displayed. As
each measurement type is updated, the measurement type heading is
highlighted in reverse video. Any out-- of-- limit conditions are
indicated by a red block with an up or down arrow. Messages may
appear in the gray bar indicating any abnormal conditions.
3- 120
YBT250 Field Transmitter & Interference Tester User Manual
Taking Measurements
You can save different sets of selected measurements for each
standard and then recall these sequences later for reuse. To save a
measurement sequence, tap Setup > Save..., enter a name, and tap
OK.
You can use the file menu to save, export, or print the numeric
Sequencer data, including error information and the timestamp (the
time of the last individual measurement taken). Note that if you
export a screen, a picture of only what shows on the screen will be
exported. If there is a scroll bar visible, then some measurement
results are hidden and are not exported. To avoid this problem,
choose Export Results As..., or scroll down and export a second
view of the screen.
YBT250 Field Transmitter & Interference Tester User Manual
3- 121
Taking Measurements
3- 122
YBT250 Field Transmitter & Interference Tester User Manual
Saving, Exporting, and Recalling Results,
Traces, and Settings
The YBT250 Field Transmitter & Interference Tester can save
measurement results and trace displays for later recall or for transfer
to a PC. You can also set up the YBT250 for specific tests and save
the setup to a file for later recall, saving you time when making
measurements in the field.
Volatile memory is memory that loses data when power is removed.
Non-volatile memory retains data when power is removed. When the
YBT250 is powered off, any data stored in volatile memory is lost.
Only data stored in non-volatile memory is retained when the
YBT250 is powered off. On the YBT250, the BuiltInDisk folder is
the only folder maintained in non-volatile memory.
When saving results, traces, or setups, be sure to save them in a
folder located in the BuiltInDisk folder. When you start the
application, the default folders for saving are as follows:
H The default folder for saved results is \BuiltInDisk\YBT250\AppData\Results.
H The default folder for saved traces is \BuiltInDisk\YBT250\AppData\Results.
H The default folder for saved setups is \BuiltInDisk\YBT250\AppData\Settings.
These locations are all located within the BuiltInDisk directory and
so any data saved there is maintained after the YBT250 is powered
down. Once you have saved a file, the default location will be
whatever location you used most recently.
For auto saving spectrograms and codograms, you can change the
default location only by selecting Setup > Edit > Save & Export
tab and then changing the path in the Codogram/Spectrogram Auto
saves: field. Your changes to this setting will persist when you next
power-on the instrument.
YBT250 Field Transmitter & Interference Tester User Manual
3- 123
Saving, Exporting, and Recalling Results, Traces and Settings
Saving Measurement Results
The YBT250 enables you to save a measurement result to a file for
later recall. Saving measurement results is meant for use in
reproducing a Measure display on the YBT250 at a later time.
Recalling a saved file allows you to use markers (if available for the
measurement) to further analyze the result. When results are
recalled, they appear in the display just as they did when saved. To
use measurement data results in another program for analysis or
generating a report, use the Export Results function; see
page 3-- 127.
To save measurement results:
1. Take the measurement you want to save.
2. Select File > Save Results As (Save Results appears only when
the Measure window is selected; Save Trace appears when the
Spectrum and Interference windows are selected.).
3. Select the folder where you want to save the results.
4. Type a name for the file. Tap
soft keyboard. Tap
finished.
, in the taskbar, to display the
again to hide the keyboard when you are
5. Tap OK to save the file.
What is Saved in a Measurement Results File
The following information is saved in the results file for each
included measurement:
H Name of the measurement
H Measurement results and units
H Pass/fail status of the measurement (if limit testing is enabled)
H Time and date of the measurement
Additional information saved in a results file includes:
H Technician name
H User notes
3- 124
YBT250 Field Transmitter & Interference Tester User Manual
Saving, Exporting, and Recalling Results, Traces and Settings
H Setup information that is visible in the results display
H Error information (if errors were present)
H GPS coordinates (Refer to page 2-- 50 for GPS set up
information.)
Recalling Measurement Results
You can recall saved measurement results for display. When saved
measurement results are displayed, the display appears just as it did
when the measurement was saved except for the status area of the
control bar.
To recall measurement results for display:
1. Select File > Open.
2. Locate the directory that contains the measurement results file
(the default is \BuiltInDisk\YBT250\AppData\Results).
3. Select the results file to recall and tap OK. See Figure 3-- 65.
4. To restart measurements, tap the Run button (
YBT250 Field Transmitter & Interference Tester User Manual
).
3- 125
Saving, Exporting, and Recalling Results, Traces and Settings
Saved Data icon indicates recalled
results are displayed
To restart acquisition,
tap the Run button
Date and time result
was saved
Figure 3- 65: Example of a Recalled Result display
When a recalled measurements file is displayed, the Saved Data icon
is displayed at the top of the screen, next to the time and date the file
was saved.
You can view the various properties of the trace file by selecting
File > Results Properties (see Figure 3-- 66).
3- 126
YBT250 Field Transmitter & Interference Tester User Manual
Saving, Exporting, and Recalling Results, Traces and Settings
Figure 3- 66: Results File Properties dialog box
Exporting Measurement Results
The YBT250 can save measurement results in a file for use in other
applications, such as Microsoft Excel. The YBT250 exports files as
tab-separated or comma-separated files. Files that use tabs to
separate data fields are saved with a “txt” extension. Files that use
commas to separate data fields are saved with a “csv” extension.
To export measurement results:
1. Select File > Export Results.
2. Select a file format from the Type list.
3. Type a name for the file. Tap
soft keyboard. Tap
finished.
, in the taskbar, to display the
again to hide the keyboard when you are
4. Choose the location where the file should be saved.
5. Tap OK to save the file.
Figure 3-- 67 shows an exported results file.
YBT250 Field Transmitter & Interference Tester User Manual
3- 127
Saving, Exporting, and Recalling Results, Traces and Settings
Name
Value
Screen Name
RF Power
Units
Signal Standard
CDMA US Cellular
Timestamp
8/6/02 12:39:46 PM
Channel
1
Pass/Fail
Channel Forward/ReverseForward
Frequency (Hz)
870030000
Technician
Chiana
Notes for saved resultsMain Array
Freq Ref
Internal
External Reference Frequency:
-----
Hz
Message
GPS Position
42 50 33.5S, 147 18 30.5E
Reference Channel
3
Mask Test Enable (idle) :
False
RF Channel Power:
-13.1
dBm
RF Channel Power:
0.000049200 W
Ref Channel Power:
-13.3
dBm
Difference:
0.2
dB
Message
Figure 3- 67: Sample Exported Results file
NOTE. The Technician name and User notes are entered from the
Save & Export page of the Setup dialog; see page 2-- 45.
Exporting a Screen
The YBT250 can export an image of the screen for use in other
programs such as Microsoft Word. An exported screen is a graphic
image of the YBT250 display. A screen can be saved in three
formats: BMP, JPEG and PNG. An exported screen cannot be
3- 128
YBT250 Field Transmitter & Interference Tester User Manual
Saving, Exporting, and Recalling Results, Traces and Settings
displayed by the YBT250, it can be viewed only by a program that
can display graphic images.
To export a screen image:
1. Select File>Export Screen As....
2. Select the image format from the Type list.
3. Type a name for the file. Tap
soft keyboard. Tap
finished.
, in the taskbar, to display the
again to hide the keyboard when you are
4. Choose the location where the file should be saved.
5. Tap OK to save the file.
Saving a Trace
A saved trace contains an array of numbers that represent a displayed
spectral graph. Saved traces are useful for sending to someone
through email, recalling for later display, or printing a hardcopy at a
later time. Saving a trace is identical to saving results, except that a
trace or traces are included as part of the result.
To save a trace using an automatically generated filename:
H Select File>Save Trace.
To save a trace with a filename you enter:
1. Select File>Save Trace As.....
2. Type a name for the file. Tap
soft keyboard. Tap
finished.
, in the taskbar, to display the
again to hide the keyboard when you are
3. Choose the location where the file should be saved (the default is
\BuiltInDisk\YBT250\AppData\Results).
4. Tap OK to save the trace.
YBT250 Field Transmitter & Interference Tester User Manual
3- 129
Saving, Exporting, and Recalling Results, Traces and Settings
Recalling a Trace
To recall a trace for display:
1. Select File > Open.
2. Locate the directory that contains the saved trace file (the default
is \BuiltInDisk\YBT250\AppData\Results).
3. Select the trace file to recall and tap OK.
When a recalled trace is displayed, the Saved Data icon appears at
the top of the display and the time and date the file was saved is also
displayed. See Figure 3-- 68.
Saved Data icon indicates
recalled results are displayed
Date and time trace
was saved
Figure 3- 68: Example of a Recalled Trace display
3- 130
YBT250 Field Transmitter & Interference Tester User Manual
Saving, Exporting, and Recalling Results, Traces and Settings
Exporting a Trace
An exported trace is a text file that contains an array of numbers that
represent a displayed trace. Exported traces are useful for analyzing
with a spreadsheet program. Exported Traces can be saved with
either tabs separating the data fields or commas separating the data
fields. Exporting a trace is identical to exporting results, except that
a trace or traces are included as part of the result.
To export a trace:
1. Select File>Export Trace As.....
2. Type a name for the file. Tap
soft keyboard. Tap
finished.
, in the taskbar, to display the
again to hide the keyboard when you are
3. Select the Type of file format, either tab-separated or commaseparated.
4. Choose the location where the file should be saved (the default is
\BuiltInDisk\YBT250\AppData\Results).
5. Tap OK to save the trace.
Differences Between Exported Screens and Traces
Though an exported screen and an exported trace or results file
might seem as though they are the same thing, they are significantly
different. You can think of an exported screen as a kind of
photograph of the YBT250 display. A saved or exported trace or
results file contains information about the displayed signal.
When you restore and view a saved results or trace file, you can then
export that result or trace file. Also, just as if the data were live, you
can extract additional data from saved results or trace file on the
YBT250 by using the measurement markers and cursors.
Table 3-- 11 shows the differences between an exported screen and a
trace.
YBT250 Field Transmitter & Interference Tester User Manual
3- 131
Saving, Exporting, and Recalling Results, Traces and Settings
Table 3- 11: Differences between exported screens and traces
File type
Menu command
Read by other
programs
Exported Screen
Export Screen As...
Yes
BMP, JPEG
PNG
Saved Trace
Save Trace
No
binary1
Save Trace As...
No
binary1
Export Trace As...
Yes
tab or commaseparated text
Exported Trace
File format
1Binary files can be read only by the YBT250
BMP is an uncompressed format and uses a lot of space, but
maintains sharp images. JPEG is a compressed format and uses far
less space than BMP, but can blur lines and text. PNG is a compressed format and maintains sharp lines and text. Table 3-- 12
compares the relative features of each of the export file formats.
Table 3- 12: Comparison of file formats for exporting screens
Format
Export speed
File Size
Quality
BMP
Medium
Large
Very Good
JPEG
Very Slow
Medium
Medium/Poor
PNG
Fast
Small
Good
An exported trace file contains information about the YBT250
settings and data that represents the trace. Figure 3-- 69 shows an
example of an exported trace saved as a tab-separated text file. The
numbers at the end (following “Trace 1 data”) represent the data
points of the trace on the display. To save space, only a few numbers
are shown in this example.
3- 132
YBT250 Field Transmitter & Interference Tester User Manual
Saving, Exporting, and Recalling Results, Traces and Settings
Name
Value
Screen Name
Spectrum
Units
Signal Standard
CDMA US Cellular
Timestamp
8/6/02 12:41:13 PM
Channel
1
Channel Forward/Reverse
Forward
Frequency (Hz)
870030000
Technician
Aeryn Sun
Pass/Fail
Notes for saved results
Freq Ref
Internal
External Reference Frequency:
-----
Hz
Message
GPS Position
Disabled
Span (Hz)
100000000
Start Freq (Hz)
820030000
Stop Freq (Hz)
920030000
Reference Level (dBm)
1
dB/div
10
Trace 1 mode
Normal
Trace 2 On
True
Trace 2 Source
Live
Trace 2 Live mode
Normal
Mask Test Enabled
False
Mask Filename
Mask Limit Test
Pass
Trace 1 data
Trace 2 data
-75.1
-75.1
-85.5
-85.5
-75.9
-75.9
-74.6
-74.6
.....
-75.1
-75.1
Figure 3- 69: Example of an Exported Trace file
Saving Setups
The YBT250 can save its settings in Setup files for later recall.
Recalling a saved setup changes the YBT250 settings to match those
in the saved setup. Using saved setups minimizes your setup time in
the field and helps to ensure more consistent measurement results.
For example, you could save a setup for taking a Channel Power
YBT250 Field Transmitter & Interference Tester User Manual
3- 133
Saving, Exporting, and Recalling Results, Traces and Settings
measurement versus a specific Reference Channel. The saved setup
will contain the channel numbers and limits as well as all other
instrument control settings. Once the setup is saved, it can be copied
to other YBT250 modules to save setup time in the field.
Saved setups contain all the settings included on the Setup pages
(Setup > Edit or Edit button). Saved setups do not contain settings
made under the Tools menu (such as Tools > Options). Options
settings are persistent, but are not part of Saved Setups.
To save YBT250 setups:
1. Set all the YBT250 settings the way you want them.
2. Select Setup > Save....
3. Type a name for the file. Tap
soft keyboard. Tap
finished.
, in the taskbar, to display the
again to hide the keyboard when you are
4. Choose the location where the file should be saved (the default is
\BuiltInDisk\YBT250\AppData\Settings).
5. Tap OK to save the setup file.
Recalling Setups
Recalling a saved setup changes the YBT250 settings to match those
in the saved setup file.
To recall setups:
1. To recall a setup, select Setup > Open...
2. Locate the directory that contains the setup file (the default is
\BuiltInDisk\YBT250\AppData\Settings).
3. Select the setup file to recall and tap OK.
3- 134
YBT250 Field Transmitter & Interference Tester User Manual
Saving, Exporting, and Recalling Results, Traces and Settings
Customizing the Setup menu
The YBT250 allows you to customize the Setup menu to include a
list of standard setups and to prevent accidental changes to existing
setup files.
Preventing Changes to Saved Setups
The YBT250 enables you to hide setup controls so that accidental
changes to saved setups cannot occur.
To hide setup controls:
1. Select Tools>Options... .
2. Select the Setup Menu tab. See Figure 3-- 70.
Figure 3- 70: Protecting Setup Controls
3. To prevent a user from changing saved setups, select Hide Setup
controls.
4. Tap OK to save the Setup Menu changes.
YBT250 Field Transmitter & Interference Tester User Manual
3- 135
Saving, Exporting, and Recalling Results, Traces and Settings
When Hide Setup controls is selected, tapping the Edit button
) displays the Open dialog box instead of the Setup window.
(
This allows the user to select a saved setup for recall, but not to edit
any settings or save any setups. Additionally, when Hide Setup
controls is selected, the Setup > Edit and Setup > Save menu items
are disabled.
Enabling Changes to Saved Setups
If setup controls have been hidden, you cannot create new setup
files. You must show setup controls so you can create new setup
files.
To show setup controls:
1. Select Tools>Options... .
2. Select the Setup Menu tab. See Figure 3-- 70.
3. Select Show Setup Controls.
Once setup controls are visible, you can create new setup files.
Specifying the List of Saved Setups
The YBT250 enables you to specify the list of saved setups that
appears in the Setup menu. You can choose to list either the 10 most
recently used saved setups or display a custom list of setups. A
custom list of saved setups provides consistent and quick access to a
standard group of setup files.
To specify the list of setups in the Setup menu:
1. Copy or move all the setup files you want to listed in the Setup
menu to the \BuiltInDisk\YBT250\AppData\Settings folder. The
YBT250 will allow you to select only setups located in the
\BuiltInDisk\YBT250\AppData\Settings folder for display in the
Setup menu.
2. Select Tools > Options... .
3. Select the Setup Menu tab. See Figure 3-- 71.
4. To display the 10 most recently used saved setups in the Setup
menu, select 10 most-recently used saved Setups.
3- 136
YBT250 Field Transmitter & Interference Tester User Manual
Saving, Exporting, and Recalling Results, Traces and Settings
Figure 3- 71: Specifying the List of Setups
5. To display only a selected list of saved setups, select Custom
List.
a. Select a setup from the list on the left and tap Add>> to
add the selected setup to the Setup menu.
b. Select additional setups until you have selected all the
setups you want in the Setup menu. (You can select up to
10 setups to appear in the Setup menu.)
To remove a setup from the Setup menu list, select the setup
to remove from the Setup menu List window and tap
<<Remove.
6. Once you have selected all the setups you want listed in the Setup
menu, tap OK.
YBT250 Field Transmitter & Interference Tester User Manual
3- 137
Saving, Exporting, and Recalling Results, Traces and Settings
3- 138
YBT250 Field Transmitter & Interference Tester User Manual
Appendices
Appendix A: Specifications
This section lists the electrical, environmental, and physical
specifications of the YBT250 Field Transmitter & Interference
Tester. All specifications are guaranteed unless labeled “typical”.
Typical specifications are provided for your convenience and are not
guaranteed.
The specifications in this section apply to the YBT250 module,
unless otherwise specified. For NetTek Analyzer Platform specifications, please refer to the NetTek Analyzer Platform User Manual.
Table A- 1: General characteristics
RF input characteristics
Description
Input Frequency Range
30 MHz -- 2500 MHz
Input Impedance
50 ohms (nominal)
Signal Amplitude for
Modulation Measurements
--50 dBm to +30 dBm for CW-like or peak envelope
power
Measurements may be outside this range but accuracy
is not guaranteed.
Signal Amplitude for
Spectral Display
CW or peak envelope power
Standard
--114 dBm to +30 dBm, 30 MHz to 2500 MHz
Option IN1
--134 dBm to +30 dBm, 100 MHz to 2000 MHz
--132 dBm to +30 dBm, 2000 MHz to 2200 MHz
--129 dBm to +30 dBm, 2200 MHz to 2500 MHz, typical
Levels apply only when using 100 kHz span
(1 kHz resolution bandwidth)
Input Overload Detect
>1 W (+30 dBm) CW or peak envelope power
Maximum Input Power without
Damaging Instrument
50 W CW or peak envelope power
Coupling
AC for all measurements and spectral display modes
YBT250 Field Transmitter & Interference Tester User Manual
A- 1
Appendix A: Specifications
Table A- 1: General characteristics (Cont.)
RF input characteristics
Description
Working Voltage
≥ 15 V (DC + peak AC)
Spurious Input Signals
To meet modulation measurement specifications:
(Total power of interest -- Total power in spurious) >
35 dB
or
(Center frequency of signal of interest -- center
frequency of spurious signal) > 1.4 MHz
and
(Total power of interest -- Total power in all spurious)
≥ --3 dB
External Reference Input
Characteristics
Description
Impedance
50 ohms (nominal)
Frequency Range
Any multiple of 1 MHz up to 15 MHz inclusive, ± 10 ppm
Any multiple of 1.2288 MHz up to 19.6608 MHz
inclusive, ± 10 ppm
2.048 MHz ± 10 ppm
4.8 MHz ± 10 ppm
Level Range
--15 dBm to +15 dBm
Maximum Input Level without
Damage Instrument
± 3 V peak continuous
Coupling
AC
Working Voltage
3 V (DC + pk. AC)
Lock Time
< 15 seconds
Even Second Clock Input
Characteristics
Description
Impedance
10 kΩ
Minimum High Threshold
2.0 V
A- 2
YBT250 Field Transmitter & Interference Tester User Manual
Appendix A: Specifications
Table A- 1: General characteristics (Cont.)
Even Second Clock Input
Characteristics
Description
Maximum Low Threshold
0.8 V
Minimum High Time
≤ 10 ns
Minimum Low Time
≤ 10 ns
Maximum Input Level without
Damage
± 5 V peak continuous
Coupling
DC
Frequency Lock Range
± 10 ppm
Internal Time Base
Characteristics
Description
Error
± 0.5 ppm drift from 0 _C to 50 _C
± 1.0 ppm aging/year
Ten minute warm-up period required to meet accuracy
specification.
Users can connect the External Reference input to a
frequency source and obtain a user correction value.
This value will be used to correct time base errors in
measurements to the accuracy of the external reference.
The internal time base will continue to drift with
temperature and age as specified above.
Signal Path Characteristics
Description
Phase Noise
≤ --70 dBc/Hz @ 20 kHz carrier offset
Table A- 2: Measurement characteristics
Measurement
Description
Standards Supported
See Table F--1 on page F--1.
External Attenuation
User Selectable ON/OFF
Attenuation = --30 dB to +80 dB
YBT250 Field Transmitter & Interference Tester User Manual
A- 3
Appendix A: Specifications
Table A- 2: Measurement characteristics (Cont.)
Measurement
Description
RF Channel Power
Measures the average RF power in a user-defined
channel. The default value of channel bandwidth is taken
from the selected standard. The acceptable values for
channel numbers are taken from the selected standard.
The user can input channel center frequency instead of
channel number.
Units
Watts (W)
dBm
Resolution
3 significant digits for W
0.1 dB for dBm units
Accuracy
± 0.75 dB: --20 dBm to +30 dBm, ± 0.5 dB typical
± 1.25 dB: --80 dBm to --20 dBm, ± 1.0 dB typical
Reference Information:
Accuracy is guaranteed for input signals between --80
and +30 dBm total power (CW or peak envelope).
Accuracy specification is typical down to --120 dBm total
power.
RF Power
(GSM/EDGE)
Measures the average RF power of the useful part of a
GSM or EDGE burst (GMSK or 8--PSK modulation), as
determined by the location of the burst Training
Sequence.
Units
dBm
Resolution
0.01 dB for dBm units
Accuracy
For GSM or EDGE (GMSK or 8--PSK modulation) burst
signals, the RF power shall be measured with an
accuracy as follows:
± 1.0 dB: --20 dBm to +30 dBm, ± 0.75 dB typical
± 1.5 dB: --80 dBm to --20 dBm, ± 1.25 dB typical
A- 4
YBT250 Field Transmitter & Interference Tester User Manual
Appendix A: Specifications
Table A- 2: Measurement characteristics (Cont.)
Measurement
Description
Reference Information:
Burst timing is determined from the location of the burst
Training Sequence. If Burst timing cannot be found, the
power measurement will be done on an arbitrarily
selected segment of the signal equal to the useful part of
a slot.
RF Power
(1xEV--DO)
Measures the RF power in the Pilot, MAC, and Data
intervals of a 1xEV-D0 timeslot.
Units
dBm
Resolution
0.01 for dBm units
Accuracy
For burst signals, the RF power shall be measured with
an accuracy as set forth in the following list:
± 1.0 dB: --20 dBm to +30 dBm, ± 0.75 dB typical
± 1.5 dB: --80 dBm to --20 dBm, ± 1.25 dB typical
RF Channel Carrier Frequency
Measures the frequency of the carrier in the user
selected channel. The user can enter either a channel
number or frequency.
Units
MegaHertz (MHz)
Resolution
1 Hz
Accuracy
± (10 Hz + Time Base Error), 99% confidence interval
W-CDMA:
± (12 Hz + Time Base Error), 99% confidence interval
Note: Carrier frequency must be within 10 kHz of
expected value, except:
W-CDMA: Must be within 5 kHz
IS-136: Must be within 1.5 kHz
1xEV--DO: Must be within 5 kHz
GSM/EDGE: Must be within 5 kHz
W-CDMA 3GPP Test Model 4
YBT250 Field Transmitter & Interference Tester User Manual
A- 5
Appendix A: Specifications
Table A- 2: Measurement characteristics (Cont.)
Measurement
Description
FM Deviation
Measures the maximum one-side frequency deviation of
the analog FM cellular carrier selected by the user after
demodulation. The user can enter either a channel
number or frequency.
Units
KiloHertz (kHz)
Resolution
0.1 kHz
Accuracy
± 10% 2 kHz ≤ Deviation ≤ 10 kHz
Maximum measurable deviation is 15 kHz peak.
Maximum modulation frequency is 3 kHz.
PN Offset
Measures the PN Offset of the cdmaOne or
cdma2000--1x signal. The user can select the CDMA
signal of interest by a channel number or frequency.
Units
PN Index
Resolution
1 PN Index
Each PN Index is 64 chips
Accuracy
Displayed PN Index must match PN Offset of CDMA
signal.
Pilot Time Alignment Error (Tau) Measures the time offset between the PN sequence of
the input signal and the External Even Second Clock.
Units
Microsecond (µs)
Chips
Resolution
0.1 µs
1 chip
Accuracy
A- 6
± 250 ns typical
YBT250 Field Transmitter & Interference Tester User Manual
Appendix A: Specifications
Table A- 2: Measurement characteristics (Cont.)
Measurement
Description
Waveform Quality (Rho, ρ)
Measures waveform quality as defined by IS-97-D using
a “pilot-only” CDMA (or cdma2000--1x) signal.
cdmaOne and cdma2000:
Measures waveform quality as defined by
IS--97--D using a “pilot--only” CDMA (or
cdma2000--1x) signal.
1xEV--DO:
Measures Rho--pilot as defined by C.S0032
“Minimum Performance Standards for
HRPD Access Network”
Units
None
Resolution
0.0001
Accuracy
± 0.005 0.9 ≥ ρ ≥ 1.0
Usable range 0.5 ≥ ρ ≥ 1.0
Reference Information:
For cdmaOne an d cdma2000, the Rho measurement as
given in IS--97--D is only specified for a “pilot--only”
CDMA signal. The accuracy specification given here
applies only to measurements made using the “Pilot
only, no other codes active on input signal” method. For
measurements made on signal that are not “pilot--only,”
see the Estimated Waveform Quality measurement.
For measurements made on signal that are not
“pilot-only”, see the Estimated Waveform Quality
measurement.
YBT250 Field Transmitter & Interference Tester User Manual
A- 7
Appendix A: Specifications
Table A- 2: Measurement characteristics (Cont.)
Measurement
Description
Estimated Waveform Quality
Measures waveform quality as defined by IS-97-D using
any CDMA signal.
Units
None
Resolution
0.0001
Accuracy
± 0.01 for rho>= 0.9, typical
Reference Information:
The Rho measurement as given in IS-97-D is only
specified for a “pilot-only” CDMA signal. This measurement makes an estimate of the Rho value on any CDMA
signal.
CDMA Error Vector Magnitude
The normalized RMS of all of the vectors that extend
from the intended constellation points to the actual
symbol points in a record of symbols
Units
Percent
Resolution
0.01%
Accuracy
Degradation due to adjacent channel CDMA carriers
(having equivalent power): add 10%.
cdmaOne and cdma2000:
±1%; EVM ≤ 31%
Residual error:
5% < 1000 MHz
7% < 2000 MHz
W-CDMA:
±2.5%; 12.5% ≤ EVM ≤ 22.5%
Residual error:
6% < 1000 MHz
8% < 2500 MHz
A- 8
YBT250 Field Transmitter & Interference Tester User Manual
Appendix A: Specifications
Table A- 2: Measurement characteristics (Cont.)
Measurement
Description
Reference Information:
The EVM measurement differs from the traditional
method in that it is normalized by the average power
rather than by maximum constellation power. This
mesurement is accurate for both pilot-only and in-service
CDMA signals.
W-CDMA 3GPP Test Model 4
Code Domain Power
Units
Measures the power in each of the Walsh codes used in
a CDMA signal.
dB relative to Pilot Power (except 1xEV--DO)
dB relative to Total Power
Resolution
0.1 dB
(all except 1xEV--DO Data CDP)
0.01 dB (1xEV--DO Data CDP)
Accuracy
cdmaOne and cdma2000:
± 1 dB Code domain power level > --20 dB relative to
total power, using the recommended TIA/EIA-IS-97-D
pilot level of --7.0 dB (20%) relative to total power.
W--CDMA:
± 1 dB Code domain power level > --20 dB relative to
total power, using W-CDMA 3GPP Test Model 3.
1xEV--DO:
MAC: ± 1 dB code domain power level > --20 dB relative
to total power in MAC interval
Data: ± 0.5 dB for non--idle slot data
Reference Information:
± 2.5 dB for --27 dB < CDP< --20 dB relative to total
power (band classes 0--9 for cdmaOne, cdma2000 and
1xEV--DO)
YBT250 Field Transmitter & Interference Tester User Manual
A- 9
Appendix A: Specifications
Table A- 2: Measurement characteristics (Cont.)
Measurement
Description
Carrier Feedthrough
Measures the offset of the constellation from zero power.
Units
dB relative to Pilot Power (all except 1xEV--DO)
Resolution
0.1 dB
Accuracy
cdmaOne and cdma2000: ± 2 dB
Residual floor: --50 dBc
Reference Information:
For cdmaOne and cdma2000, the carrier feedthrough
measurement is valid only for a pilot-only signal.
Pilot Power
Measures the absolute power of the pilot. It is made
without regard to whether other codes are present.
(P-CPICH for W-CDMA.)
Units
dBm, Watts (W)
Resolution
0.1 dB
Accuracy
± 1 dB, --20 dBm to +30 dBm
± 1.5 dB, --50 dBm to --20 dBm
Reference Information:
W-CDMA 3GPP Test Model 2
Sync Power
A- 10
Measures the absolute power of the W-CDMA sync
channel (SCH). It is made without regard to whether
other codes are present.
Units
dBm, Watts (W)
Resolution
0.1 dB
YBT250 Field Transmitter & Interference Tester User Manual
Appendix A: Specifications
Table A- 2: Measurement characteristics (Cont.)
Measurement
Description
Occupied Bandwidth
The occupied bandwidth measurement gives the
frequency bandwidth within which 99% of the power
transmitted on a single channel lies. This measurement
can be properly made only if the channel being
measured has no channels adjacent to it.
Units
Hertz (Hz)
Resolution
Three significant digits
Accuracy
5% of the reading, typical
Adjacent Channel Leakage
power Ratio (ACLR)
(W-CDMA)
Measures the ratios of the mean RRC filtered power in
the 5 MHz BW assigned channel to the mean RRC
filtered power in each of the nearest 5 MHz BW 1st and
2nd adjacent upper and lower channels. Adjacent
channel centers are offset in multiples of 5 MHz from the
assigned channel center. User can input channel center
frequency instead of channel number.
Units
dB
Resolution
0.01 dB
Accuracy
± 1.5 dB, 20 ≤ ACLR < 48 dB, typical
± 2.5 dB, 48 ≤ ACLR < 53 dB, typical
--30 dBm to +20 dBm (power in assigned channel)
Reference Information:
WCDMA Test Model 1 signal (3G PP TS25.141). Filter
response is Root-Raised Cosine (RRC), alpha=0.22,
3.84 MHz noise BW (3GPP TS25.104).
GSM/EDGE Error Vector
Magnitude
Error Vector Magnitude is the normalized RMS value of
all of the vectors that extend from the intended
constellation points to the actual symbol points in a
record of symbols. The EVM measurement is made over
one GSM or EDGE burst.
Units
Percent
Resolution
0.01%
Accuracy
(8-PSK only)
± 1.5%, 4% ≤ EVM < 10%
Residual error: 4.0%
YBT250 Field Transmitter & Interference Tester User Manual
A- 11
Appendix A: Specifications
Table A- 2: Measurement characteristics (Cont.)
Measurement
Description
GSM/EDGE Phase Error
Phase Error is the RMS value of the differences between
the phase angles of the received signal and those of an
ideal reconstructed signal. The Phase Error measurement is made over one GSM or EDGE burst.
Units
Degrees
Resolution
0.01_
Accuracy
(GMSK only)
± 1.0_, 2_ ≤ Phase Error < 12_
Residual error: 2.0_
GSM/EDGE Origin Offset
Origin Offset is the ratio of unmodulated signal power to
modulated signal power. The unmodulated signal
component causes the signal constellation center to be
offset from the ideal location. The Origin Offset
measurement is made over one GSM or EDGE burst.
Units
dB
Resolution
0.01 dB
Range
--15 dB to --60 dB
GSM/EDGE Carrier to Interference (C/I)
Carrier to Interference (C/I) is the ratio of desired signal
(carrier) to undesired signal (interference). The C/I
measurement is derived from the EVM result and gives
an estimate of the power-based C/I value. The C/I
measurement is made over one GSM or EDGE burst.
Units
dB
Resolution
0.01 dB
Range
0 dB to 50 dB
Reference Information:
C/I is derived from EVM using the following equation:
C/I = --20 * log10( EVM/100 )
A- 12
YBT250 Field Transmitter & Interference Tester User Manual
Appendix A: Specifications
Table A- 2: Measurement characteristics (Cont.)
Measurement
Description
GSM/EDGE RF Power vs Time
Power vs Time displays the normalized signal envelope
power over one GSM or EDGE burst.
Units
Time Axis:
Symbols
Microseconds
Resolution
Time Axis:
1 symbol
1 microsecond
Time uncertainty
±0.2 symbol
±0.8 microsecond
Reference Information:
Burst to mask alignment is derived from the location of
the Training Sequence in the useful part of the burst.
Table A- 3: Spectral analysis characteristics
Characteristic
Description
Measurement Frequency
Sets the measurement frequency of the display. The
measurement frequency can be set by either entering a
specific frequency or by selecting a channel number.
Units
MegaHertz (MHz)
Channel Number
Resolution
1 kHz
1 channel
Range
30 MHz to 2500 MHz
YBT250 Field Transmitter & Interference Tester User Manual
A- 13
Appendix A: Specifications
Table A- 3: Spectral analysis characteristics (Cont.)
Characteristic
Description
Frequency Span
Sets the frequency range covered by the spectral
display.
Units
KiloHertz (kHz)
MegaHertz (MHz)
Resolution
1 kHz
Range
10 kHz to 2470 MHz, continuously variable or 1--2--5
steps
Resolution Bandwidth (RBW)
Units
Width of the resolution bandwidth filter
Hertz (Hz)
KiloHertz (kHz)
MegaHertz (MHz)
Resolution
Uses 1--3 steps to cover the range
Range
100 Hz to 6 MHz
Instrument automatically sets RBW. The RBW is set as
a combination of 1--3 steps at the 1, 2, 5 span settings,
and a linear range between 1, 2, 5 span settings, for a
nominal value of approximately Span/125.
Reference Level
A- 14
The power level indicated by the top line of the spectral
display
Units
dBm
Resolution
1 dB
Range
--100 dBm to +30 dBm
YBT250 Field Transmitter & Interference Tester User Manual
Appendix A: Specifications
Table A- 3: Spectral analysis characteristics (Cont.)
Characteristic
Description
Spectral Display Amplitude
Units
dB relative to Reference Level
Resolution
0.1 dB
Range
100 Hz to 1 MHz
Accuracy
Standard
± 1.25 dB, --20 dBm to +30 dBm
± 2.0 dB, --80 dBm to --20 dBm
± 2.75 dB, --104 dBm to --80 dBm
Option IN1
± 1.25 dB, --20 dBm to +30 dBm
± 2.0 dB, --80 dBm to --20 dBm
± 2.75 dB, --120 dBm to --80 dBm
Reference Information (applies to Standard and
Option IN1 Accuracy):
Spectral display accuracy performance is specified
over the following range:
± 5 dB --134 dBm < Input < --120 dBm
Accuracy specs apply only for spans less than
1000 MHz, and to CW-like signals
The amplitude accuracy for Noise-like signals is
degraded when averaging is turned on. This is
approximately a 2.5 dB degradation due to the
averaging being done after the logging instead of
before. Any accuracy for noise-like signals using a
marker will be impacted greatly by the user not
necessarily knowing the effective IF noise bandwidth,
and less so by this error. Therefore it is recommended
that the user utilize power measurement routines
instead of markers for any noise-like signals.
YBT250 Field Transmitter & Interference Tester User Manual
A- 15
Appendix A: Specifications
Table A- 3: Spectral analysis characteristics (Cont.)
Characteristic
Description
Vertical Scale Factor
Units
1 dB to 10 dB in 1 dB increments
Display Modes
Normal -- updates display with each new result
Max Hold -- updates displayed point only if new point >
old point
Min Hold -- updates displayed point only if new point <
old point
Max/Min Hold -- displays a bar between Max Hold and
Min Hold
Average -- displays average of N (specified by user)
results
Reference Information:
Average is calculated as follows -- The last N values
are saved in memory; when a new result is available,
the earliest result of the N stored values is discarded,
the new average is calculated from the stored values. If
the number of results is less than N, then all of the
results are averaged together.
Number of Averages
A- 16
1≤N≤99
YBT250 Field Transmitter & Interference Tester User Manual
Appendix A: Specifications
Table A- 3: Spectral analysis characteristics (Cont.)
Characteristic
Spurious Free Dynamic
Range (external signal
related)
Description
> 70 dB, except 2nd harmonic > 60 dB typical
Residual Spurious Signals --125 dBm at BTS Rx frequencies (776--794, 806--849,
872--940, 1453--1465, 1525--1549, 1710--1785,
1840--1910,1920--1980) MHz and GPS frequencies
(L1 1570.3 -- 1580.5, L2 1222.5--1232.8, L5
1171.4--1181.6) MHz
--115 dBm at BTS Tx frequencies (746--764, 832--834,
840--960, 1477--1513, 1805--1880, 1930--1990,
2110--2170) MHz
--95 dBm at frequencies not listed above, except from
1155 to 1168 MHz: --20 dBm in spans above 10 MHz,
1155 MHz to 1175 MHz
Table A- 4: Interference analysis characteristics
Characteristic
Description
Modulation Identification
Attempts to display the type of modulation
present on a signal identified by the user.
Input Signal Level
--114 dBm minimum for all signal types
+30 dBm maximum for CW or peak
envelope power
Carrier Frequency
See RF Carrier Frequency on page A--5
for specifications
Power in Bandwidth
See RF Channel Power on page A--4 for
specifications
Modulation Type
The types of modulation identified are
those listed in Appendix Signal Standards
Supported.
YBT250 Field Transmitter & Interference Tester User Manual
A- 17
Appendix A: Specifications
Table A- 4: Interference analysis characteristics (Cont.)
Characteristic
Description
Noise Floor Measurement
Measures the interference power that is
coming into the receiver antenna for any
standard. Measurement defaults to uplink
channel when specified by channel
number.
Units
dBm
Resolution
0.1 dB
Accuracy
± 3 dB typical
AM Demodulation
A- 18
Provides an audio output signal after AM
demodulation of the user-selected signal
Measurement Frequency
30 MHz to 2500 MHz with 1 kHz resolution
Input Signal Level
--100 dBm minimum
Measurement Bandwidth
8 kHz
Audio Output Bandwidth
4 kHz
Run Time
4 seconds per activation
YBT250 Field Transmitter & Interference Tester User Manual
Appendix A: Specifications
Table A- 4: Interference analysis characteristics (Cont.)
Characteristic
Description
FM Demodulation
Provides an audio output signal after FM
demodulation of the user-selected signal
Measurement Frequency
30 MHz to 2500 MHz with 1 kHz resolution
Input Signal Level
--100 dBm minimum
Maximum Signal Deviation
Up to 100 kHz
Measurement Bandwidth
8 kHz, 15 kHz, 75 kHz, 200 kHz;
Selected by user
Audio Output Bandwidth
4 kHz for Measurement BW = 8 kHz,
15 kHz
15 kHz for Measurement BW = 75 kHz,
200 kHz
Run Time
Signal Strength Indicator
Input Signal Level
4 seconds per activation
Provides an audio tone and a visual
display that vary with the strength of the
selected signal
--110 dBm minimum
>--60 dB, from any other signal
Measurement Frequency
30 MHz to 2500 MHz with 1 kHz resolution
Measurement Bandwidth
Up to 10 MHz, dependent on span setting
Span
1 kHz to 100 MHz with 1 kHz resolution
Signal Strength Indicator Range
>--60 dB from Reference Level setting
Tone Type
Variable Beep Rate, based on signal
strength
Variable Frequency, based on signal
strength
YBT250 Field Transmitter & Interference Tester User Manual
A- 19
Appendix A: Specifications
Table A- 4: Interference analysis characteristics (Cont.)
Characteristic
Description
W--CDMA Scrambling Code Analyzer
Detects scrambling codes and pilot
channel power levels of received co-channel W--CDMA downlink signals
Input Signal Range
--117 to +30 dBm, typical
Units
Io, Ec -- dBm
Ec/Io -- dB
Resolution
0.1 dB
Accuracy
Ec:
±2 dB for Ec ≥ --102 dBm and
Ec/Io ≥ --12 dB, typical
±3 dB for Ec ≥ --112 dBm and
Ec/Io ≥ --14 dB, typical
Display Controls
Sort by Power (descending Ec value)
Sort by Scrambling Code (ascending SC
index)
Lock (fix) current Scrambling Code set
A- 20
YBT250 Field Transmitter & Interference Tester User Manual
Appendix A: Specifications
Table A- 5: Environmental characteristics
Characteristic
Description
Temperature Range
Operating
0 _C to +50 _C specified performance,
--10 _C to +50 _C typical
Nonoperating
--40 _C to +60 _C
Humidity
Operating
5% to 95% Relative Humidity (RH),
noncondensing: up to +30 _C
5% to 45% Relative Humidity (RH),
noncondensing: +30 _C up to +50 _C
Nonoperating
5% to 95% Relative Humidity (RH),
noncondensing: up to +30 _C
5% to 45% Relative Humidity (RH),
noncondensing: +30 _C up to +50 _C
Altitude
Operating
Up to 4,600 m (15,092 ft.)
Nonoperating
Up to 15,240 m (50,000 ft.)
Table A- 6: Physical characteristics
Characteristic
Description
Dimensions
Height: 25 cm. (9.75 in)
Width: 33 cm. (13 in)
Depth: 9 cm. (3.5 in)
Weight
1.42 kg (3.125 lbs), YBT250 module only
4.10 kg (9 lbs), NetTek Analyzer Platform only,
with one battery
YBT250 Field Transmitter & Interference Tester User Manual
A- 21
Appendix A: Specifications
Table A- 7: Miscellaneous characteristics
Characteristic
Description
Battery Life
One battery installed
2 hours with measurements active
4 hours in suspend mode
Two batteries installed
4 hours with measurements active
8 hours in suspend mode
Recommended Calibration Interval
2 years
Table A- 8: Safety compliance
Category
Standards or description
Safety
Compliance
ANSI/ISA S82.02.01
Safety Standard for Electrical and Electronic Test,
Measuring, Controlling, and Related Equipment.
CAN/CSA C22.2 No. 1010.1
Safety Requirements for Electrical Equipment for
Measurement, Control, and Laboratory Use.
EN 61010-1
Safety Requirements for Electrical Equipment for
Measurement, Control, and Laboratory Use.
IEC61010-1
Safety Requirements for Electrical Equipment for
Measurement, Control, and Laboratory Use.
UL3111-1
Standard for Electrical Measuring and Test Equipment.
A- 22
YBT250 Field Transmitter & Interference Tester User Manual
Appendix A: Specifications
Table A- 9: Electromagnetic compatibility (EMC)
Category
Standards or description
EC Declaration of
Conformity -- EMC
Meets the intent of Directive 89/336/EEC for Electromagnetic
Compatibility. Compliances were demonstrated using
EN 61326:1997 EMC Product Family Standard for Electrical
Equipment for Measurement, Control and Laboratory use.
Emissions 1
EN 61326 2
Class A Radiated and Conducted Emissions
EN 61000-3-2 (A14) Conducted Power Line Harmonic Current
EN 61000-3-3
Voltage Changes, Fluctuations, and Flicker.
Immunity 1, 3
IEC 61000-4-2
IEC 61000-4-3 4
IEC 61000-4-4
IEC 61000-4-5
IEC 61000-4-6 4
IEC 61000-4-11
Electrostatic Discharge Immunity,
Performance Criterion “B”
Radiated RF Electromagnetic Field Immunity,
Performance Criterion “A”
Electrical Fast Transient/Burst Immunity
Performance Criterion “B”
Power Line Surge Immunity,
Performance Criterion “B”
Conducted RF Immunity,
Performance Criterion “A”
Voltage Dips and Short Interruptions
Immunity, Performance Criterion “B”
Australia/New Zealand Complies with EMC Framework and demonstrated per Emission
Declaration of
standard:
Conformity -- EMC
AS/NZS 2064
Industrial, Scientific, and Medical Equipment
1
Compliance demonstrated using high quality, shielded interface cables.
2
Emissions that exceed the limits of the standard may occur when the instrument is
connected to a device under test.
3
Minimum immunity test requirement.
4
Residual spurious signals can increase to --70 dBm with exposure to the disturbance
levels of this test.
YBT250 Field Transmitter & Interference Tester User Manual
A- 23
Appendix A: Specifications
A- 24
YBT250 Field Transmitter & Interference Tester User Manual
Appendix B: Accessories
This section lists the YBT250 Field Transmitter & Interference
Tester standard and optional accessories.
Standard Accessories
Table B-- 1 lists the accessories that come standard with your
YBT250 Field Transmitter & Interference Tester.
Table B- 1: Standard accessories
Quantity
Part number
Description
2
200-0678-00
BNC Connector Cover
1
200-4696-00
N Connector Cover
1
016-1868-00
Spacer
1
020-2464-XX
User manual, English, with CD-ROM
containing YBT250 Field Transmitter &
Interference Tester software and User
Manual in PDF format.
YBT250 Field Transmitter & Interference Tester User Manual
B- 1
Appendix B: Accessories
Optional Accessories
Table B-- 2 lists optional accessories you can purchase for your
YBT250 Field Transmitter & Interference Tester. Contact your
Tektronix representative or distributor for ordering information. See
page xv for further information on contacting Tektronix.
Table B- 2: Optional accessories
B- 2
Part number
Description
012-0114-00
Low-precision “N” 6 foot cable (1.83 m)
012-0482-00
RF Coaxial Cable, 50 Ohm, 36 inch (91 cm), BNC
Male to BNC Male
012-1619-00
Calibrated precision “N” 10 Foot Cable
103-0045-00
“N” Male to BNC Female Adapter
103-0429-00
Barrell “N” Female
103-0430-00
“N” Male to “N” Male Adapter, DC--18 GHz
103-0431-00
7--16(F) to N(F) Adapter
103-0432-00
7--16(M) to N(F) Adapter
119-6594-00
Beam Antenna 824 MHz -- 896 MHz
119-6595-00
Beam Antenna 896 MHz -- 960 MHz
119-6596-00
Beam Antenna 1710 MHz -- 1880 MHz
119-6597-00
Beam Antenna 1850 MHz -- 1990 MHz
119-6598-00
DC Block Type N
119-6599-00
N(F) to N(M) Attenuator 50 W, 20 dB
119-6600-00
Calibrated Coupler “N” 500 MHz --1000 MHz
119-6601-00
Directional Coupler “N” 920 MHz --2200 MHz
119-6602-00
Universal Adapter Kit, 30 pcs
119-6609-00
Sniffer Antenna
174-3578-00
SMB Female to BNC Male
YBT250 Field Transmitter & Interference Tester User Manual
Appendix B: Accessories
Table B- 2: Optional accessories (Cont.)
Part number
Description
200-0678-00
BNC Metal Cap
200-4696-00
“N” Metal Cap
For the most current list of accessories, please see the Tektronix
website: www.tektronix.com.
YBT250 Field Transmitter & Interference Tester User Manual
B- 3
Appendix B: Accessories
B- 4
YBT250 Field Transmitter & Interference Tester User Manual
Appendix C: Options
This section lists the configuration and measurement options
available for the YBT250. To take RF measurements, interference
measurements or modulation measurements, a measurement option
must be installed in the YBT250. You can order one measurement
option, all the available options, or any combination of options. You
can add a measurement option to your YBT250 without returning it
to Tektronix. For information on installing a measurement option on
your YBT250, see Appendix D.
Table C-- 1 lists the measurement options available for the YBT250
Field Transmitter & Interference Tester.
Table C- 1: Measurement options
Option
Description
Option EM1
Add RF measurements for GSM/EDGE standards
Option GR1
Add RF measurements for GSM standards
Option CR1
Add RF measurements for cdmaOne/cdma2000
standards
Option CD1
Add Demodulation measurements for cdmaOne
standards
Option CD2
Add Demodulation measurements for cdma2000
standards
Option IR1
Add RF measurements for IS-136 standards
Option AR1
Add RF measurements for Analog standards
Option IN1
Add Interference measurements standards
Option WS1
Adds analysis of W--CDMA Scrambling Code, including a
Scrambling Code display and Ec/Io and Ec data.
Option WR1
Add RF measurements for W-CDMA
Option WD1
Add Demodulation measurements for W-CDMA
YBT250 Field Transmitter & Interference Tester User Manual
C- 1
Appendix C: Options
Table C- 1: Measurement options (Cont.)
C- 2
Option
Description
Option CRE
Add RF measurements for CDMA2000 1x EV--DO
standards
Option CDE
Add Demodulation measurements for CDMA2000
1x EV--DO standards
YBT250 Field Transmitter & Interference Tester User Manual
Appendix D: Installing Options and
Upgrading Software
The YBT250 Field Transmitter & Interference Tester is a highly-configurable instrument. You can buy the YBT250 with only the
measurement capability you need and then add measurement
capabilities as your needs expand. Additional measurement
capability is added by enabling or installing software options. The
available measurement options are shown in Table C-- 1 on page C-- 1.
Measurement options are enabled by entering an Options key. An
Options key is a coded text string that is tied to the serial number and
Global ID of the instrument module. An Options key works only on
the YBT250 for which it is purchased. To purchase an Options key,
contact your local Tektronix representative.
Before Installing Options
You can install the measurement options listed in Table C-- 1 without
returning the YBT250 to Tektronix. First, you will need to purchase
a new Options key from Tektronix. To purchase a new Options key
you will need to provide the serial number and Global ID for your
YBT250 module (not the NetTek Analyzer Platform).
To display the YBT250 serial number:
H From the YBT250 application menu bar, select Tools >
Hardware info.
The serial number is displayed near the top of the window. The serial
number is also printed on a tag located on the bottom of the module.
To display the YBT250 Global ID:
H From the YBT250 application menu bar, select Tools >
Hardware info.
The Global ID is displayed at the bottom of the scrolling window.
YBT250 Field Transmitter & Interference Tester User Manual
D- 1
Appendix D: Installing Options and Upgrading Software
To reinstall the original application software or install a free upgrade
on the YBT250, you will need the current Options key for your
YBT250.
To display the YBT250’s current Options key:
H From the YBT250 application menu bar, select Tools > Software
info.
The Options key is displayed near the bottom of the scrolling
window.
Installing Options
To install an option once you have an Options key:
1. Power on the NetTek Analyzer Platform.
2. From the YBT250 application menu bar, select Tools > Upgrade
Software. The dialog box shown in Figure D-- 1 appears.
Figure D- 1: The dialog displayed by selecting Tools>Upgrade
Software
a. To see which upgrades are installed or which upgrades are
available, select Tell me more about upgrades. This
displays the dialog shown in Figure D-- 2.
D- 2
YBT250 Field Transmitter & Interference Tester User Manual
Appendix D: Installing Options and Upgrading Software
Figure D- 2: This dialog displays information about software upgrades
b. To see more information about either the available
upgrades or the installed upgrades, select the upgrade from
the appropriate box and then select Description.
c. To continue with the software upgrade, select Close to
return to the Upgrade Software dialog.
3. To continue with a software upgrade, select Install. This displays
the dialog shown in Figure D-- 3.
Figure D- 3: Choosing the install method
YBT250 Field Transmitter & Interference Tester User Manual
D- 3
Appendix D: Installing Options and Upgrading Software
4. Select Install with only a key and then select Next > to continue
with the upgrade.
5. Enter the Options key into the dialog box as shown in
Figure D-- 4. To display the soft keyboard, tap the keyboard button
to the right of the text entry box. After you enter the Options key,
select Next >.
Figure D- 4: Entering the Options key
After you select Next >, the software installation proceeds. When
the installation is completed, the dialog box shown in
Figure D-- 5 appears.
Figure D- 5: Software installation is complete
D- 4
YBT250 Field Transmitter & Interference Tester User Manual
Appendix D: Installing Options and Upgrading Software
6. Select Done to complete the software upgrade process.
7. If you received new software as part of an upgrade kit, place the
label supplied in the kit on the bottom edge of your YBT250
module.
Upgrading/Reinstalling the YBT250 Software
On-screen installation instructions will guide you through upgrading
or reinstalling the YBT250 software:
1. Insert the YBT250 Installation SW CD-ROM (Tektronix part
number, 063-3476-XX) into your PC and follow the on-screen
instructions that appear.
2. If no instructions appear after you insert the CD-ROM, use
Windows Explorer to display the contents of the CD-ROM and
double-click the setup.exe file to begin the installation. Follow
the on-screen instructions.
3. If you received new software as part of an upgrade kit, place the
label supplied in the kit on the bottom edge of your YBT250
module.
YBT250 Field Transmitter & Interference Tester User Manual
D- 5
Appendix D: Installing Options and Upgrading Software
D- 6
YBT250 Field Transmitter & Interference Tester User Manual
Appendix E: Functional Verification
Procedure
This appendix provides a functional verification procedure. The
procedure verifies the basic functionality of the YBT250. The
functional verification procedure can be used for incoming
inspection purposes.
NOTE. The functional verification procedure in this appendix does
not confirm that the YBT250 meets or exceeds the performance
requirements for the specifications listed in Appendix A.
There are two parts to this procedure:
H Self Tests: provides instructions for performing the internal
diagnostic self-tests.
H Functional Tests: provides instructions for verifying
capabilities not completely covered by the diagnostic
self-tests. Requires the use of a signal generator.
Self Tests
Equipment Required
H None.
Prerequisite
H None.
To run the internal diagnostics self-tests:
1. Power up the NetTek Analyzer Platform.
2. Press File>Exit to quit the YBT250 application, if it is running.
3. Press Start>Programs>Tektronix Utilities>Diagnostics in the
taskbar.
YBT250 Field Transmitter & Interference Tester User Manual
E- 1
Appendix E: Functional Verification Procedure
4. Tap the + box next to All Modules, All Tests to expand the
selection tree.
5. Tap the check box next to Platform to deselect the platform
diagnostics.
6. Verify that Module 1: Digital and Module 1: Analog are
selected. See Figure E-- 1.
Figure E- 1: Settings to run diagnostics
7. Select LOOP, set the loop count to 1.
8. Tap Run.
9. Verify that each test executes and passes. You will need to verify
the audio tone output diagnostic by tapping the screen. The test
will fail if you do not respond.
NOTE. If you encounter any errors, you can tap the Failure Log tab
to display more information. If the YBT250 fails any of its diagnostic
tests, contact your local Tektronix service representative.
E- 2
YBT250 Field Transmitter & Interference Tester User Manual
Appendix E: Functional Verification Procedure
10. Tap Close to exit the diagnostic system.
Functional Tests
To perform the following tests, you must have an RF signal source.
Equipment Required
H One 50 Ω BNC cable, such as Tektronix part number
012-0057-01
H One BNC-female to N-male connector adapter, such as Tektronix
part number 103-0045-00
H An RF signal generator with a 10MHz reference output, capable
of generating a 100 MHz RF signal
Prerequisite
H None
NOTE. These procedures verify only that the YBT250 is operating
correctly. They do not verify that the YBT250 meets warranted
specifications.
Section 1: Check RF attenuation
To check the RF attenuation:
1. Power up the NetTek Analyzer Platform.
2. If necessary, launch the YBT250 application by double-tapping
the YBT250 icon on the desktop or selecting Start>Programs>NetTek>YBT250 from the Taskbar.
3. Power on the RF signal generator.
4.
Set the RF signal generator to a 100 MHz, - 30 dBm output
level.
5.
Connect the BNC female-N male adapter to the YBT250 RF
INPUT connector.
YBT250 Field Transmitter & Interference Tester User Manual
E- 3
Appendix E: Functional Verification Procedure
6.
Connect the BNC cable between the adapter on the RF INPUT
connector and the signal generator output.
7.
In the YBT250 application menubar, select Tools>Factory
Reset. Tap Reset All in the pop-up dialog box.
8.
). Using the numeric
Tap the Freq (MHz) button (
keypad, set the measurement frequency to 100 MHz.
9.
). Verify that the signal
Tap the AutoLevel button (
appears on the center of the screen, with approximately
- 30 dBm amplitude.
10. Select AMPS EIA 553 from the signal standard drop down list.
(If AMPS EIA 553 doesn’t appear in the list, select More... and
then enable AMPS EIA 553.)
11. Tap the Measure (1) button to display the Measurements
window. If the displayed measurement is not Channel Power, tap
Select Measurement, then select the RF Power measurement.
12. Verify that the Channel Power is approximately - 30 dBm.
13. Change the signal amplitude on the Signal Generator to 0 dBm.
14. Verify that the Channel Power measurement is approximately
0 dBm.
15. Change the signal amplitude on the Signal Generator to - 70dBm
16. Verify that the Channel Power measurement is approximately
- 70dBm.
17. Disconnect the Signal Generator output from the YBT250.
Section 2: External Reference
To check the External Reference function:
1. Tap the Measure button (
).
2. Tap Select Measurement. Tap Carrier Freq to display the
Carrier Frequency measurement.
3. Verify the frequency reference icon (upper-right portion of the
display) appears as
E- 4
(F INT).
YBT250 Field Transmitter & Interference Tester User Manual
Appendix E: Functional Verification Procedure
4. Verify that the External Reference Frequency measurement
readout indicates “no signal” by displaying “ - - - - - ”.
5. On your RF signal generator, set the external frequency to
10 MHz at 0 dBm.
6. Connect the external reference output of the signal generator to a
50 Ω BNC cable. Connect the cable to the FREQUENCY
REFERENCE INPUT of the YBT250.
Upon connection, the YBT250 should display a window
indicating it is acquiring the external reference. The window
should disappear within 15 seconds.
7. Verify that the External Reference Frequency is 10.00000 MHz
(bottom measurement on the screen).
8. Disconnect the Signal Generator output from the YBT250
Frequency Reference input.
This completes the Incoming Inspection procedure. If any errors
occured during this procedure, contact your local Tektronix service
representative.
YBT250 Field Transmitter & Interference Tester User Manual
E- 5
Appendix E: Functional Verification Procedure
E- 6
YBT250 Field Transmitter & Interference Tester User Manual
Appendix F: Supported Signal Standards
This appendix lists the signal standards on which measurements can
be made by the YBT250.
Table F- 1: Cellular standards supported
Standard
Channel numbers
US CDMA-Cellular
1≤N≤799
TIA/EIA-95
990≤N≤1023
TIA/EIA-97C
US CDMA-PCS
1≤N≤1199
TIA/EIA-95
TIA/EIA-97C
CDMA Korea-PCS
1≤N≤599
CDMA Japan/ARIB
1≤N≤799
801≤N≤1039
1041≤N≤1199
CDMA China-1
0≤N≤1000
1329≤N≤2047
CDMA China-2
0≤N≤1000 plus 1329≤N≤2047
CDMA2000 Class 0, Korea Cellular
1≤N≤799
990≤N≤1023
CDMA2000 Class 0, N. A. Cellular
1≤N≤799
990≤N≤1023
CDMA2000 Class 1, N. A. PCS
0≤N≤1199
CDMA2000 Class 2 (TACS Band)
0≤N≤1000
1329≤N≤2047
CDMA2000 Class 3 (JTACS Band)
1≤N≤799
YBT250 Field Transmitter & Interference Tester User Manual
F- 1
Appendix F: Supported Signal Standards
Table F- 1: Cellular standards supported (Cont.)
Standard
Channel numbers
801≤N≤1039
1041≤N≤1199
1201≤N≤1600
CDMA2000 Class 4, Korea PCS
0≤N≤599
CDMA2000 Class 5, (NMT-450W 25 kHz)
1≤N≤300
539≤N≤871
CDMA2000 Class 5, (NMT-450N 20 kHz)
1039≤N≤1473
1792≤N≤2016
CDMA2000 Class 6, IMT-2000
0≤N≤1199
CDMA2000 Class 7, N. A. 700 MHz Cell Band
0≤N≤359
W-CDMA
9601≤N≤9899
10551≤N≤10849
NADC IS-136 Cellular
1≤N≤799
990≤N≤1023
NADC-PCS / IS-136
1≤N≤1999
GSM/EDGE 450
259≤N≤293
GSM/EDGE 480
306≤N≤340
GSM/EDGE 850
128≤N≤251
GSM-E/EDGE 900
0≤N≤124
975≤N≤1023
GSM-P/EDGE 900
1≤N≤124
GSM-R/EDGE 900
0≤N≤124
955≤N≤1023
GSM/EDGE 1800
512≤N≤885
GSM/EDGE 1900
512≤N≤810
AMPS / EIA 553
1≤N≤799
F- 2
YBT250 Field Transmitter & Interference Tester User Manual
Appendix F: Supported Signal Standards
Table F- 1: Cellular standards supported (Cont.)
Standard
Channel numbers
990≤N≤1023
N-AMPS / IS-88
1≤NM≤799
990≤NM≤1023
1≤NL≤799
990≤NL≤1023
1≤NU≤799
990≤NU≤1023
TACS
1≤N≤1000
ETACS
0≤N≤1000
1329≤N≤2047
NTACS
1≤N≤799
800≤N≤1039
1040≤N≤1199
JTACS
0≤N≤798
(even chan. only)
800≤N≤1038
(even chan. only)
1040≤N≤1198
(even chan. only)
NMT-411-25 kHz
539≤N≤871
NMT-450-25 kHz
1≤N≤300
NMT-450-20 kHz
1039≤N≤1473
NMT-470-20 kHz
1792≤N≤2016
NMT-900
1≤N≤1000
NMT-900 (offset)
1025≤N≤2023
MATS-E
1≤N≤1000
YBT250 Field Transmitter & Interference Tester User Manual
F- 3
Appendix F: Supported Signal Standards
Table F- 1: Cellular standards supported (Cont.)
Standard
Channel numbers
C-450 (SA)
1≤N≤247
C-450 (P)
1≤N≤800
CDMA2000 1xEVDO Class 0 NA Cellular
1≤N≤799
990≤N≤1023
CDMA2000 1xEVDO Class 0 Korea
1≤N≤799
990≤N≤1023
CDMA2000 1xEVDO Class 1 N.A. PCS
0≤N≤1199
CDMA2000 1xEVDO Class 2 TACS Band
0≤N≤1000
1329≤N≤2047
CDMA2000 1xEVDO Class 3 JTACS Band
1≤N≤799
801≤N≤1039
1041≤N≤1199
1201≤N≤1600
CDMA2000 1xEVDO Class 4 Korea PCS
0≤N≤599
CDMA2000 1xEVDO Class 5 NMT--25k--450
1≤N≤300
539≤N≤871
CDMA2000 1xEVDO Class 5 NMT--20k--450
1039≤N≤1473
1792≤N≤2016
CDMA2000 1xEVDO Class 6 IMT--2000
0≤N≤1199
CDMA2000 1xEVDO Class 7 N.A. 700 MHz
Cellular
0≤N≤359
CDMA2000 1xEVDO Class 8 GSM Band
0≤N≤1499
CDMA2000 1xEVDO Class 9 GSM Band
0≤N≤699
F- 4
YBT250 Field Transmitter & Interference Tester User Manual
Appendix G: Channel Table
You can generally find the contents of the standard Channel Table
file by following this path on the NetTek Analyzer:
\BuiltInDisk\NetTekApps\YBT250\SignalStandards.txt
However, if the application is not loaded into the BuiltInDisk
directory due to lack of space, you can also find the standard
Channel Table file on this path:
\NetTekApps\YBT250\SignalStandards.txt
This file can be opened online as a text file (with Pocket Word);
however, for the easiest viewing, copy the file to a PC and use Excel
to view it.
For instructions on how to create a custom version of the channel
table, see page 2-- 40.
About the Signal Type
The Channel Table file contains a field that defines the type of signal
for the named signal standard. For example, the standard named
GSM 900 is designated as a Signal Type 4. The Signal Type is used
by the Signal Identification function to suggest possible sources of
interference.
Although the YBT250 will make measurements only on the first six
signal types listed in Table 2-- 12, you can define a signal standard
that is based on other signal types. For example, you could create an
FM signal standard of signal type 998 (Analog signal, no measurements available) and define channels within the FM radio band. This
would allow you to tune to “channels” within the FM band, although
you could not take measurements with the YBT250.
The reason for creating a signal standard is that the Signal Identification function uses the Channel Table to determine possible types of
signals, and if you have defined a signal standard, then it will appear
as a possible source in the signal Identification function.
YBT250 Field Transmitter & Interference Tester User Manual
G- 1
Appendix G: Channel Table
The signal types 998 and 999 are included in the Channel Table to
enable you to create a custom signal standard for analog or digital
signals that do not match the other signal types (such as an “FM”
standard noted previously). Though no measurements would be made
on channels of a standard based on either 998 or 999, the standard
they are assigned to would be used by the Signal Identification
function.
G- 2
YBT250 Field Transmitter & Interference Tester User Manual
Glossary
Glossary
ACLR. Adjacent Channel Leakage power Ratio (ACLR) is the ratio
of the RRC (Root Raised Cosine) filtered mean power centered
on the assigned channel frequency to the RRC filtered mean
power centered on an adjacent channel frequency.
BMP - Graphics File Format. BMP is one of the file formats available
for saving screen captures. BMP is the standard Windows
graphic image format. The filename extension is “bmp”.
BTS. Acronym for Base Transceiver Station.
Burst Power. Burst Power is a measurement of the average power in
a burst of RF power on a GSM signal.
Carrier Feedthrough. Carrier Feedthrough is the offset of the
constellation from zero power. It is measured relative to the full
power carrier.
Channel Power. Channel Power is the RF Power measured on the
selected channel.
Codogram. The Power Codogram displays a series of sequential code
domain power measurements where color represents amplitude
and the vertical axis represents time.
Code Domain Power. Code Domain Power is a measurement of the
power in each Walsh code.
Difference. Difference is the power difference between Channel
Power and the Ref Power.
Error Vector Magnitude (EVM). Error Vector Magnitude is the RMS
value of all the vectors that extend from the ideal constellation
points to the received signal constellation points in a record of
demodulated CDMA symbols, divided by the RMS value of the
signal. This result is multiplied by 100 to give a final value in
percent.
YBT250 Field Transmitter & Interference Tester User Manual
Glossary- 1
Glossary
Flash Memory. Flash memory is a form of non-volatile memory.
When the YBT250 software is stored in flash memory, the
YBT250 loads more quickly at power on.
FM Deviation. FM Deviation is the maximum one-sided frequency
deviation of the carrier due to modulation. The measurement
displays whichever is greatest of either the positive or negative
deviation.
Forward Frequency. The frequency the base station uses to transmit to
the mobile unit. Also called Downlink Frequency.
Frequency Marker. The frequency marker indicates the Measurement
Frequency setting. The Measurement Frequency is the frequency
at which measurements are made. The frequency marker
appears on the display as a small triangle at the bottom of a
trace display and a circle on the trace itself. Changing the
frequency marker location, by tapping a new location on the
display or entering a new Channel number or frequency, changes
the Measurement Frequency.
Frequency Error. Frequency Error is the difference in frequency
between the measured frequency of the selected channel and the
frequency assigned to the channel in the channel table.
JPEG - Graphics File Format. JPEG, an acronym for Joint Photograph-
ic Experts Group, is one of the file formats available for saving
screen captures. Files saved in JPEG format can be much
smaller in size than files saved in BMP format. The filename
extension is “jpg”.
Measurement Frequency. The Measurement Frequency is the
frequency at which measurements are made. The Measurement
Frequency is always shown in the Frequency box. The
Measurement Frequency is indicated in the spectrum displays by
the frequency marker.
Measured Frequency. The actual frequency measured for the selected
channel.
Glossary- 2
YBT250 Field Transmitter & Interference Tester User Manual
Glossary
Noise Floor. Noise Floor measures the interference coming into the
receiver antenna. The Noise Floor is an integrated power
measurement for the selected standard. Larger numbers indicate
more noise.
Occupied Bandwidth. The Occupied Bandwidth is the frequency
range where 99% of the power transmitted in a single channel
lies. If there is a signal in either channel adjacent to the selected
channel, the signal will add power to the measurement, thus
resulting in an inaccurate measurement.
Peak-to-Average Power. The Peak-to-Average Power measurement is
the ratio of the peak envelope power in the transmitted signal to
the average power in the transmitted signal. The ratio is
expressed in dB.
Pilot Power. The Pilot Power is the absolute power of the pilot
channel (Walsh Code 0) in a CDMA channel. For W-CDMA,
the Pilot Power is the absolute power of the Primary Common
Pilot Channel (P-CPICH). The primary common pilot channel
is used as a phase reference for many channels and to identify
the primary scrambling code.
Pilot Time Alignment Error (Tau). The Pilot Time Alignment Error is
the difference in timing between the pseudo noise (PN)
sequences and the CDMA system time.
PN Offset. PN Offset is the “coarse” timing difference between the
pilot channel and the even-second clock.
PNG - Graphics File Format. PNG, an acronym for Portable Network
Graphics, is one of the file formats available for saving screen
captures. PNG is a new format developed primarily for use on
the World Wide Web. PNG files are usually much smaller than
BMP files. The filename extension is “png”.
RF Channel Power. RF Channel Power is the total RF power in the
selected channel. This measurement assumes a 50 ohm nominal
impedance.
Reference Level. The power level at the top of a spectrum window.
YBT250 Field Transmitter & Interference Tester User Manual
Glossary- 3
Glossary
Reverse Frequency. The frequency the mobile unit uses to transmit to
the base station. Also called uplink frequency, reverse channel
or uplink channel.
Scrambling Code. There are 512 primary scrambling codes available
in a W-- CDMA system, numbered from 0 to 511, which are used
to uniquely identify each downlink signal. All code channels in
a downlink signal, with the exception of the primary (P-- SCH)
and secondary (S-- SCH) synchronization channels, are
scrambled by either the primary scrambling code, or one of the
15 secondary scrambling codes associated with each primary
scrambling code. The YBT250 decodes only the primary
scrambling code of each signal, not the secondary scrambling
codes.
Span. Sets the frequency range covered by the spectral display
graph. The YBT250’s resolution bandwidth (RBW) is
automatically adjusted based on the span setting.
Waveform Quality (Rho). The Waveform Quality measurement is an
indication of the quality of the transmitted signal. Rho can vary
between 0.0 and 1.0, where 1.0 represents a perfect signal. True
Waveform Quality is defined as an out-of-service measurement
where the base station is transmitting only a pilot signal. If
additional channels are active, an Estimated Rho is displayed.
Glossary- 4
YBT250 Field Transmitter & Interference Tester User Manual
Index
Index
A
C
Absolute RF power mode, 3-- 70
Accessories, B-- 1
ACLR, measuring, 3-- 118
Address, Tektronix, xiii
Audible tone, 3-- 40
Auto saving and exporting, setting
default location for files, 2-- 49
Average, trace type, 3-- 6
C/I (GSM/EDGE), measuring,
3-- 91
Calibration interval, A-- 23
Carrier Feedthrough, measuring,
3-- 85, 3-- 86, 3-- 88
Carrier Frequency, measuring,
3-- 81
Cellular standards supported, F-- 1
Certifications, A-- 24
Channel table
channel wizard, 2-- 38
contents of, G-- 1
customizing, 2-- 40
setting, 2-- 36
signal type, 2-- 44, G-- 1
Clear All Channels button, 2-- 38
Code Power, measuring
cdma2000, 3-- 95
cdmaOne, 3-- 93
Code Power readout, 3-- 97
Codogram
Auto Save, 3-- 112
displaying, 3-- 104
cdma2000, 3-- 106, 3-- 108
cdma2k 1xEV-- DO, 3-- 110
printing, 3-- 113
Compare Saved command, 3-- 15
File menu, 2-- 16, 2-- 17
Comparing traces, 3-- 13
Connecting RF signals, 2-- 24
Connectors, input, 2-- 3
Contacting Tektronix, xiii
Controls, front panel, 2-- 2
B
Band Edge Cursor, 3-- 22
View menu, 2-- 18
BATTERIES indicator, 2-- 2
Battery
installing, 1-- 6
removing, 1-- 10
Battery life, A-- 23
Beep indicator, 3-- 40
Both on front trace, 3-- 21
View menu, 2-- 18
Both on Trace 1/2, 3-- 21
View menu, 2-- 18
Buttons
command bar area, 2-- 12
help, 2-- 4
Interference window, 3-- 36
Measure window, 3-- 52
program, 2-- 6
rotate traces, 3-- 13
shared control area, 2-- 11
Spectrum window, 3-- 2
tuning control area, 2-- 13
YBT250 Field Transmitter & Interference Tester User Manual
Index- 1
Index
Conventions, xii
Coordinates, saving GPS data,
2-- 50
D
Data Code Power Min and Max ,
Code Domain Power readout,
3-- 104
Daughter readout, 3-- 97
Default file type, setting the, 2-- 48
Define Mask, View Menu, 2-- 18
Define Trace 2, View Menu, 2-- 18
Define Trace 2 tab, 3-- 13
Description, product, 1-- 1
Desktop
icons, 2-- 6, 2-- 7
overview, 2-- 5
program button, 2-- 6
Start menu, 2-- 6
status area, 2-- 7
taskbar, 2-- 6
Difference, 3-- 65
Dimensions, external, A-- 22
Disabling tap/drag, 3-- 11
Display, preferences, 2-- 35
Displaying, saved traces, 3-- 13
E
Ec scrambling code, (Opt WS1),
3-- 48
Ec/Io scrambling code, (Opt WS1),
3-- 48
Edit command, Setup menu, 2-- 19
Enabling signal standards, 2-- 33
Enabling tap/drag, 3-- 11
Environmental specifications,
A-- 24
Index- 2
Error marking in Spectrogram,
3-- 25
Error Vector Magnitude
measuring, 3-- 85, 3-- 86, 3-- 88
cdma2k 1xEV-- DO, 3-- 88
measuring (GSM/EDGE), 3-- 91
Exit command, File menu, 2-- 16,
2-- 17
Export Results As command, File
menu, 2-- 16
Export Screen As command, File
menu, 2-- 16, 2-- 17
Export Trace As command, File
menu, 2-- 17
Exporting
results, 3-- 127
screens, 3-- 128
traces, 3-- 131
F
Factory Reset command, Tools
menu, 2-- 19
File menu, 2-- 16, 2-- 17
File options, setting, 2-- 45
Filename length, 2-- 47
Filename prefix, setting, 2-- 46
Find information, start Help, 2-- 4
Frequency Correction, 2-- 29
Tools menu, 2-- 19
FREQUENCY REFERENCE
INPUT connector, 2-- 3, 2-- 26
Front-- panel controls, 2-- 2
Functional verification, E-- 1
G
Global ID, displaying, D-- 1
GPS receiver set up, 2-- 50
YBT250 Field Transmitter & Interference Tester User Manual
Index
GSM/EDGE
Absolute RF power mode, 3-- 70
BCCH Frame Sync, 3-- 67
Power vs. Time graph units, 3-- 79
Relative RF power mode, 3-- 70
H
Hardware Info command, Tools
menu, 2-- 20
Help
find information, 2-- 4
icons, 2-- 4
Hide program, 2-- 6
Horizontal position, setting, 3-- 10
I
Icons
?, 2-- 4
command bar area, 2-- 12
desktop, 2-- 6, 2-- 7
Interference window, 3-- 36
Measure window, 3-- 52
shared control area, 2-- 11
Spectrum window, 3-- 2
status, 2-- 7
tuning control area, 2-- 13
IN1, option, 3-- 35
Incoming inspection, E-- 1
Information, getting help, 2-- 4
Input connectors, 2-- 3, 2-- 23, 2-- 26
Input Overrange marking in Spectrogram, 3-- 25
Input panel, enter keyboard characters, 2-- 20
Installing
shoulder strap, 1-- 16
strand hook, 1-- 16
YBT250 module, 1-- 3
Interference
identifying, 3-- 38
locating, 3-- 35
Interference Analyst, (Option IN1),
3-- 35
Intermittent interference, locating,
3-- 44
Io scrambling code, (Opt WS1),
3-- 48
K
Keyboard, (soft) input panel, 2-- 20
Keyboard command, Tools menu,
2-- 19
Knob
button, 2-- 11
using, 2-- 14
L
Limit test measurements
Analog, 3-- 56
cdma2k 1xEV-- DO, 3-- 58
cdmaOne/cdma2000, 3-- 56
GSM, 3-- 56
GSM/EDGE, 3-- 57
NADC IS-- 136, 3-- 57
W CDMA, 3-- 57
Locating intermittent signals, 3-- 44
Location data, saving GPS coordinates, 2-- 50
Location for auto saving files, 2-- 49
Lock-up, recovering from, 2-- 2
Locking scrambling codes, (Opt
WS1), 3-- 48
YBT250 Field Transmitter & Interference Tester User Manual
Index- 3
Index
M
M1 Trace 1, M2 Trace 2, 3-- 21
View menu, 2-- 18
MAC Code Power, Code Domain
Power readout, 3-- 103
MAC Index, Code Domain Power
readout, 3-- 103
Mark All Channels button, 2-- 37
Marker Code Domain Power
readout, 3-- 100
Markers
Both on front trace, 3-- 21
Both on Trace 1/2, 3-- 21
M1 Trace 1, M2 Trace 2, 3-- 21
measuring frequency and level,
3-- 20, 3-- 21
readouts, 3-- 18
specifying units, 3-- 19
View menu, 2-- 18
viewing, 3-- 17
Mask, View Menu, 2-- 18
Max Hold, trace type, 3-- 7
Measurement frequency, 3-- 52,
3-- 53
Measurements, available, 3-- 55
Measuring
ACLR, 3-- 118
C/I (GSM/EDGE), 3-- 91
Carrier Feedthrough, 3-- 85, 3-- 86,
3-- 88
carrier frequency, 3-- 81
cdma2000 code power, 3-- 95
cdmaOne code power, 3-- 93
Error Vector Magnitude, 3-- 85,
3-- 86, 3-- 88
cdma2k 1xEV-- DO, 3-- 88
Error Vector Magnitude (GSM/
EDGE), 3-- 91
occupied bandwidth, 3-- 83
Index- 4
Origin Offset (GSM/EDGE),
3-- 91
Peak to Average Power Ratio,
3-- 80
pilot power, 3-- 115, 3-- 117
Pilot Time Alignment, 3-- 85
PN Offset, 3-- 85
Power vs. Time (GSM/EDGE),
3-- 76
RF Channel Power (GSM/
EDGE), 3-- 65
RF Power, 3-- 63
cdma2000 1xEV-- DO, 3-- 72
Scrambling Code, 3-- 86, 3-- 88
signal quality, 3-- 85, 3-- 86
cdma2k 1xEV-- DO, 3-- 88
GSM/EDGE, 3-- 91
Waveform Quality (Rho), 3-- 85
Menus
File, 2-- 16, 2-- 17
Help, 2-- 4
Setup, 2-- 19
Start, 2-- 6
Tools, 2-- 19
View, 2-- 18
Min Hold, trace type, 3-- 6
Min/Max Hold, trace type, 3-- 7
Mother Code Domain Power
readout, 3-- 97
N
No scrambling code, (Opt WS1),
3-- 48
Normal, trace type, 3-- 6
Notes, entering, 2-- 47
Numeric keypad, using, 2-- 14
YBT250 Field Transmitter & Interference Tester User Manual
Index
O
Open command
File menu, 2-- 16, 2-- 17
Setup menu, 2-- 19
Option
IN1, 3-- 35
WS1, 3-- 47
Optional accessories, B-- 2
Options, C-- 1
Options
installed, D-- 2
installing, D-- 1
Options command, Tools menu,
2-- 19
Options key, displaying, D-- 2
Origin Offset, measuring (GSM/
EDGE), 3-- 91
OVSF Code Domain Power readout, 3-- 100
P
Path for auto saving files, 2-- 49
Peak to Average Power Ratio,
measuring, 3-- 80
Phone number, Tektronix, xiii
Pilot power, measuring, 3-- 115,
3-- 117
Pilot Time Alignment, measuring,
3-- 85
PN Offset
Code Domain Power readout,
3-- 97, 3-- 103
measuring, 3-- 85
Power Code Domain Power readout, 3-- 100
Power off, analyzer, 2-- 21
Power switch, 1-- 20, 2-- 2
Power vs. Time (GSM/EDGE),
3-- 76
measuring, 3-- 76
Setting graph units, 3-- 79
Preferences tab, 2-- 35
Preset command, Setup menu,
2-- 19
Print command, File menu, 2-- 16,
2-- 17
Product description, 1-- 1
Product support, contact information, xiii
Program button, 2-- 6
Q
Quick Select List, 2-- 37
R
Recalling a trace, 3-- 130
Recalling results, 3-- 125
Recalling setups, 3-- 134
Red marking in Spectrogram, 3-- 25
Ref Power, 3-- 65
Reference level, setting, 3-- 11
Relative RF power mode, 3-- 70
Removing, a battery, 1-- 10
Removing , a module, 1-- 6
Reset
hardware, 2-- 2
software, 1-- 19, 2-- 22
switch, 2-- 2
Results
exporting, 3-- 127
recalling, 3-- 125
saving, 3-- 124
YBT250 Field Transmitter & Interference Tester User Manual
Index- 5
Index
Results Properties command, File
menu, 2-- 16, 2-- 17
RF Channel Power (GSM/EDGE)
Absolute, 3-- 70
BCCH Frame Sync, 3-- 67
measuring, 3-- 65
Relative, 3-- 70
RF INPUT connector, 2-- 3
RF Power, measuring, 3-- 63
cdma2000 1xEV-- DO, 3-- 72
Rho, measuring, 3-- 85
Rotate Trace Order, View menu,
2-- 18
Rotate traces button, 3-- 13
RSCP scrambling code, (Opt
WS1), 3-- 48
RSSI scrambling code, (Opt WS1),
3-- 48
S
Save & Export tab, 2-- 46
Save command, Setup menu, 2-- 19
Save Results command, File menu,
2-- 16
Save Results As command, File
menu, 2-- 16
Save Trace command, File menu,
2-- 17
Save Trace As command, File
menu, 2-- 17
Saved trace, displaying, 3-- 13
Saving
GPS coordinates, 2-- 50
location for auto saving files,
2-- 49
results, 3-- 124
setting default file types, 2-- 48
setting up defaults, 2-- 45
traces, 3-- 129
Index- 6
Scr Code tab, (Opt WS1), 3-- 47
Scrambling Code
Domain Power readout, 3-- 100
measuring, 3-- 86, 3-- 88
Scrambling Code Analyzer, (Opt
WS1), 3-- 47
setting, 3-- 61
Screens
exporting, 3-- 128
file formats, 3-- 132
Serial number, displaying, D-- 1
Service support, contact information, xiii
Setting
channel table, 2-- 36
codogram Auto Save, 3-- 112
display colors, 2-- 35
file options, 2-- 45
filename prefix, 2-- 46
horizontal position, 3-- 10
measurement frequency, 3-- 52
note text, 2-- 47
reference level, 3-- 11
spectrogram Auto Save, 3-- 26
spectrogram update rate, 3-- 25
startup application, 2-- 9
technician name, 2-- 47
trace type, 3-- 6
vertical position, 3-- 10
vertical scale, 3-- 9
Setup Menu, customizing, 3-- 135
Setup menu, 2-- 19
Setups
recalling, 3-- 134
saving, 3-- 133
Shoulder strap, 1-- 16
Shutdown, analyzer power, 2-- 21
YBT250 Field Transmitter & Interference Tester User Manual
Index
Signal quality, measuring, 3-- 85,
3-- 86
cdma2k 1xEV-- DO, 3-- 88
GSM/EDGE, 3-- 91
Signal standards
enabling, 2-- 33
supported, F-- 1
Signal type, in channel table, 2-- 44
Software
load process, 1-- 17
reset, 2-- 22
upgrading, D-- 1
version, xii
Software Info, Tools menu, 2-- 20
Software Options, Options, D-- 1
Sorting scrambling codes, (Opt
WS1), 3-- 48
Specifications, A-- 1
environmental, A-- 22, A-- 24
Spectrogram
Auto Save, 3-- 26
displaying, 3-- 24
update rate, 3-- 25
Spectrogram overload marking,
3-- 25
Standard accessories, B-- 1
Standby mode, 2-- 21
Start menu, 2-- 6
Startup application, setting, 2-- 9
Status
area, desktop, 2-- 7
icons, 2-- 7
STATUS indicator, 2-- 2
Strand hook, 1-- 16
Strength indicator, 3-- 40
Suspend, analyzer activity, 2-- 21
Suspend mode, 1-- 18
Symbol Rate Code Domain Power
readout, 3-- 97, 3-- 100
symbols, 3-- 79
T
Tap/drag action icon, 3-- 11
Taskbar, desktop, 2-- 6
Technical support, contact information, xiii
Technician name, setting, 2-- 47
Tektronix, contacting, xiii
Tilt stand, 1-- 14
TIMING INPUT connector, 2-- 3,
2-- 26
Tools menu, 2-- 19
Touchscreen
calibration, 1-- 18
calibration command, Tools
menu, 2-- 19
Trace
exporting, 3-- 131
recalling, 3-- 130
saving, 3-- 129
Trace 2, View Menu, 2-- 18
Trace display options, 3-- 14
Trace2, 3-- 13
Troubleshooting, GPS receiver,
2-- 51
Type Code Domain Power readout,
3-- 97, 3-- 100
YBT250 Field Transmitter & Interference Tester User Manual
Index- 7
Index
U
W
Unlocking scrambling codes,
(Opt WS1), 3-- 48
Updates..., 3-- 25
Upgrade Software command, Tools
menu, 2-- 19
Upgrading software, D-- 1
URL, Tektronix, xiii
Waveform Quality, measuring,
3-- 85
Web site address, Tektronix, xiii
Weight, A-- 22
WS1, option, 3-- 47
V
Vertical position, setting, 3-- 10
Vertical Scale, 3-- 9
View menu, 2-- 18
vxHpc, 2-- 52
Index- 8
YBT250 Field Transmitter & Interference Tester User Manual