1
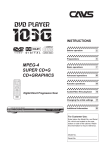
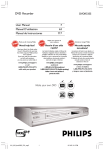
DVD PLAYER
105G USB
DVD, MPEG-4
INX, INX2, Super CD+G
CD+Graphics
Digital Direct Progressive Scan
INSTRUCTIONS
Before operation
2
Preparations
5
Basic operations
7
Advanced operations
10
Karaoke operations
13
Audio/Video files playback
15
USB memory device operations
17
Changing the initial settings
20
Additional information
24
For Customer Use:
Enter below the Model No. and Serial
No. which are located on the rear,
bottom or side of the cabinet. Retain
this information for future reference.
Model No.
Serial No.
Warnings, Cautions and Others
Mises en garde, precautions et indications diverses
CAUTION
RISK OF ELECTRIC SHOCK
DO NOT OPEN
CAUTION: TO REDUCE THE RISK OF ELECTRIC SHOCK.
DO NOT REMOVE COVER (OR BACK)
NO USER SERVICEABLE PARTS INSIDE.
REFER SERVICING TO QUALIFIED SERVICE PERSONNEL.
The lightning flash with arrowhead symbol, within an
equilateral triangle is intended to alert the user to the
presence of uninsulated "dangerous voltage" within
the product's enclosure that may be of sufficient
magnitude to constitute a risk of electric shock to
persons.
The exclamation point within an equilateral triangle is
intended to alert the user to the presence of
important operating and maintenance (servicing)
instructions in the literature accompanying the
appliance.
For U.S.A.
This equipment has been tested and found to comply with the limits for a
Class B digital device, pursuant to part 15 of the FCC Rules. These limits
are designed to provide reasonable protection against harmful interference
in a residential installation.
This equipment generates, uses and can radiate radio frequency energy
and, if not installed and used in accordance with the instructions, may
cause harmful interference to radio communications. However, there is no
guarantee that interference will not occur in a particular installation. If this
equipment does cause harmful interference to radio or television reception,
which can be determined by turning the equipment off and on, the user is
encouraged to try to correct the interference by one or more of the
following measures:
Reorient or relocate the receiving antenna.
Increase the separation between the equipment and receiver.
Connect the equipment into an outlet on a circuit different from that to
which the receiver is connected. Consult the dealer or an experienced
radio/TV technician for help.
WARNING: TO REDUCE THE RISK OF FIRE OR
ELECTRIC SHOCK, DO NOT EXPOSE THIS
APPLIANCE TO RAIN OR MOISTURE.
For Canada/Pour le Canada
CAUTION: TO PREVENT ELECTRIC SHOCK, MATCH WIDE
BLADE OF PLUG TO WIDE SLOT, FULLY INSERT
ATTENTION: POUR EVITER LES CHOCS ELECTRIQUES,
INTRODUIRE LA LAME LA PLUS LARGE DE LA FICHE DANS LA
BORNE CORRESPONDANTE DE LA PRISE ET POUSSER
JUSQUAU FOND
For Canada/Pour le Canada
THIS DIGITAL APPARATUS DOES NOT EXCEED THE CLASS B
LIMITS FOR RADIO NOISE EMISSIONS FORM DIGITAL
APPARATUS AS SET OUT IN THE INTERFERENCE-CAUSING
EQUIPMENT STANDARD ENTITLED "DIGITAL APPARATUS,"
ICES-003 OF THE DEPARTMENT OF COMMUNICATIONS.
CET APPAREIL NUMERIQUE RESPECTE LES LIMITES DE
BRUITS RADIO ELECTRIQUES APPLICABLES AUX APPAREILS
NUMERIQUES DE CLASSE B PRESCRITES DANS LA
NORMESUR LE MATERIEL BROUILLEUR: "APPAREILS
NUMERIQUES", NMB-003 EDICTEE PAR LE MINISTRE DES
COMMUNICATIONS.
CAUTION
ATTENTION
To reduce the risk of electrical shocks, fire, etc.:
1. Do not remove screws, covers or cabinet.
2. Do not expose this appliance to rain or moisture.
Caution - STANDBY/ON
Disconnect the mains plug to shut the power off completely. The POWER
button on the remote control does not disconnect the mains line when the
POWER button on the front panel is pressed in.
When the player is on standby, the POWER button is pressed in.
When the player is on standby, the power can be controled by
remote control.
IMPORTANT FOR LASER PRODUCTS
IMPORTANT POUR LES PRODUITS LASER
1. CLASS 1 LASER PRODUCT
2. CAUTION : Do not open the top cover. There are no user
serviceable parts inside the unit; leave all servicing to qualified
service personnel.
3. CAUTION : Visible and invisible laser radiation when open and
interlock failed or defeated. Avoid direct exposure to beam.
4. REPRODUCTION OF LABEL : CAUTION LABEL, PLACED INSIDE
THE UNIT.
1. PRODUIT LASER CLASSE 1
2. ATTENTION : N'ouvrez pas le couvercle superieur. II n'y aucune
piece reparable par l'utilisateur a I'interieur de I'appareil; confiez toute
reparation a un personnel qualifie.
3. ATTENTION : Risque de radiations laser visible et invisible quand
l'appareil est ouvert ou que le systeme de verrouillage ne fonctionne
pas ou a ete mis hors service. Evitez toute expositon directe au
rayon.
4. REPRODUCTION DE L'ETIQUETTE : ET QUETTE CE
PRECAUTION PLACEE L'INTERIEUR DE L'APPAREIL.
CAUTION: Visible
and invisible laser
radiation when
open and
interlock failed or
defeated. AVOID
DIRECT
EXPOSURE TO
BEAM.
(e)
ADVARSEL:
Synlig og usynlig
laserstraling nar
maskinen er aben
eller interlocken
fejler. Undga
direkte
eksponering til
straling.
(d)
VARNING: Synlig
och osynlig
laserstralning nar
den oppnas och
sparren ar
urkopplad.
Betrakta ej
stralen.
(s)
VARO: Avattaessa
ja suojalukitus
ohitettuna tai
viallisena olet alttiina
nakyvalle ja
nakymattomalle
lasersateilylle. Valta
sateen
kohdistumista
suoraan itseesi. (f)
CAUTION :
Do not block the ventilation openings or holes.
(If the ventilation openings or holes are blocked by a newspaper
or cloth, etc., the heat may not be able to get out.)
Do not place any naked flame sources, such as lighted candles,
on the apparatus.
When discarding batteries, environmental problems must be
considered and local rules or laws governing the disposal of
these batteries must be followed strictly.
Do not expose this apparatus to rain, moisture, dripping or
splashing and that no objects filled with liquids, such as vases,
shall be placed on the apparatus.
ATTENTION :
Ne bloquez pas les orifices ou les trous de ventilation.
(Si les orifices ou les trous de ventilation sont bloques par un
journal un tissu, etc., la chaleur peut ne pas etre evacuee
correctement de I'appareil.)
Ne placez aucune source de flame nue, telle qu'une bougie, sur
l'appareil.
Lors de la mise au rebut des piles, veuillez prendre en
consideration les problemes de I'environnement et suivre
strictement les regles et les lois locales sur la mise au rebut des
piles.
N'exposez pas cet appareil a la pluie, a I'humidite, a un
egouttement ou a des eclaboussures et ne placez pas des objets
remplis de liquide, tels qu'un vase, sur I'appareil.
Afin d'eviter tout risque d'electrocution, d'incendie, etc.:
1. Ne pas enlever les vis ni les panneaux et ne pas
ouvrir le coffret de l'appareil.
2. Ne pas exposer I'appareil a la pluie ni a l'humidite.
G-1
Important Product Safety
Instruction
Electrical energy can perform many useful functions.
But improper use can result in potential electrical shock or
fire hazards. This product has been engineered and
manufactured to assure your personal safety. In order not
to defeat the built-in safeguards, observe the following
basic rules for its installation, use and servicing.
ATTENTION: Follow and obey all warnings and
instructions marked on your product and its operating
instructions. For your safety, please read all the safety and
operating instructions before you operate this product and
keep this brochure and the operating instructions
packaged with your product for future reference.
INSTALLATION
1. Grounding or Polarization
(A) Your product may be equipped with a polarized
alternating-current line plug (a plug having one blade
wider than the other). This plug will fit into the power
outlet only one way. This is a safety feature. If you are
unable to insert the plug fully into the outlet, try
reversing the plug. If the plug should still fail to fit,
contact your electrician to replace your obsolete outlet.
Do not defeat the safety purpose of the polarized plug.
(B) Your product may be equipped with a 3-wire
grounding-type plug, a plug having a third (grounding)
pin. This plug will only fit into a grounding-type power
outlet. This is a safety feature. If you are unable to
insert the plug into the outlet, contact your electrician to
replace your obsolete outlet. Do not defeat the safety
purpose of the grounding-type plug.
2. Power Sources
Operate your product only from the type of power source
indicated on the marking label. If you are not sure of the
type of power supply to your home, consult your product
dealer or local power company. If your product is intended
to operate from battery power, or other sources, refer to
the operating instructions.
3. Overloading
Do not overload wall outlets, extension cords, or integral
convenience receptacles as this can result in a risk of fire
or electric shock.
4. Power Cord Protection
Power supply cords should be routed so that they are not
likely to be walked on or pinched by items placed upon or
against them, paying particular attention to cords at plugs,
convenience receptacles, and the point where they exit
from the product.
5. Ventilation
Slots and openings in the cabinet are provided for
ventilation. To ensure reliable operation of the product and
to protect it from overheating, these openings must not be
blocked or covered.
Do not block the openings by placing the product on a
bed, sofa, rug or other similar surface.
Do not place the product in a built-in installation such
as a bookcase or rack unless proper ventilation is
provided or the manufacturer's instructions have been
adhered to.
G-2
6. Wall or Ceiling Mounting
The product should be mounted to wall or ceiling only as
recommended by the manufacturer.
ANTENNA INSTALLATION
INSTRUCTIONS
1.Outdoor Antenna Grounding
If an outside antenna or cable system is connected to the
product, be sure the antenna or cable system is grounded
so as to provide some protection against voltage surges
and built-up static charges. Article 810 of the National
Electrical Code, ANSI/NFPA 70, provides information with
regard to proper grounding of the mast and supporting
structure, grounding of the lead-in wire to an antenna
discharge unit, size of grounding conductors, location of
antenna discharge unit, connection to grounding
electrodes, and requirements for the grounding electrode.
2.Lightning
For added protection for this product during a lightning
storm, or when it is left unattended and unused for long
periods of time, unplug it from the wall outlet and
disconnect the antenna or cable system. This will prevent
damage to the product due to lightning and power-line
surges.
3.Power Lines
An outside antenna system should not be located in the
vicinity of overhead power lines or other electric light or
power circuits, or where it can fall into such power lines or
circuits. When installing an outside antenna system,
extreme care should be taken to keep from touching such
power lines or circuits as contact with them might be fatal.
USE
1. Accessories
Do not place this product on an unstable cart, stand,
tripod, bracket, or table. It may fall, causing serious
injury to a child or adult, and serious damage to the
product.
Use only with a cart, stand, tripod, bracket, or table
recommended by the manufacturer or sold with the
product.
Use a mounting accessory recommended by the
manufacturer and follow the manufacturer's instructions
for any mounting of the product.
Do not try to roll a cart with small casters across
thresholds or deep-pile carpets.
2. Product and Cart Combination
A product and cart combination
should be moved with care,
Quick stops, excessive force,
and uneven surfaces may cause
the product and cart combination
to overturn.
PORTABLE CART WARNING
(Symbol provided by RETAC)
3. Water and Moisture
Do not use this product near water-for example, near a
bath tub, wash bowl, kitchen sink or laundry tub, in a
wet basement, or near a swimming pool and the like.
4. Object and Liquid Entry
Never push objects of any kind into this product through
openings as they may touch dangerous voltage point or
short-out parts that could result in a fire or electric
shock. Never spill liquid of any kind on the product.
5. Attachments
Do not use attachments not recommended by the
manufacturer of this product as they may cause
hazards.
SERVICING
1. Servicing
If your product is not operating correctly or exhibits a
marked change in performance and you are unable to
restore normal operation by following the detailed
procedure in its operating instructions, do not attempt to
service it yourself as opening or removing covers may
expose you to dangerous voltage or other hazards.
Refer all servicing to qualified service personnal.
2. Damage Requiring Service
a.
b.
c.
d.
e.
f.
Unplug this product from the wall outlet and refer
servicing to qualified service personnel under the
following conditions:
When the power supply cord or plug is damaged.
If liquid has been spilled, or objects have fallen into the
product.
If the product has been exposed to rain or water.
If the product does not operate normally by following
the operating instructions. Adjust only those controls
that are covered by the operating instructions as an
improper adjustment of other controls may result in
damage and will often require extensive work by a
qualified technician to restore the product to its normal
operation.
If the product has been dropped or damaged in any
way.
When the product exhibits a distinct change in
performance-this indicates a need for service.
3. Replacement Parts
When replacement parts are required, be sure the
service technician has used replacement parts
specified by the manufacturer or have the same
characteristics as the original part. Unauthorized
substitutions may result in fire, electric shock or other
hazards.
4. Safety Check
Upon completion of any service or repairs to this
product, ask the service technician to perform safety
checks to determine that the product is in safe
operating conditions.
6. Cleaning
Unplug this product from the wall outlet before cleaning.
Do not use liquid cleaners or aerosol cleaners. Use a
damp cloth for cleaning.
7. Heat
The product should be situated away from heat sources
such as radiators, heat registers, stoves, or other
products (including amplifiers) that produce heat.
G-3
Supplied accessories
Table of contents
Check that you have all the following accessories supplied
to you. If anything is missing, consult your dealer
immediately.
Preparations ........................................... 5
Connections ....................................................................5
Using the remote control unit ..........................................6
About this manual
The display window information and OSD (On Screen
Display) menu items are put in CAPITAL letters in the
operation procedures.
Usable disc(s) for each operation/function is (are)
referred to by the icons;
DVD
VIDEO
Super
CD+G
INX
INX2
Video
CD
CD
Graphics
Audio
CD
Precautions
Notes on the power cord
When you are away on travel or otherwise for an extended
period of time, remove the plug from the wall outlet.
When unplugging the player from the wall outlet, always pull
the plug, not the power cord.
Do not handle the power cord with wet hands!
Avoid moisture, water and dust
Do not place the player in moist or dusty places.
If water gets inside the player, turn off the power and
remove the plug from the wall outlet, then consult your
dealer. Using the player in this state may cause a fire or
electrical shock.
Avoid high temperatures
Do not expose the player to direct sunlight or place it
near a heating device.
Notes on installation
Select a place which is level, dry and neither too hot nor
too cold.
Leave sufficient distance between the player and the TV.
Do not install the player in a place subject to vibrations.
Do not put heavy objects on the player.
To prevent malfunction of the player
There are no user-serviceable parts inside. If anything
goes wrong, unplug the power cord and consult your
dealer.
Do not insert any metallic objects, such as wires,
hairpins, coins, etc. into the player.
Do not block the vents. Blocking the vents may damage
the player.
To clean the cabinet
Before operation .................................... 2
About playable media .....................................................2
Care and handling of discs .............................................2
Names of parts and controls ...........................................3
* Audio/video cable (Yellow/White/Red)
* Remote control unit
* R6(SUM-3)/AA(15F) battery x 2
* AC power plug adaptor
* USB cable
* User’s Manual
Use a soft cloth. Follow the relevant instructions on the
use of chemically-coated cloths.
Do not use benzene, thinner or other organic solvents
and disinfectants. These may cause deformation or
discoloring.
Basic operations .................................... 7
Turning on/off the player .................................................7
Initial setup .....................................................................7
Basic playback ................................................................8
Various speed playback ..................................................9
Locating the beginning of a scene or song ...................9
Advanced operations ...........................10
Playing from a specific position ....................................10
Changing the playback order ........................................11
Repeat playback ...........................................................11
Changing the language, sound and scene angle .........11
Special picture/sound effect ..........................................12
Karaoke operations ..............................13
Karaoke operations ......................................................13
Audio/Video files playback ..................15
Outline .......................................................15
Basic operations ...........................................16
USB memory device operations .........17
Outline .......................................................17
Basic operations ............................................18
Changing the initial settings ...............20
Selecting preferences ......................................20
Selecting general setup ....................................21
Selecting speaker setup ...................................22
Selecting audio setup ......................................22
Selecting karaoke setup ...................................23
Selecting equalizer .........................................23
Additional information .........................24
Troubleshooting .............................................24
Specifications ...............................................24
1
Before operation
About playable media
Optical discs
Care and handling of discs
Disc types:
DVD, MPEG-4, Video CD, Super CD+G, INX, INX2,
CD+Graphics, Audio CD, HDCD
If a disc gets dirty, dusty, scratched or warped, playback
sound and picture may be deteriorated. Take proper
precautions when handling discs.
File types:
AVI, MP3, JPEG
Handling
Do not touch the surface
of the disc.
Do not damage, stick
paper to, or use any
adhesive on either the
label side or playback
side.
Media types:
DVD R, DVD R DL, DVD-RW, CD-R, CD-RW
USB memory devices
File types:
AVI, CD+G (MP3+MCG), CD+G (MP3G), MP3, JPEG
Media types:
External hard drive (FAT32), Memory stick (FAT32)
Storing discs
Keep discs in their cases. If
discs are piled on top of one
another without their protective
cases, they can be damaged.
Do not put discs in a location
where they may be exposed to
direct sunlight, or where the
humidity or temperature is
high.
Avoid leaving discs in a car!
NOTE
If a disc gets dirty, scratched or warped, or due to the disc
characteristics or recording conditions, it may take
considerable time for the player to read the content, or the
player may not be able to playback such discs.
Color system format
This player accommodates both the NTSC and PAL
systems, and also can play back discs recorded with
NTSC and PAL system.
Digital audio formats
The player supports the following digital audio formats:
Linear PCM, Dolby Digital 5.1 Channels, DTS
NOTE
Depending on the player's AUDIO SETUP - SPDIF setting,
digital audio signals may not be output as they are
recorded on the disc.
Notes on discs
With some DVD VIDEO discs, the player starts playback
automatically after inserting the disc.
The image may be sometimes poor or noisy due to
defects in the disc itself.
With some discs, operations described in this manual
may not be possible.
2
Cleaning discs
Wipe with a soft dry cloth, moving from the center
outwards. If a disc is difficult to clean, wipe with a cloth
moistened with water.
Never use record cleaners, petrol, alcohol or any
anti-static agents.
Before operation
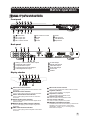
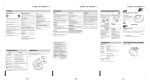
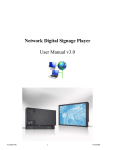
Names of parts and controls
Front panel
Power button
MIC 1 Input Jack
MIC 2 Input Jack
MIC 1 Volume Control
MIC 2 Volume Control
ECHO
Play
Pause
STOP
Fast Forward
Fast Backward
Open/Close
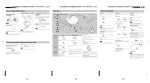
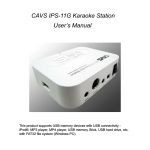
Back panel
Audio/Video Apparatus
19UC
E300037
Analog 5.1 Channel Dolby Audio Outputs
Component Video Outputs
Composite Video Output
2 Channel Downmix Audio Outputs
Coaxial Digital Audio Output
Display window
DVD Video format indicator
Turns on when playing back a DVD or MPEG-4 video
format disc.
DTS Audio format indicator
Turns on when playing back a DTS audio format disc.
SVCD / VCD Video format indicator
Turns on when playing back a SVCD or VCD video
format disc.
DOLBY Audio format indicator
Turns on when playing back a DOLBY Digital Sound
audio format disc.
Multiple Angle Video format indicator
Turns on when playing back a Multiple Angle video
format disc.
PBC Video format indicator
Turns on when playing back a Playback Control video
format disc.
S-Video Output
Optical Audio Output
VGA Video Output
Scart Video Output
Power Cord
USB IN
MP3 Audio format indicator
Turns on when playing back a MP3 audio format disc.
Playback indicator
Turns on when playback is in progress.
Repeat ALL indicator
Turns on while in the Repeat All mode.
Repeat One indicator
Turns on while in the Repeat One mode.
Play / Pause indicator
Turns on while in playback or in pause.
Multiple Information window
Indicates various kinds of information by numbers and
alphabets, such as the player's current status
("READING", "OPEN", etc.) or currently played
DVD's title and chapter.
3
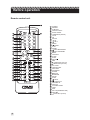
Before operation
Remote control unit
/EQ
MPX
4
POWER
REPEAT
SUBTITLE
Numeric buttons
MULTI ANGLE
LANGUAGE (AUDIO)
TITLE
3D
SETUP
UP
LEFT
MENU
DOWN
PLAY
PAUSE
FAST BACKWARD
FAST FORWARD
MUTE
NTSC/PAL
SLOW
STEP
RETURN
PBC
LOWER KEY (PITCH)
RESET KEY (PITCH)
A-B LOOP
OPEN/CLOSE
DISC/USB
PROGRAM
ENTER
RIGHT
CLEAR/EQ
ZOOM
STOP
NEXT
PREVIOUS
VOLUME UP
DISPLAY
VOLUME DOWN
TIME
MPX
MIC ON (KARAOKE ON)
RESUME
RAISE KEY (PITCH)
Preparations
Connections
Before using the player, connect the player to a TV and/or
amplifier.
Before making connections
Do not connect the AC power cord until all other
connections have been made.
Connect VIDEO OUT of the player directly to the video
input of your TV. Connecting VIDEO OUT of the player
to a TV via a VCR may cause a monitor problem. You
may also have a monitor problem when connecting the
player to an integrated TV/Video system.
Connecting to a TV
The following sections A to C describe TV connections
where only a TV is connected to the player so that you will
hear sound also from the TV.
A
Connecting to a conventional TV
Connect the Composite video output of the player to the
video input of TV. Connect the 2 Channel Downmix Audio
outputs to the audio inputs of TV.
B
Connecting to a TV with an S-Video jack
If your TV has a S-VIDEO input, you can get better picture
quality by connecting it with the S-VIDEO output of the
player using an S-video cable instead of connecting the
composite video input of the TV to the composite video
output of the player.
NOTES
When using the S-VIDEO output jack, do not connect the
COMPONENT VIDEO OUT jacks on the player.
C
Connecting to a TV with component jacks
If your TV has COMPONENT video inputs, you can enjoy
picture of high-fidelity color reproduction by connecting it
with COMPONENT video outputs of the player..
NOTES
Connect "Y" to "Y", "PB" to "PB" (CB), "PR" to "PR" (CR)
correctly.
When using the COMPONENT video output, do not connect
the S-VIDEO output of the player.
Progressive scan video playback available
In the Progressive scanning mode, you can enjoy high
quality picture with less flickers. The Progressive
scanning mode works only when you connect the player
and TV using COMPONENT video. See “Selecting
preferences” at page 20 for more details.
NOTE
In the following description, "TV" may be substituted
with "monitor" of "projector".
Terminal names used for other components may be
different from those used in the following description.
Connecting to optional audio
equipment
Connecting to a stereo audio
amplifier / receiver
Connect the player's 2 Channel Downmix audio outputs (ML,
MR) to any line-level inputs (such as AUX, DVD, CD, etc.) of
an audio amplifier or receiver.
Connecting to Analog 5.1 Channel Dolby
amplifier / receiver
Connect the player's Analog 5.1 Channel Dolby audio outputs
(FL, FR, SUB, SL, SR, CEN) to an amplifier or receiver with
5.1 Channel Analog audio inputs.
Connecting to a digital audio device
You can enjoy sound of enhanced quality by connecting the
player's DIGITAL (either OPTICAL or COAXIAL) audio
outputs to a digital audio input of an amplifier or receiver,
using an optical or coaxial digital cable. The digital audio
signal including the Dolby Digital or DTS signal on a disc will
be transferred directly from the player.
NOTE
Connect the player and the digital audio device by using
either an optical digital cable or a coaxial digital cable.
It is not recommended to use the digital jacks for dubbing.
When recording the sounds(DVD VIDEO, Video CD or Audio
CD) played back on the player, record them through the
analog (2 Channels or 5.1 Channels) outputs.
Depending on the disc, no signal may come out from the
DIGITAL outputs. Make an analog connection in this case.
Set SPDIF OUTPUT in the AUDIO SETUP correctly
according to the connected digital audio
equipment. If setting made for SPDIF OUTPUT is
incorrect, loud noise may be generated causing
damage to the speakers.
NOTES
There are some progressive TV and High-Definition TV sets
that are not fully compatible with the player, resulting in the
unnatural picture when playing back a DVD VIDEO disc in
the Progressive scanning mode. In such a case, use the
Interlaced scanning mode.
5
Preparations
Connecting the power cord
Remote sensor
When all the audio/video connections have been made,
connect the AC power plug first to the player and then to
the wall outlet. Make sure that the plugs are inserted
firmly.
Point the top of the remote control unit toward the remote
sensor as directly as possible. If you operate it from a
diagonal position, the operating range(approx. 5 m) may be
shorter.
Warning
Remote sensor
* Disconnect the power cord:
if you are not going to use the player for a long time.
before cleaning the player.
before moving the player.
* Do not:
connect or disconnect the power cord with wet hands.
pull the power cord when disconnecting it, as this may
damage the cord and cause fire, electric shock, or other
accidents.
Caution
Do not alter, twist or pull the power cord, or put anything
heavy on it, which may cause fire, electric shock, or
other accidents.
If the cord is damaged, consult a dealer and have the
power cord replaced with a new one.
Using the remote control unit
To install batteries
Open the compartment cover, and place the two supplied
R6(SUM-3)/AA(15F) batteries in the remote control unit
according to the polarity marking("+" and "-") inside the
compartment. Then replace the cover.
Precautions of the safe use of batteries
Observe the following precautions for the safe use of
batteries. If they are used improperly their lives will be
shortened, they may burst or their contents may leak.
Remove the batteries from the remote control unit if it
is not going to be used for a long period of time.
Remove dead batteries and dispose of them properly.
Never leave dead batteries lying around, take them
apart, mix them with other refuse, or throw them into
an incinerator.
Never touch liquid that has leaked out of a battery.
Do not mix new and old batteries, or batteries of
different types, when replacing them.
The batteries will last about six months with normal use.
If the functions of the remote control unit become erratic,
replace the batteries.
6
Basic operations
Initial setup
PLAY STOP OPEN/CLOSE
When you turn on the player for the first time, you may want to
change the settings in the player according your preferences.
Use / and ENTER buttons to navigate within SETUP
menu.
POWER
POWER
POWER
OPEN/CLOSE
Numeric buttons
SETUP
Press SETUP.
The MAIN PAGE of SETUP MENU appears.
SET MENU --- MAIN PAGE
ENTER
GENERAL SETUP
STOP
AY
PL
PLAY
1
SPEAKER SETUP
AUDIO SETUP
MPX
KARAOKE SETUP
PREFERENCES
EXIT SETUP
About invalid operation icon
When you press a button, and if the player does not
accept its operation, appears on your TV screen.
Operations are occasionally unacceptable even if
is not displayed.
Note that some operations may not be accepted due to
the media in play. For example, some discs may not allow
rapid advance/reverse or slow-motion playback.
2
Select OSD language
The default OSD (on-screen display) language is
English. To change, press ENTER to select GENERAL
SETUP and go to OSD LANG. Move to a language of
your choice and press ENTER.
-- GENERAL PAGE -PIC MODE
ANGLE MARK
Turning on/off the player
Press POWER button on the front panel to
turn on the player. The POWER button on the
remote control works only when the POWER
button on the front panel is pressed ON.
INITIALIZING message will first appear on the TV screen,
followed by the opening display with CAVS logo. The duration
of INITIALIZING will depend on the media inserted in the
player.
NOTES
Even if you turn off the player with the POWER button on
the remote control, the player is not disconnected from
the AC power source as long as the POWER button on
the front panel is turned on. This state is called standby
mode. In this state, the player consumes a very small
amount of power.
OSD LANG
ENGLISH
CAPTIONS
FRENCH
SCR SAVER
GERMAN
MAIN PAGE
3
SPANISH
Select TV display.
Select PREFERENCES from the SETUP MENU. For a
normal (conventional) TV, select NORMAL/PS or
NORMAL/LB. For a wide-screen TV, select WIDE.
-- PREFERENCES PAGE -TV DISPLAY
NORMAL/PS
TV TYPE
NORMAL/LB
VIDEO OUTPUT
WIDE
AUDIO
SUBTITLE
DISC MENU
LOCALE
PARENTAL
7
Basic operations
Basic playback
4 Select a desired Audio Output
Select an Audio Output according to your audio
connection. Enter AUDIO SETUP from the SETUP
MENU.
For COAXIAL or OPTICAL connection to digital amplifier or
receiver, set the SPDIF OUTPUT to SPDIF/RAW or
SPDIF/PCM. For Analog 5.1 Channel or Stereo (Karaoke)
connection, set SPDIF OUTPUT to OFF.
-- AUDIO SETUP -SPDIF OUTPUT
OFF
OP MODE
SPDIF/RAW
DUAL MONO
SPDIF/PCM
COMPRESSION
PRO LOGIC
LPCM OUTPUT
MAIN PAGE
DVD
VIDEO
Super
CD+G
INX
INX2
Video
CD
CD
Graphics
Audio
CD
1
2
Press OPEN/CLOSE to open the disc tray.
3
Press OPEN/CLOSE to close the disc tray.
4
Press PLAY.
Place a disc in the disc tray.
The player starts playback from the beginning.
If a menu is shown on the TV screen
When inserting a DVD VIDEO or Video CD disc, a menu may
be shown on the TV screen. From the menu, you can select a
desired item to be played back.
For DVD VIDEO
1 Press / / / to select a desired item.
2 Press ENTER.
The player starts playback of the selected item.
For Super CD+G
5
Select a desired Speaker Setup
1 Input a song number or press / to select a desired song.
2 Wait for the display of title and press ENTER. The player
starts playback of the selected song.
For digital connection through COAXIAL or OPTICAL audio
output, there is no need to adjust the SPEAKER SETUP in
the SETUP menu. The adjustment needs to be made in the
digital amplifier.
For INX, INX2
Select according to your speaker connection.
For Stereo (Karaoke) audio output, press MIC ON button on
the remote control to set KARAOKE ON.
For Analog 5.1 Channel audio output, press MIC ON button
on the remote control to set KARAOKE OFF. Each of the
channel can further be adjusted in SPEAKER SETUP under
SETUP menu. See “Selecting speaker setup” at page 22.
NOTE
Do not select a digital (SPDIF) output when the player is
connected to TV or an audio system using Analog 5.1
Channel or Stereo (Karaoke) output of the player.
Microphone signal is only output through Stereo
(Karaoke) audio output.
6
8
Press SETUP to return
The TV screen returns to the opening display.
1 Input a song number or press / to select a desired song.
2 Wait for the display of title and press ENTER. The player
starts playback of the selected song.
For Video CD
Press the numeric buttons to select a desired item.
The player starts playback of the selected item.
NOTES
Do not insert an unplayable disc.
When inserting a disc on the disc tray, be sure to position
the disc inside the recess. Otherwise, the disc may be
damaged when the disc tray is closed, or you may not be
able to remove the disc from the player.
If it takes time to read the loaded disc ("READING"
appears on the display window), remove the disc by
pressing OPEN/CLOSE on the remote control and check
the disc.
Basic operations
To check the playback status
Press DISPLAY button on the remote control to see the
current selection number (the title/chapter number for DVD
VIDEO or track number for Video CD/Audio CD), time
information (the time elapsed, or time remaining) on the TV
screen.
To turn off the status bar
Press DISPLAY button repeatedly until the status bar goes
off.
To stop playback temporarily
To resume playback
Video
CD
DVD
VIDEO
Video
CD
While paused, press STEP button.
Each time you press STEP button, the still picture
advances to the next frame.
Pressing PLAY returns to normal playback.
To playback in slow motion
Press STOP button to stop playback.
DVD
VIDEO
To advance a still picture
frame by frame
DVD
VIDEO
Audio
CD
Press PLAY or RESUME button to resume playback.
Video
CD
During playback, press SLOW button to
play forward slow motion or reverse
slow motion.
Press PLAY to return to normal playback.
To stop playback completely
Press STOP button twice to stop playback completely.
Next time the PLAY button is pressed, the playback will
begin from the beginning of the disc
If you press OPEN/CLOSE button during playback, the
player stops playback completely and opens the disc tray.
To pause playback
Press PAUSE button to pause playback. Press PLAY or
PAUSE button again to resume playback.
Various speed playback
To advance or reverse playback
rapidly while monitoring
DVD
VIDEO
Video
CD
During playback, press
remote control unit.
NOTE
During slow motion playback, the sound will be muted.
For Video CD, the reverse slow motion does not work.
Locating the beginning
of a scene or song
DVD
VIDEO
Video
CD
CD
Graphics
Audio
CD
During playback, you can skip a chapter or title, depending
on the disc configuration.
To skip forward, press .
To skip backward , press twice.
Using the numeric buttons
Press the numeric buttons to specify a
chapter or title number.
The player starts playback from the beginning of the
selection.
or
on the
You can select from 2 times, 4 times, 8 times, and 16
times normal speed. Pressing PLAY returns the player to
normal playback.
NOTE
During rapid playback, the sound will be muted.
About screen saver function
A television monitor may have an image burned into it if a
static image is displayed for a long time. To prevent this,
the player automatically activates the screen saver function
if a static picture, such as an on-screen display or menu, is
displayed for over 5 minutes. When the screen saver
function is activated, the TV screen gets darker. Pressing
any buttons will release the screen saver function.
The screen saver function does not work when playing
back the following sources:
- AVI/JPEG (while in pause)
- Audio CD
9
Advanced operations
Playing from a specific
position
To locate a desired scene from
the DVD menu
DVD
VIDEO
DVD VIDEO discs generally have their own menus which
show the disc contents. These menus contain various items
such as titles of movies, names of songs, or artist
information, and display them on the TV screen. You can
locate a desired scene using the DVD menu.
1
While a DVD VIDEO disc is inserted, press MENU.
2
Press / / /
press ENTER.
The TV screen shows available items in the menu.
to select a desired item, then
The player starts playback of the selected item.
Hint
With some discs, you can select items by entering the
corresponding number using the numeric buttons, which
may cause the player to automatically start playback.
To locate a desired scene from
the Video CD menu with PBC
Video
CD
To specify a desired title
DVD
VIDEO
1
Press TITLE.
2
Press / / /
press ENTER.
The TV screen shows available items in the menu.
The player starts playback of the selected item.
Hint
With some discs, you can select items by entering the
corresponding number using the numeric buttons, which
may cause the player to automatically start playback.
To locate a desired position in the
current title or track(Time search)
DVD
VIDEO
In stop mode, press PLAY.
2
Press the numeric buttons to select the
desired item.
Audio
CD
1
Press TIME twice.
2
Press the numeric buttons (0 to 9) to enter the
desired time.
The menu bar appears on the TV screen.
Example (for DVD VIDEO)
To play back from 2(H):34(M):00(S)
Press 2, 3, then 4.
TIME 2:34:_ _
Example (for Video CD/Audio CD)
To play back from 23(M):40(S)
Press 2, 3, then 4.
A disc menu appears on the TV screen.
TIME
23:4_
You do not have to press "0" to enter the trailing zeros (for
the last two digits in the example above).
The player starts playback of the selected item.
To return to the menu, press RETURN.
To correct a mistake
Press TIME repeatedly to reset and reenter a correct one.
Hint
If something like "NEXT" or "PREVIOUS" appears on the TV
screen, pressing
advances to the next page, and pressing
returns to the previous page.
Video
CD
You can play a disc from the desired position by specifying
the time from the beginning of the current title (for DVD
VIDEO) or the disc (Video CD/Audio CD).
Some Video CD discs support the PBC function. PBC is an
abbreviation of "Playback Control." Some Video CD discs
recorded with PBC have their own menus, such as a list of
the songs of the disc. You can locate a specific scene by
using the PBC menu.
1
to select a desired item, then
3
Press ENTER.
The player starts playback from the specified time.
To dismiss the menu bar
Press TIME.
NOTES
Some DVD VIDEO discs do not contain time information,
and the time search function cannot be used.
The time search function cannot be used during program
playback.
10
Advanced operations
Changing the playback order
To playback in a specific order
(Program play)
Video
CD
CD
Graphics
Audio
CD
To repeat a desired part
(A-B repeat playback)
DVD
VIDEO
1
Video
CD
Audio
CD
Press A-B at the start of the part you want to
repeat (point A).
By programming tracks, you can play up to 99 tracks in any
order. You may program the same track more than once.
The A TO B SET A message appears.
2
Press A-B at the end of the part you want to
repeat (point B).
1
In stop mode, press PROG.
2
Press the numeric buttons to specify track.
3
Press ENTER.
The specified track will be assigned a number of its order.
To quit A-B repeat playback
4
Press the number buttons to program the next
track followed by ENTER. Continue to complete
the programming.
Press A-B to turn off the A-B repeat mode. The A TO B
CANCELLED message will appear and the normal playback
continues.
5
6
7
Press PLAY to start playback.
The menu bar appears on the TV screen.
The A TO B SET B message appears and then changes
to A TO B REPEAT ON. The player begins to repeat
playback between "A" and "B".
NOTES
To stop the program playback, press STOP.
The A and B points must be set in the same
title/chapter/track.
When you press STOP twice during DVD VIDEO playback,
A-B repeat is canceled.
To clear the program, press STOP again.
NOTES
When the disc tray is opened or the player is turned off, the
program is cleared.
During Audio CD playback, you can select previous or next
tracks by pressing / .
During VCD playback, you cannot search for the portion on
the discs by pressing / .
During program playback, you can repeat playback.
To repeat the current selection
or all tracks
Video
CD
CD
Graphics
Audio
CD
Press REPEAT.
If you press REPEAT in stop mode, press PLAY
to start playback. Each time you press REPEAT, the
repeat mode cycles among REP-ALL, REP-ONE and
OFF. A window which indicates the current repeat mode
will be displayed on the TV screen.
To stop repeat playback
Press STOP. The unit stops playback but does not quit the
repeat mode.
To quit repeat playback
To select the subtitle language
(SUBTITLE)
DVD
VIDEO
Repeat playback
DVD
VIDEO
Changing the language,
sound and scene angle
Press REPEAT until REPEAT OFF is displayed.
Some DVD VIDEO discs contain more than one subtitle
language. You can choose a desired one from them.
Hint
At the beginning of the part where the subtitles are recorded,
appears on the TV screen.
1
During playback, press SUBTITLE.
2
Press SUBTITLE repeatedly to make a selection.
3
Press SUBTITLE repeatedly to turn the subtitle off
The subtitle selection window appears on the TV screen.
Each time you press SUBTITLE, the subtitle language
changes.
Press SUBTITLE until SUBTITLE OFF message appears.
NOTES
The subtitle selection window will automatically disappear
if you do not change the subtitle for several seconds.
11
Advanced operations
To change the audio language or
sound (LANGUAGE)
DVD
VIDEO
Video
CD
Special picture/sound effect
To zoom in pictures
DVD
VIDEO
The audio selection setting allows you to change the audio
language of a movie.
Video
CD
Hint
1
During playback or while paused, press ZOOM.
1
During playback, press LANGUAGE.
2
Press
2
Press LANGUAGE repeatedly to make a
selection.
3
To return to normal play, press ZOOM
repeatedly until ZOOM OFF message appears.
At the beginning of the part where the multiple audio tracks are
recorded,
appears on the TV screen.
The audio selection window appears on the TV screen.
Pressing ZOOM causes the player to zoom in on the
image. Each time you press ZOOM, the magnification is
changed (1.5, 2 and 3 times).
/ / /
to move the zoomed position.
Each time you press LANGUAGE, the audio changes.
NOTE
NOTES
The audio selection window will automatically disappear if you
do not change the audio for several seconds.
To select a scene angle of
DVD VIDEO (ANGLE)
DVD
VIDEO
At the beginning of a "multi-angle" part,
screen.
appears on the TV
1
During playback, press ANGLE.
2
Press ANGLE repeatedly to make a selection.
The angle selection window appears on the TV screen.
Each time you press ANGLE, the angle changes.
NOTE
The angle selection window will automatically disappear if
you do not change the angle for several seconds.
12
To change sound field (3D)
DVD
VIDEO
Super
CD+G
INX
INX2
Video
CD
CD
Graphics
Audio
CD
Using the Sound Effect (3D) function, you can change the sound
field. This function is enabled only when Karaoke Setup is ON.
You can enjoy a variety of scene angles if the DVD VIDEO disc
contains "multi-angle" parts, where multiple cameras were used
to shoot the same scene from different angles.
Hint
While zoomed, the picture may look coarse.
1
Press MIC ON to turn on the Karaoke Setup.
2
During playback, press 3D.
3
Press 3D repeatedly to make a selection.
4
Press 3D repeatedly to return to normal play.
The Karaoke indication appears on the TV screen.
The Sound Effect (3D) indication appears on the TV screen.
Each time you press the button, the Sound Effect (3D)
mode changes as follows:
NOTE
The Sound Effect (3D) indication disappears if no operation
is made for about few seconds.
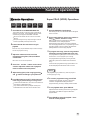
Karaoke operations
Karaoke Operations
DVD
VIDEO
1
Super
CD+G
INX
INX2
Video
CD
Super CD+G (SCDG) Operations
CD
Graphics
Audio
CD
Press MIC ON to set KARAOKE MODE ON.
This enables the key control and voice cancel (MPX)
features in the player. The SPEAKER SETUP is also
automatically changed to DOWNMIX: STEREO.
Be sure to set SPDIF OUTPUT as OFF in AUDIO
SETUP.
Super
CD+G
1
Insert the SCDG disc into the player.
2
Using numeric buttons, input a song number or
using / buttons, search for a song.
Microphone signal is only output through 2 Channel
Downmix (ML/MR) audio output terminals.
2
3
Wait for the title of the song to appear on the screen.
Press ENTER or PLAY to begin playback
When selecting a song after a rest or other operations
such as changing SETUP menu, it may take longer for the
song title to appear. Be sure to wait for the title before
pressing ENTER or PLAY to begin playback.
Insert a karaoke disc and select a song for
playback.
Each disc may require different steps to search through
menus and playback a song.
3
Adjust the volume and echo level of the
microphones using VOL1, VOL2, and ECHO
control knobs.
Press VOL + and VOL - buttons on the remote
control to adjust the volume level of playback
music in relation to the microphones.
5
Adjust the key (pitch) of the song by pressing
and
buttons according to your preference.
6
Press MPX button to set OFF / ON the lead vocal
in the song, to practice along or to sing in solo.
To program next songs, enter the song numbers
followed by pressing of PROG after each entry.
The programmed song will appear on the lower left corner
of the screen. You can program up to 10 songs.
The programmed songs will play one song at a time,
waiting for a press of PLAY button at the end of each
song.
Be sure to turn on the microphones.
4
After reading the disc, the initial SCDG screen will appear
on the TV screen..
To see the list of programmed songs, press PROG. The
list will be displayed at the bottom of the TV screen.
NOTE
The programming is possible only when the player is
currently playing a song.
4
To cancel a programmed song, press STOP.
5
To see playback status, press DISPLAY.
In most DVD Karaoke discs, the voice cancel feature is
controlled by LANGUAGE button.
Only certain karaoke discs (multiplex format) have
embedded lead vocals that can be set ON or OFF.
If stopped during playback, the song in play will be
canceled. If stopped while waiting for the next
programmed song, the song in waiting will be canceled.
Elapsed time and remaining time of the song will appear
sequentially. Press DISPLAY again to dismiss the
playback status.
6
Press PAUSE to pause the playback. Press
PLAY to resume playback.
13
Karaoke operations
INX, INX2 Operations
INX
INX2
1
Insert the INX or INX2 disc into the player.
2
Using numeric buttons, input a song number or
using / buttons, search for a song.
To program next songs, enter the song numbers
followed by pressing of PROG after each entry.
The programmed song will appear on the lower left corner
of the screen. You can program up to 10 songs.
The programmed songs will play one song at a time,
waiting for a press of PLAY button at the end of each
song.
After reading the disc, the initial CAVS INX screen will
appear on the TV screen..
Wait for the title of the song to appear on the screen.
Press ENTER or PLAY to begin playback
When selecting a song after a rest or other operations
such as changing SETUP menu, it may take longer for the
song title to appear. Be sure to wait for the title before
pressing ENTER or PLAY to begin playback.
3
Search a song by title or singer name.
Press MENU to select Help, Search by Title, or Search by
Singer display.
See the Help display for instruction on how to search a
song by title or singer.
To search by title, use the 4-way direction buttons to spell
the title at the Search by Title display. When a list of songs
is shown on the display, you can continue spelling the title
or use the FF, FR, NEXT, PREV buttons to move the
cursor by line or page to select a song.
Press ENTER or PLAY to start the song. Press STOP or
CLEAR to return to the initial CAVS INX (or SDK) display.
To search by singer, use the 4-way direction buttons to
spell the singer’s name at the Search by Singer display.
When a list of songs is shown on the display, you can
continue spelling the singer’s name or use the FF, FR,
NEXT, PREV buttons to move the cursor by line or page
to select a song.
Press ENTER or PLAY to start the song. Press STOP or
CLEAR to return to the initial CAVS INX (or SDK) display.
4
5
(For INX2 only) To turn on or off the background
video.
Press STOP or CLEAR for the initial CAVS INX (or SDK)
screen.
Press DISPLAY to turn on or off the background video.
14
To see the list of programmed songs, press PROG. The
list will be displayed at the bottom of the TV screen.
NOTE
The programming is possible only when the player is
currently playing a song.
6
To cancel a programmed song, press STOP.
7
To see playback status, press DISPLAY.
If stopped during playback, the song in play will be
canceled. If stopped while waiting for the next
programmed song, the song in waiting will be canceled.
Elapsed time and remaining time of the song will appear
sequentially. Press DISPLAY again to dismiss the
playback status.
8
Press PAUSE to pause the playback. Press
PLAY to resume playback.
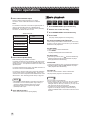
Audio/Video files playback
Outline
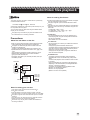
Notes for making files/folders
The player can play AVI / MP3 / JPEG files on a personally
recorded media as follows:
CD-R/RW, DVD R, DVD R DL, DVD-RW
Some discs mastered as multi border (multi-session) may not
be compatible with the player.
You can select and play back files using the SMART NAVI
display on the TV screen.
The player may be unable to play back the media due to
the characteristics or recording conditions.
Precautions
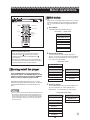
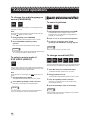
About files and folders on the disc
Files may be grouped into folders, and the folders organized
under “Root” folder, which represent the inserted disc.
The player can detect and play back the folders which are
located up to the fifth layer.
The files in the SMART NAVI display are arranged by the
alphabetical order of extensions as follows: "avi", "jpeg", and
"mp3".
Time required for reading the media contents may vary for
different media, depending on the numbers of folders
(groups) and files recorded, etc.
The player recognizes up to 1,000 files per folder, and up to
250 folders per disc.
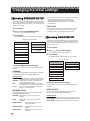
Root folder
File 1. mp3
File 2. mp3
File 3. mp3
Folder 1
Folder 3
File 1. jpg
File 2. jpg
File 3. jpg
File 4. jpg
If a file name includes even one 2-byte character, the player
may not show the file name correctly.
The player supports up to 9 characters as the file / folder
names.
The player can only recognize files with one of the following
extensions, which can be in any combination of upper and
lower case.
- For MP3 files, ".MP3", ".mp3".
- For JPEG files, ".JPG", ".JPEG, ".jpg", ".jpeg".
- For MPEG-4 files, ".AVI", ".avi".
For MP3 files:
- It is recommended that you record your material at 44.1
KHz sampling rate, using the 128 kbps data transfer rate.
- ID3 Tag is not available.
- MP3i and MP3 Pro are not available.
For JPEG files:
- We recommend you to record your material at a 640*480
pixel resolution.
- This player supports the baseline JPEG format.
- The player does not support a baseline-formatted picture of
more than 5120*3413 pixels. Make sure that the pictures
pixel size is 5120*3413 pixels or less.
- This player cannot play back a progressive JPEG file of
more than 2048*1536 pixels.
For MPEG-4 files:
- The player supports the AVI files whose resolution is
640*480 pixels or less, and created using 4 Mbps ASP
codec.
- The size of the playback screen will be the same size as it
is recorded.
- Some recorded files may not be able to be played back
depending on file characteristics, kind of digital still/video
cameras, or recording conditions.
- The player can playback the following MPEG-4 files:
MPEG-4 V2: Simple(single) stream
MPEG-4 V3: Fully supported
(MPEG-4 V1 file is not compatible.)
File 4. jpg
File 5. jpg
File 6. jpg
Folder 2
Notes for making your own disc
Use "UDF format" as the disc format for DVD R /
DVD R DL / DVD-RW.
Use "ISO 9660" as the disc format for CD-R / CD-RW.
The player does not support "packet writing" for CD-R /RW.
The player supports discs recorded with up to five multiple
sessions.
The player may not recognize the full 1,000 files and 250
folders due to the disc or file characteristics.
Some disc may not play due to media characteristics or
recording conditions.
15
Audio/Video files playback
Basic operations
When you insert a disc with folders and files, the player will
automatically begin playback of the AVI, MP3, JPEG
contents. Press STOP and the SMART NAVI display that
shows the folders and files will appear on the TV screen.
You can specify and play back the desired folder/file from
the SMART NAVI display using the following procedure.
1
To stop playback
Press STOP to stop the playback.
The SMART NAVI display will show the contents of the
disc on the TV screen.
Press STOP.
The SMART NAVI display appears on the TV.
-- SMART NAVI --
NOTES
...
ROOT
CD01
To rotate/reflect a still picture
While the still picture is played back:
Pressing rotates the picture by 90 clockwise.
Pressing rotates the picture by 90 counterclockwise.
Pressing rotates the picture vertically.
Pressing rotates the picture horizontally.
0
MP3 001
1
MP3 002
2
MP3 003
3
MP3 004
4
MP3 005
5
Opening the disc tray stops playback.
It may take time to show the SMART NAVI display due to
the layer configuration of the files and folders.
The elapsed time may be incorrectly indicated on the
display window due to the recording condition of the file.
The display window cannot show the file number more
than 100. When the files numbered over 100th are played
back, the player re-counts file number again from 0.
When the screen saver starts, the SMART NAVI display
disappears.
To change PLAY MODE.
2
Press / / / to move the bar to a desired
folder position and press ENTER.
In the right column, files in the selected folder are shown.
3
Press / / /
press ENTER.
to select the desired file, then
The selected file will begin to playback.
When you press ENTER, the continuous playback starts
from the selected file. The playback stops after playing
back of all files in the same FOLDER.
You can also change the files on the list by pressing
/
or the numeric buttons.
To pause playback
Press .
Pressing PLAY resumes normal playback.
To reverse or advance playback rapidly
Press / during playback of AVI / MP3.
Each time you press
( or
), the player reverses
(or advances) playback, rapidly changing the playback speed.
To zoom in a picture
Press ZOOM.
Each time you press ZOOM, the magnification is changed.
The 3 time magnification may not work for some AVI / JPEG
files according to their resolutions.
Pressing
moves the zoomed position during
playback of JPEG file.
To cancel the zoom function, select the normal size by
pressing ZOOM repeatedly.
16
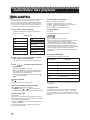
Press REPEAT to change the PLAY MODE.
PLAY MODE
FUNCTION
SINGLE
SELECTED FILE ONLY
REP - ONE
REPEAT SELECTED FILE
FOLDER
ALL FILES IN FOLDER
FOLDER REPEAT
REPEAT ALL FILES IN FOLDER
DISC SCAN
SCAN ALL FILES IN DISC
DISC
ALL FILES IN DISC
DISC REPEAT
REPEAT ALL FILES IN DISC
During playback, you can also press REPEAT to change the
PLAY MODE.
To program files
Press PROG to change the PLAY MODE to PROGRAM.
Select a file and press ENTER to program. Repeat the
process of selecting a file and pressing ENTER to program.
Press STOP to finish the programming. Press PLAY to start
playback.
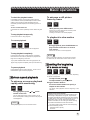
USB memory device operations
Outline
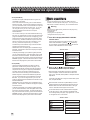
Notes for making files/folders
The player can play AVI / CD+G (MP3+MCG) / CD+G (MP3G) /
MP3 / JPEG files on USB memory devices as follows:
External hard drive (FAT32), Memory stick (FAT32).
The memory devices can be of any size and capacity. They must
be configured in FAT32 format, and some may require self power
supply in order to operate. You can select and play back files
using the SMART NAVI or INX menu display on the TV screen.
The player may be unable to play back the media due to
incorrect format or file specification.
Precautions
About files and folders on the device
Files may be grouped into folders, and the folders organized
under “Root” folder, which represents the connected media.
The player can detect and play back the folders which are
located up to the fifth layer.
The files in the SMART NAVI display are arranged by the
alphabetical order of extensions as follows: "avi", "jpeg", and
"mp3".
Time required for reading the media contents may vary for
different media, depending on the numbers of folders and
files recorded, etc.
The player recognizes up to 500 files per folder, and up to
250 folders per media.
Root folder
File 1. mp3
File 2. mp3
File 3. mp3
USB
Folder 1
Folder 3
File 1. jpg
File 2. jpg
File 3. jpg
File 4. jpg
File 4. jpg
File 5. jpg
File 6. jpg
Folder 2
Notes for making your own device
Use FAT32 format for USB memory devices.
Use "ISO 9660" file naming format.
The player may not recognize the full 500 files and 250
folders due to the media or file characteristics.
Some devices may not play due to its media format or file
specifications.
If a file name includes even one 2-byte character, the player
may not show the file name correctly.
The player supports up to 9 characters as the folder / file
names.
The player can only recognize files with one of the following
extensions, which can be in any combination of upper and
lower case.
- For MP3 files, ".MP3", ".mp3".
- For JPEG files, ".JPG", ".JPEG, ".jpg", ".jpeg".
- For MPEG-4 files, ".AVI", ".avi".
- For CD+G (MP3+MCG) files, “MP3”, “mp3”, “MCG”, “mcg”.
- For CD+G (MP3G) files, “MP3”, “mp3”.
For MP3 files:
- It is recommended that you record your material at 44.1
KHz sampling rate, using the 128 kbps data transfer rate.
- ID3 Tag is not available.
- MP3i and MP3 Pro are not available.
For JPEG files:
- We recommend you to record your material at a 640*480
pixel resolution.
- This player supports the baseline JPEG format.
- The player does not support a baseline-formatted picture of
more than 5120*3413 pixels. Make sure that the pictures
pixel size is 5120*3413 pixels or less.
- This player cannot play back a progressive JPEG file of
more than 2048*1536 pixels.
For MPEG-4 files:
- The player supports the AVI files whose resolution is
640*480 pixels or less, and created using 4 Mbps ASP
codec.
- The size of the playback screen will be the same size as it
is recorded.
- Some recorded files may not be able to be played back
depending on file characteristics, kind of digital still/video
cameras, or recording conditions.
- The player can playback the following MPEG-4 files:
MPEG-4 V2: Simple(single) stream
MPEG-4 V3: Fully supported
(MPEG-4 V1 file is not compatible.)
For Karaoke Song files:
There are two type of CD+G karaoke files that can be
played from a USB memory device in the player:
CD+G (MP3+MCG)
CD+G (MP3G).
Both types of files can be downloaded from
www.cavsusa.com/cinet_home. The CD+G (MP3+CDG)
karaoke song files, also compatible to many of CAVS
professional models, consist of MP3 and MCG components.
The CD+G(MP3G) files, newly introduced, combines the
two components to a single composite MP3 file.
17
USB memory device operations
CD+G (MP3+MCG)
- All CAVS CD+G (MP3+MCG) karaoke song files are
compatible to the player.
- Go to www.cavsusa.com/cinet_home to download the
karaoke song files. Save the downloaded song files into
your PC, and double click on the saved files to unzip into
MP3 and MCG components for each song. In you are
not using Win XP in your PC, use Tugzip or Winzip
programs available in the Internet to unzip the
downloaded files.
- You can also make your own MP3+MCG karaoke song
files from any standard CD+G discs using Encoder MCG
program available at www.cavsusa.com/playcdg_home.
Download the program and follow the instruction within.
- For each song, the MP3 and MCG components should
always be named in the same way, followed by .mp3
and .mcg extensions respectively. For example,
21000032.mp3 and 21000032.mcg would be the MP3
and MCG components of a song.
Basic operations
Connect the USB memory device to USB IN terminal
located on the back panel of the player. You may use the
USB cable, included as accessory, for an extended reach.
Warning
Disconnect the USB memory device from the player only
when the player is:
- powered off.
- playing from an optical disc.
- assigned to the disc play mode.
1
The D/U button will only work when the player is in Stop
mode. Select USB DEV by pressing / followed by
PLAY or ENTER. The SMART NAVI display will show the
contents of the USB device on the TV screen.
- SMART NAVI menu can display up to 500 karaoke songs
per folder. This restriction comes from the player’s capacity
to store file names.
- To display and manage up to 49,999 song files per folder,
you can use the INX menu, which will appear when an INX
menu file is included in the folder. To create the INX menu
file, go to www.cavsusa.com/cinet_home and download the
INXMENU program. Follow the instruction within to create
the INX menu file (English.inx) and insert it into the folder.
CD+G (MP3G)
- CAVS CD+G (MP3G) karaoke song files can also be
played from a USB memory device in the player. This
new karaoke file format combines the audio and graphic
components of a song into a single composite MP3 file.
The file is named, for example, 21000032-mcg.mp3.
- Go to www.cavsusa.com/cinet_home to download the
karaoke song files. Save the downloaded song files into
your PC, and double click on the saved files to unzip into
MP3 files. In you are not using Win XP in your PC, use
Tugzip or Winzip programs available in the Internet to unzip
the downloaded files.
- SMART NAVI menu can display up to 500 karaoke songs
per folder. This restriction comes from the player’s capacity
to store file names.
- To display and manage up to 49,999 song files per folder,
you can use the INX menu, which will appear when an INX
menu file is included in the folder. To create the INX menu
file, go to www.cavsusa.com/cinet_home and download the
INXMENU program. Follow the instruction within to create
the INX menu file (English.inx) and insert it into the folder.
Press D/U to display DISC DRIVE / USB DEV
selection menu.
-- SMART NAVI --
...
ROOT
0
CAVS INX1
CAVS INX2
CAVS MCG1
CAVS MCG2
2
Press / or / to move the bar to a
desired folder position and press ENTER.
When the folder contains INX menu file, the CAVS INX
screen will appear. Follow the instruction to select and
play a song. See INX, INX2 operation in Chapter: Karaoke
Operations.
To exit the CAVS INX menu and go to another folder, press
D/U, and press ENTER.
When the folder contains CD+G (MP3+MCG) or CD+G
(MP3G) karaoke song files without the INX menu file, the
SMART NAVI menu will show the MP3 files on the right
column. MCG files will not appear on the screen.
For all other folders, the files contained within will appear
on the right column. Files of format or specification that
are not recognized by the player, may appear with “?” mark
or not appear at all on on the screen.
-- SMART NAVI -ROOT
18
...
0
CAVS INX1
MP3 001
1
CAVS INX2
MP3 002
2
CAVS MCG1
MP3 003
3
MP3 004
4
USB memory device operations
3
Press / or / to select the desired file,
then press ENTER.
You can also press
/
page-down in the list.
to move by page-up or
To change PLAY MODE.
Press REPEAT to change the PLAY MODE.
FUNCTION
PLAY MODE
When you press ENTER, the selected file will begin
playing. During play, press / to change to the next or
previous file.
SINGLE
SELECTED FILE ONLY
REP - ONE
REPEAT SELECTED FILE
You can also select a file by entering its file number shown
on the right side of the file name. Input the number and
press ENTER to play.
FOLDER
ALL FILES IN FOLDER
FOLDER REPEAT
REPEAT ALL FILES IN FOLDER
DISC SCAN
SCAN ALL FILES IN DISC
DISC
ALL FILES IN DISC
DISC REPEAT
REPEAT ALL FILES IN DISC
To pause playback
Press .
Pressing PLAY resumes normal playback.
To reverse or advance playback rapidly
Press / during playback of AVI / MP3.
Each time you press
( or
), the player reverses (or
advances) playback, rapidly changing the playback speed.
To zoom in a picture
Press ZOOM.
Each time you press ZOOM, the magnification is changed.
The 3 time magnification may not work for some AVI / JPEG
files according to their resolutions.
Pressing
moves the zoomed position during
playback of JPEG file.
To cancel the zoom function, select the normal size by pressing
ZOOM repeatedly.
To rotate/reflect a still picture
While the still picture is played back:
Pressing rotates the picture by 90 clockwise.
Pressing rotates the picture by 90 counterclockwise.
Pressing rotates the picture vertically.
Pressing rotates the picture horizontally.
To stop playback
Press STOP.
The SMART NAVI display appears on the TV.
During playback, you can also press REPEAT to change the
PLAY MODE.
The term “DISC” refers to the USB memory device connected
to the player.
The PLAY MODE feature does not apply to the INX, CD+G
(MP3+MCG), or CD+G (MP3G) karaoke file folders.
To program files
Press PROG to change the PLAY MODE to PROGRAM.
Select a file and press ENTER to program. Repeat the
process of selecting a file and pressing ENTER to program.
Press STOP to finish the programming. Press PLAY to start
playback.
To return to Disc play
Be sure the player is in Stop mode. Press D/U to display
the DISC DRIVE / USB DEV selection menu. Select DISC
DRIVE by pressing / followed by PLAY or ENTER.
The player will become standby for a disc play.
NOTES
Opening the disc tray stops playback.
It may take time to show the SMART NAVI display due to
the layer configuration of the files and folders.
The SMART NAVI menu cannot show the file number more
than 500. When the files numbered over 500th are played
back, the player re-counts file number again from 0.
When the screen saver starts, the SMART NAVI display
disappears.
19
Changing the initial settings
Selecting PREFERENCES
VIDEO OUTPUT
This section refers to the settings which are already made
when you purchase the player. Read this section when you
want to change settings according to your preferences and
viewing environment.
Setting options
1
2
3
Press SETUP.
Press
/
to select PREFERENCES.
The color of the selected item changes.
Press ENTER.
The PREFERENCES menu appears on the TV screen.
-- PREFERENCES PAGE --
You can select the video output to best match your TV for
higher video quality.
SVIDEO - For Composite or S-Video connections
YCBCR - For Component connection
SCART - For European connection
YPBPR - For Progressive Scan connection
VGA
- For VGA PC Monitor connection
Your TV may have more than one connection. If available,
use Component output for higher quality video.
You cannot change the setting during playback.
AUDIO
You can select the default audio language to be displayed
if it is contained on a DVD VIDEO disc.
TV DISPLAY
NORMAL/PS
Setting options
TV TYPE
NORMAL/LB
VIDEO OUTPUT
WIDE
ENGLISH, SPANISH, FRENCH, CHINESE, GERMAN,
ITALIAN, JAPANESE, language code from AA TO ZU
AUDIO
SUBTITLE
DISC MENU
LOCALE
PARENTAL
PASSWORD
DEFAULTS
SMARTNAVI
To dismiss PREFERENCES PAGE display
Press SETUP.
If the disc does not have the selected language, the disc's
default language will be used.
You cannot change the setting during playback.
SUBTITLE
You can select the default subtitle language to be displayed
if it is contained on a DVD VIDEO disc.
Setting options
OFF, ENGLISH, SPANISH, FRENCH, CHINESE,
GERMAN, ITALIAN, JAPANESE, language code
from AA TO ZU
If the disc does not have a subtitle in the language, the disc's
default language will be used.
You cannot change the setting during playback.
DISC MENU
You can select the default disc menu language to be displayed
if it is contained on a DVD VIDEO disc.
Setting options
NOTES
PREFERENCES cannot be changed during disc
playback.
TV DISPLAY
Select the TV DISPLAY for your viewing preference.
Setting options
NORMAL/PS
NORMAL/LB
WIDE
- 4 x 3 Full TV screen
- 4 x 3 Movie screen
- 16 v 9 Wide screen TV
TV TYPE
Select the TV TYPE to match your TV.
Setting options
MULTI, NTSC, PAL
You can also select the TV TYPE by pressing N/P button
on the remote control.
20
ENGLISH, SPANISH, FRENCH, CHINESE, GERMAN,
ITALIAN, JAPANESE, language code from AA TO ZU
If the disc does not have a subtitle in the language, the disc's
default language will be used.
You cannot change the setting during playback.
LOCALE
You can select the default locality code to be displayed if it is
contained on a DVD VIDEO disc.
Setting options
CHINA, FRANCE, HONG KONG, JAPAN, TAIWAN,
GBR, USA
If the disc does not have a locality code, the disc's default
locality code will be used.
You cannot change the setting during playback.
Changing the initial settings
PARENTAL
You can select the level of restriction on DVD VIDEO playback
that contains violent (and other) scenes. For example, if
movie which includes violent scenes supports the parental
rating, such scenes will be cut or replaced with other scenes.
Setting options
G, PG, PG-13, PG-R, NC-17, ADULT, NO PARENTAL
Some of the options are blank in expectation of new ratings
to come in the future.
You cannot change the setting during playback.
PASSWORD
You can change the password to PREFERENCES SETUP so
that settings within, such as PARENTAL, can only be changed
by you. The factory default password is “3308”. Enter the
current password and new password (twice) to change.
Password must consists of 4 digits.
You cannot change the setting during playback.
DEFAULTS
You can re-set the SETUP menu with factory default values.
It will re-set all existing options.
You cannot change the setting during playback.
SMARTNAVI
You can select to turn on or off the SMART NAVI menu on
screen.
Setting options
NO MENU, WITH MENU
You cannot change the setting during playback.
Selecting GENERAL SETUP
This section refers to the settings which are already made
when you purchase the player. Read this section when you
want to change settings according to your preferences and
viewing environment.
1
2
3
PIC MODE
You can select whether the content on the disc is
processed by field (video source) or by frame (film source).
Setting options
AUTO - Video & film contents
FILM
- Film contents
VIDEO - Video contents
SMART - Video & film, normal & active
SUPER SMART - Video & film, normal & active
Normally, SUPER SMART is selected.
ANGLE MARK
You can select to display multi-angle mark when contents
on a disc contains multi-angle video shots.
Setting options
ON, OFF
OSD LANG
You can select the on-screen display language of the player.
Setting options
ENGLISH, SPANISH, FRENCH, GERMAN
Some screen messages are shown in English regardless of
the setting.
You cannot change the language shown in SMART NAVI.
CAPTIONS
You can select ON to see the captions in the contents of the
disc.
Setting options
ON, OFF
SCREEN SAVER
You can set the screen saver function to ON or OFF.
Setting options
ON, OFF
Press SETUP.
Press
/
to select GENERAL SETUP.
The color of the selected item changes.
Press ENTER.
The GENERAL SETUP menu appears on the TV screen.
-- GENERAL PAGE -PIC MODE
AUTO
ANGLE MARK
FILM
OSD LANG
VIDEO
CAPTIONS
SMART
SCREEN SAVER
SUPER SMART
MAIN PAGE
To dismiss GENERAL SETUP display
Press SETUP or move the bar to MAIN PAGE and press ENTER.
21
Changing the initial settings
Selecting SPEAKER SETUP
This section refers to the settings which are already made
when you purchase the player. Read this section when you
want to change settings according to your preferences and
viewing environment.
1
2
3
Press SETUP.
Press
/
to select SPEAKER SETUP.
For 5.1 Channel Surround Sound, the best sound effect
can be achieved when the distance between the
audience and each speaker is the same. Set the
CENTER DELAY and REAR DELAY to achieve this
equal distance.
TEST TONE
You can select ON to perform a speaker output test. The
test will be performed in the order of Front Left, Center,
Front Right, Rear Left, Rear Right, and Subwoofer.
The color of the selected item changes.
Press ENTER.
The SPEAKER SETUP menu appears on the TV screen.
-- SPEAKER SETUP PAGE -DOWNMIX
LT/RT
CENTER
STEREO
REAR
VSS
SUBWOOFER
5.1 CHANNEL
CENTER DELAY
REAR DELAY
Selecting AUDIO SETUP
This section refers to the settings which are already made
when you purchase the player. Read this section when you
want to change settings according to your preferences and
viewing environment.
1
2
3
Press SETUP.
Press
/
to select AUDIO SETUP.
The color of the selected item changes.
Press ENTER.
The AUDIO SETUP menu appears on the TV screen.
TEST TONE
-- AUDIO SETUP --
MAIN PAGE
SPDIF OUTPUT
OFF
To dismiss SPEAKER SETUP display
OP MODE
SPDIF/RAW
Press SETUP or move the bar to MAIN PAGE and press
ENTER.
DUAL MONO
SPDIF/PCM
DOWNMIX
You can select a downmix option when the player is connected to
an amplifier (sound system) using analog audio outputs.
Setting options
LT/RT
- Analog amplifier with Dolby Prologic decoder
connected to the 2 channel downmix outputs.
STEREO - Analog stereo amplifier connected to the
2 channel downmix outputs.
VSS
- Analog amplifier with virtual surround sound
connected to the 2 channel downmix outputs.
5.1 Ch
- 5.1 channel analog amplifier connected to
analog 5.1 channel outputs.
SPEAKER SETUP
The following speaker setup can only be selected when
KARAOKE SETUP is turned off.
CENTER - Select ON if you are using the center
speaker.
REAR
- Select ON if you are using the rear L/R
speakers.
SUBWOOFER
- Select ON if you are using the
subwoofer speaker.
CENTER DELAY - Select delay time of the center
speaker.
REAR DELAY
22
- Select delay time of the rear L/R
speakers.
COMPRESSION
PRO LOGIC
LPCM OUTPUT
MAIN PAGE
To dismiss AUDIO SETUP display
Press SETUP or move the bar to MAIN PAGE and press
ENTER.
SPDIF OUTPUT
You can select between digital outputs (COAXIAL and
OPTICAL) and analog outputs (DOWNMIX).
Setting options
OFF
- Analog audio output for downmix connections.
SPDIF/RAW - Digital audio output with Digital Dolby, DTS, etc.
SPDIF/PCM - Digital audio output with 2 channel stereo.
Changing the initial settings
OP MODE
KARAOKE MODE
Setting options
Setting options
LINE OUT
RF REMOD
OFF, ON
You can select between a direct connection or a connection
through RF Remodulator (or VCR player) to TV.
- Direct connection to TV.
- Connection through RF Remodulator to TV.
DUAL MONO
You can select the mode of analog outputs (DOWNMIX).
Setting options
STEREO
L-MONO
R-MONO
MIX-MONO
- Stereo output.
- Left mono output.
- Right mono output.
- Left and right mono output.
COMPRESSION
You can select the level of dynamic range compression in
the audio output. Normally, it should be set at FULL.
Setting options
FULL, 7/8, 6/8, 5/8, 4/8, 3/8, 2/8, 1/8, OFF
You can select ON for karaoke playback that would enable
key control and voice cancel features.
Selecting KARAOKE MODE ON automatically changes the
speaker output to DOWNMIX STEREO.
SPDIF OUTPUT should be OFF in AUDIO SETUP.
Pressing MIC ON on the remote control also changes
KARAOKE MODE.
Selecting EQUALIZER
This section refers to the settings in EQUALIZER which
are already made when you purchase the player. Read this
section when you want to change settings according to
your preferences and viewing environment.
1
The EQUALIZER menu appears with TYPE: STANDARD,
which you can changed by pressing ENTER. The
selection will rotate among STANDARD, CLASSIC, JAZZ,
ROCK, POPS, BALLAD, DANCE, and PERSONAL.
PRO LOGIC
You can select ON when listening to surround
multi-channel sound with the player’s analog audio output
connected to a surround decoder.
2
Setting options
OFF, ON, AUTO
3
LPCM OUTPUT
You can select the quality of the linear PCM digital sound
of the player. Normally, it should be set at 96KHz.
Setting options
4
LPCM 48K, LPCM 96K
This section refers to the settings which are already made
when you purchase the player. Read this section when you
want to change settings according to your preferences and
viewing environment.
3
Press SETUP.
Press
/
Press ENTER repeatedly to select PERSONAL.
Press
/
to select a frequency block.
The color of the selected block will turn to yellow.
Press / to select a volume level for the
frequency block.
The volume level will go up or down accordingly.
Selecting KARAOKE SETUP
1
2
Press CLEAR/EQ.
to select KARAOKE SETUP.
The color of the selected item changes.
Press ENTER.
The KARAOKE SETUP menu appears on the TV screen.
5
Press CLEAR/EQ to change to SPECTRUM
display.
The SPECTRUM will display the volume levels of each
frequency block during playback.
6
7
Press CLEAR/EQ to turn off SPECTRUM display.
The SPECTRUM display will disappear but the
EQUALIZER is still in effect.
Press CLEAR/EQ to turn off EQUALIZER.
The EQUALIZER OFF message will appear.
The message will also clear in 2 seconds.
-- KARAOKE PAGE -KARAOKE MODE
OFF
ON
MAIN PAGE
To dismiss KARAOKE SETUP display
Press SETUP or move the bar to MAIN PAGE and press ENTER.
23
Additional information
Troubleshooting
AVI files cannot be played back.
Power
AVI files are played back without sound.
Power does not come on.
Power plug is not inserted securely. Plug in securely.
Operation
"REGION CODE ERROR!" is shown on the TV
screen.
Region code of the inserted disc does not match the
player. Check the region code of the disc printed on the
disc jacket. To change the region code of the player,
please visit www.cavsusa.com.
Operation is not possible.
Microcomputer malfunction due to lightning or static
electricity. Turn off the power and unplug the power
cord, then connect the power cord again.
Moisture condensation caused by a sudden change of
temperature or humidity. Turn off the power, then turn it
on a few hours later.
The disc does not allows the operation, or an
unplayable disc is inserted. Check and replace the disc.
Picture
Picture is noisy.
The player is connected to a VCR directly and the
copyguard function is activated. Connect the player so
that the picture signal flows directly to the TV.
With some discs, the picture may be blurred when PIC
MODE is set to FILM or AUTO. Set PIC MODE to
VIDEO or SUPER SMART.
Picture is distorted when using COMPONENT
VIDEO OUT or S-VIDEO output jack(s).
The Progressive scanning mode is activated. Change
the scanning mode to the Interlaced scanning mode by
selecting VIDEO OUTPUT in PREFERENCE SETUP
as SVIDEO or YCBCR.
Karaoke
No microphone signal can be found in the audio.
Connect the downmix L/R outputs of the player to your
sound system. Digital audio connection does not carry
microphone signals.
No graphics come out when playing Super CD+G.
When selecting a song after a rest, insert a song
number and wait for the display of title before pressing
ENTER or PLAY.
Key control does not work.
Press MIC ON to turn on the KARAOKE MODE.
AVI/MP3/JPEG
No sound and / or no picture comes out.
AVI/MP3 disc is recorded with the "packet writing (UDF
format)." It cannot be played.
Check the files you want to play back.
Files (tracks) are not played in the recorded order.
This player plays the files in the alphabetic order. So,
the playback order can vary.
24
The format of the file is not asf.
This player can play back the MP3 sound for the audio
part of the AVI files. Select the proper audio CODEC
when making AVI files.
Specifications
Specifications and appearance are subject to change without
prior notice.
General
Optical discs
DVD, Video CD, Super CD+G, INX,
INX2, CD+G, Audio CD, HDCD
AVI, MP3, JPEG
DVD R, DVD R DL, DVD-RW,
CD-R/RW
USB memory
devices
AVI, MP3, JPEG, CD+G (MP3+MCG),
CD+G (MP3G)
Hard drive, Memory stick (FAT32)
Video format
NTSC/PAL, 480i (Interlaced scan)
/ 480p (Progressive scan)
Other
Power requirements AC 110 - 240V 50/60Hz
Power consumption 10W (POWER ON),
1.1W (STANDBY mode)
Mass
2.1kg (4.7 lbs)
Dimensions
435mm 47mm 259mm
(W H D)
(17- / inch 1- / inch 10- / inch)
Video outputs
COMPONENT
(pin jacks)
VIDEO OUT
(pin jack)
S-VIDEO OUT
(S jack)
Y Output: 1.0 Vp-p (75 )
PB/PR Output: 0.7 Vp-p (75
1.0 Vp-p (75 )
)
Y Output: 1.0 Vp-p (75 )
C Output: 286 mVp-p (75 )
Horizontal resolution 500 lines or more
Audio outputs
ANALOG OUT
(pin jack)
DIGITAL OUT
(COAXIAL)
DIGITAL OUT
(OPTICAL)
2.0 Vrms (10 k
0.5 Vp-p (75
)
termination)
-21 dBm to -15 dBm (peak)
Audio characteristics
Frequency response CD (sampling frequency 44.1 kHz):
- 2 Hz to 20 kHz
DVD (sampling frequency 48 kHz):
- 2 Hz to 22 kHz
(4 Hz to 20 kHz for DTS and Dolby
Digital bitstream signals)
DVD (sampling frequency 96 kHz):
- 2 Hz to 44 kHz
Dynamic range
16 bit: More than 98 dB
20 bit/24 bit: More than 100 dB
Wow and flutter
Unmeasurable (less than 0.002%)
Total harmonic distortion Less than 0.007%
CAVS
LIMITED WARRANTY
CAVS DVD KARAOKE
CAVS USA Inc. warrants this product and all parts thereof, except as set forth below ONLY TO THE ORIGINAL
PURCHASER AT RETAIL to be FREE FROM DEFECTIVE MATERIALS AND WORKMANSHIP from the data of
original retail purchase for the period as shown below. ("The Warranty Period")
PARTS
1 YR
LABOR
90 DAYS
THIS LIMITED WARRANTY IS VALID ONLY IN THE FIFTY (50) UNITED STATES, THE DISTRICT OF
COLUMBIA AND IN COMMONWEALTH OF PUERTO RICO.
WHAT WE WILL DO :
If this products is found to be defective, CAVS will repair or replace defective parts at no charge to the original
owner. Such repair and replacement services shall be rendered by CAVS during normal business hours at CAVS
authorized service centers. Parts used for replacement are warranted only for the remainder of the Warranty
Period. All products and parts there of may be brought to a CAVS authorized service center on a carry-in basis.
WHAT YOU MUST DO FOR WARRANTY SERVICE :
Return your product to a CAVS authorized service center with a copy of your bill of sale. For your nearest CAVS
authorized service center, please call : (562) 777-1846.
If service is not available locally, box the product carefully, preferably in the original carton, and ship, insured, with
a copy of your bill of sale plus a letter of explanation of the problem to the nearest CAVS Factory Service Center,
the name and location of which will be given to you by the phone.
If you have any questions concerning your CAVS Product, please contact our Technical Support Department.
WHAT IS NOT COVERED :
This limited warranty provided by CAVS does not cover :
1. Products which have been subject to abuse, accident, alteration, modification, tampering, negligence, misuse,
faulty installation, lack of reasonable care, or if repaired or serviced by anyone other than a service facility
authorized by CAVS to render such service, or if affixed any attachment not provided with the products, or if the
model number or serial number has been altered, tampered with, defaced or removed ;
2. Initial installation and removal for repair ;
3. Operational adjustments covered in the Owner's Manual, normal maintenance, video and audio head cleaning ;
4. Damage that occurs in shipment, due to act of God, and cosmetic damage ;
5. Signal reception problems and failures due to line power surge ;
6. Video Pick-up, Tubes/CCD Image Sensor, Cartridge, Stylus (Needle) are covered for 90 days from the data of
purchase ;
7. Accessories ;
8. Batteries (except that Rechargeable Batteries are covered for 90 days from the date of purchase) ;
There are no express warranties except as listed above.
THE DURATION OF ANY IMPLIED WARRANTIES, INCLUDING THE IMPLIED WARRANTY OF
MERCHANTABILITY, IS LIMITED TO THE DURATION OF THE EXPRESS WARRANTY HEREIN.
CAVS SHALL NOT BE LIABLE FOR THE LOSS OF USE OF THE PRODUCT, INCONVENIENCE, LOSS OR ANY OTHER
DAMAGES, WHETHER DIRECT, INCIDENTAL OR CONSEQUENTIAL (INCLUDING, WITHOUT LIMITATION, DAMAGE TO
TAPES, RECORDS OR DISCS) RESULTING FROM THE USE OF THIS PRODUCT, OR ARISING OUT OF ANY BREACH OF
THIS WARRANTY. ALL EXPRESS AND IMPLIED WARRANTIES, INCLUDING THE WARRANTIES OD MERCHANT-ABILITY
AND FITNESS FOR PARTICULAR PURPOSE, ARE LIMITED TO THE WARRANTY PERIOD SET FORTH ABOVE.
Some states do not allow the exclusion of incidental or consequential damages or limitations on how long an
implied warranty lasts, so these limitations or exclusions may not apply to you. This warranty gives you specific
legal rights and you may also have other rights which vary from state to state.
CAVS USA Inc.
10707 Fulton Wells Ave
Santa Fe Springs, CA 90670
REFURBISHED PRODUCTS CARRY A SEPARATE WARRANTY, THIS WARRANTY DOES NOT APPLY. FOR DETAILS OF
REFURBISHED PRODUCT WARRANTY, PLEASE REFER TO THE REFURBISHED PRODUCT WARRANTY INFORMATION
PACKAGED WITH EACH REFURBISHED PRODUCT.
For customer use :
Enter below the Model No. which is located either on the rear, bottom or side of the cabinet. Retain this
information for future reference.
Authorized Service Centers
HOW TO LOCATE YOUR CAVS SERVICE CENTER
CALL: 1 (562) 777-1846
http://www.cavsusa.com
Dear Customer,
In order to receive the most satisfaction from your purchase, please read the instruction booklet
before operating the unit. In the event that repairs are necessary, please call 1 (562) 777-1846 for
your nearest authorized service or visit our website www.cavs.com.
Remember to retain your Bill of Sale for Warranty Service.
Do not service the product yourself
Caution
To prevent electrical shock, do not open the
cabinet. There are no user serviceable parts
inside. Please refer to qualified service
personnel for repairs.
Accessories
To purchase accessories for your CAVS
product, please call : 1 (562) 777-1850
or visit us at www.cavsusa.com
CAVS USA INC.
10707 Fulton Wells Ave
Santa Fe Springs, CA 90670
TEL: 1 (562) 777-1846
http://www.cavsusa.com