1
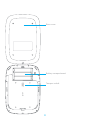
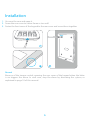
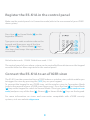
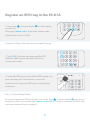
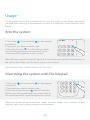
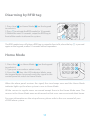
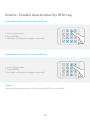
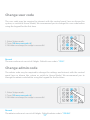
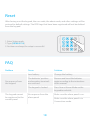
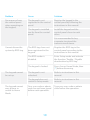
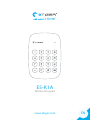
ES-K1A
Wireless Keypad
www.etiger.com
EN
Foreword
Thank you for purchasing the ES-K1A. The ES-K1A is a keypad that enables you to arm
and disarm your alarm system, or arm it in Home Mode.
Before entering your home, all you need to do is to type your passcode and press the
Disarm button [ ], or swipe the RFID tag (sold separately) in front of the RFID reader
to disarm the system.
Box Content
Keypad x 1
AAA 1.5V batteries x 3
Screws x 4
Documentation
2
Appearance
LED indicator
RFID reader1
Arm / Unlock
Disarm
Home Mode /
Unlock
SOS Key
1
RFID tag (125 KHz) sold separately.
The keypad supports up to 50 RFID tags.
Refer to the instructions on page 9 of this
manual to learn how to register an RFID tag
in the keypad.
3
RFID Tag
Rear cover
Battery compartment
Tamper switch
4
Preparation Before Use
How to turn the ES-K1A on
The ES-K1A is powered by 3 AAA batteries. Before using for the first time, remove the battery
strip.
1. Unscrew and open the case.
2. Insert the batteries according to the positive and negative signs.
3. Close the case and screw it back.
Remark
Because of the tamper switch, opening the rear cover of the keypad when the latter
is on triggers the alarm. In such case, stop the alarm by disarming the system, as
explained in page 10 of this manual.
5
Installation
1. Unscrew the case and open it.
2. Screw the rear cover to a door frame or to a wall.
3. Fasten the front cover of the keypad to the rear cover and screw them together.
Remark
Because of the tamper switch, opening the rear cover of the keypad when the latter
is on triggers the alarm. In such case, stop the alarm by disarming the system, as
explained in page 10 of this manual.
6
Setup
The ES-K1A operates under 4 modes.
Normal mode
The LED indicator blinks once every 5 seconds.
Sleep mode
Under Normal mode, the keypad switches to Sleep mode if no operation is made for
35 seconds. Press the Arm [ ] or Home Mode [ ] keys to exit Sleep mode. When the
keypad is in Sleep mode, the LED indicator is off.
RFID Reader mode
Under Normal mode, press [*] on the keypad to activate the RFID reader for 10
seconds: the LED indicator turns on. After 10 seconds, the LED light turns off as the
RFID reader turns off automatically.
Setup mode
To enter Setup mode, switch to Normal mode and then enter [your admin code + #]
on the keypad. The LED indicator blinks once every second. Press [*] to exit the Setup
mode and switch to the Normal mode.
After 30 seconds without operation, the keypad goes back to the Normal mode.
Default admin code : 123456
Remark
Correct operation: 1 beep and the LED light blinks once.
Wrong operation: 2 beeps and LED light blinks twice.
7
Register the ES-K1A in the control panel
Make sure the control panel is in Connection mode (refer to the user manual of your eTIGER
alarm system).
Press Arm [ ] or Home Mode [ ] on the
keypad to unlock it.
Type your user code or admin code on the
keypad, and then press any of the Arm
[ ], Disarm [ ] or Home Mode [ ] keys.
Your hear short beeps: the registration has
succeeded.
Default admin code : 123456. Default user code : 1234
The control panel of your alarm system can be controlled from distance on the keypad
once the latter has been registered in the control panel.
Connect the ES-K1A to an eTIGER siren
The ES-K1A can be connected to an eTIGER indoor or outdoor siren, which enables you
to trigger the siren by pressing the [SOS] key on your keypad.
To connect the keypad to an eTIGER siren, set the wireless siren to Connection Mode
(refer to the manual of your eTIGER siren if necessary). Press the Arm [ ] or Home Mode
[ ] key on the keypad to switch to Normal Mode. Then type [your admin code or user
code] and press any of the Arm [ ], Disarm [ ] or Home Mode [ ] keys on the keypad.
For more information on sirens and accessories compatible with eTIGER security
systems, visit our website etiger.com
8
Register an RFID tag in the ES-K1A
1. Press Arm [ ] or Home Mode [ ] on the keypad
to unlock it.
Then type [admin code + #] to enter Setup mode.
Default admin code: 123456
If you hear 2 beeps, the code you have typed is wrong.
2. Type [41#]. You hear one beep and the LED
indicator lights up: the keypad switches to
Connection mode.
3. Swipe the RFID tag in front of the RFID reader. You
hear one beep: the connection is successful.
If you hear two beeps, the RFID tag has already been
connected.
Press [*] to exit Setup Mode.
To clear all registered RFID tags, press any of the Arm [ ] or Home Mode [ ] keys on the
keypad to unlock it, and then type [admin code+#42#]. You hear one beep: the RFID tags
have been deleted from the keypad.
9
Usage
The keypad can be used as a remote control. Your user code or your admin code will be
required before arming or disarming the system, or switching to Home Mode or Mute
Mode.
Arm the system
1. Press Arm [ ] or Home Mode [ ] on the keypad
to unlock it.
2. Type your user code or admin code.
3. Press the Arm key [ ]. The LED indicator blinks
once, the keypad beeps once and sends to the
control panel the signal to arm the system.
When the alarm panel receives the signal, the siren beeps once and the Arm indicator on
the control panel lights up. The alarm system is now armed.
Default admin code : 123456, default user code : 1234
Disarming the system with the keypad
1. Press Arm [ ] or Home Mode [ ] on the keypad
to unlock it.
2. Type your user code or admin code.
3. Press the Disarm button [ ]: the LED indicator
blinks once, the keypad beeps once and sends to
the control panel the signal to disarm the system.
When the control panel receives the signal, the siren beeps twice and the Disarm
indicator lights up: the alarm system is now disarmed.
10
Disarming by RFID tag
1. Press Arm [ ] or Home Mode [ ] on the keypad
to unlock it.
2. Press [*] to activate the RFID reader for 10 seconds.
3. Within the next 10 seconds, swipe the RFID tag in
front of the reader to disarm the system.
The RFID reader turns off when a RFID tag is swiped in front of it, when the key [*] is pressed
again on the keypad, or after 10 seconds without operation.
Home Mode
1. Press Arm [ ] or Home Mode [ ] on the keypad
to unlock it.
2. Type your user code or admin code.
3. Press the [ ] key: the LED indicator blinks once,
the keypad beeps once and sends the signal to the
control panel to switch to Home Mode.
When the alarm panel receives the signal, the siren beeps once and the Home Mode
indicator lights up: the alarm system is now in Home Mode.
All the sensors in regular zones are armed except those in the Home Mode zone. The
sensors in the Home Mode zone are disarmed so that users can move inside their home.
For more information on the setup of zones, please refer to the user manual of your
eTIGER alarm system.
11
Emergency call
Refer to the instructions page 14 of this manual for more information on how to lock/
unlock the SOS button.
With SOS button unlocked
1. Press Arm [ ] or Home Mode [ ] on the keypad
to unlock it.
2. Press [SOS].
3. The LED indicator blinks once, the keypad beeps
once, and the alarm is triggered immediately.
With SOS button locked
1. Press Arm [ ] or Home Mode [ ] on the keypad to unlock it.
2. Type your user code or admin code.
3. Press [SOS] to trigger the alarm immediately.
Low battery indication
When the battery level is low, the LED indicator blinks 3 times every 5 seconds. In such
case, please change the batteries.
12
Settings
Enter Setup mode
Press Arm [ ] or Home Mode [ ] on the keypad
to unlock it.
Type [admin code+#] to enter Setup mode.
Default admin code : 123456
Under setup mode, if no operation is made for 30 seconds the keypad will exit the setup mode
automatically. The setup mode can also be exited by pressing [*].
Exit delay
Detectors start detecting potential intrusions immediately after the system has been
armed. To prevent alarms when you leave your house, an exit delay can be set up. If
you have set up an exit delay, the control panel will receive the signal to arm the system
when you press the Arm key [ ] on the keypad after the time set.
1. Enter Setup mode.
2. Type [33+delay time in seconds+#].
3. You hear one beep: the setup is successful.
To deactivate the Exit delay, set 0 as delay time.
Remark
The time is set in seconds, it can be set from 0 to 255. Default setting: 0.
13
If the exit delay has been set, the control panel will beep once every second after having
pressed the Arm [ ] key. The rhythm of the beeps will speed up during the last 15
seconds. After the exit delay time has elapsed, the control panel is armed.
If an exit delay has been set up for both the control panel and the keypad, the actual
delay time will be the combination of both exit delays.
This setting does not apply to the Home Mode.
Remark
Only the Exit delay can be set on the keypad. The Entry delay can be set on the control
panel (refer to the user manual of your eTIGER alarm system).
Lock / Unlock the SOS button
Lock the SOS button
1. Enter Setup mode.
2. Type [3410#].
3. You hear one beep: the setup is successful.
If the SOS button is locked, you will need to press Arm
[ ] (or Home Mode [ ]) to unlock the keypad, to type
your admin or user code, then to press [SOS] to trigger
the alarm.
Unlock the SOS button
1. Enter Setup mode.
2. Type [3411#].
3. You hear one beep: the setup is successful.
If the SOS button is unlocked, the control panel will
ring out immediately when you press Arm [ ] (or
Home Mode [ ]) and then [SOS].
Remark
Default setting: SOS button is locked.
14
Keyboard clicks
Keyboard clicks can be turned on or off. If keyboard clicks are off, the successful setup
notification sound will be off too.
Turn keyboard clicks on
1. Enter Setup mode.
2. Type [3510#].
3. You hear one beep: the setup is successful.
Turn keyboard clicks off
1. Enter Setup mode.
2. Type [3511#].
Remark
Default setting: keyboard clicks are on.
15
Enable / Disable deactivation by RFID tag
Enable deactivation of the system by RFID tag
1. Enter Setup mode.
2. Type [3610#].
3. You hear one beep: the setup is successful.
Disable deactivation of the system by RFID tag
1. Enter Setup mode.
2. Type [3611#].
3. You hear one beep: the setup is successful.
Remark
Default setting: deactivation of the system by RFID tag is enabled.
16
Change user code
The user code may be required to interact with the control panel (arm or disarm the
system, or switch to Home Mode). We recommend you to change the user code before
using the keypad for the first time.
1. Enter Setup mode.
2. Type [38+new user code+#].
3. You hear one beep: the setup is successful.
Remark
The user code must consist of 4 digits. Default user code is “1234” .
Change admin code
The admin code may be required to change the settings and interact with the control
panel (arm or disarm the system or switch to Home Mode). We recommend you to
change the admin code before using the keypad for the first time.
1. Enter Setup mode.
2. Type [39+new user code+#].
3. You hear one beep: the setup is successful.
Remark
The admin code must consist of 6 digits. Default admin code is “123456”.
17
Reset
After having reset the keypad, the user code, the admin code, and other settings will be
restored to default settings. The RFID tags that have been registered will not be deleted
from the keypad.
1. Enter Setup mode.
2. Type [987654321#].
3. You hear one beep: the setup is successful.
FAQ
Problem
No response from
the keypad
The keypad cannot
be registered to the
control panel
Cause
Solution
Low battery
Change the battery.
The batteries’ positive
and negative terminals
are reversed.
Remove and insert the batteries
again according to the instructions
in this manual.
The keypad is locked
Press Arm or Home Mode on the
keypad to unlock it.
No response from the
alarm panel
Make sure the alarm panel is on.
18
Make sure the alarm panel is in
Connection mode.
Problem
Cause
Solution
No response from
the control panel
when operating on
the keypad.
The keypad is not
registered in the control
panel.
Register the keypad in the
control panel by following the
instructions in this manual.
The keypad is installed
too far from the control
panel.
Install the keypad and the
control panel closer to each
other.
It is recommended to buy
a repeater to extend the
transmission distance.
Cannot disarm the
system by RFID tag.
The keypad cannot
be set up.
The keypad cannot
arm, disarm or
switch to Home
Mode.
The RFID tags have not
been registered in the
keypad.
Register the RFID tag in the
control panel according to the
instructions in this manual.
The RFID reader is
disabled.
Enter Setup mode and activate
the function “Enable / Disable
deactivation by RFID tag”.
The keypad is locked.
Press Arm or Home Mode, then
[*] before disarming.
The keypad is not
unlocked.
Refer to instructions in this
manual.
The keypad does not
switch to Setup mode.
Refer to instructions in this
manual.
Your user code or admin
code has not been typed
before each operation.
Type your user code or admin
code before the operation.
19
Care and Maintenance
For a safer use and a longer lifetime of the ES-K1A, we recommend you to follow the
instructions listed below.
Usage notices
General instructions
- This keypad must be registered in the control panel of your eTIGER alarm system before
being used for the first time.
- The power supply of this keypad may impact the transmission distance of the wireless
signal.
- This keypad is powered by 3 x AAA batteries.
- This keypad is compatible with eTIGER Secual alarm systems.
- Remove the battery strip before using for the first time.
- To avoid disturbing your neighborhood, do not press the [SOS] key unless necessary.
- Check your keypad on a regular basis to make sure the system works properly in case of
emergency.
- This keypad is neither waterproof nor moisture-proof. Install it in a shady, cool and dry
place.
- The case of this keypad is made of ABS plastic. Please keep it away from strong light to
ensure longer lifetime.
Limitations
- This keypad is not explosion proof. Keep it away from fire and flame sources.
- Install this keypad away from objects that produce heat or electromagnetic fields such as
heaters, air conditioners, microwave ovens, etc.
Recycling instructions
- Dispose of the keypad according to local regulations.
- Do not dismantle the product if you are not a professional technician.
20
Maintenance
Clean your keypad with a dry soft cloth or tissue. If there is dirt on your keypad, wipe
the surface with a soft cloth and diluted detergent and then wipe again with a dry cloth.
Standards
This product bears the selective sorting symbol for waste electrical and electronic
equipment (WEEE). This means that this product must be handled pursuant to
European Directive 2002/96/EC in order to be recycled or dismantled to minimize
its impact on the environment. For further information, please contact your local or
regional authorities. Electronic products not included in the selective sorting process
are potentially dangerous for the environment and human health due to the presence
of hazardous substances.
In compliance with European laws. This product is in compliance with the essential
requirements and other relevant provisions of Directive 1999/5/EC.
This product was designed and manufactured in compliance with Directive 2002/95/
EC of the European Parliament and of the Council on the restriction of use of certain
hazardous substances in electrical and electronic equipment (RoHS Directive - RoHS)
and is deemed to comply with the maximum concentration values set by the European
Technical Adaptation Committee (TAC).
Images, illustrations and text are non-contractual. ETIGER and the ETIGER logo are
registered trademarks and the property of ETIGER.
Copyright © 2015 ETIGER. All rights reserved.
21
ES-K1A–UM-EN20150303-2.1-W
Manufactured in China.
This user manual is available in other languages at
www.etiger.com/eu/support
ETIGER EUROPE
Rue de la Loi, 25, 7100 La Louvière, Belgium
[email protected]