1
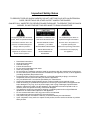
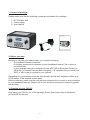
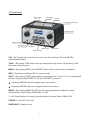
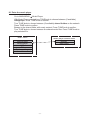
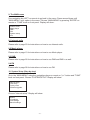
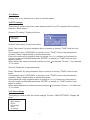
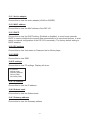
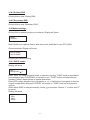
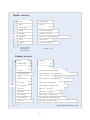
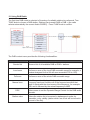
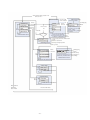
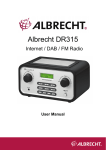
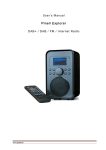
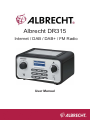
Albrecht DR315
Internet / DAB / DAB+ / FM Radio
User Manual
-1-
Important Safety Notes
TO PREVENT FIRE OR SHOCK HAZARD, DO NOT USE THIS PLUG WITH AN EXTENSION
CORD, RECEPTACLE OR OTHER OUTLET UNLESS THE BLADES
CAN BE FULLY INSERTED TO PREVENT BLADE EXPOSURE. TO PREVENT FIRE OR SHOCK
HAZARD, DO NOT EXPOSE THIS APPLIANCE TO RAIN OR MOISTURE.
The lightning flash with arrowhead
WARNING: TO REDUCE THE
The exclamation point within an
symbol, within an equilateral triangle
RISK OF ELECTRIC SHOCK
equilateral triangle is intended to
is intended to alert the user to the
DO NOT REMOVE COVER
alert the user to the presence of
presence of insulated ‘dangerous
(OR BACK ) , NO USER
important operating and
voltage’ within the product’s
SERVICEABLE PARTS INSIDE
maintenance (servicing) instructions
enclosure that may be of sufficient
REFER SERVICING TO
in the literature accompanying
magnitude to constitute a risk of
QUALIFIEDSERVICE
the appliance.
electric shock to persons.
PERSONNEL.
x
x
x
x
x
x
x
x
x
x
x
x
x
x
x
x
x
Read these instructions.
Keep these instructions.
Heed all warnings.
Follow all instructions.
Do not use this apparatus near water.
Clean only with dry cloth.
Do not block any ventilation openings. Install in accordance with the manufacturer’s instructions.
Do not install near any heat sources such as radiators, heat registers, stoves, or other apparatus
(including amplifiers) that produce heat.
Protect the power cord from being walked on or pinched particularly at plugs, convenience
receptacles, and the point where they exit from the apparatus.
Only use attachments / accessories specified by the manufacturer.
Unplug this apparatus during lightning storms or when unused for long periods of time.
Refer all servicing to qualified service personnel. Servicing is required when the apparatus has
been damaged in any way, such as power-supply cord or plug is damaged, liquid has been
spilled or objects have fallen into the apparatus, the apparatus has been exposed to rain or
moisture, does not operate normally, or has been dropped.
This appliance shall not be exposed to dripping or splashing water and no object filled with
liquids such as vases shall be placed on the apparatus.
Do not overload wall outlet. Use only power source as indicated.
Use replacement parts as specified by the manufacturer.
The product may be mounted to a wall only if recommended by the manufacturer.
Upon completion of any service or repairs to this product, ask the service technician to perform
safety checks.
-2-
Welcome
Thank you for purchasing the Albrecht DR 315 radio. Your DR 315is designed to provide
you with hours of music enjoyment with simple, convenient access to thousands of Internet
radio stations worldwide and furthermore with DAB, the new DAB + as well as FM and
music streaming options. No matter whether you are in Alaska and wants to listen to
Hawaiian music, or whether you want to listen to classical music, hard rock or jazz the
DR315 brings you home the radio station of your choice.
Table of content
1. Content of package..........................................................................................................5
2. Before you start ...............................................................................................................5
3. Overview of your DR 315................................................................................................5
3.1 Front Panel ....................................................................................................................6
3.2 Back Panel.....................................................................................................................7
4. Turning on DR 315 ..........................................................................................................7
5. General menu navigation.................................................................................................7
6. Setting up the DR 315(Quick Guide) ...............................................................................8
6.2 Manual Config................................................................................................................9
6.3 View settings..................................................................................................................9
6.4 Using the DR 315 ........................................................................................................10
7. Setting the time and date ...............................................................................................10
7.1 To set the time manually..............................................................................................10
7.2 Set Clock .....................................................................................................................10
7.3 Set Date.......................................................................................................................10
7.4 Auto Update.................................................................................................................10
7.5 Set 12/24 Hour.............................................................................................................11
7.6 Set Sleep .....................................................................................................................11
7.7 Set Alarms ...................................................................................................................11
8. Setting up the music player............................................................................................12
PC: Domain/Workgroup configuration ............................................................................12
PC: Setting up a new user account ................................................................................12
PC: Configuring a shared drive ......................................................................................12
DR-315: Storing the user name and password ..............................................................12
8.1 Enter the music player .................................................................................................13
9. The MAIN menu.............................................................................................................16
9.1 Internet radio................................................................................................................16
9.2 Music player.................................................................................................................16
9.3 DAB .............................................................................................................................16
9.4 FM................................................................................................................................16
10. System Setup (Step by step) .......................................................................................16
10.1 Wizard........................................................................................................................17
10.2 PC settings ................................................................................................................17
10.3 View settings..............................................................................................................17
10.3.1 Active adapter .........................................................................................................18
10.3.2 MAC address ..........................................................................................................18
10.3.3 DHCP......................................................................................................................18
-3-
10.3.4 PC settings .............................................................................................................18
10.3.5 SSID .......................................................................................................................18
10.4 IP settings ..................................................................................................................18
10.5 Manual settings..........................................................................................................19
10.5.1 DHCP enable ..........................................................................................................19
10.5.2 DHCP disable .........................................................................................................20
10.6 Time Setup ................................................................................................................22
10.7 Factory Reset ............................................................................................................22
10.8 Software upgrade.......................................................................................................22
10.9 Info.............................................................................................................................22
10.9.1 Adding favourites and stations................................................................................23
11. Using Internet Radio ....................................................................................................23
11.1 Using the switches on the back panel of the radio ....................................................24
12. Using DAB Radio .........................................................................................................26
13. Using FM Radio ...........................................................................................................28
14. Presets.........................................................................................................................28
-4-
1. Content of package
Please make sure that the following content are included in the package:
1. DR 315 Main unit
2. Power supply
3. User Manual
2. Before you start
Before you can use your internet radio, you need the following:
A broadband internet connection.
A wireless access point connected to your broadband internet. Via a router is
recommended.
If your wireless network is configures to use WEP (Wired Equivalent Privacy) or
WPA (Wi-Fi Protected Access) data encryption, it is important that you know your
WEP or WPA code to connect to your network.
Depending on your wireless router the internet radio should work anywhere within up to
20-30 meters of the wireless access point.
Before continuing, make sure that your wireless access point is turned on and connected
to your broadband internet. Please refer to your wireless access point manual to get this
part working.
3. Overview of your DR 315
After taking your DR 315 out of the package, please spend some time to familiarize
yourself with its features.
-5-
3.1 Front Panel
Volume Knob
(V+ V-)
LCD Display
Speaker
Tune Knob(push:Enter)
ON/OFF button
Earphone output
Menu button
Info button
Mode button
Shift button
Number button
VOL = By Turning VOL knob Volume level is set. By Pressing VOL knob MUTE is
activated/deactivated.
TUNE = By turning TUNE knob users can navigate through menus. By pressing TUNE
knob user confirms choice.
MENU = By pressing MENU the CONTEXT Menu of the current mode is displayed.
INFO = Displays the different INFO in current mode.
SHIFT = By pressing SHIFT preset buttons will change from 1-4 to 5-8. F.ex. pressing shift
and then long pressing PRESET 2 will save PRESET on preset 6.
= Pressing ARROW left will navigate back in the menus.
= Pressing ARROW right will navigate forward in the menus.
MODE = By pressing MODE the DR 315 will change between the different modes:
Internet Radio, Music Player, DAB (DAB+) & FM.
1 – 4 = Preset buttons for saving favourite stations (Internet Radio, DAB or FM)
POWER = Turns DR 315 on/off
EARPHONE = Earphone out
-6-
3.2 Back Panel
L
R
4. Turning on DR 315
Preparing DR 315 for operation:
1. Place DR 315 on a flat surface.
2. If you are accessing the internet via wired Ethernet LAN, place DR 315 near
Ethernet LAN access and proceed to 6. Setting up the DR 315 (wired access is
optional and may not be available in your radio)
3. If you are accessing the internet via Wireless LAN, please proceed to 6. Setting up
the radio.
5. General menu navigation
To navigate to the different menus you must use the ARROW buttons on the front panel
and the TUNE knob. This is general for all menu items. Use ARROW keys to find the
menu you wish to select and turn the TUNE knob to navigate to the desired menu item.
Then press TUNE knob to select. When menu item is selected pressing right ARROW key
will also confirm selection.
For example to navigate to the MAIN MENU while in INTERNET RADIO MODE press left
ARROW button and the Menu is showing on display. Turn the TUNE knob until MAIN
MENU is selected. Press TUNE knob to select MAIN MENU.
Pressing MENU on front panel will take you to the Context Menu of the present mode of
DR 315 (Internet, DAB etc.)
-7-
DR 315 has numerous features which require a small degree of setup before users are
able to fully use all the functionalities of the radio. The Main Menu Æ System Setup menu
has a series of options that allow system-wide settings to be altered.
These settings are:
Setting
Internet setup
Time setup
Software upgrade
Factory reset
Action
Enter the Internet Settings submenu
Enter the Time/Alarm setup submenu
Enter the Software Upgrade wizard
Performs a factory reset
Please go to page 14 for System Menu (Step by Step).
6. Setting up the DR 315(Quick Guide)
The first time you want to connect to the internet to listen to radio stations, you will have to
set up the connection. This is done with the Internet Wizard. The radio has been
configured to automatically run the Internet Wizard when you enter the Internet Radio
mode (If a connection has not already been made).
Alternatively you can manually run the Internet Wizard if you want to connect to a different
WiFi network. This can be accessed from the System Setup Æ Internet Setup menu in the
MAIN MENU.
The Internet Setup menu consists of 4 options:
Wizard, PC Settings, View Settings and Manual Settings.
6.1 Wizard:
1. Select the Wizard.
2. The Wizard will then automatically scan for available Wireless or Wired (Ethernet)
networks and a list is displayed.
3. Turn the TUNE knob to either select desired network (SSID) or select one of the
three other options. Rescan (Performs a rescan for networks), Wired (Optional)
(Will select Ethernet) or Manual Config (Will allow user to manually configure the
Wireless setup).
4. If the network has no security the following messages appears – “Please wait
Connecting”, “Please wait Acquiring address” and “Connected” The Internet Radio
menu will be displayed.
5. If the network has a security feature enabled the DR 315 will prompt you to enter
the key or pass phrase. The security details must match the security information
configured in the wireless access point. The authentication type (WEP, Open, WPA
or WPA2) will automatically be detected.
-8-
6. Password Entry:
Turn the TUNE knob to display different sets of characters and numbers. Use the
ARROW buttons to move the flashing cursor to select the desired characters.
To enter your key, use the Select
control to move the cursor through the
characters and select. As each character
is selected, the key is built up near the
top of the display.
There are three options accessible by
turning Select back before the first
characters (0123…) – Backspace, OK
and Cancel. You can also use
the Back function to erase characters.
6.2 Manual Config
More advanced users can also edit their WiFi settings by selecting the System Setup
Internet Setup
Manual Settings menu.
Selecting Manual Settings allows you to manually configure your network. First choose
between Wired (Optional) or Wireless. Press TUNE knob to confirm. Then choose
between DHCP enable or disable.
Choose enable if you want DHCP to automatically acquire en IP address. Choose Press
TUNE knob to confirm. Enter SSID (Same procedure as explained above (6). Turn TUNE
knob to choose between authentitication type (Open, WEP, WPA or WPA2). Press TUNE
knob to confirm. Turn TUNE knob to choose between Open or PSK. Press TUNE knob to
confirm. Enter security key or pass phrase as explained above (6). Display will show
“Please wait Connecting”, “Please wait Acquiring address” and “Connected” The Internet
Radio menu will be displayed.
Choose disable if you want to manually enter IP address etc. Press TUNE knob to confirm.
Enter IP address by turning the TUNE knob to desired number. Use ARROW buttons to
choose next or previous number. Press TUNE knob to confirm. Enter Subnet mask. Press
TUNE knob to confirm. Enter Gateway address. Press TUNE knob to confirm. Enter
Primary DNS. Press TUNE knob to confirm. Enter Secondary DNS. Press TUNE knob to
confirm. Enter SSID. Choose “
” to confirm. Choose between Open, WEP, WPA or
WPA2. Press TUNE knob to confirm. Choose between Open or PSK (For WEP), TKIP or
AES (For WPA, WPA2). Press TUNE knob to confirm. Enter security key or pass phrase
as explained above (6). Display will show “Please wait Connecting”, “Please wait Acquiring
address” and “Connected” The Internet Radio menu will be displayed.
6.3 View settings
Selecting View Settings allows you to view your settings. The menu items are:
Active Adapter (Display the current connection being used to connect to the internet
(WLAN or Wired)
MAC Address (Displays the DR 315MAC Address)
SSID (Displays the current SSID)
DHCP (Displays the current DHCP setting)
PC Setting (Display User Name or Password)
-9-
IP Settings (Displays current IP Address, Subnet Mask, Gateway Address, Primary DNS
or Secondary DNS)
6.4 Using the DR 315
On power up the DR 315 accesses the last mode or service selected. To access another
mode:
1. Press Menu button on front panel to display Context menu of the mode you are in.
2. Turn the TUNE knob to select Main Menu. Press TUNE knob to confirm.
3. Turn TUNE knob to choose desired mode.
The DR 315 accesses the last service played in that mode.
7. Setting the time and date
The time and date must be set manually each time main power has been switched off
(Alternatively you can tune into a DAB station and (if available) time and date can be
extracted from the DAB stream).
7.1 To set the time manually
Go to MAIN MENU
SYSTEM SETUP
TIME SETUP
Choose to either SET CLOCK, SET DATE, AUTO UPDATE, SET 12/24 Hour, SLEEP or
ALARM
7.2 Set Clock
Select Set Clock. Turn TUNE knob to set hour. Press right ARROW button to select
minutes. Turn TUNE knob to set minutes. Use ARROW keys to choose between hours
and minutes. Press TUNE knob to confirm settings.
7.3 Set Date
Select Set Date. Turn TUNE knob to set year. Press right ARROW button to select month.
Turn TUNE knob to set month. Press right ARROW button to select day. Turn TUNE knob
to set day. Use ARROW keys to choose between year, month and day. Press TUNE knob
to confirm settings.
7.4 Auto Update
Select Auto update. Turn TUNE knob to choose between Update from DAB or No Update.
When selected press TUNE knob to confirm setting. When Update from DAB is selected
you can tune into a DAB (or DAB+) station and (if available) time and date can be
extracted from the DAB stream.
- 10 -
7.5 Set 12/24 Hour
Select Set 12/24 Hour. Turn TUNE knob to choose between Set 12 Hour or Set 24 Hour.
When selected press TUNE knob to confirm setting.
7.6 Set Sleep
Select Sleep. Turn TUNE knob to choose between No Sleep, 15, 30, 45 or 60 minutes.
Press TUNE knob to confirm. The DR 315will turn off automatically after the desired
amount of minutes.
7.7 Set Alarms
Select Alarms. Turn TUNE knob to choose from Alarm 1 or 2. Press TUNE knob to
confirm. Press TUNE knob to choose between Time, Off, Mode, Last listened, Volume and
Save. Select Time by pressing TUNE knob. Turn TUNE knob to set Hour. Press right
ARROW button to choose minutes. Turn TUNE knob to set minutes. Use ARROW keys to
choose between hours and minutes. Press TUNE knob to confirm settings.
Other settings can be selected by turning TUNE knob and pressing TUNE knob to select.
7.7.1 Modes: Internet Radio, DAB (with DAB+extension), FM or Buzzer
7.7.2 Last Listened: Selecting Last Listened will also include all Presets to be chosen.
7.7.3 Volume: Turn TUNE knob to set ALARM volume.
7.7.4 Save: When all settings are as desired. Select SAVE and press TUNE knob to
confirm. ALARM will activate even if DR 315 is playing. However if playing mode and
alarm mode are the same there will only be a short break when alarm enters mode. When
POWER button is turned of and ALARM is set display shows a Bell in upper right corner.
Equaliser
Several preset EQ modes are available; also a user-defined setting.
To adjust the EQ, select Menu > System settings > Equaliser.
You can then choose from a variety of preset modes or create your own, with custom bass,
treble and loudness settings.
- 11 -
8. Setting up the music player
In order to set up the DR 315 to playback music stored on shared network drives, user
name, password and domain settings must be configured to work with the PC share
settings.
PC: Domain/Workgroup configuration
The domain configuration item can be found on a Windows XP machine as follows:
System.
From the start menu, select Control Panel
Select the Computer Name tab. The domain or workgroup that the computer is a
member of is displayed in this tab.
If the PC is not a member of any domain or Workgroup then one must be joined.
To do so click on the change button on the computer name tab and enter the
name of the domain (Default on Windows XP is MSHOME)
A reboot of the PC may be required if the domain or workgroup has been
changed.
PC: Setting up a new user account
(If no user accounts already exists)
The DR 315 requires a user account to be set up on each PC that you wish to browse.
This username and password (Optional) needs to be the same on each PC as the DR 315
can only stores one username and password for all shared folders. Normally, in a home
network, no passwords are used (this is standard when using Windows XP Home edition)
PC: Configuring a shared drive
From the start menu select My Computer and navigate to the directory you wish to share.
Right click on the directory and select Sharing and security. Configure the shared drive
and make sure the user name has as minimum read access to the share. DR 315 works
as well with a LINUX (Samba) Server system where the shares are configured to be used
by Windows clients.
DR-315: Storing the user name and password
Before the DR 315 can stream music from PC, you need to ensure that you have a shared
folder available on the PC, and that user name and password (If one has been set) for the
shared folder on the PC. (Here again our recommendation, not to use a password in Home
networks with Windows XP Home computers) .
- 12 -
8.1 Enter the music player
Go to MAIN MENU
Music Player
With Music Player selected turn TUNE knob to choose between (If available)
workgroups. Press TUNE knob to confirm.
Turn TUNE knob to choose between (If available) shared folders on the network.
Press TUNE knob to confirm.
Browse to the shared folder with music content. Press TUNE knob to confirm.
Turn TUNE knob to choose between the shared music files. Press TUNE knob to
play selected file.
Main menu
Music player context menu
Browse
Main menu
Internet radio
Music player
DAB
FM
System settings
Info
- 13 -
Please wait
Connecting···
MP Connecting splash screen
<Select>,<Back> or time
Is there a
domain?
No Network
No1ghbourhood
No
MP No Domain splash screen
Yes
>MSHome
Second Domain
MP Domain List menu
<Select>,<Back> or time
Select a domain
Are there PC
on this
domain?
No PC on
Network
No
MP No PC splash screen
Yes
>XP Home
Second PC
MP PC List menu
Select a PC
Are there any
shares on
the PC?
<Select>,<Back> or time
No shares on
PC
MP No Shares splash screen
No
Yes
>First share
Second share
MP Share List menu
- 14 -
1. Ensure that the user name and password (If needed) are configured.
2. Enter the Music Player menu.
3. DR 315searches for all available domains and shows all found domains.
>MSHome
Up
Down
Second Domain
MP Domain List menu
4. Once the user selects a domain, a list of PCs on the domain will be displayed:
>XP Home
Up
Down
Second PC
MP PC List menu
5. Once a domain and PC has been chosen, a list of all the shared folders in the
system is displayed.
6. User can then select a folder and select a file to play within the folder.
7. Pressing MENU button on front panel will display the Music Player context menu,
which allows the user to return to the main menu, or pressing browse will take the
user into the last selected shared folder.
> Browse
UP/Down
Main Menu
MP Context menu
- 15 -
9. The MAIN menu
Use navigation key LEFT on remote to go back in the menu. Press several times until
“MAIN MENU” is an option in the menu. Choose “MAIN MENU” by pressing “ENTER” on
remote or “TUNE” knob on front panel. Display will show:
Internet radio
Music player
DAB
FM
System setup
Info
9.1 Internet radio
Please refer to page 23 for instructions on how to use Internet radio.
9.2 Music player
Please refer to page 13 for instructions on how to use Music player.
9.3 DAB
Please refer to page 26 for instructions on how to use DAB and DAB + as well.
9.4 FM
Please refer to page 28 for instructions on how to use FM.
10. System Setup (Step by step)
Go to the “MAIN MENU” using the navigations keys on remote or “|<<” button and “TUNE”
knob on front panel. Choose “SYSTEM SETUP” Display will show:
Internet setup
Time setup
Factory reset
Software upgrade
Choose “Internet setup”. Display will show:
Wizard
PC settings
View settings
Manual settings
- 16 -
10.1 Wizard
Please refer to our instructions on how to use the wizard.
10.2 PC settings
This setting is used to input user name and password if your PC requires this for sharing
folders in “Music player”
Choose “PC setting”. Display will show:
>User name
Password
Choose “User name” to input user name.
Enter “User name” by using navigation keys on remote or turning “TUNE” knob on front
panel.
Use navigation keys “UP/DOWN” on remote or turn “TUNE” knob to choose between
numbers, letters, capital letters or special characters.
Enter user name using navigation keys on remote or >>| <<| buttons on front panel to
choose correct number/letter and press “ENTER” on remote or “TUNE” knob on front
panel to confirm.
When whole user name is entered correctly choose
to proceed. Choose “<” to clear and
“C” to cancel.
Choose “Password” to input password.
Enter “Password” by using navigation keys on remote or turning “TUNE” knob on front
panel.
Use navigation keys “UP/DOWN” on remote or turn “TUNE” knob to choose between
numbers, letters, capital letters or special characters.
Enter password using navigation keys on remote or >>| <<| buttons on front panel to
choose correct number/letter and press “ENTER” on remote or “TUNE” knob on front
panel to confirm.
When whole password is entered correctly choose
to proceed. Choose “<” to clear and
“C” to cancel.
10.3 View settings
This setting is used to view the current settings. Choose “VIEW SETTINGS”. Display will
show:
>Active adapter
MAC address
DHCP
PC settings
SSID
IP settings
- 17 -
10.3.1 Active adapter
Choose this to view the active adapter (WLAN or WIRED).
10.3.2 MAC address
Choose this to view the MAC address of the DR 315.
10.3.3 DHCP
Choose this to view the DHCP setting. (Enabled or disabled). In most home networks
DHCP is used to distribute the access data automatically to all connected devices. In such
cases no manual configuration of the DR 315 is necessary. The factory default setting is
DHCP enabled.
10.3.4 PC settings
Choose this to view User name or Password set for Music player.
10.3.5 SSID
Choose this to view SSID.
10.4 IP settings
Choose this to view PC settings. Display will show:
>IP address
Subnet mask
Gateway address
Primary DNS
Secondary DNS
10.4.1 IP address
Choose this to view the IP address.
10.4.2 Subnet mask
Choose this to view the Subnet mask.
10.4.3 Gateway address
Choose this to view the Gateway address.
- 18 -
10.4.4 Primary DNS
Choose this to view Primary DNS.
10.4.5 Secondary DNS
Choose this to view Secondary DNS.
10.5 Manual settings
Choose this to manually setup your network. Display will show:
>Wired
Wireless
Note! Wired is an optional feature and may not be available for your BT-H1506.
Choose wireless. Display will show:
>DHCP enable
DHCP disable
Choose your desired setting.
10.5.1 DHCP enable
Display will show:
SSID
0123456789<
C
Enter “SSID” by using navigation keys on remote or turning “TUNE” knob on front panel.
Use navigation keys “UP/DOWN” on remote or turn “TUNE” knob to choose between
numbers, letters, capital letters or special characters.
Enter SSID using navigation keys on remote or >>| <<| buttons on front panel to choose
correct number/letter and press “ENTER” on remote or “TUNE” knob on front panel to
confirm.
When whole SSID is entered correctly choose
to proceed. Choose “<” to clear and “C”
to cancel.
Display will show:
>Open
WEP
WPA
WPA2
- 19 -
Choose your Security. If Open is chosen (No security) radio will connect. However having
No security is not recommended. If any other security (WEP, WPA, WPA2) is chosen,
display will show:
If WEP is chosen:
>Open
PSK
If WPA is chosen:
>TKIP
AES
Choose your desired setting. Display will show:
Key:
0123456789<
If WPA2 is chosen:
>TKIP
AES
C
Enter “Key” by using navigation keys on remote or turning “TUNE” knob on front panel.
Use navigation keys “UP/DOWN” on remote or turn “TUNE” knob to choose between
numbers, letters, capital letters or special characters.
Enter key using navigation keys on remote or >>| <<| buttons on front panel to choose
correct number/letter and press “ENTER” on remote or “TUNE” knob on front panel to
confirm.
When whole key is entered correctly choose
to proceed. Choose “<” to clear and “C” to
cancel.
Radio will connect.
10.5.2 DHCP disable
Display will show:
IP address
0.0.0.0
Enter desired IP address by using the navigation buttons on the remote or turn”TUNE”
knob on front panel. Press “ENTER” or “LEFT” on remote or press “TUNE” knob to go to
next number. When fully entered display will show:
Subnet mask
255.255.255.0
Enter desired Subnet mask by using the navigation buttons on the remote or turn”TUNE”
knob on front panel. Press “ENTER” or “LEFT” on remote or press “TUNE” knob to go to
next number. When fully entered display will show:
Gateway address
0.0.0.0
Enter desired Gateway address by using the navigation buttons on the remote or turn
”TUNE” knob on front panel. Press “ENTER” or “LEFT” on remote or press “TUNE” knob to
go to next number. When fully entered display will show:
Primary DNS
0.0.0.0
- 20 -
Enter desired Primary DNS by using the navigation buttons on the remote or turn ”TUNE”
knob on front panel. Press “ENTER” or “LEFT” on remote or press “TUNE” knob to go to
next number. When fully entered display will show:
Secondary DNS
0.0.0.0
Enter desired Secondary DNS by using the navigation buttons on the remote or turn
”TUNE” knob on front panel. Press “ENTER” or “LEFT” on remote or press “TUNE” knob to
go to next number. When fully entered display will show:
SSID
0123456789<
C
Enter “SSID” by using navigation keys on remote or turning “TUNE” knob on front panel.
Use navigation keys “UP/DOWN” on remote or turn “TUNE” knob to choose between
numbers, letters, capital letters or special characters.
Enter SSID using navigation keys on remote or >>| <<| buttons on front panel to choose
correct number/letter and press “ENTER” on remote or “TUNE” knob on front panel to
confirm.
When whole SSID is entered correctly choose
to proceed. Choose “<” to clear and “C”
to cancel.
Display will show:
>Open
WEP
WPA
WPA2
Choose your Security. If Open is chosen (No security) radio will connect. However having
No security is not recommended. If any other security (WEP, WPA, WPA2) is chosen,
display will show:
If WEP is chosen:
>Open
PSK
If WPA is chosen:
>TKIP
AES
If WPA2 is chosen:
>TKIP
AES
Choose your desired setting. Display will show:
Key:
0123456789<
C
Enter “Key” by using navigation keys on remote or turning “TUNE” knob on front panel.
Use navigation keys “UP/DOWN” on remote or turn “TUNE” knob to choose between
numbers, letters, capital letters or special characters.
- 21 -
Enter key using navigation keys on remote or >>| <<| buttons on front panel to choose
correct number/letter and press “ENTER” on remote or “TUNE” knob on front panel to
confirm.
to proceed. Choose “<” to clear and “C” to
When whole key is entered correctly choose
cancel.
Radio will connect.
10.6 Time Setup
Please go chapter 7. Setting the time and date
10.7 Factory Reset
Go to “MAIN MENU”
Use navigation key LEFT on remote to go back in the menu. Press several times until
“MAIN MENU” is an option in the menu. Choose “MAIN MENU” by pressing “ENTER” on
remote or “TUNE” knob on front panel. From the main menu choose “System setup” From
system setup choose “Factory reset” Display will show:
Press ‘INFO’ to
confirm reset
Press “SETUP/INFO” on remote to confirm reset. By doing this the radio will restart with
the factory settings. This also means that all connections has to be configured again. A
factory reset may be necessary if the radio is not functioning correctly or menu/display is
acting up.
10.8 Software upgrade
Used for upgrading software from factory server. Before You try to download a new
software version, check on our download server (http://hobbyradio.de/DAB) whether such
updates are available or not.
10.9 Info
Choose “Info”. Display will show:
>SW version
Radio ID
Choose “SW version” to see the software version.
Choose “Radio ID” to see the unique ID of your radio. This can be used to create an
account on http://www.wifiradio-frontier.com/
- 22 -
10.9.1 Adding favourites and stations
Choose “Radio ID” to see the unique ID of your radio. This can be used to create an
account on http://www.wifiradio-frontier.com/
When you have created an account you can now add favourites directly to your radio. You
can also add your own stations if needed. You can also listen to all the radio stations from
here on your PC.
11. Using Internet Radio
The Internet Radio mode allows the user to select services (Live radio stations or
Podcasts) to listen to from the VTuner portal.
When the user connects to Internet Radio , a station list is provided. This is built up after
the initial logon from the VTuner server. The actual menu items within the Station list menu
will not change and it is sent back directly from the VTuner portal; We do not alter the data.
The Station list menu and the two submenus that lead off (for items relating to Internet
Radio and Podcasts, respectively) are shown below.
The Internet Radio Stations list menu provides the following functions:
Name
My favourites
Stations
Podcast
My Added stations
Description
Create an account on http://www.wifiradio-frontier.com/
When you have created an account you can now add favourites
directly to your radio. You can also add your own stations if
needed. You can also listen to all the radio stations from here on
your PC.
Navigates to sub-menu which allows user to navigate to stations
by location, genre, most popular, new stations, or by doing a
search by alphabets.
Navigate to sub-menu which allows users to navigate to podcast
and listen-again services by location, genre, or by doing a search
by alphabets. On to off
Create an account on http://www.wifiradio-frontier.com/
When you have created an account you can now add favourites
directly to your radio. You can also add your own stations if
needed. You can also listen to all the radio stations from here on
your PC.
- 23 -
The Internet Radio playing screen displays information on the currently selected service,
and is the default behaviour when a service is selected and playing. The top line always
displays a Station name, whilst the information displayed in the bottom line can be scrolled
through by pressing the INFO button on the front panel. The different info displayed are
shown below.
11.1
Using the switches on the back panel of the radio
On the back panel of the radio you will find besides the connectors:
LCD Brightness
a manual brighness switch allows different display background
illumination levels
Speaker ON / OFF
If the radio shall be connected to a home stereo system, it will
be probably not necessary to have the internal speakers
activated.
With the internal speakers switched off, the volume potentiometer
on the front panel will only allow to adjust the volume transfered to
the RCA sockets on the back side, where You can connect Your
home stereo system.
Note: if You want to operate the radio with internal speakers, do
not forget to switch the speakers on!
- 24 -
Radio services
Info
Name
<Name string>
Status
Playing
Signal strength
·····
Format
Format : 128 kbps/MP3
Reliability
Reliability : Excellent
Description
Description : <a description string>
Genre
Genre : Dance
Location
Location : Internet Only
Pressing the Info
Button changes
the Display state
Example screen
Podcast services
Info
Status
Playing
Signal strength
·····
Location
Location : London United Kingdom
Episode Description
Episode Description : <description string>
URL
URL : <url string>
Show Description
Show Description : <description string>
Show genre
Show Format : <format string>
Show Language
Show Language : <language string>
Show City
Show City : <city string>
Show State
Show State : <state string>
Show Country
Show Country : <country string>
Show bookmark
Show bookmark : <description string>
Show Title
Show Title : <description string>
Internet Radio Playing screen
- 25 -
12. Using DAB Radio
The first time DAB mode is selected a Scanning of available stations is performed. Turn
TUNE knob to choose a DAB station. Stations can transmit DAB or DAB + (the radio
selects automatically the correct Audio-CODEC). Press TUNE knob to confirm.
Main Menu
Internet radio
DAB context menu
Music player
DAB
Main Menu
Manual time
Service List
FM
System Settings
Info
<Fwd>/<Back>
Station <Fwd>/<Back>
List
Playing
Local scan
<Fwd>
(back to Main Menu)
Set bomd
DRC
Set order
Menu
The DAB context menu provides the following functionalities:
Name
Description
Service list
Shows a list of all available DAB or DAB + stations.
Local scan
Performs a scan of the local DAB ensemble range(for example, a
product designed for the UK will scan ensemble 11B to 12D).
Full scan
Manual tune
Performs a scan of the whole DAB ensemble range
list of frequencies displayed is dependant on the currently-set
frequency band and contains all of the frequencies within that
band. It starts with the short name of the frequency. for example
12B, and is followed by the actual frequency in MHZ
DRC
Allows users to set the Dynamic Range Control for the DAB audio
decoder.
Station order
Allows the station list to be sorted in alphanumeric order, by
ensemble, or by validity (station which are off-air will be moved to
the end of the list).
- 26 -
Scroll up/down,menu pressed or No
services in list
Station list menu
>Station List
Local Scan
Manual Tune
DRC
Up /
Down Station Order
Main Menu
Select/
Forward
Enter service
list
Scan fails
Select/
forward
>1Xtra
6 Music
Up / ···
Down Q103
Virgin
Scan successful ?
DAB Context menu
Scanning 27
·····
Scanning screen
Service could
not be selected
Station Selecting
screen
>1Xtra
Connecting
Attempt to tune to service. If
successful , goes to ’ DAB
station ’ screen.
If not successful , go back to
service list
Up/down scrolls through all the currentlyknown services in the list..
If there are no services,’ No service
available ’ is displayed for a period
before going back to the DAB context
menu
Performs a scan of the
currently-set frequency band
Scroll up / down
>11B 218.640MHz Select /
11C 220.352MHz Forward
···
Up /
Down 12C 227.360MHz
12D 229.072MHz
>12B 225.640MHz B
ƵƵƵƶƵ
Up /
Down
DRC , effective
nmediately ,
Store in NVS
>DRC High
DRC Low
DRC Off
DRC Selection screen
>Alphanumeric
Ensemble
Validity
DAB Station Order menu
Enter the Main menu
- 27 -
DAB playing
screen
Back or Menu key to stop , System will attempt
to select last listened / first service. Frequency is
followed by ensemble name , both scrolling
Manual Tune screen
Manual Tune Selection screen
Up /
Down
DAB playing
screen
13. Using FM Radio
Main Menu
Internet radio
Music player
DAB
FM
System Settings
<Fwd>
FM context menu
Search sensitivity
<Fwd>/<Back>
Stereo output
Info
Stop on Strong
Signals only
Playing
<Fwd>/<Back>
Stereo or Mono
Mono Only
Menu
The FM context menu allows you to set up the following:
Name
Scan setting
Description
The Scan settings menu allows the user to set how an FM search
(started by a long-hold press of the Up/Down keys in the FM
Playing screen) behaves.
Stop on strong signals only' will only stop under strong signal
strengths if other objectives are also meant. This means that the
audio quality of services that it stops on should be good, there is
also the chance that desired services may be missed.
Stop on all signals' will stop under many more circumstances,
including Carrier Wave and other non-broadcast interference.
Whilst this means that there will be more stops, it reduces the
chances of missing a desired service.
Audio setting
The Audio setting menu allows the user to set whether to always
play stereo stations in mono mode, or whether to switch stereo
stations to mono when the signal quality gets below a certain
threshold
To search for a stations press TUNE knob to automatically search for a station. Turn
TUNE knob to manually set frequency.
14. Presets
Presets are a system that allows the user to store a number of preset stations in each
mode. The behaviour of presets is different in each mode because of the way that the
preset is stored within the system.
- 28 -
Presets are available in the following modes:
Internet Radio
DAB (DAB+)
FM
A short press of a preset button is used to recall a preset. A long press of a preset button
is used to store a preset.
When listening to a radio station (Internet/DAB/FM) Press and hold numeric key 1-4 to
store a station to preset. When station is playing press and hold will show PRESET
STORED and the current station will be stored.(stored1-4)
Playing a preset station (1-4)
Press the numeric key with a station already preset. The preset station will play.
Pressing SHIFT and numeric key 1-4 same time to store a station to preset, when station
is playing press and hold will show PRESET STORED and the current station will be
stored) (stored 4-8)
Playing a preset station (4-8)
Press SHIFT and numeric key 1-4 same time with a station already preset. The preset
station will play
Legal publications:
This radio is primarily intended for sales in Germany. Please find our publications (as far
as requested by European laws) about warranty, CE declaration and recycling matters on
the last page of our German user manual.
© 2010 Alan Electronics GmbH - Daimlerstr.1 k – D- 63303 Dreieich
www.albrecht-online.de - www.alan-electronics.de
Service Download: www.alan-albrecht.de
Service Address (for radios sold in Germany):
PST professional support technologies GmbH
Breitscheider Weg 117a
40885 Ratingen
Hotline: 01805-012204 (14 Cent p. minute from german fixed network, max 42 Cent p.
minute from mobile networks) e-mail: [email protected]
- 29 -