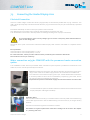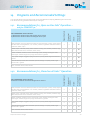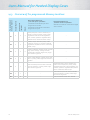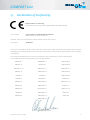
1
Users Manual
HEATED DISPLAY CASES
COMFORT Line
Users Manual for Heated Display Cases
Operating and Maintenance Manual
Before you put the heated display case into operation, read this operating and maintenance manual through
carefully and observe the information given in it. That way you make a contribution yourself to always owning a
functioning heating appliance.
The guarantee claim may be lost if the given information is not observed.
2
Valid as of May 2015
COMFORT Line
Contents
1.Introduction
1.1.Welcome
1.2. Symbols and Markings
1.3. Guarantee and Liability
1.4. General Safety Instructions
1.5.Validity
1.6. Configuration
4
4
4
4
5
6
6
2.
Designated Use
7
3.
Usage in Accordance with the Intended Purpose
7
4.
Improper Use
7
5.
Safety Guidelines
7
6.
6.1.
6.2.
6.3.
Basic Safety Instructions
Obligation of the User
Obligation of the Staff
Possible Risks
8
8
8
8
7.
First Steps
7.1. Taking Possession
7.2.Setup
7.3. Connecting the Heated Display Case
8
8
8
9
8.
General operating instructions
8.1. Operating and Display Elements of the Controller
8.2. Operating the Controller
8.3. Water Filling of the Tank System
8.4. Humidity Distribution
8.5. Other Functions of the Unit
8.5.1.Hinged Doors
8.5.2.Cutting Board and Folding Mirror 10
10
11
13
15
16
16
16
9.
9.1.
9.2.
9.3.
9.4.
9.5.
9.6.
9.7.
9.8.
Cleaning and Care
General Recommendations
Cleaning Agents
Cleaning the Glass
Cleaning the Tank
Cleaning the Cutting Board
Removal of the Folding Mirror
Maintenance of the Steam Generator
Replacement of the Filter Cartridge
18
18
18
19
19
20
20
21
21
10.
Malfunctions and Causes
22
11.Hazards
23
12.
Maintenance Information
24
13.
Wiring Diagram
24
14. Programs and Recommended Settings
14.1. Recommendations for „Open on One Side“ Operation – not for COMFORT-70
14.2. Recommendations for „Closed on all Sides“ Operation
14.3. Overview of Pre-programmed Memory Locations
25
25
25
26
15.
27
Declaration of Conformity
Subject to technical changes
3
Users Manual for Heated Display Cases
1.
1.1.
Introduction
Welcome
By purchasing a new heated display case, you have chosen a product that combines the highest technical standards with practical operating convenience. We recommend that you read this operating and maintenance manual
carefully so that you become familiar with the product quickly.
You will enjoy the unit for a long time if it is treated properly. You should keep this operating and maintenance
manual in a safe place for any maintenance or repair work that may arise.
1.2.
Symbols and Markings
These symbols indicate important information for the correct use of the unit.
Not observing this information could lead to problems with the unit or the surroundings!
This symbol stands for possible or immediate danger to the life and health of an individual and/or
a hazardous situation.
Ignoring this information could harm your health and/or your property.
This symbol indicates information for the operation or particularly helpful information.
They help to use all the functions on your unit in an optimum way.
1.3.
Guarantee and Liability
Generally, our „General Terms of Delivery and Payment“ apply. They are known to the user at the latest when the
contract is signed. A guarantee claim and liability for personal and property damage is not possible if it is attributable to one or more of the following reasons:
■■
■■
■■
■■
■■
■■
■■
■■
improper use of the unit
improper assembly, start-up, operation and maintenance of the unit
operation of the unit with defective safety components or with safety components that have not been installed
properly and are not operable
non-compliance with the instructions in the operating manual in connection with the correct transport, installation, start-up, operation, maintenance and assembly of the unit
unauthorised mechanical or technical changes to the unit
inadequate maintenance of used and wearing parts
unauthorised repairs
forces of nature or force majeure
4
Valid as of May 2015
COMFORT Line
1.4.
General Safety Instructions
Technical changes to the heated display case may only be carried out by specialists. This applies in
particular to work on the heating system, electrical installation and mechanics.
Any change must be authorised by the manufacturer.
■■
■■
■■
■■
■■
■■
■■
■■
■■
■■
■■
■■
■■
■■
■■
Covers with warning signs may only be opened by specialists!
The counter must not be cleaned with a water jet at any place.
The heated floor space must not be filled with liquids.
No highly flammable objects or liquids may be stored near the heated display case.
The protective covers of the equipment may not be removed, otherwise there is a risk of injury.
Do not reach into the power outlets, because they may be live.
The counter controller may only be opened by a specialist.
Air flows around the presentation space from improperly installed fans or draughts must be avoided in order
to ensure perfect operation of the heated display case.
A draught near the display case must be avoided. It can have a strong negative effect on the operation of the
unit, especially if no covers are used on the food containers.
The surrounding temperature is not to drop below 23 °C on an ongoing basis; otherwise the stipulated core
temperatures cannot be maintained. This applies in particular if no protective windows are used, or they are
not closed.
The products brought for presentation must be brought in with a core temperature of at least 70 °C to 80 °C.
No guarantee can be assumed by the manufacturer for constant assurance of a core temperature of 65 °C
with open presentation units.
Sharp objects must not be kept loosely near the counter; otherwise there is a risk of injury.
All glass assemblies must be treated with the necessary care in order to prevent injuries from the glass
breaking.
Components and service fluids may only be replaced with original parts.
CAUTION, RISK OF BURNS!
High temperatures may occur on the lamps and heaters as well as the parts of the unit nearby!
These parts must not be touched!
CAUTION, RISK OF FIRE!
No highly flammable parts or materials may be stored anywhere in the unit including the substructure if there is one.
Subject to technical changes
5
Users Manual for Heated Display Cases
1.5.
Validity
This operating manual applies to the following models:
COMFORT
1.6.
Configuration
Your customer benefits for your guests
Multifunctional heated display case with closed or open customer side, which is well suited for all foods that are to
be kept hot as well as for food that needs protection against drying out through air humidification (climate).
Brightly lit presentation levels for optimum presentation of hot food.
■■
■■
■■
■■
■■
■■
■■
■■
■■
■■
■■
■■
■■
Hotplate, supporting heat and humidification can each be set to 3 levels
7 preprogramed memory locations as well as other memory locations that can be programmed freely at any
time for individual heating programs
Presentation levels COMFORT: recessed hotplate (120 mm), and for cleaning purposes removable support
frame for GN trays up to 100 mm deep (optional 150 mm) or alternatively flat presentation trays with different
decor for drop-in installation.
Easy Change for models COMFORT 45 and COMFORT 53: choice of service or self-service case. The
front glass can slide in for self-service and can then be used for protection against breath and spittle.
No self-service operation is provided for model COMFORT 70 . However, the front glass can be pushed in for
cleaning purposes.
Quick Clean: Glass cover can be folded up for cleaning purposes and the front pane of glass can be removed
Operating side: hinged door(s) mirrored – removable
Cutting board made of Poly-Hygiene
Folding mirror to be folded up when the hinged doors are removed – not for BASIC Mini
Supporting heat from medium-wave infrared heaters, which are positioned individually over each GN field
LED lighting
Humidity (climate in the unit) via steam generator in the substructure; the steam supply can be regulated across
the areas.
Automatic water topping up by means of a tank system consisting of a water tank and pump for a flexible setup
of the unit, or optionally with a permanent water connection including a solenoid valve
Substructure for tank system and steam generator included.
The holes can be seen on the GN frame through which
the humidity can rise for an optimum climate.
6
Valid as of May 2015
COMFORT Line
2.
Designated Use
The heated display cases were developed specifically for the presentation, storage and sale of food. They are
suitable for keeping food products hot and presenting them at temperatures of +65 °C to +85 °C.
This heated display case is not suitable for heating up food. All products brought for presentation must be
brought in with a core temperature of 75 °C to 80 °C.
Do not put in too much product or product that is too cold.
We recommend heating up the heated display case for approximately 30 minutes while it is closed
before putting in the food.
3.
Usage in Accordance with the Intended Purpose
The heated display cases are state of the art and are built in accordance with recognised safety regulations, and
they are reliable.
The unit may only be used for its intended use if it is in perfect working order. Be safety-conscious and aware of
hazards, taking into account the operating manual. Any other use or use that goes above and beyond this is not
considered proper use. The manufacturer/supplier is not liable for damage resulting from improper use. All risk
is borne by the user.
Proper use also includes observing the user‘s documentation and compliance with the inspection and maintenance conditions.
After cleaning, the unit must be checked for loose connections, shearing points and damage. Remedy any
deficiencies that are discovered immediately. Do not use the unit for any non-designated purposes. Only the
manufacturer is permitted to make changes to the unit.
4.
Improper Use
The heated display cases are not suitable for heating up or cooking food. The heating units must not be filled with
food that does not comply with the HACCP regulations for putting hot food in heated display cases.
5.
Safety Guidelines
All the safety regulations, in particular the VDE and international CEE guidelines, were observed during manufacturing. The unit was subjected to an extensive final inspection in the factory.
Subject to technical changes
7
Users Manual for Heated Display Cases
6.
6.1.
Basic Safety Instructions
Obligation of the User
The user is obligated to only allow people to work on the unit who:
■■ are familiar with basic instructions for safe and accident-free work and have been trained in how to operate the
unit correctly.
■■ have read the chapter 1.4 General Safety Instructions and 11 Dangers and have confirmed this with their signature.
Personnel should be checked regularly to make sure they are working in a safety-conscious way.
6.2. Obligation of the Staff
Anyone who is authorised to work with the unit is obligated:
■■ to observe the basic rules for safe and accident-free work,
■■ Chapter 1.4 General Safety Instructions and Chapter 11 Dangers in this operating and maintenance manual
must be read, and it must be confirmed that they have been understood before working with the unit.
6.3.
Possible Risks
The heated display cases are designed and configured in accordance with all safety provisions. Nevertheless, it
is possible for there to be risks for the body and life of the user and/or third parties. The unit should only be used:
■■ for the designated purpose.
■■ in a safe and flawless condition.
Malfunctions that put safety at risk should be resolved without delay.
7.
7.1.
First Steps
Taking Possession
Check whether the unit has any transport damage and write down the transport damage that you discover on the
transfer papers from the freight forwarder as well as on your form. Have the damage confirmed. If the damage is
only discovered after unpacking, then you are required to report the damage immediately in writing. It is advisable
to notify your supplier by phone in advance.
Your claim to compensation for the damage is lost if you do not report transport damage in good time.
7.2.
Setup
During the setup or alternatively installation in the counter, the unit must not be turned over or tipped. This could
damage the glass in the case.
Make sure that the unit is in a stable and secure position and that it is in balance. Pull the protective film off the
case before putting it into use.
Sufficient distance must kept from the bottom of the display case (at least 50 mm from the bottom
of the tray).
This distance is important to prevent overheating of the heating plate.
8
Valid as of May 2015
COMFORT Line
7.3.
Connecting the Heated Display Case
Electrical Connection
Units for a rated voltage of 230V and 50 Hz (single-phase) are delivered by default with a plug connector. The
400 V, 50 Hz (three-phase) units are delivered without a plug connector and may only be connected by a qualified
specialist.
Permanent availability of 16A of current per phase must be ensured.
Any deficiencies in the power supply must be resolved before connecting the units.
The manufacturer of the units is not responsible for damage resulting from improper connection.
It is not permitted to connect to any voltage, type of current or frequency other than that which is
given on the rating plate.
We would like to point out that each individual heated display case must be connected to a separate electric
circuit.
Fuse protection:
Units with 230 V, 50 Hz (single-phase): 1 x 16 A
Units with 400 V, 50 Hz (three-phase): 3 x 16 A
For units with 400 V, a three-pin main switch must be provided by the customers without fail.
Not included in the scope of delivery.
Water connection only for COMFORT with the permanent water connection
option
The COMFORT model with the permanent water connection option requires a professional connection to the
water line, which must be provided by the customer.
Besides the electrical connection, the display case also has a black coupling including a check valve for the water supply that is to be connected to the water line.
The customer must screw the coupling onto a 3/4“ outside thread water connection.
It must be possible to shut it off for maintenance purposes (e.g. ball valve, and so
on), which must be provided by the customer.
Important: The pressure of the water supply line must be between 3 bar and 6 bar.
The decalcification system for water treatment is installed in the substructure of the
display case (filter cartridges from Brita).
Initial filter filling:
Put a container under the hose (C) on the filter head to catch any water. Press the flushing
valve button (D) and hold it until the water flowing out of the hose (C) no longer has any
bubbles.
D
C
Also see the enclosed original documents from „Brita“.
Information on regular replacement of the filter cartridge can be found in the chapter
on „Cleaning and Care“.
Subject to technical changes
9
Users Manual for Heated Display Cases
8.
8.1.
General operating instructions
Operating and Display Elements of the Controller
The heated display cases of the COMFORT line are equipped with a modern, powerful and very easy to operate controller.
The display shows you all the settings and condition of the units. If the display doesn‘t
show anything, it may be that the power supply is not intact.
Button for switching the heated display case ON and OFF
Button for selecting the stored programs P1 to P7
(program display) and for storing new settings
Button for switching the LED lighting in the heated display case ON and OFF
Button for switching the water heater for the climate in the heated display case ON and OFF. Three
levels can be selected here.
Button for switching the primary heater ON and OFF for dry heat in the heated display case. Three levels
can be selected here.
Button for switching the supporting heat ON and OFF for stable heat in the heated display case. Three
levels can be selected here.
10
Valid as of May 2015
COMFORT Line
8.2.
Operating the Controller
The heated display case gives you as a user
the greatest possible comfort and easy operation of the controller.
When a heated display case of the COMFORT Line is connected to the power mains,
„OFF“ must always appear in the display. That way you can also be sure that the unit is
connected to the power supply.
Press the right button
to switch on the unit. .
If „OFF“ is not shown in the display, then the unit cannot be switched on
by pressing the
button.
After being switched on, the controller always shows power level NEUTRAL for all heat
sources. The unit will not heat up. The light can be switched ON and OFF.
By pressing the push buttons
or
or , the top heat, bottom heat and humidification can be activated with three levels each and separate from each other. The heating
levels are shown as a picture in the display.
By pressing push button , the LED lighting in the heated display case can be switched
ON or OFF. There is nothing in the display, because the lighting in the unit can be seen
clearly.
That way, the unit can also be operated NEUTRAL (unheated).
Subject to technical changes
11
Users Manual for Heated Display Cases
Heat settings
The pre-set program memory locations can be selected with the „P“ button.
The current program memory location is shown by the red LED lighting on the
top right on the control panel. You can find a list of recommended set values in
chapter 14 for different types of food.
The primary heating (heat from below) can be set in three power levels by pressing
the
 button. In this case, level 1 is the lowest setting and level 3 is the highest setting.
This is shown in the display by a red bar symbol that becomes increasingly red in a downward direction.
The supporting heat (from above) can be set in three power levels by pressing
the  button. In this case, level 1 is the lowest setting and level 3 is the highest setting.
This is shown in the display by a red bar symbol that becomes increasingly red in an
upward direction.
The humidity (climate in the unit) can be set in three power levels by pressing
the    button. In this case, level 1 is the lowest setting and level 3 is the highest setting.
This is shown in the display by a red drip symbol that becomes increasingly red in an
upward direction. The humidity is not used to keep the food hot, rather only to saturate
the hot, dry air that is generated by the primary heating and the supporting heat.
12
Valid as of May 2015
COMFORT Line
8.3.
Water Filling of the Tank System
When starting up the heated display case each day for the first time,
the cleaned water storage tank (in the picture on the right) should be
filled with drinking water. After activation of the humidification, a pump
supplies the steam generator with water automatically.
Before the water reaches the steam generator, it is decalcified by means
of a filter (centre of the picture).
The heated display cases COMFORT Line have Water Proof System,
which triggers an acoustic as well as visual warning signal if the water
level in the water tray drops below the required amount. The acoustic
warning signal can be heard for five seconds and then it switches off.
However, the visual warning signal „H20“ (the fill-level in the glass on the
display moves up and down) remains visible in the display until the required amount of water is filled using the supplied measuring cup (accessory included with the delivery contents).
Reset „H2O“ alarm
After filling up the water tank, press the buttons
alarm (see chapter 8.3. for this).
and
at the same time for 7 seconds to acknowledge the
Only drinking water may be used!
The tank should be emptied and cleaned daily!
Subject to technical changes
13
Users Manual for Heated Display Cases
Possible faults and messages
FAULT/SYMBOL
No steam is being
generated.
DESCRIPTION
TO OVERCOME THIS PROBLEM
There is nothing in the
display.
■■
No steam rises into the inside
of the display case via the
steam control system.
■■
■■
■■
Check the power supply.
If the fault could not be resolved with „remedy 1“,
then contact a service technician.
Steam generation takes somewhat longer for the
first start of the day.
Makes sure that the „HUMIDITY“ function is active
(see section 8.2. Operating the Controller/Heat
Settings).
CAUTION, THERE IS A RISK OF BURNS!
■■
■■
The food cools down.
The food cools down.
■■
■■
Only once: Switch the unit OFF and ON with the
button.
If the fault could not be resolved with the previous
remedies, then contact a service technician.
Make sure that the „Primary heat“ or alternatively
„Supporting heat“ functions (see section 8.2)
Operating the Controller/Heat Settings are active.
Check whether the hot plate of the primary heat
or alternatively supporting heat work.
CAUTION, THERE IS A RISK OF BURNS!
■■
■■
Message in the display: The water tank is empty.
■■
■■
■■
(Fill-level in the glass
flashes and increases)
Error message in the
display: F90
Communication error
between the display and
the controller.
14
■■
■■
Check whether the food was brought in with the
required core temperature of 75 °C to 80 °C.
If the fault could not be resolved with the previous
remedies, then contact a service technician.
Top up the water in the water tank.
Perform an alarm reset:
After filling up the water tank, the buttons
and
have to be pressed at the same time for 7
seconds to acknowledge the message and restart
the humidity supply.
If that doesn‘t help, then the operation of the float
must be checked by a service technician.
Only once: Switch the unit OFF and ON with the
button.
If this cannot resolve the fault, then contact a
service technician.
Valid as of May 2015
COMFORT Line
FEHLER/SYMBOL
BESCHREIBUNG
ABHILFE
Error message in the
display: F1H
Error in the supporting heat
sensor or alternatively the
sensor is defective.
Contact a service technician.
Error message in the
display: F2H
Error in the primary hotplate
sensor or alternatively the
sensor is defective.
Contact a service technician.
8.4. Humidity Distribution
The humidity distribution across the presented food can be adjusted via the
slider on the operating side.
Recommendation:
■■ Customer side open / operator side closed:
Slider open
■■ Customer side closed / operator side open:
Slider closed
Subject to technical changes
15
Users Manual for Heated Display Cases
8.5.
Other Functions of the Unit
8.5.1.
Hinged Doors
Hinged door
Rear frame
The inside of the hinged doors has a mirror coating, which is also to provide an
attractive product presentation through visual multiplication even if there is only
a small amount of food.
The hinged doors have a mirror coating on the inside. They can be removed
in order to provide more space in peak times and for removing the items. We
recommend their removal only when the glass pane on the customer side is
closed; otherwise the temperature and humidity on the inside of the heated
display case cannot be maintained.
The COMFORT Line has in his substructure two slide-ins for the removed
hinged doors. The doors can be stored there when operating the unit with the
operating side open.
8.5.2. Cutting Board and Folding Mirror
The COMFORT heated display cases are equipped with a cutting board on the
operator side under which there is a mirror that can be folded up.
When the hinged doors are removed, the mirror can be folded up for a visual
multiplication of the food being presented.
When the hinged doors are closed, the mirror is located under the CNS tray of
the cutting board.
16
Valid as of May 2015
COMFORT Line
Folding the mirror up and down
The cutting boards of theCOMFORT Line consist of a removable CNS tray with one or more Poly-Hygiene inserts.
The Poly-Hygiene inserts can be removed from CNS holder for cleaning.
When the hinged doors are removed, then the cutting board can also be lifted out of the guide and removed.
Hooked-in position
Cutting board hooked in, mirror
below.
Lift the cutting board support out of
the anchoring.
Remove the cutting board.
There is a folding mirror under the
cutting board.
Hooking in apparatus.
Fold up the mirror and grasp it in
the middle ...
Hooked-in position
... so that the folding mirror snaps
into place in the hooking in
apparatus.
Subject to technical changes
The mirror is folded up. The
cutting board support can
now be pushed in until it
snaps into place. Afterwards,
reinsert the cutting board.
Make sure that the bracket
points towards the front of
the unit.
To fold up the mirror once again,
grasp it on the left and right and lift
it up. Then pull it towards yourself
slightly and fold it town.
17
Users Manual for Heated Display Cases
9.
Cleaning and Care
CAUTION, RISK OF BURNS!
All parts of the heated display case can be hot. There is a danger of burns! High temperatures may
occur on the housing and the lamps near the heat radiators and hotplates. These parts must not
be touched!
ATTENTION!
Disconnect the power supply before cleaning the unit.
Unplug the heated display case or disconnect both poles from the power mains.
In the following, we would like to give you some advice on maintenance, care, dealing with problems and service
for your heated display case. In accordance with the respective hygiene ordinances, the unit must be cleaned
inside and out. That is the only way to guarantee optimum product presentation.
Since the heated display case has to be switched off for cleaning, it makes the most sense to clean it at the end of
the workday. Wait until the unit has cooled down.
The heated display case can remain switched off overnight or alternatively outside of business hours.
9.1.
■■
■■
■■
General Recommendations
The unit must be cleaned daily.
Wear acid-resistant gloves to prevent skin irritation.
After cleaning with special cleaners, all parts must be rinsed with clear water and then dried so that no residue
remains.
It is absolutely necessary to pay attention to several basic items so that this stainless steel product will work flawlessly for a long time.
■■ Always keep the stainless steel surface clean.
■■ Always make sure that there is enough fresh air on the surface.
■■ Never touch the surface with rusty material.
9.2. Cleaning Agents
Use the following cleaning agents!
■■
■■
■■
■■
Lukewarm soapy water: Only use lukewarm soapy water for all surfaces that come into contact with the
products.
Glass cleaner: Removes grease from the glass surfaces.
Stainless steel cleaner: The outer stainless steel surfaces of the display case should be treated with commercial stainless steel cleaning agents.
Lamps: Only wipe with a soft cloth or rags.
Avoid the following cleaning agents!
■■
■■
■■
■■
Do not use any strong-smelling, caustic, solvent-based, bleaching or chlorinated cleaning agents.
Never use high-pressure, water-pressure or steam-pressure cleaners.
Never use flammable chemical cleaners.
Never use abrasive agents (Scotch, cleaning fleece) or steel wool.
18
Valid as of May 2015
COMFORT Line
9.3.
Cleaning the Glass
The covering glass can be folded up for easy cleaning. The front pane can be folded up or alternatively removed.
ATTENTION!
Hang on to the glass firmly when cleaning, and never let the front glass fall.
9.4. Cleaning the Tank
To clean the inside tank, it is necessary to remove the
overlying individual parts from the operating side.
First of all, remove the separators by lifting them
slightly.
Then, remove the GH supporting frame.
Now you can lift up the primary hotplate by the handle.
CAUTION, THERE IS A RISK OF BURNS!
Afterwards, you will have no problem to remove the slide control and steam deflector plate by simply unhooking and removing them.
The inside tank of the heated display case can now be cleaned conveniently with
a suitable cleaning agent because the panel remains open due to the gas damper.
Before closing the primary hotplate, put the steam deflector plate back in again..
Make sure that the hotplate is controlled with the centrally placed grip and guided
down until it reaches the home position.
Under no circumstances should you let it fall down in an uncontrolled manner!
In addition to daily cleaning, it is necessary to have regular service and maintenance of the heated display case by qualified specialists (see Chapter 12
Maintenance Information).
ATTENTION!
When all the cleaning work is finished, the heated display case must be put back into its original
condition to ensure flawless operation.
Subject to technical changes
19
Users Manual for Heated Display Cases
9.5. Cleaning the Cutting Board
The Poly-Hygiene inserts can be removed for cleaning.
With COMFORT Line, the cutting board support can also be removed for cleaning.
9.6. Removal of the Folding Mirror
The folding mirror can be removed for cleaning if necessary.
Fold up the mirror (see Chapter „8.5.2 Cutting Board and Folding Mirror“), but do not
put the cutting board in with the cutting board support.
There is a wing screw on the right side.
Unscrew the wing screw and remove the bracket that becomes free.
As soon as the bracket has been removed, the mirror can be unhooked from the
right side.
Pull the mirror out of the guide pins on the left side.
Then the mirror is removed and can be cleaned.
After cleaning the mirror and hooking it back in, make sure that the mirror is secured again with the supporting bracket and wing nut.
The mirror is reinstalled in reverse order.
20
Valid as of May 2015
COMFORT Line
9.7.
Maintenance of the Steam Generator
If the heated display case has not been used for an extended period of time of
several days, then drain the water with the drain cock on the front side of the generator (bottom). Do not forget to put a water bowl underneath.
Before the next start-up, make sure that the drain cock is closed again (black lever
in the crosswise position).
Regularly replacing the filter cartridge is also part of regular maintenance of the
steam generator.
9.8. Replacement of the Filter Cartridge
The filter cartridge of the water filter must be replaced after 5 months of normal operation (8 hours a day) in order
to guarantee that the unit works flawlessly. Replacement filters can be obtained from your AKE unit dealer.
A
E
B
C
(A) Filter head
(B) Filter cartridge
(C) Locking handle
(D) Hose
(E) Flushing valve button
D
When the unit is delivered, the date of the next filter change is already written on
the filter cartridge.
■■
■■
■■
■■
■■
To replace the filter cartridge, the external water supply to the display case must
be cut off (e.g. shut-off valve, ball valve). Put a container under the hose (D) on
the filter head (A) to catch any water.
Open the locking handle (C) by turning it. Actuate the flushing valve (E) to get rid
of any pressure from the filter. Remove the filter cartridge (B) from the filter head.
The filter cartridge can swivel by 90° in the wall holder so that it can be removed.
Pull the protective cap off the new filter cartridge.
Write down the next replacement date in the date field on the side of the filter
cartridge (filter operating time = 5 months).
Insert the new filter cartridge vertically in the filter head, and twist the locking grip
until it snaps into place. Re-establish the connection to the external water supply.
Actuate the flushing valve and flush the filter system until the water drains out
without any bubbles.
Also see the enclosed original documents from „Brita“.
Subject to technical changes
21
Users Manual for Heated Display Cases
10. Malfunctions and Causes
If your heated display case does not work satisfactorily, then we would like to give you the following checklist
as your first source of assistance. Only contact a service technician or alternatively your supplier after you have
checked the following points.
Checklist for your heated display case
FAULT
CAUSE
MEASURE
Heat radiator and/
or heating tray don't
become hot.
Unit is not switched on.
Switch unit on.
Heat sources cannot
be controlled.
Controller or fuse defective.
Call customer service or electrician.
Light cannot be
switched on.
Lamp or power cord
defective.
Call customer service or electrician.
Food is too hot.
Temperature controller is set
too high.
Set the controller for heat sources lower.
Malfunction of the
power supply.
■■
■■
■■
■■
■■
■■
Switch the unit off immediately. Maintenance work by
an electrician.
Is the current/voltage level correct (please check the rating plate for details)?
Is the electric circuit breaker working correctly?
Are all the heating elements of the display case working correctly?
Check all the local power connections and the control lamp.
Is it possible that cold or frozen food is in the display case?
Are the lamps working perfectly? Check the lamps and connections.
If the given possibilities are not the cause of the malfunction that occurred, then please contact your customer
service, a service technician or your supplier.
Status displays and error messages on the display
You can find the error messages in the programming guide.
The manufacturer is not liable for any loss of product, even if the unit is still under guarantee.
Therefore, we recommend checking the temperature of your unit periodically.
22
Valid as of May 2015
COMFORT Line
11.
Hazards
Electrical Energy
Switch the unit off immediately in the event of faults in the electrical energy supply.
Work on electrical systems or equipment may only be performed by an electrician or by instructed persons under
the management and supervision of an electrician in accordance with electrical technology regulations.
CAUTION, ELECTRIC SHOCK!
Do not bring any running water or water jets anywhere near an electrical connection or the covers
of the unit.
Make sure that the unit and system components are not under voltage before any inspection, maintenance or
repair work. First test the disengaged components to make sure they aren‘t under voltage, and then ground and
short-circuit them. Isolate neighbouring components that are under voltage.
CAUTION, RISK OF INJURY!
The unit must be disconnected from all sources of power before any inspection, maintenance or
repair work.
Risks of injury
During operation, the unit heats up not only in the interior, but the entire display case. Therefore, when you touch
it, be aware that the glass surfaces and metal parts are hot.
CAUTION, RISK OF BURNS!
High temperatures may occur on the lamps and heaters as well as parts of the unit nearbay!
These parts must not be touched!
WARNING, RISK OF FIRE!
No highly flammable parts or materials may be stored anywhere in the unit including the substructure if there is one.
CAUTION, RISK OF INJURY FROM BREAKING GLASS!
Always put the glass panes into their final position with both hands.
Subject to technical changes
23
Users Manual for Heated Display Cases
12. Maintenance Information
In order to guarantee perfect operation of the heated display case and optimum product presentation, the entire
system must be checked and maintained regularly.
Service and maintenance, handling problems
■■
■■
■■
■■
■■
The stipulated adjustment, service and inspection work must be completed in good time by the manager or, if
necessary, by an authorised service technician.
The operating staff must be informed before starting any maintenance or service work.
The unit must be switched off by the main switch until the maintenance, inspection and repair work is completed. The main switch must be watched to prevent the unit from being switched back on unintentionally.
Check whether all screws are screwed in tightly.
After completion of the maintenance work, check all safety components to make sure they work properly.
The following work must be carried out
■■
■■
■■
■■
■■
■■
■■
■■
■■
Basic cleaning of the entire display case
Removal of grime on the ceramic cooktop (primary hotplate and under the water tray) by means of a ceramic
hob scraper.
Removal of grime from the primary CNS hotplate by means of a caustic-alkali-free grill cleaner.
Functional test of the infrared heat radiator
Functional test of the LED lighting
Check of the internal temperature of the display case
Mechanical check (doors, glass)
Safety test of the system
Decalcification of the water tray or alternatively cleaning of the water tank
13. Wiring Diagram
You can find the wiring diagram in the programming manual.
24
Valid as of May 2015
COMFORT Line
14. Programs and Recommended Settings
You will find tables in the following with recommendations for keeping different types of food hot.
The values are only guidelines and may be changed.
Supporting heat
Primary heat
(bottom)
Steam
Pre-programmed
memory location
14.1. Recommendations for „Open on One Side“ Operation –
not for COMFORT-70
meat-poultry-fish in sauce, steamed products in some liquid (fish, poultry, meat), vegetables filled with meat/vegetables, rice, noodles, potatoes, vegetables with/without sauce,
casseroles, stews, soups
3
2
3
P1
cutlets, chops, meat and poultry, entire roasts for carving, rice, noodles, potatoes, vegetables with/without sauce, casseroles, stews, soups
3
3
3
P2
cutlets, meatballs, meatloaf, hocks, chicken legs, pizza, sausage, hotdogs in water,
hamburgers, skewers (finger food), finger food articles in general.
3
2
2
P3
chips, potato wedges, nuggets, spring rolls, fish in a pastry jacket, finger food articles in
general.
3
2
1
P4
filled hot bread pouches, filled croissants, quiche, sausage in a pastry jacket, finger
food articles in general
2
1
1
P5
buns, croissants, bread, cake, biscuits
1
0
1
–
RECOMMENDED APPLICATIONS:
1) Self-service window open and hinged doors closed
2) Self-service window closed and hinged doors open
Supporting heat
Primary heat
(bottom)
Steam
Pre-programmed
memory location
14.2. Recommendations for „Closed on all Sides“ Operation
meat-poultry-fish in sauce, steamed products in some liquid (fish, poultry, meat), vegetables filled with meat/vegetables, rice, noodles, potatoes, vegetables with/without sauce,
casseroles, stews, soups
2
1
1
P5
cutlets, chops, meat and poultry, entire roasts for carving, rice, noodles, potatoes, vegetables with/without sauce, casseroles, stews, soups
2
1
1
P5
cutlets, meatballs, meatloaf, hocks, chicken legs, pizza, sausage, hotdogs in water,
hamburgers, skewers (finger food), finger food articles in general.
2
1
1
P5
chips, potato wedges, nuggets, spring rolls, fish in a pastry jacket, finger food articles in
general.
2
1
0
–
filled hot bread pouches, filled croissants, quiche, sausage in a pastry jacket, finger
food articles in general
1
1
1
P6
buns, croissants, bread, cake, biscuits
1
0
0
P7
RECOMMENDED APPLICATIONS:
Self-service window closed and hinged doors closed
Subject to technical changes
25
Users Manual for Heated Display Cases
P1
P2
3
3
2
3
Steam
Primary heat
(bottom)
Supporting heat
Pre-programmed
memory location
14.3. Overview of Pre-programmed Memory Locations
Recommendations for
„one side open“ operation:
1) Self-service window open and
hinged doors closed
2) Self-service window closed and
hinged doors open
Recommendations for
„all sides closed“ operation:
Self-service window closed and hinged
doors closed
3
meat-poultry-fish in sauce, steamed products in some liquid (fish, poultry, meat),
vegetables filled with meat/vegetables,
rice, noodles, potatoes, vegetables with/
without sauce, casseroles, stews, soups
–
3
cutlets, chops, meat and poultry, entire
roasts for carving, rice, noodles, potatoes,
vegetables with/without sauce, casseroles,
stews, soups
–
–
–
P3
3
2
2
cutlets, meatballs, meatloaf, hocks, chicken
legs, pizza, sausage, hotdogs in water,
hamburgers, skewers (finger food), finger
food articles in general.
P4
3
2
1
chips, potato wedges, nuggets, spring rolls,
fish in a pastry jacket, finger food articles in
general.
filled hot bread pouches, filled croissants,
quiche, sausage in a pastry jacket, finger
food articles in general
meat-poultry-fish in sauce, steamed products in some liquid (fish, poultry, meat),
vegetables filled with meat/vegetables, rice,
noodles, potatoes, vegetables with/without
sauce, casseroles, stews, soups
P5
2
1
1
P6
1
1
1
–
filled hot bread pouches, filled croissants,
quiche, sausage in a pastry jacket, finger
food articles in general
P7
1
0
0
–
buns, croissants, bread, cake, biscuits
26
Valid as of May 2015
COMFORT Line
15. Declaration of Conformity
EU Declaration of Conformity
in accordance with EC guidelines 2006/95/EC and 2004/108/EC
The company
Ausseer Kälte- und Edelstahltechnik GmbH
8984 Kainisch, Pichl 66, Österreich
declares, under sole responsibility, that the heated display case product
of the types
COMFORT
to which this declaration refers, complies with the relevant basic safety and health requirements of EC guideline
2006/95/EC (low-voltage guideline) as well as the requirements of EC guideline 2004/108/EC (electromagnetic
compatibility).
The following standards and/or technical specifications were consulted for proper implementation
of the safety and health requirements given in the EU guideline:
EN 50081-1
EN60598-2-1
EN61000-4-4
EN55014-1
EN60730-1
EN61000-4-6
EN55014-1:A1
EN60730-2-1
EN61000-4-11
EN55014-2
EN60730-2-9
EN61000-6-1
EN55015
EN60947
EN61000-6-3
EN55022
EN60950-1
EN61058-1
EN60204-1
EN61000-3-2
EN61058-1-A1
EN60335-1
EN61000-3-3
EN61347-1
EN60335-2
EN61000-3-11
EN61347-2-3
EN60529
EN61000-4-2
EN61547
EN60598-1
EN61000-4-3
EN61558
EN61000-4-5
Andreas Pilz
Managing Director
Subject to technical changes
27
www.ideal-ake.at
AKE_BH-WV-COMFORT_EN_20.07.2015
AKE Ausseer Kälte- und Edelstahltechnik GmbH
Pichl 66, 8984 Kainisch, Austria