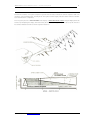
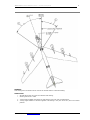
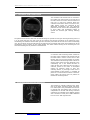
1
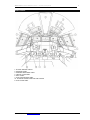
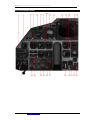
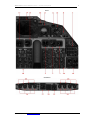
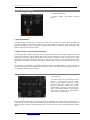
‘B-52 Driver’ FLIGHT MANUAL Part II – Aircraft and Systems
DO NOT USE FOR FLIGHT
PART II – Aircraft and Systems
Captain Sim is not affiliated with any entity mentioned or pictured in this document.
All trademarks are the property of their respective owners.
© 2010 Captain Sim www.captainsim.com
1
‘B-52 Driver’ FLIGHT MANUAL Part II – Aircraft and Systems
DO NOT USE FOR FLIGHT
2
ABOUT THIS MANUAL
VERSION: 08 DECEMBER, 2010
WARNING: THIS MANUAL IS DESIGNED FOR MICROSOFT® FSX USE ONLY. DO NOT USE FOR FLIGHT.
The ‘B-52 Driver FLIGHT MANUAL is organized into three Parts.
Each Part is provided as a separate Acrobat® PDF document:
•
Part I – User’s Manual
•
Part II – Aircraft and Systems - this document.
•
Part III – Normal Procedures.
FOR GENERAL INFORMATION ON THE ‘B-52 DRIVER’ PRODUCT PLEASE USE WWW.CAPTAINSIM.COM .
THIS MANUAL PROVIDES ADDITIONAL INFORMATION ONLY, WHICH IS NOT AVAILABLE ON THE WEB SITE.
© 2010 Captain Sim www.captainsim.com
‘B-52 Driver’ FLIGHT MANUAL Part II – Aircraft and Systems
DO NOT USE FOR FLIGHT
PART II – AIRCRAFT SYSTEMS
Page
5
Contents
INTRODUCTION
6
PANELS LAYOUT
7
11
11
12
12
12
13
13
13
14
15
16
17
17
17
18
18
18
19
19
19
20
20
20
21
21
21
21
22
22
22
23
24
24
25
26
27
27
27
27
28
28
28
28
29
29
29
29
30
30
30
31
31
31
31
PILOT’S INSTRUMENT PANELS
1. ANTI-ICE CONTROL PANEL
2. EVS CONTROL PANEL
3. CLOCK
4. FLIGHT COMMAND INDICATOR
5. ALTIMETER
8. MARKER BEACON LIGHT TEST SWITCH
9. INDICATED AIRSPEED INDICATOR
10. HORIZONTAL SITUATION INDICATOR
11. MARKER BEACON LIGHT
12. ATTITUDE-DIRECTOR INDICATOR
TERRAIN AVOIDANCE RADAR SYSTEM
CONTROLS AND INDICATORS
14. EVS MONITOR
P20. TERRAIN DISPLAY CONTROL PANEL
15. VERTICAL VELOCITY INDICATOR
16. MACH INDICATOR
17. RADAR ALTIMETER
18. STANDBY HORIZONT INDICATOR
22. ENGINE PRESSURE RATIO GAGES
23. WING FLAP POSITION INDICATOR
24. LANDING GEAR POSITON INDICATORS PANEL
25. LOW OIL PRESSURE WARNING LIGHTS
27. ACCELEROMETER
29. MAGNETIC STANDBY COMPASS
30. EXHAUST GAS TEMPERATURE GAGE
31. FUEL FLOWMETERS
32. DME INDICATOR
34. OIL PRESSURE GAGES
35. TACHOMETERS
36. MASTER CAUTION LIGHT
38. FUEL SYSTEM MANAGEMENT PANELS
39. TOTAL FUEL FLOW INDICATOR
40. LANDING GEAR LEVER
CROSSWIND CRAB SYSTEM
TURNING ANGLES AVAILABLE WITH MAXIMUM CROSSWIND CRAB SETTINGS
CONTROLS AND INDICATORS
P21. CROSSWIND CRAB CONTROL KNOB
P22. CROSSWIND CRAB CONTROL CENTERING BUTION
41. CROSSWIND CRAB POSITION INDICATOR
42. TOTAL FUEL QUANTITY INDICATOR
43. MAIN TANKS LOW WARNING LIGHT
44. SAS CONTROL PANEL
49. BOMB DOORS OPEN LIGHT
50. BOMB DOORS NOT LATCHED LIGHT
51. ANTISKID SWITCH
52. OUTSIDE AIR TEMPERATURE GAGE
53. BOMB DOORS SWITCH
54. RUDDER TRIM INDICATOR
55. AUTOPILOT TURN CONTROL SELECTOR SWITCH
57. WINDSHIELD WIPERS SWITCH
59. HEADING INDICATOR (GYRO)
60. TRUE AIRSPEED INDICATOR
62. MACH INDICATOR SWITCH
63. FLIGHT DIRECTOR SWITCH
© 2010 Captain Sim www.captainsim.com
3
‘B-52 Driver’ FLIGHT MANUAL Part II – Aircraft and Systems
DO NOT USE FOR FLIGHT
32
33
33
34
34
34
OVERHEAD PANEL
O01. OVERHEAD LIGHTING PANEL
O03. UHF RADIO CONTROL PANEL
O04. UHF2 RADIO CONTROL PANEL
O05. TACAN RADIO CONTROL PANEL
O06. VOR CONTROL PANEL
35
36
37
38
PILOT’S SIDE PANEL
A01. HYDRAULIC PANEL
A04. PILOT'S LIGHT CONTROL PANEL
A07. ANTISKID MACH
39
40
41
41
42
42
43
COPILT’S SIDE PANEL
B01. ELECTRICAL PANEL
B02. TEMP INDICATOR
B07. ENG START CONTROL PANEL
B11. COPILOT'S LIGHT CONTROL PANEL
B12. HF RADIO PANEL
B14. BATTERY SWITCH PANEL
44
45
45
46
47
48
48
49
49
50
AISLE STAND
P02. AIRBRAKE LEVER
P03. AUTOPILOT TURN AND PITCH CONTROLLER
P04. AUTOPILOT COMMAND SELECTOR PANEL
P18. NAVIGATION SYSTEM SELECT PANEL
P06. LANDING LIGHTS PANEL
P10. STABILIZER TRIM WHEEL AND INDICATOR
P11. THROTTLES
P15. DRAG CHUTE LEVER
P17. WING FLAP LEVER
51
51
51
51
CUSTOMER CARE
FORUM
VIDEO CHANNEL
TECH SUPPORT
© 2010 Captain Sim www.captainsim.com
4
‘B-52 Driver’ FLIGHT MANUAL Part II – Aircraft and Systems
DO NOT USE FOR FLIGHT
5
INTRODUCTION
The 'B-52 Driver' is one of the most advanced, complete and accurate digital replicas of the B-52 aircraft
ever available for any game platform.
But the 'B-52 Driver' (same as MSFS itself and any MSFS expansion) is a flight simulation software game.
Therefore this product should not be used as flight training device (FTD) and/or simulator for flight training
purposes.
Moreover the 'B-52 Driver' is Fun Line product, so it features some of essential systems programming.
All items should work as described in this manual. If something is not described as functional (therefore it
does not work or does not exist in the model) it is not a system 'bug' but a reasonable simplification.
© 2010 Captain Sim www.captainsim.com
‘B-52 Driver’ FLIGHT MANUAL Part II – Aircraft and Systems
DO NOT USE FOR FLIGHT
PANELS LAYOUT
1. SLIDING WINDOW HANDLE
2. OVERHEAD PANEL
3. EYEBROW INSTRUMENT PANEL
4. COPILOT’S SIDE PANEL
6. AISLE STAND
7. PILOT’S INSTRUMENT PANEL
7A. ALTIMETER CORRECTION CARD AND HOLDER
8. PILOT’S SIDE PANEL
© 2010 Captain Sim www.captainsim.com
6
‘B-52 Driver’ FLIGHT MANUAL Part II – Aircraft and Systems
DO NOT USE FOR FLIGHT
PILOT’S INSTRUMENT PANELS
LEFT
© 2010 Captain Sim www.captainsim.com
7
‘B-52 Driver’ FLIGHT MANUAL Part II – Aircraft and Systems
DO NOT USE FOR FLIGHT
CENTER
© 2010 Captain Sim www.captainsim.com
8
‘B-52 Driver’ FLIGHT MANUAL Part II – Aircraft and Systems
DO NOT USE FOR FLIGHT
RIGHT
OVERHEAD
© 2010 Captain Sim www.captainsim.com
9
‘B-52 Driver’ FLIGHT MANUAL Part II – Aircraft and Systems
DO NOT USE FOR FLIGHT
1. ANTI-ICE CONTROL PANEL
2. EVS CONTROL PANEL
3. CLOCK
4. FLIGHT COMMAND INDICATOR
5. ALTIMETER
8. MARKER BEACON LIGHT TEST SWITCH
9. INDICATED AIRSPEED INDICATOR
10. HORIZONTAL SITUATION INDICATOR
11. MARKER BEACON LIGHT
12. ATTITUDE-DIRECTOR INDICATOR
13. AUTOPILOT DISENGAGED LIGHT
14. EVS MONITOR
15. VERTICAL VELOCITY INDICATOR
16. MACH INDICATOR
17. RADAR ALTIMETER
18. STANDBY HORIZONT IND
19. RADAR ALTIMETER CAUTION LIGHT
22. ENGINE PRESSURE RATIO GAGES
23. WING FLAP POSITION INDICATOR
24. LANDING GEAR POSITON INDICATORS PANEL
25. LOW OIL PRESSURE WARNING LIGHTS
27. ACCELEROMETER
29. MAGNETIC STANDBY COMPASS
30. EXHAUST GAS TEMPERATURE GAGE
31. FUEL FLOWMETERS
32. DME INDICATOR
34. OIL PRESSURE GAGES
35. TACHOMETERS
36. MASTER CAUTION LIGHT
38. FUEL SYSTEM MANAGEMENT PANELS
39. TOTAL FUEL FLOW INDICATOR
40. LANDING GEAR LEVER
41. CROSSWIND CRAB POSITION INDICATOR
42. TOTAL FUEL QUANTITY INDICATOR
43. MAIN TANKS LOW WARNING LIGHT
44. SAS CONTROL PANEL
48. TOTAL OXYGEN QUANTITY GAGE
49. BOMB DOORS OPEN LIGHT
50. BOMB DOORS NOT LATCHED LIGHT
51. ANTISKID SWITCH
52. OUTSIDE AIR TEMPERATURE GAGE
53. BOMB DOORS SWITCH
54. LATERAL TRIM INDICATOR
55. AUTOPILOT TURN CONTROL SELECTOR SWITCH
57. WINDSHIELD WIPERS SWITCH
59. HEADING INDICATOR (GYRO)
60. TRUE AIRSPEED INDICATOR
61. LANDING GEAR CONTROLS PANEL
62. MACH INDICATOR SWITCH
63. FLIGHT DIRECTOR SWITCH
© 2010 Captain Sim www.captainsim.com
10
‘B-52 Driver’ FLIGHT MANUAL Part II – Aircraft and Systems
DO NOT USE FOR FLIGHT
11
1. ANTI-ICE CONTROL PANEL
1,2. Pitot Heat Switches
3. Engine,
Switch
Nacelle,
And
Scoops
Anti-Icing
1. Pitot Heat Switches
Two ON-OFF pitot heat switches are located on the left side of the pilots' instrument panel. ON position of
each switch energizes the I pitot tube heaters on the respective (left or right) side of the aircraft to prevent
pitot tube stoppage by icing. The left pitot heat switch also controls the Q-spring ram air inlet heater. OFF
position removes power from the heaters.
3. Engine, Nacelle, and Scoops Anti-Icing Switch
The ON--OFF engine, nacelle, and scoops anti-icing switch on the anti-ice control panel controls anti-icing of
engine inlet components, nacelle leading edge areas, the ram airscoop lip in the left wing, and the cabin
emergency rain airscoop. ON position makes the connections to supply TR power to energize the various
solenoids and relays which cause the anti-icing air valves to open and turn on the electrical heater power.
OFF position deenergizes the solenoids and relays, causing engine, nacelle. and scoop anti-icing to be shut
off.
The emergency ram airscoop is electrically heated and will also cycle approximately 1 minute open and 15
seconds closed to prevent ice formation when the engine, nacelle, and scoops anti-Icing switch is ON and the
air conditioning master switch is in RAM.
2. EVS CONTROL PANEL
1. Power Switch
The power switch on the pilots' EVS control
panel is a push-on/push- off type switch
having an ON position (depressed) (switch
face flush with switch housing) and an OFF
position (extended) (switch face extends
approximately 1/8 inch from switch housing)
which is mechanically latched in each position.
The switch is used to turn on and place the
EVS monitor in standby mode.
When depressed in ON position, the word "ON" green is illuminated on the switch face provided power is on
in the aircraft. When the switch is pressed again and the switch face extends from its housing, the switch is
OFF and the EVS monitor is deactivated and power is removed from the other circuits provided through the
switch.
© 2010 Captain Sim www.captainsim.com
‘B-52 Driver’ FLIGHT MANUAL Part II – Aircraft and Systems
DO NOT USE FOR FLIGHT
12
3. CLOCK
1. Winding Knob
2,3. Hands
4. FLIGHT COMMAND INDICATOR
The AN, ASQ-38(V) BNS flight command
indicator (FCI) located on the pilots' instrument
panel provides localizer information.
5. ALTIMETER
1.100-Foot Pointer
2. Barometric Scale
3. 100-Foot Drum
4. Barometric Pressure Set Knob
5. 1000-Foot Counter
6. 10,000-Foot Counter
A type AAU-19/A altimeters on the pilot's and copilot's instrument panels. The altimeter has a counter-drumpointer display. Tne counters and drum provide a direct digital readout in hundreds and thousands of feet.
The single pointer repeats the 100- foot indications of the drum, serving both as a vernier for the drum and
as a quick indication of the rate and direction of altitude change. A barometric pressure set knob and
barometric scale are provided for adjusting the altimeter setting.
© 2010 Captain Sim www.captainsim.com
‘B-52 Driver’ FLIGHT MANUAL Part II – Aircraft and Systems
DO NOT USE FOR FLIGHT
13
8. MARKER BEACON LIGHT TEST SWITCH
Marker beacon indicator lights are tested by
pushing the central caution panel test switch.
9. INDICATED AIRSPEED INDICATOR
1. Maximum Allowable Airspeed Indicator
2. Indicated Airspeed Pointer
Located at both the left and right sides of the
pilots' instrument panel. By the use of twо
pointers, the pilots can observe the airspeed
indication and the maximum allowable airspeed
indication at the same time. The airspeed dial is
graduated from 50 to 650 in 10-knot
increments.
10. HORIZONTAL SITUATION INDICATOR
1. Range Indicator
2. Range Indicator Warning Flag
3. Heading Marker
4. Lubber Line
5. Compass Card
6. Course Deviation Indicator Warning Flag
7. Course Selector Window
8. Power Off Flag
9. Course Arrow (Head)
10. To-From Indicator
11. Course Deviation Indicator
12. Course Set Knob
13. Heading Set Knob
14. Course Arrow (Tail)
15. Aircraft Symbol
16. Course Deviation Scale
17. Bearing Pointer (head)
18. Bearing Pointer (tail)
It is an electrically operated instrument and replaces the bearing distance indicator, the radio course
indicator, and the directional indicator (heading system). In the event of loss of all ac power, no information
will be available from either the pilot's or copilot's horizontal situation indicator.
1. Range Indicator
Will give a digital display of the line-of-sight distance.
2. Range Indicator Warning Flag
The display will be covered by a range indicator warning flag if the NAV1 radio system is not tuned to a
surface beacon that is within 300 nautical miles of the aircraft and will also be covered if the NAV1 station is
not transmitting a signal of dependable strength
© 2010 Captain Sim www.captainsim.com
‘B-52 Driver’ FLIGHT MANUAL Part II – Aircraft and Systems
DO NOT USE FOR FLIGHT
14
3. Heading Marker
Indicates a desired heading. The heading marker will rotate with the compass card after the desired heading
has been selected by the heading set knob.
4. Lubber Line and 5. Compass Card
Provide an indication of aircraft heading.
7. Course Selector Window
Gives a digital display of the desired course selected by the course set knob.
9,14. Course Arrow
Indicates the desired course selected by the course set knob during ILS, ILS APP, VOR, and TACAN modes.
The course arrow will rotate (in step) with the compass card.
10. To-From Indicator
Indicates whether the selected course, if intercepted and flown, will take the aircraft to the selected facility,
or vice versa.
11. Course Deviation Indicator
referenced to the course arrow that indicates whether the aircraft is left or right of the desired course or
perpendicular to the course arrow represent of course deviation and 1/4 of the localizer width. The deviation
indicator provides information relative to the localizer beam when the nav mode select switch is in ILS or ILS
APP and the NAV1 is on and tuned to an ILS frequency. For all other conditions, the course deviation
indicator provides information relative to the desired course provided NAV1 radio is tuned to the respective
surface beacon or omni-range station.
12. Course Set Knob
Used to set the course arrow and the digital display in the course selector window to the desired course.
When the nav mode select switch is in VOR position and the NAV1 is tuned to an ILS frequency, the course
set knob will have no functional effect on the course deviation indicator; however, the course deviation
indicator will rotate in conjunction with the course set knob.
13. Heading Set Knob
Is used to set the heading marker to the desired heading.
17. Bearing Pointer (head)
A Bearing Pointer indicates the bearing heading to VOR station.
11. MARKER BEACON LIGHT
The marker beacon indicator light is used as a
navigational and landing aid. The light is
located just above the respective pilot's
horizontal situation indicator.
© 2010 Captain Sim www.captainsim.com
‘B-52 Driver’ FLIGHT MANUAL Part II – Aircraft and Systems
DO NOT USE FOR FLIGHT
15
12. ATTITUDE-DIRECTOR INDICATOR
1. Glide Slope Indicator
2. Attitude Sphere
3. Course Warning Flag
4. Pitch Steering Bar
5. Bank Steering Bar Shield
6. Bank Steering Bar
7. Bank Scale
8. Pitch Trim Knob
9. Bank Pointer
10. Turn And Slip Indicator
11. OFF Flag
12. Miniature Aircraft
13. Glide Slope Warning Flag
14. Glide Slope Indicator
15. Glide Slope Deviation Scale
An ARU-49/A attitude director indicator, located on both the pilot's and copilot's instrument panel provides
an indication of aircraft pitch and roll attitudes and rate of turn and slip indications. In addition, it provides
glide slope and localizer information in that it shows the aircraft position above or below the glide slope and
whether the aircraft has the correct bank angle and rate of turn to intercept and maintain a heading or
course.
3. Course Warning Flag
A course warning will come into view during TACAN, VOR, ILS, or ILS APP mode of operation when the NAV1
fails or signals from the URN-3 beacon or the VOR or ILS stations are lost or become unreliable.
4. Pitch Steering Bar
A pitch steering bar will indicate whether the aircraft has the proper pitch to intercept the glide slope
correctly. The bar will operate in ILS APP mode only. When not in operation and normal power is available,
the pitch steering bar will be out of view.
6. Bank Steering Bar
A bank steering bar will indicate whether the aircraft has the correct bank angle and rate of turn to intercept
the localizer beam "on course" if the NAV1 is tuned to an ILS frequency.
8. Pitch Trim Knob
A pitch trim knob permits zeroing the horizon line with reference to the miniature aircraft.
10. Turn and Slip Indicator
Indications of aircraft rate of turn and slip are provided by the needle and ball arrangement at the bottom
center of the instrument.
11. OFF Flag
An OFF flag will appear upon interruption of power to the attitude indicating system.
13. Glide Slope Warning Flag
A glide slope warning flag will come into view during ILS or ILS APP mode of operation when the NAV1 fails
or a glide slope signal of dependable strength is not being received.
© 2010 Captain Sim www.captainsim.com
‘B-52 Driver’ FLIGHT MANUAL Part II – Aircraft and Systems
DO NOT USE FOR FLIGHT
16
TERRAIN AVOIDANCE RADAR SYSTEM
The terrain avoidance (ТА) system comprises a special mode of radar, an electronic terrain computer, radar scan
converter, video distribution unit, and the pilot's and copilot's terrain display indicators (EVS monitors) and their
associated electronic components.
The ТА system provides a monochromatic radar display of actual FSX terrain rrelief along the flight path of the
aircraft. By interpreting the display and manoeuvring the aircraft accordingly, the pilot is able to fly the aircraft at
low absolute altitudes (aircraft to terrain separation distance).
© 2010 Captain Sim www.captainsim.com
‘B-52 Driver’ FLIGHT MANUAL Part II – Aircraft and Systems
DO NOT USE FOR FLIGHT
17
CONTROLS AND INDICATORS
14. EVS MONITOR
EVS monitor is located at both pilots' stations.
1. Indicated Airspeed Indicator
2. EVS monitor
3. Magnetic Course Indicator
4. TA return
5. Radar Altitude Indicator (up 5000 feet)
6. Brightness Knob
P20. TERRAIN DISPLAY CONTROL PANEL
1. Mode Selector Switch (MAP-PEAK)
2. Range Selector Knob
Note:
The higher an aircraft above the terrain is the
more difference between MAP and PEAK mode
returns.
MAP Mode
© 2010 Captain Sim www.captainsim.com
PEAK Mode
‘B-52 Driver’ FLIGHT MANUAL Part II – Aircraft and Systems
DO NOT USE FOR FLIGHT
18
15. VERTICAL VELOCITY INDICATOR
An MS28049 vertical velocity indicator is
located at both the right and left sides of the
pilots' instrument panel. The pointer shows
aircraft vertical speed.
16. MACH INDICATOR
1. M-Pointer
2. Rotating Subdial
Indicates the ratio of aircraft speed to the
speed of sound at the particular pressure
altitude at any time during flight. The
instrument has a range of 0. 5 to 1.0 which is
indicated on a stationary dial by a rotating
pointer.
Note:
Mach Indicator Switch must be in ON position.
17. RADAR ALTIMETER
1. Radar Altimeter Caution Light
2. Altitude Indicator Needle
The instrument provides for measuring
absolute altitude from 0 to 5000 feet.
An altitude indicator needle indicates altitude
from 0 to 1000 feet in 20- foot increments
and from 1000 to 5000 feet in 100- foot
increments.
Radar Altimeter Caution Light is ON if aircraft
is lower than 150 feet above ground.
© 2010 Captain Sim www.captainsim.com
‘B-52 Driver’ FLIGHT MANUAL Part II – Aircraft and Systems
DO NOT USE FOR FLIGHT
19
18. STANDBY HORIZONT INDICATOR
1. Attitude Sphere
2. Miniature Aircraft
3. Pitch Trim Knob
4. Bank Scale
5. Bank Pointer
Pitch Trim Knob permits zeroing the horizon
line with reference to the miniature aircraft.
22. ENGINE PRESSURE RATIO GAGES
An engine pressure ratio (EPR) gage for each
engine is located on the pilots' instrument
panel. These gages indicate the ratio of
engine inlet to exhaust pressures which is
used as a measure of engine thrust. The
engine inlet and exhaust indications are
compared by a computer-transmitter which
electrically transmits an indication to the
engine pressure ratio gage.
23. WING FLAP POSITION INDICATOR
A wing flap position indicator is provided on
the pilots' instrument panel. This indicator
reads from 0% to 100% of wing flap travel.
© 2010 Captain Sim www.captainsim.com
‘B-52 Driver’ FLIGHT MANUAL Part II – Aircraft and Systems
DO NOT USE FOR FLIGHT
20
24. LANDING GEAR POSITON INDICATORS PANEL
1-6. Landing Gear Position Indicators
Six tab-window type landing gear position
indicators in the lower center of the pilots'
instrument panel indicate landing gear
position. Each tab indicator has three visual
indicators to register landing gear position.
When the landing gear is up and locked, the
word UP appears in the tab window. A gear in
an intermediate position is indicated by
slanting alternate black and ivory stripes. The
appearance of DWN indicates a gear down
and locked.
25. LOW OIL PRESSURE WARNING LIGHTS
Low engine oil pressure is indicated by eight
amber low oil pressure warning lights located
over each oil pressure gage on the eyebrow
instrument panel. A pressure switch is
installed on each engine that will illuminate
the light when a decreasing oil pressure
reaches 37 (+2) psi and extinguish the light
when an increasing oil pressure reaches 37
(+2) psi. These lights will complement the oil
pressure indicating system to provide a crosscheck to establish if a malfunction is occurring
in the oil pressure indicating system or in the
engine.
27. ACCELEROMETER
An accelerometer is located on the pilots'
eyebrow panel. The accelerometer is a selfcontained
unit
requiring
no
external
connections. The dial is calibrated in "g" units
from -2 to +4 "g's."
© 2010 Captain Sim www.captainsim.com
‘B-52 Driver’ FLIGHT MANUAL Part II – Aircraft and Systems
DO NOT USE FOR FLIGHT
21
29. MAGNETIC STANDBY COMPASS
A pilot's magnetic standby compass is located
on the eyebrow instrument panel between the
oil pressure gages.
30. EXHAUST GAS TEMPERATURE GAGE
Exhaust gas temperature of each engine is
indicated by eight gages on the pilots'
instrument panel. These gages are calibrated
in degrees centigrade and indicate the
temperature of the exhaust gases of each
engine. Engine thermocouples supply power
to operate the gages which are independent
of the aircraft electrical power system.
31. FUEL FLOWMETERS
Fuel flow to the engine is shown by eight fuel
flowmeters on the pilots' instrument panel.
These indicators read in pounds per hour and
operate on TR power.
32. DME INDICATOR
Indicates the line-of-sight distance to DME
station.
© 2010 Captain Sim www.captainsim.com
‘B-52 Driver’ FLIGHT MANUAL Part II – Aircraft and Systems
DO NOT USE FOR FLIGHT
22
34. OIL PRESSURE GAGES
Engine oil pressure is indicated by eight oil
pressure gages located on the eyebrow
instrument panel.
35. TACHOMETERS
1. Larger Pointer
2. Small Pointer
Speed of the high pressure compressor rotor
in percent rpm is indicated by eight
tachometers on the pilot's instrument panel.
Engine - driven tachometer generators supply
power to operate the indicators which are
independent of the aircraft electrical system.
Each instrument has two pointers.
1. Larger Pointer
Is read on a dial calibrated from 0 to 100 rpm.
2. Small Pointer
Indication is read on a dial calibrated from 0% to 10% rpm.
36. MASTER CAUTION LIGHT
Is ON if any of the following occurs:
1. In the fuel tank there is less than 10% of
fuel.
2. Vertical speed is more than 7000 ft per
minute.
3. Altitude is less than 200 ft and speed is
more than 250 Knots.
© 2010 Captain Sim www.captainsim.com
‘B-52 Driver’ FLIGHT MANUAL Part II – Aircraft and Systems
DO NOT USE FOR FLIGHT
23
38. FUEL SYSTEM MANAGEMENT PANELS
1,3,7,8,16,18,22,25,28,31,36,39. Fuel Quantity Gages
2,4,9,10,15,17,24,27,30,32,35,38. Fuel Flow Indicator Lights
5,6,13,14. Auxiliary Tank Engine Feed Control Valve Switches
11,12,20,21,29,33,41,42. Auxiliary Tank Fuel Flow Control Switches
19. Wing Tank Warning Light
23,26,37,40. Main Tank Fuel Level Control Valves Switches
34. Main Mainfold Interconnect Valves Switch
1,3,7,8,16,18,22,25,28,31,36,39. Fuel Quantity Gages
The quantity of available fuel in each tank is indicated in pounds by 12 fuel quantity gages on the fuel
system panel. Fuel probes in each tank sense quantity indications. The fuel probe signals are relayed to
amplifiers which operate the gages. Due to the type of fuel quantity probes used, changes in fuel density
have little if any effect upon quantity indications.
2,4,9,10,15,17,24,27,30,32,35,38. Fuel Flow Indicator Lights
Twelve amber fuel flow indicator lights are located on the fuel system panel adjacent to the fuel quantity
gages. Those indicator lights indicate no fuel flow from the corresponding tank during fuel feed operations.
5,6,13,14. Auxiliary Tank Engine Feed Control Valve Switches
Four auxiliary tank engine feed control valve I switches on the fuel system panel have unmarked OP EN-CLOSED positions. These rotary switches are control operation of valves of corresponding numbers to direct
auxiliary tank fuel to the engines.
11,12,20,21,29,33,41,42. Auxiliary Tank Fuel Flow Control Switches
With an auxiliary tank fuel flow control switch in ENGINE FEED position, the boost pumps in the
corresponding auxiliary tank supply fuel to the main manifold.
19. Wing Tank Warning Light
Wing tank warning light on the fuel system panel is provided to warn the crew that fuel is being used from
the external or outboard wing tanks out of sequence.
34. Main Mainfold Interconnect Valves Switch
A main mainfold interconnect valves switch on the fuel system panel lias unmarked OPEN--CLOSED
positions. This rotary switch controls the operation of main manifold interconnect valves. When the white
stripe on the switch is aligned with the flow line on the panel, the switch is OPEN and left TR power is
supplied to open valve. Opening these valves interconnects the right and left sides of the main manifold.
CLOSED position closes the two valves.
© 2010 Captain Sim www.captainsim.com
‘B-52 Driver’ FLIGHT MANUAL Part II – Aircraft and Systems
DO NOT USE FOR FLIGHT
24
39. TOTAL FUEL FLOW INDICATOR
This instrument uses 115-volL ac power to
electrically add the flow rates indicated on the
eight individual fuel flowmeters. The totalizer
indication is accurate within ±3%. When all
engines are operating.
40. LANDING GEAR LEVER
A landing gear lever is located on the pilots'
instrument panel ahead of the aisle stand.
Positions of the lever are GEAR UP-GEAR
DOWN.
© 2010 Captain Sim www.captainsim.com
‘B-52 Driver’ FLIGHT MANUAL Part II – Aircraft and Systems
DO NOT USE FOR FLIGHT
25
CROSSWIND CRAB SYSTEM
A crosswind crab system is provided on this aircraft to facilitate making crosswind landings and takeoffs and
to reduce the hazards of crosswind conditions. The crosswind crab system provides a means of turning all
four main gear to align with the runway while the aircraft is flown in a wings-level attitude compensating for
drift. This system utilizes the steering actuators on the front main gear and a similar set on the rear main
gear. The landing gear can be preset and turned up to 20° left or right of center during the approach. The
maximum of 20° crab will accommodate landings in crosswinds up to and including 43 knots blowing 90° to
the runway at a landing weight of 270, 000 pounds. The direction of the landing gear is preset by a
crosswind crab control knob which mechanically operates the steering metering valves on each main gear.
These valves meter hydraulic pressure to the actuating cylinders to position the gear as desired. The
crosswind crab system is automatically centered when the landing gear lever is moved to the GEAR UP
position. On the ground after landing, the gear is quickly centered by a pilot - operated centering button or
by turning the crosswind crab control knob to center.
© 2010 Captain Sim www.captainsim.com
‘B-52 Driver’ FLIGHT MANUAL Part II – Aircraft and Systems
DO NOT USE FOR FLIGHT
26
TURNING ANGLES AVAILABLE WITH MAXIMUM CROSSWIND CRAB SETTINGS
REMARKS:
Crab setting refers to direction of the nose of the aircraft relative to desired heading.
CONDITIONS:
•
Aircraft taxiing with 20° nose left crosswind crab setting.
•
Steering ratio lever in TAXI.
1.
2.
Turning angle available in direction of crab setting is 55° from new neutral position.
Turning angle available in direction opposite crab setting is 35° (55° minus 20°) from new neutral
position.
© 2010 Captain Sim www.captainsim.com
‘B-52 Driver’ FLIGHT MANUAL Part II – Aircraft and Systems
DO NOT USE FOR FLIGHT
27
CONTROLS AND INDICATORS
P21. CROSSWIND CRAB CONTROL KNOB
The crosswind crab control knob is recessed in
the rudder trim control knob on the aft end of
the aisle stand. The control sets the amount of
nose left or right trim selected. When the
crosswind crab control knob is turned for trim,
cable linkage moves the jackscrew at the
differential coordinating unit. The jackscrew
positions the rear drum of the coordinating unit
to move cable and mechanical linkage to
operate the forward gear steering metering
valves.
The jackscrew also moves cable and mechanical linkage to operate the rear gear steering metering valves. It
is to be noted that the rear main gear can be steered only through movement of the jackscrew of the
coordinating unit while the forward main gear are steered by movement of the rear drum of the coordinating
unit. The rear drum can be moved both by the jackscrew for crosswind crab and by the forward drum of the
coordinating unit for steering by the rudder pedals. This action allows steering of the forward gear even
when the forward gear are preset for crosswind crab.
P22. CROSSWIND CRAB CONTROL CENTERING BUTION
A crosswind crab centering button located to
the right of the crosswind crab control knob on
the aisle stand is used to center all four main
landing gear from a turned position to neutral.
The crosswind crab centering button controls an
electric motor which turns the jackscrew in the
coordinating unit in the desired direction to
center all four gear. When the left rear gear is
centered, power to the motor is interrupted
causing all centering action to stop. The
centering button, a push-type switch that is
spring-loaded to OFF position, is supplied TR
power. It is covered with a moisture- and dustproof rubber cap which must be pressed to
actuate the centering button.
41. CROSSWIND CRAB POSITION INDICATOR
The indicator is centrally located on the lower
part of the pilots' instrument panel and shows
in a relative plan view presentation the amount
in degrees that the landing gear is turned to
compensate for aircraft crab during crosswind
conditions. The indicator has a diagram marked
with a miniature runway and a scale calibrated
from 0° to 20° both right and left.
© 2010 Captain Sim www.captainsim.com
‘B-52 Driver’ FLIGHT MANUAL Part II – Aircraft and Systems
DO NOT USE FOR FLIGHT
28
42. TOTAL FUEL QUANTITY INDICATOR
Indicates total quantity of fuel in the aircraft.
43. MAIN TANKS LOW WARNING LIGHT
Illuminates when there is low fuel in main tanks.
44. SAS CONTROL PANEL
1. Yaw SAS Switch
The pitch and yaw SAS provides increased
aircraft stability and structural life with
improved handling qualities over non-SAS
operation
The yaw SAS commands the rudder to dampen
aircraft oscillations in yaw as measured by
triply
redundant
yaw rate
and lateral
acceleration sensors located in the fuselage.
Electrical signals from these sensors are fed to
the rudder hydraulic actuator. The yaw SAS can
command maximum rudder deflections of 10°.
49. BOMB DOORS OPEN LIGHT
A green caution light marked "Bomb-DoorsOpen. When illuminated, they indicate that the
bomb doors are fully open, that the bomb doors
will be held open until the bomb doors close
circuit is energized, and that the bomb door
safety switches are positioned so bomb release
may be made by either the normal or the
jettison system. The lights will remain
illuminated as long as the bomb doors are fully
open.
© 2010 Captain Sim www.captainsim.com
‘B-52 Driver’ FLIGHT MANUAL Part II – Aircraft and Systems
DO NOT USE FOR FLIGHT
29
50. BOMB DOORS NOT LATCHED LIGHT
An amber caution light marked "Bomb-DoorsNot-Latched". Will illuminate when the forward
bomb door latch is unlatched. These lights will
remain on until the bomb doors are closed and
the forward bomb door is latched.
51. ANTISKID SWITCH
The switch has two positions, ON--OFF, and is
guarded to the ON position. When the switch is
ON, the antiskid system is in operation.
52. OUTSIDE AIR TEMPERATURE GAGE
A Type G-10 outside air temperature gage is
located on the left side of the pilot's instrument
panel. The air temperature gage is operated by
an electrical resistance thermometer bulb
located flush with the body skin on the lower
left side of the forward pressurized section of
the radar navigator's escape hatch. The
temperature range of the gage is -70° to
+50°C. The pointer should rest off the scale
with power off, and should register outside air
temperature with power on.
53. BOMB DOORS SWITCH
A pilot's bomb door on the pilots' instrument
panel provides a means of controlling the bomb
doors. The switch has OPEN-OFF-CLOSED
positions and is spring-loaded to OFF position.
Actuating this switch to OPEN or CLOSED
position will energize the bomb doors open
circuit or the bomb doors close circuit which
positions the bomb door control valves which in
turn directs hydraulic pressure to the bomb
door actuators.
© 2010 Captain Sim www.captainsim.com
‘B-52 Driver’ FLIGHT MANUAL Part II – Aircraft and Systems
DO NOT USE FOR FLIGHT
30
54. RUDDER TRIM INDICATOR
The indicator provides an indication of rudder
trim input.
55. AUTOPILOT TURN CONTROL SELECTOR SWITCH
This switch is of the solenoid locking type and
has PILOT-BOMB positions for selecting either
the autopilot flight controller (PILOT) or the
BNS (BOMB) respectively for turn command of
the autopilot.
Interlocks will return the turn control selector
switch from BOMB to PILOT position without
disengaging the autopilot when the pilots' turn
knob is rotated out of center detent.
BOMB position is INOP.
57. WINDSHIELD WIPERS SWITCH
Electrically operated windshield wipers clear the
windows in front of the pilot and copilot, A
separate motor drives each of the two blades.
Both wipers are controlled by a single rotarytype switch on the pilots' Instrument panel. The
switch has PARK-OFF-1-2-3 positions, giving a
choice of wiper speeds. The switch is springloaded from PARK to OFF position. After use,
the switch is held in PARK position until the
blades move to the stowed position and stop.
The switch is then placed to OFF position.
© 2010 Captain Sim www.captainsim.com
‘B-52 Driver’ FLIGHT MANUAL Part II – Aircraft and Systems
DO NOT USE FOR FLIGHT
31
59. HEADING INDICATOR (GYRO)
A Type C-2A heading indicator (gyro) is located
on the left side of the pilots' instrument panel.
The heading indicator is an unslaved-gyro
which
provides
auxiliary
headings
for
navigational purposes and is also used to
provide headings in the event of failure of the
main compass system.
60. TRUE AIRSPEED INDICATOR
A true airspeed indicator is a remote indicating
unit. A main dial and subdial in the true
airspeed indicator repeat airspeed information
transmitted from the true airspeed computer. A
cutout and reference mark on the main dial
permit reading of the subdial. The power to
operate this indicator is supplied by the true
airspeed computer. The true airspeed computer
uses static pressure, pitot pressure, and
temperature to compute true airspeed and
Mach information.
62. MACH INDICATOR SWITCH
Mach Indicator power switch on the pilot's
panel has ON-OFF positions. In ON position, the
switch supplies power to the pilot's Mach
Indicator.
63. FLIGHT DIRECTOR SWITCH
Flight Director switch on the pilot's panel has
ON-OFF positions. In ON position, the switch
supplies power to the Flight Director indicators.
© 2010 Captain Sim www.captainsim.com
‘B-52 Driver’ FLIGHT MANUAL Part II – Aircraft and Systems
DO NOT USE FOR FLIGHT
OVERHEAD PANEL
O01.
O03.
O04.
O05.
O06.
© 2010 Captain Sim www.captainsim.com
OVERHEAD LIGHTING PANEL
UHF RADIO CONTROL PANEL
UHF2 RADIO CONTROL PANEL
TACAN RADIO CONTROL PANEL
VOR CONTROL PANEL
32
‘B-52 Driver’ FLIGHT MANUAL Part II – Aircraft and Systems
DO NOT USE FOR FLIGHT
O01. OVERHEAD LIGHTING PANEL
The following lights can be controlled independently from the overhead light control panel:
1. Dome Flood Light Switch
2. Navigational Lights Switches
3. Anti-collision Lights Switch (Strobe Lights FSX key)
4. Overhead Instruments Lights Switch
1. Dome Flood Light Switch
Red and white lights are controlled by a RED-OFF-WHITE toggle switch.
2. Navigational Lights Switches
ON position selects illumination of all navigational lights, while OFF position turns the lights out.
O03. UHF RADIO CONTROL PANEL
1. COMM 1 Frequency Indicator
2-5. COMM 1 Frequency Selector Knobs
© 2010 Captain Sim www.captainsim.com
33
‘B-52 Driver’ FLIGHT MANUAL Part II – Aircraft and Systems
DO NOT USE FOR FLIGHT
34
O04. UHF2 RADIO CONTROL PANEL
1,3,5,7,9. COMM 2 Frequency Indicator
2,4,6,8,10. COMM 2 Frequency Selector Knobs
O05. TACAN RADIO CONTROL PANEL
1. NAV2 Frequency Indicator Window
2. NAV2 Frequency tens and units Selector
Knob
3. NAV2 Frequency tenth and hundredth
Selector Knob
1. NAV2 Frequency Indicator Window
Indicates selected NAV2 frequency.
Note: As the first digit of the frequency is always 1 so it is not shown on the indicator.
O06. VOR CONTROL PANEL
1. NAV1 Frequency Indicator
2. NAV1 Frequency Selector Switch
Note:
As the first digit of the frequency is always 1
so it is not shown on the indicator.
© 2010 Captain Sim www.captainsim.com
‘B-52 Driver’ FLIGHT MANUAL Part II – Aircraft and Systems
DO NOT USE FOR FLIGHT
PILOT’S SIDE PANELS
UPPER PANEL
LOWER PANEL
A01.
A04.
A07.
A08.
A14.
HYDRAULIC PANEL
LIGHT CONTROL
ANTISKID MACH GYRO
OXYGEN QUANTITY
OXYGEN REGULATOR PANEL
© 2010 Captain Sim www.captainsim.com
35
‘B-52 Driver’ FLIGHT MANUAL Part II – Aircraft and Systems
DO NOT USE FOR FLIGHT
36
A01. HYDRAULIC PANEL
1-6. Engine-Driven Hydraulic Pump Out Lights
7-10. Standby Pump Switches
11,12. RUD/ELEV Hydraulic System Switches
13-18. Hydraulic System Pressure Gages
19-22. RUD/ELEV Hydraulic System Lights
1-6. Engine-Driven Hydraulic Pump Out Lights
Each of the six individual hydraulic systems has an red pump out indicating light located on the hydraulic
control panel at the pilots' station. Since the lights indicate engine-driven pump pressure only, a light will
remain on after failure of a main pump even though (for those systems which have a standby pump) system
pressure is restored to normal by the standby pump. Only a return of the affected main pump to proper
operation will extinguish the light.
11,12. RUD/ELEV Hydraulic System Switches
Two rudder/elevator hydraulic system switches are located on the lower portion of the hydraulic control
panel. These switches have ON— OFF positions and in the ON position they energize ac motor-driven pumps
that operate the rudder/elevator main No. 1 and 2 hydraulic systems. In the OFF position, power is removed
from the hydraulic pumps.
© 2010 Captain Sim www.captainsim.com
‘B-52 Driver’ FLIGHT MANUAL Part II – Aircraft and Systems
DO NOT USE FOR FLIGHT
37
13-18. Hydraulic System Pressure Gages
Six gages on the hydraulic control panel indicate pressure of the hydraulic systems. The location of each
gage on the control panel corresponds to the respective hydraulic system which it serves and which is shown
by outline on the control panel.
A04. PILOT'S LIGHT CONTROL PANEL
The following lights can be controlled independently from the pilot's light control panel:
1. Pilot’s
Switch
Side
Panel
Instruments
Lights
2. Forward Center Panel Instruments Lights
Switch
3. Panels Backlights Switch (Shift+L)
4. Pilot’s Panel Instruments Lights Switch
5. Eyebrow Panel Instruments Lights Switch
1. Pilot’s Side Panel Instruments Lights Switch
Turns pilot’s side panel instrument lights on/off.
2. Forward Center Panel Instruments Lights Switch
Turns forward center panel instruments lights on/off.
3. Panels Backlights Switch (Shift+L)
Turns panels backlights on/off.
4. Pilot’s Panel Instruments Lights Switch
Turns pilot’s panel instruments lights on/off.
5. Eyebrow Panel Instruments Lights Switch
Turns eyebrow panel instruments lights on/off.
© 2010 Captain Sim www.captainsim.com
‘B-52 Driver’ FLIGHT MANUAL Part II – Aircraft and Systems
DO NOT USE FOR FLIGHT
38
A07. ANTISKID MACH
1. Antiskid Switch
2. MACH Switch
3. Gyro Power Switch
1. Antiskid Switch
The switch has two positions, ON--OFF, and is guarded to the ON position. When the switch is ON, the
antiskid system is in operation.
2. MACH Switch
Mach Indicator is a servo-type indicator, receiving power from the true airspeed computer through a Mach
indicator switch on the pilot's side panel.
3. Gyro Power Switch
Two gyro power switches on the pilot's panel and pilot's side panel have ON--OFF positions. In ON position,
the pilot's gyro power switch supplies power to the pilot's attitude indicating system and the heading
indicator.
© 2010 Captain Sim www.captainsim.com
‘B-52 Driver’ FLIGHT MANUAL Part II – Aircraft and Systems
DO NOT USE FOR FLIGHT
COPILT’S SIDE PANELS
UPPER
LOWER
B01.
B02.
B03.
B07.
B08.
B11.
B12.
B13.
B14.
ELECTRICAL PANEL
TEMP INDICATOR
OIL TEMP INDICATOR
ENG START CONTROL PANEL
GYRO POWER SWITCH
LIGHT CONTROL
HF RADIO PANEL
OXYGEN REGULATOR PANEL
BATTERY SWITCH PANEL
© 2010 Captain Sim www.captainsim.com
39
‘B-52 Driver’ FLIGHT MANUAL Part II – Aircraft and Systems
DO NOT USE FOR FLIGHT
40
B01. ELECTRICAL PANEL
1-4. Ammeter
5. Voltmeter
6. Frequency Meter
7,8,10,11. Generator Switch
9. Main External Power Switch
12-15. Generator Circuit Breaker Position Indicator
16-19. Bus Tie Circuit Breaker Position Indicator
20-23. Generator Drive Overheat Light
24-27. Generator Drive Decoupler Switch
28. Frequency And Voltmeter Selector Switch
29. External Power Circuit Breaker Position Indicator
30. Master Isolate Switch
1-4. Ammeter
Provides indication of output in amperes supplied by each individual generator. The ammeters indicate from
0 to 500 amperes.
6. Frequency Meter
A frequency meter provides a means of reading individual frequencies of the generators and central bus tie.
7,8,10,11. Generator Switch
Generator switches on the copilot's ac control panel are marked ON and OFF. When the switch is held
momentarily in ON position, 28-volt nominal dc essential power closes the generator control relay and the
generator circuit breaker and energizes the generator field.
9. Main External Power Switch
Main external power switch on the ac control panel is marked ON and OFF. The switch is provided for
controlling the main external power system.
© 2010 Captain Sim www.captainsim.com
‘B-52 Driver’ FLIGHT MANUAL Part II – Aircraft and Systems
DO NOT USE FOR FLIGHT
41
12-15. Generator Circuit Breaker Position Indicator and 16-19. Bus Tie Circuit Breaker Position
Indicator
Eight tab indicators, one for each generator circuit breaker and one for each bus tie circuit breaker are
located on the ac control panel and provide a means of indicating the position of the respective circuit
breakers.
24-27. Generator Drive Decoupler Switch
The switches are marked NORM and i ECPI at the extreme positions and MON at the center position.
28. Frequency And Voltmeter Selector Switch
A five-position frequency and voltage selector switch has ENG GEN -ENG 3 GEN--CENTRAL TIE BUS—ENG 5
EN- ENG 7 GEN positions. The switch provides a means of selecting and reading frequency and voltage >i
the central bus tie and of each generator. In ENG 1 GEN position, the frequency and voltage of the No. !
generator may be read on the frequency meter and voltmeter provided the generators are isolated. The
remaining positions will perform the above operation tor their respective generators as marked. When the
generators are in parallel, all generator switch positions will be read the same as the CENTRAL TIE BUS
position.
30. Master Isolate Switch
An isolate switch is marked "Push to Isolate Central Tie Bus" Pressing the switch energizes the master isolate
relay, which In turn trips the bus tie circuit breakers, isolating all generators from the central bus tie.
B02. TEMP INDICATOR
Shows static air temperature.
B07. ENG START CONTROL PANEL
1-8. Starter Switches
1-8. Starter Switches
These switches select the engines pair for which a starting function is desired. When the starter switch is in
START, the starter air valve is opened and ignition power is directed to that engines pair.
© 2010 Captain Sim www.captainsim.com
‘B-52 Driver’ FLIGHT MANUAL Part II – Aircraft and Systems
DO NOT USE FOR FLIGHT
42
B11. COPILOT'S LIGHT CONTROL PANEL
The following lights can be controlled independently from the copilot's light control panel:
1. Copilot’s Side Panel Instruments Lights
Switch
Turns copilot’s side panel instruments lights
on/off.
2. Panels Backlights Switch (Shift+L)
Turns panels backlights on/off.
3. Copilot’s
Switch
Panel
Instruments
Lights
Turns copilot’s panel instruments lights on/off.
B12. HF RADIO PANEL
1,3,4,5. NAV1 Frequency Selection Knobs
2. NAV1 Frequency Selection Indicator
© 2010 Captain Sim www.captainsim.com
‘B-52 Driver’ FLIGHT MANUAL Part II – Aircraft and Systems
DO NOT USE FOR FLIGHT
43
B14. BATTERY SWITCH PANEL
1. Battery Switch (Shift+M)
An ON-OFF battery switch on the copilot's side panel routes battery power to the essential battery buses.
When the battery switch is placed in ON position, battery power is directed to the essential buses through
the essential dc battery relays and, when TR power is available, relays are energized to transfer essential
buses to TR power. When the battery switch is in OFF position, no battery power is available to the essential
battery buses. Battery power is supplied directly from each battery to individual (direct) battery buses at all
times, regardless of the position of the battery switch.
© 2010 Captain Sim www.captainsim.com
‘B-52 Driver’ FLIGHT MANUAL Part II – Aircraft and Systems
DO NOT USE FOR FLIGHT
AISLE STAND
© 2010 Captain Sim www.captainsim.com
44
‘B-52 Driver’ FLIGHT MANUAL Part II – Aircraft and Systems
DO NOT USE FOR FLIGHT
P02.
P03.
P04.
P05.
P06.
P10.
P11.
P12.
P13.
P15.
P17.
P18.
P19.
P21.
P22.
45
AIRBRAKE LEVER
AUTOPILOT TURN AND PITCH CONTROLLER
AUTOPILOT COMMAND SELECTOR PANEL
CROSSWIND CRAB CONTROL KNOB нет номера на скрине
LANDING LIGHTS PANEL
STABILIZER TRIM WHEEL AND INDICATOR
THROTTLES
THROTILE BRAKE LEVER
PARKING BRAKE LEVER (Ctrl+.)
DRAG CHUTE LEVER
WING FLAP LEVER
NAVIGATION SYSTEM SELECT PANEL
TERRAIN DISPLAY CONTROL PANEL
RUDDER TRIM KNOB
CROSSWIND CRAB CONTROL CENTERING BUTION
P02. AIRBRAKE LEVER
The airbrake lever on the pilot's side of the
aisle stand operates airbrakes.
P03. AUTOPILOT TURN AND PITCH CONTROLLER
1. Pitch Controllers
2. Turn Controller
1. Pitch Controllers
2 controllers mechanically joined to one another. Free to rotate without limit in either direction.
Activated when autopilot engaged so that when rotated, new attitude reference is set and airplane pitches to
maintain it.
Deactivated when Altitude Hold is selected or when glideslope is captured.
2. Turn Controller
•
Detented at center position
•
May be rotated at 130 degrees in either direction.
•
When rotated, causes airplane to turn. Rate and amount of rotation determines rate and amount of
airplane roll.
•
Will remain in any position
•
Can effect a maximum bank angle of 50°
© 2010 Captain Sim www.captainsim.com
‘B-52 Driver’ FLIGHT MANUAL Part II – Aircraft and Systems
DO NOT USE FOR FLIGHT
46
P04. AUTOPILOT COMMAND SELECTOR PANEL
1. Autopilot Master Pilot Switch
2. Servos Engage Switch
3. Altitude Control Switch
4. Automatic Approach Localizer Switch
5. Automatic Approach Glide Slope Switch
1. Autopilot Master (Pilot) Switch (Z key)
An autopilot master (pilot) switch on the autopilot selector panel has ON-OFF positions. ON position puts
power to the servo control drive motor and permits ready engagement of the servos. OFF position cuts off
power to the servo control drive motor and also disengages the autopilot
3. Altitude Control Switch (Ctrl+Z)
An altitude control switch has ON-OFF positions. In ON position, the elevator servo is controlled by a
barometric pressure control unit. Rotating the pitch knob drops the altitude control switch to OFF and
deactivates altitude control operation. Moving the glide slope switch to ON will drop the altitude control
switch to OFF position. The altitude control switch will remain locked in OFF as long as the glide slope switch
is in ON position.
4. Automatic Approach Localizer Switch
Dummy on this panel. See description of ILS position of Nav Mode Select Switch for details.
5. Automatic Approach Glide Slope Switch
Dummy on this panel. See description ILS APP positions Nav Mode Select Switch for details.
© 2010 Captain Sim www.captainsim.com
‘B-52 Driver’ FLIGHT MANUAL Part II – Aircraft and Systems
DO NOT USE FOR FLIGHT
47
P18. NAVIGATION SYSTEM SELECT PANEL
1. Nav Mode Select Switch
2. Heading Selector Switch
1. Nav Mode Selector Switch
Nav mode select switch marked "Mode Select" is located on the navigation system select panel. The rotary
switch has TACAN-VOR-ILS-ILS APP positions.
•
•
•
•
In TACAN position, the bank steering bar will respond to the MSFS flight plan (if loaded).
(Ctrl+Shift+N should be assigned)
In VOR position, the omnirange radio navigation system is selected and NAV1 may be placed in
operation. The bank steering bar will respond to NAV1. (Ctrl+N)
In ILS positions, the instrument landing system mode of navigation is selected. The bank steering
bar will respond to ILS localizer. If Autopilot is engaged, ILS position allows the lateral controls of
the autopilot to be controlled by the localizer beam after it has been intercepted. (Ctrl+0)
In ILS APP positions, the instrument landing system mode of navigation is selected. The bank
steering bar will respond to ILS localizer. The pitch steering bar will will respond to ILS glideslope. If
Autopilot is engaged, ILS APP position allows the lateral and pitch controls of the autopilot to be
controlled by the localizer and glide slope beams after they have been intercepted. (Ctrl+A)
Note: Nav Mode Selector Switch is active only if Heading Selector Switch in NOR position.
2. Heading Selector Switch (Ctrl+H)
A heading selector switch located on the navigation system select panel on the aisle stand is marked "HDG
Select." The switch has MAN-NOR positions and controls the input source for signals to the bank steering bar
on the attitude-director indicator. In NOR (normal) position, the information displayed on the flight director
indicator will be determined by the position of the mode select switch. In MAN (manual) position, the flight
director system will overrides Nav Mode Selector Switch. The bank steering bar will will respond to the
heading set by the heading set knob on the captain's horizontal situation indicator. The bar will indicate zero
deflection when the aircraft has the correct bank angle to arrive at the selected heading. The heading can be
maintained by keeping the bank steering bar at zero deflection.
The autopilot localizer and glide slope can be energized only when the nav mode select switch is in ILS or
ILS APP position respectively and the omni-range radio system is on and tuned to an ILS frequency.
© 2010 Captain Sim www.captainsim.com
‘B-52 Driver’ FLIGHT MANUAL Part II – Aircraft and Systems
DO NOT USE FOR FLIGHT
48
P06. LANDING LIGHTS PANEL
Landing Lights ON- OFF Switch (Ctrl+L)
Turn landing lights on-off.
Crosswind Landing Light Switch
Turn crosswind landing lights on-off.
Taxi Lights Switch
Turn taxi lights on-off.
P10. STABILIZER TRIM WHEEL AND INDICATOR
1. Copilot's Trim wheel
2. Stabilizer Trim Indicator
Manual control of the stabilizer trim metering
valve is provided by rotation of the stabilizer
trim wheels on the aisle stand. The pilot's trim
wheel is attached to the throttle shaft and
operates through a chain sprocket linkage to
move a trim indicator located forward and
inboard of the wheel.
The copilot's trim wheel and trim indicator are
located opposite to the pilot's trim indicator.
The manual trim wheels can be used to
override the electric trim control system or
autopilot trim system.
The trim wheel face and periphery is painted in
alternate black and white segments as a visual
aid and reminder when the electric trim control
system is being used.
© 2010 Captain Sim www.captainsim.com
‘B-52 Driver’ FLIGHT MANUAL Part II – Aircraft and Systems
DO NOT USE FOR FLIGHT
49
P11. THROTTLES
Eight throttles control eight engines.
Due to MSFS limitations the eight throttles
combined as four pairs of engines.
Note:
Place all throttles to idle position (F1) before
engines starting up.
P15. DRAG CHUTE LEVER
Positions of the lever are DEPLOY-LOCKEDJETTISON. This lever manually operates the
drag chute release and jettison mechanisms
through a cable system. Normally, the lever
must be moved to DEPLOY before it can be
moved to JETTISON position. LOCKED position
holds
the
spring-loaded
drag
chute
compartment door securely closed. JETTISON
position causes release of the jettison
mechanism and allows the chute to pull free of
the aircraft.
Drag Chute Limitations
•
•
•
During the deceleration of a landing or
refused take-off, the drag chute may
be deployed at 135 knots IAS.
Deployment at higher speeds may
result in failure of the chute or the
shear pin.
Drag chute will not deploy at or over
200 knots IAS.
Once deployed the drag chute will
automatically jettison at 20 knots IAS.
To deploy the drag chute while in exterior views use Wing Fold FSX key (should be assigned).
Drag chute is visual feature, it does not affect landing distance.
© 2010 Captain Sim www.captainsim.com
‘B-52 Driver’ FLIGHT MANUAL Part II – Aircraft and Systems
DO NOT USE FOR FLIGHT
50
P17. WING FLAP LEVER
The wing flap system includes four separate wing flap sections. The flaps are of the Fowler type with high
liftdrag ratio resulting in shortened takeoffs and reduced landing speeds. All four flap sections are
simultaneously driven by a single power unit located in the fuselage aft of the center section gear spar.
During the first 37% of extension, the flaps rotate downward 35° with little rearward movement. For the
remainder of the extension, the flaps move rearward only. Most of the drag increase occurs during the first
20% of the flap motion. This initial 20% rotates the flaps down 29° in approximately 12 seconds, leaving
only 6° of rotation in the remaining 80% of flap extension. The flaps are electronically controlled by a single
flap lever. No emergency control system is provided for the flaps.
Control of the wing flaps is accomplished by
moving a lever with an airfoil-type knob on a
detent quadrant located on the right side of the
aisle stand. This lever can be moved from
either the UP or DN position. When the lever is
placed in the UP or DN position, a circuit is
closed to supply TR power to left and right flap
extend or retract relays.
The
flaps
extend
or
approximately 60 seconds.
© 2010 Captain Sim www.captainsim.com
retract
fully
in
‘B-52 Driver’ FLIGHT MANUAL Part II – Aircraft and Systems
DO NOT USE FOR FLIGHT
51
CUSTOMER CARE
FORUM
You are invited to join Captain Sim community forum
DAILY NEWS
For Captain Sim daily news please follow us at Twitter or Facebook.
VIDEO CHANNEL
For Captain Sim videos please watch our YouTube channel.
TECH SUPPORT
Our product is not perfect (unfortunately nothing is). But we are working on improvements. If you have
some important issue to report, please check-in to Your Profile then click Product Name > Customer Support
> and use the Trouble Ticket System. We process all tickets and consider the most significant issues for
further upgrades.
© 2010 Captain Sim www.captainsim.com