1
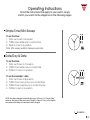
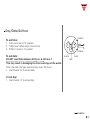
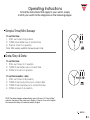
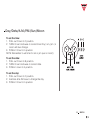
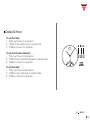
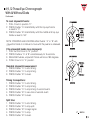
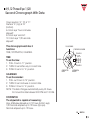
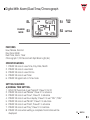
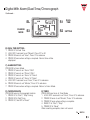
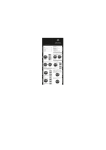
Warranty/instruction Booklet
Guess Watches
10 Year Limited Warranty
WOMENS
OPERATING
OPERATING
INSTRUCTIONS
INSTRUCTIONS
Operating
Instructions
To find the instructions that apply to your watch, simply
OPERATING
TO
FIND
THE INSTRUCTIONS
match
watch
the diagrams on the following pages.
TO your
FIND
THEtoINSTRUCTIONS
THAT APPLY,
SIMPLY MATCH YOUR WATCH
INSTRUCTIONS
THAT APPLY, SIMPLY MATCH
YOUR WATCH
TO THE DIAGRAMS ON THE FOLLOWING PAGES.
TO THE DIAGRAMS ON THE FOLLOWING PAGES.
TO FIND THE INSTRUCTIONS
THAT APPLY,
SIMPLY
YOUR WATCH
SIMPLE
TIME MATCH
/ MINI SWEEP
SIMPLE
TIME
/
MINI
SWEEP
Simple Time/Mini
Sweep
TO THE DIAGRAMS ON THE FOLLOWING PAGES.
To set the time:
To set the time:
1. PULL out crown to B position.
SIMPLE TIME / MINI SWEEP
1. PULL out crown to B position.
2. TURN crown either way to correct time.
2. TURN crown either way to correct time.
3. Push in crown to A position.
ToAset
the time:
3. Push in crown to
position.
Note: Mini sweep subdial measures seconds.
1. PULL
out crown
to B position.
Note: Mini sweep subdial
measures
seconds.
2. TURN crown either way to correct time.
DATE / DAY & DATE
3. Push in crown to A position.
DATE / DAY & DATE
Date/Day & Date
Note: Mini sweep subdial measures seconds.
To set the time:
To set the time:
1. PULL out Crown to C position.
1. PULL out Crown to C position.
DATE / DAY & DATE
2. TURN Crown either way to correct time.
2. TURN Crown either way to correct time.
3. PUSH in Crown to A position.
the time:
3. PUSH in CrownTo
to set
A position.
1.
PULL
Crown to
C position.
To set
theout
calendar
/ date:
To set the calendar
/ TURN
date: Crown either way to correct time.
2.
1. PULL out Crown to B position.
1. PULL out Crown
to B position.
3.
Crown
to Afrom
position.
2. PUSH
TURN in
Crown
away
you to correct date.
2. TURN Crown away from you to correct date.
3. TURN Crown towards you to correct the day.
To set the
date:
3. TURN Crown towards
you calendar
to correct/ the
day.
4. PUSH in crown to A position.
PULL
out Crown to B position.
4. PUSH in crown1.
to A
position.
NOTE:
The
date changes
every
24 hours.
2.
TURN
Crown
away fromautomatically
you to correct
date.
NOTE: The date changes On
automatically
every
24 hours.
“Day &towards
Date”
watches,
the days
the week are in English +
3. TURN Crown
you to correct
the of
day.
On “Day & Date” watches,
the days
of English,
the weekthe
areconsecutive
in English +days will continue to
French.
Once
setposition.
in
4. set
PUSH
in crown
to A
Once
in
English,
the
consecutive
days
will
continue to
NOTE: The French.
date changes
automatically
every
24
hours.
On
“Day
&
Date”
be in English.
watches, the
of the
week
are
in
English
+
French.
Once
set
in
English,
bedays
in English.
NOTE: The date changes automatically every 24 hours.
the consecutive days will continue to be in English.
On “Day & Date” watches, the3days of the week are in English +
3 set in English, the consecutive days will continue to
French. Once
be in English.
3
2
WOMENS
DAY / DATE / 24
HOUR
DAY
/ DATE / 24 HOUR
DAY / DATE / 24
HOUR
HOUR
PUSHER A
PUSHER B
DAY
Day/Date/24 Hour
To set time:
To set time:
1.
1.
2.
2.
3.
3.
24 HOUR
24 HOUR
PUSHER A
PUSHER A
PUSHER A
PUSHER B
PUSHER B
PUSHER B
DAY 24 HOUR
DAY
DATE
DATE
DATE
DAY
DAY
/ DATE / 24 HOUR
PUSHER A
To set time:
PULL out crown to1.“B”PULL
position.
out crown to “B” position.
PULL out crown to “B” position.
TURN crown either
way
to correct
2.
TURN
crown time.
either way to correct time.
TURN crown either way to correct
time.
PUSH in crown to3.
“A”PUSH
position
in crown to “A” position
PUSH in crown to “A” position
To set date:
To set date:
To set date:
PUSHER B
24 HOUR
DAY
DATE may result in
DO NOT reset DateDO
between
9:00 Date
p.m. &
4:00 a.m.
This
may
result
in This
NOT reset
between
9:00
p.m.
& 4:00
a.m.
DO
NOT
reset
Date
between
9:00
p.m.
&
4:00
a.m.
This
may
result
in
the inner
workingsthe
of the
watch.
inner
workings of the watch.
00 a.m. damaging
This
may result
in damaging
damaging
the inner
workings of the
watch.
To
set
time: every 24 hours
Note: the date changes
automatically
every
24
hours
Note:
the
date
changes
automatically
Note: the date changes automatically every1.
24PULL
hours
out crown to “B” position.
Push Pusher “B” to
date. “B” to correct date.
4 hours 1.
1.correct
Push Pusher
1. Push Pusher “B” to
correct
date.
To set day:
To set day:
2. TURN crown either way to correct time.
3. PUSH in crown to “A” position
To set day:
1. Push Pusher “A” to
day. “A” to correct
To setday.
date:
1.correct
Push Pusher
1. Push Pusher “A” to
correct
day.
DO NOT reset Date between 9:00 p.m. & 4:00 a.m. This may r
damaging the inner workings of the watch.
Note: the date changes automatically every 24 hours
1. Push Pusher “B” to correct date.
To set day:
1. Push Pusher “A” to correct day.
1
1
1
3
WOMENS
DAY / DATE / 24 HOUR
Day/Date/24 Hour
DATE
DAY
A B C
A B C
A B C
DAY / DATE / 24 HOUR
DAY
DATE A B C
DATE
DATE
24-HOUR
A B C
24-HOUR
DAY
DATE
DAY
DAY
A DATE
B C
DATE
24-HOUR
24-HOUR
position
A B C
24-HOUR
A B C
24-HOUR
DAY
MONTH SETTING
BUTTON
A B C
DAY
DATE
DAY
24-HOUR
crown
position
24-HOUR
DATE
1 2 3
DAY
crown
position
24-HOUR
crown
position
A B C
A B C
DATE
24-HOUR
crown
position
A B C
DATE
A B C
SECOND
Acrown
B C
position
A DATE
B C
DAY
DATE
1 2 3
24-HOUR
24-HOUR
MONTH
DAY
MONTH SETTING
BUTTON 24-HOUR
MONTH
DAY
DAY
crown
position
crown
crown
DATE
position
position
DAY
MONTH SETTING
DAY
BUTTON DATE
A B C
DATE
A B C
1 2 3
DATE
DAY
A B C
Acrown
B C
DAY
24-HOUR
A B C
24-HOUR
DATE
DAY
C
A B crown
position
A B C
DATE
DATE
DAY
A B C
A B C
DAY
DATE
DAY
24-HOUR / DATE / 24 HOUR
DAY
DATE
DATE
crown
position
24-HOUR
DATE
To set time:
1. PULL out crown to C position.
To set day:
To set time:
2.To
TURN
either way to correct time.
set day:
1. set
PULL
out crown to C position.
1. PULL out
crown
to Ccrown
position.
To
day:
To set day:
1.
PULL
out
crown
to
C
position.
3.
PUSH
in
crown
to
A
position.
2.
Advance
24tohours
to change the day.
2.
TURN
crown
either
way
to
correct
time.
To set time: To set day:
1. PULL out time
crown
C position.
1. PULL out crown to C p
24-HOUR
MONTH
24-HOUR
24-HOUR
SECOND
DATE
DATE
SECOND
crown
position
24-HOUR
DATE
2.crown
Advance
time 24 hours to change the day. 2.
3. Advance
PUSH in crown
tohours
A position.
3. PULL
PUSH out
in crown
totoACout
position.
1.
position.
time 24
to 2.
change
the day.
1. PULL
crown to C position.
Advance
time 24 hours
3.
PUSH
in
crown
to
A
position.
NOTE:
24
hour
indicator
can
change
only
when setting
2. TURN crown
either
way
to
correct
time.
3.
PUSH
in
crown
to
A
position.
To2.setAdvance
date: time 24 hours to change the day.
3. PUSH in crown to A po
To set
date:
NOTE:to24Ahour
indicator can change only when NOTE:
setting the
time.indicator can change only when setting
3.
PUSH
inNOTE
crown
position.
24
hour
3. PUSH
in crown
to A position.
NOTE: 24 hour indicator c
the date
changes
automatically
every
24month:
hours.
To set
NOTE the date
changes
automatically
every
24 hours.
NOTE:
24
hour
indicator
can
change
only
when
setting
the
time.
1.To
PULL
crown to B position.
set month:
Push
setting button until the small hand of month
1. set
PULL
out
crown
to out
B position.
To
setmonth
month:
To
date:
To set month:
month.
Push
month
setting
button
until
the
small
hand
of
month
is
set
to the button
correctuntil the small hand of month
2.
TURN
crown
clockwise
to
correct
date.
2.
TURN
crown
clockwise
to
correct
date.
Push
month
setting
NOTE the dateTo
changes
automatically every 24 hours.
set month:
Push month setting button
month.
3. PULL
PUSH out
in3.crown
to
position.
1.
crown
toABin
position.
PUSH
crown
to A position.
Push
month
setting button
until the small hand month.
of month is set to the correct month.
2. TURN crown
clockwise to correct date.
month.
6,12 TWO-EYE CHRONOGRAPH WI
3. PUSH in crown to A position.
6,12 TWO-EYE CHRONOGRAPH WITH
DATE
6,12
TWO-EYE CHRONOGRAPH
WI
6,12 TWO-EY
Crown
position
“A” , “B” & “C”. 4 WOMENS
CHRO
4
6,12 TWO-EYE CHRONOGRAPH
WITH DATE
Pushers “A” (top) & “B” (bottom).
Crown position “A” , “B” & “C”.
Pushers “A” (top) & “B” (bottom).
Crown position “A” , “B”4 & “C”.
4
CHRONOGRAPH
Crown
positionMINUTE
“A” HAND
, “B” & “C”.
CHRO
position
12 o’clock
eye
“1 minute
up toCrown
maxinum
60 “A” , “B” &
Pushers
“A”
(top)
&
“B” (bottom).
Pushers “A” (top) & “B” (b
CHRONOGRAPH MINUTE HAND
month.
To set month:
Push month
button until the small hand of month is set to the correct
Tosetting
set month:
month.
Push month
setting button until
theDate
small hand of month is set to the correct
6,12 Two-Eye
Chronograph
With
6,12 TWO-EYE
CHRONOGRAPH
WITH DATE
month.
6,12 TWO-EYE CHRONOGRAPH WITH DATE
Crown position “A” , “B” & “C”.
CHRONOGRAPH MINUTE HAND
Pushers
“A” (top)
“B”
(bottom).
Crown position
“A” , &“B”
& “C”.
CHRONOGRAPH MINUTE HAND
Pushers
“A” eye
(top)“1
& 6,12
“B”
(bottom).
12
o’clock
minute
up to maxinum 60
TWO-EYE
CHRONOGRAPH WITH
12
o’clock
eye
“1
minute
up to maxinum 60
minute”.
6minute”.
o’clock eye “second”.
position
6 o’clockCrown
eye “second”.
“A” , “B” & “C”.
Pushers
“A”
(top)
& 3“B”
(bottom).
This
chronograph
watch
functions:
This chronograph
watch
hashas
3 functions:
12 o’clock
eye “1 minute up to maxinum 60
TIME,
CALENDAR,
STOPWATCH.
TIME, CALENDAR,
STOPWATCH.
minute”.
CHRONOGRAPH
SECOND HAND
TIME
SECOND
TIME 6 o’clock eye “second”.
SECOND
DATE
CHRONOGRAPH MINUTE HAND
CHRONOGRAPH
SECOND HAND
To set
set the
To
thetime:
time:
1. PULL crown to “C” position.
1.
PULL crown
crown
to “C” position.watch
chronograph
2. TURNThis
either way to correct
time. has 3 functions:
2.
TURN
crown
either
way
to
correct
time.hand begins to run.
3. PUSHTIME,
crown inCALENDAR,
to “A” position, small
second
STOPWATCH.
3. PUSH crown in to “A” position, small second hand begins to run.
CHRONOGRAPH
CALENDAR
SECOND HAND
TIME
SECOND
To set the calendar:
CALENDAR
1. set
PULL
out
crown
to “B”
position.
To
set
the
time:
STOPWATCH
To
the
calendar:
2. TURN1.
crown
clockwise
to correct
date.
PULL
crown
to
“C”
position.
The stopwatch is capable of measuring:
1. PULL out crown to “B” position.
3. PUSH in crown to “A” position.
1/1
second
elapsed
2. date
TURN
crown
either
way
to
correct
time.up to maxinum of 60 minute (top eye).
2.
TURN
clockwise
to
correct
date.
NOTE:
Thecrown
changes
automatically
every
24 hours.
BEFORE
USING THE STOP WATCH, reset the stopwatch hands to the “60”
3. PUSH
crown to
“A” position.
3.in PUSH
crown
in to “A” position,
small second hand begins to run.
and “0” positions.
NOTE:
The date changes automatically every 24 hours.
STOPWATCH
5
To reset stopwatch hands:
The stopwatch
is capable of measuring:
CALENDAR
1. PULL
crown to position “C”.
1/1 second elapsed up to maxinum of 60 minute
(top eye).
set THE
theSTOP
calendar:
52. stopwatch
PRESS pusher
intermittently
until the chronograph second hand is
BEFORE To
USING
WATCH, reset the
hands“A”
to the
“60”
reset to “0”.
1. PULL out crown to “B” position.
and “0” positions.
2. TURN crown clockwiseStandard
to correct
date. measurement:
stopwatch
To reset stopwatch hands:
1. PRESS pusher “A” to start timing.
PUSH
in crown
1. PULL3.
crown
to position
“C”. to “A” position.
2.
PRESS pusher
“A”hand
to stop
2. PRESS
pusher “A”
until the automatically
chronograph
second
is timing.
NOTE:
Theintermittently
date changes
every
24
hours.
3.
PRESS
pusher
“B”
to
reset.
reset to “0”.
Accumulated elapsed time measurement:
5 “A” to start timing.
1. PRESS Pusher
2. PRESS Pusher “A” to stop timing.
3. PRESS pusher “A” to restart timing.
4. PRESS Pusher “A” to stop 2nd timing.
Accumulated elapsed time measurement:5. PRESS Pusher “B” to reset.
1. PRESS Pusher “A” to start timing.
2. PRESS Pusher “A” to stop timing.
Standard stopwatch measurement:
1. PRESS pusher “A” to start timing.
2. PRESS pusher “A” to stop timing.
3. PRESS pusher “B” to reset.
5
WOMENS
ANA-DIGIT
EL
EL
Ana-Digit
S2
EL
S1
S2
S1
S2
S1
FEATURES
ANA-DIGIT
FEATURES
Hour, Minute, Second
Month,
Date Second
Hour,
Minute,
FEATURES
Back
Light
Month,
Date(EL)
Hour, Minute,
Second
Back
Light
(EL)
Month, Date
NORMAL
Back LightTIME
(EL) MODE
NORMAL
MODE
1. PRESSTIME
S1 once
to view Month & Date
EL
2. PRESSTIME
twice
to view
view Month
Second& Date
1.
S1 once
to
NORMAL
MODE
3.
S2 twice
once,
""Time""
& ""Date""
mode will be displayed alternatively
2.
to
view Month
Second
1. PRESS S1
once to
view
& Date
displayed
twice,to
back
mode"
3. alternatively
S2 twice
once,
""Time""
&Time
""Date""
mode will be displayed alternatively
S2
S1
2.
PRESS S1
viewtoSecond
4.
PRESS
EL
to
light-up
display
splayed alternatively
S1
twice,
back
to
Time
mode"
3.
S2 once, ""Time"" & ""Date"" mode will be displayed alternatively
4. PRESS EL
light-up
S1 to
twice,
backdisplay
to Time mode"
SETTING
SEQUENCE
4. PRESS EL to light-up display
SETTING
1. PRESSSEQUENCE
S2 twice to set "Month"; Press S1 to advance
ance 1.
2.
once to
S1
toto
advance
PRESS
S2 twice
to set
set "Date";
"Month";Press
Press
S1
advance
SETTING SEQUENCE
FEATURES
nce
3. PRESS S2 twice
"Hour";
e
2.
once to
S1S1
toto
advance
1.
to set
set "Date";
"Month";Press
Press
advanceSecond
Hour,
Minute,
nce
4.
"Minute";
Press
S1
to
advance
3.
PRESS
S2
once
to
set
"Hour";
Press
S1
to
advance
2.
"Date";
Month,
Date time will be displayed
ance 3.
5. PRESS S2 once to
when
is
complete.
Normal
4.
"Minute";
Press
advance
set setting
"Hour";
Press
S1S1
toto
advance
Back Light
(EL)
(Press
S1
time when
mode
does not
flash).
mal
be displayed
e time will
5.
S2ifonce
is Press
complete.
time will be displayed
4. PRESS
to
set setting
"Minute";
S1 toNormal
advance
(Press
S1
time when
modesetting
does not
flash).
ime will 5.
be PRESS
displayed
S2ifonce
is complete.
Normal time will be displayed
NORMAL
TIME MODE
(Press S1 if time mode does not flash).
1. PRESS S1 once to view Month & Date
2. PRESS S1 twice to view Second
7
3. PRESS S2 once, ""Time"" & ""Date"" mode will be disp
7
PRESS S1 twice, back to Time mode"
7
4. PRESS EL to light-up display
SETTING SEQUENCE
6 S1
WOMENS
1. PRESS S2 twice to set "Month"; Press
to advance
2. PRESS S2 once to set "Date"; Press S1 to advance
DIGITAL
Digital
Features:
Hour, minute, seconds, month & date.
DIGITAL
Setting Sequence:
1. PRESS “B” to get to Normal Time mode.
2. Set Month: PRESS “B” to “Month”. PRESS “A” to advance.
3. Set Date: PRESS “B” to “Date”. PRESS “A” to advance.
4. Set Hour: PRESS “B” to “Hour”. PRESS “A” to advance.
(“A”=A.M., “P”=P.M., “H”=24 hour format)
5. Set Minute: PRESS “B” to “Minute”. PRESS “A” to advance.
6. When hour & minutes are set, PRESS “A”Features:
to confirm.
7. Return to Normal Time: PRESS “B”.
Hour, minute, seconds, month & date.
Setting
Sequence:
To view month & date from Normal Time mode,
PRESS
“A”.
1. PRESS “B” to get to Normal Time mode.
2. Set Month: PRESS “B” to “Month”. PRESS “A” to advan
3. Set Date: PRESS “B” to “Date”. PRESS “A” to advance.
4. Set Hour: PRESS “B” to “Hour”. PRESS “A” to advance.
(“A”=A.M., “P”=P.M., “H”=24 hour format)
5. Set Minute: PRESS “B” to “Minute”. PRESS “A” to advan
6. When hour & minutes are set, PRESS “A” to confirm.
7. Return to Normal Time: PRESS “B”.
To view month & date from Normal Time mode, PRESS “A”
8
7
WOMENS
MENS
OPERATING
OPERATING
INSTRUCTIONS
INSTRUCTIONS
Operating
Instructions
To find the instructions that apply to your watch, simply
OPERATING
TO
FIND
THE INSTRUCTIONS
match
watch
the diagrams on the following pages.
TO your
FIND
THEtoINSTRUCTIONS
THAT APPLY,
SIMPLY MATCH YOUR WATCH
INSTRUCTIONS
THAT APPLY, SIMPLY MATCH
YOUR WATCH
TO THE DIAGRAMS ON THE FOLLOWING PAGES.
TO THE DIAGRAMS ON THE FOLLOWING PAGES.
TO FIND THE INSTRUCTIONS
THAT APPLY,
SIMPLY
YOUR WATCH
SIMPLE
TIME MATCH
/ MINI SWEEP
SIMPLE
TIME
/
MINI
SWEEP
Simple Time/Mini
Sweep
TO THE DIAGRAMS ON THE FOLLOWING PAGES.
To set the time:
To set the time:
1. PULL out crown to B position.
SIMPLE TIME / MINI SWEEP
1. PULL out crown to B position.
2. TURN crown either way to correct time.
2. TURN crown either way to correct time.
3. Push in crown to A position.
ToAset
the time:
3. Push in crown to
position.
Note: Mini sweep subdial measures seconds.
1. PULL
out crown
to B position.
Note: Mini sweep subdial
measures
seconds.
2. TURN crown either way to correct time.
DATE / DAY & DATE
3. Push in crown to A position.
DATE / DAY & DATE
Date/Day & Date
Note: Mini sweep subdial measures seconds.
To set the time:
To set the time:
1. PULL out Crown to C position.
1. PULL out Crown to C position.
DATE / DAY & DATE
2. TURN Crown either way to correct time.
2. TURN Crown either way to correct time.
3. PUSH in Crown to A position.
the time:
3. PUSH in CrownTo
to set
A position.
1.
PULL
Crown to
C position.
To set
theout
calendar
/ date:
To set the calendar
/ TURN
date: Crown either way to correct time.
2.
1. PULL out Crown to B position.
1. PULL out Crown
to B position.
3.
Crown
to Afrom
position.
2. PUSH
TURN in
Crown
away
you to correct date.
2. TURN Crown away from you to correct date.
3. TURN Crown towards you to correct the day.
To set the
date:
3. TURN Crown towards
you calendar
to correct/ the
day.
4. PUSH in crown to A position.
PULL
out Crown to B position.
4. PUSH in crown1.
to A
position.
NOTE:
The
date changes
every
24 hours.
2.
TURN
Crown
away fromautomatically
you to correct
date.
NOTE: The date changes On
automatically
every
24 hours.
“Day &towards
Date”
watches,
the days
the week are in English +
3. TURN Crown
you to correct
the of
day.
On “Day & Date” watches,
the days
of English,
the weekthe
areconsecutive
in English +days will continue to
French.
Once
setposition.
in
4. set
PUSH
in crown
to A
Once
in
English,
the
consecutive
days
will
continue to
NOTE: The French.
date changes
automatically
every
24
hours.
On
“Day
&
Date”
be in English.
watches, the
of the
week
are
in
English
+
French.
Once
set
in
English,
bedays
in English.
NOTE: The date changes automatically every 24 hours.
the consecutive days will continue to be in English.
On “Day & Date” watches, the3days of the week are in English +
3 set in English, the consecutive days will continue to
French. Once
be in English.
3
9
MENS
DAY + DATE
Minuted Hand
Hour Hand
Crown
Day + Date
Day Hand
Second Hand
To set time:
1. PULL out crown to C position.
2. TURN crown either way to correct time.
3. PUSH in crown to A position.
DAY + DATE
Hour Hand
Minuted Hand
To set date:
1. PULL out crown to B position.
2. TURN crown towards you to correct date.
3. PUSH in crown to A position.
To set day:
1. PULL out crown to B position.
2. TURN crown away from you to change the day.
3. PUSH in crown to A position.
To set time:
Crown
Second Hand
Day Hand
1. PULL out crown to C position.
2. TURN crown either way to correct time.
3. PUSH in crown to A position.
To set date:
1. PULL out crown to B position.
2. TURN crown towards you to correct date.
3. PUSH in crown to A position.
4
To set day:
1. PULL out crown to B position.
10 MENS
2. TURN crown away from you to change the day.
3. PUSH in crown to A position.
Day/Date/A.M./P.M./Sun/Moon
DAY / DATE /
A.M. /P.M. / SUN / MOON
set the time:
To set theTo
time:
1. Crown
PULL out
to C position.
1. PULL out
to CCrown
position.
2. TURN
Crown clockwise
to correct
am / pm
2. TURN Crown
clockwise
to correct time.
Day /time.
am / Day
pm // moon
will/ moon will
also
change.
change.
/ am / pm / also
moon
will
3. Crown
PUSHtoinACrown
to A position.
3. PUSH in
position.
NOTE: Remember
for (sun
am ororpm
(sun or moon)
NOTE: Remember
to set timeto
forset
amtime
or pm
moon)
or moon)
set the date:
To set theTo
date:
1. Crown
PULL out
to B position.
1. PULL out
to BCrown
position.
2. TURN
Crown clockwise
to correct date.
2. TURN Crown
clockwise
to correct date.
3. crown
PUSHtoinAcrown
to A position.
3. PUSH in
position.
set the day:
To set theTo
day:
1. Crown
PULL out
to C position.
1. PULL out
to CCrown
position.
To set the time:
2. time
Advance
timeto24change
hours to
2. Advance
24 hours
thechange
day. the day.
3. Crown
PUSHtoinACrown
to A position.1. PULL out Crown to C position.
3. PUSH in
position.
2. TURN Crown clockwise to correct time. Day / am / pm /
also change.
3. PUSH in Crown to A position.
NOTE: Remember to set time for am or pm (sun or moon)
5
5
To set the date:
1. PULL out Crown to B position.
2. TURN Crown clockwise to correct date.
3. PUSH in crown to A position.
To set the day:
11 MENS
1. PULL out Crown to C position.
2. Advance time 24 hours to change the day.
DAY / DATE / 24 HOUR
Day/Date/24 Hour
DATE
DAY
A B C
A B C
A B C
DAY / DATE / 24 HOUR
DAY
DATE A B C
DATE
DATE
24-HOUR
A B C
24-HOUR
DAY
DATE
DAY
DAY
A DATE
B C
DATE
24-HOUR
24-HOUR
position
A B C
24-HOUR
A B C
24-HOUR
DAY
MONTH SETTING
BUTTON
A B C
DAY
DATE
DAY
24-HOUR
crown
position
24-HOUR
DATE
1 2 3
DAY
crown
position
24-HOUR
crown
position
A B C
A B C
DATE
24-HOUR
crown
position
A B C
DATE
A B C
SECOND
Acrown
B C
position
A DATE
B C
DAY
DATE
1 2 3
24-HOUR
24-HOUR
MONTH
DAY
MONTH SETTING
BUTTON 24-HOUR
MONTH
DAY
DAY
crown
position
crown
crown
DATE
position
position
DAY
MONTH SETTING
DAY
BUTTON DATE
A B C
DATE
A B C
1 2 3
DATE
DAY
A B C
Acrown
B C
DAY
24-HOUR
A B C
24-HOUR
DATE
DAY
C
A B crown
position
A B C
DATE
DATE
DAY
A B C
A B C
DAY
DATE
DAY
24-HOUR / DATE / 24 HOUR
DAY
DATE
DATE
crown
position
24-HOUR
DATE
To set time:
1. PULL out crown to C position.
To set day:
To set time:
2.To
TURN
either way to correct time.
set day:
1. set
PULL
out crown to C position.
1. PULL out
crown
to Ccrown
position.
To
day:
To set day:
1.
PULL
out
crown
to
C
position.
3.
PUSH
in
crown
to
A
position.
2.
Advance
24tohours
to change the day.
2.
TURN
crown
either
way
to
correct
time.
To set time: To set day:
1. PULL out time
crown
C position.
1. PULL out crown to C p
24-HOUR
MONTH
24-HOUR
24-HOUR
SECOND
DATE
DATE
SECOND
crown
position
24-HOUR
DATE
2.crown
Advance
time 24 hours to change the day. 2.
3. Advance
PUSH in crown
tohours
A position.
3. PULL
PUSH out
in crown
totoACout
position.
1.
position.
time 24
to 2.
change
the day.
1. PULL
crown to C position.
Advance
time 24 hours
3.
PUSH
in
crown
to
A
position.
NOTE:
24
hour
indicator
can
change
only
when setting
2. TURN crown
either
way
to
correct
time.
3.
PUSH
in
crown
to
A
position.
To2.setAdvance
date: time 24 hours to change the day.
3. PUSH in crown to A po
To set
date:
NOTE:to24Ahour
indicator can change only when NOTE:
setting the
time.indicator can change only when setting
3.
PUSH
inNOTE
crown
position.
24
hour
3. PUSH
in crown
to A position.
NOTE: 24 hour indicator c
the date
changes
automatically
every
24month:
hours.
To set
NOTE the date
changes
automatically
every
24 hours.
NOTE:
24
hour
indicator
can
change
only
when
setting
the
time.
1.To
PULL
crown to B position.
set month:
Push
setting button until the small hand of month
1. set
PULL
out
crown
to out
B position.
To
setmonth
month:
To
date:
To set month:
month.
Push
month
setting
button
until
the
small
hand
of
month
is
set
to the button
correctuntil the small hand of month
2.
TURN
crown
clockwise
to
correct
date.
2.
TURN
crown
clockwise
to
correct
date.
Push
month
setting
NOTE the dateTo
changes
automatically every 24 hours.
set month:
Push month setting button
month.
3. PULL
PUSH out
in3.crown
to
position.
1.
crown
toABin
position.
PUSH
crown
to A position.
Push
month
setting button
until the small hand month.
of month is set to the correct month.
2. TURN crown
clockwise to correct date.
month.
6,12 TWO-EYE CHRONOGRAPH WI
3. PUSH in crown to A position.
6,12 TWO-EYE CHRONOGRAPH WITH
DATE
6,12
TWO-EYE CHRONOGRAPH
WI
6,12 TWO-EY
Crown
position
“A” , “B” & “C”.
CHRO
4
12
MENS
6,12 TWO-EYE CHRONOGRAPH
WITH DATE
Pushers “A” (top) & “B” (bottom).
Crown position “A” , “B” & “C”.
Pushers “A” (top) & “B” (bottom).
Crown position “A” , “B”4 & “C”.
4
CHRONOGRAPH
Crown
positionMINUTE
“A” HAND
, “B” & “C”.
CHRO
position
12 o’clock
eye
“1 minute
up toCrown
maxinum
60 “A” , “B” &
Pushers
“A”
(top)
&
“B” (bottom).
Pushers “A” (top) & “B” (b
CHRONOGRAPH MINUTE HAND
2•
4•
6•8
• 10 •
12 • 14 • 16 • 1
8•2
0•
22
•
To set month:
Push month setting button until the small hand of month is s
correct month.
24
0•
DATE / 24 HOUR
Date/24 Hour
To set the time:
1. PULL out Crown to C position.
2. TURN Crown either way to correct time.
3. PUSH in Crown to A position.
DATE / 24 HOUR
2•
4•
6•8
• 10 •
12 • 14 • 16 • 1
8•2
0•
22
•
24
0•
To set the 24 hour indicator:
1. PULL out Crown to B position.
2. TURN Crown counter-clockwise to correct time.
3. PUSH in Crown to A position.
To set the date:
1. PULL out Crown to B position.
2. TURN Crown clockwise to correct date.
To set the time:
3. PUSH in Crown to A position.
1. PULL out Crown to C position.
2. TURN Crown either way to correct time.
3. PUSH in Crown to A position.
7
To set the 24 hour indicator:
1. PULL out Crown to B position.
2. TURN Crown counter-clockwise to correct time.
3. PUSH in Crown to A position.
To set the date:
1. PULL out Crown to B position.
2. TURN Crown clockwise to correct date.
13
3. PUSH in Crown to A position.
MENS
DAY / DATE / 24 HOUR
DAY / DATE / 24 HOUR
OUR
R
r
Crown
Day
Crown
Day
24 Hour
Date
24 Hour
Crown
Date
Crown
Day
Date
Date
Crown
Day
Crown
Date
24 Hour
24 Hour
Date
DAY / DATE / 24
Day/Date/24 Hour
To set the time:
Da
To
theout
time:
1. set
PULL
Crown to C position.
Crown
1.
Crown
to C position.
2. PULL
TURN out
Crown
clockwise/counter-clockwise
to correct time. Day
e to correct
time. in
2.
Crown
clockwise/counter-clockwise
to correct time.
3. TURN
PUSH
Crown
to A position.
Date
orrect time.
3. PUSH in Crown to A position.
24 Hour
To set the date:
DAY
/
DATE
/
24
HOUR
To
theout
date:
1. set
PULL
Crown to B position.
1.
Crown
to B position. to correct date.
2. PULL
TURN out
Crown
counter-clockwise
t date. 2.
Crown
counter-clockwise
3. TURN
PUSH in
Crown
to A position. to correct date.
e.
3. PUSH in Crown to A position.
To set the time:
To set the day:
1.DayPULL out Crown to C position.
To
theout
day:
1. set
PULL
Crown to C position.
2. TURN Crown clockwise/counter-clock
Crown
Crown
Day
1.
out time
Crown
C position.
2. PULL
Advance
24to
hours
to change the day.
3. PUSH in Crown to A position.
y.
2.
time 24tohours
to change the day. Date
Date
3. Advance
PUSH in Crown
A position.
3. PUSH in Crown to A position.
To
set
the
date:
24 Hour
24 Hour
Note: 24 Hour indicator changes automatically when time is adjusted.
1. PULL out Crown to B position.
ly when Note:
time is24adjusted.
Hour indicator changes automatically when time is adjusted.
2. TURN Crown counter-clockwise to co
en time is adjusted.
3. PUSH in Crown to A position.
To set the time:
To set the day:
1. PULL out Crown to C position.
1. PULL out Crown to C position.
2. TURN Crown clockwise/counter-clockwise
to correct
time.
2. Advance
time 24
hours to change the
3. PUSH in Crown to A position.
3. PUSH in Crown to A position.
To set the8date:
Note: 24 Hour indicator changes automa
8 Crown to B position.
1. PULL out
2. TURN Crown counter-clockwise to correct date.
14 MENS
3. PUSH in Crown to A position.
month.
To set month:
Push month
button until the small hand of month is set to the correct
Tosetting
set month:
month.
Push month
setting button until
theDate
small hand of month is set to the correct
6,12 Two-Eye
Chronograph
With
6,12 TWO-EYE
CHRONOGRAPH
WITH DATE
month.
6,12 TWO-EYE CHRONOGRAPH WITH DATE
Crown position “A” , “B” & “C”.
CHRONOGRAPH MINUTE HAND
Pushers
“A” (top)
“B”
(bottom).
Crown position
“A” , &“B”
& “C”.
CHRONOGRAPH MINUTE HAND
Pushers
“A” eye
(top)“1
& 6,12
“B”
(bottom).
12
o’clock
minute
up to maxinum 60
TWO-EYE
CHRONOGRAPH WITH
12
o’clock
eye
“1
minute
up to maxinum 60
minute”.
6minute”.
o’clock eye “second”.
position
6 o’clockCrown
eye “second”.
“A” , “B” & “C”.
Pushers
“A”
(top)
& 3“B”
(bottom).
This
chronograph
watch
functions:
This chronograph
watch
hashas
3 functions:
12 o’clock
eye “1 minute up to maxinum 60
TIME,
CALENDAR,
STOPWATCH.
TIME, CALENDAR,
STOPWATCH.
minute”.
CHRONOGRAPH
SECOND HAND
TIME
SECOND
TIME 6 o’clock eye “second”.
SECOND
DATE
CHRONOGRAPH MINUTE HAND
CHRONOGRAPH
SECOND HAND
To set
set the
To
thetime:
time:
1. PULL crown to “C” position.
1.
PULL crown
crown
to “C” position.watch
chronograph
2. TURNThis
either way to correct
time. has 3 functions:
2.
TURN
crown
either
way
to
correct
time.hand begins to run.
3. PUSHTIME,
crown inCALENDAR,
to “A” position, small
second
STOPWATCH.
3. PUSH crown in to “A” position, small second hand begins to run.
CHRONOGRAPH
CALENDAR
SECOND HAND
TIME
SECOND
To set the calendar:
CALENDAR
1. set
PULL
out
crown
to “B”
position.
To
set
the
time:
STOPWATCH
To
the
calendar:
2. TURN1.
crown
clockwise
to correct
date.
PULL
crown
to
“C”
position.
The stopwatch is capable of measuring:
1. PULL out crown to “B” position.
3. PUSH in crown to “A” position.
1/1
second
elapsed
2. date
TURN
crown
either
way
to
correct
time.up to maxinum of 60 minute (top eye).
2.
TURN
clockwise
to
correct
date.
NOTE:
Thecrown
changes
automatically
every
24 hours.
BEFORE
USING THE STOP WATCH, reset the stopwatch hands to the “60
3. PUSH
crown to
“A” position.
3.in PUSH
crown
in to “A” position,
small second hand begins to run.
and “0” positions.
NOTE:
The date changes automatically every 24 hours.
STOPWATCH
5
To reset stopwatch hands:
The stopwatch
is capable of measuring:
CALENDAR
1. PULL
crown to position “C”.
1/1 second elapsed up to maxinum of 60 minute
(top eye).
set THE
theSTOP
calendar:
52. stopwatch
PRESS pusher
intermittently
until the chronograph second hand is
BEFORE To
USING
WATCH, reset the
hands“A”
to the
“60”
reset to “0”.
1. PULL out crown to “B” position.
and “0” positions.
2. TURN crown clockwiseStandard
to correct
date. measurement:
stopwatch
To reset stopwatch hands:
1. PRESS pusher “A” to start timing.
PUSH
in crown
1. PULL3.
crown
to position
“C”. to “A” position.
2.
PRESS pusher
“A”hand
to stop
2. PRESS
pusher “A”
until the automatically
chronograph
second
is timing.
NOTE:
Theintermittently
date changes
every
24
hours.
3.
PRESS
pusher
“B”
to
reset.
reset to “0”.
Accumulated elapsed time measurement:
5 “A” to start timing.
1. PRESS Pusher
2. PRESS Pusher “A” to stop timing.
3. PRESS pusher “A” to restart timing.
4. PRESS Pusher “A” to stop 2nd timing.
Accumulated elapsed time measurement:5. PRESS Pusher “B” to reset.
1. PRESS Pusher “A” to start timing.
2. PRESS Pusher “A” to stop timing.
Standard stopwatch measurement:
1. PRESS pusher “A” to start timing.
2. PRESS pusher “A” to stop timing.
3. PRESS pusher “B” to reset.
15
MENS
6,9,12 THREE-EYE
6,9,12CHRONOGRAPH
Three-Eye Chronograph
WITH & WITHOUT
DATE
6,9,12 THREE-EYE
With & Without Date CHRONOGRAPH WITH & WITHOUT DATE
Crown position “A”, “B” & “C”.
Pushers “A” (top) & “B” (bottom)
Crownelapsed”
position “A”, “B” & “C”.
12 o’clock eye “1/10 seconds
Pushers
9 o’clock eye “minutes elapsed” “A” (top) & “B” (bottom)
12 o’clock eye “1/10 seconds elapsed”
6 o’clock eye “seconds elapsed”
9 o’clock eye “minutes elapsed”
6 o’clock
eye “seconds elapsed”
This chronograph watch
has 3 functions:
TIME, CALENDAR, STOPWATCH
This chronograph watch has 3 functions:
TIME, CALENDAR, STOPWATCH
TIME
To set the time:
TIME
1. PULL Crown to “C” position.
To set
the time:
2. TURN Crown either way
to correct
time.
1. PULL Crown to “C” position.
3. PUSH Crown into “A” position.
2. TURN Crown either way to correct time.
3. PUSH Crown into “A” position.
CALENDAR
To set the calendar:
CALENDAR
1. PULL out Crown to “B” position.
To set
the calendar:
2. TURN Crown clockwise
to correct
date.
1. PULL out Crown to “B” position.
3. PUSH in Crown to “A” position.
2. TURN Crown clockwise to correct date.
NOTE: The date changes automatically
every 24 hours. 3. PUSH in Crown to “A” position.
NOTE: The date changes automatically
every 24 hours.
STOPWATCH
The stopwatch is capable of measuring:
STOPWATCH
1/10 seconds elapsed up to one second (top eye).
Thehour
stopwatch
capable of measuring:
Minutes elapsed up to one
(middleiseye).
1/10
seconds
elapsed
up to one second (top eye).
Seconds elapsed up to one minute (bottom eye)
Minutes elapsed up to one hour (middle eye).
Seconds
elapsed
one minute
(bottom
eye)
BEFORE USING THE STOP
WATCH,
reset up
thetostopwatch
hands
to the
“60” and “0” positions.
BEFORE USING THE STOP WATCH, reset the stopwatch hands to the
“60” and “0” positions.
16
13
13
MENS
6,9,12 Three-Eye Chronograph 6,9,12 THREE-EYE
With & Without Date CHRONOGRAPH WITH & WITHOUT DATE
Continued....
To reset stopwatch
hands: hands:
To reset stopwatch
1. PULL Crown
to
position
“C”.
1. PULL Crown
to
position
Crown
position“C”.
“A”, “B” & “C”.
2. PRESS2.
Pusher
“A”Pusher
intermittently
until
top
eyethe
hand
reset
to is reset to
PRESS
“A”
intermittently
until
top is
eye
hand
Pushers “A”
(top)the
& “B”
(bottom)
“0”.
pand
eyeishand
resetistoreset to “0”.
12 o’clock eye “1/10 seconds elapsed”
3. PRESS3.
Pusher
“B”Pusher
intermittently
until
the middle
andmiddle
top eye
PRESS
“B” intermittently
until
the
and top eye
9 o’clock
eye
“minutes
elapsed”
hands
to “60”.
hands
is reset
to
“60”.
ddle
eye is reset
nd
topand
eyetop
6 o’clock eye “seconds elapsed”
NOTE: PRESSING
and HOLDING
either Pusher
“A”has
or “B”
will
NOTE: PRESSING
and HOLDING
either
Pusher
“A” cause
or “B” will cause
This chronograph
watch
3 functions:
the
hands
to
continue
to
move
until
the
pusher
is
released.
the hands
to CALENDAR,
continue to move
until the pusher is released.
“A” will
or “B”
will cause
rr “B”
cause
TIME,
STOPWATCH
pusher
is released.
is released.
If the stopwatch
handsTIME
move
improperly:
If the stopwatch
hands
move improperly:
1. PULL out
Crown
to
“B”
position.
1. the
PULL
out the
Crown
to
“B” position.
To set the time:
2. PRESS2.
Pushers
“A”
&
“B”
simultaneously
forposition.
3 seconds.
PRESS Pushers
“A” Crown
& “B” simultaneously
for 3 seconds.
1. PULL
to “C”
3. RELEASE
hands
will
move
180
degrees.
oronds.
3 seconds.
3. Pushers,
RELEASEstopwatch
Pushers,
stopwatch
hands
will
move
degrees.
2. TURN Crown either way to correct180
time.
4.
PUSH
Crown
in
to
“A”
position.
180 degrees. 4. PUSH Crown
0ove
degrees.
to “A”
position.
3. in
PUSH
Crown
into “A” position.
Standard stopwatch
measurement:
Standard stopwatch
measurement:
CALENDAR
1. PRESS1.
Pusher
“A”
to start“A”
timing.
PRESS Pusher
to calendar:
start timing.
To set the
2. PRESS2.
Pusher
“A”Pusher
to1.stop
timing.
PRESS
“A”
to
stop
timing.
PULL out
Crown
to “B” position.
3. PRESS3.
Pusher
“B”
to
reset.
PRESS Pusher
“B”
to
reset.
2. TURN Crown clockwise to correct date.
3. PUSH in Crown to “A” position.
Timing 2 competitors:
Timing 2 competitors:
NOTE: The date changes automatically
1. PRESS1.
Pusher
“A”Pusher
to start“A”
timing.
PRESS
to start
every
24 timing.
hours.
2. PRESS2.
Pusher
“B”
to
stop
timing.
PRESS Pusher “B” to stop timing.
3. PRESS3.
Pusher
“A”Pusher
toSTOPWATCH
stop“A”
timing
of second
event.
PRESS
to stop
timing of
second event.
Pusher
“B”
to
view
time
of
second
event.
event. 4. PRESS4.
PRESS Pusher
“B” to viewistime
of second
event.
The stopwatch
capable
of measuring:
Pusher
“B”Pusher
to1/10
reset.
vent. 5. PRESS5.
PRESS
“B”
to reset.
seconds
elapsed up to one second (top eye).
Minutes elapsed up to one hour (middle eye).
Split time:Split time: Seconds elapsed up to one minute (bottom eye)
1. PRESS1.
Pusher
“A”Pusher
to start“A”
timing.
PRESS
to start timing.
BEFORE
USING
THE STOP WATCH, reset the stopwatch hands to the
2. PRESS2.
Pusher
“B”Pusher
to stop“B”
split.
PRESS
to
stop split.
“60”
and
“0”
positions.
3. PRESS3.
Pusher
“B”Pusher
to begin
PRESS
“B”again.
to begin again.
4. PRESS4.
Pusher
“A”Pusher
to stop.“A” to stop.
PRESS
17 MENS
5. PRESS5.
Pusher
“B”
to
reset.
PRESS Pusher “B” to reset.
13
6, 9, 12 THREE EYE
6,9,12 Three-Eye 1/20
1/20 SECOND CHRONOGRAPH WITH DATE
Second Chronograph With Date
1/20 SECONDS
Crown position “A”, “B” & “C”.
Pushers “A” (top) & “B”
(bottom).
6 o’clock eye “hour & minutes
elapsed”.
9 o’clock eye “second”.
12 o’clock eye “1/20 seconds
elapsed”.
STOPWATCH SECOND
PUSHER A
crown
position
SECOND
A B C
6, 9, 12 THREE
EYE
PUSHER B
1/20 SECOND CHRONOGRAPH WITH DATE
STOPWATCH
HOUR
This chronograph watch has 3
functions:
Crown position “A”, “B” & “C”.
TIME, STOPWATCH, CALENDA.
Pushers “A” (top) & “B”
(bottom).
TIME
6 o’clock eye “hour & minutes
To set the time:
elapsed”.
1. PULL Crown to “C” position.
9 o’clock eye “second”.
2. TURN Crown either way
correct
time.
12 to
o’clock
eye
“1/20 seconds
3. PUSH Crown in to “A”elapsed”.
position.
STOPWATCH
MINUTE
1/20 SECONDS
STOPWATCH SECOND
PUSHER A
crown
position
SECOND
A B C
PUSHER B
STOPWATCH
HOUR
STOPWATCH
MINUTE
This chronograph watch has 3
CALENDAR
functions:
To set the calendar:
STOPWATCH, CALENDA.
1. PULL out Crown to “B”TIME,
position.
2. TURN Crown clockwise to correct date.
3. PUSH in Crown to “A”TIME
position.
To
set the time:
NOTE: The date changes automatically
every 24 hours.
1.
PULL Crown
to “C”
Do not set the date between
9:00 PM
andposition.
1:00 AM.
2. TURN Crown either way to correct time.
3. PUSH Crown in to “A” position.
STOPWATCH
The stopwatch is capable of measuring:
CALENDAR
Hour & Minutes elapsed up
to 12 hours (bottom eye).
the calendar:
1/20 Seconds elapsed upTo
toset
12 hours
(top eye).
1. hours.
PULL out Crown to “B” position.
Seconds elapsed up to 12
2. TURN Crown clockwise to correct date.
3. PUSH15
in Crown to “A” position.
NOTE: The date changes automatically every 24 hours.
18
MENS
6,9,12 Three-Eye 1/20
Second Chronograph With Date
Continued....
BEFORE USING THE STOP WATCH, reset the stopwatch hands to the
“60” and “12 o’clock” positions.
To reset stopwatch hands:
1. PULL Crown to position “C”.
6, 9, 12hour,
THREE
2. PRESS Pusher “A” for 2 seconds until the stopwatch
minuteEYE
and second hand is reset to1/20
“0”. SECOND CHRONOGRAPH WITH
Standard stopwatch measurement:
1. PRESS Pusher “A” to start timing.
2. PRESS Pusher “A” to stop
timing.
Crown
position “A”, “B” & “C”.
3. PRESS Pusher “B” to reset.
Pushers “A” (top) & “B”
(bottom).
6 o’clock eye “hour & minutes
Split time:
elapsed”.
1. PRESS Pusher “A” to start
timing.
9 o’clock
2. PRESS Pusher “B” to stop
split.eye “second”.
12 o’clock
eye “1/20 seconds
3. PRESS Pusher “B” to begin
again.
elapsed”.
4. PRESS Pusher “A” to stop.
5. PRESS Pusher “B” to reset.
This chronograph watch has 3
functions:
Accumulated elapsed time measurement:
TIME,timing.
STOPWATCH, CALENDA.
1. PRESS Pusher “A” to start
DATE
1/20 SECONDS
STOPWATCH SECOND
PUSHER A
crown
position
SECOND
A B C
PUSHER B
STOPWATCH
HOUR
STOPWATCH
MINUTE
2.
3.
4.
5.
PRESS Pusher “A” to stop timing.
TIME
PRESS Pusher “A” to restart timing.
To set the time:
PRESS Pusher “A” to stop 2nd timing.
1. PULL Crown to “C” position.
PRESS Pusher “B” to reset.
2. TURN Crown either way to correct time.
3. PUSH Crown in to “A” position.
Timing 2 competitors:
1. PRESS pusher “A” to start timing.
CALENDAR
2. PRESS pusher “B” to stop timing of first event. Stopwatch
To set the calendar:
continues to run internally.
1. PULL out Crown to “B” position.
3. PRESS pusher “A” to stop timing of second event.
2. TURN Crown clockwise to correct date.
4. PRESS pusher “B” to view time of second event.
3. PUSH in Crown to “A” position.
5. PRESS pusher “B” to reset.
NOTE: The date changes automatically every 24 hours.
19
MENS
Date Indicator
2, 6, 10 Three-Eye Chronograph
With Or Without Date Window
NOTE:
NOTE:
NOTE:
NOTE:
NOTE:
2,6,10 THREE-EYE CHR
WITH OR WITHOUT DA
Crown position “1”, “2” & “3”
Pushers “A” (top) & “B” (bottom)
Left eye “minute totalizer”
Right eye “small second”
Centre eye “date indicator”
This chronograph watch has 3 functions:
TIME, CALENDAR, STOPWATCH
Small Second
Pusher “A”
Minute
TIME
Pusher “B”
To set the time:
1. PULL Crown to position “3” .
2,6,10 THREE-EYE CHRONOGRAPH
Date Indicator
2. TURN Crown either way to correct time. WITH OR WITHOUT DATE
WINDOW
3. PUSH Crown to position “1” .
CALENDAR
CALENDAR
CALENDAR
To set
set the
the calendar:
calendar:
To
CALENDAR
To
set
the
calendar:
1.
PULL
Crown
to position
position “2”
“2” ..
1.
PULL
to
To set
the Crown
calendar:
Small Second
1.
PULL
Crown
to
position
“2”
.
NOTE: Crown position “1”, “2” & “3”
2.
TURN
Crown
clockwise
to
correct
the date.
date.
2.
TURNCrown
Crown
clockwise
1. PULL
to position
“2” .to correct
17 the
NOTE: Pushers “A” (top) & “B” (bottom)
2.
TURN
Crown
clockwise
to
correct
the
date.
3. TURN
PUSHCrown
in Crown
Crown
to position
position
“1”the
2.
clockwise
to correct
3.
PUSH
in
to
“1”
.. date.
NOTE: Left eye “minute totalizer”
Pusher
“A”
3.
PUSHininCrown
Crown
to position
3. PUSH
to position
“1” .“1” .
NOTE: Right eye “small second”
Minute
STOPWATCH
NOTE: Centre eye “date indicator”
STOPWATCH
STOPWATCH
STOPWATCH
The
stopwatch
is
capable
of
measuring:
The
stopwatch
is
capable
of measuring:
The
stopwatch
is is
capable
of 30
measuring:
The
stopwatch
capable
ofminutes
measuring:
1. Minutes
Minutes
elapsed
up to
to
minutes
(left eye).
eye).
Pusher “B” This chronograph watch has 3 functions
1.
elapsed
up
30
(left
1.
Minutes
elapsed
up
to
30
minutes
(left
eye).
TIME, CALENDAR, STOPWATCH
1.
elapsed
up1/5
to 30
minutes (left eye).
2. Minutes
Chronograph
hand
second
2.
Chronograph
hand
second
2. Chronograph
hand
1/51/5
second
2. Chronograph hand 1/5 second
Date Indicator
TIME
BEFORE
USING
THE
STOPWATCH,
reset
the
stopwatch
hands
toTo
the
BEFORE USING
THE
STOPWATCH,
reset reset
the stopwatch
hands tohands
the to
BEFORE
USING
THE
STOPWATCH,
the stopwatch
the
set the time:
BEFORE
USING
THE
STOPWATCH,
reset
the
stopwatch
hands
to
the
“60”
position
by
mean
of
pusher
“B”.
If
stopwatch
Hands
move
“60” position
mean
of pusher
“B”. If
stopwatch
Hands Hands
move move 1. PULL Crown to position “3” .
“60”
positionbyby
mean
of pusher
“B”.
If stopwatch
“60”
position
bythe
mean
ofas
pusher
“B”. If stopwatch Hands move 2. TURN Crown either way to correct time.
improperly,
reset
the
hands
as follow:
follow:
improperly,
reset
hands
follow:
improperly,
reset
the
hands
as
improperly, reset the hands as follow:
3. PUSH Crown to position “1” .
NOTE: Crown position “1”, “2” & “3”
To
reset
stopwatch
hands:
To
reset
stopwatch
hands:
To
reset stopwatch
NOTE: Pushers “A” (top) & “B” (bottom)
1.
Pusher
“A”“A”
&hands:
“B”.
To
reset
stopwatch
hands:
1. PRESS
PRESS
Pusher
& “B”.
“B”.
NOTE: Left eye “minute totalizer”
1.
PRESS
Pusher
“A”
&
2. PRESS
Pusher
“B”“A”
intermittently
until the
left eye hand is reset to
1.
PRESS
Pusher
&
“B”.
NOTE:the
Right
“small
second”
2.
“B”
intermittently
until
lefteye
eye
hand
is reset
reset to
to
2. “0”.
PRESS Pusher “B” intermittently until
the
left
eye
hand
is
NOTE:
Centre
eye
“date
indicator”
17
2.
PRESS
Pusher
“B”
intermittently
until
the
left
eye
hand
is
reset
to
“0”.
“0”. Pusher “A” intermittently until the chronograph hand reset
3. PRESS
“0”.
3.
PRESS
Pusher
“A”
intermittently
until
the
chronograph
hand
reset
“60”. Pusher “A” intermittently until
This chronograph
watch hand
has 3 functions:
3. to
PRESS
the chronograph
reset
3.
PRESS
Pusher
“A”
intermittently
until
the
chronograph
hand
reset
to
“60”.
4. PRESS
Pusher
“A”
&
“B”.
20 MENS
TIME,
CALENDAR,
STOPWATCH
to “60”.
to
“60”.
4.
PRESS
Pusher
“A”
&
“B”.
4. PRESS Pusher “A” & “B”.
TIME “A” or “B” will cause
NOTE:
PRESSING
and“A”
HOLDING
4.
PRESS
Pusher
& “B”. either Pusher
improperly, reset the hands as follow:
To reset
stopwatch
hands:
To reset
stopwatch
hands:
1.
PRESS
Pusher
“A”
& “B”.
1.
PRESS
Pusher
“A”
&
“B”.
To reset stopwatch hands:
2.
PRESS
Pusher
“B”
intermittently
hand
is reset
2.
PRESS
Pusher
“B”
intermittently
untiluntil
the the
left left
eyeeye
hand
is reset
to to
1. PRESS Pusher “A” & “B”.
handis
is
reset
to
eyehand
reset
to
“0”.Three-Eye
“0”.10
2,
Chronograph
2. 6,
PRESS
Pusher “B” intermittently
until the left eye hand is reset to
3.
PRESS
Pusher
“A”
intermittently
chronograph
hand
reset
3.
PRESS
Pusher
“A”
intermittently
untiluntil
the the
chronograph
hand
reset
“0”.Or Without Date
With
Window
nograph
hand
reset
graph hand
reset
to
“60”.
to
“60”.
3. PRESS Pusher “A” intermittently until the chronograph hand reset
Continued....
PRESS
Pusher
& “B”.
4. 4.
PRESS
Pusher
“A”“A”
& “B”.
to “60”.
4. PRESS Pusher “A” & “B”.
NOTE:
PRESSING
HOLDING
either
Pusher
or “B”
cause
NOTE:
PRESSING
andand
HOLDING
either
Pusher
“A”“A”
or “B”
will will
cause
“B”will
willcause
cause
”A”oror“B”
the
hands
to
continue
to
move
until
the
pusher
is
released.
the
hands
to
continue
to
move
until
the
pusher
is
released.
NOTE:
PRESSING and HOLDING either Pusher “A” or “B” will cause
sheris isreleased.
released.
her
the hands to continue to move until the pusher is released.
Standard
stopwatch
measurement:
Standard
stopwatch
measurement:
1.
PRESS
Pusher
“A”
to start
timing.
1.
PRESS
Pusher
“A”
to
start
timing.
Standard stopwatch measurement:
2.
PRESS
Pusher
“A”
to
stop
timing.
2.
PRESS
Pusher
“A”
to
stop
timing.
1. PRESS Pusher “A” to start timing.
Minute
PRESS
Pusher
to reset.
3.
PRESS
Pusher
“B”
to
2. 3.
PRESS
Pusher
“A”“B”
to reset.
stop
timing.
2,6,10 THREE-EYE CHR
WITH OR WITHOUT DA
Small Second
Pusher “A”
3. PRESS Pusher “B” to reset.
Pusher “B”
Accumulated
elapsed
time
measurement:
Accumulated
elapsed
time
measurement:
1.
PRESS
Pusher
to start
timing.
1.
PRESS
Pusher
“A”“A”
totime
start
timing.
2,6,10 THREE-EYE CHRONOGRAPH
Accumulated
elapsed
measurement:
Date Indicator
PRESS
Pusher
to stop
timing.
2.
PRESS
Pusher
“A”
to
timing.
WITH OR WITHOUT DATE WINDOW
1. 2.
PRESS
Pusher
“A”“A”
to stop
start
timing.
PRESS
Pusher
to restart
timing.
3.
PRESS
Pusher
“A”
to
timing.
2. 3.
PRESS
Pusher
“A”“A”
to restart
stop
timing.
PRESS
Pusher
to stop
2nd
timing.
4.
PRESS
Pusher
“A”
to
2nd
timing.
3. 4.
PRESS
Pusher
“A”“A”
to stop
restart
timing.
5.
PRESS
Pusher
“B”
to
reset.
5.
PRESS
Pusher
“B”
to
reset.
4. PRESS Pusher “A” to stop 2nd timing.
Small Second
5. PRESS Pusher “B” to reset.
NOTE: Crown position “1”, “2” & “3”
18 18
18
Split time measurement:
Minute
1. PRESS Pusher “A” to start timing.
2. PRESS Pusher “B” to split.
3. PRESS Pusher “B” to begin again.
4. PRESS Pusher “A” to stop.
5. PRESS Pusher “B” to reset.
NOTE: Pushers “A” (top) & “B” (bottom)
Pusher “A” NOTE: Left eye “minute totalizer”
NOTE: Right eye “small second”
NOTE: Centre eye “date indicator”
Pusher “B” This chronograph watch has 3 functions
TIME, CALENDAR, STOPWATCH
Date Indicator
TIME
To set the time:
1. PULL Crown to position “3” .
2. TURN Crown either way to correct time.
3. PUSH Crown to position “1” .
Timing 2 competitors:
1. PRESS Pusher “A” to start timing of first event.
2. PRESS Pusher “B” to stop timingNOTE:
of firstCrown
event.
Stopwatch
position
“1”, “2” & “3”
continues to run internally.
NOTE: Pushers “A” (top) & “B” (bottom)
Left eye
“minute totalizer”
3. PRESS Pusher “A” to stop timingNOTE:
of second
event.
NOTE: Right eye “small second”
4. PRESS Pusher “B” to view time ofNOTE:
second
event.
Centre
eye “date indicator”
5. PRESS Pusher “B” to reset.
This chronograph watch has 3 functions:
TIME, CALENDAR, STOPWATCH
TIME
17
21
MENS
3, 6, 9, 12 Four-Eye Chronograph
24-HOUR
STOPWATCH MINUTE
STOPWATCH SECOND
NOTE:
NOTE:
NOTE:
NOTE:
NOTE:
NOTE:
Crown position “A” & “B”
Pushers “A” (top) & “B” (bottom)
12 o’clock eye “1/10” or seconds elapsed”
9 o’clock eye “minutes elapsed”
6 o’clock eye “seconds elapsed”
3 o’clock eye “24-hour”
3,6,9,12 FOUR-EYE CHRONOGRAPH
This chronograph watch has 2 functions:
TIME, STOPWATCH.
TIME
To set the time:
1. PULL Crown to “B” position.
2. TURN Crown either way to correct time.
3. PUSH Crown in to “A” position.
STOPWATCH MINUTE
STOPWATCH SECOND
NOTE:
STOPWATCH
NOTE:
The stopwatch is capable of measuring:
NOTE:
1/10 seconds elapsed up to 60 minutes (top eye).
NOTE:
Minutes elapsed up to one hour (middle eye). NOTE:
Seconds elapsed up to one minute (bottom eye)NOTE:
20
24-HOUR
Crown position “A” & “B”
Pushers “A” (top) & “B” (bottom)
12 o’clock eye “1/10” or seconds elapsed”
9 o’clock eye “minutes elapsed”
6 o’clock eye “seconds elapsed”
3 o’clock eye “24-hour”
This chronograph watch has 2 functions:
TIME, STOPWATCH.
TIME
To set the time:
1. PULL Crown to “B” position.
2. TURN Crown either way to correct time.
3. PUSH Crown in to “A” position.
22
STOPWATCH
The stopwatch is capable of measuring:
MENS
3, 6, 9, 12 Four-Eye Chronograph
Continued....
BEFORE
USING
THE
STOPWATCH,
reset
the
stopwatch
hands
tothe
the
BEFORE
USING
THE
STOPWATCH,
reset
the
stopwatch
hands
to
the
BEFORE
USING
THE
STOPWATCH,
reset
the
stopwatch
hands
totothe
BEFORE USING
USING
THE
STOPWATCH,
reset the
the stopwatch
stopwatch
hands
to the
the
BEFORE
USING
THE
STOPWATCH,
reset
the
stopwatch
hands
BEFORE
THE
STOPWATCH,
reset
hands
to
“60”
and
“0”
positions.
pwatch
hands
to
the
“60”
and
“0”
positions.
opwatch
hands
“60”
“0”
positions.
“60”
and to
“0”
positions.
BEFORE
USING
THE
STOPWATCH,
“60”
and
“0”
positions. reset the stopwatch hands to the
stopwatch
hands
tothe
theand
“60”
and
“0”
positions.
“60” and
“0” THE
positions.
BEFORE
USING
STOPWATCH, reset the stopwatch hands to the
To
reset
stopwatch
hands:
To
reset
stopwatch
hands:
ToTo
reset
stopwatch
hands:
To reset
reset
stopwatch
hands:
“60”
and “0”stopwatch
positions.
reset
stopwatch
hands:
To
hands:
1.
PULL
Crown
to
position
“B”.
1.
PULL
Crown
to
position
“B”.
1.1. PULL
Crown
to
1.ToPULL
PULL
Crown
to position
position
“B”.
reset Crown
stopwatch
hands:
PULL
Crown
toposition
position“B”.
“B”.
1.
to
“B”.
To
reset
stopwatch
hands:
2.
PRESS
Pusher
“A”
intermittently
until
the
top
eye
hand
isreset
reset
2.1. PRESS
PRESS
Pusher
“A”
intermittently
until the
the top
top
eye
hand
iseye
reset
to isisreset
2.
Pusher
“A”
until
the
top
hand
tototo
PULL
Crown
to“A”
position
“B”.
2.
Pusher
“A”
intermittently
until
eye
hand
is
reset
to
2.toPRESS
PRESS
Pusher
“A”intermittently
intermittently
until
the
top
eye
hand
2.
PRESS
Pusher
intermittently
until
the
top
eye
hand
is
reset
to
1.
PULL
Crown
position
“B”.
“0”.“A” intermittently until the top eye hand 3,6,9,12
ye
hand
is “0”.
reset
to to
eye
hand
is
“0”.
PRESS
Pusher
is reset toFOUR-EYE CHRONOGRAPH
“0”.
op
eye
hand
isreset
reset
to“0”.
“0”.
2.2.PRESS
Pusher
“A”
intermittently until the top eye hand is reset to
3.
PRESS
Pusher
“B”
intermittently
until
the
minute
and
second
eye
3.
PRESS
Pusher
“B”
intermittently
until
the
minute
and
second
eye
“0”.
3.
PRESS
Pusher
“B”
intermittently
until
the
minute
second
eye
3.
PRESS
Pusher
“B”
intermittently
until
the
minute
and
second
eye
“0”.
3. PRESS
Pusher “B” intermittently
untiland
the second
minuteand
and
second
eye
3. PRESS Pusher
“B” intermittently
until the minute
eye
hands
reset
to
“60”.
te
and
second
eye
hands
reset
to intermittently
“60”.
3.3.
PRESS
Pusher
“B”
until
the minute
nute and
second
eye
hands
reset
toto
“60”.
hands
reset
to
“60”.
PRESS
Pusher
“B”
intermittently
until and
the second
minuteeye
and second eye
hands
reset
“60”.
minute
and
second
eye
hands
reset
to
“60”.
hands reset to “60”.
hands reset to “60”.
NOTE:
PRESSING
and
HOLDING
either
Pusher
“A”
or“B”
“B”
will
cause
NOTE:
PRESSING
and
HOLDING
either
Pusher
“A”
or
“B”
will
cause
NOTE:
and
HOLDING
either
Pusher
“A”
oror“B”
will
cause
NOTE:PRESSING
PRESSING
and
HOLDING
either
Pusher
“A”
or
“B” will
will
cause
NOTE:
PRESSING
and
HOLDING
either
Pusher
“A”
will
cause
NOTE:
andPRESSING
HOLDING
either
Pusher
“A”Pusher
or “B”
will
cause
NOTE:
PRESSING
and
HOLDING
either
“A”
or
“B”
cause
the
hands
to
continue
to
move
until
the
pusher
is
released.
A”
or
“B”
will
cause
the
hands
tothe
continue
to
move
until
the
pusher
isthe
released.
cause
the
hands
toto
continue
toPusher
until
the
pusher
isisreleased.
the
hands
to continue
toHOLDING
move
until
the
pusher
ismove
released.
the
hands
to
continue
to
move
until
the
pusher
is
released.
NOTE:
PRESSING
and
either
“A”
or
“B”
will cause
hands
to
continue
tomove
until
pusher
released.
er“A”
“A”oror“B”
“B”will
will
cause
the
hands
to
continue
move
until
the
pusher
is
released.
sher
is
released.
pusher
is
released.
the hands to continue to move until the pusher is released.
e pusher is released.
Standard
stopwatch
measurement:
Standard
stopwatch
measurement:
Standard
stopwatch
measurement:
Standard
stopwatch
measurement:
Standard
stopwatch
measurement:
Standard
stopwatch
measurement:
Standard
stopwatch
measurement:
1.
PRESS
Pusher
“A”PRESS
to“A”
start
timing.
1.
Pusher
“A”
tostart
start
timing.
1.
PRESS
Pusher
to
start
timing.
1.
Pusher
timing.
1.Standard
PRESS
Pusher
“A”
to
start“A”
timing.
stopwatch
measurement:
1. PRESS
PRESS
Pusher
“A”totostart
timing.
1.
PRESS
Pusher
to
start
timing.
2.
PRESS
Pusher
“A”
to“A”
stop
timing.
2.
PRESS
Pusher
“A”
to
stop
timing.
2.
PRESS
Pusher
“A”
to
stop
timing.
2.
Pusher
totostop
2.1.PRESS
PRESS
Pusher
“A”
to
stop
timing.
PRESS
Pusher
“A”
tostop
start“A”
timing.
3.
Pusher
“B”
to“A”
reset.
2. PRESS
PRESS
Pusher
“A”
stoptiming.
timing.
2.
PRESS
Pusher
to
timing.
3.
PRESS
Pusher
“B”
to
reset.
3.
PRESS
Pusher
“B”
to
reset.
3.
PRESS
Pusher
“B”
to
reset.
2.
PRESS
Pusher
“A”
to
stop
timing.
3.
PRESS
Pusher
“B”
to
reset.
3.
PRESS
Pusher
“B”
to
reset.
3.
PRESS Pusher “B” to reset.
24-HOUR
STOPWATCH MINUTE
Accumulated elapsed time measurement:
3.
PRESS
Pusher
“B”
to
reset.
1. PRESS Pusher
“A” to start timing.
STOPWATCH SECOND
Accumulated
elapsed
time
measurement:
Accumulated
elapsed
time
measurement:
Accumulated
elapsed
time
measurement:
Accumulated
elapsed
time
measurement:
Accumulated
elapsed
time
measurement:
2.
PRESS Pusher
“A” to stop time
timing.
Accumulated
elapsed
measurement:
PRESS
Pusher
“A”
tostart
start
timing.
1.
PRESS
Pusher
“A”
to
start
timing.
1.
Pusher
“A”
totostart
timing.
1.Accumulated
PRESS
Pusher
“A”
to
start
timing.
3.
PRESS
Pusher
“A”
to“A”
restart
timing.
elapsed
time
measurement:
1.1.PRESS
PRESS
Pusher
“A”
timing.
1.
PRESS
Pusher
to
start
timing.
NOTE: Crown position “A” & “B”
2.
PRESS
Pusher
“A”
to
stop
timing.
2.
PRESS
Pusher
to
stop
timing.
4.
Pusher
“A”
to“A”
stop
2nd
timing.
2.
Pusher
“A”
totostop
PRESS
Pusher
“A”
to
start
timing.
2.1.PRESS
PRESS
Pusher
“A”
to
stop
timing.
2. PRESS
PRESS
Pusher
“A”
stoptiming.
timing. NOTE: Pushers “A” (top) & “B” (bottom)
2.
PRESS
Pusher
“A”
to
stop
timing.
5.
Pusher
“B”PRESS
to“A”
reset.
“A”
torestart
restart
timing.
3.
PRESS
Pusher
to
restart
timing.
3.
Pusher
totorestart
timing.
PRESS
Pusher
“A”
toPusher
stop“A”
timing.
3.2.PRESS
PRESS
Pusher
“A”
to
restart
timing.
3.3.PRESS
PRESS
Pusher
“A”
timing.
3.
PRESS
Pusher
“A”
to
restart
timing.
NOTE: 12 o’clock eye “1/10” or seconds elapsed”
PRESS
“A”
tostop
stop
2nd
timing.
4.
PRESS
Pusher
“A”
to
stop
2nd
timing.
4.
“A”
totiming.
2nd
timing.
4.3. PRESS
PRESS
Pusher
“A”
to
stop
2nd
timing.
PRESS
Pusher
“A”Pusher
toPusher
restart
timing.
NOTE: 9 o’clock eye “minutes elapsed”
4.4.PRESS
PRESS
Pusher
“A”
tostop
2nd
timing.
Split
time measurement:
4.
Pusher
“A”
to
stop
2nd
5.
PRESS
Pusher
“B”
to
reset.
5.
PRESS
Pusher
“B”
to
reset.
NOTE: 6 o’clock eye “seconds elapsed”
1.
PRESS
Pusher
“A”
to
start
timing.
5.
PRESS
Pusher
“B”
to
reset.
4.
PRESS
Pusher
“A”
to
stop
2nd
timing.
5.
PRESS
Pusher
“B”
to
reset.
5. PRESS
5. PRESS Pusher
“B” toPusher
reset. “B” to reset.
NOTE: 3 o’clock eye “24-hour”
2.5.PRESS
Pusher
“B”
to
stop
split.
PRESS Pusher “B” to reset.
3.
PRESS
Pusher
“B” totime
beginmeasurement:
again.
Split
Split
time
measurement:
Split
time
measurement:
Split
time
measurement:
Split
time
measurement:
Split
time
measurement:
4.
PRESS
Pusher
“A”PRESS
to“A”
stop.
1.PRESS
Pusher
“A”
tostart
start
timing.This chronograph watch has 2 functions:
1.
PRESS
Pusher
to
start
timing.
1.
Pusher
totostart
timing.
1.
PRESS
Pusher
“A”
to
start“A”
timing.
Split
time
measurement:
1.
PRESS
“A”
timing.
1.
PRESS
Pusher
toPusher
start
timing.
5. PRESS
Pusher
“B” to“A”
reset.
PRESS
“B”
tostop
stop
split. TIME, STOPWATCH.
2.
PRESS
Pusher
“B”
to
stop
split.
totostop
split.
PRESS2.
Pusher
“A”Pusher
toPusher
start“B”
timing.
2.1. PRESS
PRESS
Pusher
“B”
to
stop
split.
2.2.PRESS
PRESS
Pusher
“B”
split.
2.
Pusher
“B”
to
stop
split.
PRESS
“B”
tobegin
begin
again.
3.
PRESS
Pusher
“B”
to
begin
again.
totobegin
again.
3.2. PRESS
PRESS
Pusher
“B”
to
begin
again.
TIME
PRESS3.
Pusher
“B”Pusher
toPusher
stop“B”
split.
3.3.PRESS
PRESS
Pusher
“B”
again.
3.
Pusher
“B”
to
begin
again.
4.
PRESS
Pusher
“A”
to
stop.
4.
PRESS
Pusher
“A”
to
stop.
To set the time:
“A”
totostop.
PRESS4.
Pusher
“B”Pusher
tostop.
begin
again.
4.3. PRESS
PRESS
Pusher
“A”
to
stop.
4. PRESS
PRESS
Pusher
“A”
stop.
4.
Pusher
“A”
to
5.
PRESS
Pusher
“B”
to
reset.
1. PULL Crown to “B” position.
5.
PRESS
Pusher
“B”
to
reset.
“B”
PRESS5.
Pusher
“A”Pusher
toreset.
stop.
5.4. PRESS
PRESS
Pusher
“B”
to
reset.
5. PRESS
PRESS
Pusher
“B”totoreset.
reset.
5.
Pusher
“B”
to
2. TURN Crown either way to correct time.
5. PRESS Pusher “B” to reset.
3. PUSH Crown in to “A” position.
21
23
STOPWATCH
The stopwatch is capable of measuring:
MENS
ANA-DIGIT
EL
EL
Ana-Digit
S2
EL
S1
S2
S1
S2
S1
FEATURES
ANA-DIGIT
FEATURES
Hour, Minute, Second
Month,
Date Second
Hour,
Minute,
FEATURES
Back
Light
Month,Minute,
Date(EL)
Hour,
Second
Back
Light
(EL)
Month, Date
NORMAL
Back LightTIME
(EL) MODE
NORMAL
MODE
1. PRESSTIME
S1 once
to view Month & Date
EL
2. PRESSTIME
twice
to view
view Month
Second& Date
1.
S1 once
to
NORMAL
MODE
3.
S2 twice
once,
""Time""
& ""Date""
mode will be displayed alternatively
2.
to
view Month
Second
1. PRESS S1
once to
view
& Date
displayed
twice,to
back
mode"
3. alternatively
S2 twice
once,
""Time""
&Time
""Date""
mode will be displayed alternatively
S2
S1
2.
PRESS S1
viewtoSecond
4.
PRESS
EL
to
light-up
display
splayed alternatively
S1
twice,
back
to
Time
mode"
3.
S2 once, ""Time"" & ""Date"" mode will be displayed alternatively
4. PRESS EL
light-up
S1 to
twice,
backdisplay
to Time mode"
SETTING
SEQUENCE
4. PRESS EL to light-up display
SETTING
1. PRESSSEQUENCE
S2 twice to set "Month"; Press S1 to advance
ance 1.
2.
once to
S1
toto
advance
PRESS
S2 twice
to set
set "Date";
"Month";Press
Press
S1
advance
SETTING SEQUENCE
FEATURES
nce
3. PRESS S2 twice
"Hour";
e
2.
once to
S1S1
toto
advance
1.
to set
set "Date";
"Month";Press
Press
advanceSecond
Hour,
Minute,
nce
4.
"Minute";
Press
S1
to
advance
3.
PRESS
S2
once
to
set
"Hour";
Press
S1
to
advance
2.
"Date";
Month,
Date time will be displayed
ance 3.
5. PRESS S2 once to
when
is
complete.
Normal
4.
"Minute";
Press
advance
set setting
"Hour";
Press
S1S1
toto
advance
Back Light
(EL)
(Press
S1
time when
mode
does not
flash).
mal
be displayed
e time will
5.
S2ifonce
is Press
complete.
time will be displayed
4. PRESS
to
set setting
"Minute";
S1 toNormal
advance
(Press
S1
time when
modesetting
does not
flash).
ime will 5.
be PRESS
displayed
S2ifonce
is complete.
Normal time will be displayed
NORMAL TIME MODE
(Press S1 if time mode does not flash).
1. PRESS S1 once to view Month & Date
2. PRESS S1 twice to view Second
7
3. PRESS S2 once, ""Time"" & ""Date"" mode will be disp
7
PRESS S1 twice, back to Time mode"
7
4. PRESS EL to light-up display
SETTING SEQUENCE
1. PRESS S2 twice to set "Month"; Press24S1 MENS
to advance
2. PRESS S2 once to set "Date"; Press S1 to advance
DIGITAL WITH ALARM / DUAL TIME /
CHRONOGRAPH
DIGITAL WITH ALARM
/ DUAL TIME /
CHRONOGRAPH
Digital With Alarm/Dual Time/Chronograph
EL
CHANGE
MODE
CHANGE
MODE
S3
EL
S1
S3
S2
S1
DUAL
TIME
S2
SETTING
DUAL
TIME
SETTING
FEATURES
FEATURES Hour, Minute, Second
Date, Month
Hour, Minute,Day,
Second
Dual
Day, Date, Month Time, Alarm, Timer
Chronograph
Dual Time, Alarm,
Timer 1/100 Second with Split Back Light (EL)
Chronograph 1/100 Second with Split Back Light (EL)
OPERATION MODES
PRESS S3 once to view Time, Day, Date, Month
OPERATION1.MODES
PRESS
S3 once
viewDate,
Alarm
1. PRESS S32.once
to view
Time,toDay,
Month
3.
PRESS
S3
once
to
view
Chrono
2. PRESS S3 once to view Alarm
PRESS
S3 once
to set Timer
3. PRESS S35.once
to view
Chrono
PRESS
S3Timer
again back to Time mode
5. PRESS S36.once
to set
6. PRESS S3 again back to Time mode
SETTING SEQUENCE
A) NORMAL TIME SETTING .
SETTING SEQUENCE
HOLD
S2 2 seconds
to set "Second"; Press S1 for 00
A) NORMAL1.TIME
SETTING
.
PRESS S3
to set "Minute";
Press
S1 to advance
1. HOLD S22.2 seconds
to once
set "Second";
Press S1
for 00
3.
PRESS
S3
once
to
set
"Hour";
Press
S1
2. PRESS S3 once to set "Minute"; Press S1 to advanceto advance
PRESS
S3"Hour";
once toPress
set hour
Press S1 to set "12H" / "24H"
3. PRESS S34.once
to set
S1 todisplay;
advance
5.
PRESS
S3
once
to
set
"Month";
Press
to advance
4. PRESS S3 once to set hour display; Press S1 to setS1"12H"
/ "24H"
6.
PRESS
S3
once
to
set
"Date";
Press
S1
to
advance
5. PRESS S3 once to set "Month"; Press S1 to advance
PRESS
S3"Date";
once to
set "Day";
Press S1 to advance
6. PRESS S37.once
to set
Press
S1 to advance
PRESS
S2"Day";
once Press
when setting
is complete. Normal time will be
7. PRESS S38.once
to set
S1 to advance
displayed.
8. PRESS S2 once when setting is complete. Normal time will be
displayed.
22
22
25
MENS
DIGITAL WITH ALARM / DUAL TIME /
CHRONOGRAPH
Digital With Alarm/Dual Time/Chronograph
Continued....
EL
CHANGE
MODE
S3
S1
DUAL
TIME
S2
SETTING
B) DUAL TIME SETTING .
1. PRESS S1 to Dual Time
2. HOLD S2 2 seconds to set "Minute"; Press S1 for 00
3. PRESS S3 once to set "Hour"; Press S1 to advance
4. PRESS S2 once when setting is complete. Normal time will be
displayed.
FEATURES
Hour, Minute, Second
B) DUAL TIMEDay,
SETTING
Date,.Month
1. PRESS S1 to Dual Time
C) ALARM SETTING
Dual Time, Alarm, Timer
2. HOLD S2 2 seconds to set "Minute"; Press S1 PRESS
for 00 S3 to Alarm Mode
Chronograph 1/100 Second with
Back
Lightto(EL)
1. Split
PRESS
S1 once
on "Alarm" ONLY
3. PRESS S3 once to set "Hour"; Press S1 to advance
2. PRESS
S1be
once to on "Chime" ONLY
4. PRESS S2 once when setting is complete. Normal
time will
displayed. OPERATION MODES
3. PRESS S1 once to on "Alarm" & "Chime"
1. PRESS S3 once to view Time,
Date,
Month
4. Day,
PRESS
S1 once
to off "Alarm" & "Chime"
C) ALARM SETTING
2. PRESS S3 once to view Alarm
5. HOLD S2 2 seconds to set "Hour"; Press S1 to advance
PRESS S3 to Alarm
Mode S3 once to view Chrono
6. PRESS S3 once to set "Minute"; Press S1 to advance
3. PRESS
1. PRESS S1 once to on "Alarm" ONLY
5. PRESS S3 once to set Timer7. PRESS S2 once when setting is complete. Return to Alarm Mod
2. PRESS S1 once to on "Chime" ONLY
6. PRESS
S3 again
back to Time mode
3. PRESS S1 once
to on "Alarm"
& "Chime"
D) CHRONOGRAPH
4. PRESS S1 once to off "Alarm" & "Chime"
PRESS S3 twice to Chronograph function
5. HOLD S2 2SETTING
seconds toSEQUENCE
set "Hour"; Press S1 to1.advance
PRESS S1 to "Start" / "Stop" timing
6. PRESS S3 once
to set "Minute";
S1 to advance
A) NORMAL
TIMEPress
SETTING
. 2. PRESS S2 to "Split" time
7. PRESS S2 once
when setting
is complete.
Return
to Alarm
Mode.
1. HOLD
S2 2 seconds
to set
"Second";
Press
00
3. PRESS
S1,
thenS1
S2for
to "Reset"
2. PRESS S3 once to set "Minute"; Press S1 to advance
E) TIMER
"Hour";
Press S1 to advance
PRESS S3 three times to Time Mode
hour 1.
display;
S1 to set
"12H"
/ "24H"
HOLD Press
S2 2 seconds
to set
"Hour";
Press S1 to advance
"Month";
Press
S1
to
advance
2. PRESS S3 once to set "Minute"; Press S1 to advance
"Date";
advance
3. Press
PRESSS1
S2to
once
when setting is complete.
RESSS1
S1 to
to advance
"Start" / "Stop"
7. PRESS S3 once to set "Day";4.Press
E) TIMER
5. isPRESS
S2 to "Reset"
8. PRESS S2 once when setting
complete.
Normal time will be
PRESS S3 three times to Time Mode
When
counting
complete, alarm will sound.
displayed.
D) CHRONOGRAPH
3. PRESS S3 once to set
PRESS S3 twice to Chronograph function
4. "Start"
PRESS
S3 once
1. PRESS S1 to
/ "Stop"
timingto set
5.
PRESS
S3
once
to set
2. PRESS S2 to "Split" time
S3 once to set
3. PRESS S1,6.
thenPRESS
S2 to "Reset"
1.
2.
3.
4.
HOLD S2 2 seconds to set "Hour"; Press S1 to advance
PRESS S3 once to set "Minute"; Press S1 to advance
22
PRESS S2 once when setting is complete.
RESS S1 to "Start" / "Stop"
26
MENS
EL
S1
Digital With Alarm, Chronograph
1/100 Sec, Countdown
& Dual Time
S2
S3
FEATURES
Hour, Minute, Second
Day, Date, Month
Dual Time, Alarm, Countdown
Chronograph 1/100 Second with lap control
Back Light (EL)
DIGITAL WITH ALARM, CHRONOGRAPH 1
COUNTDOWN & DUAL TIME
SETTING SEQUENCE
EL
S1
A) NORMAL TIME SETTING
1. HOLD S2 3 seconds to “Second”; Press S1 or S3 for 00
2. PRESS S2 once to set “Minute”; Press S1 or S3 to advance /
backward
3. PRESS S2 once to set “Hour”; Press S1 or S3 to advance /
S2
S3
backward
4. PRESS S2 once to set “Year”; Press S1 or S3 to advance /
backward
FEATURES
5. PRESS S2 once to set “Month”; Press S1 or S3 toHour,
advance
/
Minute, Second
backward
Day, Date, Month
6. PRESS S2 once to set “Day”; Press S1 or S3 to advance
/ Alarm, Countdown
Dual Time,
backward
Chronograph 1/100 Second with lap control
Back Light (EL)
7. HOLD S2 3 seconds to return to normal time display.
SETTING SEQUENCE
B) DUAL TIME SETTING
A) NORMAL TIME SETTING
1. PRESS S1 to Dual Time
1. HOLD S2 3 seconds to “Second”; Press S1 or S3 for
2. HOLD S2 2 seconds to set "Minute";
Press S1 for2.00PRESS S2 once to set “Minute”; Press S1 or S3 to adv
25
3. PRESS S3 once to set "Hour"; Press S1 to advance backward
3. time
PRESS
4. PRESS S2 once when setting is complete. Normal
willS2
beonce to set “Hour”; Press S1 or S3 to adva
backward
displayed.
C) ALARM SETTING
PRESS S3 to Alarm Mode
1. PRESS S1 to "Alarm 1" – “Alarm 5”
2. HOLD S2 2 seconds until “AL” flash
PRESS S1/S3 to set “Alarm” / “Chime”
4. PRESS S2 once to set “Year”; Press S1 or S3 to advan
backward
5. PRESS S2 once to set “Month”; Press S1 or S3 to adv
backward
MENS
6. PRESS S2 once to set “Day”; Press27S1 or
S3 to advan
backward
7. HOLD S2 3 seconds to return to normal time display.
B) DUAL TIME SETTING
1. PRESS S1 to Dual Time
2. HOLD S2 2 seconds to set "Minute"; Press S1 for 00
3. PRESS S3 once to set "Hour"; Press S1 to advance
4. PRESS S2 once when setting is complete. Normal time will be
displayed.
Digital With Alarm, Chronograph
1/100 Sec, Countdown & Dual Time
Continued....
C) ALARM SETTING
PRESS S3 to Alarm Mode
1. PRESS S1 to "Alarm 1" – “Alarm 5”
2. HOLD S2 2 seconds until “AL” flash
PRESS S1/S3 to set “Alarm” / “Chime”
3. PRESS S2 once to set “Hour” Press S1 or S3 to advance /
DIGITAL
backward
4. PRESS S2 once to set “Minute” Press S1 or S3 to advance /
backward
5. HOLD S2 3 seconds when setting is complete. Return to Alarm
Model.
WITH ALARM, CHRONOGRAPH 1
COUNTDOWN & DUAL TIME
EL
S1
D) COUNTDOWN TIMER SETTING
(i) PRESS S3 twice to Countdown Timer function [T1] (1~90 mins)
1) HOLD S2 2 seconds to set "Minute"; Press S1/S3 to advance /
backward
2) HOLD S2 3 sec to end setting
S2
S3
3) PRESS S2 to start/stop countdown
(ii) PRESS S1 to get into Countdown timer [T2] (from normal time to
preset time – within 24hrs)
1) HOLD S2 3 seconds to set "Hour"; Press S1/S3 to advance /
FEATURES
backward
2) PRESS S2 once to set “Minute” Press S1 or S3 to advance
/ Minute, Second
Hour,
backward
Day, Date, Month
3) HOLD S2 3 sec to end setting
Dual Time, Alarm, Countdown
4) PRESS S2 to start/stop countdown. Time different between
Chronograph 1/100 Second with lap control
Normal time & Preset time will be shown
Back Light (EL)
(iii) PRESS S1 to get into Countdown Day Timer [T3]
1) HOLD S2 3 seconds to set “Year"; Press S1/S3 to advance
/
SETTING
SEQUENCE
backward
A) NORMAL TIME SETTING
2) PRESS S2 once to set “Month” Press S1 or S3 to advance
1. / HOLD S2 3 seconds to “Second”; Press S1 or S3 for
backward
26
2. PRESS S2 once to set “Minute”; Press S1 or S3 to adv
3) PRESS S2 once to set “Day” Press S1 or S3 to advance / backward
backward
3. PRESS S2 once to set “Hour”; Press S1 or S3 to adva
4) PRESS S2 once when setting is complete.
E) CHRONOGRAPH
PRESS S3 three times to Chronograph Mode
1) PRESS S1 to select LAP (LAP) or Split (SPL) option
2) PRESS S2 to start/stop
3) PRESS S1 to get Lap/Split time
5) HOLD S2, then press S1 to “Reset”
backward
4. PRESS S2 once to set “Year”; Press S1 or S3 to adva
backward
5. PRESS S2 once to set “Month”; Press S1 or S3 to adv
backward
6. PRESS S2 once to set “Day”; Press28S1 MENS
or S3 to advan
backward
7. HOLD S2 3 seconds to return to normal time display.
INTERCHANGEABLES
TOTAL CHARGES
(Resident's of CT & NY please apply appropriate sales tax)
TOTAL CHARGES (with sales tax if applied)
Total charges may be paid with a check, money order, or When paying by charge card, please advise:
VISA
MASTERCARD
How To Remove Straps and Metal Bands
CARD#
EXPIRATION DATE
SIGNATURE
Step 1
Step 2
Step 3
Turn counterclockwise
12
12
GUESS
GUESS
Place straps
on watch turn
top ring
clockwise
12
12
GUESS
GUESS
Lift off
bracelet/
strap
GUESS
GUESS
GUESS
Step 1
Step 2
Remove top ring
by turning counterclockwise
Place top ring
on watch and
turn clockwise
to secure
Step 1
Step 2
Push lever left
to replace
strap
Step 3
Place pin in hole
and push lever to
the left
30
INTERCHANGEABLES
CARE & WARRANTY
Water Resistant Care and Details
Watches are marked Water Resistant from 3ATM to 10ATM only as long as lens, buttons,
crown, case, caseback and gaskets remain intact. Do NOT operate crowns or buttons
when the watch is wet or under water.
Always wipe watch dry after being exposed to water.
Water Resistance levels are marked on case backs.
Example:
Water Resistant
3 atm/30m/100 ft.
5 atm/50m/165 ft
10atm/100m/330ft.
Withstands splashes of water or rain; do not submerge
Rain, do not submerge
Rain, showering do not submerge
Rain, showering, swimming
Care and Safety Measures
Water resistance is not permanent. In the course of time, the gaskets of the cases may
become worn and reduce the water resistance of the watches.
32
CARE & WARRANTY
Battery Care and Safety Measures
The battery contains a small amount of mercury. Please recycle or dispose of properly.
Visit www.watchbatteryrecycle.org for more information.
Strap Care and Details
LEATHER STRAPS
All Guess Leather straps are Genuine Leather
All Denim Straps have a Genuine Leather Backing
Leather/Denim straps should not be submerged in water
Waterpro straps are water resistant, but are not impervious to water and should not be
submerged in water for extended periods of time.
SILICONE OR POLYURETHANE SPORT STRAPS
Rubber/Silicone straps are water resistant, but should not be submerged in water for extended
periods of time.
Do NOT expose straps to gases or chemicals (Ex: fragrance sprays, detergents, insecticides, etc.)
Stains made by dye, paints and oily substances may be difficult to remove. Due to the composition
of the material, straps may harden or discolor after extensive use.
33
CARE & WARRANTY
Limited 10 Year Warranty
This GUESS Watch is warranted to you, the owner, for a period of ten years from the date of
original purchase against all defects in material or workmanship. This warranty does not
apply to normal wear and tear or abuse or water damage and excludes batteries, case,
strap or bracelet; does not cover costs, parts or labor or defects or damage caused by any
source other than SEQUEL. We do not recommend changing your own battery. If you would
like your battery, case/crystal and/or strap replaced, please see the warranty repair
coupon for additional charges. Any implied warranties are also limited to ten years from
date of original purchase. Some states do not allow limitations on how long an implied
warranty lasts, so the above limitation may not apply to you. This warranty gives you specific
legal rights, and you may also have other rights, which vary from state to state. In the event
of a defect or malfunction within this period, it will be repaired or replaced, at our option
provided that it is returned prepaid with VISA, MASTERCARD or AMEX for $8.50 to cover the
cost of handling and return postage (this is not a repair charge). DO NOT SEND CASH. Never
include a special watch band or any other article of personal value in your shipment.
GUESS Watches/SEQUEL is not responsible for lost or stolen watches.
Watch Repair
Return the watch, carefully packed (do not send in original packaging as it will not be
returned) and insured to:
Sequel
145 Woodward Avenue
Norwalk, CT 06854
ATT: Repair Department
Enclose your payment and the completed warranty coupon.
Any questions, call Customer Service at 1.800.2GUESS5 or 1.800.248.3775
Monday - Friday, 8:30am - 5pm EST
34
CARE & WARRANTY