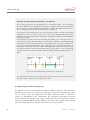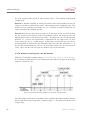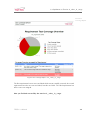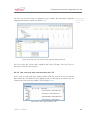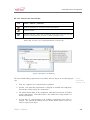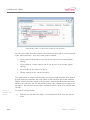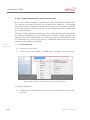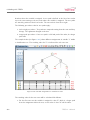
1
User Manual
Release 11/14, Revision 31.178
TESSY Version 3.1
Razorcat Development GmbH
Imprint
Razorcat Development GmbH
Witzlebenplatz 4
Germany, 14057 Berlin
tel: +49 (030) 53 63 57 0
fax: +49 (030) 53 63 57 60
e-mail: [email protected]
internet: http://www.razorcat.com
Windows is a registered trademark of Microsoft. TESSY and CTE are registered trademarks of
Razorcat Development GmbH.
All other registered or unregistered trademarks referenced herein are the property of their respective owners and no trademark rights to the same is claimed.
Liability exclusion
Razorcat Development GmbH assumes no liability for damage that is caused by improper installation or improper use of the software or the non-observance of the handling instructions
described in this manual.
Thanks
Various contents are based on application notes and publications on TESSY written by Frank
Büchner, Hitex Development Tools GmbH. We would like to thank Frank for his valuable contribution and commitment in supporting TESSY and spotlighting functionalities and features.
TESSY 3.1 Manual
iii
Contents
Preface
About TESSY . . . . . . . . . . . . . . . . . . . . . . . . . . . . . . . . .
How to use this manual . . . . . . . . . . . . . . . . . . . . . . . . . . . .
Subject matter . . . . . . . . . . . . . . . . . . . . . . . . . . . . . .
Helpers . . . . . . . . . . . . . . . . . . . . . . . . . . . . . . . . . .
Safety procedures . . . . . . . . . . . . . . . . . . . . . . . . . . . . . . .
Core workflow and registration for safety information . . . . . . . . .
Verification and certification of TESSY . . . . . . . . . . . . . . . . .
Instrumentation for coverage measurement . . . . . . . . . . . . . . .
Adaptation to target environment . . . . . . . . . . . . . . . . . . . .
Operating limits . . . . . . . . . . . . . . . . . . . . . . . . . . . . .
New features in TESSY 3.0 . . . . . . . . . . . . . . . . . . . . . . . . . .
Revised graphical user interface (GUI) . . . . . . . . . . . . . . . . .
Improved main perspective . . . . . . . . . . . . . . . . . . . . . . .
Traceability of requirements . . . . . . . . . . . . . . . . . . . . . . .
Improved integration of the Classification Tree Editor (CTE) . . . . .
Tabular Test Data Editor (TDE) . . . . . . . . . . . . . . . . . . . .
Enhanced Usercode editor . . . . . . . . . . . . . . . . . . . . . . . .
Improved test data plots . . . . . . . . . . . . . . . . . . . . . . . . .
Enhanced component testing . . . . . . . . . . . . . . . . . . . . . .
Application Programming Interface (API) and command line interface
New features in TESSY 3.1 . . . . . . . . . . . . . . . . . . . . . . . . . .
Enhanced coverage handling . . . . . . . . . . . . . . . . . . . . . . .
Generator test case . . . . . . . . . . . . . . . . . . . . . . . . . . .
Command line interface . . . . . . . . . . . . . . . . . . . . . . . . .
.
.
.
.
.
.
.
.
.
.
.
.
.
.
.
.
.
.
.
.
.
.
.
.
xv
xvi
xvii
xvii
xix
xxi
xxi
xxii
xxii
xxiii
xxiii
xxv
xxv
xxv
xxvi
xxvi
xxvi
xxvii
xxvii
xxviii
xxviii
xxviii
xxix
xxx
xxx
1 Installation and registration
1.1 Technical requirements . . . .
1.2 Setup . . . . . . . . . . . . . .
1.3 Registration . . . . . . . . . .
1.3.1 Requesting a license key
1.3.2 Registrating the license
1.3.3 The License Manager .
1.4 Uninstallation . . . . . . . . .
.
.
.
.
.
.
.
1
1
1
6
6
8
10
10
TESSY 3.1 Manual
.
.
.
.
.
.
.
.
.
.
.
.
.
.
.
.
.
.
.
.
.
.
.
.
.
.
.
.
.
.
.
.
.
.
.
.
.
.
.
.
.
.
.
.
.
.
.
.
.
.
.
.
.
.
.
.
.
.
.
.
.
.
.
.
.
.
.
.
.
.
.
.
.
.
.
.
.
.
.
.
.
.
.
.
.
.
.
.
.
.
.
.
.
.
.
.
.
.
.
.
.
.
.
.
.
.
.
.
.
.
.
.
.
.
.
.
.
.
.
.
.
.
.
.
.
.
.
.
.
.
.
.
.
.
.
.
.
.
.
.
.
.
.
.
.
.
.
v
1.5
Using license part-time on another computer . . . . . . . . . . . . . . .
2 Migrating from TESSY 2.x to 3.x
2.1 Changes in handling . . . . . . . . . . . .
2.2 Importing previous projects . . . . . . . .
2.3 Missing features . . . . . . . . . . . . . .
2.3.1 Python based report . . . . . . . .
2.3.2 THAI . . . . . . . . . . . . . . . .
2.3.3 Debugger Scripting Prolog / Epilog
2.3.4 Diff Viewer . . . . . . . . . . . . .
.
.
.
.
.
.
.
.
.
.
.
.
.
.
.
.
.
.
.
.
.
.
.
.
.
.
.
.
.
.
.
.
.
.
.
.
.
.
.
.
.
.
.
.
.
.
.
.
.
.
.
.
.
.
.
.
.
.
.
.
.
.
.
.
.
.
.
.
.
.
.
.
.
.
.
.
.
3 General handling
3.1 Creating databases and working with the file system . . . . . .
3.1.1 Creating a project database . . . . . . . . . . . . . . .
3.1.2 Creating, importing, cloning, editing, deleting a project
3.1.3 Creating a template project . . . . . . . . . . . . . . .
3.1.4 Moving the project directory . . . . . . . . . . . . . .
3.1.5 Handling with equal named projects . . . . . . . . . .
3.1.6 Using a specific environment setting . . . . . . . . . .
3.1.7 Updating the database . . . . . . . . . . . . . . . . .
3.2 Understanding the graphical user interface . . . . . . . . . . .
3.2.1 Menu bar . . . . . . . . . . . . . . . . . . . . . . . .
3.2.2 Tool bar . . . . . . . . . . . . . . . . . . . . . . . . .
3.2.3 Perspectives and perspective (tool) bar . . . . . . . . .
3.2.4 Views . . . . . . . . . . . . . . . . . . . . . . . . . .
3.2.5 Status bar . . . . . . . . . . . . . . . . . . . . . . . .
3.3 Using the context menu and shortcuts . . . . . . . . . . . . .
3.3.1 Context menu . . . . . . . . . . . . . . . . . . . . . .
3.3.2 Shortcuts . . . . . . . . . . . . . . . . . . . . . . . .
.
.
.
.
.
.
.
.
.
.
.
.
.
.
.
.
.
.
.
.
.
.
.
.
4 Basic knowledge
4.1 Unit testing of embedded software . . . . . . . . . . . . . . . .
4.1.1 Standards that require testing . . . . . . . . . . . . . . .
4.1.2 About unit testing . . . . . . . . . . . . . . . . . . . . .
4.1.2.1 What is unit testing? . . . . . . . . . . . . . .
4.1.2.2 What are the benefits? . . . . . . . . . . . . .
4.1.3 Considerations for unit testing . . . . . . . . . . . . . .
4.1.3.1 Which units are good test candidates? . . . . .
4.1.3.2 What is not in the scope of unit testing? . . .
4.1.3.3 Why is regression testing necessary? . . . . . .
4.1.3.4 Who should conduct the tests? . . . . . . . . .
4.1.3.5 What is special for testing embedded software?
vi
.
.
.
.
.
.
.
.
.
.
.
.
.
.
.
.
.
.
.
.
.
.
.
.
.
.
.
.
.
.
.
.
.
.
.
.
.
.
.
.
.
.
.
.
.
.
.
.
.
.
.
.
.
.
.
.
.
.
.
.
.
.
.
.
.
.
.
.
.
.
.
.
.
.
.
.
.
.
.
.
.
.
.
.
.
.
.
.
.
.
.
.
.
.
.
.
.
.
.
.
.
.
.
.
.
11
.
.
.
.
.
.
.
15
15
17
20
20
20
20
20
.
.
.
.
.
.
.
.
.
.
.
.
.
.
.
.
.
21
22
22
28
30
30
31
32
33
35
35
36
36
37
40
41
41
41
.
.
.
.
.
.
.
.
.
.
.
43
44
44
45
45
45
46
46
46
47
47
48
TESSY 3.1 Manual
4.1.4
4.2
Methods for unit testing . . . . . . . . . . . . . . .
4.1.4.1 a. Test application . . . . . . . . . . . .
4.1.4.2 b. Original binary test . . . . . . . . . .
4.1.4.3 Pros and cons . . . . . . . . . . . . . . .
4.1.5 Conclusion . . . . . . . . . . . . . . . . . . . . . .
The Classification Tree Method (CTM) . . . . . . . . . . .
4.2.1 General . . . . . . . . . . . . . . . . . . . . . . . .
4.2.2 Steps to take . . . . . . . . . . . . . . . . . . . .
4.2.3 Example is_value_in_range . . . . . . . . . . . .
4.2.3.1 Test-relevant aspects . . . . . . . . . . .
4.2.3.2 Forming classes . . . . . . . . . . . . . .
4.2.3.3 A first range specification . . . . . . . . .
4.2.3.4 A second range specification . . . . . . .
4.2.3.5 Extending the tree by a boundary class . .
4.2.3.6 Another interesting test case specification
4.2.3.7 The completed classification tree . . . . .
4.2.3.8 The completed test case specification . .
4.2.3.9 Another test case specification . . . . . .
.
.
.
.
.
.
.
.
.
.
.
.
.
.
.
.
.
.
.
.
.
.
.
.
.
.
.
.
.
.
.
.
.
.
.
.
.
.
.
.
.
.
.
.
.
.
.
.
.
.
.
.
.
.
5 Practical exercises
5.1 Quickstart 1: Exercise is_value_in_range . . . . . . . . . . . .
5.1.1 Creating a test project . . . . . . . . . . . . . . . . . . .
5.1.2 Specifying the target environment . . . . . . . . . . . .
5.1.3 Adding the test object and analyzing the C-source file . .
5.1.4 Editing the test object interface . . . . . . . . . . . . . .
5.1.5 Designing test cases . . . . . . . . . . . . . . . . . . . .
5.1.6 Adding test cases and test steps . . . . . . . . . . . . .
5.1.7 Entering test data . . . . . . . . . . . . . . . . . . . . .
5.1.8 Executing the test . . . . . . . . . . . . . . . . . . . . .
5.1.9 Repeating the test run with coverage instrumentation . .
5.1.10 Analyzing the coverage . . . . . . . . . . . . . . . . . .
5.1.10.1 The flow chart view . . . . . . . . . . . . . . .
5.1.10.2 The Branch (C1) Coverage view . . . . . . . .
5.1.10.3 The MC/DC Coverage view . . . . . . . . . .
5.1.10.4 Analyzing . . . . . . . . . . . . . . . . . . . .
5.1.11 Creating a report . . . . . . . . . . . . . . . . . . . . .
5.1.12 Repeating the test run with requirements . . . . . . . . .
5.1.12.1 Importing requirements . . . . . . . . . . . . .
5.1.12.2 Committing the requirements document . . . .
5.1.12.3 Linking test cases with requirements . . . . . .
5.1.12.4 Creating a planning coverage report . . . . . .
5.1.12.5 Executing the test and examining the coverage
TESSY 3.1 Manual
.
.
.
.
.
.
.
.
.
.
.
.
.
.
.
.
.
.
.
.
.
.
.
.
.
.
.
.
.
.
.
.
.
.
.
.
.
.
.
.
.
.
.
.
.
.
.
.
.
.
.
.
.
.
.
.
.
.
.
.
.
.
.
.
.
.
.
.
.
.
.
.
.
.
.
.
.
.
.
.
.
.
.
.
.
.
.
.
.
.
.
.
.
.
.
.
.
.
.
.
.
.
.
.
.
.
.
.
.
.
.
.
.
.
.
.
.
.
.
.
.
.
.
.
.
.
.
.
.
.
.
.
.
.
.
.
.
.
48
48
49
49
50
51
51
52
58
58
59
59
60
61
62
63
65
66
.
.
.
.
.
.
.
.
.
.
.
.
.
.
.
.
.
.
.
.
.
.
69
70
71
73
75
77
78
78
80
83
84
86
87
87
87
88
91
93
93
95
96
98
101
vii
5.2
5.1.13 Reusing a test object with a changed interface . . . . . . .
5.1.13.1 Changing the interface of the test object . . . . .
5.1.13.2 Assigning the changed interface of the test object
Quickstart 2: Exercise Classification Tree Editor (CTE) . . . . . .
5.2.1 Creating classifications . . . . . . . . . . . . . . . . . . .
5.2.2 Creating classes . . . . . . . . . . . . . . . . . . . . . . .
5.2.3 Entering test data . . . . . . . . . . . . . . . . . . . . . .
5.2.4 Creating test cases . . . . . . . . . . . . . . . . . . . . .
6 Working with TESSY
6.1 Menu Bar Entries: Setting up the basics . . . . . . . . .
6.1.1 File menu . . . . . . . . . . . . . . . . . . . . .
6.1.2 Edit menu . . . . . . . . . . . . . . . . . . . . .
6.1.3 Window menu . . . . . . . . . . . . . . . . . . .
6.1.4 Windows > Preferences menu . . . . . . . . . .
6.1.5 Help menu . . . . . . . . . . . . . . . . . . . . .
6.2 Overview perspective: Organizing the test . . . . . . . .
6.2.1 Structure of the Overview perspective . . . . . .
6.2.2 Test Project view . . . . . . . . . . . . . . . . .
6.2.2.1 Icons of the view tool bar . . . . . . . .
6.2.2.2 Status indicators . . . . . . . . . . . .
6.2.2.3 Creating tests . . . . . . . . . . . . . .
6.2.2.4 Analyzing modules . . . . . . . . . . .
6.2.2.5 Executing tests . . . . . . . . . . . . .
6.2.2.6 Instrumentation settings . . . . . . . .
6.2.2.7 Viewing test results . . . . . . . . . . .
6.2.2.8 Creating reports . . . . . . . . . . . . .
6.2.2.9 Batch test operations . . . . . . . . . .
6.2.2.10 Importing and exporting . . . . . . . .
6.2.3 Properties view . . . . . . . . . . . . . . . . . .
6.2.3.1 General . . . . . . . . . . . . . . . . .
6.2.3.2 Sources: Sources pane . . . . . . . . .
6.2.3.3 Sources: Compiler pane . . . . . . . . .
6.2.3.4 Coverage . . . . . . . . . . . . . . . .
6.2.3.5 Attributes . . . . . . . . . . . . . . . .
6.2.3.6 Specification / Description / Comment
6.2.4 Requirements Coverage view . . . . . . . . . . .
6.2.5 Test Items view . . . . . . . . . . . . . . . . . .
6.2.5.1 Icons of the view tool bar . . . . . . . .
6.2.5.2 Status indicators . . . . . . . . . . . .
6.2.5.3 Creating test cases and test steps . . .
6.2.5.4 Creating test steps automatically . . . .
viii
.
.
.
.
.
.
.
.
.
.
.
.
.
.
.
.
.
.
.
.
.
.
.
.
.
.
.
.
.
.
.
.
.
.
.
.
.
.
.
.
.
.
.
.
.
.
.
.
.
.
.
.
.
.
.
.
.
.
.
.
.
.
.
.
.
.
.
.
.
.
.
.
.
.
.
.
.
.
.
.
.
.
.
.
.
.
.
.
.
.
.
.
.
.
.
.
.
.
.
.
.
.
.
.
.
.
.
.
.
.
.
.
.
.
.
.
.
.
.
.
.
.
.
.
.
.
.
.
.
.
.
.
.
.
.
.
.
.
.
.
.
.
.
.
.
.
.
.
.
.
.
.
.
.
.
.
.
.
.
.
.
.
.
.
.
.
.
.
.
.
.
.
.
.
.
.
.
.
.
.
.
.
.
.
.
.
.
.
.
.
.
.
.
.
.
.
.
.
.
.
.
.
.
.
.
.
.
.
.
.
.
.
.
.
.
.
.
.
.
.
.
.
.
.
.
.
.
.
.
.
.
.
.
.
.
.
.
.
.
.
.
.
.
.
.
.
.
.
104
104
109
112
113
115
115
118
.
.
.
.
.
.
.
.
.
.
.
.
.
.
.
.
.
.
.
.
.
.
.
.
.
.
.
.
.
.
.
.
123
127
127
127
128
128
131
132
132
133
134
134
135
136
138
140
140
142
145
148
151
151
152
153
156
159
160
161
161
162
162
163
164
TESSY 3.1 Manual
6.3
6.4
6.2.5.5 Test cases and steps created within the CTE
6.2.5.6 Renumbering test cases . . . . . . . . . . . .
6.2.6 Test Results view . . . . . . . . . . . . . . . . . . . .
6.2.7 Evaluation Macros view . . . . . . . . . . . . . . . . .
6.2.8 Console view . . . . . . . . . . . . . . . . . . . . . . .
6.2.8.1 Icons of the view tool bar . . . . . . . . . . .
6.2.8.2 Handling . . . . . . . . . . . . . . . . . . . .
6.2.9 Suspicious Elements view . . . . . . . . . . . . . . . .
C/C++: Editing the C-source . . . . . . . . . . . . . . . . . .
6.3.1 Opening the C/C++ perspective . . . . . . . . . . . .
6.3.2 Structure of the C/C++ perspective . . . . . . . . . .
6.3.3 Editor view . . . . . . . . . . . . . . . . . . . . . . . .
6.3.3.1 Editing the C-source file . . . . . . . . . . .
6.3.4 Project Explorer view . . . . . . . . . . . . . . . . . .
6.3.5 Outline view . . . . . . . . . . . . . . . . . . . . . . .
6.3.5.1 Icons of the view tool bar . . . . . . . . . . .
6.3.6 Properties view . . . . . . . . . . . . . . . . . . . . .
6.3.7 Console view . . . . . . . . . . . . . . . . . . . . . . .
Requirement management . . . . . . . . . . . . . . . . . . . .
6.4.1 Structure of the Requirement Management perspective
6.4.2 RQMT Explorer view . . . . . . . . . . . . . . . . . .
6.4.2.1 Icons of the view tool bar . . . . . . . . . . .
6.4.2.2 Status indicators . . . . . . . . . . . . . . .
6.4.2.3 Creating requirements . . . . . . . . . . . . .
6.4.2.4 Importing requirements . . . . . . . . . . . .
6.4.2.5 Committing requirements . . . . . . . . . . .
6.4.2.6 Editing requirements . . . . . . . . . . . . .
6.4.2.7 Renaming a document / alias . . . . . . . .
6.4.3 Requirements List view and Requirement Editor . . . .
6.4.3.1 Icons of the view tool bar . . . . . . . . . . .
6.4.3.2 Viewing requirements, versions, IDs . . . . .
6.4.4 Test Means view . . . . . . . . . . . . . . . . . . . . .
6.4.4.1 Icons of the view tool bar . . . . . . . . . . .
6.4.5 VxV Matrix view . . . . . . . . . . . . . . . . . . . . .
6.4.5.1 Icons of the view tool bar . . . . . . . . . . .
6.4.6 Link Matrix view . . . . . . . . . . . . . . . . . . . . .
6.4.6.1 Icons of the view tool bar . . . . . . . . . . .
6.4.6.2 Status indicators . . . . . . . . . . . . . . .
6.4.6.3 Adding and removing elements . . . . . . . .
6.4.6.4 Updating requirement links . . . . . . . . . .
6.4.7 Suspicious Elements view . . . . . . . . . . . . . . . .
6.4.7.1 Icons of the view tool bar . . . . . . . . . . .
TESSY 3.1 Manual
.
.
.
.
.
.
.
.
.
.
.
.
.
.
.
.
.
.
.
.
.
.
.
.
.
.
.
.
.
.
.
.
.
.
.
.
.
.
.
.
.
.
.
.
.
.
.
.
.
.
.
.
.
.
.
.
.
.
.
.
.
.
.
.
.
.
.
.
.
.
.
.
.
.
.
.
.
.
.
.
.
.
.
.
.
.
.
.
.
.
.
.
.
.
.
.
.
.
.
.
.
.
.
.
.
.
.
.
.
.
.
.
.
.
.
.
.
.
.
.
.
.
.
.
.
.
.
.
.
.
.
.
.
.
.
.
.
.
.
.
.
.
.
.
.
.
.
.
.
.
.
.
.
.
.
.
.
.
.
.
.
.
.
.
.
.
.
.
.
.
.
.
.
.
.
.
.
.
.
.
.
.
.
.
.
.
.
.
.
.
.
.
.
.
.
.
.
.
.
.
.
.
.
.
.
.
.
.
.
.
167
168
168
169
169
170
170
171
172
172
173
174
174
175
176
176
177
177
178
179
180
181
182
182
182
185
187
188
190
190
190
192
192
193
193
194
194
195
195
196
197
198
ix
6.5
6.6
x
6.4.7.2 Determine changes that caused suspicious status . . .
6.4.8 Attached Files view . . . . . . . . . . . . . . . . . . . . . . . .
6.4.8.1 Icons of the view tool bar . . . . . . . . . . . . . . . .
6.4.9 Attributes view . . . . . . . . . . . . . . . . . . . . . . . . . .
6.4.9.1 Icons of the view tool bar . . . . . . . . . . . . . . . .
6.4.9.2 Editing attributes of a requirement . . . . . . . . . . .
6.4.10 History view . . . . . . . . . . . . . . . . . . . . . . . . . . . .
6.4.10.1 Icons of the view tool bar . . . . . . . . . . . . . . . .
6.4.10.2 Reviewing changes . . . . . . . . . . . . . . . . . . .
6.4.11 Related Elements view . . . . . . . . . . . . . . . . . . . . . . .
6.4.12 Document Preview . . . . . . . . . . . . . . . . . . . . . . . .
6.4.12.1 Icons of the view tool bar . . . . . . . . . . . . . . . .
6.4.12.2 Editing the requirement as HTML version . . . . . . .
6.4.13 Requirements Coverage view . . . . . . . . . . . . . . . . . . .
6.4.13.1 Icons of the view tool bar . . . . . . . . . . . . . . . .
6.4.13.2 Planning tab . . . . . . . . . . . . . . . . . . . . . .
6.4.13.3 Execution tab . . . . . . . . . . . . . . . . . . . . . .
TEE: Configuring the test environment . . . . . . . . . . . . . . . . . .
6.5.1 Starting the TEE . . . . . . . . . . . . . . . . . . . . . . . . .
6.5.2 Structure of the TEE . . . . . . . . . . . . . . . . . . . . . . .
6.5.3 Icons of the tool bar . . . . . . . . . . . . . . . . . . . . . . . .
6.5.4 Status indicators . . . . . . . . . . . . . . . . . . . . . . . . . .
6.5.5 Viewing all available configurations . . . . . . . . . . . . . . . .
6.5.6 Configuration files . . . . . . . . . . . . . . . . . . . . . . . . .
6.5.7 Customizing the configurations . . . . . . . . . . . . . . . . . .
6.5.7.1 Enabling configurations . . . . . . . . . . . . . . . . .
6.5.7.2 Adding configurations . . . . . . . . . . . . . . . . . .
6.5.7.3 Adjusting enabled configurations . . . . . . . . . . . .
6.5.7.4 Assigning an existing configuration file to your project
TIE: Preparing the test interface . . . . . . . . . . . . . . . . . . . . .
6.6.1 Structure of the TIE perspective . . . . . . . . . . . . . . . . .
6.6.2 Test Project view . . . . . . . . . . . . . . . . . . . . . . . . .
6.6.3 Properties view . . . . . . . . . . . . . . . . . . . . . . . . . .
6.6.4 Interface view . . . . . . . . . . . . . . . . . . . . . . . . . . .
6.6.4.1 Icons of the view tool bar . . . . . . . . . . . . . . . .
6.6.4.2 Status indicators . . . . . . . . . . . . . . . . . . . .
6.6.4.3 Handling . . . . . . . . . . . . . . . . . . . . . . . . .
6.6.4.4 Interface elements . . . . . . . . . . . . . . . . . . . .
6.6.4.5 Setting passing directions . . . . . . . . . . . . . . . .
6.6.4.6 Setting the data format . . . . . . . . . . . . . . . . .
6.6.4.7 Setting passing direction of special data types . . . . .
6.6.4.8 Defining stubs for functions . . . . . . . . . . . . . . .
198
200
201
202
202
203
204
205
205
206
206
207
207
208
209
210
211
212
213
214
215
216
218
220
221
222
223
225
227
229
230
230
230
231
232
232
232
233
234
236
237
239
TESSY 3.1 Manual
6.7
6.8
6.6.4.9 Other interface settings . . . . . . . . . . . .
6.6.5 Plots view . . . . . . . . . . . . . . . . . . . . . . . .
CTE: Designing the test cases . . . . . . . . . . . . . . . . . .
6.7.1 The basic idea . . . . . . . . . . . . . . . . . . . . . .
6.7.2 Starting CTE . . . . . . . . . . . . . . . . . . . . . .
6.7.3 Structure of the CTE perspective . . . . . . . . . . . .
6.7.4 Test Project view . . . . . . . . . . . . . . . . . . . .
6.7.5 Properties view . . . . . . . . . . . . . . . . . . . . .
6.7.6 Classification Tree view . . . . . . . . . . . . . . . . .
6.7.6.1 Icons of the view tool bar . . . . . . . . . . .
6.7.6.2 Structure of the Classification Tree view . . .
6.7.6.3 Creating classifications, classes and test cases
6.7.7 Test Data view . . . . . . . . . . . . . . . . . . . . .
6.7.7.1 Assigning test data to the CTE . . . . . . . .
6.7.8 Test data assignment precedence rules . . . . . . . . .
TDE: Entering test data . . . . . . . . . . . . . . . . . . . . .
6.8.1 Structure of the TDE perspective . . . . . . . . . . . .
6.8.2 Test Project view . . . . . . . . . . . . . . . . . . . .
6.8.3 Test Results view . . . . . . . . . . . . . . . . . . . .
6.8.4 Evaluation Macros view . . . . . . . . . . . . . . . . .
6.8.5 Test Items view . . . . . . . . . . . . . . . . . . . . .
6.8.6 Properties view . . . . . . . . . . . . . . . . . . . . .
6.8.7 Test Data view . . . . . . . . . . . . . . . . . . . . .
6.8.7.1 Icons of the view tool bar . . . . . . . . . . .
6.8.7.2 Status indicators . . . . . . . . . . . . . . .
6.8.7.3 Viewing the interface of the test object . . .
6.8.7.4 Entering values . . . . . . . . . . . . . . . .
6.8.7.5 Entering evaluation modes . . . . . . . . . .
6.8.7.6 Ignoring values for a test step . . . . . . . .
6.8.7.7 Generating test steps automatically . . . . .
6.8.7.8 Pointers . . . . . . . . . . . . . . . . . . . .
6.8.7.9 Static local variables . . . . . . . . . . . . .
6.8.8 Test Definition view . . . . . . . . . . . . . . . . . . .
6.8.9 Declarations / Definitions view . . . . . . . . . . . . .
6.8.10 Prolog/Epilog view . . . . . . . . . . . . . . . . . . .
6.8.10.1 Entering C code . . . . . . . . . . . . . . . .
6.8.10.2 Using evaluation macros . . . . . . . . . . .
6.8.11 Usercode Outline view . . . . . . . . . . . . . . . . . .
6.8.12 Plots view . . . . . . . . . . . . . . . . . . . . . . . .
6.8.12.1 Icons of the view tool bar . . . . . . . . . . .
6.8.12.2 Entering plots . . . . . . . . . . . . . . . . .
TESSY 3.1 Manual
.
.
.
.
.
.
.
.
.
.
.
.
.
.
.
.
.
.
.
.
.
.
.
.
.
.
.
.
.
.
.
.
.
.
.
.
.
.
.
.
.
.
.
.
.
.
.
.
.
.
.
.
.
.
.
.
.
.
.
.
.
.
.
.
.
.
.
.
.
.
.
.
.
.
.
.
.
.
.
.
.
.
.
.
.
.
.
.
.
.
.
.
.
.
.
.
.
.
.
.
.
.
.
.
.
.
.
.
.
.
.
.
.
.
.
.
.
.
.
.
.
.
.
.
.
.
.
.
.
.
.
.
.
.
.
.
.
.
.
.
.
.
.
.
.
.
.
.
.
.
.
.
.
.
.
.
.
.
.
.
.
.
.
.
.
.
.
.
.
.
.
.
.
.
.
.
.
.
.
.
.
.
.
.
.
.
.
.
.
.
.
.
.
.
.
.
.
.
.
.
.
.
.
.
.
241
241
242
242
242
243
243
243
244
244
245
246
250
250
251
254
254
255
256
256
256
256
257
258
258
259
261
266
268
268
271
272
273
274
275
276
278
280
281
281
281
xi
6.9
CV: Analyzing the coverage . . . . . . . . . . . . . . . . . . . . . . . . 286
6.9.1 Structure of the CV perspective . . . . . . . . . . . . . . . . . . 287
6.9.2 Instrumentation for coverage measurements . . . . . . . . . . . 287
6.9.3 Test Project view . . . . . . . . . . . . . . . . . . . . . . . . . 290
6.9.4 Called Functions view / Code view . . . . . . . . . . . . . . . . 291
6.9.5 Flow Chart view . . . . . . . . . . . . . . . . . . . . . . . . . . 292
6.9.5.1 Icons of the view tool bar . . . . . . . . . . . . . . . . 293
6.9.5.2 Viewing functions . . . . . . . . . . . . . . . . . . . . 293
6.9.5.3 Selecting elements . . . . . . . . . . . . . . . . . . . 294
6.9.5.4 Searching for uncovered decisions and unreached branches295
6.9.6 Statement (C0) Coverage view . . . . . . . . . . . . . . . . . . 296
6.9.6.1 Coverage percentage . . . . . . . . . . . . . . . . . . 297
6.9.7 Branch (C1) Coverage view . . . . . . . . . . . . . . . . . . . . 297
6.9.7.1 Coverage percentage . . . . . . . . . . . . . . . . . . 298
6.9.8 Decision Coverage view . . . . . . . . . . . . . . . . . . . . . . 298
6.9.9 MC/DC Coverage view . . . . . . . . . . . . . . . . . . . . . . 298
6.9.9.1 Selecting decisions . . . . . . . . . . . . . . . . . . . 300
6.9.10 MCC Coverage view . . . . . . . . . . . . . . . . . . . . . . . . 300
6.9.11 Coverage Report views . . . . . . . . . . . . . . . . . . . . . . 300
6.10 IDA: Assigning interface data . . . . . . . . . . . . . . . . . . . . . . . 301
6.10.1 Structure of the IDA perspective . . . . . . . . . . . . . . . . . 302
6.10.2 Test Project view . . . . . . . . . . . . . . . . . . . . . . . . . 302
6.10.3 Properties view . . . . . . . . . . . . . . . . . . . . . . . . . . 303
6.10.4 Compare view . . . . . . . . . . . . . . . . . . . . . . . . . . . 303
6.10.4.1 Status indicators . . . . . . . . . . . . . . . . . . . . 303
6.10.4.2 Comparing interfaces and assigning changes . . . . . . 304
6.11 SCE: Component testing . . . . . . . . . . . . . . . . . . . . . . . . . 306
6.11.1 Creating component tests . . . . . . . . . . . . . . . . . . . . . 307
6.11.2 Preparing the test interface . . . . . . . . . . . . . . . . . . . . 309
6.11.3 Designing the test cases . . . . . . . . . . . . . . . . . . . . . . 310
6.11.4 Executing the scenarios . . . . . . . . . . . . . . . . . . . . . . 310
6.11.5 Editing scenarios . . . . . . . . . . . . . . . . . . . . . . . . . . 310
6.11.5.1 Configuring the work tasks . . . . . . . . . . . . . . . 310
6.11.5.2 Adding Function Calls . . . . . . . . . . . . . . . . . . 313
6.11.5.3 Entering test data for time steps . . . . . . . . . . . . 313
6.11.6 Evaluating scenarios . . . . . . . . . . . . . . . . . . . . . . . . 315
6.11.6.1 Checking return values of component functions . . . . 316
6.11.6.2 Checking the calling sequence . . . . . . . . . . . . . 316
6.11.6.3 Checking if a function is not called . . . . . . . . . . . 317
6.11.6.4 Checking stub function parameters . . . . . . . . . . . 318
6.12 Backup, restore, version control . . . . . . . . . . . . . . . . . . . . . . 319
6.12.1 Backup . . . . . . . . . . . . . . . . . . . . . . . . . . . . . . . 319
xii
TESSY 3.1 Manual
6.12.2 Restore . . . . . . . . . . . . . . . . . . .
6.12.2.1 Restore into the original location
6.12.2.2 Restore into another location . .
6.12.3 Version control . . . . . . . . . . . . . .
6.13 Command line interface . . . . . . . . . . . . . .
6.13.1 Starting TESSY in headless mode . . . .
6.13.2 Invoking tessycmd.exe . . . . . . . . . . .
6.13.3 Usage of tessycmd.exe . . . . . . . . . . .
6.13.4 Commands . . . . . . . . . . . . . . . . .
6.13.5 Example: DOS script . . . . . . . . . . .
.
.
.
.
.
.
.
.
.
.
.
.
.
.
.
.
.
.
.
.
.
.
.
.
.
.
.
.
.
.
.
.
.
.
.
.
.
.
.
.
.
.
.
.
.
.
.
.
.
.
.
.
.
.
.
.
.
.
.
.
.
.
.
.
.
.
.
.
.
.
.
.
.
.
.
.
.
.
.
.
.
.
.
.
.
.
.
.
.
.
.
.
.
.
.
.
.
.
.
.
.
.
.
.
.
.
.
.
.
.
.
.
.
.
.
.
.
.
.
.
320
320
321
321
323
323
324
324
325
325
7 Troubleshooting
7.1 Contacting the TESSY support . . . . . . . . . . . . . . .
7.2 Solutions for known problems . . . . . . . . . . . . . . . .
7.2.1 TESSY does not start or gives errors when starting
7.2.2 TESSY gives errors when quitted . . . . . . . . . .
7.2.3 License server does not start or gives errors . . . .
.
.
.
.
.
.
.
.
.
.
.
.
.
.
.
.
.
.
.
.
.
.
.
.
.
.
.
.
.
.
.
.
.
.
.
327
328
332
332
333
334
Appendix
337
A Abbreviations
338
B Glossary
340
C List of Figures
344
D List of Tables
352
Index
355
TESSY 3.1 Manual
xiii
xiv
TESSY 3.1 Manual
Preface
About TESSY . . . . . . . . . . . . . . . . . . . . . . . . . . . . . . . . . xvi
How to use this manual . . . . . . . . . . . . . . . . . . . . . . . . . . . . xvii
Subject matter . . . . . . . . . . . . . . . . . . . . . . . . . . . . . . xvii
Helpers . . . . . . . . . . . . . . . . . . . . . . . . . . . . . . . . . . xix
Safety procedures . . . . . . . . . . . . . . . . . . . . . . . . . . . . . . . xxi
Core workflow and registration for safety information . . . . . . . . . xxi
Verification and certification of TESSY . . . . . . . . . . . . . . . . . xxii
Instrumentation for coverage measurement . . . . . . . . . . . . . . . xxii
Adaptation to target environment . . . . . . . . . . . . . . . . . . . . xxiii
Operating limits . . . . . . . . . . . . . . . . . . . . . . . . . . . . . xxiii
New features in TESSY 3.0 . . . . . . . . . . . . . . . . . . . . . . . . . . xxv
Revised graphical user interface (GUI) . . . . . . . . . . . . . . . . . xxv
Improved main perspective . . . . . . . . . . . . . . . . . . . . . . . xxv
Traceability of requirements . . . . . . . . . . . . . . . . . . . . . . . xxvi
Improved integration of the Classification Tree Editor (CTE) . . . . . xxvi
Tabular Test Data Editor (TDE) . . . . . . . . . . . . . . . . . . . . xxvi
Enhanced Usercode editor . . . . . . . . . . . . . . . . . . . . . . . . xxvii
Improved test data plots
. . . . . . . . . . . . . . . . . . . . . . . . xxvii
Enhanced component testing . . . . . . . . . . . . . . . . . . . . . . xxviii
Application Programming Interface (API) and command line interface xxviii
New features in TESSY 3.1 . . . . . . . . . . . . . . . . . . . . . . . . . . xxviii
Enhanced coverage handling . . . . . . . . . . . . . . . . . . . . . . xxix
Generator test case . . . . . . . . . . . . . . . . . . . . . . . . . . . xxx
Command line interface . . . . . . . . . . . . . . . . . . . . . . . . . xxx
TESSY 3.1 Manual
xv
Preface
About TESSY
The test system TESSY was developed by the Research and Technology Group of Daimler.
The former developers of the method and tool at Daimler were:
Klaus Grimm
Matthias Grochtmann
Roman Pitschinetz
Joachim Wegener
TESSY has been well-tried in practice at Daimler and is since applied successfully. TESSY
is commercially available since spring 2000 and is further developed by Razorcat Development GmbH.
TESSY offers an integrated graphic user interface conducting you comfortably through
the unit test. There are special tools for every testing activity as well as for all organizational and management tasks.
Dynamic testing is indispensable when testing a software system. Today, up to 80% of the
development time and costs go into unit and integration testing. It is therefore of urgent
necessity to automate testing processes in order to minimize required time and costs
for developing high-quality products. The test system TESSY automates the whole test
cycle; unit testing for programs in C/C++ is supported in all test phases. The system
also takes care of the complete test organization as well as test management, including
requirements coverage measurement and traceability.
xvi
TESSY 3.1 Manual
How to use this manual
How to use this manual
Apply for our e-mail list if you want to be informed of a new version of TESSY
manual by sending an e-mail to [email protected].
Subject matter
The structure of the manual guides you through working with TESSY from the start to
the specific activities possible. In order:
section
matter
Preface
Describes New features in TESSY 3.0 and New features in TESSY 3.1
and contains important information about Safety procedures.
1 Installation
and
registration
Lists all technical requirements to work with TESSY and describes how
to install the software.
2 Migrating
from TESSY
2.x to 3.x
Lists the changed and new functions and handling within the new version.
This will help you when switching from TESSY version 2.x to the new
TESSY 3.x.
3 General
handling
Explains the workflow of Creating databases and working with the file
system. Check this section carefully to know how to handle your project
data! The TESSY interface and basic handling is explained in the following sections Understanding the graphical user interface and Using the
context menu and shortcuts.
4 Basic
knowledge
Contains a brief introduction about unit testing with TESSY and the
classification tree method.
continue next page
TESSY 3.1 Manual
xvii
Preface
section
5 Practical
exercises
matter
In this chapter you will get to know TESSY with the help of exercises
that are prepared to follow easily though most functions of TESSY:
The Quickstart 1: Exercise is_value_in_range is a very basic example
to give you a fast introduction.
The Quickstart 2: Exercise Classification Tree Editor (CTE) gives a short
and easy introduction of handling with the Classification Tree Editor
(CTE). It continues the Quickstart 1: Exercise is_value_in_range.
We recommend strongly to check the practical exercises!
It is very much easier to learn by doing than learning by
just reading. Exercise first and then check the detailed information in the corresponding section of chapter “Working with TESSY”.
6 Working with
TESSY
Explains in detail the unit test activities possible with TESSY.
As you will notice, the headlines of the sections follow the actions taken during a test. TESSY provides different editors and windows
(“perspectives” and “views”) for different configurations and steps taken
during and after a test. You will find the name of the perspective or
view as well as the description of the step within the headline, e.g. 6.7
CTE: Designing the test cases.
Therefore, if you need help at some point, ask either “How do I handle
. . . ?” or “Where am I?” and follow the headlines.
Important: Read the General handling first, because basic functions of each editor are explained there.
7 Troubleshooting Contains information of Solutions for known problems and how to get in
touch with the TESSY support if needed.
Appendix
Contains a list of tables, a list of figures, a list of used abbreviations as
well as definitions of used terms in the glossary. Check the glossary when
you need some explanations of terms!
The index in the very end of this manual provides the positions of your
theme of interest.
Table 0.1: Where to find - matters of the several parts of the TESSY manual
xviii
TESSY 3.1 Manual
How to use this manual
Helpers
• The Index in the very end of this manual helps you by looking up a theme by a
keyword.
• Various information is clearly represented within tables, e.g. icons and indicators
(symbols of the interface) and their meanings. For a fast access to all tables consult
the List of Tables in the appendix of this manual.
The sidearrow
shows where to
find information
and references.
• Figures are used to demonstrate information described before. You may as well
check the List of Figures to find those figures.
• All cross references as well as the content directory are active links (blue colored),
so you can easily switch to the referenced chapter or section.
Information box
Gray bordered information boxes
provide further information and explanations for the respective issues and operations to be executed. The information will give you an overview, while the practical
part is explained in the following section.
Font characters and signs
To help you to work with this manual, different font characters and signs are used to
mark specific information:
what
for
example
Þ
instructions you are supposed to
follow immediately
Þ Open the TESSY interface.
>
navigation through a menue
Þ Select “File” > “Open . . . ”
[. . . ]
variable
Þ Switch to “[project root]\tessy”
bold
accentuation
Important:
typewriter
italic
input (you need to type this information) or output (message
from system)
Enter Test Example .
continue next page
TESSY 3.1 Manual
xix
Preface
What
For
Example
“typewriter
in quotes”
path of data
“C:\Program Files\Razorcat”
“quotes”
indicate keys, buttons, etc.
Þ Select “File” > “Open . . . ”
Ctrl+C
Keyboard characters are not
marked in supposition they are
commonly known.
Ctrl+C for pressing control and c
Table 0.2: Font characters
Important: You urgently need to know this for operating correctly!
Warning: There might be some damages to your data if you do not operate
correctly! Please follow instructions carefully.
A light bulb provides hints, references and additional information on handling
with TESSY for better usability.
xx
TESSY 3.1 Manual
Safety procedures
Safety procedures
Core workflow and registration for safety information
Important: If you work with TESSY in a safety-relevant environment, please
read this chapter carefully and register for our safety customer e-mail-list to be
informed about known problems as described below!
TESSY can be used for testing of safety-relevant software. Therefore, the core workflow
of TESSY as well as the release and test process of the TESSY product has been certified according to ISO 26262-08:2011 and IEC 61508-3:2010. Our quality management
system ensures proper handling of all development processes for the TESSY product and
constantly improves all procedures concerning quality and safety.
Figure 0.1: Core workflow of TESSY
The figure above shows the core workflow of TESSY that is fully automated and subject
to tool qualification. All other tool capabilities like editing or environment and interface
settings are additional features out of scope of the tool qualification. The core workflow
of TESSY has been certified according to ISO 26262:2011 and IEC 61508:2010. Starting
from editing of test data, the core workflow covers test execution, evaluation of test
results and report generation. Additionally, the coverage measurements have been verified
according to our certified safety plan. Please note, that the Classification Tree Editor
TESSY 3.1 Manual
xxi
Preface
(CTE) which covers test preparation activities is not part of the certified core workflow
of TESSY. Safety-relevant problems arising in released TESSY versions will be reported
(once they are detected) and regarded closely to have them fixed as fast as possible. If
you work with TESSY in a safety-related environment, please register for our safety
customer e-mail-list:
Þ
Send an e-mail to [email protected]
Þ
Topic: “Known problems requested”
Þ
Content: your contract data
You will be informed about current and newly arising “known problems” as well as
workarounds.
Verification and certification of TESSY
The “Tool Qualification Pack” (TQP) is an additional purchase of documents and tests
for TESSY, provided as baseline for the certification process in order to qualify TESSY
as a software verification tool according to DO-178B/C.
Please contact via [email protected].
Additionally, TESSY has been qualified by the german certification authority TÜV SÜD
Rail GmbH as a testing tool for usage in safety-related software development according
to ISO 26262 and IEC 61508. The TÜV certificate and a certification report is available
on http://www.razorcat.com.
The TQPack contains tests for ANSI-C compliant source code using the GNU GCC
compiler that is part of the TESSY installation. Using an embedded compiler/debugger
for a specific microcontroller requires adaptation of the TQPack for this specific target
environment. This can be provided as an engineering service by Razorcat.
Instrumentation for coverage measurement
When executing tests using coverage measurements, it is recommended that all tests are
executed once with and once without coverage instrumentation. TESSY uses a copy of
the original source file when creating the test application. This copy of the source file
will be instrumented for coverage measurements. Usually both test runs yield the same
result, indicating that the instrumentation did not change the functional behavior of the
test objects.
Please note, that the source code will be instrumented even if no coverage measurement
has been selected in the following cases:
xxii
TESSY 3.1 Manual
Safety procedures
•
When using the call trace feature
•
When using static local variables
Some extra code will be added at the end of the copied source file in the following
cases:
•
When testing static functions
•
When using static global variables
Please keep this behavior in mind when preparing and executing tests with TESSY.
Adaptation to target environment
When running tests on a specific target platform, adaptations of compiler options and
target debugger settings may be needed within the respective target environment. The
verification of the TESSY core workflow covers tests conducted on a Windows host
system using the GNU GCC compiler. In order to verify the transmission of test data
and expected results to and from the target device, there are tests available that may be
executed using the adapted target environment. These tests check the communication
layers of the test driver application.
For details on how to run these tests refer to the application note “048 Using
Test Driver Communication Tests.pdf” within the TESSY installation directory.
It is recommended to run these tests with your specific compiler/target environment.
Operating limits
TESSY is constructed for usage as a unit testing tool in order to verify the functional
correctness of the function under test. The following restrictions and prerequisites for
TESSY apply:
•
The source code to be tested shall be compilable without errors and warnings
by the compiler of the respective microcontroller target. TESSY may fail
analyzing the interface of the module to be tested, if there are syntactical
errors within the source code.
TESSY 3.1 Manual
xxiii
Preface
xxiv
•
TESSY does not check any runtime behavior or timing constraints of the
function under test.
•
The test execution on the target system highly depends on the correct configuration of the target device itself, the correct compiler/linker settings within the
TESSY environment and other target device related settings within TESSY
(if applicable). Any predefined setup of the TESSY tool for the supported
devices requires manual review by the user to ensure proper operation of the
unit testing execution.
•
The usage of compiler specific keywords and compiler command line settings
may require additional tests for tool qualification. Correct operation of the
TESSY toolset with respect to the Qualification Test Suite (QTS) test results
is only provided for ANSI compliant C code.
TESSY 3.1 Manual
New features in TESSY 3.0
New features in TESSY 3.0
Note the chapter Migrating from TESSY 2.x to 3.x. You will find a list where
to find functions that moved within the new version.
Check as well the Practical exercises to learn about TESSY´s new features!
Revised graphical user interface (GUI)
Based on the Eclipse Rich Client platform, the new TESSY GUI provides easier access
to all functionalities within multiple perspectives and views on the test data. All TESSY
tools are now integrated as individual perspectives within one application (see section 3
General handling).
Improved main perspective
The new main perspective Overview provides a more summarized overview about passed
and failed results, coverage and other useful status information. The new project structure
introduces a folder hierarchy instead of the former single project level. The coverage
results are displayed directly within the project structure.
Figure 0.2: New Test Project view
Test results are stored within test runs which allows keeping former (successful) results
for reporting while continuing to work on test cases and test data. Grouping of test cases
is available for better structuring of test data.
TESSY 3.1 Manual
xxv
Preface
Traceability of requirements
TESSY introduces a basic requirement management solution that allows synchronizing
with external requirement sources (e.g. DOORS, Microsoft Word, Microsoft Excel and
other through CVS/XML file import). Reference mechanisms from test cases back to
the requirements allow easy coverage analysis and reports as well as impact analysis of
requirements changes.
Figure 0.3: New traceability of requirements
Modules, test objects and test cases may be linked to requirements within a convenient
requirements coverage view.
Improved integration of the Classification Tree Editor (CTE)
The CTE has a tighter integration to TESSY and the Test Data Editor (TDE). Values
for all types of variables can be specified in the new CTE.
Tabular Test Data Editor (TDE)
The new tabular TDE provides easy overview about test data and entering of test data
for multiple test steps at a glance.
xxvi
TESSY 3.1 Manual
New features in TESSY 3.0
Figure 0.4: New tabular Test Data Editor
Enhanced Usercode editor
The Usercode editor is now an integral part of the TDE perspective and provides flexible
editing and outline views together with the tabular test data viewer. Usercode for stub
functions may be specified on a per-test-step basis which facilitates returning specific
values for individual test steps. A new evaluation macro results view provides faster
access to failed test results.
Improved test data plots
The new plot view provides graphical plots of test data for input and expected values.
Plots may be created for an arbitrary number of variables on test case, test step or
even on array element level. Each plot is populated with the current test data within a
graphical preview. Multiple variables may be added to a single plot.
TESSY 3.1 Manual
xxvii
Preface
Enhanced component testing
The component test feature has been improved, so that all variables of the component
interface may be set and checked at arbitrary points in time within the scenario. Entering
of input data and expected results is carried out using the normal test data view.
Figure 0.5: New Test Data view
Application Programming Interface (API) and command line interface
An API for the project database (PDB) and the test database (TDB) is now available,
enabling the user to write scripts (e.g. using a DOS shell) to modify these information
or add new modules with all necessary settings (e.g. source files, include paths, defines)
into the project database. A command line executable provides all commands of the API
for usage within DOS batch files.
New features in TESSY 3.1
Note the chapter Migrating from TESSY 2.x to 3.x. You will find a list where
to find functions that moved within the new version.
Check as well the Practical exercises to learn about TESSY´s new features!
xxviii
TESSY 3.1 Manual
New features in TESSY 3.1
Enhanced coverage handling
The coverage measurements section has been revised and instrumentations were added.
Figure 0.6: Defining coverage measurements
Select a default coverage measurement for your project, according to various known
safety standards, or add or edit coverage instrumentations within the Preferences menu
(see section 6.1.4 Windows > Preferences menu).
You can as well choose a different coverage measurement for a specific module or test
object within the Properties view (see section 6.2.3.4 Coverage), or select a certain
instrumentation for any test execution (see section 6.2.2.5 Executing tests).
TESSY 3.1 Manual
xxix
Preface
Generator test case
With the Generator Test Case you can generate test steps automatically, i.e. of a range
of input values which you enter in the TDE:
Figure 0.7: Automatically generated test steps
To use the generator test case refer to section 6.2.5.4 Creating test steps automatically.
Command line interface
You can work with TESSY in headless mode without the graphical user interface for
automated testing within a continuous integration process, e.g. with Jenkins.
To use the command line interface refer to section 6.13 Command line interface.
xxx
TESSY 3.1 Manual
1 Installation and registration
1.1 Technical requirements
•
Windows 8 (32bit/64bit), Windows 7 (32bit/64bit), Windows Vista
(32bit/64bit) or Windows XP (ServicePack 2 or higher).
•
TESSY 3.x can be installed and run in parallel to any previous TESSY version.
•
For the reports you need at least Adobe Reader 7.0.
•
To run TESSY 3.x you need at least a 1.5 GHz CPU and 2 GB RAM for
TESSY.
1.2 Setup
Warning: Deactivate your firewall or virus scanner temporarily while installing
TESSY! Otherwise the firewall can cause problems during the installation. Note
that some firewalls and anti-virus software can limit the functionality of applications, including TESSY and might need to be modified. For further help ask
the producer of the firewall or anti-virus software.
Important: You need local administrator privileges to install TESSY!
To install TESSY 3.x on your computer,
Þ
insert the TESSY-DVD into the DVD drive and wait for the setup program to
start OR start the installation program manually (“tessy[version number].exe”).
The InstallAware Wizard will start. This will take a few moments.
Þ
When the InstallAware Wizard is ready, click “Next”.
TESSY 3.1 Manual
1
1 Installation and registration
Figure 1.1: InstallAware Wizard
Þ
Read the license agreement carefully. Check the box to accept and click “Next”.
Figure 1.2: License Agreement
Þ
2
Now select the setup type: “Complete” (default) is recommended. click “Next”.
TESSY 3.1 Manual
1.2 Setup
Figure 1.3: Setup Type
Þ
Select the destination folder (default “C:\Program Files\Razorcat”) and
click “Next”.
Figure 1.4: Destination Folder
Þ
Select the TESSY testarea folder (“Folder for temporary files:”; default
“C:\tessy”) click “Next”.
TESSY 3.1 Manual
3
1 Installation and registration
Figure 1.5: TESSY Testarea Folder
Þ
Select the program folder (default “TESSY 3.x”) and decide, whether the installation on the system is for “all users” or for a certain user. Click “Next”.
Figure 1.6: Program folder and user selection
Þ
Start the installation by clicking “Next”.
The installation will take a few moments.
4
TESSY 3.1 Manual
1.2 Setup
Figure 1.7: Installing process of TESSY
Þ
When the InstallAware Wizard is completed, click “Finish”.
Figure 1.8: Installation is completed
Now you have completed the installation of TESSY.
TESSY 3.1 Manual
5
1 Installation and registration
1.3 Registration
Important: To register TESSY 3.x you need access to the internet!
1.3.1 Requesting a license key
Þ
Start TESSY by selecting in Windows “Start” > “All Programs” > “TESSY 3.x”
> “TESSY 3.x” (see fig. 1.9).
Figure 1.9: Starting TESSY 3.x
If a valid license is found, the TESSY 3.x will start. If there is no valid license, the License
Manager will start with a License Key Request popup window (see figure 1.11).
To start the request manually,
6
Þ
start the License Manager by selecting in Windows “Start” > “All Programs” >
“TESSY 3.x” > “TESSY 3.x” > “Floating License Manager”.
Þ
Click on “License” > “Request” (see figure 1.10).
TESSY 3.1 Manual
1.3 Registration
Figure 1.10: Starting the key request
The License Key Request popup window will appear (see figure 1.11).
Figure 1.11: License key request popup window
Þ
Click on “Online Request” and fill out the form for a license key request.
TESSY 3.1 Manual
7
1 Installation and registration
Figure 1.12: Form for the license key request
You will get a license key via e-mail within a license key file. The license key file is a
plain text file with the ending .txt.
Important: The license key file is not generated and send out automatically,
therefore it can take up to a workday until you receive it!
1.3.2 Registrating the license
When you have received the license key file (.txt-file),
Þ
open the license manager.
Þ
If you have already received a license key file: Click on “Done”.
The Configure window for the License Server will open (see figure 1.13).
8
TESSY 3.1 Manual
1.3 Registration
Figure 1.13: Configure menu of the license server
Þ
Under “License Key File” choose your license key file (*.txt).
Þ
Tick the box “Autostart” to start the license server hereafter in the background.
The system will try to set the autostart. If you do not have administrator
privileges, the autostart is set for your windows user.
Þ
Optional: You can run the license server as service (select “Service” under “Run
Local Server”). The default is “Application”. If you wish to remove the service
from the registry, tick the accordingly box under “Settings”.
Important: You need administrator privileges to run the license
server as service and to remove it from the registry!
Þ
Click on “OK”.
The license server will start automatically. If not, click on
Server).
Þ
(Start Local
Close the License Manager and start TESSY by selecting “Start” > “All Programs” > “TESSY 3.x” > “TESSY 3.x”.
TESSY 3.1 Manual
9
1 Installation and registration
1.3.3 The License Manager
Þ
To start the License Manager manually select “Start” > “All Programs” >
“TESSY 3.x” > “TESSY 3.x” > “Floating License Manager”.
Þ
To start the server manually click on the icon
Þ
To stop the server manually click on
Þ
To configure the server click on
Þ
To check your license key file click on
(Check). This can be useful to
determine the error if the server does not start.
(Start Local Server).
(Stop Local Server).
(Configure).
Figure 1.14: License key check successful: this license key is correct
1.4 Uninstallation
By uninstalling TESSY the project root will not be deleted,
neither your project data or your configuration file will be deleted. But anyway
make sure that your data is saved.
Important:
To uninstall and remove all components of TESSY,
Þ
in Windows click “Start” > “All Programs”.
Þ
“TESSY 3.x” > “Uninstall TESSY”
All components of TESSY will be removed. This will take a few seconds.
10
TESSY 3.1 Manual
1.5 Using license part-time on another computer
1.5 Using license part-time on another computer
Important: For using your TESSY license part-time on another computer,
you need a “Floating License”.
You can check-out your TESSY floating license on your computer and import it on
another computer to work with TESSY on another system.
This check-out option
•
is only possible with a TESSY floating license.
•
is for 30 days altogether: You can check-out the license for one, for two or
up to 30 days each time, but overall for 30 days at the most.
•
means, that you can use TESSY EITHER on computer 1 OR on computer 2.
When you check-out the license on computer 1 for three days, you can NOT
use TESSY on computer 1 for the three days.
Checking-out a
License
Important: It is not possible to return a checked-out license prematurely to
the computer from which the licenses were checked-out!
To check how many days are left for the check-out:
Þ
In Windows klick on “Start” > “All Programs” > “TESSY 3.x” > “Floating
License Manager”.
Þ
In the license manager click on “License” > “Info”.
Þ
Next to “State” the amount of days for possible check-outs left will be displayed
(see figure 1.15).
Important: If the state says “disabled” contact your administrator!
TESSY 3.1 Manual
11
1 Installation and registration
Figure 1.15: The license info shows the possible days for checking out the license
Þ
In the menu bar click on “License” > “Check Out. . . ” (see figure 1.16).
Þ
Choose the amount of days. The Registration Information will be filled out
automatically (see figure 1.17).
Þ
Click “ok” and save the file.
You can now use this license file like a normal file on your second computer.
To registrate the license refer to section 1.3.2 Registrating the license.
Figure 1.16: Checking out the TESSY license
12
TESSY 3.1 Manual
1.5 Using license part-time on another computer
Figure 1.17: Determine the amount of days for the check-out
You do not have to check-in your license again on computer 1! The license will
be activated automatically.
TESSY 3.1 Manual
13
14
TESSY 3.1 Manual
2 Migrating from TESSY 2.x to 3.x
In the new version of TESSY you will find many new functions as mentioned in sections
New features in TESSY 3.0 and New features in TESSY 3.1. Therefore, the user interface
has changed in some ways and known features moved.
2.1 Changes in handling
To make it easy to switch from working with TESSY 2.9 to TESSY 3.x, the following
table shows and explains functions and new handling:
Theme
Handling in TESSY 2.9
New handling in TESSY 3.x
analyzing
modules
A double click on a module
starts the interface analysis
and the module is opened.
In case of interface changes,
a reuse is required before
continuing working with the
module.
Start the analysis by clicking on the icon of
the tool bar or on the plus sign of the module
tree node. You can as well use the context
menu.
If there are any test objects ready to be
tested, the module can be opened. On
interface changes, a reuse can be carried out
for individual test objects. Other test objects
that are still up to date can be executed
independently. New test readiness status
icons provide a quick overview about the test
object status.
coverage
measurement
Results of the coverage
measurements are shown in
addition to the results of the
test execution.
Coverage measurement results are part of the
overall test result for a test object. The
available coverage measurements (i.e. C1,
MC/DC, MCC) can be enabled or disabled.
Threshold values for successful coverage can
be defined.
CTE
Assigning variables to
classifications and classes in
CTE is restricted to certain
variable types.
All variables of the test object interface can
be assigned using CTE. The full featured test
data view is available for entering data within
the CTE perspective of TESSY.
continue next page
TESSY 3.1 Manual
15
2 Migrating from TESSY 2.x to 3.x
Theme
Handling in TESSY 2.9
New Handling in TESSY 3.x
IDA
(reuse of
test data)
All test objects of a module
need to be assigned to the
new interface for a reuse
operation.
The new IDA allows reusing individual test
objects while leaving the other ones
untouched (they may be reused later). All
reused test objects are ready for execution
independently of the status of other test
objects within the same module.
module
properties
The module properties
dialog provides the means to
change any module settings.
Module settings are specified on all levels of
parent elements of modules within a test
project (e.g. test collection and folder). These
settings are inherited by modules and can be
overwritten on module level.
PDB file
Within the PDB file all tests
for a specific software
project are stored. It is
usually stored beneath the
project root of the project.
It contains a list of
“projects”. Each project has
a list of modules as children.
All tests for a specific software project are
stored now within a database that is located
beneath the project root directory of this
software project. This is called a “test project”
which contains a list of “test collections” that
can be further structured using “folder” trees.
Each folder contains “modules”.
reports
Reports are generated in
HTML, Word and Excel
format using python scripts.
Reports are available in PDF format only.
Command
line tool
The “tessycmd” executable
provides basic operations to
import and execute tests
using the command line.
The “tessycmd” executable provides full
control for the overview perspective in
TESSY. This allows creating whole test
projects and executing tests as well as
importing and exporting of test data.
result plots
Result plots of output
variables are based on the
assignment of a special
evaluation mode.
Result plots are defined independently from
the evaluation mode for any number of
variables. Each result plot can include mixed
input and output variables.
TDE
The test data editor TDE
shows the test data of one
test step.
The new tabular TDE shows multiple test
steps and test cases as a spread sheet. Input
values and expected values including the
evaluation mode are entered using an inline
editor.
continue next page
16
TESSY 3.1 Manual
2.2 Importing previous projects
Theme
Handling in TESSY 2.9
New Handling in TESSY 3.x
test
execution
The test cases to be
executed need to be selected
prior to execution.
Selecting the test object within the test
project view allows execution of all test cases
without further test case selection. The test
item view provides selection and execution of
individual test cases.
test results
Test results are available
after execution of the test
and any changes of test
data void the results.
The test item view displays the current
execution results, if available. All previous
test results are also available within the
separate test results view which provides a
history of the latest test runs.
Any historical test run can be selected to
provide the current result (e.g. for reporting).
TIE
The interface editor TIE
shows the interface of one
test object.
The interface can be displayed on module level
showing all defined struct, union and enum
types as well as on test object level showing
the interface specific for this test object.
usercode
The user code editor UCE
shows the user code for a
test object and is opened as
separate tool beside the
TDE
The TDE perspective within TESSY includes
editors for all user code parts and an outline
view showing all available user code
fragments.
Table 2.1: Changes in handling with TESSY 2.9 and TESSY 3.x
2.2 Importing previous projects
Warning: Proceed as described below, otherwise there might be some damages to your data!
Important: With TESSY versions 2.6 and previous you need TESSY 2.9
to convert your databases to the new format. Download TESSY 2.9 from
http://www.razorcat.com. Contact our product support if assistance is needed.
TESSY 3.1 Manual
17
2 Migrating from TESSY 2.x to 3.x
Version
HowTo
TESSY 2.9
We recommend to perform the following steps to import a module backup file
from Tessy 2.9 into TESSY 3.0:
• Create a new project in TESSY 3.0 to be used for the import. Please
use the default configuration.
• Activate your compiler and debugger within the Test Environment
Editor TEE (“File > Edit Environment”).
• Next to the tool bar click on “File” and choose “Show all”.
• Drag and drop the configuration from “Configuration > System” onto
the File node. By default, the GCC environment is already used in the
File node (respectively configuration file).
• Import the tmb file. If you have module backup files like
project_name.module_name.tmb , you can restore tmb files from
“File > Database Backup > Restore...”. Choose the backup directory in
question. If you have module backup files like module_name.tmb , you
have to restore the tmb files with the Import button. Please select a
test collection at first or create a new one.
Configuration files from Tessy 2.9 cannot be used in TESSY
3.0! If you want to use a configuration file from Tessy 2.9,
you have to merge all settings into the new configuration file
of TESSY 3.0.
Not all settings can be taken into the new configuration file:
The Make Call has been changed in TESSY 3.x. All attributes
which are needed within the makefile template are automatically generated by TESSY. For this purpose the attributes in
question gets the special flag “Makefile Variable”. For instance,
the attribute “Linker File” will be generated in the test object
makefile as “LINKER_FILE ”.
The makefile templates of Tessy 2.9 are not usable in TESSY
3.x: You have to merge your settings into the new makefile
template of TESSY 3.x. The TESSY 3.x makefile templates
have the version number of 2 to distinguish the new makefile
templates from former versions.
continue next page
18
TESSY 3.1 Manual
2.2 Importing previous projects
Version
HowTo
TESSY 2.6
You have to convert your projects to version TESSY 2.9 first!
• Open your projects in TESSY 2.9. The TESSY converter will ask you
to convert the databases to the new format (*.pdb).
• Continue as described above with TESSY 2.9.
TESSY 2.5
You have to convert your projects to version TESSY 2.6 first!
• Create a module backup file (“Module” > “Save”) for each module
which you want to use. To restore all tmb files within their project
folders, please name the tmb file as follows: [project name].[module
name].tmb
• Save all tmb files in a folder of your choice, e.g.
tmb2.5_[project database name].
• Open TESSY 2.6 and create a new project database. Adjust the project
root, configuration file, etc., so that the project settings are identical as
in TESSY 2.5.
• Select the backup folder using “File” > “Database Backup” > “Backup
Directory”, e.g. tmb2.5_[project database name].
• Restore all backup files using “File” > “Database Backup” > “Select”.
• In the restore from backup dialog, select all tmb files. TESSY 2.6 will
now restore and to convert the tmb files. In addition TESSY creates
the respective project folder for the modules to be imported.
• Continue as described above with TESSY 2.6.
TESSY 2.4,
previous
• Convert the projects to the next major version of TESSY up to TESSY
2.5 (e.g. TESSY 2.4 > TESSY 2.5 > TESSY 2.6). Please contact our
product support if assistance is needed.
• Continue as described above with TESSY 2.6.
Table 2.2: How to import previous projects in TESSY 3.x
TESSY 3.1 Manual
19
2 Migrating from TESSY 2.x to 3.x
2.3 Missing features
Some features are obsolete while others are not yet available within this release of TESSY
3.x.
2.3.1 Python based report
All TESSY 3.x reports are created as PDF files, the former Python based report generation scripts are not available any more. Reporting is now based on the Eclipse BIRT
reporting framework. Report adaptations can be carried out by changing the BIRT report
templates. For more information refer to the application note “008 Customizing Reports”
in the Help menu of TESSY (“Help” > “Documentation”).
2.3.2 THAI
The TESSY hardware abstraction interface is not yet available.
2.3.3 Debugger Scripting Prolog / Epilog
The support of usercode script code as prolog / epilog for TRACE32 and HiTOP debuggers is not yet available.
2.3.4 Diff Viewer
The “Diff Viewer” application of TESSY 2.9 which showed the differences between two
result XML files is not available within TESSY 3.x. This feature will be replaced by a more
powerful implementation and will become available within a later version of TESSY.
20
TESSY 3.1 Manual
3 General handling
This chapter explains how to create databases for your test, how to work with the
different files and the graphical user interface of TESSY and provides some information
about useful shortcuts to work more efficient.
3.1
3.2
3.3
Creating databases and working with the file system . . . . . . . . . . 22
3.1.1
Creating a project database . . . . . . . . . . . . . . . . . . . 22
3.1.2
Creating, importing, cloning, editing, deleting a project . . . . 28
3.1.3
Creating a template project . . . . . . . . . . . . . . . . . . . 30
3.1.4
Moving the project directory . . . . . . . . . . . . . . . . . . 30
3.1.5
Handling with equal named projects . . . . . . . . . . . . . . 31
3.1.6
Using a specific environment setting . . . . . . . . . . . . . . 32
3.1.7
Updating the database . . . . . . . . . . . . . . . . . . . . . 33
Understanding the graphical user interface . . . . . . . . . . . . . . . 35
3.2.1
Menu bar . . . . . . . . . . . . . . . . . . . . . . . . . . . . 35
3.2.2
Tool bar . . . . . . . . . . . . . . . . . . . . . . . . . . . . . 36
3.2.3
Perspectives and perspective (tool) bar . . . . . . . . . . . . . 36
3.2.4
Views . . . . . . . . . . . . . . . . . . . . . . . . . . . . . . 37
3.2.5
Status bar . . . . . . . . . . . . . . . . . . . . . . . . . . . . 40
Using the context menu and shortcuts . . . . . . . . . . . . . . . . . 41
3.3.1
Context menu . . . . . . . . . . . . . . . . . . . . . . . . . . 41
3.3.2
Shortcuts . . . . . . . . . . . . . . . . . . . . . . . . . . . . 41
TESSY 3.1 Manual
21
3 General handling
3.1 Creating databases and working with the file system
The following table provides a fast overview about TESSY´s file system and databases:
What
does
configuration
file
Contains appropriate target environments for the project database
which can be defined with the Test Environment Editor and will be
stored by default under [project root]/tessy/config.
persist (folder)
Contains the databases for the project, one for requirements and test
collections, the other one for test data.
tessy.pdbx (file)
Marker file for the location of a TESSY project. The project can be
opened via double-click. Contains the basic settings of a project and
can be renamed.
project root
Specifies the root directory of your project, so that all paths (e.g.
sources, includes, etc.) can be related to this root. Every project will
have an own project root.
tmb-files
Format to store your backups, usually under
[project root]/tessy/backup.
work (folder)
Contains all temporary files generated during the test process. This
entire directory can be deleted without loosing any data of the TESSY
project.
workspace
Contains all Eclipse-related settings for TESSY (layout/size of
windows/perspectives/views) and the list of projects (the file
projects.xml). You can close TESSY, move the projects.xml somewhere
else, delete the entire directory, restart TESSY and restore the
projects.xml.
Table 3.1: File system and databases of TESSY
3.1.1 Creating a project database
Þ
Start TESSY by selecting “All Programs” > “TESSY 3.x” > “TESSY 3.x”.
Loading TESSY will take a few seconds.
22
TESSY 3.1 Manual
3.1 Creating databases and working with the file system
Figure 3.1: Loading TESSY
The Select Project dialog will open. At top you can see the path of your
workspace (see figure 3.2).
If you have opened a project before, TESSY will open the last project
database. To create a new project, select “File” > “Select Project”
in the menu bar.
Figure 3.2: Path of the workspace
TESSY 3.1 Manual
23
3 General handling
Þ
Click on
(Create Project).
The Project Configuration dialog opens (see figure 3.3).
Figure 3.3: Creating a new project
Creating a new
project
Þ
Enter the name of your project, e.g. Example1 .
Þ
Optional: Enter a description of your project.
Þ
Select a project root: Click on “. . . ” and select a directory where your development project resides, i.e. where source and header files are located and where a
sub directory “tessy” containing the test project shall be created (see figure 3.4).
All the project-related TESSY databases containing information on
the test environment, referenced source files, compiler, debugger,
etc. will be stored within a sub folder of the project root and all
paths into your project will relate to this root.
24
TESSY 3.1 Manual
3.1 Creating databases and working with the file system
Figure 3.4: Selecting a folder for the project root.
Þ
Optional: Extend the “Advanced Settings” by clicking on the plus (see figure
3.5).
You have the following advanced option settings:
Source Root
Advanced
Settings
Use this option to provide an alternative root location for source
files, if your source files reside in another location than the project
root. In this case all path name references to source files and include
paths will automatically be collapsed using the source root location.
If this option is enabled and you open this project on another
computer, you will be asked for the source root location. The source
root location will be remembered locally on each computer and the
given absolute path will not be stored into the TESSY project file.
Configuration File
Enter the path to a specific configuration file or leave the field
blank to use the default configuration. TESSY will create a new
configuration file containing only the GNU/GCC compiler. Refer to
section 6.5.6 Configuration files about how to customize this
configration file.
continue next page
TESSY 3.1 Manual
25
3 General handling
Project Location
You can choose a different location if you would like to locate the
test project files into another sub directory of the project root.
Important: The location has to be within the project
root directory!
Database Location
It is recommended to use the same directory as the project location
but you can choose another sub directory of the project root if you
want to separate the project database files from the other
configuration files of your test project.
If you tick the box “Store database in user profile” the database will
be stored in a directory named using the project identifier GUID
located within the “.tessy_persist” directory within the user
profile.
Backup Location
This directory will be used to store all backup and settings files of
your project which are vital for your project in order to restore it on
another computer. Refer to section 6.12 Backup, restore, version
control for information about files that are relevant for version
control.
It is recommended to use the default location but you can also
choose a different location preferably within the project root. It will
be used as standard for the backup and restore dialog.
Table 3.7: Options of the Project Configuration dialog
26
TESSY 3.1 Manual
3.1 Creating databases and working with the file system
Figure 3.5: Creating a new project
Þ
Click “OK”.
Now TESSY creates automatically a sub folder “tessy” within the project root
directory. This folder contains (within sub folders) the configuration file and
the persistence databases. This will take a few seconds.
TESSY 3.1 Manual
27
3 General handling
Figure 3.6: Project Example1 is created.
The project root
By default the project root contains your development project, e.g.
files, and one sub folder “tessy” that contains all TESSY related files.
source
With the project root set you will be able to use relative paths within the
TESSY configuration, e.g. references to source and config files. This ensures
that you can move whole projects to new locations.
3.1.2 Creating, importing, cloning, editing, deleting a project
In the Select Project dialog you can create, import, clone, edit and remove or delete your
project with selecting the project and click on the icon in the tool bar:
Creates a new project.
Imports an existing project.
Clones a project: TESSY creates a complete copy of a project and adds it to the
project list. A new name is required.
continue next page
28
TESSY 3.1 Manual
3.1 Creating databases and working with the file system
Opens the Project Configuration dialog.
Important: Project root, project location and database location
cannot be modified subsequently!
Removes a project from the workspace. If you want to delete all data including
project and database location, tick the box “Delete project contents on disk”.
Warning: Deleted files cannot be restored! Before deleting make
sure the project is not needed anymore or backup the project as
described in section 6.12 Backup, restore, version control.
Table 3.9: Tool bar options of the Select Project dialog
With a right-click you can open the context menu for further options:
Figure 3.7: Context menu of the Select Project dialog
TESSY 3.1 Manual
29
3 General handling
3.1.3 Creating a template project
With a right-click on a project in the project list you can mark a project as “Template
Project” (see figure 3.7).
This will have the following effects:
•
The project cannot be opened anymore!
•
Doubleclicking the project or marking the project and click “Open Project”
will start the Project Configuration Dialog and the “Clone Project” command
(see section 3.1.2 Creating, importing, cloning, editing, deleting a project).
•
Doubleclicking the .pdbx-file of the template project will start the Project
Configuration Dialog and the “Clone Project” command.
At anytime you can remove the mark as template project. The project will then
be a normal project and you can open it as usual.
3.1.4 Moving the project directory
You can move your whole project directory and then import the project again:
Þ
Either double-click on the tessy.pdbx file or use the Import Project button.
TESSY will ask you, if the project was moved or copied (see figure 3.8).
Þ
Answer this question correctly and click “OK”.
If the project was copied, i.e. you want to create a new project as a copy of
the original one, a new project identifier needs to be assigned to distinguish the
new project from the original one. TESSY will do this automatically.
30
TESSY 3.1 Manual
3.1 Creating databases and working with the file system
Figure 3.8: Project identifier
3.1.5 Handling with equal named projects
In the “Select Project” dialog all projects are listed with name and local path.
Figure 3.9: Project Example1 is created.
It is possible to handle projects with equal names. The table below explains in which way
TESSY will replace projects within the projects list if they have identical names:
TESSY 3.1 Manual
31
3 General handling
status
operation
behavior and tip
Project named
’Alpha’ exists in
location ’xy’.
You create a new project
’Alpha’ in another
location.
You will get a warning:
“Project with identical name will be
removed from the project list.”
The new project appears in the project
list, the old project will be removed from
the list (but not deleted!).
If you want to open the old project
again,
Þ click on “Import” and open the old
project. In that case the newer project
will again be removed from the list.
Project ’Alpha’
exists in location
’xy”.
You try to create a new
project ’Alpha’ in the
same location.
You will get an error, it is not possible to
create the project, because two projects
cannot share the same location.
Þ Change the location of the new
project.
Project ’Alpha’
exists in location
’xy’.
You open an existing
project ’Alpha’ (either
with click on “Import” or
within the command line
interface) in another
location ’Beta’.
You will get a note
“Information: Project ’Alpha’ replaced
within the project list.”
The second project appears in the
project list, the first project will be
removed from the list (but not deleted!).
If you want to open the other project
again,
Þ click on “Import” and open the other
project.
Table 3.12: Handling of projects with equal names
3.1.6 Using a specific environment setting
Important: This section is only recommended for advanced users that have
already worked with TEE. For basic handling we recommend to continue with
section 3.2 Understanding the graphical user interface and following sections
and then return to this section.
32
TESSY 3.1 Manual
3.1 Creating databases and working with the file system
TESSY will create a specific configuration file for each project database. This way you
can share the environment settings with other members of your development team. The
configuration file is stored within your project root together with other project related
files. Such a configuration file contains only the compiler/target environments you want
to use. All other environment configurations are not visible for the user as long as this
file is assigned to a given project database.
To customize the configuration file within the Test Environment Editor (TEE)
Þ
refer to section 6.5.6 Configuration files.
3.1.7 Updating the database
After the update you cannot open the project in previous versions of TESSY!
TESSY will recognize, if an upate of the database is necessary (see figure 3.10).
Figure 3.10: TESSY notifies, that a database update is necessary
TESSY 3.1 Manual
33
3 General handling
When you want to open the project, you will be asked to update the database
(see figure 3.11).
Þ
Click “OK”.
Figure 3.11: A database update is necessary
34
TESSY 3.1 Manual
3.2 Understanding the graphical user interface
3.2 Understanding the graphical user interface
When TESSY starts the first time, the graphical user interface (GUI) will open within
the Overview perspective.
Please check the terminology shown in the figure “TESSY interface” and the explanations
beneath. This terminology will be used throughout this manual.
Figure 3.12: TESSY interface and its terminology
3.2.1 Menu bar
The menu bar provides actions as “File”, “Windows” etc. Within the “Help” you find the
online help of TESSY. Many of these actions may also be available within the context
TESSY 3.1 Manual
35
3 General handling
menu of individual views, if the actions are applicable for the items within the view.
3.2.2 Tool bar
At the global tool bar of TESSY interface you can select a project, save changes etc. By
rolling over an icon with the cursor a tooltip will tell you the purpose of each icon. There
may also be individual tool bars within the views. Here you find the tools for operating,
e.g. to start the test execution .
Save all changes in any views or editors by clicking the save icon
.
3.2.3 Perspectives and perspective (tool) bar
TESSY contains several perspectives to present information based on different tasks in the
test workflow (“Requirement Management”, “Overview”, “TIE” etc.). Each perspective
offers several views. In the perspective bar (containing the perspective names) you can
switch between the different perspectives. The perspectives - from the left to the right
- follow the actions taken while preparing, running and evaluating a test.
Every perspective name has several right click menu options (the context menu).
By clicking on the left symbol
you can open other perspectives (see figure 3.13):
Figure 3.13: Open other perspectives
36
TESSY 3.1 Manual
3.2 Understanding the graphical user interface
3.2.4 Views
Figure 3.14: Test Project view within the Overview perspective
Every view in each perspective contains possibilities of configurations or provides presentations of data. Some views are common to several perspectives (such as the properties
of sources), and some are specific to one perspective (such as the plots in the TIE).
Notice that the views appear differently combined with other views, e.g. the view Test
Results within the Overview perspective is combined with the Test Items view, but within
the TDE perspective it is combined with the Test Project view. The reason for the
different combinations is to give you a fast overview and comparison between various
information within each project step.
You can change the appearance of views for you own needs and open views of one
perspective into another perspective:
Þ
Activate (open) the perspective where you want to add a view.
Þ
Click “Window” > “Show View”.
Adding views to
a perspective
A window displaying all views will open (see figure 3.15).
Þ
Select the view you want to open.
Þ
Click “OK”.
The selected view is added to the active perspective.
TESSY 3.1 Manual
37
3 General handling
Figure 3.15: Adding views to a perspective
Changing view
position
Change the position of views with drag and drop:
Þ
Click on a name of a view and move it where you like: You can move views to
another location within the same group of views or into another group of views
or even outside the current window.
Þ
Right-click on the perspective switch and choose “Reset” to switch back to the
original positions of all views of the respective perspective (see figure 3.16).
Figure 3.16: Move the views separately. To switch back, use “Reset”.
38
TESSY 3.1 Manual
3.2 Understanding the graphical user interface
To switch back all positions of perspectives and views:
Þ
Resetting
workbench
Choose “Window” > “Reset Workbench” from the menu bar (see figure 3.17).
Figure 3.17: To switch back all positions of views and perspectives use “Reset
Workbench”.
You can maximize and minimize views for better visibility.
To maximize a view,
Þ
Maximize and
minimize views
use the button within the right corner (see figure 3.18) or double click on the
tab of the view.
Figure 3.18: Minimizing and maximizing views
The view will be maximized and other views of the perspective will be minimized, displayed
by the view symbol on the left and the right (see figure 3.19).
To restore all views,
Þ
click on the “Restore”-button on the upper left side.
TESSY 3.1 Manual
39
3 General handling
Figure 3.19: Maximized view with minimized views on the right and the
restore-button on the left
There are navigation views that present hierarchical structured data. Selections on such
tree items may cause other views or the editor pane to change the information being
displayed.
All views are context sensitive: If you select an item within one view, another
view might display other information. If something is not displayed correctly,
make sure you selected the desired item.
3.2.5 Status bar
The status bar provides status information about the application and current status, e.g.
the directory of the project root and the configuration file.
40
TESSY 3.1 Manual
3.3 Using the context menu and shortcuts
3.3 Using the context menu and shortcuts
3.3.1 Context menu
Most contents, tabs etc. have options that are displayed in the context menu, which is
retrieved with a right click. It shows main operations as “Copy”, “Paste”, “Delete” etc.
The context menu is context sensitive and changes as different items are selected (see
figure 3.20).
Figure 3.20: Using the context menu with right click.
3.3.2 Shortcuts
You can operate within TESSY with several shortcuts by using the keyboard:
Important: For using shortcuts make sure to be in editing mode of the current
view! Otherweise the shortcut will not work.
Warning: You cannot reverse the deleting of data. Before deleting make sure
this database is really not needed anymore.
Function
Shortcut / Keys
copy
Ctrl+C
cursor positioning
right
tab
alternatively
Ctrl+right arrow key
Comment
Moves the cursor to the next input section on
the right side of the line.
Only within TDE.
continue next page
TESSY 3.1 Manual
41
3 General handling
Function
Shortcut / Keys
Comment
cursor positioning
left
Shift+tab
alternatively
Ctrl+left arrow key
Moves the cursor to the input section on the left
side of the line.
Only within TDE.
cut
Ctrl+X
Only possible for folders, modules and (synthetic) testobjects, not for test items.
delete
Del
Only possible if the item to delete does not contain any data or folders or modules!
Only manually created test cases can be deleted!
You cannot delete test cases created by CTE.
This prevents possible inconsistencies within the
CTE document.
generate test report
Ctrl+R
new folder
Shift+Ins
new module
Ins
paste
Ctrl+V
rename
F2
start test execution
Ctrl+E
Only possible, if a test collection or folder is selected.
Executes a testobject.
Table 3.20: Shortcuts and key functions
Drag & Drop
You can also operate with “drag & drop”, which is the same as “cut & paste”.
Shortcuts for certain views are described in the related section within chapter 6
Working with TESSY.
42
TESSY 3.1 Manual
4 Basic knowledge
This chapter offers a brief introduction about unit testing with TESSY and the classification tree method. It provides basic knowledge for organizing and executing a unit test in
general and in particular with TESSY. The chapter about the classification tree method
helps you to understand the logical system and to use the CTE.
4.1
4.2
Unit testing of embedded software . . . . . . . . . . . . . . . . . . . 44
4.1.1
Standards that require testing . . . . . . . . . . . . . . . . . 44
4.1.2
About unit testing . . . . . . . . . . . . . . . . . . . . . . . . 45
4.1.3
Considerations for unit testing . . . . . . . . . . . . . . . . . 46
4.1.4
Methods for unit testing . . . . . . . . . . . . . . . . . . . . 48
4.1.5
Conclusion . . . . . . . . . . . . . . . . . . . . . . . . . . . . 50
The Classification Tree Method (CTM) . . . . . . . . . . . . . . . . 51
4.2.1
General
4.2.2
Steps to take . . . . . . . . . . . . . . . . . . . . . . . . . . 52
4.2.3
Example is_value_in_range
TESSY 3.1 Manual
. . . . . . . . . . . . . . . . . . . . . . . . . . . . . 51
. . . . . . . . . . . . . . . . . . 58
43
4 Basic knowledge
4.1 Unit testing of embedded software
Testing is an integral part of the software development process for embedded
systems and its necessity to attain software quality is undisputed. This section
gives a comprehensive overview on aspects of unit tests of embedded software.
4.1.1 Standards that require testing
International standards like IEC 61508 require module tests. According to part 3 of IEC
61508, the module test shall show that the module under test performs its intended
function, and does not perform unintended functions. The results of the module testing
shall be documented.
IEC 61508 classifies systems according to their safety criticality. There are four safety
integrity levels (SIL), where 1 is the lowest level and 4 the highest, i.e. systems at level
4 are considered to be the most critical to safety. Even for applications of low criticality
(i.e. at SIL 1), a module test is already “highly recommended”. The tables contained in
the annexes of IEC 61508, Part 3 specify the techniques that should be used, e.g. for
module testing the technique “functional and black box testing” is highly recommended at
SIL 1 already. Other techniques, such as dynamic analysis and testing are recommended
at SIL 1 and highly recommended at SIL 2 and higher.
Part 4 of IEC 61508 defines a (software) module as a construction that consists of
procedures and/or data declarations, and that can interact with other such modules. If
we consider embedded software which is written in the C programming language, we can
take a C-level function as a module. To prevent a mix-up between C-level functions and
C source modules, we will refer to the C-level functions as units from now on.
Also other standards like the British Def Stan 00-55, ISO 15504 or DO-178B require
module testing (where the nomenclature ranges from “module” to “unit” to “component”).
However, all standards have more or less the same requirements for that kind of test: the
tests have to be planned in advance, test data has to be specified, the tests have to be
conducted, and the results have to be evaluated and documented.
44
TESSY 3.1 Manual
4.1 Unit testing of embedded software
4.1.2 About unit testing
4.1.2.1 What is unit testing?
During unit testing of C programs, a single C-level function is tested rigorously, and is
tested in isolation from the rest of the application. Rigorous means that the test cases
are specially made for the unit in question, and they also comprise of input data that
may be unexpected by the unit under test. Isolated means that the test result does not
depend on the behavior of the other units in the application. Isolation from the rest of
the application can be achieved by directly calling the unit under test and replacing the
calls to other unit by stub functions.
Unit testing tests at the interface of the unit, and unit testing does not consider the
internal structure of the unit, and therefore unit testing is considered as black-box testing.
The interface of the unit consists of the input variables to the unit (i.e. variables read
by the unit) together with the output variables (i.e. variables written by the unit). A
variable can both be an input and an output (e.g. a variable that is incremented by the
unit), and the return value of the unit - if present - is always an output. The structure
of a test case follows from the structure of the interface.
Unit testing is conducted by executing the unit under test with certain data for the input
variables. The actual results are compared to those predicted, which determines if a test
case has passed or failed.
Unit testing (of C-level functions, as described) is well suited to fulfill the requirements
of module testing for IEC 61508, because unit testing is
•
functional, because the functionality of the unit is tested, and
•
a black-box, because the internals of the unit are not taken into account, and
•
dynamic, because the test object is executed during the test.
4.1.2.2 What are the benefits?
•
Finding errors early: Unit testing can be conducted as soon as the unit to
be tested compiles. Therefore, errors inside the unit can be detected very
early.
•
Saving money: It is general knowledge that errors which are detected late
are more expensive to correct than errors that are detected early. Hence, unit
testing can save money.
TESSY 3.1 Manual
45
4 Basic knowledge
•
Reducing complexity: Instead of trying to create test cases that test the
whole set of interacting units, the test cases are specific to the unit under test.
Test cases can easily comprise of input data that is unexpected by the unit
under test or by even random input test data, which is rather hard to achieve
if the unit under test is called by a fully-functioning unit of the application. If
a test fails, the cause of the failure can be easily identified, because it must
stem from the unit under test, and not from a unit further down the calling
hierarchy.
•
Giving confidence: After the unit tests, the application is made up of single,
fully tested units. A test for the whole application will be more likely to
pass, and if some tests fail, the reason will have probably stemmed from the
interaction of the units (and not from an error inside a unit). The search for
the failure can concentrate on that, and must not doubt the internals of the
units.
4.1.3 Considerations for unit testing
4.1.3.1 Which units are good test candidates?
Unit testing verifies that certain input data generates the expected output data. Therefore, units that do data processing in its widest sense, e.g. generation of data, analysis
of data, sorting, making complex decisions, difficult calculations are best suited for unit
testing. To find such units, the application of metrics (e.g. the cyclomatic complexity
according to McCabe) may be appropriate.
Other criteria for selecting units to test may be how critical the functionality is to the
unit’s operation, or how often a unit is used in the application.
4.1.3.2 What is not in the scope of unit testing?
The interaction of the units is not tested during the unit test. This includes the semantic
of the parameters passed between units (e.g. the physical unit of the values), and the
timely relationships between units (e.g. does a unit fulfill its task fast enough to let a calling unit fulfill their tasks also at the required speed?) In addition, the interrupt behavior
of the application is not in the scope of unit testing. Questions like “Does my interrupt
really occur every 10 ms?” or “Which interrupt prolonged my unit unacceptably?” are not
addressed by unit testing, because unit testing explicitly aims at testing the functional
behavior of the unit isolated from environmental effects such as interrupts.
46
TESSY 3.1 Manual
4.1 Unit testing of embedded software
4.1.3.3 Why is regression testing necessary?
Regression testing is the repetition of tests that have already passed after the implementation of bug fixes or improvements in the software. Regression testing proves that a
change in the software did not result in any unexpected behavior. Regression testing is
a key to software quality. Obviously, the practice of regression testing requires the automation of the tests, because the effort to repeat the tests manually is too high. Even
for non-repetitive unit tests, the proper tool support will save you lots of time, but tool
support is indispensable for the repetition of the unit tests.
4.1.3.4 Who should conduct the tests?
The dilemma: It is commonly accepted that a software developer is badly suited to test
his own software, especially if the complete implementation, or the compliance of the
implementation with the specification is an issue (blindness against own faults). If the
developer has forgotten to implement a certain functionality, it is likely he will also forget
a test that will reveal the missing functionality. If the developer has misinterpreted the
specification, it is likely that his tests will pass in spite of the wrong functionality.
On the other hand, experience has shown that a tester, who should test a code not
written by him must put a lot of effort into understanding the function´s interface. The
tester must find out the meaning of the variables, and which values to use to conduct
certain tests. E.g., if the test specification requires the test of something “green”, which
variable (or variables) represents the color, and which value of the variable represents
green? The prediction of the expected results poses similar problems.
If the developer does not do tests, this gives rise to additional efforts, because the
failed test has to be passed to the developer, he has to reproduce the failure, correct
the problem, and then normally a concluding external regression test has to take place.
Furthermore, additional effort rises due to the fact that the developer will not hand
out his software to the QA department without having done at least some tests. This
duplicated test effort could be saved if the developer immediately starts testing by using
the externally predefined test cases.
The way out: A way out of that dilemma could be that a tester, who has not written
the code, specifies the test cases according to the functional specification of the unit,
including the expected results. He can use abstract data for this (e.g. color = green). The
set of test cases is handed over to the developer of the software. For him, it should be no
problem to set the input variables to the required values (e.g. the appropriate RGB value
for green). If a test fails, the developer can immediately correct the problem and re-run
all tests that have passed so far (regression testing). Testing is seen as an additional step
during the implementation of software, in comparison to the compiling step, where the
TESSY 3.1 Manual
47
4 Basic knowledge
compiler finds all syntax errors, and the developer corrects them interactively, verifying
his changes by subsequent compiler runs.
However, standards require the organizational separation of development and test, due
to the initial mentioned reason of blindness against own faults. Possibly, it could be
sufficient to only separate the specification of the test cases from the development,
and to consider the conduction of predefined test cases not to suffer under the above
mentioned blindness.
Furthermore, a developer´s time is often considered as too valuable to be wasted on
testing, which is why developer testing is not found often in practice. However, this is
going to be reconsidered.
4.1.3.5 What is special for testing embedded software?
For embedded software it is essential that the unchanged source code with all the nonANSI keywords and non-ANSI peculiarities is used for testing. For instance, some cross
compiler for embedded systems allow for bit fields that are smaller than the integer
size, e.g. 8-bit wide bit fields in a 16-bit application. This is forbidden by the ANSI C
standard, but justifiable by the perfect adaptation to the embedded system. Naturally,
the unit test results are worthless, if this illegal size cannot be maintained during the
tests. This requires specialized tools. Furthermore, it is also essential that the concluding
tests at least execute on the actual hardware, i.e. the embedded microcontroller. This
is a challenge, but there are ways to attenuate this. Using a cross compiler for the
microcontroller in question is a prerequisite, preferably the exact version that will be used
also for the user application.
4.1.4 Methods for unit testing
Unit test tools can follow two technical approaches towards unit test: The test application
approach uses a special application for conducting the unit tests. This is the usual
approach. The original binary test uses the unchanged user application for testing.
4.1.4.1 a. Test application
The usual method for unit test tools to conduct unit tests is to generate a test driver
(also called test harness) and compile the test driver together with the source code of
the unit under test. Together they form the test application. The test driver includes
startup code for the embedded microcontroller, the main() function entry, and a call to
the unit under test. If required, the test driver contains also code for stub functions and
the like. For each unit to test, an own test application is created. This test application is
48
TESSY 3.1 Manual
4.1 Unit testing of embedded software
used to conduct the unit tests. For that, the test application is loaded into an execution
environment capable of executing the test application. This execution environment is
normally a debugger connected to an (instruction set) simulator, an in-circuit emulator
stand-alone or connected to a target system, a JTAG or BDM debugger or the like. After
test data is transferred to the execution environment, (the test data may already be
included in the test application), tests are conducted and the results are evaluated.
To execute the test application on the actual hardware, the test application must not only
be compiled using a cross compiler for the microcontroller in question, but also the test
application must fit into the memory present on the actual hardware. Also, the startup
code of the test application must take into account peculiarities of the actual hardware,
e.g. the enabling of chip selects and the like. Making the test application fit into memory
can be simplified by using an in-circuit emulator, which provides emulation memory, and
serves as a kind of generalized hardware platform for the microcontroller in question.
When the actual hardware has to be used and if memory on this hardware is very limited,
the test application must be minimized to fit into this memory. This is especially challenging for single chip applications, where only the internal memory of the microcontroller
is available. If test data is included in the test application (and memory is limited), a
single test application can only include a few test cases, which in turn means several test
applications for the test of one unit, which is cumbersome. An approach which avoids
this, keeps the test data separated from the test application, which allows not only for a
minimized test application, but also allows you to change the test data without having
to regenerate the test application.
4.1.4.2 b. Original binary test
Another approach is to use the unchanged user application for unit testing. This resembles
the manual test that is usually done by a developer after the application is completed.
The complete application is loaded into the execution environment, and the application
is executed until the unit to be tested is eventually reached. Then the input variables are
set to the required values, and the test is conducted.
4.1.4.3 Pros and cons
The advantage of the Original Binary Test approach is that the unit under test is tested
exactly in its final memory location. There is no extra effort (or hassle) for compiling and
linking a test application, because the user application is used, which is already compiled
and linked or had to be compiled and linked anyway. Because the user application must
fit in the memory anyway, problems regarding the size of the application can be neglected.
Even applications that already reside in the ROM of the hardware can be tested. Even
TESSY 3.1 Manual
49
4 Basic knowledge
if the cross compiler used to compile the user application is no longer at hand, tests are
still feasible.
However, this Original Binary Test approach has some disadvantages compared to using
a test application:
•
There is no control over the test execution. It depends on the user application,
when the unit under test is reached. It may be the case that the unit under
test is never reached, or only after some special external event has happened,
e.g. the push of a button of the actual hardware and an interrupt resulting
from this.
•
During the Original Binary Test, stub functions cannot be used. This is clear
because the application is already linked using the current functions that are
called by the unit under test. A unit is always tested using the other units of
the application. Therefore, the unit under test is not isolated from the rest
of the application, and errors of called units may show up during the test of
the unit under test.
•
It is not possible to use arbitrary test data for the unit test. For instance, if
the unit under test gets its test data by a pointer pointing to a memory area,
the amount test data must fit into this memory area, which was allocated by
the user application.
Apart from its easy usage, which possibly could be the only means to do some unit testing
at all, the Original Binary Test has strong disadvantages, which are essential for proper
unit testing and therefore one could even insist that it is not a unit test in its strictest
sense.
4.1.5 Conclusion
Besides being required by standards, unit testing reduces the complexity of testing, finds
errors early, saves money, and gives confidence for the test of the whole application. If
used in the right way, unit testing can reduce development/test time and therefore reduce
the time-to-market. To conduct regression tests, test automation is indispensable. This
requires tool support.
50
TESSY 3.1 Manual
4.2 The Classification Tree Method (CTM)
4.2 The Classification Tree Method (CTM)
The objective of the Classification Tree Method (CTM) is to transform a (functional) definition of a problem systematically into a set of error-sensitive, low
redundancy set of test case specifications. This document gives a comprehensive
overview of the CTM.
4.2.1 General
Testing is a compulsory step in the software development process. The planning of such
testing often raises the same questions:
•
How many tests should be run?
•
What test data should be used?
•
How can error-sensitive tests be created?
•
How can redundant tests be avoided?
•
Have any test cases been overlooked?
•
When is it safe to end testing?
Anyone who has been confronted with such issues will be glad to know that the CTM
offers a systematic procedure to create test case specifications based on a problem definition.
The objective of the CTM is to transform a (functional) definition of a problem systematically into a set of error-sensitive, low redundancy set of test case specifications. The
systematic approach yields a high probability that the resulting set of test specifications
is complete and no relevant tests are overlooked. Naturally, correct usage of the method
and an appropriate integration in the development process are prerequisites. Having a
complete set of tests gives evidence when it is safe to end testing.
The CTM is applied by a human being. Therefore, the outcome of the method depends
on the experiences, reflections, and appraisals of the user of the CTM. Most probably
two different users will come out with a different set of test case specifications for the
same functional problem. Both sets could be considered to be correct, because there
is no absolute correctness. It should be clear that there are set of test cases that are
definitively wrong or incomplete. Because of the human user, errors cannot be avoided.
One remedy is the systematic inherent in the method. This systematic guides the user
TESSY 3.1 Manual
51
4 Basic knowledge
and stimulates his creativity. The user shall specify test cases with a high probability
to detect a fault in the test object. Such test cases are called error-sensitive test cases.
On the other hand, the user shall avoid that too many test cases are specified, that are
superfluous, i.e. do not increase test intensiveness or test relevance. Such test cases are
called “redundant” test cases. It is advantageous, if the user is familiar with the field of
application the method is applied in.
The CTM is a general method: It can not only be applied to module/unit testing of
embedded software, but to software testing in general and also to functional testing of
problems, that are not software related. The prerequisite to apply the method is to
have available a functional specification of the behaviour of the test object. The CTM
incorporates several well-known approaches for test case specification, e.g. equivalent
partitioning, and boundary value analysis.
The CTM stems from the former software research laboratory of Daimler in Berlin,
Germany.
4.2.2 Steps to take
a. Defining the functional problem
The first step is to describe the expected behaviour of the test object, e.g. “If the button
is pushed, the light will go on; if the button is released, the light will go off”. Data
processing software normally solves functional problems, since input data is processed
according to an algorithm (the function) to become output data (the solution).
b. Determining the test-relevant aspects
Analyse the functional specification. This means, you think about this specification with
the objective to figure out the test-relevant aspects of the specification. An aspect is
considered relevant if the user expects that aspect to influence the behaviour of the test
object during the test. In other words, an aspect is considered relevant if the user wants
to use different values for this aspect during testing. To draw the tree, these aspects are
worked on separately. This reduces the complexity of the original problem considerably,
what is one of the advantages of the CTM.
Example for a test-relevant aspect
Consider systems that measures distances in a range of some meters, e.g. the distance to
a wall in a room. Those systems usually send out signals and measure the time until they
receive the reflected signal. Those systems can base on two different physical effects: One
can use sonar to determine the distance, whereas the other can use radar.
52
TESSY 3.1 Manual
4.2 The Classification Tree Method (CTM)
The question is now: Is the temperature of the air in the room a test relevant aspect for
the test of these measurement systems? The answer is yes for one system and no for the
other:
The speed of sound in air (sonar) is dependent on the temperature of the air. Therefore,
to get exact results, the sonar system takes this temperature into account during the
calculation of the distance. To test if this is working correct, you have to do some tests at
different temperatures. Therefore, the temperature is a test-relevant aspect for the sonar
system. On the other hand we all know that the speed of a radar signal, that travels
at the speed of light, is independent from the temperature of the air it travels in (it did
not even need air to travel). Therefore, the temperature of the air is not a test-relevant
aspect for the testing of the radar system. It would be superfluous to do testing at different
temperatures.
This example shows that it needs careful thinking to figure out (all) test relevant aspects.
It would lead to poor testing if someone simply takes the test cases for the radar system
and applies them to the sonar system without adding some temperature-related test cases.
Additionally, this example illustrates that it is advantageous to have some familiarity with
the problem field at hand when designing test cases.
c. Classifying the values of a test-relevant aspect
After all test relevant aspects are determined, the values that each aspect may take are
considered. The values are divided into classes according to the equivalence partitioning
method: Values are assigned to the same class, if the values are considered equivalent
for the test. Equivalent for the test means that if one value out of a certain class causes
a test case to fail and hence reveals an error, every other value out of this class will also
cause the same test to fail and will reveal the same error.
In other words: It is not relevant for testing which value out of a class is used for testing,
because they all are considered to be equivalent. Therefore, you may take an arbitrary
value out of a class for testing, even the same value for all tests, without decreasing the
value of the tests. However, the prerequisite for this is that the equivalence partitioning
was done correctly, what is in the responsibility of the (human) user of the CTM.
Please note:
•
Equivalent for the test does not necessarily mean that the result of the test
(e.g. a calculated value) is the same for all values in a class.
•
Equivalence partitioning must be complete in mathematical sense: Every possible value of a test relevant aspect must be assigned to a class.
•
Equivalence partitioning must be unique in mathematical sense: A value of
a test relevant aspect must be assigned to a single class, and not to several
classes.
TESSY 3.1 Manual
53
4 Basic knowledge
Example for equivalence partitioning: Ice Warning
An ice warning indication in the dashboard of a car shall be tested. This ice warning
indication depends on the temperature reported by a temperature sensor at the outside of
the car, which can report temperatures from -60°C to +80°C. At temperatures above 3°C
the ice warning shall be off, at lower temperatures it shall be on.
It is obvious that the temperature is the only test-relevant aspect. To have an reasonable
testing effort, we do not want to have a test case for every possible temperature value.
Therefore, all possible temperature values need to be classified according to the equivalence
partitioning method.
It is best practice to find out if invalid values may be possible. In our case a short circuit or
an interruption of the cable could result in an invalid value. Therefore, we should divide the
temperature in valid and invalid values first. The invalid values can relate to temperatures
that are too high (higher than 80°C) and to ones that are too low (lower than -60°C). It
is tempting to form two classes out of the valid temperatures: The first class shall contain
all values that result in the ice warning display being on (from -60°C to 3°C) and the other
class shall contain all values that result in the ice warning display being off (from 3°C to
80°C).
Figure 4.1: Initial equivalence partitioning for “ice warning”
The equivalence partitioning in the figure above leads to at least four test cases, because
we need to take a value out of each class for the tests.
d. Repeating equivalence partitioning
An equivalence class can be sub-divided according to additional aspects. This equivalence
partitioning on several levels reduces the complexity of equivalence partitioning, because
you can consider each class isolated from the other classes and decide, if and how it
needs to be sub-divided or not. Furthermore, this equivalence partitioning on several
levels documents the thoughts resp. stages of work until the final equivalence partition.
This serves understandability and traceability of the result. Also it allows easily reverting
steps if the final equivalence partition has become too fine granulated.
54
TESSY 3.1 Manual
4.2 The Classification Tree Method (CTM)
Example for repeated equivalence partitioning
For the example ice warning, the classification of the valid values is not detailed enough,
because according to the equivalence partitioning method, it would be sufficient to use
a single, arbitrary value out of a class for all the tests. This could be for instance the
value 2°C out of the class of temperatures, for which the ice warning display is on. In
consequence, no test with a minus temperature would check if the ice warning display is
on. To avoid this consequence, you could divide this class further according to the sign of
the temperature:
Figure 4.2: Repeated equivalence partitioning for “ice warning”
Result: Classification tree
Using the CTM, the result of the repetition of equivalence partitioning for all test relevant
aspects is depicted in the CT. The root represents the functional problem, the test relevant
aspects. Test relevant aspects (classifications) are drawn in nodes depicted by rectangles.
Classes are ellipses.
TESSY 3.1 Manual
55
4 Basic knowledge
Figure 4.3: A possible CT for “ice warning”
e. Using boundary values
The idea behind using boundary values is that values at the borders of a range of values
are better suited to form error-sensitive test cases than values in the middle. The idea
behind boundary values analysis is contrary to equivalence partitioning, because one
method takes a set of values as equivalent and the other method prefers special values in
such a set. Despite the fact that the idea behind boundary values analysis is exactly the
opposite of equivalence partitioning, both approaches can be expressed in the CTM.
f. Testing a hysteresis
The current problem specification of the ice warning-example does not mention hysteresis.
It may be tempting to extend the current problem specification in that fast changes in
the state of the ice warning display shall be avoided. For instance, the ice warning display
shall be switched off only after the temperature has risen to more than 4°C. This could be
realized by a hysteresis function. The necessary test cases for such a hysteresis function
can be specified by the CTM.
g. Specifying test cases
Test cases are specified in the so-called combination table below the CT. The leaf classes
of the CT form the head of the combination table. A line in the combination table depicts
a test case. The test case is specified by selecting leaf classes, from which values for the
56
TESSY 3.1 Manual
4.2 The Classification Tree Method (CTM)
test case shall be used. This is done by the user of the method, by setting markers in
the line of the respective test cases in the combination table.
Figure 4.4: Result of the CTM: tree (above) with combination table (below)
It may be tempting to combine every class with every other class during the specification
of the test cases. Besides the fact, that not every combination might be possible for logical
reasons, it is not the intention of the CTM to do so, it could be done automatically by
a tool. This would lead to many test cases, with the disadvantages of loss of overview
and too much effort for executing the test cases.
The objective of the CTM is to find a minimal, non-redundant but sufficient set of test
cases by trying to cover several aspects in a single test case, whenever possible. Similar
to the drawing of the tree, it depends on the appraisal and experience of the user of the
method, how many and which test cases are specified.
Obviously the size of the tree influences the number of test cases needed:
A tree with more leaf classes naturally results in more test cases than a tree with less leaf
classes. The number of leaf classes needed at least for a given tree is called the minimum
criterion. It can be calculated from the consideration that each leaf class should be
marked in at least one test case, and that some leaf classes cannot be combined in a
single test case, because the classes exclude each other.
Similar a maximum criterion can be calculated, which gives the maximal number of test
cases for a given CT. A rule of thumb states that the number of leaf classes of the
tree gives the order of magnitude for the number of test cases required for a reasonable
coverage of the given tree.
TESSY 3.1 Manual
57
4 Basic knowledge
4.2.3 Example is_value_in_range
Problem definition:
A start value and a length define a range of values. Determine if a given value is within
the defined range or not. Only integer numbers are to be considered.
Figure 4.5: The problem “is_value_in_range” depicted graphically
It is obvious, that completed testing is practically impossible, because we get 65536 * 65536
* 65536 = 281.474.976.710.656 test cases, even if we assume only 16 bit integers. If we
would assume 32 bit integers . . . well, we better do not.
4.2.3.1 Test-relevant aspects
The start of the range and the length can be regarded as test relevant aspects. This is
convenient since, according to the problem definition, a range of values is defined by a
start value and a length. It reflects the intention to use different values for the start and
the length during testing.
We should have some test cases, which result in inside, and other test cases which result
in outside. We call the corresponding aspect position, because the position of the value
under test with respect to the range determines the result. So the three test-relevant
aspects to be used for classifications are initial value, length and position and they thus
form the basis of the CT:
Figure 4.6: The initial CT with three test-relevant aspects
58
TESSY 3.1 Manual
4.2 The Classification Tree Method (CTM)
4.2.3.2 Forming classes
Now classes are formed for the base classifications according to the equivalence partitioning method. Usually, the problem specification gives us hints how to form the classes.
E.g. if the problem specification would state: “If the start value is greater than 20, the
length value doubles”, then we should form a class for start values greater than 20 and a
class for start values smaller or equal to 20.
Unfortunately, the problem specification at hand is too simple to give us similar hints.
However, since the start value can take on all integer numbers, it would be reasonable to
form a class for positive values, a class for negative values, and another class for the value
zero. It would also be reasonable to form just two classes, e.g. one class for positive
start values including zero and the other class for negative start values. This depends on
ones emphasis having zero as value for the start of the range in a test case or not.
Figure 4.7: The CT for is_value_in_range, 2nd step
Because of the systematic inherent in the CTM, and because range_length is an integer
as well as range_start, it is stringent to use for range_length the same classes as for
range_length. This results in the following tree:
Figure 4.8: The CT for is_value_in_range, 3rd step
4.2.3.3 A first range specification
To specify a first range (to be used in the first test case), we have to insert a line in the
combination table and to set markers on that line:
TESSY 3.1 Manual
59
4 Basic knowledge
Figure 4.9: A first specification for the range in the combination table
Two markers are set on the line for the first specification. One marker selects the class
positive for the start of the range. The other marker selects the class positive for the
length of the range. A range with the start value of, say, 5 and a length of 2 would
accord to the specification. This first specification was named trivial.
4.2.3.4 A second range specification
We can insert a second line in the combination table and specify a much more interesting
tests case:
Figure 4.10: A second specification for the range in the combination table
For the second specification again two markers are set. They specify that a negative
value shall be used both for the start and for the end of the range. Hence a range with
the start value of -5 and a length of -2 would accord to the second specification. But
this value pair raises some questions: Shall the value -6 lie inside the range? Or shall the
value -4 lie inside the range? Or shall no value at all lie inside the range, if the length
of the range is negative? Each opinion has its supporters and it is hard to decide what
is to be considered correct. Actually, at this point it is out of our competence to decide
what is correct. We have found a problem of the specification!
60
TESSY 3.1 Manual
4.2 The Classification Tree Method (CTM)
It is a valuable result to find a problem (omission or contradiction) in the functional problem specification, and that it was achieved in the case during test case
specification for the functional problem. It is generally more likely to detect a
problem in the functional specification if the test case specification is systematic.
The CTM is a systematic method for test case specification. Hence, the CTM
provides good means to detect problems in the functional problem specification.
Probably a test case using a negative length would not have been used if the test case
specification would have been done spontaneous and non-systematic. But a negative
length is completely legal for the functional problem specification that was given above.
If you consider that the problem specification at hand was a very simple one, you may
imagine how likely it is to overlook a problem in a more comprehensive and complicated
problem specification.
4.2.3.5 Extending the tree by a boundary class
In case we are not satisfied with the fact that a fixed single positive value, e.g. 5, may
serve as value for the start of the range in all test cases, we can sub-divide the class
positive according to a suitable classification. In our example, we classify according to
the size. The idea behind this is to have a class containing only a single value, in our case
the highest positive value existing in the given integer range. We use this value because
it is an extreme value, and as we know, using extreme values (or boundary values) in test
cases is well-suited to produce error-sensitive (or interesting) test cases.
Figure 4.11: The CT for is_value_in_range, 4th step
In the figure above, the positive values for the start of the range are subdivided according
to their size. This results in the two classes normal positive and maximal positive. The
class maximal positive holds the highest possible positive value (i.e. MAX_INT), and
TESSY 3.1 Manual
61
4 Basic knowledge
the class normal positive holds all other positive values. This satisfies mathematical
completeness.
Remark 1: Another possibility to classify the positive start values would have been for
instance to classify in odd and even values. This would have been completely legal. This
would have been probably also sensible for e.g. a problem of number theory, but not
target-oriented for the problem at hand.
Remark 2: Please note that for the moment we do not know and we need not to know
the size (in bits) of the integers used in the problem at hand. We simply specify “the
highest positive value in the given integer range”. This keeps our test case specification
abstract! I.e. our test case specification is appropriate for any integer size. As soon
as we assume we use e.g. 16 bit integers, and therefore parameterize our test case by
specifying 32767 as value in the class maximal positive, we loose this abstraction. I.e. if
we port the parameterized test case to a 32 bit integer system, the test case looses its
sense. This is not the case if we port the abstract test case specification.
4.2.3.6 Another interesting test case specification
With the CT extended according to figure 4.11 The CT for is_value_in_range, 4th step,
we can insert an additional line in the combination table and specify again an interesting
range for a third test case:
Figure 4.12: The third range specification provokes a wrap-around
The third range specification in the figure above combines the highest positive number
for the start value of the range with a positive length, i.e. the range exceeds the given
integer range.
62
TESSY 3.1 Manual
4.2 The Classification Tree Method (CTM)
The situation with the third range specification is similar to the situation depicted in the
figure above. The situation raises some questions: Will the situation be handled sensible
and gracefully by the test object? Or will it crash due to the overflow? Will the negative
values on the left hand side ibe accounted to lie inside the range or not? And what
is correct with respect to the last question? The problem specification above does not
give an answer to the latter question, again we have found a weak point in the problem
specification.
To sum up, designing test cases according to the CT method has revealed two problems
of the problem specification and has lead to interesting test cases so far.
4.2.3.7 The completed classification tree
Figure 4.13: The completed CT for is_value_in_range
In the figure above, one possible completed CT is depicted. Classifications are depicted by
rectangles, classes by ellipses. The “range” node is a composition with two classifications
as child elements. This tree is discussed in the following:
TESSY 3.1 Manual
63
4 Basic knowledge
64
•
Analogous to the class maximal positive for the start value of the range, a
class maximal negative is introduced. The idea behind this class is to combine
the maximal negative start value with a negative length of the range, what
shall provoke an underflow or negative wraparound. This idea comes from
the systematic in the CTM: If a positive wrap-around is seen as an interesting
test case, also a negative wrap-around should be exercised.
•
An example for a composition is given by range. A composition may be used
for a relation “consists of”. In our case, the range consists of a start value
and a length.
•
The final tree features still the three initial classes positive, zero, and negative
for the length of the range. It is important to note that the tree reveals at
a glance that nothing like maximal positive length or similar is considered to
be useful for the testing problem at hand.
•
It is obvious that a position can either be inside or outside the range, hence
this classification suggests itself. Furthermore, it is obvious that there are two
different areas outside the range: below the range and above the range. This
is reflected in the classification position outside. (If the tree would miss such
a classification, it may well be considered incorrect).
•
The class inside of the classification position could well be a leaf class of
the classification tree. However, in the CT in the figure above, this class
is subdivided further in the sub-classes range_start, opposite_border, and
inlying. This is done to force the use of boundary values in the test cases.
If a test case specification selects the class range_start, the value that shall
be checked if it is inside the range or not shall take the value of the start of
the range, that is the lowest value that is considered to be inside the range, a
boundary value. The class opposite_border is intended to create an analogous
test case specification, but using the highest value that is considered to be
inside the range. The class range_start and the class opposite_border both
contain only a single value. All other values inside the range are collected
in the class inlying ; this class exists mainly because of the requirement for
completeness of equivalence partitioning. A similar approach to use boundary
values is visible in the classes at border for positions outside the range.
TESSY 3.1 Manual
4.2 The Classification Tree Method (CTM)
4.2.3.8 The completed test case specification
In the next figure, the same CT is depicted with a completed combination table, what
results in a complete test case specification for the functional problem:
Figure 4.14: The completed test case specification
The test case specification above lists 14 test cases. Please note that these are specified
by the user and depend on its judgment. Based on the CT it is possible for some values
to be determined that provide clues to the number of test cases required.
The first value is the number of test cases, if each leaf class is included at least once in a
test case specification. This number is known as the minimum criterion. In our example,
the largest amount of leaf classes, namely seven, belong to the base classification position.
Seven is thus the value of the minimum criterion. The maximum criterion is the number
of test cases that results when all permitted combinations of leaf classes are considered.
In our example, the maximum criterion amounts to 105 (i.e. 5 * 3 * 7). The maximum
criterion takes into account that it is not possible to select e.g. a negative length and
a positive length for the same test case specification, because this is impossible by the
construction of the tree. The maximum criterion takes not into account that it is not
TESSY 3.1 Manual
65
4 Basic knowledge
possible to select e.g. a zero length and inlying, because this is not impossible by the
construction of the tree, but by the semantics of the function problem.
A reasonable number of test case specifications obviously lies somewhere between the
minimum and the maximum criterion. As a rule of thumb, the total number of leaf classes
gives an estimate for the number of test cases required to get sufficient test coverage. In
the test case specification, the CT has 15 leaf classes, what fits well to 14 test cases.
By the test case specification in the figure above, you can deduct how the functional
problem specification was extended with respect to the questions raised in sections “A
second range specification” and “Another interesting test case specification”:
•
“If the length of the range is negative, are there values that can be inside the
range?” The answer is “yes”, because in test case specification no. 5 and no.
6 a negative length shall be used and the position of the value shall be inside
the range.
•
“If the length of the range exceeds the given integer range, shall negative
values be inside the range?” Test case specification no. 12 clarifies that this
should not be the case.
The leaf class inlying is selected for only one test case specification (no. 1). This reflects
the fact that this class exists only because of the requirement for mathematical completeness of equivalence partitioning, and not because the inlying values are considered
to produce error-sensitive test cases.
4.2.3.9 Another test case specification
Here is an alternative test case specification to the functional problem specification at
hand depicted:
Figure 4.15: An alternative test case specification
66
TESSY 3.1 Manual
4.2 The Classification Tree Method (CTM)
What are the differences to the more elaborated test case specification in the section
above?
•
The start value of the range is not mentioned in the CT. This means, the
start value is not considered to be a test-relevant aspect by the user of the
CTM. In consequence, any arbitrary value can be used as start value in the
four test cases. This value can be fix for all test cases, but does not have to
be.
•
The problem of a negative length is completely neglected. For the problem
specification from section Problem which specifies a length to be an integer
and hence also the length to be negative, this is a serious flaw.
•
The problem of wrap-around is neglected. This may be considered to be an
esoteric problem, and therefore it could be accepted that it is not mentioned
in the alternative test case specification.
•
The usage of boundary values is not forced by the alternative test case specification. This is questionable, because boundary values produce error-sensitive
test cases. The alternative test case specification minimizes testing effort (by
specifying only four test cases), but this is at the cost of thoroughly testing.
But the point is not which test case specification is better. The main point is:
Test case specification according to the CTM visualizes testing ideas!
TESSY 3.1 Manual
67
68
TESSY 3.1 Manual
5 Practical exercises
This chapter will show you on the basis of prepared exercises how to work with TESSY:
•
The Quickstart 1: Exercise is_value_in_range is a very basic example of how to
operate with TESSY.
•
The Quickstart 2: Exercise Classification Tree Editor (CTE) gives a short and easy
introduction of operating with the Classification Tree Editor (CTE). It continues the
Quickstart 1.
5.1
Quickstart 1: Exercise is_value_in_range . . . . . . . . . . . . . . . 70
5.1.1
Creating a test project . . . . . . . . . . . . . . . . . . . . . 71
5.1.2
Specifying the target environment . . . . . . . . . . . . . . . 73
5.1.3
Adding the test object and analyzing the C-source file . . . . . 75
5.1.4
Editing the test object interface . . . . . . . . . . . . . . . . 77
5.1.5
Designing test cases . . . . . . . . . . . . . . . . . . . . . . . 78
5.1.6
Adding test cases and test steps . . . . . . . . . . . . . . . . 78
5.1.7
Entering test data . . . . . . . . . . . . . . . . . . . . . . . . 80
5.1.8
Executing the test . . . . . . . . . . . . . . . . . . . . . . . . 83
5.1.9
Repeating the test run with coverage instrumentation . . . . . 84
5.1.10 Analyzing the coverage . . . . . . . . . . . . . . . . . . . . . 86
5.1.11 Creating a report . . . . . . . . . . . . . . . . . . . . . . . . 91
5.1.12 Repeating the test run with requirements . . . . . . . . . . . 93
5.1.13 Reusing a test object with a changed interface . . . . . . . . . 104
5.2
Quickstart 2: Exercise Classification Tree Editor (CTE) . . . . . . . . 112
5.2.1
Creating classifications . . . . . . . . . . . . . . . . . . . . . 113
5.2.2
Creating classes . . . . . . . . . . . . . . . . . . . . . . . . . 115
5.2.3
Entering test data . . . . . . . . . . . . . . . . . . . . . . . . 115
5.2.4
Creating test cases . . . . . . . . . . . . . . . . . . . . . . . 118
TESSY 3.1 Manual
69
5 Practical exercises
5.1 Quickstart 1: Exercise is_value_in_range
In this exercise we will get to know the basic functionality of testing with TESSY. We will
operate with the example “is_value_in_range” which will give you a fast introduction
and an overview as well as the terms of importance.
Figure 5.1: Operational sequences in TESSY
70
TESSY 3.1 Manual
5.1 Quickstart 1: Exercise is_value_in_range
A unit test in TESSY is divided into the following central test activities:
•
Determining test cases.
•
Entering test data and expected values.
•
Executing the test.
•
Evaluating and documenting the test.
Central test
activities
Usually you would import your requirements first. To keep this exercise understandable for beginners, we will first exercise a simple project, then import some
basic requirements and restart the test!
We will now follow a simple source code example to show how to excercise those activities
with TESSY.
Example “is_value_in_range”
A start value and a length define a range of values.
Function: Determine if a given value is within the defined range or not. Only integer
numbers are to be considered.
5.1.1 Creating a test project
If you have not created the project “Example1” yet, do as follows:
To understand TESSY´s file system and databases, consult section 3.1 Creating
databases and working with the file system.
Þ
Start TESSY by selecting “All Programs” > “TESSY 3.x” > “TESSY 3.x”.
Þ
If the “Open Project” dialog will open, click on
(Create Project).
If another project is opened within TESSY, click “File” > “Select Project” >
“New Project” and then click on
.
The Project Configuration dialog opens (see figure 5.2).
TESSY 3.1 Manual
71
5 Practical exercises
Figure 5.2: Creating the new project “Example1”.
Þ
Enter Example1 as name of the project.
Þ
Leave the automatically created Project Root as it is
C:\[User]\Projects\TESSY\[Projectname]) and click “OK”.
(default
TESSY now creates the project “Example1” (see figure 5.3). This will take a
few seconds.
Figure 5.3: New project “Example1” is created
72
TESSY 3.1 Manual
5.1 Quickstart 1: Exercise is_value_in_range
Þ
Click “Open Project”.
TESSY now opens your project. This will take a few seconds.
The project “Example1” is opened within the Overview perspective. You can create different folders within a test collection, each containing modules with various test objects.
To keep it simple, we will create now one test collection with one folder.
Organizing
“Example1”
We start within the view “Test Project”:
(New Test Collection) in the tool
Þ
In the Test Project view click on the icon
bar of the view.
Þ
Enter Is_value_in_range and press the “Enter”-key.
Þ
Click on
(New Folder), enter ExampleFolder , click “Enter”.
Þ
Click on
(New Module), enter ExampleModule , click “Enter”.
The module relates to one or many source files which are to be tested.
Figure 5.4: Test collection “Is_value_in_range” with an example folder and module
Rename or delete a module or a folder by using the context menu (right click >
“rename” or “delete”) or the key F2.
5.1.2 Specifying the target environment
Usually at this point you will have to specify the target environment, that is to determine the compiler, the target and the microcontroller. You will do that in the “Test
Environment Editor” which we will get to know later.
TESSY 3.1 Manual
73
5 Practical exercises
Please notice beneath in the Properties view at tab “General” that the GNU GCC compiler
is already selected for this module (see figure 5.5), chich is enough for our example.
Figure 5.5: GNU GCC compiler is selected by default.
C-source file
Now we will add the source file to the module. The source file contains the C-function
to be tested:
Figure 5.6: The source code of the C-Function to be tested
74
TESSY 3.1 Manual
5.1 Quickstart 1: Exercise is_value_in_range
5.1.3 Adding the test object and analyzing the C-source file
We will use the example C-source file “is_val_in_range.c” which is stored under
“C:\Program files\Razorcat\TESSY_3.1\Examples\IsValueInRange”. Copy the
C-source file, paste it in the project root an add it to the module:
Þ
Open the Windows Explorer.
Þ
Copy the source file “is_val_in_range.c” in a folder which is located in the
project root, e.g. “c:\MyProjects\TESSYProjectABC\sources”.
It is useful to relate all sources, includes etc. to the project root.
You have a better overview about all sources, includes etc.
Þ
Switch back to TESSY.
Þ
In the Test Project view select the module (“Example Module”).
Þ
In the Properties view switch to tab “Sources”.
Þ
Click on
(Add Source).
Adding the
C-source
Figure 5.7: Adding the C-source file.
Þ
Select the source file “is_val_in_range.c” from the folder where you just
pasted the source.
Þ
Click “Open”. The C-source file will be added.
Þ
In the Test Project view above click on
analysis (see figure 5.8).
TESSY 3.1 Manual
(Analyze Module) to start the module
75
5 Practical exercises
Figure 5.8: Analyzing the module, that is the C-source file.
TESSY now analyzes the C-source file, this will take a few seconds. After successful
processing,
Þ
click on the white arrow in front the module:
.
TESSY will as well analyze the C-source file by just clicking on the white arrow
after adding the C-source-file.
Now all functions which were defined in the C-source file are displayed as children of the
module above within the Test Project view (see figure 5.9).
Figure 5.9: The function of the C-source is displayed as child of the module.
Our sample C-source file contains only one function, our test object “is_value_in_range”.
76
TESSY 3.1 Manual
5.1 Quickstart 1: Exercise is_value_in_range
The term “test object” indicates the functions within the module we are attempting to test.
5.1.4 Editing the test object interface
Þ
Switch to the TIE (Test Interface Editor).
Figure 5.10: Perspective TIE - Test Interface Editor
Now we can edit the interface information for every test object and determine which values
are input and which ones are output variables. Input values are all interface elements
that are read by the test object. Output values are written by the test object.
Determine
passing directions
Upon opening the module, TESSY will try to set the default passing directions (input or
putput) automatically. You can change these default interface settings to your needs.
In our sample the passing directions are already defined, you do not have to take
actions.
Þ
In the Interface view open the Parameter paragraph to see the inputs and output
values that are already defined in our example (see figure 5.11)
TESSY 3.1 Manual
77
5 Practical exercises
Figure 5.11: The inputs and outputs are already defined
5.1.5 Designing test cases
Usually now you would design the test cases, either manually or within the Classification
Tree Editor (CTE), based on specifications of your test object.
Since the CTE is a subject for its own, we will not make use of the CTE in this example,
but simply enter some ad-hoc test data manually.
To learn about the CTE refer to section 6.7 CTE: Designing the test cases or
follow the Quickstart 2: Exercise Classification Tree Editor (CTE).
5.1.6 Adding test cases and test steps
Now we will add three test cases each with one test step within the Test Items view:
Þ
78
Switch to Overview perspective and to view Test Items.
TESSY 3.1 Manual
5.1 Quickstart 1: Exercise is_value_in_range
Figure 5.12: Test Items view
Þ
Select the test object in the Test Project view.
Þ
In the Test Items view click on
(New Test Case).
The first test case is created and a test step is automatically added.
In TESSY every test case has at least one test step.
Þ
Add two further test cases.
Þ
Expand the test cases by clicking on the arrows in front of the test cases.
Adding test cases
Figure 5.13: Three test cases were added in the Test Items view
TESSY 3.1 Manual
79
5 Practical exercises
Please notice the following habits of this view:
•
The first number is the number of the test case, the number in brackets shows the
quantity of the test steps included.
•
Test case numbers will be counted continuously: If you delete test cases, new test
cases will get a new number and existing test cases will not be renumbered.
•
If you cannot click on “New Test Case” oder “New Test Step” because the icons are
within the
inactive, you might be in the wrong selection: Select the test object
Test Project view, then select the Test Items view.
5.1.7 Entering test data
Now we will define some input and output values:
Þ
Switch to the perspective “TDE - Test Data Editor”. The TDE will also open
with a double click on a test case or a test step.
In the Test Data view you can see the test cases and steps in tabular form.
Þ
Under “Inputs” click on the arrow to open “struct range r1”.
Þ
For test case 1 (1.1) enter 3 for “range_start”.
Þ
Enter 2 for “range_len”.
Þ
Enter 4 for “v1”.
Þ
Click on
(Save) to save your inputs.
After saving, the symbol of the test object in the Test Project view as well as
the symbol of the test case in the Test Items view turns yellow to indicate that
the test case is ready to run (see figure 5.14).
80
Þ
Under “Outputs” click on the arrow ahead “Return”.
Þ
Enter “yes” for the return value.
TESSY 3.1 Manual
5.1 Quickstart 1: Exercise is_value_in_range
Figure 5.14: Data is entered, test step turns yellow and test case is ready to run.
Please notice the changes of the test object icon to indicate different conditions:
Empty gripper: Test object is analyzed but has no test case.
Gripper with white object: Test object has test cases but no data.
Gripper with yellow object: At least one test step is ready to be executed.
Þ
Now enter data for the other two test cases as shown in table 5.18.
test step:
1.1
2.1
3.1
range_start:
3
20
0
range_length:
2
8
5
v1:
4
22
6
expected return:
yes
no
no
Table 5.18: Entering data for test object is_value_in_range.
TESSY 3.1 Manual
81
5 Practical exercises
•
Test case 1.1: The range starts at 3 and has a length of 2. Therefore, the range
ends at 5 and the given value 4 is supposed to be inside of the range (yes).
•
Test case 2.1: The range starts at 20 and has a length of 8. Therefore, the range
ends at 28 and the given value 22 is supposed to be inside of the range. Because we
want to force an incorrect output, we state this to be not inside of the range (no).
•
Test case 3.1: The range starts at 0 and has a length of 5. Therefore, the range
ends at 5 and the given value 6 is supposed NOT to be inside of the range (no).
Figure 5.15: Entering data for test object is_value_in_range
The test step icons in the Test Items view will now turn to yellow (see figure 5.16). This
indicates that we are now ready to run the test.
Figure 5.16: The test cases are ready to test
82
TESSY 3.1 Manual
5.1 Quickstart 1: Exercise is_value_in_range
5.1.8 Executing the test
Þ
Click on
(Start Test Execution) in the tool bar of the Test Project view.
A progress dialog will be shown while TESSY generates, compiles and links the
test driver and runs the test. This will take a few seconds.
After the test run, test case icons (within TDE) should be (see figure 5.17):
•
Within the Test Data view the second test step is marked with a red cross
and the expected result “no” is marked red to indicate, that the result did not
match the ecpected result (the actual result is “yes”).
•
Within the Test Project view the test collection, folder, module and test object
are marked with a red cross to indicate, that not all results did match the
expected results.
•
The Test Items view indicates with a red cross, that test case 2 did not the
expected result.
Figure 5.17: TDE after test run is_value_in_range
TESSY 3.1 Manual
83
5 Practical exercises
Þ
Switch to the Overview perspective.
Figure 5.18: Test results of is_value_in_range
You can see the results of every test step within the Test Results view.
5.1.9 Repeating the test run with coverage instrumentation
To analyze the source code coverage of the test, repeat the test run with the branch,
MC/DC and MCC-coverage instrumentation:
84
Þ
In the tool bar of the Test Project view click on the arrow next to the Execute
and select “Edit Test Execution Settings . . . ”.
Test icon
Þ
In the following dialog tick the boxes “Run” (default) and “Create New Test
Run”.
Þ
Choose the instrumentation “Test Object” and untick the box “Use preselected
coverage”.
Þ
Tick the boxes for “Branch Coverage (C1)” and “Modified Condition / Decision
Coverage (MC/DC)” (see figure 5.19).
Þ
Click on “Execute”.
TESSY 3.1 Manual
5.1 Quickstart 1: Exercise is_value_in_range
Figure 5.19: Selecting Branch and MC/DC Coverage for test run
A progress dialog will be shown while TESSY generates, compiles and links the
test driver and runs the test. This will take a few seconds.
Figure 5.20: Execute Test dialog while running the test
TESSY 3.1 Manual
85
5 Practical exercises
5.1.10 Analyzing the coverage
Þ
Switch to the Coverage Viewer (CV) perspective.
Figure 5.21: The Coverage Viewer displays the coverage of is_value_in_range
Analyzing with
the CV
The CV shows the results of the coverage measurement of a previously executed test.
You can select a default coverage measurement as well for your whole project
or any specific module or test object. Refer to section 6.2.3.4 Coverage).
86
TESSY 3.1 Manual
5.1 Quickstart 1: Exercise is_value_in_range
5.1.10.1 The flow chart view
The flow chart view displays the code structure and the respective coverage in graphical
form. Within each flow chart, you will see the decisions and branches of the function
being displayed. Green and red colors indicate whether a decision has been fully covered
or a branch has been reached.
5.1.10.2 The Branch (C1) Coverage view
The Branch C1 Coverage view displays the branch coverage for each individual test case
and test step as well as the total coverage for all test cases and test steps.
Figure 5.22: Branch coverage is_value_in_range
5.1.10.3 The MC/DC Coverage view
The MC/DC-Coverage view displays the coverage of the currently selected decision within
the flow chart view (see figure 5.23). If no decision is selected (as initially when starting
the CV), the MC/DC Coverage view is empty.
TESSY 3.1 Manual
87
5 Practical exercises
Figure 5.23: Decision coverage is_value_in_range
The current example is_value_in_range has only simple decisions, for which MC/DC is
the same as branch coverage.
5.1.10.4 Analyzing
In our example you can see in the flowchart, that
88
•
three test cases were executed (each with with one test step).
•
the first decision has an else branch on the right, that was executed three
times.
•
the if branch on the left of the first decision was not reached and is therefore
marked red.
•
the first decision was not fully covered, so it is marked red.
•
the second decision was fully covered and is therefore marked green.
•
the else branch on the right of the second decision was reached two times,
the else branch was reached once.
TESSY 3.1 Manual
5.1 Quickstart 1: Exercise is_value_in_range
Þ
Select the red branch of the first decision (the if branch).
The respective code section is highlighted within the source code view (see
figure 5.24). This allows finding out the execution path of the selected test
step.
Figure 5.24: Code section of the if branch of the first decision
TESSY 3.1 Manual
89
5 Practical exercises
Þ
Select the second decision.
The respective code section is highlighted within the source code view (see
figure 5.25).
Figure 5.25: Code section of the second decision
90
TESSY 3.1 Manual
5.1 Quickstart 1: Exercise is_value_in_range
5.1.11 Creating a report
Þ
In the Test Project view of the Overview perspective click on the arrow next
and select “Edit Test Details Report Setto the Generate Report icon
tings. . . ”.
Þ
In the dialog click on the button “Browse. . . ” and select your project folder
‘”Example1”.
Þ
Click on “Make New Folder” and create a folder “Reports” (see figure 5.26).
Þ
Click on “OK” and “Generate”.
Figure 5.26: Creating the folder for reports
TESSY creates the report within the new folder. This will take a few seconds.
The selection of the folder is memorized and used for the following.
When finished, TESSY will open the file automatically.
TESSY 3.1 Manual
91
5 Practical exercises
If you get an error “No matching program found for the
file . . . ”, then the Adobe Reader is not installed, which you need to open
the reports (PDF files). Download and install the Adobe Reader from
http://get.adobe.com/reader/ and generate the report again.
Important:
Figure 5.27: Content of the test report is_value_in_range
Now you have accomplished your first test project!
You can change the default Razorcat logo within the reports to your own company logo: In the menu bar select “Window” > “Preferences” > “Test Report
Options”. Klick on “Browse” and select your logo image file (PNG, JPG or GIF
format).
92
TESSY 3.1 Manual
5.1 Quickstart 1: Exercise is_value_in_range
5.1.12 Repeating the test run with requirements
We will now import some very basic requirements and repeat some steps of this exercise.
This way you get to know the feature of requirement management and can consolidate
the just learned workflows.
Requirement
Management
5.1.12.1 Importing requirements
Þ
Copy the example requirements document “Is Value In Range Requirements.txt” into a folder of your test project “TESSYProjectABC”. It is located within the TESSY installation directory
\Razorcat\[TESSY-Version]\Examples\IsValueInRange.
Þ
Switch to the Requirement Management perspective.
Þ
Right click within the blank RQMT Explorer view and select “Import” from the
context menu (see figure 5.28).
Figure 5.28: Importing a requirement
In the following Import dialog you can import various file formats. In our example we
select the file we just copied into our project:
TESSY 3.1 Manual
93
5 Practical exercises
Þ
Click on “. . . ” and select the file “Is Value In Range Requirements.txt” from
your project.
Þ
Leave the File Content Type and the Target Document as it is and click “OK”
(see figure 5.29).
Figure 5.29: Import dialog
The newly imported requirement document will be displayed in the RQMT Explorer view
(see figure 5.30).
Figure 5.30: The new requirement document
Þ
94
Right click the document and select “Properties” from the context menu.
TESSY 3.1 Manual
5.1 Quickstart 1: Exercise is_value_in_range
Þ
Change the alias to “IVIR” and click “OK” (see figure 5.31)..
The document alias will be used for reporting, in order to have an abbreviation
of the document name when building the requirement identifier, e.g. IVIR-[1.0]
in our example.
Figure 5.31: Changing the alias of the new requirement document
5.1.12.2 Committing the requirements document
Before linking any tests to a requirement, the respective requirements document needs
to be checked in as initial revision:
Þ
Select the document and click on
Þ
Enter “Initial revision” as commit comment and click “OK” (see figure 5.32).
Committing
(Commit Changes) in the global tool bar.
An initial revision of the requirement document will be created.
Figure 5.32: Comment for the initial revision of the commit
TESSY 3.1 Manual
95
5 Practical exercises
TESSY manages different versions of a requirements document. You can track
any changes either from importing updated versions or from any modifications
that you did directly within TESSY.
5.1.12.3 Linking test cases with requirements
Þ
Switch to the Overview perspective and select the test object.
Þ
Select the Requirements Coverage view.
Þ
Click on
(Always show unlinked Requirements).
The view shows the imported requirements and the module, test object and
test cases in a tree-based arrangement.
Important: If the view says “No requirements available, select the
test object in the Test Project view!
Use the toggle buttons on the right to link modules, test objects or test cases
to requirements:
Þ
Link the first test case with the first requirement.
Þ
Link the second test case with the second requirement (see figure 5.33).
The third requirement is not linked.
96
TESSY 3.1 Manual
5.1 Quickstart 1: Exercise is_value_in_range
Figure 5.33: Linking test cases with requirements
Remember the values of our test cases:
•
Test case 1.1: range start 3, length 2, given value 4, supposed to be inside of the
range (yes)
•
Test case 2.1: range start 20, length 8, given value 22. Because we wanted to force
an incorrect output, we stated this to be not inside of the range (no).
Þ
Switch to the TDE perspective.
Þ
In the Test Item view select the first test case and have a look at the Test
Definition view: It shows the requirements we just linked with our test cases.
Þ
Select the second test case.
The second requirement will be displayed (see figure 5.34).
Since we did not link any requirement to the third test case, the “Linked Requirements” will be empty when selecting the third test case.
TESSY 3.1 Manual
97
5 Practical exercises
Figure 5.34: Test Definition view within TDE with linked requirement
5.1.12.4 Creating a planning coverage report
At this stage, we can already generate a report showing the planned test case for our
requirements:
Þ
Switch to the Test Project view of the Overview perspective and click on the
arrow next to the Generate Report icon
.
Þ
Select “Edit Planning Coverage Report Settings. . . ” (see figure 5.35).
Figure 5.35: Editing the settings of a Planning Coverage Report
98
TESSY 3.1 Manual
5.1 Quickstart 1: Exercise is_value_in_range
Þ
A dialog for the settings for the Planning Coverage Report will open.
Figure 5.36: Dialog of the settings for the Planning Coverage Report
Þ
Select an output directory for the report (default: C:\tessy\report).
Þ
Select all Report Arguments (default).
Þ
Select the ivir_requirements.
Þ
Do NOT select any test means.
Þ
Click on “Generate”.
A planning coverage report will be created.
TESSY 3.1 Manual
99
5 Practical exercises
Figure 5.37: Planning coverage report of the IVIR requirement document
Planning
Coverage Report
The report shows the available requirements and the linked test cases. It provides an
overview about the planned tests and if all requirements are covered by at least one test
case.
Since we have links to two of our requirements, the resulting requirement coverage should
be as shown above.
Notice the usage of the requirement document name and alias within the report!
It is important to select an appropriate alias in order to get useful report outputs.
We have planned test cases for the first two requirements, whereas the third requirement
is not yet linked with any test case, because there are no tests available to validate this
requirement.
100
TESSY 3.1 Manual
5.1 Quickstart 1: Exercise is_value_in_range
5.1.12.5 Executing the test and examining the coverage
We will now execute our tests again to see the results of the test cases with respect to
the linked requirements within the execution coverage report.
Þ
Switch to the Overview perspective and execute our test object
is_value_in_range again: Click on , choose none instrumentation and click
“OK”.
Þ
Generate a test details report to review the results on test object level (see
figure 5.38).
Figure 5.38: Generating a Test Details Report
The report will open automatically.
Þ
Have a look at the second page.
The report will show additional paragraphs with the linked requirements after
the overview pages and for each test case (see figure 5.39):
TESSY 3.1 Manual
101
5 Practical exercises
Figure 5.39: Part of the generated test report of is_value_in_range
Test Object
Report
Now we will generate a coverage report showing the test case results with respect to our
requirements:
Þ
In the global tool bar click on the arrow next to the Generate Report icon
and select “Generate Execution Coverage Report” (see figure 5.40).
Figure 5.40: Creating an Execution Coverage Report
The settings dialog will open.
Þ
Choose the ivir_requirements document and click on “Generate”.
TESSY creates the coverage report, showing the available requirements and the
results of the linked test cases. It provides an overview about the current test
status, e.g. if tests for any requirements are failed.
Since one of our test cases was passed while the other one was failed, the
resulting requirement coverage should be as in figure 5.41.
102
TESSY 3.1 Manual
5.1 Quickstart 1: Exercise is_value_in_range
Execution
Coverage Report
Figure 5.41: Coverage Report of is_value_in_range
The first requirement has one test case linked which was successfully executed, the second
requirement has also one test case linked, but this one failed. The third requirement has
still no test case assigned.
Now you finished successfully the exercise is_value_in_range.
TESSY 3.1 Manual
103
5 Practical exercises
5.1.13 Reusing a test object with a changed interface
Using IDA
If the interface of the test object changes, TESSY will indicate the changes with specific
test readiness states. With the Interface Data Assigner (IDA) you can assign the elements
of a changed (new) interface to the elements of the old one.
In this section we will change the interface of the test object by editing the C-source and
exercise a reuse operation within the IDA.
Important: Make sure to keep the original C-source file “is_val_in_range.c”
and edit a copy. Do not change the original file in folder “C:\Program
files\Razorcat\[tessy version]\examples\IsValueInRange”!
5.1.13.1 Changing the interface of the test object
The target of this section is to show you the three different test readiness states
“changed”, “deleted” and “new”.
Therefore we will first change a test object and add two new test objects
called “delete” and “new”. In a second step we will remove the “delete” object so it
appears as deleted. The names are chosen to illustate the test readiness states.
Þ
104
Switch back to the Overview perspective.
TESSY 3.1 Manual
5.1 Quickstart 1: Exercise is_value_in_range
Figure 5.42: Overview perspective after test run (with requirements)
Þ
Select the module and “Edit Source” from the context menu (see figure 5.43).
Figure 5.43: Use the context menu to edit a source
The C-source is opened.
Þ
Select the line “ result is_value_in_range (struct range r1; value v1) ”
(see figure 5.44).
TESSY 3.1 Manual
105
5 Practical exercises
Figure 5.44: Editing the C-source file is_val_in_range.c
Changing the
C-source
Þ
Edit the line as shown in figure 5.45
Figure 5.45: Changed C-source file of is_value_in_range
Þ
106
Now add a “delete” object and a “new” object as shown in figure 5.46
TESSY 3.1 Manual
5.1 Quickstart 1: Exercise is_value_in_range
Figure 5.46: Adding a “delete” and “new” object
Þ
Save the changes with “File” > “Save” and close the file.
Þ
Click on
to analyze the module.
In the Test Project view you can see now three test objects with different test
readiness states (see figure 5.47):
Figure 5.47: Changed and new test objects of is_value_in_range
The test object is_value_in_range has changed. You see the test object, but
there is no operation possible. You have to start a reuse operation.
The test objects “deleted” and “new” are newly available since the last interface
analysis. You have to add test cases, test steps and enter data for a test.
Before deleting the test object “deleted”, we will have to add some test cases with test
steps:
TESSY 3.1 Manual
107
5 Practical exercises
Deleted test objects that did not contain any test cases and test steps are not
displayed anymore because they are considered as not important. If you want
to display a deleted test object, you have to add at least one test case and one
test step!
Þ
Switch to the Test Item view and add a test case and a test step.
Þ
Switch to the Overview perspective and to the Test Project view.
Þ
Select the module and “Edit Source” from the context menu.
Þ
Remove the test object “deleted” as shown in figure 5.48.
Figure 5.48: Remove the code for test object “deleted”.
Þ
Save the changes with “File” > “Save” and close the file.
Þ
Click on
to analyze the module.
In the Test Project view you can see now three test objects with three different
test readiness states (see figure 5.49):
108
TESSY 3.1 Manual
5.1 Quickstart 1: Exercise is_value_in_range
Figure 5.49: Changed and new test objects of is_value_in_range
The test object is_value_in_range is still displayed as changed since there
was no reuse operation yet.
The test object “deleted” has been removed. You still see the object, but there
is no operation possible.
The test object “new” is not shown anymore as “newly available”, because the
last interface analysis already detected the object as new.
Note that removed and changed test objects require a reuse
operation before you can further operate on them!
Important:
5.1.13.2 Assigning the changed interface of the test object
Warning: If you do not assign the interface object, you will loose the test
data entered for parameter v1 and the global variable v1 will have no values
after the reuse operation!
Þ
Switch to IDA perspective.
Þ
Double click the test object “is_value_in_range” in the Test Project view to
assign its interface.
TESSY 3.1 Manual
109
5 Practical exercises
Please notice (see figure 5.50):
•
On the right side within the IDA perspective you see the Compare view with the
test object is_value_in_range.
•
Within the Compare view you can see the old interface of our test object
is_value_in_range and the new one. The red exclamation mark within the new
interface indicates the need to assign this interface object before starting the reuse.
•
The title of the view shows the old name versus the newly assigned name. In our
case the names are the same since only the interface did change.
Figure 5.50: Changed, deleted and new test object of is_value_in_range
Þ
110
Assign the interface object “long v1” either by using the context menu or just
drag and drop from the left side (see figure 5.51).
TESSY 3.1 Manual
5.1 Quickstart 1: Exercise is_value_in_range
Figure 5.51: Use drag and drop in IDA
The red exclamation mark turns to a green check
Þ
Commit the assignments by clicking on
Compare view.
.
(Commit) in the menu bar of the
The data of all test cases and test steps will be copied from the old interface
to the current test object interface.
The test object changes to yellow
to be executed again.
to indicate that all test cases are ready
Please notice the following habits:
•
Removed and changed test objects require a reuse operation before you can further
operate on them.
•
Those test objects that remained unchanged will automatically be reused, e.g. they
will be ready to use without further activities required.
•
Removed test objects will only be displayed as “removed”, if they did contain any
test cases and test steps.
TESSY 3.1 Manual
111
5 Practical exercises
5.2 Quickstart 2: Exercise Classification Tree Editor (CTE)
To understand the handling and create a simple classification tree we consider some
aspects from the Quickstart 1: Exercise is_value_in_range.
We will continue with the quickstart example “is_value_in_range”.
If
you have not done the exercise, proceed with the Quickstart 1: Exercise
is_value_in_range up to section Designing test cases.
After editing the test object interface and switching to the CTE, the root “is_value_in_range”
of the classification tree appears on the draw pad.
Important: If you cannot see the root on the draw pad, move the scrollbar
at the bottom or enlarge the window.
Figure 5.52: CTE with the root “is_value_in_range”
112
TESSY 3.1 Manual
5.2 Quickstart 2: Exercise Classification Tree Editor (CTE)
Example is_value_in_range
Our three test-relevant aspects are the start value of the range, the length and the
position, which is a given value under test (v1). We should have test cases which result in
“inside the range”, and other test cases which result in “outside”, to have a high coverage
of possibilities.
So the three test-relevant aspects to be used for classifications are start value, length and
position and they thus form the basis of a classification tree.
In the ’Advanced Knowledge’ of this manual you find detailed information of
using The Classification Tree Method (CTM).
5.2.1 Creating classifications
Þ
Select the root tree item (“is_value_in_range”).
Þ
Create a new classification either using the context menu (“New” > “Classification”) or press Ins (see figure 5.53).
Figure 5.53: Creating a new classification with the context menu
Þ
Double click the new classification or press F2 to start the inline editor for the
tree item.
TESSY 3.1 Manual
113
5 Practical exercises
Þ
In the window Element Properties rename the new classification to
range_start.
Figure 5.54: Renaming the new classification
Þ
Create two further classifications range_length and position .
Figure 5.55: Classifications of is_value_in_range
Within the draw pad you can move the classifications with drag and drop: Select
either a classification, a sub tree (click on
) or select all (click on
) and
press the mouse button until the cursor turns into a cross with four arrows
then move the selection.
114
,
TESSY 3.1 Manual
5.2 Quickstart 2: Exercise Classification Tree Editor (CTE)
5.2.2 Creating classes
Þ
Now create the classes “positive”, “zero” and “negative” for the classifications
range_start und range_length: Right click the classification and select “New”
> “Class” or select the classification and press Ins.
Þ
Create the classes “inside” and “outside” for the classification “position”.
Þ
In the tool bar click on
overview.
(Arrow Layout) to rearrange the tree for a better
Try the several layouts for the tree, e.g. leftdown
may give you a better overview.
or horizontal
Now the classification tree should look like in figure 5.56.
Figure 5.56: Simple classification tree for is_value_in_range
5.2.3 Entering test data
Þ
Select the class “positive” of the classification “range_start”.
Þ
In the Test Data view on the right enter the value 3 as range start (see figure
5.57).
Important: To enter the data it might be necessary to enlarge the
window or to change the width of the first column containing the
interface elements.
TESSY 3.1 Manual
115
5 Practical exercises
Figure 5.57: Entering data in CTE
Now enter more test data for the other classes of the classification “range_start”:
Þ
Select the class “zero” and enter 0 as range_start.
Þ
Select the class “negative” and enter -3 as range_start.
When selecting a tree item within the classification tree you will see
the test data entered for this tree item within the Test Data view.
Notice the following habits:
116
•
The name of the selected item will be displayed as column header in the Test Data
view (see red marked sections in figure 5.57, here: “positive”).
•
The class will be marked with a blue dot (when selected) to indicate that test data
is assigned.
•
All tree items with test data assigned will be marked by a yellow dot when not
selected (e.g. select the root “is_value_in_range”).
TESSY 3.1 Manual
5.2 Quickstart 2: Exercise Classification Tree Editor (CTE)
Figure 5.58: Entering more data in CTE
Now enter test data for the classes of the classification “range_length”:
Þ
Select the class “positive” of the classification “range_length” and enter 2 as
range_length.
Þ
Select the class “zero” and enter 0 as range_length.
Þ
Select the class “negative” and enter -2 as range_length.
Entering values
for
“range_length”
Notice the following habits:
•
All tree items with assigned test data are marked with a yellow dot, when not
selected.
•
When selecting a tree item, you will see the test data entered for this item within
the Test Data view.
•
When selecting any interface element within the Test Data view, all classification
tree elements that contain test data for this interface element will be marked with
a blue dot.
TESSY 3.1 Manual
117
5 Practical exercises
Figure 5.59: Blue dots indicate that “range_start” elements contain data
5.2.4 Creating test cases
Now create 9 test cases:
Þ
Select the pane on the lower left (test item list).
Þ
Create the test cases either using the context menu (“New” > “Classification”,
see figure 5.60) or press Ins.
Figure 5.60: Creating test cases in the test item list
Test cases are defined by setting markings in the combination table: If you move the
mouse pointer over the combination table, connecting lines to the classes of the classification tree are drawn. If the mouse pointer is placed over a point of intersection it is
118
TESSY 3.1 Manual
5.2 Quickstart 2: Exercise Classification Tree Editor (CTE)
changed to a circle.
Þ
Select the first test case in the test item list.
Þ
Move the mouse over the line of the first test case.
Þ
Click on the circles that connect the first test case with the two positive classes.
The test data for the test case 1 is displayed within the Test Data view (see
figure 5.61). The test data is read-only because it is defined by the marks set
within the combination table.
Figure 5.61: Defining test cases in the combination table of CTE
Þ
Create more marks within the combination table for the other test cases to cover
completely all classes of the classifications “range_start” ’ and “range_length”
with your test cases.
For example the CTE could look like in figure 5.62.
TESSY 3.1 Manual
119
5 Practical exercises
Figure 5.62: Completed table with all test cases for example “is_value_in_range”
Certainly there are various possibilities of combining the classes within the test
cases.
As you can see the classification “position” is still not marked for any test item. This
would be rated as an error because each class of the classification tree should be marked
at least within one test item.
We also did choose all possible combinations for the first two classifications. In a
real example you would need to select only the most interesting combinations in order to
get a reasonable number of test cases.
120
Þ
Select the test cases one after another and review the test data resulting from
your mark settings being displayed within the Test Data view (see figure 5.63).
Þ
Click on
to save the classification tree.
TESSY 3.1 Manual
5.2 Quickstart 2: Exercise Classification Tree Editor (CTE)
Figure 5.63: Test data is displayed when selecting a test case in the combination table
Þ
Switch to the TDE perspective.
Figure 5.64: Test data displayed within TDE
TESSY 3.1 Manual
121
5 Practical exercises
You will see the test cases updated with the test data values entered within the CTE
perspective.
Please notice the following habits:
122
•
Test items with values stemming from the CTE perspective are marked with new
status indicators:
(test case) and
(test steps).
•
Values stemming from the CTE are read-only. If you want to change them, switch
back to the CTE perspective and do your changes there.
TESSY 3.1 Manual
6 Working with TESSY
This chapter provides detailed information of the test activities possible with TESSY. The headlines of the sections follow the actions taken during a test and refer to the corresponding perspectives and views, e.g. “CTE: Designing the test cases”.
The subsections describe the views of each perspective, displaying used icons and status indicators and giving quickly answers to your questions of “What can I do within this view?” and
“How do I do . . . ?”. So if you need help at some point, ask “Where am I?”. You should find the
answer easily within this chapter. If you have questions about the workflow, consult chapter 5
Practical exercises.
Some views are displayed within various perspectives. Because views are context
sensitive, not every operation is possible within every perspective. In this case the
manual will refer to the respective section and perspective, where all operations
of the view are possible.
6.1
6.2
Menu Bar Entries: Setting up the basics . . . . . . . . . . . . . . . . 127
6.1.1
File menu . . . . . . . . . . . . . . . . . . . . . . . . . . . . 127
6.1.2
Edit menu . . . . . . . . . . . . . . . . . . . . . . . . . . . . 127
6.1.3
Window menu . . . . . . . . . . . . . . . . . . . . . . . . . . 128
6.1.4
Windows > Preferences menu . . . . . . . . . . . . . . . . . 128
6.1.5
Help menu . . . . . . . . . . . . . . . . . . . . . . . . . . . . 131
Overview perspective: Organizing the test . . . . . . . . . . . . . . . 132
6.2.1
Structure of the Overview perspective . . . . . . . . . . . . . 132
6.2.2
Test Project view . . . . . . . . . . . . . . . . . . . . . . . . 133
6.2.3
Properties view . . . . . . . . . . . . . . . . . . . . . . . . . 151
6.2.4
Requirements Coverage view . . . . . . . . . . . . . . . . . . 161
6.2.5
Test Items view . . . . . . . . . . . . . . . . . . . . . . . . . 161
6.2.6
Test Results view . . . . . . . . . . . . . . . . . . . . . . . . 168
6.2.7
Evaluation Macros view . . . . . . . . . . . . . . . . . . . . . 169
6.2.8
Console view . . . . . . . . . . . . . . . . . . . . . . . . . . . 169
6.2.9
Suspicious Elements view . . . . . . . . . . . . . . . . . . . . 171
TESSY 3.1 Manual
123
6 Working with TESSY
6.3
6.4
C/C++: Editing the C-source . . . . . . . . . . . . . . . . . . . . . 172
6.3.1
Opening the C/C++ perspective . . . . . . . . . . . . . . . . 172
6.3.2
Structure of the C/C++ perspective . . . . . . . . . . . . . . 173
6.3.3
Editor view
6.3.4
Project Explorer view . . . . . . . . . . . . . . . . . . . . . . 175
6.3.5
Outline view . . . . . . . . . . . . . . . . . . . . . . . . . . . 176
6.3.6
Properties view . . . . . . . . . . . . . . . . . . . . . . . . . 177
6.3.7
Console view . . . . . . . . . . . . . . . . . . . . . . . . . . . 177
. . . . . . . . . . . . . . . . . . . . . . . . . . . 174
Requirement management . . . . . . . . . . . . . . . . . . . . . . . . 178
6.4.1
Structure of the Requirement Management perspective . . . . 179
6.4.2
RQMT Explorer view . . . . . . . . . . . . . . . . . . . . . . 180
6.4.3
Requirements List view and Requirement Editor . . . . . . . . 190
6.4.4
Test Means view . . . . . . . . . . . . . . . . . . . . . . . . . 192
6.4.5
VxV Matrix view . . . . . . . . . . . . . . . . . . . . . . . . 193
6.4.6
Link Matrix view . . . . . . . . . . . . . . . . . . . . . . . . 194
6.4.7
Suspicious Elements view . . . . . . . . . . . . . . . . . . . . 197
6.4.8
Attached Files view . . . . . . . . . . . . . . . . . . . . . . . 200
6.4.9
Attributes view . . . . . . . . . . . . . . . . . . . . . . . . . 202
6.4.10 History view . . . . . . . . . . . . . . . . . . . . . . . . . . . 204
6.4.11 Related Elements view . . . . . . . . . . . . . . . . . . . . . 206
6.4.12 Document Preview . . . . . . . . . . . . . . . . . . . . . . . 206
6.4.13 Requirements Coverage view . . . . . . . . . . . . . . . . . . 208
6.5
6.6
6.7
124
TEE: Configuring the test environment . . . . . . . . . . . . . . . . . 212
6.5.1
Starting the TEE . . . . . . . . . . . . . . . . . . . . . . . . 213
6.5.2
Structure of the TEE . . . . . . . . . . . . . . . . . . . . . . 214
6.5.3
Icons of the tool bar . . . . . . . . . . . . . . . . . . . . . . . 215
6.5.4
Status indicators . . . . . . . . . . . . . . . . . . . . . . . . . 216
6.5.5
Viewing all available configurations . . . . . . . . . . . . . . . 218
6.5.6
Configuration files . . . . . . . . . . . . . . . . . . . . . . . . 220
6.5.7
Customizing the configurations . . . . . . . . . . . . . . . . . 221
TIE: Preparing the test interface . . . . . . . . . . . . . . . . . . . . 229
6.6.1
Structure of the TIE perspective . . . . . . . . . . . . . . . . 230
6.6.2
Test Project view . . . . . . . . . . . . . . . . . . . . . . . . 230
6.6.3
Properties view . . . . . . . . . . . . . . . . . . . . . . . . . 230
6.6.4
Interface view . . . . . . . . . . . . . . . . . . . . . . . . . . 231
6.6.5
Plots view . . . . . . . . . . . . . . . . . . . . . . . . . . . . 241
CTE: Designing the test cases . . . . . . . . . . . . . . . . . . . . . 242
6.7.1
The basic idea . . . . . . . . . . . . . . . . . . . . . . . . . . 242
6.7.2
Starting CTE . . . . . . . . . . . . . . . . . . . . . . . . . . 242
TESSY 3.1 Manual
6.8
6.7.3
Structure of the CTE perspective . . . . . . . . . . . . . . . . 243
6.7.4
Test Project view . . . . . . . . . . . . . . . . . . . . . . . . 243
6.7.5
Properties view . . . . . . . . . . . . . . . . . . . . . . . . . 243
6.7.6
Classification Tree view . . . . . . . . . . . . . . . . . . . . . 244
6.7.7
Test Data view . . . . . . . . . . . . . . . . . . . . . . . . . 250
6.7.8
Test data assignment precedence rules . . . . . . . . . . . . . 251
TDE: Entering test data . . . . . . . . . . . . . . . . . . . . . . . . . 254
6.8.1
Structure of the TDE perspective . . . . . . . . . . . . . . . . 254
6.8.2
Test Project view . . . . . . . . . . . . . . . . . . . . . . . . 255
6.8.3
Test Results view . . . . . . . . . . . . . . . . . . . . . . . . 256
6.8.4
Evaluation Macros view . . . . . . . . . . . . . . . . . . . . . 256
6.8.5
Test Items view . . . . . . . . . . . . . . . . . . . . . . . . . 256
6.8.6
Properties view . . . . . . . . . . . . . . . . . . . . . . . . . 256
6.8.7
Test Data view . . . . . . . . . . . . . . . . . . . . . . . . . 257
6.8.8
Test Definition view . . . . . . . . . . . . . . . . . . . . . . . 273
6.8.9
Declarations / Definitions view . . . . . . . . . . . . . . . . . 274
6.8.10 Prolog/Epilog view . . . . . . . . . . . . . . . . . . . . . . . 275
6.8.11 Usercode Outline view
. . . . . . . . . . . . . . . . . . . . . 280
6.8.12 Plots view . . . . . . . . . . . . . . . . . . . . . . . . . . . . 281
6.9
CV: Analyzing the coverage . . . . . . . . . . . . . . . . . . . . . . . 286
6.9.1
Structure of the CV perspective . . . . . . . . . . . . . . . . 287
6.9.2
Instrumentation for coverage measurements . . . . . . . . . . 287
6.9.3
Test Project view . . . . . . . . . . . . . . . . . . . . . . . . 290
6.9.4
Called Functions view / Code view . . . . . . . . . . . . . . . 291
6.9.5
Flow Chart view . . . . . . . . . . . . . . . . . . . . . . . . . 292
6.9.6
Statement (C0) Coverage view . . . . . . . . . . . . . . . . . 296
6.9.7
Branch (C1) Coverage view . . . . . . . . . . . . . . . . . . . 297
6.9.8
Decision Coverage view . . . . . . . . . . . . . . . . . . . . . 298
6.9.9
MC/DC Coverage view . . . . . . . . . . . . . . . . . . . . . 298
6.9.10 MCC Coverage view . . . . . . . . . . . . . . . . . . . . . . . 300
6.9.11 Coverage Report views . . . . . . . . . . . . . . . . . . . . . 300
6.10 IDA: Assigning interface data . . . . . . . . . . . . . . . . . . . . . . 301
6.10.1 Structure of the IDA perspective . . . . . . . . . . . . . . . . 302
6.10.2 Test Project view . . . . . . . . . . . . . . . . . . . . . . . . 302
6.10.3 Properties view . . . . . . . . . . . . . . . . . . . . . . . . . 303
6.10.4 Compare view . . . . . . . . . . . . . . . . . . . . . . . . . . 303
6.11 SCE: Component testing . . . . . . . . . . . . . . . . . . . . . . . . 306
6.11.1 Creating component tests . . . . . . . . . . . . . . . . . . . . 307
6.11.2 Preparing the test interface . . . . . . . . . . . . . . . . . . . 309
TESSY 3.1 Manual
125
6 Working with TESSY
6.11.3 Designing the test cases . . . . . . . . . . . . . . . . . . . . . 310
6.11.4 Executing the scenarios . . . . . . . . . . . . . . . . . . . . . 310
6.11.5 Editing scenarios
. . . . . . . . . . . . . . . . . . . . . . . . 310
6.11.6 Evaluating scenarios . . . . . . . . . . . . . . . . . . . . . . . 315
6.12 Backup, restore, version control . . . . . . . . . . . . . . . . . . . . . 319
6.12.1 Backup
. . . . . . . . . . . . . . . . . . . . . . . . . . . . . 319
6.12.2 Restore . . . . . . . . . . . . . . . . . . . . . . . . . . . . . . 320
6.12.3 Version control . . . . . . . . . . . . . . . . . . . . . . . . . 321
6.13 Command line interface . . . . . . . . . . . . . . . . . . . . . . . . . 323
6.13.1 Starting TESSY in headless mode . . . . . . . . . . . . . . . 323
6.13.2 Invoking tessycmd.exe . . . . . . . . . . . . . . . . . . . . . . 324
6.13.3 Usage of tessycmd.exe . . . . . . . . . . . . . . . . . . . . . 324
6.13.4 Commands . . . . . . . . . . . . . . . . . . . . . . . . . . . . 325
6.13.5 Example: DOS script . . . . . . . . . . . . . . . . . . . . . . 325
126
TESSY 3.1 Manual
6.1 Menu Bar Entries: Setting up the basics
6.1 Menu Bar Entries: Setting up the basics
Figure 6.1: Menu bar of TESSY
The menu bar provides global operations such as project handling commands, editing
commands, window settings, TESSY preferences and the help contents.
6.1.1 File menu
File menu entry
setting options
“Select Project”
Opens the dialog “Select Project”. If you select another project,
TESSY closes the current project, restarts and opens the
selected project.
“Edit Project”
Opens the dialog “Project Configuration”. Refer to section 3.1.1
Creating a project database.
“Close Project”
Closes the current project. TESSY will restart and show the
dialog “Select Project”.
“Edit Environment”
Opens the TEE, the Test Environment Editor. Refer to chapter
6.5 TEE: Configuring the test environment.
“Database Backup”
Refer to chapter 6.12 Backup, restore, version control.
“Exit”
Quits TESSY.
Table 6.1: File menu options
6.1.2 Edit menu
Here you will find common actions as “Delete” or “Undo”, “Redo” etc. You can use as
well the context menu. Refer to section 3.3 Using the context menu and shortcuts.
TESSY 3.1 Manual
127
6 Working with TESSY
6.1.3 Window menu
Window menu
setting options
“Show . . . ”
Switch to the various perspectives or show additional views
within the current perspective to customize it to your needs.
You can as well use the graphical user interface. Refer to section
3.2 Understanding the graphical user interface.
“Reset Workbench”
With a click you reset the positions of all perspectives and views
to the default setting.
Table 6.2: Window menu options
6.1.4 Windows > Preferences menu
Figure 6.2: Preferences menu of TESSY
Within section “Preferences” of the Windows menu you find many options for setting
basic functions to your needs:
128
TESSY 3.1 Manual
6.1 Menu Bar Entries: Setting up the basics
Preferences menu
setting options
“Preferences”
> “Coverage Settings”
In this section you can setup an instrumentation for coverage
measurement that will be the default for all of your projects (see
figure 6.3).
You can still set up a different instrumentation for
every test collection, folder, module or test run. Refer so section 6.2.3.4 Coverage within the Properties
view.
TESSY includes various pre-defined coverage measurements for
common known safety standards. You can as well
• modify the existing selections (tick a box),
• choose the test type for the selection (unit or component
test),
• define your own (click on “Create”) coverage selections,
• import (click on “Import”) and export coverage
instrumentation settings as XML-file.
To define a default instrumentation for your project, select from
the pull-down list on top.
“Preferences”
> “Dialog Settings”
Within this section you can
• set the default directories for imports of test objects,
exports for test objects and modules and for adding
includes and source files,
• decide, which confirmation dialogs will be shown.
“Preferences”
> “Test Execution
Settings”
Within this section you can choose if selections and settings
should be remembered, e.g. if you tick unter “Remember test
instrumentation settings” the option “Globally for all test
objects” the last used coverage selection will be used, see section
6.2.2.6 Instrumentation settings.
“Preferences”
> “Test Interface
Settings”
Within this section you can personalize TESSY’s behaviour
within the Interface view, such as.
• sorting order,
• hide empty sections,
• show available types fpr test objects.
continue next page
TESSY 3.1 Manual
129
6 Working with TESSY
Preferences menu
setting options
“Preferences”
> “Test Project
Settings”
Within this section you can personalize TESSY’s behaviour
within the Test Project view, such as
• sorting order,
• showing the Overview perspective when starting,
• showing the Problems viewq on error.
“Preferences”
> “Test Report Options”
Within this section you can
• change the output directory for the various TESSY
reports,
• change the filenames and
• change the default Razorcat logo within the reports to
your own company logo (PNG, JPG or GIF-file possible)
(see figure 6.2).
If you move the mouse over the entry, a tooltip will
give you further information of the options!
Table 6.3: Preferences menu options
130
TESSY 3.1 Manual
6.1 Menu Bar Entries: Setting up the basics
Figure 6.3: Pre-defined coverage instrumentation settings
6.1.5 Help menu
Help menu
setting options
“About TESSY”
Shows information i.e. the TESSY verson.
“User Manual”
Opens the TESSY User Manual.
“Documentation . . . ”
Contains various documentation for compiler and targets and
frequently asked questions (pdf-files).
“Create Support File”
Creates a support file. Refer to section 7.1 Contacting the
TESSY support.
“Start Shell”
Starts a bash shell that can be used to try out the command line
execution of TESSY. The PATH variable is already set to the
bin directory of the currently running TESSY installation, so
that you can run tessycmd immediately. Refer to section 6.13
Command line interface.
Table 6.4: Help menu options
TESSY 3.1 Manual
131
6 Working with TESSY
6.2 Overview perspective: Organizing the test
Important: If you have not created a project yet, do so as described in the
chapter “Basic handling” in section 3.1.1 Creating a project database!
Figure 6.4: Overview perspective
6.2.1 Structure of the Overview perspective
pane
location
(default)
function
Test Project view
upper left
To organize the project: Create test collections, modules
and test objects; execute the test, create reports and have
a fast overview on your project.
Properties view
lower left
To edit all properties, e.g. adding sources or including
paths to your modules.
continue next page
132
TESSY 3.1 Manual
6.2 Overview perspective: Organizing the test
pane
location
(default)
function
Requirement
Coverage view
lower left
To select and link the requirements that you managed
within the Requirement management perspective.
Test Items view
upper right
To create test cases and test steps manually.
Test Results view
upper right
To view the test results.
Evaluation
Macros view
upper right
To view evaluation macro results, if the usercode of the
test object contains any.
Console view
lower right
To display messages of sub processes invoked during test
execution, e.g. compiler calls.
Suspicious
Elements view
lower right
To review changes of requirements, modules or test objects
that require updating the linked test cases.
Table 6.5: Structure of the Overview perspective
6.2.2 Test Project view
Test Project view
Figure 6.5: Test Project view within the Overview perspective
TESSY 3.1 Manual
133
6 Working with TESSY
6.2.2.1 Icons of the view tool bar
icon
action / shortcut / comment
Imports files (type depends on the selection).
Exports files.
Resets a module (deletes all contents of the module!).
Analyzes the C-source file(s) of the module.
Defines a batch test.
Executes the test (Ctrl + E).
Generates various test reports. The test details report for a test object will be
generated as default (Ctrl + R).
Inserts a new test collection.
Inserts a new folder (Shift + Ins), optional for organizing your test project.
Inserts a new module (Ins). Modules will contain the test objects available
within the C-source files to be tested, i.e. C functions.
Table 6.6: Tool bar icons of the Test Project view
6.2.2.2 Status indicators
indicator
status / meaning
Test collecion containing folder(s) (optional) and module(s).
Folder containing module(s) (optional).
Module containing the test object(s).
Module containing a comment, a description or a specification.
There is no test object.
The test object was analyzed but has no test case.
continue next page
134
TESSY 3.1 Manual
6.2 Overview perspective: Organizing the test
indicator
status / meaning
The test object has test cases but no data.
At least one test case has any data.
At least one test case is ready to be executed.
The test object interface has changed. A reuse operation within IDA is required.
The C-source of the test object has changed. The C-source needs to be
analyzed again.
The test object has been removed. You still see the object, but there is no
operation possible. Only displayed when the test object contained any test
cases before the removal.
The test object is suspicious.
The test execution has been aborted for this test object.
The test object contains a comment, a description or a specification.
The test result of a test run is failed. This may be either due to a mismatch
of actual and expected results or if the coverage did not achieve the minimum
coverage.
Test results and coverage of the test run are both OK.
The coverage did not achieve the required minimum coverage. The red part
of the bar indicates the missing percentage of coverage, e.g. more red means
less achieved coverage.
The coverage achieved the minimum coverage, but the minimum coverage
was less than 100.
Table 6.7: Status indicators of the Test Project view
6.2.2.3 Creating tests
You need at least one test collection to organize your test, and within at least one module
and one test object. Folders and further test collections are optional and just have the
purpose to organize your test project.
TESSY 3.1 Manual
Creating the test
135
6 Working with TESSY
Important: We recommend to do any changes of the test project structure
within the Test Project view of the Overview perspective. The view layout of
this perspective is optimized for this purpose!
Þ
Click on the icon
(New Test Collection) on the tool bar of the view.
Þ
Enter a name and click “OK”.
Þ
Click on
(New Folder), enter a name and click “OK”.
Þ
Click on
(New Module), enter a name and click “OK”.
6.2.2.4 Analyzing modules
Important: To analyze a module it is necessary to select an execution environment, add at least one C-source file and required include paths for header
files and add defines necessary for analyzation/compilation of the source file(s),
see section 6.2.3 Properties view. If you need to learn more about this workflow,
have a look at the Practical exercises.
Analyzing the
C-source file
To analyze a module (the C-source file),
Þ
in the tool bar click on
(Analyze Module) to start the module analysis.
TESSY now analyzes the C-source file, this will take a few seconds.
After successful processing,
Þ
click on the white arrow in front the module:
.
TESSY will as well analyze the C-source file by just clicking on the white arrow
next to the module after adding the C-source-file.
Now all functions which were defined in the C-source file are displayed as children of the
136
TESSY 3.1 Manual
6.2 Overview perspective: Organizing the test
module above within the Test Project view (see figure 6.6).
Figure 6.6: The function of the C-source is displayed as child of the module.
TESSY 3.1 Manual
137
6 Working with TESSY
6.2.2.5 Executing tests
After entering test data for a particular test object you are ready to execute the test.
During this process, TESSY will perform the following steps:
•
Generate the test driver based on the interface information and user code
provided.
•
Link the test driver to the test object to create an executable file.
•
Run the test with the appointed coverage instrumentation.
Generating the test driver
The test driver is necessary to call the function under test and will be
generated automatically. Test driver and the function under test form a complete
(embedded) test application, including the startup code for it, and will use an
appropriate compiler for the particular embedded microcontroller architecture. If
the function under test uses external variables that are not defined, the test driver
generated by TESSY can define those variables.
Once the test driver has been compiled, it can be run as often as required. You can select a subset of your test cases and run the test again by just
selecting the run option. Changes to test data and expected results might require
building a new test driver. TESSY will check this automatically and generate a
new driver.
Stub functions
If the function under test itself calls other functions (subroutines), TESSY
can provide replacement functions (stubs) for the missing subroutines with the
test driver. TESSY features two types of stub functions:
138
•
Stub functions for which you may provide the C source code for the
bodies of the stub functions.
•
Stub functions for which TESSY is able to check if the expected value for
a parameter is passed into the stub function and for which TESSY is able to
provide any value specified by the user as return value of the stub function.
TESSY 3.1 Manual
6.2 Overview perspective: Organizing the test
To execute a test:
Executing the
test
Þ
Click on the arrow next to the icon Start Test Execution
of the Test Project view.
Þ
Click on “Edit Test Execution Settings”.
in the tool bar
A progress dialog will be opened (see figure 6.7).
Þ
Choose the desired options and click “Execute”.
A progress dialog will be shown while TESSY generates, compiles and links the
test driver and runs the test. This will take a few seconds.
Figure 6.7: Test Execution Settings
TESSY 3.1 Manual
139
6 Working with TESSY
6.2.2.6 Instrumentation settings
Within the Test Execution Settings dialog you can select the various possible coverage
instrumentation for this test run:
Þ
Select from the pull-down menu, if the coverage shall be used for the test object
or the test object and the called functions.
Þ
Untick the box “Use preselected Coverage”.
Þ
Select the coverage instrumentation (more than one possible).
The coverage instrumentation is now used for this test run, even if you have
selected a different coverage instrumentation as default for your project (see
section 6.1.4 Windows > Preferences menu) or for the module or test object
within the Properties view (see section 6.2.3.4 Coverage).
“Use preselected Coverage”
If you tick the box “Use preselected Coverage”, coverage selection will be
applied according to the following rules:
• If a coverage selection is set in the Properties view (see section 6.2.3.4
Coverage), that selection will be used.
• If no coverage selection is set in the Properties view, but in the Test Execution Settings of the Windows > Preferences menu the option “Remember
instrumentation settings” is set, the last used selection will be used.
• If no coverage selection is set and the option “Remember instrumentation
settings” is not set, no instrumentation will be used.
For more information about the coverage measurements refer to the application
note “Coverage Measurement” in TESSY (“Help” > “Documentation”).
6.2.2.7 Viewing test results
Viewing test
results
140
After a test run, the Test Project view gives an overview about the coverage, if selected:
TESSY 3.1 Manual
6.2 Overview perspective: Organizing the test
Figure 6.8: Coverage displayed within the Test Project view
•
The actual results will be compared with the expected values according to the
evaluation mode. The result will be either failed or passed.
•
The last step of test execution is the generation of an XML result file. This
file contains all test data and the actual results. It will be used for reporting.
The results of every coverage measurement can be reviewed in the CV (Coverage Viewer)
as soon as the test was carried out. For details refer to section 6.9 CV: Analyzing the
coverage.
See 6.9 CV:
Analyzing the
coverage
Please notice the following habits:
•
A green tick will indicate that the actual value complies with the expected value for
the given variable with respect to the evaluation mode.
•
A red cross will indicate that the actual value does not comply with the expected
value for the given variable with respect to the evaluation mode.
•
If the interface has changed, the test object will indicate changes with test readiness
states (see Status indicators).
•
The
time
of
the
test
run
is
stated
within
the
Test
Project
view:
The results of the coverage measurement are also part of the
test result for a test object, e.g. if all outputs yield the expected result but the
coverage was less than the minimum coverage, the test result will be failed.
Important:
TESSY 3.1 Manual
141
6 Working with TESSY
6.2.2.8 Creating reports
All reports are generated as PDF-files. You need the Adobe
Reader to open the files. Download and install the Adobe Reader from
http://get.adobe.com/reader/.
Important:
The following reports are available in TESSY:
Test Details Report
Contains information about the test cases, their
properties and values, linked requirements and
if test cases failed or were successful.
The Test Details report is based on the XML
result file which is created after every test run
and stored within the latest test run.
A test report can be generated as soon as
TESSY has finished running a test.
Test Overview Report
Contains information about the test objects and
the test case results in grafical form (pie chart).
The Test Overview Report summarizes the
results of a selected set of test objects. The
report can be generated based on already
executed test objects or right after the
execution of the selected test objects.
continue next page
142
TESSY 3.1 Manual
6.2 Overview perspective: Organizing the test
Planning Coverage Report
Contains information about the requirements
linked to test cases and the planned validation.
Planning coverage summarizes the achieved
coverage of requirements by test cases. Each
link of a test case to a requirement will be
counted. This report provides information
about the planning progress of the test project,
since it will show all requirements that have not
yet been planned to be tested by at least one
test case.
Execution Coverage Report
Contains information about the validation of
requirements after test run.
Execution coverage summarizes the achieved
coverage of requirements based on executed
tests. The results of test runs (i.e. the result of
each test case) will be propagated to the list of
requirements by creating requirement
evaluations for all linked requirements, if any
link was set. This report provides an overview
about the result status of the test project since
it will show all requirements for which the
linked test cases are failed for any reason.
Table 6.19: Reports available within TESSY
All reports are created as PDF documents based on XML data files. These XML
data files can also be used for generating reports or further processing if desired.
To create a report within TESSY:
Þ
Creating reports
Click in the Test Project view (i.e. within the Overview perspective) on the
arrow next to the Generate Report icon
.
TESSY 3.1 Manual
143
6 Working with TESSY
Þ
Select the report you wish to create (see figure 6.9).
TESSY creates the report within the new folder. This will take a few seconds.
When finished, TESSY will open the file automatically.
The first time you create a report, the “Edit Settings” dialog
will be opened automatically. These settings are memorized and used for the
following reports.
Important:
Figure 6.9: Creating a report
Change settings
of a report
To change settings:
Þ
Click on the arrow next to the Generate Report icon
Þ
Select “Edit [report] Settings. . . ”.
.
the settings dialog for the selected report will be opened.
You can as well change basic settings, e.g. output directories, filenames and the
logo on the reports. Refer to section 6.1.4 Windows > Preferences menu.
144
TESSY 3.1 Manual
6.2 Overview perspective: Organizing the test
Optional settings of the different reports and their default values:
report
settings
default
Test Details Report
folder selection
show usercode
show test step details
hide results (show test data only)
C:\tessy\report
yes
yes
no
Test Overview
Report
folder selection
show test object result pie chart
show test object list
show test case results bar chart
show coverage charts
C:\tessy\report
yes
yes
yes
yes
Planning Coverage
Report
folder selection
show overview pie chart
show requirements list
show test item list
selection of requirement document
selection of test means
C:\tessy\report
yes
yes
yes
selected, if only one available
no
Execution Coverage
Report
folder selection
show overview pie chart
show requirements list
show test item list
selection of requirement document
selection of test means
C:\tessy\report
yes
yes
yes
selected, if only one available
no
Table 6.22: Available settings of the reports
6.2.2.9 Batch test operations
Tessy provides a batch test feature with various operations.
Batch Test
Open the batch operation settings:
Þ
In the Test Project view right click a project, a module or a test object.
Þ
Select “Define Batch Operation. . . ” from the context menu (see figure 6.10).
TESSY 3.1 Manual
145
6 Working with TESSY
Figure 6.10: Context menu “Define Batch Operation”
The window “Define Batch Operation” will be opened.
Figure 6.11: Defining the batch operation
To select the test objects for the batch test:
Þ
146
Under “Test Objects” choose the project or modules or test objects for the batch
test. Click “Select All” to select all at once (see figure 6.12).
TESSY 3.1 Manual
6.2 Overview perspective: Organizing the test
Figure 6.12: Selecting all text objects
The right side of the window ist context sensitive:
Þ
Switch to the setting by either marking the operation on the left side or use the
tabs on the upper right side (see figure 6.13). The optional settings for this
operation will then be shown on the right side of the window.
Figure 6.13: Editing the settings of each batch operation
TESSY 3.1 Manual
147
6 Working with TESSY
You can create a TBS-file (or other files you need to use the command line) by saving
the batch test settings:
Þ
In the batch operation settings window click on
Þ
Choose the type of the file and click “Save” (see figure 6.14).
(Save batch file as. . . ).
Figure 6.14: Saving the settings of a batch operation as TBS-file
6.2.2.10 Importing and exporting
The Test Project view provides the import and export of test data and module backup
files (*.TMB):
148
Þ
Select a folder, module or test object.
Þ
In the toolbar click on
to import or
to export the data.
TESSY 3.1 Manual
6.2 Overview perspective: Organizing the test
The kind of import/export depends on the selection:
selection
type of file
folder
import: *.TMB files
module
export: *.TMB file
test object
import and export: test data
When importing data there are following options (see figure 6.15):
•
“Update passing directions”: If you tick the box, the passing directions of
all interface variables will be set according to the passing directions specified
within the import file. All other interface variables will be set to IRRELEVANT. The test object will be ready to execute when using this option
because all variable with passing directions IN, OUT or INOUT will be filled
with values.
•
“Overwrite/append test cases”: Either delete existing test cases before importing or append any imported test cases at the end of the test case list.
Figure 6.15: Import settings of data import
When exporting data there are following options (see figure 6.16):
•
The conversion of the export settings is only applicable, if ASAP conversion
is enabled! Please refer to table “General tab of Properties view” in section
General.
TESSY 3.1 Manual
149
6 Working with TESSY
•
Input/Expected versus Input/Actual: Either export the expected or the actual
result values. The latter is only available if the test has been executed and
actual results are present.
Figure 6.16: Export settings of data export
150
TESSY 3.1 Manual
6.2 Overview perspective: Organizing the test
6.2.3 Properties view
Properties view
Figure 6.17: Properties view
The Properties view is divided into several tabs on the left and provides various settings
explained in the following:
6.2.3.1 General
The General tab (see figure 6.17) is used to determine the test environment. Following
options are available:
Option
Function
Test
Directory
The path has been specified during database creation and is not adjustable
here.
Name
Name of the element, e.g. test collection or module.
Environment
Specifies your target compiler (debugger/emulator/simulator) combination
to be used for test execution. To enable the test environment see chapter
6.5 TEE: Configuring the test environment and section 6.5.7.1 Enabling
configurations.
The GNU toolset is already available by default.
Kind of Test
Unit: Enables the unit test of TESSY.
Component: Enables the component test of TESSY.
continue next page
TESSY 3.1 Manual
151
6 Working with TESSY
Option
Function
Features
“Enable ASAP”: TESSY provides a close integration to the ASAP
standard, allowing the usage of ASAP conversion rules for physical to
integer conversion of test data. If ASAP is ticked, you will find additional
attributes within the Attributes tab in which you have to specify your
ASAP file.
For more information refer to our application notes in the
Help menu in the menu bar (“Help” > “Documentation” >
“Using ASAP Information”).
Table 6.31: General tab of Properties view
6.2.3.2 Sources: Sources pane
Figure 6.18: The Sources pane in the Sources tab of the Properties view
Adding the
C-source file
152
On the Sources tab in the upper Sources pane you add the source files to be tested. All
exported functions will be displayed if the module is opened. Some additional compiler
options can be specified on module level by selecting the module entry, other options can
be specified for each source file in the list.
Þ
Click on
(Add Source).
Þ
Select your C-source file.
Þ
Click “Open”. The C-source file will be added.
TESSY 3.1 Manual
6.2 Overview perspective: Organizing the test
To remove a source file:
Þ
Select a source file and “Remove File” from the context menu.
To replace a source file:
Þ
Select a source file and “Replace File” from the context menu.
Þ
From the next dialog, select another source file.
6.2.3.3 Sources: Compiler pane
Figure 6.19: The Compiler pane in the Sources tab of the Properties view
The lower Compiler pane displays information about the item selected from the upper
Source pane. Some of the displayed options (e.g. Includes) in the lower Compiler pane
can be specified in the Test Environment Editor and will be inherited from there.
What kind of information is visible depends on the tab Includes, Defines, Options, Settings
which you have selected. You may specify additional settings in each of the provided tab.
Module options apply to all source files unless otherwise specified on file level. File
options apply to one selected source file and will overwrite options that are specified on
module level.
TESSY 3.1 Manual
153
6 Working with TESSY
Options of the Compiler pane:
Includes
Including path
To add an include path:
Þ
Click on
(Add Include Path).
Þ
Select an appropriate path.
Þ
The path will be inserted.
Defines
If necessary, define a macro for the preprocessor:
Defines
Þ
Click on
(New Define).
Þ
Enter the name of the define without the normally used option of your target
compiler, e.g. -D. TESSY will use the appropriate option automatically.
To edit defines:
Þ
Click on
(Edit Defines).
The Edit Defines As Text dialog will be opened.
Macros have to be separated by a comma or semicolon.
Options
Specify additional directives for your target compiler for your needs. Note that macros for
the preprocessor and include paths have to be specified within the Defines tab respectively
within the Includes tab.
All compiler options added here will be used for the compilation of the source file when
building the test driver application.
154
TESSY 3.1 Manual
6.2 Overview perspective: Organizing the test
Settings - module selected
Figure 6.20: The Setting tab of the Properties view with module selected
If the module is selected, you can force TESSY to enable static functions, static local
variables or to hide inline functions. These options apply to the whole module though it
may be selected only when the module entry is selected.
Static Functions
If this box is not checked, no static function will be listed
in the test object list of the module.
Inline Functions
If this box is not checked, no function with the keyword
“inline” will be listed in the test object list of the module.
Static Local Variables
Static local variables within functions may be used as
normal input or output variables within TESSY. The interface parser will recognize those variables and they may
be set and evaluated.
Table 6.38: Options of module settings in Properties view
TESSY 3.1 Manual
155
6 Working with TESSY
Settings - C-source file selected
Figure 6.21: The Setting tab of the Properties view with C-source file selected
If the C-source file is selected, you can force TESSY to hide the functions of the C-source
file from being displayed in the list of test objects.
This option is useful for additional C-source files needed for testing (e.g. implementation of stub functions for called functions), since they are not relevant for testing and
reporting.
6.2.3.4 Coverage
Figure 6.22: The Coverage tab of the Properties view
156
TESSY 3.1 Manual
6.2 Overview perspective: Organizing the test
While you have probably chosen an instrumentation for coverage measurements as default
for your whole project as described within section 6.1.4 Windows > Preferences menu,
within the Properties view you can enable a different coverage measurement on folder or
test collection level or for a single module:
Þ
In the Test Project view select your module, for which you want to choose the
coverage measurement.
Þ
In the Properties view select your coverage selection in the pull-down menu (see
figure 6.23).
See 6.1.4
Windows >
Preferences menu
Figure 6.23: Selection of the coverage measurement in the pull-down menu
The pre-selected coverage instrumentations according to the selected safety standard
level will be displayed.
TESSY supports the following instrumentations:
•
Statement Coverage (C0)
•
Branch Coverage (C1)
•
Decision Coverage (DC)
•
Modified Condition / Decision Coverage (MC/DC)
•
Multiple Condition Coverage (MCC)
•
Entry Point Coverage (EPC)
•
Function Coverage (FC)
TESSY 3.1 Manual
157
6 Working with TESSY
To edit the coverage selection of a measurement:
Þ
Click on the button “Preferences”.
Þ
Edit the instrumentation to your needs by ticking or unticking the boxes or
creating a new coverage selection according to your required safety standard
and level with a click on “Create”.
Figure 6.24: Defining coverage measurements
See 6.2.2.5
Executing tests
See 6.9 CV:
Analyzing the
coverage
158
You can choose a different instrumentation for each test run. The options will be shown
within the Execute Test dialog (refer to section 6.2.2.5 Executing tests).
To analyze the coverage refer to chapter 6.9 CV: Analyzing the coverage. For more
information about coverage measurements and usage of coverage analysis refer to the
application note “Coverage Measurement” in TESSY (“Help” > “Documentation”).
TESSY 3.1 Manual
6.2 Overview perspective: Organizing the test
6.2.3.5 Attributes
Figure 6.25: The Attributes tab of the Properties view
The Attributes tab specifies settings required by the compiler or the target environment
of the module. Most attributes were preset and inherited from the Test Environment
Editor (TEE).
You can change the default values or add new attributes to the Attributes pane:
Insert attributes
Changes are carried out only locally and do not influence other modules.
To create a new attribute:
Þ
Click on
(New Attribute).
The Edit Attribute Properties dialog will ne opened.
Þ
Enter an attribute name and select an appropriate type, e.g. String. Available
types are String, Boolean, Integer, Real, File, Folder and Url.
Þ
Select appropriate flags, depending on the type selected.
TESSY 3.1 Manual
159
6 Working with TESSY
Figure 6.26: Creating a new attribute
To edit an existing attribute:
Þ
Click on
(Edit Attribute).
The Edit Attribute Properties dialog will ne opened.
You can remove user defined attributes. You cannot remove default attributes, only reset
the value to its default state, if changed before.
To remove an attribute respectively reset a default attribute:
Þ
Click on
.
6.2.3.6 Specification / Description / Comment
Those tabs provide editable textboxes to be used for specifications, descriptions and
comments by the tester.
160
TESSY 3.1 Manual
6.2 Overview perspective: Organizing the test
6.2.4 Requirements Coverage view
Figure 6.27: Requirements Coverage view
Within the Requirements Coverage view you can link the requirements with your test
cases. We will describe this view in section 6.4 Requirement management > 6.4.13
Requirements Coverage view.
6.2.5 Test Items view
In the Test Items view you get an overview about your test cases and test steps, and
you can as well create test cases and test steps manually without using the Classification
Tree Editor (CTE, see section 6.7). This is useful for simple test objects with a few test
cases that can be documented in a few words manually.
Test Items view
Figure 6.28: Test Items view
TESSY 3.1 Manual
161
6 Working with TESSY
6.2.5.1 Icons of the view tool bar
icon
action / shortcut / comment
Displays expected results.
Displays evaluation macros results.
Displays call trace results.
Executes selected test cases.
Adds new test case.
Generates test steps automatically i.e. within a range.
Adds new test step.
Renumbers the test cases and test steps.
Expands all test cases.
Collapses all test cases.
Table 6.45: Tool bar icons of the Test Items view
6.2.5.2 Status indicators
indicator
status / meaning
The test case has no data.
The test case contains any data.
At least one test step of the test case is ready to be executed.
Test case passed: The actual results did match the expected results.
Test case failed: The actual result of at least one test step did not match the
expected results.
Test Case Generator: This test case generates test steps automatically i.e. if
you enter a range. It does not contain any data yet.
continue next page
162
TESSY 3.1 Manual
6.2 Overview perspective: Organizing the test
indicator
status / meaning
Test Case Generator with data: This test case has automatically generated
test steps.
The test step has no data.
The test step contains any data.
The test step is ready to be executed.
Test step passed: The actual result did match the expected results.
Test step failed: The actual result did not match the expected results.
The test case has been created by the CTE and therefore can be changed only
within CTE. The test case does not contain any data.
The test case has been created by the CTE and therefore can be changed only
within CTE. The test case does contain some data.
The test case has been created by the CTE and therefore can be changed only
within CTE. At least one test step is ready to be executed.
The test step has been created by the CTE and therefore can be changed only
within CTE. It does not contain any data.
The test step has been created by the CTE and therefore can be changed only
within CTE. It does contain some data.
The test case has been created by the CTE and therefore can be changed only
within CTE. At least one test step is ready to be executed.
Table 6.46: Status indicators of the Test Items view
6.2.5.3 Creating test cases and test steps
To create test cases and test steps:
Þ
Switch to the Test Items view.
Þ
Click on
Creating test
cases
(New Test Case).
The first test case is created and a test step is automatically added.
Þ
Add further test steps with a click on
TESSY 3.1 Manual
(New Test Step).
163
6 Working with TESSY
Figure 6.29: First test case with one test step.
Please notice the following habits of this view:
•
The first number is the number of the test case, the number in brackets shows the
quantity of the test steps included.
•
Test case numbers will be counted continuously: If you delete test cases, new test
cases will get a new number and existing test cases will not be renumbered.
•
If you cannot click on “New Test Case” oder “New Test Step” because the icons are
inactive, you might be in the wrong selection: Select the test object
within the
Test Project view, then select the Test Items view.
•
If you double click a test case, the TDE will be openened to enter test data. Make
sure to adjust or review the passing directions first in the TIE.
Every test step contains a complete set of test data. For instance, the mechanism of test
steps can be used to achieve an initialization of the test object before executing the test
step that checks the actual test condition of the current test case.
6.2.5.4 Creating test steps automatically
You can generate test steps automatically, i.e. with ranges of input values:
164
Þ
Click on the arrow next to the “New Test Case” icon
Þ
Select “New Generator Test Case” (see figure 6.30).
.
TESSY 3.1 Manual
6.2 Overview perspective: Organizing the test
Figure 6.30: Selecting the test case generator.
A new test case will be created. The star symbol indicates, that this test case is generated and you cannot add any test steps, because these will be generated automatically
(see figure 6.31).
Figure 6.31: A new test case generator is created.
To fill the data and generate the test steps, you will use the Test Data view within the
TDE perspective:
Þ
Follow the description of section 6.8.7.7 Generating test steps automatically.
After generating the test steps, the icon of the test case within the Test Items view will
change to yellow as well as test steps (see figure 6.32).
TESSY 3.1 Manual
165
6 Working with TESSY
Figure 6.32: The test steps were generated and are ready to be executed.
The test steps are read only! You can change the type of the test case and test steps to
“normal”. That way you can edit the test steps as usual.
To change the status to normal,
Þ
Rightclick the test case and select “Change Test Case Type to Normal” (see
figure 6.33).
Figure 6.33: Selecting “Change Test Case Type to Normal”
166
TESSY 3.1 Manual
6.2 Overview perspective: Organizing the test
The test case and test steps are changed to type “normal” but will indicate originally
being generated with a status (see figure 6.34).
Changing test
case to type
normal
Figure 6.34: The test case and test steps originally being generated.
You can reverse the action with a righclick and choose “Change Test Case Type to
Generator” from the context menu.
6.2.5.5 Test cases and steps created within the CTE
If test cases and test steps were assigned within CTE, the icons of test cases and test
steps within the Test Items view are displayed with a CTE symbol to indicate you can
change those test cases only within CTE (see figure 6.35).
Figure 6.35: Test cases created by CTE
TESSY 3.1 Manual
167
6 Working with TESSY
6.2.5.6 Renumbering test cases
After deleting test cases or test steps, you can renumber the existing test cases and
steps:
Þ
Click on
(Renumber Test Cases).
A notice will appear that all test cases will be renumbered (see figure 6.36).
Þ
Click “OK”.
Figure 6.36: All test cases will be renumbered
6.2.6 Test Results view
Figure 6.37: Test Results view
168
TESSY 3.1 Manual
6.2 Overview perspective: Organizing the test
After a test run the Test Results view will display the coverage measurement results and
the results of expected outputs, evaluation macros and call traces, if applicable.
Important: The view is context sensitive: If the Test Results view is empty,
make sure a test run is selected within the Test Project view!
6.2.7 Evaluation Macros view
Figure 6.38: Evaluation Macros view
This view lists the detailed results of the evaluation macros if the usercode of the test
object contains any evaluation macros, see 6.8.10.2 Using evaluation macros. The results
are displayed wherever they occur within the usercode, e.g. within stub functions or test
step epilogs.
6.2.8 Console view
Figure 6.39: Console view
TESSY 3.1 Manual
169
6 Working with TESSY
The Console view displays messages of sub processes invoked during the compilation and
execution process of the test driver application. It provides a quick overview about any
error messages.
6.2.8.1 Icons of the view tool bar
icon
action / shortcut / comment
Clears the Console view.
Locks the scrolling function.
Opens the console.
Table 6.54: Tool bar icons of the Console view
6.2.8.2 Handling
You can enable the console view to be shown whenever an error occurs during C-source
analysis or test driver compilation:
Þ
In the menu bar blick on “Window”.
Þ
Open the “Preferences”.
Þ
Click on “Test Execution Settings” and check the setting “Show console on
error” (see figure 6.40.
Figure 6.40: Preference “Show console on error”
170
TESSY 3.1 Manual
6.2 Overview perspective: Organizing the test
6.2.9 Suspicious Elements view
Since the view refers to changes of requirements, we will discuss this view in section 6.4.7
Suspicious Elements view.
TESSY 3.1 Manual
171
6 Working with TESSY
6.3 C/C++: Editing the C-source
Important: The C/C++ perspective is not displayed by default! Open the
perspective as described below!
Figure 6.41: Perspective C/C++
Within the C/C++ perspective you can edit your C-source file.
6.3.1 Opening the C/C++ perspective
172
Þ
Within the Test Project view right click the desired test object or module.
Þ
Select “Edit Source” (see figure 6.42).
TESSY 3.1 Manual
6.3 C/C++: Editing the C-source
Figure 6.42: Opening the C/C++ perspective
6.3.2 Structure of the C/C++ perspective
pane
location
(default)
function
Project Explorer
view
left
To view the includes and the functions of the C-source
file.
Editor view
upper middle
To edit the C-cource file.
Outline view
right
To overview all functions of the C-source file.
Console view
lower middle
Same view as within the Overview perspective.
Properties view
lower middle
Same view as within the Overview perspective.
Table 6.57: Structure of the C/C++ perspective
in
Important: Most party of this view are usual Eclipse functions! Please refer
to the Eclipse documentation: http://help.eclipse.org/
TESSY 3.1 Manual
173
6 Working with TESSY
6.3.3 Editor view
Editor view
Figure 6.43: Editor view within the C/C++ perspective
Important: The Editor view is not a normal view in Eclipse sense, therefore
you cannot move the view as other views of the perspectives!
6.3.3.1 Editing the C-source file
174
Þ
Open the C/C++ perspective with a right click on the desired test object or
module within the Test Project viewk.
Þ
Select “Edit Source” (see figure 6.44).
TESSY 3.1 Manual
6.3 C/C++: Editing the C-source
Figure 6.44: Opening the C/C++ perspective
Þ
Edit the C-source file.
The view is context sensitive: If you choose a function within the Outline view,
the function will be highlighted within the Editor view!
6.3.4 Project Explorer view
Figure 6.45: Project Explorer view within the C/C++ perspective
TESSY 3.1 Manual
175
6 Working with TESSY
Within this view you can browse easily between the includes and have an overview of all
functions of the C-source file.
The view is context sensitive: If you choose a function within the Project Explorer view,
the function will be highlighted within the Editor view.
6.3.5 Outline view
Outline view
The Outline view displays all functions of the C-source.
The view is context sensitive: If you choose a function within the Outline view, the function will be highlighted within the Editor view (see figure 6.46).
Figure 6.46: Outline view within the C/C++ perspective
6.3.5.1 Icons of the view tool bar
icon
action / shortcut / comment
Sorts the functions in alphabetica order.
Hides fields.
Hides static members.
Hides non-public members.
continue next page
176
TESSY 3.1 Manual
6.3 C/C++: Editing the C-source
icon
action / shortcut / comment
Hides all inactive elements.
Table 6.60: Tool bar icons of the Outline view
6.3.6 Properties view
The Properties view displays all the properties which you organized within the Overview
perspective. Most operations are possible.
For changing a source switch to the Properties view within the Overview perspective.
6.2.3
Properties view
6.3.7 Console view
The Console view displays messages of sub processes invoked during the compilation and
execution process of the test driver application. It provides a quick overview about any
error messages. Same view as within the Overview perspective, see section 6.2.8 Console
view.
TESSY 3.1 Manual
177
6 Working with TESSY
6.4 Requirement management
The basis for all testing activities should be a precise functional specification of the system
under test. All testing activities should be caused by requirements described within the
functional specification and each change of the requirements need to be tracked in order
adjust the tests, if necessary. That is the reason why TESSY incorporates a requirement
management solution that provides a basic environment for requirements engineering
with the following features:
•
Exporting and importing requirements
•
Creating new requirements
•
Comparing of requirement versions
•
Automatic versioning of requirement changes
•
Adding images to requirements
•
Marking different versions of requirements as semantically equivalent
You will use different views and perspectives for your requirement management:
6.4.1 Structure
of the Requirement
Management
perspective
1. To create and import requirements, track changes and versionize your requirements
use the Requirement Management perspective.
6.4.13
Requirements
Coverage view
2. To link requirements with test cases takes use the Link Matrix view or the Requirements Coverage view of the Overview perspective.
178
TESSY 3.1 Manual
6.4 Requirement management
6.4.1 Structure of the Requirement Management perspective
Figure 6.47: Requirement Management perspective
pane
location
(default)
function
RQMT Explorer view
left
To create requirements.
Requirements List
view
upper center
To view imported requirements as list for a selected
document or folder.
Explorer view
upper center
To organize the requirements, e.g. adding information as text or images.
Test Means view
lower center
To list the available test means, up to unit test and
component test.
VxV Matrix view
lower center
To assign requirements to test means.
Link Matrix view
lower center
To link requirements with modules, test objects and
test cases.
Attached File view
lower center
To attach files to requirements.
continue next page
TESSY 3.1 Manual
179
6 Working with TESSY
pane
location
(default)
function
Attributes view
lower center
To edit a list of attributes for a requirement.
Suspicious Elements
view
lower center
To have a quick look over all suspicious (modified)
elements.
History view
right
To display the version history of the selected requirement or document.
Related Elements
view
right
To display linked elements for a selected requirement.
Document Preview
right
To edit the HTML contents of the requirements.
Requirements
Coverage view
Overview
perspective!
To select and link the requirements.
Table 6.62: Structure of the Requirement Management perspective
Important: To gather all information about managing requirements within
this chapter, we will describe the Requirement Coverage view in this chapter, although the workflow makes it reasonable to place this view within the Overview
perspective.
6.4.2 RQMT Explorer view
Figure 6.48: RQMT Explorer view
180
TESSY 3.1 Manual
6.4 Requirement management
The RQMT Explorer view displays an overall view of all requirements of a requirement
document. If you double click a requirement, the requirement editor will open to display
all information of the specific requirement (see figure 6.49).
RQMT Explorer
view
Figure 6.49: Double clicking on a requirement opens the requirement editor
6.4.2.1 Icons of the view tool bar
icon
action / shortcut / comment
Creates a new document.
Creates a new chapter.
Creates a new requirement.
Creates a new validation and verification matrix.
Locks the marked item.
For editing the document hierarchy.
Generates a document report.
Deletes the marked item.
Table 6.63: Tool bar icons of the RQMT Explorer view
TESSY 3.1 Manual
181
6 Working with TESSY
6.4.2.2 Status indicators
indicator
status / meaning
The requirement document is suspicious.
Table 6.64: Status indicators of the RQMT Explorer view
6.4.2.3 Creating requirements
Creating
requirements
To create requirements:
Þ
In the RQMT Explorer view tool bar click on
Þ
Click on
(New Chapter). Chapters are optional to structure a requirement
document.
Þ
Click on
(New Requirement Document).
(New Requirement) to create a requirement.
6.4.2.4 Importing requirements
Þ
182
Right click a document or right click within the blank RQMT Explorer view and
select “Import” from the context menu (see figure 6.50). When no document
is selected, the import will create a new document.
TESSY 3.1 Manual
6.4 Requirement management
Figure 6.50: Importing requirements
Þ
The Import dialog opens (see figure 6.51).
Figure 6.51: Import dialog
Þ
Click on “. . . ” and select the file with the requirements.
TESSY 3.1 Manual
183
6 Working with TESSY
Þ
Select the File Content Type. For the possible types see table below.
TESSY will pre-select the content type according to the contents of
the currently selected file. If the file cannot be imported, this field
will be empty. You can select a content type that you think the
file contains and start importing. TESSY will then show the errors
within the file.
Þ
Select the Target Document and click “OK”.
If no existing document has been selected, the new requirements will
be imported into a new document. You can also select any existing
document within the list to update this document. Whether you will
see existing requirement documents or validation matrices depends
on the file content type.
Formats of
requirement
sources
You can import following formats of requirement sources:
Format
Comment
*.txt
Simple ASCII format were each line is recognized as a requirement. This is
the very basic format that allows importing all sorts of text as requirements.
*.reqif
Requirements interchange format (ReqIF). For further information see
http://www.omg.org/spec/ReqIF.
*.csv, *.tsv
Comma or tab separated ASCII text with a headline indicating the column
names. This format allows specifying requirement id, version and all other
available requirement properties.
*.xml
TESSY specific XML format which provides specifying the chapter structure of
a requirement document. All available requirement properties may be specified
within this format. It is the recommended exchange format when importing
requirements from any other requirement management systems.
Table 6.69: Possible formats of requirement sources
The newly imported requirement document will be displayed in the RQMT Explorer view
(see figure 6.52).
184
TESSY 3.1 Manual
6.4 Requirement management
Figure 6.52: The new requirement document
The asterisk (*) indicates that the requirement is new and not commited yet.
mouseover shows a tooltip (see figure 6.53).
A
New imported
requirement
Figure 6.53: The asterix and a mouseover shows the status “new”.
6.4.2.5 Committing requirements
The requirements document needs to be checked-in as initial revision:
Þ
Select the document within the RQMT Explorer view and click on
Changes) in the global tool bar.
Committing
requirements
(Commit
You can commit all documents or selected elements (see figure 6.54).
TESSY 3.1 Manual
185
6 Working with TESSY
Figure 6.54: Committing options
Þ
Enter a comment and click “OK” (see figure 6.55).
Figure 6.55: Comment for the initial revision of the commit
An initial revision of the requirement document will be created.
Figure 6.56: After the commit
186
TESSY 3.1 Manual
6.4 Requirement management
6.4.2.6 Editing requirements
To edit a requirement:
Þ
Double click on the requirement you want to edit.
The requirement will be opened within the requirement editor in the center of
the Requirement Management perspective.
Figure 6.57: Double click on the RQMT opens the requirement editor
Þ
After editing, click on
to save the changes.
TESSY will create now a locally modified version of the requirement which will
be illustrated with the term MODIFIED in front of the requirement name (see
figure 6.58).
Figure 6.58: The first requirement was modified
Þ
Commit your changes with a click on
Þ
A new version of the requirement will be created and you need to decide either
to increment the major or the minor version number within the check-in dialog.
TESSY 3.1 Manual
.
187
6 Working with TESSY
If you did only minor changes or want to commit a draft update of a requirement,
you can decide to increment only the minor version. In all other cases, it is
recommended to increment the major version.
After committing, the ID of the requirement will be updated to display the new
version (see figure 6.59).
Figure 6.59: The first requirement has the version 2.0
Editing
requirements
Every change of a requirement will be displayed wit ha “modified” status, which is displayed with an angle bracket and a status “modified”, shown when you move the mouse
over the requirement (see figure 6.60).
Figure 6.60: The requirement document was modified
6.4.2.7 Renaming a document / alias
You can rename a requirement document and assign an alias which is useful for the
reporting, because you have an abbreviation of the document name when building the
requirement identifier. The identifier will be: [document alias]:[id]-[version].
To rename or give an alias:
188
TESSY 3.1 Manual
6.4 Requirement management
Þ
Right click the document and select “Properties” from the context menu.
Þ
Change the name or the alias and click “OK”.
Figure 6.61: Changing the alias of the new requirement document
The new alias (in our Example “IVIR”) will be used within the Requirements List view
and the document preview (see figure 6.62).
Figure 6.62: The alias of a requirement is used in various views
TESSY 3.1 Manual
189
6 Working with TESSY
6.4.3 Requirements List view and Requirement Editor
Figure 6.63: Requirements List view
Figure 6.64: Double clicking on a requirement opens the Requirement Editor
6.4.3.1 Icons of the view tool bar
icon
action / comment
Shows all descendants.
Adds an image to the element.
Table 6.77: Tool bar icons of the Requirements List view
6.4.3.2 Viewing requirements, versions, IDs
Within the Requirement Editor the requirements are displayed with text, figures, if available, versions and IDs (see figure 6.65).
190
TESSY 3.1 Manual
6.4 Requirement management
Figure 6.65: Requirements Editor with test and a figure
Every requirement has an explicit ID and a version number. TESSY provides the following
two mechanisms for assigning requirement version numbers:
•
Automatic: TESSY assigns and increments version numbers automatically if
the import file does not contain version numbers. This is the normal behavior
when importing requirements from text files or spreadsheets. When checkingin requirements, you can decide to increment the major or minor version
number (e.g. major 1.0 to 2.0 or minor 1.0 to 1.1).
•
Using external version numbers: It is possible to use existing requirement
version numbers from the import file. This is useful if you get requirements
from an external requirements management tool and need to import exactly
the same version numbers that where already assigned to the requirements.
The only prerequisite for this kind of import is the consistency of the version
numbers.
When using external version numbers, the following checks of the imported data will be
performed when importing:
•
If any requirement content is changed, the external version must have been
incremented. Otherwise an error will be reported for the respective requirements.
•
If the version number was changed but no requirement content was changed,
a warning will be reported.
TESSY 3.1 Manual
Requirements
List view
Using external
version numbers
191
6 Working with TESSY
•
If the new version number is less than the highest existing version number for
a requirement, an error will be reported.
Gaps within the numbering of requirement IDs are allowed.
The numbering has to be ascending.
6.4.4 Test Means view
Figure 6.66: Test Means view
Requirements will be tested using different test means, e.g. unit test, system test or
review. The default test means used within TESSY are for unit and component testing.
You can filter your requirements by test mean for later reporting issues.
6.4.4.1 Icons of the view tool bar
icon
action / shortcut / comment
Creates a new test mean.
To edit the selected test mean.
Deletes the selected test mean (Del).
Table 6.80: Tool bar icons of the Test Means view
192
TESSY 3.1 Manual
6.4 Requirement management
6.4.5 VxV Matrix view
Figure 6.67: VxV Matrix view
The VxV matrix supports the assignment of requirements to the test means used for
validation of the requirement. This helps filtering out those requirements that are to be
tested with unit and component testing. The assignments within the VxV matrix will be
used for requirement filtering for reporting.
6.4.5.1 Icons of the view tool bar
icon
action / shortcut / comment
Adds all test means to the matrix.
Adds all requirements to the matrix.
Removes all unused items.
Table 6.81: Tool bar icons of the VxV Matrix view
TESSY 3.1 Manual
193
6 Working with TESSY
6.4.6 Link Matrix view
Figure 6.68: Link Matrix view
Link Matrix view
Within the Link Matrix view you can link modules, test objects and test cases with
requirements. It shows the link relationship of the elements currently contained within
the matrix.
6.4.6.1 Icons of the view tool bar
icon
action / shortcut / comment
Transposes the matrix, e.g. changes the rows and columns (Ctrl+T).
Adds all currently linked elements based on the elements selected within the
first column of the matrix.
Removes selected elements (Del). Does NOT delete the element but removes
it from the view.
Removes all elements. Does NOT delete the element.
Table 6.82: Tool bar icons of the Link Matrix view
194
TESSY 3.1 Manual
6.4 Requirement management
6.4.6.2 Status indicators
indicator
status / meaning
The link is suspicious.
Table 6.83: Status indicators of the Suspicious Elements view
6.4.6.3 Adding and removing elements
To add elements to the Link Matrix view:
Þ
Drag and drop requirements, modules, test objects or test cases into the matrix. The elements will be shown either within the rows or columns of the matrix.
To exchange rows or colums, click on
Þ
within the view tool bar.
Use the context menu entry “Add to Link Matrix” within the requirements
explorer, Test Project view or Test Items view (see figure 6.69).
To remove elements from the Link Matrix view:
Þ
Click on
(Remove All Elements) to remove all currently displayed elements.
This will only remove the elements from the matrix view, no changes
will be made to the elements themselves.
Þ
Click on (Remove Selected Element) will remove the currently selected element within a row of the matrix (if any element is selected).
TESSY 3.1 Manual
195
6 Working with TESSY
Figure 6.69: Adding Test Cases to Link Matrix view
Please notice the following habits:
•
The current contents of the link matrix are remembered when restarting TESSY but
the matrix itself is not persisted in any way. You can add or remove elements and
this will not cause any changes to the elements.
•
The search button “Add All Elements Linked to Elements in Rows” allows finding
and adding the elements that are linked to the elements currently displayed within
the rows of the matrix.
•
The view is available within the Overview and within the Requirement Management
perspective. Setting links or changing elements will cause dependent elements to
become suspicious. Refer to the Suspicious view for details.
6.4.6.4 Updating requirement links
If requirements have changed, the links within the Link Matrix view will be declared
suspicious with an exclamation mark (see figure 6.70).
196
TESSY 3.1 Manual
6.4 Requirement management
Figure 6.70: Link Matrix view with suspicious elements
To update suspicious links:
Þ
Double click the link within the matrix. Another double click will delete the link
and one more double click will create the link again.
Þ
Right click a cell and select “Update Selected Suspicious Link” from the context
menu.
Þ
Right click a row and select “Update Suspicious Links” from the context menu.
All links within the selected row will be updated.
Updating
suspicious links
6.4.7 Suspicious Elements view
Figure 6.71: Suspicious Elements view
The Suspicious Elements view allows finding out the reason why an element is suspicious.
TESSY 3.1 Manual
Suspicious
Elements view
197
6 Working with TESSY
During the testing process modules, test objects and test cases will be linked to
requirements indicating that the respective requirements are tested by the linked
elements.
Whenever a requirement changes because of modifications or because a new
version has been checked in, the linked elements will become suspicious and
need to be reviewed. The suspicious status will be indicated by an exclamation
mark icon decorator, i.e.
for a suspicious test object.
6.4.7.1 Icons of the view tool bar
icon
action / shortcut / comment
Sets elements semantic equal (all elements or selected element).
Updates links (all links or selected link).
Compares the versions.
Table 6.89: Tool bar icons of the Suspicious Elements view
6.4.7.2 Determine changes that caused suspicious status
When you have linked the test object and some test cases, any changes to the linked
requirements will cause the linked elements to become suspicious.
Figure 6.72: Suspicious test object and test cases
Determine the related modified requirements that causes the status of a test object being
suspicious within the Suspicious Elements view:
198
TESSY 3.1 Manual
6.4 Requirement management
Þ
Select the suspicious test object within the Test Project view (i.e. within the
Overview perspective).
The Suspicious Elements view will display the changed requirements (see figure
6.73).
Figure 6.73: Suspicious test object and linked modified requirements
As you can see in figure 6.73 above, one requirement has been added to the module. If
you select a test case, the Suspicious Elements view will show the changed requirement(s)
(see figure 6.74).
Figure 6.74: Selecting the suspicious test case shows the modified requirement(s)
TESSY 3.1 Manual
199
6 Working with TESSY
Differences view
Within the Differences view you can determine the exact differences:
Þ
Click on
(Compare Versions).
The Differences view shows all changes of the requirement (see figure 6.75).
Figure 6.75: Comparing the versions of the requirement
You need to determine if the change of the requirement affects the linked test cases and
adapt the test data if necessary. If no changes to the test cases are required, update the
link to acknowledge the requirement change. The suspicious icon will then disappear for
the respective test case. You can also use the Link Matrix view to update requirement
links.
6.4.8 Attached Files view
Figure 6.76: Attached Files view
Attached Files
view
200
The Attached Files view allows adding arbitrary files to the selected requirement. You
TESSY 3.1 Manual
6.4 Requirement management
can add additional documents with detailed information about the requirement. The files
will be stored within the TESSY database.
6.4.8.1 Icons of the view tool bar
icon
action / shortcut / comment
Adds the selected file (Ctrl+N).
Creates a new folder (Ctrl+B).
To edit a name or description of the selected file or folder (Alt+C).
Deletes the selected file (Del).
Table 6.92: Tool bar icons of the Attached Files view
TESSY 3.1 Manual
201
6 Working with TESSY
6.4.9 Attributes view
Figure 6.77: Attributes view
Attributes view
The Attributes view allows adding arbitrary attributes for the selected requirement or
requirement document.
Important: New attributes should be created for the requirement document.
They will then be inherited to each requirement of the document and can be
overwritten on requirement level.
There are some predefined attributes on document level that control the behavior of the
requirement evaluation and suspicious calculation for elements linked to requirements.
6.4.9.1 Icons of the view tool bar
icon
action / shortcut / comment
Creates a new attribute (Ctrl+N).
Edits the selected attribute (Ctrl+E or double click).
Deletes the selected attribute (Del).
Table 6.93: Tool bar icons of the Attributes view
202
TESSY 3.1 Manual
6.4 Requirement management
6.4.9.2 Editing attributes of a requirement
To edit an attribute:
Þ
Within the Explorer view select a requirement oor a requirement document.
The Attributes view will display the attributes for the selected element.
Þ
Right click the desired attribute and select “Edit” from the context menu.
Þ
Change name, type or value of the attribute.
Figure 6.78: Editing the requirement settings within the Attributes view
To edit the HTML version of a requirement, change the “type” to HTML (instead of
plain text):
Þ
Select the desired requirement document within the Explorer view.
Þ
Right click the attribute “Content Type” within the Attributes view and select
“Edit”.
Þ
Change the value to “HTML” and click “OK” (see figure 6.79).
TESSY 3.1 Manual
203
6 Working with TESSY
Figure 6.79: Changing the “Content Type” attribute to HTML
6.4.10 History view
Figure 6.80: History view
History view
204
The History view shows the version history of the currently selected element, e.g. requirement or document.
TESSY 3.1 Manual
6.4 Requirement management
6.4.10.1 Icons of the view tool bar
icon
action / shortcut / comment
Two versions of a requirement are set to be semantically equal if their contents
reflect the same semantics but minor changes were made, e.g. spelling errors.
Unsets semantic equal. You need to have two versions of a requirement selected to do this operation.
Compares the versions.
Table 6.96: Tool bar icons of the Histroy view
6.4.10.2 Reviewing changes
Each requirement has a version history showing all of its changes.
To review the changes between any two versions of the history or between a historic
version and the current version,
Þ
select either two versions within the history view to compare these versions or
select only one version within the view if you want to compare it against the
current version.
Þ
Click on
Reviewing
changes
(Compare) in the toolbar.
The Differences view will be displayed within the lower pane, which provides a direct
comparison of the respective requirement versions printed as text (see figure 6.81).
Differences view
Figure 6.81: Differences view
TESSY 3.1 Manual
205
6 Working with TESSY
6.4.11 Related Elements view
Figure 6.82: Related Elements view
In this view you can see the links of requirements to other requirements, e.g. when creating refined requirements based on a given requirements document. This view presents
all linked elements of a requirement, e.g. all sub requirements or the linked main requirements.
6.4.12 Document Preview
Important: You have to open the Document Preview by double clicking on
the appropriate requirement document!
Figure 6.83: View Document Preview
206
TESSY 3.1 Manual
6.4 Requirement management
6.4.12.1 Icons of the view tool bar
icon
action / comment
Displays the test means within the requirement document.
Displays the linked sub requirements.
Toggles to the HTML inline editor (only available of the “Content Type” of
the document is “HTML”).
Exports the HTML version as HTML file.
Refreshes the view. Necessary after editing any requirement.
Table 6.98: Tool bar icons of the Document Preview
6.4.12.2 Editing the requirement as HTML version
After you created or imported requirements, you can edit them as HTML version:
Þ
Click on the icon
Þ
If a note is displayed, that the “Content Type” must be set to HTML, refer to
section 6.4.9.2 Editing attributes of a requirement. After changing the content
.
type to HTML, refresh the Document Preview with a click on
Þ
Click in a field with any description of a requirement. An HTML inline editor
appears.
Þ
With a click on the icon
you can switch between the WYSIWYG editor and
plain HTML (see figure 6.84).
TESSY 3.1 Manual
(Toggle HTML Editing).
207
6 Working with TESSY
Figure 6.84: HTML editing within the inline editor (WYSIWYG and plain HTML)
6.4.13 Requirements Coverage view
Figure 6.85: Requirements Coverage view
Important: By default you will find the Requirements Coverage view within
the Overview perspective!
Requirements
Coverage view
within the
Overview
perspective
208
Within the Requirements Coverage view you will link the test cases with the requirements.
You will as well have an overview of the requirements coverage, therefore you will find
this view within the Overview perspective.
TESSY 3.1 Manual
6.4 Requirement management
6.4.13.1 Icons of the view tool bar
icon
action / shortcut / comment
Shows all requirements, including unlinked requirements.
Updates all links.
Refreshes the view. With click on the little arrow next to the icon, you can
choose on which selection you want to refresh (see figure 6.86).
Table 6.100: Tool bar icons of the Requirements Coverage view
Figure 6.86: Options of refreshing
The idea behind linking requirements to modules and test objects is the following process:
•
First, the complete list of requirements is gathered.
•
Second, each applicable requirement is assigned to modules that implement
functionality referenced by the requirement.
•
For further break down of the assignment, individual test objects are linked
to the requirements. This makes sense if the module has a large number of
linked requirements.
•
At last there is a small subset of all available requirements that must be
verified. The requirement linking must be further broken down to test case
level for a given test object.
TESSY 3.1 Manual
Linking
requirements
with test cases
209
6 Working with TESSY
For this process TESSY provides the Requirement Coverage view within the Overview
perspective.
It is divided into two tabs:
•
The Planning tab is the editor for all requirement links to modules, test objects
and test cases.
•
The Execution tab provides quick overview about the achieved test results for
linked requirements.
The content that is displayed depends on the current selection. You can select the
following elements to display data:
selected element
content displayed
document, folder
Displays the requirement links of all sub elements and provides an
overview of which other sub elements have not been linked to those
requirements.
module, test object
If not already linked with any requirement, all available requirements
will be displayed; otherwise only the linked requirements will be displayed.
You can choose to display all available requirements by clicking on
“Always show unlinked requirements” button (this button remains
active for other selections as well).
test case
Displays only the requirements for the currently selected test case
(and those requirements already linked to the module or test object).
You can choose to link the module and test object level linked requirements also on test case level, if applicable.
Table 6.103: Selected elements within Requirement Management and displayed
contents
Important: When selecting objects on upper levels of the test project, the
calculation of the test planning/execution links can take a moment.
6.4.13.2 Planning tab
The current status of the links between modules, test objects, test cases and requirements
reflects the current state of your requirements coverage. This coverage can be examined
210
TESSY 3.1 Manual
6.4 Requirement management
on arbitrary levels of your test project.
You can also create a report that shows the currently achieved planning coverage.
6.4.13.3 Execution tab
After execution of any tests, the test results are stored within test runs. The test result
of a test run covers the requirements that were linked to modules, test objects or test
cases at the time the test was executed. Therefore, the actual execution coverage result
may differ from the planning coverage result. The execution coverage view is read-only,
because this just displays the results. Any changes to requirement links need to be carried
out within the planning coverage view.
You can create a report that shows the currently achieved execution coverage.
TESSY 3.1 Manual
211
6 Working with TESSY
6.5 TEE: Configuring the test environment
Figure 6.87: Test Environment Editor (TEE)
To execute a test, you need to create and configure a new module. The necessary
settings, besides the source files that you want to test, are the following:
•
include paths and defines for the source files
•
the compiler of a microcontroller target and debugger, i.e. the desired test
environment
•
compiler and linker options
•
debugger settings
•
other optional module settings, e.g. ASAP conversion files
We do that within the “Test Environment Editor”, the TEE.
For a complete list of all the available attributes and possible values refer to the
application note “Environment Settings (TEE)”.
212
TESSY 3.1 Manual
6.5 TEE: Configuring the test environment
With the installation of TESSY, the configurations for all supported compiler
and target environments (including necessary settings and files) were copied to
the TESSY installation directory. You need to enable the compiler and targets
that you want to use and add them to your configuration file as described in the
following sections.
Their default settings may need to be adapted to your needs, e.g. the installation
path of the compiler or target debugger is one of the settings that normally need
to be changed to your local values. Settings which have already been used with a
previous version of TESSY were also taken over during installation.
The TEE configuration management allows you to create variants of compiler
and target settings and assign them to a module. We recommend to save your
settings in a specific configuration file, which is the default when creating a
new project database (see section 6.5.6 Configuration files). This allows easy
sharing of specific environment configurations between developers of the same
development team.
As a result you have all your basic settings at one central place, i.e. include paths, additional compiler options, etc. Once configured, you can start
testing immediately using the required configuration for all your modules.
6.5.1 Starting the TEE
To open the TEE:
Þ
In the menu bar click on “File” > “Edit Environment” (see figure 6.88).
The TEE will start with the custom configuration file assigned to this project
database.
TESSY 3.1 Manual
213
6 Working with TESSY
Figure 6.88: Call of the Test Environment Editor (TEE)
6.5.2 Structure of the TEE
Important: TEE is not an eclipse-based program and does not provide views
and perspectives! Therefore you cannot drag and drop the panes.
pane
location
(default)
function
General
left
Section General lists all supported compiler and target environments which were configured with default settings.
Configurations
left
Section Configurations lists all supported compiler and target
combinations. The settings of these combinations have been
inherited by the paragraph General. The section displays a
configuration file with default environments.
Attributes
right
Displays all attributes of an item as soon as it is selected in
the left pane.
Table 6.106: Structure of TEE
214
TESSY 3.1 Manual
6.5 TEE: Configuring the test environment
The configuration file
When you have created your project database with the default settings,
you will already have a configuration file assigned to the project database. The
name of this file will be displayed within the lower right side in the status bar of
TESSY. This configuration file will be edited when opening TEE.
Figure 6.89: Configuration file
6.5.3 Icons of the tool bar
icon
action / shortcut / comment
Collapses the selected item.
Expands the selected item.
continue next page
TESSY 3.1 Manual
215
6 Working with TESSY
icon
action / shortcut / comment
Copies a compiler, including the target and environment sub tree. Icon is only
active when a compiler is selected.
Copies a target, including the environment sub tree. Icon is only active when
a target is selected.
Copies an environment. Icon is only active when an environment is selected.
Deletes the selected item.
Table 6.107: Tool bar icons of the TEE
6.5.4 Status indicators
The following table shows the indicators of status and their meaning which are used by
TEE.
indicator status / meaning
Item added as Windows environment variable for all processes, i.e. the make
call or the slave call, spawned using this test environment.
Item added to path variable of the execution environment.
Item disabled.
Item disabled because of an inherited parent item being disabled. Example: A
compiler item within section “Configurations” gets this item if the respective
compiler item within section “General” is disabled.
Error.
Error, but the cause is somewhere within the attributes inherited by item.
Check for errors upwards or downwards within the configuration hierarchy and
fix the error there.
Information.
The information comes from another item upwards or downwards within the
configuration hierarchy.
continue next page
216
TESSY 3.1 Manual
6.5 TEE: Configuring the test environment
indicator status / meaning
Attribute inherited. The attributes in section “Configurations”, i.e. compiler,
targets, environment, are normally inherited from the respective section “General”.
Compiler active.
Compiler inactive, probably overwritten or replaced by another item downwards the configuration hierarchy.
Target active.
Target inactive, probably overwritten or replaced by another item downwards
the configuration hierarchy.
Environment active.
Environment inactive, probably overwritten or replaced by another item downwards the configuration hierarchy.
Warning of error within the attributes of the item. This needs to be resolved
somewhere else within the configuration hierarchy.
Warning, but the cause is somewhere within the attributes inherited by this
item. Check for warnings and errors upwards within the configuration hierarchy
and fix the errors there.
Table 6.108: Status indicators of TEE
Example:
The directory is added to the Windows path variable and also added as Windows environment variable. The attribute has been inherited.
TEE will display the attributes in different fonts to indicate the following situations:
normal letters
represent factory settings respectively default settings from
paragraph “General” and have been inherited.
bold
value has been defined the first time for the attribute
italic
factory setting respectively default setting from paragraph “General” has been overwritten
TESSY 3.1 Manual
Different fonts as
indicators
217
6 Working with TESSY
6.5.5 Viewing all available configurations
The TEE provides predefined configurations for all supported compiler and target
environments. By default, at least the GNU GCC and GNU GCC (C++) environments will be enabled and all your compiler/target environments used in previously
installed versions of TESSY, if any, and only basic attributes are visible for the
user.
Visualizing all
attributes
To visualize all settings, compiler and targets:
Þ
In the tool bar select the option “Show All” from the pull-down menu (see figure
6.90).
Figure 6.90: Visualizing all items within TEE
Under “Configurations” more sections are now visible, e.g. “System”, which
contains the compiler and targets possible to use (see figure 6.91).
218
TESSY 3.1 Manual
6.5 TEE: Configuring the test environment
Figure 6.91: Compiler and targets possible to use in TESSY
You can see the enabled GNU GCC and GNU GCC (C++) environments. All other
predefined configurations are disabled (see figure 6.92).
Figure 6.92: Enabled and disabled configurations within TEE
When you select any item on the left pane, the attributes will be shown in the right pane
(see figure 6.93).
TESSY 3.1 Manual
219
6 Working with TESSY
Figure 6.93: Attribute settings of the Eclipse target
You can refresh the panes in TEE by pressing F5.
6.5.6 Configuration files
A system default configuration file contains the settings for all supported compiler
and target environments and has been installed with TESSY into the installation
directory. The configuration file assigned to the project database contains all
settings that are changed compared to the system default configuration. The
contents of this file are displayed within section “File”.
Every configuration group of section “Configurations” (System, File, etc.)
has separate configuration files! The configuration files for “Network”, “All Users”
and “User” are for backward compatibility only and shall not be used any more!
All displayed settings will be stored in a set of configuration files with the
extension *.xml.
220
TESSY 3.1 Manual
6.5 TEE: Configuring the test environment
Configuration files of the respective sections will be stored in following default folders:
paragraph
storage, file(s), function
System
stored under C:\Program Files\Razorcat\TESSY\config
• configuration.xml: Contains settings for paragraphs “General” and
“Configurations”.
• configuration.default.xml: Contains factory settings of TESSY.
During installation of new TESSY versions, the settings within this file will
be used to update configuration.xml.
The System section is read only! Change your settings by drag ’n drop compiler
and targets onto the file section. Changes are possible within the General section.
File
Stored within the default configuration file of the project
C:[Projectroot]\tessy\config\configuration.xml
Network /
All Users /
User
These entries are obsolete! They are still available only for backward compatibility
with former versions of TESSY!
“Network” stored under C:\Program Files\Razorcat\TESSY\config
• network_configuration.xml: Specifies a configuration.xml which is
stored in your network. The syntax is as follows:
<?xml version="1.0" encoding="ISO-8859-1"?>
<link target="[PATH]\\configuration.xml"/>
“All Users” stored under
%ALLUSERSPROFILE%\Application Data\Razorcat\TESSY\[Version]\config
• configuration.xml: Contains settings for this section (if any).
“User” stored under %APPDATA%\Razorcat\TESSY\[Version]\config\
• configuration.xml: Contains settings for this section (if any).
• configuration.system.xml: Contains all your changes made in
paragraphs “General” and “Configurations” if you do not have enough
privileges (user) to change the system configuration file.
Table 6.113: Contents, functions and storage location of configuration files
6.5.7 Customizing the configurations
The following steps are necessary to customize the configuration file of the currently open
project:
TESSY 3.1 Manual
221
6 Working with TESSY
•
Enable the compiler/target environments that you want to use for testing (see
section 6.5.7.1 Enabling configurations).
•
Add the desired compiler/target environments to the “FILE” section (see section 6.5.7.2 Adding configurations).
•
Review and adjust the attributes (see section 6.5.7.3 Adjusting enabled configurations).
You need administrator privileges to change the contents of the “General” section! If you do not have enough privileges, TEE will inform you and save your
changes in a user specific file.
6.5.7.1 Enabling configurations
A configuration consists of a combination of compiler, target and a default environment.
Enable
configurations
To enable a compiler or target,
Þ
select “Show All” from the pull-down menu to display all supported compiler
and target environments.
Þ
Either in section General or under “Configuration > System” select the compiler
or target.
Þ
Select “Enable Compiler” respectively “Enable target” from the context menu
or press Ctrl+E (see figure 6.94).
TEE will remove the red cross from the icon to indicate, that the item is enabled.
222
TESSY 3.1 Manual
6.5 TEE: Configuring the test environment
Figure 6.94: Enable compiler
After enabling your desired compiler/targets, we recommend to select “Hide Disabled”
from the filter menu to have a better overview.
6.5.7.2 Adding configurations
You make a configuration available as compiler/target environment for usage within
TESSY by adding it to the configuration file. To add an environment, copy an available
configuration environment from section “System” onto section “File” by either using the
context menu or drag and drop:
Þ
Rightclick the compiler and choose “Add to File Section” from the context menu
(see figure 6.95) or “grap” the compiler with the mouse and drop it onto the
file section (see figure 6.96).
The compiler will be added to the list under “File”.
Þ
Change the settings to your needs, e.g. delete some debuggers if they are not
necessary for your test environment.
Important: Do all necessary settings within section “File”, because
all contents of this section will be saved into your configuration file.
Only changed values of attributes will be saved, not the inherited
values from other sections!
TESSY 3.1 Manual
223
6 Working with TESSY
Figure 6.95: Adding an environment to a configuration file by using the context menu
Figure 6.96: Adding an environment to a configuration file by drag and drop
224
TESSY 3.1 Manual
6.5 TEE: Configuring the test environment
6.5.7.3 Adjusting enabled configurations
Normally you need to change some settings for your specific environment. Some of the
settings will be checked for validity. The TEE will check all enabled configurations and
displays error and warning signs as soon as an error has been found, e.g. if the “Compiler
Install Path” must be corrected.
We recommend that all customizations are done within section “File” to have
them saved into the custom configuration file. The only exceptions would be
the compiler and target installation paths: Those path settings should be carried
out within the sections “Compiler” and “Targets” which are saved either into the
installation directory or into a configuration file within the user profile. This
way, you keep computer specific path settings out of the configuration file that
you will probably share with other testers on different computers.
Adding and editing attributes
TEE preserves all default settings. You can revert the default values with “Restore Factory Value” in the context menu (right click the attribute).
To edit an attribute,
Þ
right click an attribute in the Attributes pane.
Þ
Select “Edit Attribute” from the context menu.
Þ
If you want to change only an attribute value, select “Edit Attribute Value”
from the context menu.
Editing attributes
Depending on the attribute type, either a standard selection dialog for that kind
of information will appear (e.g. Browse for Folder in case of directories) or the
inline editor for the value will be activated.
If you have changed a default value other than the factory setting, the attribute
will be displayed in italics.
Þ
If you want to delete the attribute value, select “Reset Attribute” from the
context menu or press Del.
This will either remove the local value and show the inherited value or delete
the whole attribute entry, if it is only defined locally in this section.
TESSY 3.1 Manual
225
6 Working with TESSY
Adding attributes
To add an attribute,
Þ
right click in the Attributes pane.
Þ
Select “New Attribute” from the context menu.
The New Property dialog will open.
You see different attribute types available: String, Boolean, Number, Float, File
and Directory.
Þ
Specify the desired type.
Important: The type cannot be changed once the attribute is created!
Þ
Check the desired specific attribute flags. This depends on the type used. For
description see table below.
Þ
Click “OK”.
flag
description
Inheritable
This flag will always be ticked by default. It controls the inheritance of
the attribute: The attribute will be available in all (child) section nodes.
Some basic attributes are defined at the main nodes, e.g. compiler. Each
supported compiler will inherit these basic attributes.
validate
This flag may be important for directory or file types. The attribute value
will be validated by TEE, e.g. whether the path or file is available. An error
sign will indicate that the file or directory could not be found.
Read only
This flag makes it impossible to change a default value by using the attribute
pane of the module properties dialog.
Always Valid
Internal flag of TEE
As List
Using this flag, the attribute value will be handled as list of values (comma
separated). The values may be edited using a special list dialog. This is
useful for file or directory types.
Multiline
Provides a text window for multiline editing.
System
Internal flag of TEE.
continue next page
226
TESSY 3.1 Manual
6.5 TEE: Configuring the test environment
flag
description
Hex Format
This flag is useful in combination with the number type. TEE will convert
all inputs (e.g. a decimal value) to a hex value, e.g. 1 > 0x01.
Visible
This flag makes the attribute visible in the attribute pane of the module
properties dialog (and within the test report).
Not Empty
Checks whether the value is not empty. An error sign will indicate that the
attribute does not have a value.
System
Internal flag of TEE.
Environment
Variable
This flag is useful during test execution and during the make process:
TESSY will create an environment variable within the process space of the
process that will be used for test execution (e.g. running the slave process)
and for make (e.g. building the test driver).
Important: The environment variable will only be recognized by TESSY if a plus-sign is used in front of the Make
Call value.
Add to PATH
Variable
This flag is useful for attributes of type directory. Like described above
for the flag “Environment Variable”, the respective directory value will be
added to the PATH variable of the process space used for test execution
and make.
Makefile Variable
Adds this variable to the generated makefile for compilation/linking of the
test driver application. You can use this variable within the makefile for
include paths or other settings required during the make process. A variable named “My Include Path” will be added to the generated makefile as
MY_INCLUDE_PATH with the respective value.
Table 6.119: Meanings of flags in the attribute properties
6.5.7.4 Assigning an existing configuration file to your project
If you want to assign an existing customized configuration file to your project, do as
follows:
Þ
Assigning a
configuration file
In the menu car of TESSY select “File” > “Edit Project. . . ”
The Project Configuration dialog opens.
Þ
Open the “Advanced Settings”.
TESSY 3.1 Manual
227
6 Working with TESSY
Þ
Under “Configuration File” click on “. . . ”, choose your file and click “Open”.
Click “OK”.
228
TESSY 3.1 Manual
6.6 TIE: Preparing the test interface
6.6 TIE: Preparing the test interface
Figure 6.97: Perspective TIE - Test Interface Editor
Within the TIE you determine which values are input and which ones are output variables.
Input values are all interface elements that have to be set before execution of a test
object. Output values are compared with the expected values after test execution.
After configuring the test environment of a module and opening the module the
analysis of the respective source files starts. The functions found within the source
files will be available as test objects, TESSY will try to assign useful default passing directions automatically.
You need to specify missing information that TESSY could not determine automatically, i.e. array dimensions or values of enumeration constants. This can happen
due to the usage of the “sizeof” operator when declaring arrays or enumeration
constants.
TESSY 3.1 Manual
229
6 Working with TESSY
6.6.1 Structure of the TIE perspective
pane
location
(default)
function
Test Project view
upper left
Same view as within the Overview perspective.
Properties view
lower left
Same view as within the Overview perspective.
Interface view
upper right
To display all interface elements of the test object and
to provide the edit fields to enter passing directions of
variables as well as additional information.
Plot Definitions
view
right
To create and configure plots (same view as within the
TDE perspective).
Table 6.121: Structure of TIE
6.6.2 Test Project view
6.2.2 Test
Project view
The Test Project view displays your test project which you organized within the Overview
perspective.
Important: We recommend to do any changes of the test project structure
within the Test Project view of the Overview perspective. The view layout of
this perspective is optimized for this purpose!
6.6.3 Properties view
Passing directions
of a variable
230
The Properties view is context sensitive: You can view the passing direction of a variable
(e.g. IN, OUT, IRRELEVANT) if you select the variable within the Interface view. Then
the Properties view will display the passing direction and the type information (see figure
6.98).
TESSY 3.1 Manual
6.6 TIE: Preparing the test interface
Figure 6.98: Information of passing direction and type
6.6.4 Interface view
Figure 6.99: Interface view
TESSY 3.1 Manual
231
6 Working with TESSY
6.6.4.1 Icons of the view tool bar
icon
action / shortcut / comment
Highlights the next undefined value.
Highlights the previous undefined value.
Creates a new variable.
External functions.
Internal functions.
External variables.
Global Variables.
Function.
Variable.
Table 6.122: Icons of the Interface view
6.6.4.2 Status indicators
status
indicator
status / meaning
Variable with advanced stub funcion.
Variable with global stub function.
Table 6.123: Status indicators of the Interface view
6.6.4.3 Handling
You can browse through the interface items of the currently selected test object. An
arrow in front indicates further levels (see figure 6.100).
232
TESSY 3.1 Manual
6.6 TIE: Preparing the test interface
Important: In some windows versions you need to move the mouse over the
view to see the arrows! They will fade-out when the view is not active.
Figure 6.100: White arrow indicating further levels, black arrow when expanded
6.6.4.4 Interface elements
The variables are either read within the function (IN), written within the function (OUT),
both read and written (INOUT), to be altered by usercode (EXTERN), or they are simply
not used within the function (IRRELEVANT).
Interface
elements
The TIE classifies all recognized interface elements of the test object into the following
sections:
External Functions
All functions which are not defined within the source file(s) of
the module. These functions are called from the test object.
Local Functions
All functions defined within the source file(s). These functions
are called from the test object.
External Variables
External declared variables which are not defined within the
source file(s).
Global Variables
Global variables and module local static variables which are defined within the source file(s).
Parameter
Parameter of the test object. You can browse through the structures by clicking on the plus sign to see the basic components.
Return
Return value of the test object.
TESSY 3.1 Manual
233
6 Working with TESSY
Unused
Contains all sections and the related interface elements which
are not used in the current test object.
6.6.4.5 Setting passing directions
The passing direction reflects the kind of usage for each variable while testing the
test object. You can specify how TESSY treats a value for an interface variable
either to provide the value before test execution (IN) or to keep the value for
evaluation and reporting after test execution (OUT).
Setting passing
directions
To set the passing directions:
Þ
Click in the relevant cell of the element in the column “Passing”.
A drop-down menu will be displayed with the available options IN, OUT, INOUT
and IRRELEVANT.
Þ
Select a suitable passing direction.
You have to specify one of the following passing directions for each interface element:
234
•
provide an input value for that interface element, because the element is only
read by the test object (IN),
•
evaluate and report the results of that interface element, because the element
is only written by the test object (OUT),
•
both provide a value and evaluate the result, because the interface element is
both read and written by the test object (INOUT),
•
provide a value within the UCE (Usercode Editor) of TESSY (EXTERN) .
With this setting, the interface element is visible in the scope of the user code
and may be set using C code,
•
not use the interface element at all (IRRELEVANT). In this case, you will not
see this variable for all further testing activities.
TESSY 3.1 Manual
6.6 TIE: Preparing the test interface
The following table shows possible passing directions of the different types of interface
elements:
direction:
IN
OUT
INOUT
EXTERN
IRRELEVANT
external variable
x
x
x
x
x
global variable
x
x
x
x
x
parameter
x
x
x
x
x
element:
return
x
Table 6.127: Possible passing directions of the interface elements
Automatic analysis of the passing directions
During processing when opening the module, TESSY analyzes the passing directions automatically and stores its findings in the interface database. This information is available
in the TIE as default values of the passing directions. TESSY analyzes the usage of
individual interface elements by the test object.
Warning: Although TESSY usually correctly recognizes all interface settings,
open the TIE for every test object and make sure that the values are set correctly
or do match your needs!
Depending on that usage, the following passing directions will be set as default:
read only
IN
write only
OUT
read and write
INOUT
not used
IRRELEVANT
In case that the passing directions or any other interface information could not be determined the respective fields in the TIE will be empty, i.e. if TESSY could not calculate
the size of an array dimension (indicated with a question mark), you have to set them
manually. Reset passing direction to the initial value TESSY analyzes the usage
TESSY 3.1 Manual
235
6 Working with TESSY
of individual interface elements by the test object. Change the passing direction of an
interface element to suite your needs.
Reset the passing direction for all interface elements of one section:
Þ
Select the respective section and “Reset to Default Passing” from the context
menu (see figure 6.101.
Figure 6.101: Resetting passing directions
Reset the passing direction only for an individual interface element:
Þ
Select the respective interface element and “Reset to Default Passing” from the
context menu.
6.6.4.6 Setting the data format
Setting the data
format
236
You can change the data format:
Þ
In the row “Data Format” click into the cell to open the pull-down menu.
Þ
Click on a format to change it either to “Decimal”, “Hexadecimal” or “Binary”
(see figure 6.102) and click on
(Save).
TESSY 3.1 Manual
6.6 TIE: Preparing the test interface
Figure 6.102: Setting the data format
Important: If you change the data format, all newly entered values within
the Test Data view of the TDE will be formatted into the new format. Existing
data will not be formatted!
6.6.4.7 Setting passing direction of special data types
Pointers and complex data types will be treated slightly different as normal data types.
Pointers
Interface elements of pointer type have two passing directions:
Both the passing direction of the pointer itself and the passing direction of the target to
which it points have to be specified. The passing direction of the pointer and the target
can be set interdependently, but they are checked or corrected by TIE to ensure valid
combinations.
Pointers
Complex data types
Complex data types as “Structure” and “Union” have a dependency between their passing
direction of the overall structure/union and the passing directions of their components.
To avoid invalid combinations the TIE checks the setting of passing directions for these
data types in the following manner:
TESSY 3.1 Manual
237
6 Working with TESSY
•
When the passing direction of one component is set, TIE determines the
resulting passing direction for the overall structure/union and set them automatically.
•
When the passing direction for the overall structure is set, all components are
automatically set to the same passing direction.
Arrays
The passing direction of the data type “Array” will be set for the entire array to the same
direction. Only one passing direction will be defined for the whole array and all elements.
If the array is made up of structured array elements (e.g. structures) it is possible to
define different passing directions for the components of these structures.
Arrays
Using arrays as
pointers
You can use the array parameter as a pointer:
Þ
Rightclick the array parameter and select “Use as Pointer” fro the context menu
(see figure 6.103).
Figure 6.103: Using an array parameter as pointer
TESSY will handle this parameter now as a pointer which can be allocated within the
TDE with NULL or an dynamic object (see figure 6.104).
238
TESSY 3.1 Manual
6.6 TIE: Preparing the test interface
Figure 6.104: Array as pointer NULL
6.6.4.8 Defining stubs for functions
The TIE displays all functions used by the test object either in section External Functions
or Local Functions and it provides an interface to define stubs for these functions that will
be executed instead of the original function. TIE distinct two different stub functions:
•
A stub function for which you can enter C code.
•
An advanced stub function that allows to provide values for parameters and
return values of stub functions like normal variables in the TDE.
You can define stubs globally for all test objects of the module or create a stub
independently of the global module setting.
To create a stub,
Þ
Creating a stub
function
rightclick the function and choose “Create Stub” from the context menu (see
figure 6.105).
TESSY 3.1 Manual
239
6 Working with TESSY
Figure 6.105: Create a stub function within the context menu
You can create stubs either for external or local functions which will be executed instead
of the original functions. There are several options available:
•
Create stubs for all functions at once for all test objects of the module (global
setting).
•
Create stubs for a single function for all test objects of the module (global
setting).
•
Create stubs for the current test object.
•
Change settings for the current test object.
The enhancement to normal stub functions are advanced stub functions, that allow to
provide values for parameters and return values of stub functions like normal variables.
TESSY checks if the stub is called by the test object with the specified parameter values,
otherwise the test fails. You can also provide a return value for further processing by the
test object. This reveals if the test object handles the return values of the stub function
correctly.
Creating an
advanced stub
function
240
To create an advanced stub,
Þ
rightclick the function and choose “Create Advanced Stub” from the context
menu.
TESSY 3.1 Manual
6.6 TIE: Preparing the test interface
You can create advanced stubs either for external or local functions. There are several
options available:
•
Create advanced stubs for all functions at once for all test objects of the
module (global setting).
•
Create advanced stubs for the current test object.
•
Change settings for the current test object.
6.6.4.9 Other interface settings
For test execution the information on data types of the test object interface has to
be complete. The dimensions for arrays, the values of the enumeration constants for
enumerations, and the dimensions for bitfields have to be defined. If these values have
been automatically recognized by TESSY while opening the module, the respective text
field will show the calculated value for every data type. In this case, it is not possible to
change these values.
If a value for an interface element has not been recognized automatically, the respective
text field will be empty or contain the value -1. In case of arrays TIE will also use
question marks to indicate this issue, i.e. array[?]. In all those cases you have to add
values manually.
Warning: Wrong array dimensions or wrong values for enumeration constants
can cause the test object to crash during test execution! TIE cannot check for
plausibility of used values!
6.6.5 Plots view
The Plots view visualizes graphically the test results. For details refer to section 6.8.12
Plots view within chapter TDE: Entering test data.
TESSY 3.1 Manual
6.8.12 Plots
view
241
6 Working with TESSY
6.7 CTE: Designing the test cases
Figure 6.106: CTE perspective
6.7.1 The basic idea
After preparing a test in the TIE, you need to create well designed test case specifications. The Classification Tree Method provides a systematical approach to create test
case definitions based on the functional specification of the function or system to be
tested. TESSY includes the specialized Classification Tree Editor CTE which assists you
in creating low redundant and error sensitive test cases.
The basic concept of the Classification Tree Method is to first partition the set of possible
inputs for the test object separately and from different aspects, and then to combine them
to obtain redundancy-free test cases covering the complete input domain.
6.7.2 Starting CTE
Þ
242
Switch to the CTE perspective.
TESSY 3.1 Manual
6.7 CTE: Designing the test cases
6.7.3 Structure of the CTE perspective
pane
location
(default)
function
Test Project view
upper left
Displays your test project. For editing your test project
switch to the Overview perspective.
Properties view
lower left
Displays the properties of your test project, e.g. sources
to the test object.
Classification
Tree view
center
To edit the classification tree.
Test Data view
right
Allows to assign test data to classification tree elements.
Table 6.140: Structure of the CTE perspective
6.7.4 Test Project view
The Test Project view displays your test project which you organized within the Overview
perspective.
6.2.2 Test
Project view
Important: We recommend to do any changes of the test project structure
within the Test Project view of the Overview perspective. The view layout of
this perspective is optimized for this purpose!
6.7.5 Properties view
The Properties view displays all the properties which you organized within the Overview
perspective. Most operations are possible.
6.2.3
Properties view
For changing any module related settings switch to the Properties view within the
Overview perspective.
TESSY 3.1 Manual
243
6 Working with TESSY
6.7.6 Classification Tree view
Classification
Tree view
Figure 6.107: Classification Tree view
Maximize the CTE window within the Classification Tree view to avoid additional
scroll bars and to always show the whole CTE window contents within the view.
6.7.6.1 Icons of the view tool bar
icon
action / shortcut / comment
Prints the classification tree (Ctrl + P).
Gives a print preview.
Undoes the last move or edit operation within the classification tree pane.
Cuts the selection (Ctrl + X).
Copies the selection (Ctrl + C).
Paste (Ctrl + V).
continue next page
244
TESSY 3.1 Manual
6.7 CTE: Designing the test cases
icon
action / shortcut / comment
Delete (Del).
Selects all leaves that are children of the current selection (Ctrl + L).
Selects the whole CT (Ctrl + A).
Adjusts the tree horizontal (Shift + H).
Adjusts the tree vertical (Shift + V).
Displays the tree in a horizontal layout.
Displays the tree in an arrow layout.
Displays the tree in a leftdown layout.
Displays the tree in a rightdown layout.
Zooms in.
Zooms out.
Table 6.141: Tool bar icons of the Classification Tree view
6.7.6.2 Structure of the Classification Tree view
pane
location
(default)
function
test item list
lower left
Defining test cases, test sequences and test steps. Every test
item creates a new line in the table pad.
draw pad
upper right
Drawing the classification tree with a root, classifications and
classes.
table pad
lower right
Marking classes of the classification tree in order to define
test cases, test sequences and test steps. Every test item
creates a new line in the table pad.
Table 6.142: Structure of Classification Tree view
TESSY 3.1 Manual
245
6 Working with TESSY
6.7.6.3 Creating classifications, classes and test cases
A test case is formed through the combination of classes from different classifications.
For each test case exactly one class of each classification is considered. The combined
classes must be logical compatible; otherwise the test case is not executable. You should
choose as many test cases that all aspects, not only individual but also in combination,
are considered enough.
The method offers a graphical representation of the recursive partitioning of classifications
and classes as classification tree. The classifications are drawn as named rectangles. The
respective classes are arranged below. To specify the test cases as combination of classes
the classification tree is used as the head of a combination table wherein the classes,
which are to be combined, are marked.
Creating
classifications
To create classifications:
Þ
Select the root tree item.
Þ
Use the context menu (“New” > “Classification”, see figure 6.108) or press Ins.
Figure 6.108: Creating a new classification with the context menu
To edit the classification:
Þ
246
Double click the new classification or press F2 to start the inline editor for the
tree item.
TESSY 3.1 Manual
6.7 CTE: Designing the test cases
Within the draw pad you can move the classifications with drag and drop: Select
either a classification, a sub tree (click on
) or select all (click on
) and
press the mouse button until the cursor turns into a cross with four arrows
then move the selection.
,
To create classes:
Þ
Creating classes
Right click the classification and select “New” > “Class” or select the classification and press Ins.
Try the several layouts for the tree for a better overview, e.g.
leftdown
or horizontal
(Arrow Layout),
!
You can assign test data to all interface variables for each tree node of the
classification tree. This speeds up testing because the test data will be assigned
automatically to the test cases via the marked class nodes (refer to section 6.7.7
Test Data view).
To create test cases:
Þ
Select the pane on the lower left (test item list).
Þ
Create the test cases either using the context menu (“New” > “Testcase”, see
figure 6.109) or press Ins.
TESSY 3.1 Manual
Creating test
cases
247
6 Working with TESSY
Figure 6.109: Creating test cases in the test item list
Test cases are defined by setting markings in the combination table:
Þ
Move the mouse pointer over the combination table.
Connecting lines to the classes of the classification tree are drawn. If the mouse
pointer is placed over a point of intersection it is changed to a circle.
Þ
Click on a circle to connect a test case with a class.
Þ
Click on
to save the classification tree.
If you connect a test case with a class, the respective test data assigments of the
class will be assigned to the test case. If you want to review the resulting test
data assignments for the whole test case, select the test case within the test item
list. The Test Data view will now display the assignments for the test case.
The test data is displayed read-only because it is defined by the marks set
within the combination table and cannot be changed here.
248
TESSY 3.1 Manual
6.7 CTE: Designing the test cases
Figure 6.110: Classification Tree with test data for class h
Notice the following habits:
•
All tree items with assigned test data are marked with a yellow dot, when not
selected.
•
When selecting a tree item, you will see the test data entered for this item within
the Test Data view.
•
When selecting any interface element within the Test Data view, all classification
tree elements that contain test data for this interface element will be marked with
a blue dot.
Þ
Switch to the TDE perspective.
TESSY 3.1 Manual
249
6 Working with TESSY
Figure 6.111: The first two test cases are read only and created within the CTE
Please notice the following habits:
•
Test items with values stemming from the CTE perspective are marked with new
(test case) and
(test steps).
status indicators:
•
Values stemming from the CTE are read-only. If you want to change them, switch
back to the CTE perspective and do your changes there.
6.7.7 Test Data view
6.8.7 Test
Data view
Whether using the CTE or creating the test cases manually within the TDE perspective,
you will use the Test Data view to enter the values. Because some operations and
overviews are only possible within the TDE perspective, switch to chapter 6.8.7 Test
Data view to learn how to use the Test Data view.
6.7.7.1 Assigning test data to the CTE
Instead of assigning test data directly to all variables of the test object interface for each
test case, you can assign them using the tree nodes of the classification tree. For each
tree node you can assign values to variables.
Child nodes inherit the values from their parent nodes, but you can as well overwrite
inherited variable values for a child tree node. Inherited values are marked with
(see
also figure 6.112).
250
TESSY 3.1 Manual
6.7 CTE: Designing the test cases
Figure 6.112: Showing data of a tree node
When combining leaf classes of the classification tree to test cases, the variable assignments of the marked tree nodes will be assigned to the respective test case. In this
way, you can assign all test data within the classification tree and get your test cases
automatically filled by setting marks within the combination table.
To assign test data to a variable of the test object interface:
Þ
Select a tree node within the CTE tree.
The Test Data view on the right hand will show the test object interface with
the value assignments for this tree node as well as inherited values of parent
nodes of the tree node.
Þ
Double click in the value cell and enter the value.
Þ
Click on
to save the entries.
When selecting a test case within the test item list you will see the resulting test data
assignments according to the marks of the test case within the Test Data view.
6.7.8 Test data assignment precedence rules
When assigning test data to tree nodes of the classification tree, the same variable can
be assigned within different locations of the tree and each assignment can have another
value for the variable. The resulting value for such a variable (for a given test case)
depends on the classes being marked for a test case.
When calculating the variable assignments for a test case, CTE collects all marked tree
TESSY 3.1 Manual
251
6 Working with TESSY
branches where the variable is assigned. A tree path is defined as the list of tree nodes
up to the root starting at the tree node where the variable is assigned. The tree paths
are sorted by position of their leaf nodes: The sort order is from left to right.
The following precedence rules for tree paths apply:
1. Left to right precedence: Tree paths are compared starting from the root until they
diverge. The rightmost diverged node wins.
2. Longer path precedence: If one tree path is a full sub path of the other, the longer
path wins.
The example below (see figure 6.113) shows different assignments of variable “x” within
a classification tree. The resulting value for “x” is indicated for each test case.
Figure 6.113: Variable assignments in classification trees
The resulting value for the test cases will be calculated like follows:
1. For the first test case the variable is assigned in class “b” which is a longer path
than the assignment within the root, so the value of class "b" will be taken.
252
TESSY 3.1 Manual
6.7 CTE: Designing the test cases
2. For the second test case we have values within class “b” and class “e”. The tree
paths diverge below the root node and the classification “O” is on the right side so
that the value of class “e” will be taken.
3. In the third test case there are values within the root node and within classes “b”
and “c”. Both tree paths of the classes are longer than the root path and the
classification “B” is on the right side so that the value of class “c” will be taken.
4. In the fourth test case we have the tree paths of classes “b” and “g” that diverge
at the root. Because classification “O” is in the right side, the value of class “g”
will be taken.
5. In this test case all marked classes refer to the value defined within the root node
so that the value of the root node will be taken.
TESSY 3.1 Manual
253
6 Working with TESSY
6.8 TDE: Entering test data
Figure 6.114: TDE perspective
6.8.1 Structure of the TDE perspective
pane
location
(default)
function
Test Project view
upper left
Same view as within the Overview perspective.
Test Results view
upper left
Same view as within the Overview perspective.
Evaluation
Macros view
upper left
Same view as within the Overview perspective.
Test Items view
lower left
Same view as within the Overview perspective.
Properties view
lower left
Same view as within the Overview perspective.
Test Data view
upper right
To enter test data and expected values, after the test
execution, reviewing passed, failed and undefined values.
continue next page
254
TESSY 3.1 Manual
6.8 TDE: Entering test data
pane
location
(default)
function
Test Definition
view
lower center
To display the test case specification, the optional description and linked requirements of the current test case.
Declaration view
lower center
To define own variables for the user code.
Prolog/Epilog
view
lower center
To specify usercode that will be executed at a certain
point in time during the test execution.
Plots view
lower center
To visualize graphically the test results.
Usercode Outline
view
lower right
To display the usercode that will be executed at a certain
point in time during the test execution.
Plot Definitions
view
lower right
To create and configure plots (same view as within the
TDE perspective).
Table 6.154: Structure of TDE
Usercode
TESSY provides an interface to specify the usercode that will be executed
at a certain point in time during the test execution. Using the usercode views
(i.e. Prolog/Epilog view and Usercode Outline view) you can specify such C code
fragments or emulator scripts depending on the selected target configuration.
6.8.2 Test Project view
The Test Project view displays your test project which you organized within the Overview
perspective.
6.2.2 Test
Project view
Important: We recommend to do any changes of the test project structure
within the Test Project view of the Overview perspective. The view layout of
this perspective is optimized for this purpose!
TESSY 3.1 Manual
255
6 Working with TESSY
6.8.3 Test Results view
6.2.6 Test
Results view
The Test Results view displays the coverage measurement results and the results of a
test run of expected outputs, evaluation macros and call traces, if applicable. It is the
same view as within the Overview perspective.
6.8.4 Evaluation Macros view
6.2.7
Evaluation Macros
view
This view lists the detailed results of the evaluation macros if the usercode of the test
object contains any evaluation macros. The results are displayed wherever they occur
within the usercode, e.g. within stub functions or test step epilogs. It is the same view
as within the Overview perspective.
6.8.5 Test Items view
6.2.5 Test
Items view
Within the Test Items view you get an overview about your test cases and test steps
which you organized within the Overview perspective or the CTE (see section 6.7).
To create test cases and test steps manually without using the Classification Tree Editor,
switch to the Test Items view within the Overview perspective.
6.8.6 Properties view
6.2.3
Properties view
Type information
of a variable
256
The Properties view displays all the properties which you organized within the Overview
perspective. Most operations are possible.
For changing a source switch to the Properties view within the Overview perspective.
The view is context sensitive: You can view the passing direction and all type information
of the variable (i.e. the basic type, the size as well as any modifiers and pragmas) if you
select the variable within the Test Data view (see figure 6.115).
TESSY 3.1 Manual
6.8 TDE: Entering test data
Figure 6.115: Type information of the variable long range_start
6.8.7 Test Data view
Figure 6.116: Test Data view
Whether using the CTE or creating the test cases manually within the TDE perspective,
you will use the Test Data view to enter or review the input values and expected results
of all test cases and test steps.
Important: CTE exported values are read-only within the TDE perspective.
The cells are insensitive. Switch to the CTE perspective to change such values
if necessary (respectively the underlying document).
TESSY 3.1 Manual
257
6 Working with TESSY
6.8.7.1 Icons of the view tool bar
icon
action / shortcut / comment
Highlights the next failed value.
Highlights the previous failed value.
Highlights the next passed value.
Highlights the previous passed value.
Highlights the next undefined value.
Highlights the previous undefined value.
Highlights the next modified value.
Highlights the previous modified value.
Shows all actual values.
Highlights all undefined values.
Highlights all modified values.
Shows only failed test cases.
Shows only failed test steps.
Table 6.155: Tool bar icons of the Test Data view
6.8.7.2 Status indicators
The following table shows the indicators of status and their meaning which are used by
the Test Data view.
indicator status / meaning
Test step passed: The actual result did match the expected results.
Test step failed: The actual result did not match the expected results.
continue next page
258
TESSY 3.1 Manual
6.8 TDE: Entering test data
indicator status / meaning
Test step generated: The test step was generated by the test case generator
but has no executable data yet.
Test step generated with data: The test step was generated by the test case
generator and executable test steps were generated.
Table 6.156: Status indicators of the Test Data view
6.8.7.3 Viewing the interface of the test object
The Test Data view displays the interface of the test object. On the left side of the Test Data
view you see the following interface elements and icons:
Interface elements with the passing direction “Irrelevant” or
“Extern” will NOT be displayed within the TDE!
Important:
element / icon
means
Inputs and
Outputs
Input values are all interface elements that are read by the test object.
Output values are written by the test object respectively are the expected
results.
Within the TIE you determine which values are Inputs and which are
Outputs. TESSY tries to find out the default passing directions (input or
output) automatically when analyzing the source files.
Globals
Globals are the global variables referenced by your test object. Global
variables can contain global static variables and static local variables that
are defined within functions.
Parameter
Parameters of the functions of the test object.
Dynamics
Return
(white arrow)
Pointer targets, referenced through a pointer of the test object interface.
Return variables.
The arrow is displayed when an element has child elements. Click on the
arrow to expand.
If you want to expand all child elements, use the context menu (“Expand
all”).
continue next page
TESSY 3.1 Manual
259
6 Working with TESSY
element / icon
means
(blue dot)
Variable
Table 6.157: Interface elements and icons of the Test Data view
Every variable will be assigned to one of the interface elements described above, e.g.
Parameter, Global etc. Initially, the Dynamics section will always be empty. The colums
on the right represent the test steps where the values of the variables are defined.
Please notice the following habits of this view:
•
Select a column by clicking on the number of the test step. The selected column is
marked in blue (compare figure 6.117).
•
Move the mouse pointer over the number of the test step to see the name of the
test step within a tool tip (compare figure 6.117).
•
Select all values for a variable by clicking on the variable in the left column.
•
If you select the icon “Highlight Undefined Values” in the tool bar, all variables that
do not contain any data are marked in yellow (compare figure 6.117).
Figure 6.117: Test step 1.1 is selected and undefined values are highlighted in yellow
260
TESSY 3.1 Manual
6.8 TDE: Entering test data
6.8.7.4 Entering values
Values for interface elements are entered into the cells of the Test Data view. The
values will be checked and/or converted when leaving the cell or when changing to any
neighboring cell.
Entering values
Validation of test data values
By default, all imported or manually entered test data values are checked for syntactical correctness, truncated to the type size and optionally formatted. The truncation
of values depends on which kind of number format was used:
•
Decimal numbers will be checked against the minimum and maximum value of the
respective data type. When entering -10 for an unsigned type you will see a value
of 0 as test data. If the value is less than the minimum, the minimum value will be
used, if it is more than the maximum, the maximum value will be used.
•
Hexadecimal and binary numbers will be truncated to the number of bytes available
for the respective data type, regardless if the type is signed or unsigned. When
entering 0xF11 for an 8 bit type you will see a value of 0x11 as test data. Also when
entering a binary 0b1100001111 you will see a value of 0b00001111 as test data.
•
Missing leading zeros will be filled up for hexadecimal and binary values. If you enter
0x12 for a 16 bit value, you will see a value of 0x0012 as test data.
After the truncation of the value to the available data type size, it will be formatted
according to the data format configured within TIE. Suppose you have an 8 bit signed
value with data format “Decimal” and you enter a value of 0xF05: The value will firstly
be truncated to 0x05 and then formatted as decimal number so that you will see 5 as test
data value.
Important: If you change the data format within TIE, only newly entered
test data will be formatted according to the new format. If you want to change
the format of the available test data for a certain variable, you need to use
the “Convert to Data Format” menu entry within TDE. Make sure the box
“Enable Value Checking and Conversion” is checked within the menu “Window”
> “Preferences” > “Test interface Settings”.
The TDE provides undo/redo functionality for all changes within the Test Data view.
TESSY 3.1 Manual
261
6 Working with TESSY
Important: When running the test with undefined values, the initial value
passed to the test object depends on the default initialization of the compiler.
Clicking into a cell activates the inline editing mode and you can enter arbitrary values:
Þ
Click in a cell and press enter.
Now you are in the inline editing mode (editing mode).
Þ
Enter the value.
You can navigate between the cells with CTRL + cursor left/right.
You can apply the available operations of the context menu to multiple cells depending
on the current selection within the Test Data view:
•
If you select a single variable of the interface tree, all values of all test steps
for this variable will be affected.
•
If you select a test step column, all variables of this test step will be affected.
•
If you select an array, a struct or a union, all components of this element will
be affected.
The current selection is highlighted in blue. You need to select a test step
column before right clicking for the context menu, because the right click will
not select the test step column.
Setting defines
Defines
Þ
Double click in a cell or press ENTER to be in the inline editing mode.
Þ
Press Ctrl + Space.
A window will open with all known defines.
Þ
262
Choose your define with a doubleclick.
TESSY 3.1 Manual
6.8 TDE: Entering test data
Enums
Þ
Enums
Click in a cell.
A dropdown menu will open showing the available enum constants (see figure
6.118.
Þ
Choose any constant or click into the inline editor field to enter any other
suitable value.
Figure 6.118: Clicking in the cell opens the available enums
Input values
Input values are all interface elements that need to have a defined value at the beginning
of the execution of a test object. These values are included in the calculation of the
output values during test execution or will be used as a predicate of a condition.
There are three types of input values:
•
Global and external variables, used by the test object.
•
Function parameters, transferred during function call.
•
Dynamic objects: They represent pointer targets, referenced through a pointer
of the test object interface (they are not really dynamic, variables will be
created for each one within the generated test driver).
TESSY 3.1 Manual
Types of input
values
263
6 Working with TESSY
Vector values for advanced stub functions
External called functions can be defined as advanced stub functions to provide the return
value and the expected parameter values within the Test Data view. If a test object calls
an external function multiple times the same return value would be returned for each
invocation and also the parameters would be checked against the same parameter values
as specified within TDE.
To provide different values for each invocation of the advanced stub, you can enter
multiple values as a vector written within braces, e.g. 1,2 (see figure 6.119).
In this example the return value of the stub will be 1 for the first call, 2 for the second
call. You can also specify a vector value for the expected parameter values.
Figure 6.119: Entering values as vector for an advanced stub
Expected values
Expected values are the calculated results regarding the input values for the test object
after test execution. TESSY will compare both expected and actual values after test
execution. The result will be either failed or passed.
Important: The values are compared with the evaluation mode equal (==).
To change the evaluation mode refer to section Entering evaluation modes.
Types of
expected values
There are three types of expected values:
•
264
Global or external variables: They can always be expected values as they have
a valid value after execution of a test object.
TESSY 3.1 Manual
6.8 TDE: Entering test data
•
The return value of a function.
•
Dynamic objects: Referenced through a pointer that is either an input or
expected value, dynamic objects continue to be accessible after execution of
a test object. They can therefore also be expected values, just like global
variables.
Initializing test data
You can initialize all interface variables of a test step at once.
Þ
Rightclick the variable and choose “Initialize Test Data. . . ” from the context
menu.
The “Initialize Values” dialog opens.
You can use following options:
option
means
Pattern
a pattern in hexadecimal format, i.e. 0xff
Value
a specific value only
Random
a range of generated values for the initialization. The random values
will adhere to the min/max limits of each interface variable type
Ignore values
all input and expected values will be set to “*none*”
Initialize all
array elements
all array elements will be initialized. Otherwise only visible array
elements will be initialized
Table 6.169: Options of initializing values
The following table shows the initialization values for certain data types:
type
contents
Integer
0x00000000
i.e. if 0x42 is entered as pattern, all int variables will be initialized
with 0x42424242.
Float
0.0
continue next page
TESSY 3.1 Manual
265
6 Working with TESSY
type
contents
Char
the pattern or numerical value
Struct
all sub components are initialized according to their type
Union
the first sub component is initialized as active component
Enum
the first enum constant is used as initialization value
Array
all array elements are initialized according to their type if option “Initialize all Array Elements” is used
Pointers
Pointers are initialized with NULL provided that they do not point to
dynamic objects
Table 6.170: Initialization values for data types
6.8.7.5 Entering evaluation modes
Using the evaluation mode allows to specify how to compare the actual value (calculated
during the test run) with your specified expected value. The evaluation mode together
with the expected value will be used to process the test results after the test run.
The default evaluation mode is equal (==).
Evaluation modes
266
To enter another evaluation mode:
Þ
Click in a cell.
Þ
Enter the desired evaluation mode within the inline editor mode (see figure
6.120).
TESSY 3.1 Manual
6.8 TDE: Entering test data
Figure 6.120: Entering evaluation mode “unequal” within the inline editor
The following evaluation modes are available:
evaluation
mode
written as
means
equal
==
Checks the expected value and actual value for Equality.
This is the default setting.
unequal
!=
Checks the expected value and actual value for inequality.
greater
>
Checks if the actual value is greater than the expected value.
less
<
Checks if the actual value is less than the expected value.
greater or
equal
>=
Checks if the actual value is greater or equal to the expected
value.
less or
equal
<=
Checks if the actual value is less or equal to the expected value.
range
[1:10]
Checks if the actual value is within a range, here: range 1 to
10.
deviation
100 +/- 1
100 +/- 1%
Checks if the actual value equals the expected value but takes
into account a deviation value. The deviation can either be
an absolute value or a percentage, i.e. the following expected
values would yield OK: 99, 100, 101.
Table 6.172: Evaluation modes
TESSY 3.1 Manual
267
6 Working with TESSY
6.8.7.6 Ignoring values for a test step
By default, values have to be assigned for all variables with passing directions “IN” or
“INOUT”. It can be useful to not overwrite a value calculated in the last test step. In
this case you can use the special value “*none*”:
Þ
Rightclick a value and choose “Ignore Value” within the contextmenu.
6.8.7.7 Generating test steps automatically
You can generate test cases and steps automatically, i.e. test steps of a range of input
values which you enter in the TDE:
Þ
Create a test case generator within the Test Items view as described in section
6.2.5.4 Creating test steps automatically.
Þ
Switch back to the Test Data view.
Þ
Enter your values and a range of an input value, i.e. [6:9] as in our example
(see figure 6.121).
TESSY can generate the test cases stepwise: Enter a semicolon and the step
size behind the range, e.g. [6:15;3] would give you the values 6, 9, 12 and 15.
You can also enter specific values, e.g. [1,5,8] would be the values 1, 5 and 8.
Combinations are as well possible: [2:8;2,11,15,20:22] would be 2, 4, 6, 8, and
11, 15, 20, 21 and 22.
268
TESSY 3.1 Manual
6.8 TDE: Entering test data
Figure 6.121: Generator test case 4 has a range value from 6 to 9 for parameter v1
Þ
Save your inputs with a click on
in the TESSY tool bar.
TESSY will now create automatically a test step for every value within the
range you entered (see figure 6.122).
You might need to expand or scroll the Test Data view to see all the
test steps!
Figure 6.122: Four test steps are generated for every value within the range “6 to 9”.
TESSY 3.1 Manual
269
6 Working with TESSY
The test steps are read only because they were generated!
You can change the type of the test case and test steps to “normal”. That way you can
edit the test steps as usual.
To change the status to normal,
Þ
switch to the Test Items view.
Þ
Rightclick the test case and select “Change Test Case Type to Normal” (see
figure 6.123).
Figure 6.123: Selecting “Change Test Case Type to Normal”
Changing test
case to type
normal
270
The test case and test steps are changed to type “normal” but will indicate originally
being generated with a status within the Test Items view (see figure 6.124).
TESSY 3.1 Manual
6.8 TDE: Entering test data
Figure 6.124: The test case and test steps originally being generated.
You can reverse the action with a rightclick and choose “Change Test Case Type to
Generator” from the context menu.
6.8.7.8 Pointers
Þ
Rightclick the pointer value cell to open the context menu.
The context menu offers the following possibilities to assign a value for a pointer:
option
means
Set Pointer
NULL
The value of the selected pointer will be set to NULL. The text box will be
filled with NULL.
continue next page
TESSY 3.1 Manual
271
6 Working with TESSY
option
means
Set Pointer
Target
You can select another interface element or a component of a structure or
union and assign its address to the pointer. The cursor will change, when
you move the mouse pointer over a variable:
The object type fits the pointers target type. You can assign the pointer.
The object type does not match the pointers target type. You cannot
assign the pointer.
When you click on an element, the variable name of that element will be
entered into the field next to the pointer. During test execution, the address
of the variable will be assigned into the input field of the pointer.
Create pointer
target value
Allows to create a new object as target object for the pointer. The address
of the object will be assigned to the pointer. The type of the created object
depends on the target type of the pointer.
Þ Choose “Create Pointer Target Value” from the context menu.
Þ Enter a valid C identifier as name for the new target object.
Þ Click “OK”.
A new target object will be listed in the dynamic objects section of the TDE.
Array as
Target Value
It is also possible to create an array as target value using the Dimension
option of the Create Pointer Target dialog:
Þ Tick the check box for” As Array of Size” to enter an appropriate size
into the input field.
Þ Click “OK”.
The name of the new object appears in the input field of the pointer value.
TDE will create an array of the pointers target type. The pointer will point
to the first array element.
Within the Dynamics section, you will see the newly created target object.
You can enter values, like for every other interface element.
Table 6.178: Value assignments for pointers
6.8.7.9 Static local variables
Variables defined as static local variables within the test object or called functions can
also be tested. Since such variables are not accessible from outside the location where
they are defined, TESSY instruments the source code and adds some code after the
272
TESSY 3.1 Manual
6.8 TDE: Entering test data
variable definition to get a pointer to the memory location of the variable. All static local
variables can only be accessed after the code containing the variable definition has been
executed. You need to keep this in mind when providing input values or checking results
for such variables. The following restrictions apply for static local variables:
•
The first time when the code of a static local variable definition is executed,
the variable will get the initialization value assigned from the source code. It
is not possible to set the initial value from TESSY. You need at least one test
step to initialize the variable by executing the definition code. The next test
step can then supply an input value for the variable.
•
The same applies for expected values: If the source code of the variable
definition has not been executed, the result value of the respective variable is
not accessible and will be displayed as *unknown* in this case. This situation
may arise when the variable definition is located within a code block which
has not been executed, e.g. within an if statement block.
6.8.8 Test Definition view
Figure 6.125: Test Definition view within TDE with linked requirement
The Test Definition view displays the test case specification, the optional description
and linked requirements of the current test case in individual input fields. The test
case specification should enable the tester to provide concrete input values and expected
results.
The Test Definition view is context sensitive! To display the specifications, definitions
and requirements for a test case:
Þ
Select a test case within the Test Items view (see figure 6.125).
TESSY 3.1 Manual
273
6 Working with TESSY
Important: The contents are not editable if the test cases have been created
and exported using the CTE!
6.8.9 Declarations / Definitions view
Figure 6.126: Declarations/Definitions view
Within the Declarations view you can define your own variables that may then be used
within the user code. If you just want to declare a variable that is already available within
the source files, you do this within the declarations section. If you want to create a new
variable, you need to enter the declaration into the declarations section and the definition
into the definitions section.
Important: TESSY provides the means to add new variables within the TIE
perspective (see section 6.6 TIE: Preparing the test interface). Such variables
can be used like normal interface variables of the test object which is much
more convenient than defining them here in the Declarations/Definition view.
274
TESSY 3.1 Manual
6.8 TDE: Entering test data
6.8.10 Prolog/Epilog view
Figure 6.127: Prolog/Epilog view
Within the Prolog/Epilog view you can specify usercode that will be executed at a certain
point in time during the test execution. The C part of the usercode will be integrated
into the test driver and executed at the places specified. The following figure outlines
the call sequence of the usercode parts.
Figure 6.128: Call sequence of the usercode parts
TESSY 3.1 Manual
275
6 Working with TESSY
The figure shows the interaction of the usercode sections with the assignment of test
data provided within TDE and the result values that are saved into the test database and
evaluated against the expected results.
During the test object call, the code specified for the stub functions (if any functions are
called from your test object) will be executed depending on the code logic of your test
object.
Example
Have a look at figure 6.127 Prolog/Epilog view in the beginning of this section.
The test step 1.1 prolog contains the code TS_REPEAT_COUNT=2, and the Repeat
Count for this prolog/epilog section was set to 5.
The whole prolog / test object call / epilog sequence will be repeated five times and the
test object will be called twice in every repetition of this loop. Since there are 5 loops, the
test object will be called 10 times in total.
6.8.10.1 Entering C code
The Prolog/Epilog view provides a popup menu containing variables for convenient editing.
Figure 6.129: Prolog/Epilog functions
276
TESSY 3.1 Manual
6.8 TDE: Entering test data
To show this menu,
Þ
use the Usercode Outline view to mark the test case or test step for which you
want to set the usercode.
Þ
Click into the Prolog or Epilog section of the Prolog/Epilog view and enter the
usercode.
Þ
Press CTRL + Space or type the first letters and press CTRL + Space.
The popup menu appears (see figure 6.129), showing all available names respectively the filtered list according to the characters you already typed.
Important: TS_REPEAT_COUNT is only usable within the prolog section!
To edit the prolog/epilog for a test case/test step,
Þ
Use the Usercode Outline view to navigate and select a test case or test step
from the tree.
Þ
Enter the code within the Prolog/Epilog view.
A new node will automatically appear at the corresponding place in the tree
(see figure 6.130).
Figure 6.130: Editing C code
TESSY 3.1 Manual
277
6 Working with TESSY
6.8.10.2 Using evaluation macros
Within the test step epilog or within stub functions, you can evaluate any variable or
expression using the evaluation macros. These predefined macros allow to check an
expression against an expected value. The result is stored within the test report like the
evaluation of normal output variables of the test object.
Evaluation macros can only be used within the following Usercode sections:
Evaluation
macros
•
test step epilog
•
stub function code
A popup menu contains all available interface variables and symbolic constants for convenient editing as well as the available evaluation macros, e.g. TESSY_EVAL_U8 for
unsigned character values:
Þ
Press CTRL + Space.
Figure 6.131: Call the popup menu by pressing CTRL + space
The only difference of the evaluation macros is the type of argument for the actual and
expected value, see table below for a description of the available types.
278
TESSY 3.1 Manual
6.8 TDE: Entering test data
evaluation macro name
C type
TESSY_EVAL_U8
unsigned, 1 byte
TESSY_EVAL_S8
signed, 1 byte
TESSY_EVAL_U16
unsigned, 2 byte
TESSY_EVAL_S16
signed, 2 byte
TESSY_EVAL_U32
unsigned, 4 byte
TESSY_EVAL_S32
signed, 4 byte
TESSY_EVAL_U64
unsigned, 8 byte
TESSY_EVAL_S64
signed, 8 byte
TESSY_EVAL_FLOAT
float
TESSY_EVAL_DOUBLE
double
TESSY_EVAL_LONGDOUBLE
long double
Table 6.185: Available types of evaluation macros
operator
meaning
==
equal
!=
unequal
<
less
>
greater
<=
less or equal
>=
greater or equal
Table 6.186: Operators of evaluation macros
Each invocation of an evaluation macro results in an additional entry within the test
report. All evaluation macros will be added to the list of actual/expected values of the
current test step. The results will be displayed within the Usercode Outline view and the
Evaluation Macros view.
TESSY 3.1 Manual
279
6 Working with TESSY
It is possible to format the output of the evaluation macros as binary value, decimal or
hexadecimal (default setting) by appending one of the following format specifiers at the
end of the evaluation macro name:
binary
%bin, e.g. “Value printed as bin%bin”
decimal
%dec, e.g. “Value printed as dec%dec”
hexadecimal
%hex, default setting.
6.8.11 Usercode Outline view
Figure 6.132: Usercode Outline view
The Usercode Outline view displays the usercode that will be executed at a certain point
in time during the test execution and that you just defined in the Prolog/Epilog view.
280
TESSY 3.1 Manual
6.8 TDE: Entering test data
6.8.12 Plots view
Figure 6.133: Plots view
The Plots view visualizes graphically the test results.
Important: If you use other evaluation modes than equal (e.g. <, <=,
>, >=, !=, [Range]), it is not possible to see the expected values. To see
expected values use the evaluation mode == (equal). See section 6.8.7.5
Entering evaluation modes.
6.8.12.1 Icons of the view tool bar
icon
action / shortcut / comment
Shows the symbols for all series, i.e. shows dots for each distinct value on the
value curves.
Reloads the plot data.
Table 6.188: Tool bar icons of the Plots view
6.8.12.2 Entering plots
To enter a new plot:
Þ
Rightclick in the Plots pane.
TESSY 3.1 Manual
281
6 Working with TESSY
Þ
Select “New Plot” in the context menu (see figure 6.134).
Figure 6.134: Creating a new plot with the context menu
The New Plot window will be opened (see figure 6.135). It will show you the possible
items for the plot.
Figure 6.135: Creating a new plot
Setting plot
properties
282
To set the properties for the plot:
Þ
Under “Title” choose the default title or enter an own title. The default title
will be build from the names of the variables used within the plot.
Þ
Under “Settings” select, if you want to see the plots grafic in the report and
which kind of grafic: You can select between a test case plot, a test step plot
or a whole array plot.
TESSY 3.1 Manual
6.8 TDE: Entering test data
TESSY can handle different kind of plots:
A test case plot spanns over all values of all test cases of the selected
variables.
A test step plot provides one curve for each test case spanning over all values
of the test steps of this test case. This requires at least two test steps for each
test case to define a valid curve.
An array plot creates plots for array type variables. There will be one curve
spanning over the array values for each test step.
Þ
Under “Include/Exclude” select, which test cases you want to select: With
Shift + selection you can select test cases for include or exclude.
Important: Be careful with selecting “Include Selected”: If you add
new test steps afterwards, they will not be included automatically!
In that case it might be more useful to select “Exclude Selection”.
Þ
Click “OK”.
To add variables to the plot:
Adding variables
to plot
Figure 6.136: Adding variables to a plot
TESSY 3.1 Manual
283
6 Working with TESSY
Þ
Drag and Drop the variables to the plots (see figure 6.136.).
You can add several variables.
6.137):
In our example we added two variables (see figure
Figure 6.137: Plots view with a plot and two variables
Important: When the values of variables differ significantly, it may not be
possible to scale them usefully within one plot. In this case you should use
individual plots for each variable instead.
You can select a variable, or uncheck a box to see only the checked plot (see figure
6.138).
284
TESSY 3.1 Manual
6.8 TDE: Entering test data
Figure 6.138: Uncheck variables for a better overview
If you mark the upper or lower value, the curve will be highlighted in blue (see figure
6.139).
Figure 6.139: Highlighted upper value for variable sine_value
It is possible to save the view as a .jpg oder .png-file:
Þ
Righclick on the Plots view and select “Save As...”.
Þ
Select where you want to save the file (default: “projects” > “samples”).
Þ
Enter a name and select the kind of file.
Þ
Click “Save”.
All these settings will be saved and the plots within the test report will be created
as currently displayed within the plot view!
TESSY 3.1 Manual
285
6 Working with TESSY
6.9 CV: Analyzing the coverage
Figure 6.140: Perspective CV - Coverage Viewer
The Coverage Viewer (CV) displays the results of the coverage measurement of a previously executed test, which is either
•
an overall instrumentation for your whole project, which you selected in the
preferences menu of TESSY (see section 6.1.4 Windows > Preferences menu),
or
•
an instrumentation which you selected within the Properties view for your
module or test object under test (see section 6.2.3.4 Coverage), or
•
an instrumentation which you selected for your test run (see section 6.2.2.5
Executing tests).
The available information displayed and the sub windows shown within the CV depends
on the coverage options selected during the test run. The CV will be updated with the
coverage information of the currently selected test object whenever you switch to the CV
or when you select another test object within the Test Project view.
286
TESSY 3.1 Manual
6.9 CV: Analyzing the coverage
6.9.1 Structure of the CV perspective
pane
location
(default)
function
Test Project view
upper left
Same view as within the Overview perspective.
Called Functions
view
middle left
Contains the test object itself and the functions called
from the test object.
flow chart view
upper
middle
Displays the graphical representation of the control structure of the currently selected function (only displayed
when a coverage mesurement was selected for a test run!).
Coverage views
upper /
middle
right
Displays the results for the selected coverage instrumentation.
Code view
lower pane
Displays the source code of the currently selected function
(and highlighting selected decisions/branches).
Report views
lower pane
Displays the ASCII based coverage summary reports for
the selected instrumentation.
Table 6.195: Structure of CV
6.9.2 Instrumentation for coverage measurements
TESSY supports the following coverage measurements:
•
C0 (Statement Coverage)
•
C1 (Branch Coverage)
•
MC/DC (Modified Condition / Decision Coverage)
•
MCC (Multiple Condition Coverage)
•
DC (Decision Coverage)
•
EPC (Entry Point Coverage) - only for unit tests
•
FC (Function Coverage) - only for component tests
TESSY 3.1 Manual
287
6 Working with TESSY
For more information about coverage measurements and usage of coverage analysis refer to the application note “Coverage Measurement” in TESSY (“Help”
> “Documentation”).
There are no views for the Entry Point Coverage (EPC) and the Function Coverage
(FC)! The results are displayed only within the Test Overview Report (see section
6.2.2.8 Creating reports) or the Test Project view (see figure 6.141).
Figure 6.141: Results of the EPC are displayed within the Test Project view
288
TESSY 3.1 Manual
6.9 CV: Analyzing the coverage
The following figure 6.142 displays a component test with a Function Coverage instrumentation result (amongst others).
Figure 6.142: Coverage results within the CV perspective (component testing)
Please notice:
•
If you move the mouse over the result within the Test Project view, the percentage
of the coverage for the respective item will be displayed.
•
The Called Functions view displays the coverage result for every function.
TESSY 3.1 Manual
289
6 Working with TESSY
6.9.3 Test Project view
Figure 6.143: Test Project view within the CV perspective
6.2.2 Test
Project view
The Test Project view displays your test project which you organized within the Overview
perspective.
Important: We recommend to do any changes of the test project structure
within the Test Project view of the Overview perspective. The view layout of
this perspective is optimized for this purpose!
After a test run you will see columns being added to the Test Project view for each applied coverage measurement. The coverage icons provide an overview about the reached
coverage for each test object as well as cumulated for modules, folders and test collections.
290
TESSY 3.1 Manual
6.9 CV: Analyzing the coverage
6.9.4 Called Functions view / Code view
Figure 6.144: Called Functions view
The Called Functions view contains the test object itself and all called functions of the
test object. It displays the achieved coverage of the current test run. By clicking on a
function, you can review the source code within the Code view and see the code structure
within the flow chart view.
To highlight the source code within the code view:
Þ
Click on
view.
(Toggle Code Coverage Highlighting) in the tool bar of the Code
The statements, branches or conditions of the source code will be marked within
the Code view according to the selected coverage measurement. If the respective
code location have been covered successfully, i.e. 100% coverage has been
reached for this code part, it will be marked in green. Otherwise the code
location will be marked in red indicating that it has not been fully covered.
To highlight a specific code location:
Þ
Select an element within the Flow Chart view.
The respective source code lines will be marked within the Code view.
TESSY 3.1 Manual
291
6 Working with TESSY
To have a quick overview of the coverage:
Þ
Within the Called functions view move the mouse over the function.
All the coverages will be displayed (see figure 6.144).
6.9.5 Flow Chart view
Figure 6.145: Flow Chart view
The flow chart view displays the code structure and the respective coverage in graphical
form.
You might want to learn the functions of the flow chart view with an easy example: Consult section 5.1.10 Analyzing the coverage of the Practical exercises.
292
TESSY 3.1 Manual
6.9 CV: Analyzing the coverage
6.9.5.1 Icons of the view tool bar
icon
action / shortcut / comment
Searches the next uncovered decision.
Searches the previous uncovered decision.
Searches the next unreached code branch.
Searches the previous unreached connection.
Zooms out.
Zooms in.
Table 6.202: Tool bar icons of the Test Items view
6.9.5.2 Viewing functions
To display a flow chart of a function:
Þ
Click on a function within the Called Functions view.
The code structure of the function will be displayed in the flow chart view.
Zoom in or out using the tool bar icons or the entries from the chart menu.
Within each flow chart, you will see the branches and decisions of the function being
displayed in green and red colors, which indicates whether the respective decision has
been fully covered or the respective branch has been reached:
Viewing
Functions
green = 100 % coverage
red = less than 100 % coverage: at least one condition combination was not executed
If none of DC, MC/DC or MCC coverage has been selected for the last test execution, the
decision elements remain grey, but they are still selectable in order to find the respective
line of code in the source code view.
The following elements are displayed within the flow chart of the CV:
TESSY 3.1 Manual
293
6 Working with TESSY
if decision
The if branch on the left side was not
reached, the else branch on the right side was
reached three times. The decision was not fully
covered.
for or while loop
The loop body was not reached, instead
the exit out of the loop was executed once. The
loop decision was not fully covered.
switch statement
The first case branch was reached once,
the second case branch and the default branch
were not reached.
do while loop
The loop body was only reached once (without
repeated execution of the loop body branch)
and the exit branch was reached. The loop
decision was not fully covered.
Table 6.204: Elements of the Flow Chart view
6.9.5.3 Selecting elements
You can select decisions, branches and code statement elements within the flow chart.
The respective code section will then be highlighted within the source code view. Since
294
TESSY 3.1 Manual
6.9 CV: Analyzing the coverage
not all connection lines within the flow chart are branches in terms of the C1 branch
definition, some of the connection lines may not be selectable.
If an element (e.g. the ? operator and statements containing boolean expressions) also
appears in green or red, the element contains sub flow charts that can be visualized with
a right click on the respective element. CV will insert a new tab for the condition.
6.9.5.4 Searching for uncovered decisions and unreached branches
The CV provides search functionality for decisions and branches that are not fully covered
respectively reached through all the executed test cases. The decisions and branches are
already marked in red, but the search function can assist in finding all uncovered decisions
or unreached branches.
Þ
Select the respective icon from the tool bar (i.e.
).
The chart will change into the search result mode, marking the found element
in blue.
Figure 6.146: Unreached code branch is marked blue
TESSY 3.1 Manual
295
6 Working with TESSY
6.9.6 Statement (C0) Coverage view
Figure 6.147: Statement coverage
The Statement (C0) Coverage view displays the statement coverage for each individual
test case and test step as well as the total coverage for all test cases (and test steps).
The coverage information in this view is calculated for the selected function within the
Called Functions view.
If you selected only the C0 coverage instrumentation for test execution, you will see the
code branches marked in red and green within the flow chart. “Else” branches, that do
not exist within the code, wil be displayed in the Flow Chart view in grey.
The flow chart shows code branches and not individual statements and also blocks
of statements will be shown as one block instead of individual items for each
statement.
If you select individual test cases or test steps within the test case list, the respective
statements covered by those test steps will be marked within the flow chart, i.e. the code
branch containing these statements will be marked. This allows finding out the execution
296
TESSY 3.1 Manual
6.9 CV: Analyzing the coverage
path of the selected test step. By selecting multiple test steps, review the resulting
cumulated statement coverage within the flow chart. The total coverage number will also
be updated with the C0 statement coverage for the selected test cases / test steps.
6.9.6.1 Coverage percentage
The coverage percentage is the relation between the total numbers of statements of
the currently selected function compared to the number of reached statements. This
coverage calculation includes the currently selected test cases and test steps within the
test case / test step list (see figure IsValueStatementCoverageC0-1). By default, all test
cases are selected when opening the CV.
6.9.7 Branch (C1) Coverage view
Figure 6.148: Branch coverage
The Branch (C1) Coverage view displays the branch coverage for each individual test
case and test step as well as the total coverage for all test cases (and test steps). The
coverage information in this view is calculated for the selected function within the Called
Functions view.
If you selected only the C1 coverage instrumentation for test execution, you will see only
the C1 branches marked in red and green within the flow chart.
TESSY 3.1 Manual
297
6 Working with TESSY
If you select individual test cases or test steps within the test case list, the respective
branches covered by those test steps will be marked within the flow chart. This allows
finding out the execution path of the selected test step. By selecting multiple test steps,
review the resulting cumulated branch coverage within the flow chart. The total coverage
number will also be updated with the C1 branch coverage for the selected test cases /
test steps.
6.9.7.1 Coverage percentage
The coverage percentage is the relation between the total numbers of branches of the
currently selected function compared to the number of reached branches. This coverage
calculation includes the currently selected test cases and test steps within the test case
/ test step list. By default, all test cases are selected when opening the CV.
6.9.8 Decision Coverage view
Refer to the description of the MC/DC Coverage view. The only difference is the calculation according to the definition of the decision coverage.
6.9.9 MC/DC Coverage view
Figure 6.149: MC/DC coverage view
298
TESSY 3.1 Manual
6.9 CV: Analyzing the coverage
The MC/DC Coverage view displays the coverage of the currently selected decision within
the flow chart view (see figure 6.149). If no decision is selected (as initially when starting
the CV), the MC/DC Coverage view is empty.
When selecting a decision, the respective combination table according to the MC/DC coverage definition will be displayed within the MC/DC-Coverage view (see figure 6.150).
Figure 6.150: MC/DC coverage
The combination table contains all atomic conditions of the decision. The conditions
are the basic atoms of the decision which remain after removing the or, and and not
operators from the decision. TESSY calculates the MC/DC set of true/false combinations
of the condition atoms that fits best to the test steps executed during the test run.
The last table column contains the test step that caused the execution of the decision with
the true/false combination of the respective table row. If one or more of the condition
combinations were not reached during the test run, the test step column of those rows
will be marked in red.
TESSY 3.1 Manual
299
6 Working with TESSY
6.9.9.1 Selecting decisions
Þ
Select a decision by clicking on the respective control flow element within the
flow chart view.
The code fragment will be marked within the source code view.
The decisions are either green or red depending on the degree of coverage. If no coverage
information is available, i.e. when you ran the test without any of DC, MC/DC or MCC
instrumentation selected, the decisions within the flow chart will appear in grey and the
Coverage view will not be available (N/A).
6.9.10 MCC Coverage view
Refer to the description of the MC/DC Coverage view. The only difference is the calculation according to the definition of the MCC coverage.
6.9.11 Coverage Report views
There are up to five coverage reports available depending on the instrumentation mode
selected for test execution. They contain the summarized coverage information of the
last test execution:
300
•
The statement (C0) coverage report contains some meta information (e.g.
number of statements, reached statements, total statement coverage) and
the source code of the test object.
•
The branch (C1) coverage report contains some meta information (e.g. number of branches, reached branches, total branch coverage) and the source
code of the test object.
•
The decision coverage report lists all decisions of the test object code including
the coverage tables with the respective decision condition combinations.
•
The MC/DC coverage report lists all decisions of the test object code including
the coverage tables with the respective MC/DC condition combinations.
•
MCC coverage report also lists all decisions of the test object code including
the coverage tables with the respective MCC condition combinations.
TESSY 3.1 Manual
6.10 IDA: Assigning interface data
6.10 IDA: Assigning interface data
Figure 6.151: IDA perspective
For coherent testing it is essential to realize changes of the interface of test objects and to
re-execute previously passed tests to assure that any changes of the source do not cause
the previous passed tests to fail. This is often summed up with the keywords “regression
testing”.
If the interface of the test object changes, TESSY will indicate the changes with specific
test readiness states. With the Interface Data Assigner (IDA) you can assign the elements
of a changed (new) interface to the elements of the old one and proceed a reuse.
To appropriately react to changes, the test system needs to know the structure
of the interface. TESSY examines the source files and determines the functions
and their interfaces by analyzing the source code. This information is stored in
a special database and can be retrieved any time. The information enables the
representation and adjustment of the interface structure independent of the test
data or expected values.
TESSY 3.1 Manual
301
6 Working with TESSY
All settings on the interface page, e.g. the definition of external variables or stub functions,
are specified separate from the data required for the test. This separation of interface
information and its test data achieves a clear distinction between structure and data and
offers an enormous advantage when handling changes in the source code. On the one
hand the test of the interface is possible, indicating changes in the first place. On the
other hand, if a change occurs usually only a few elements of the interface of a function
under test are changed.
Source files are often modified extensively during the later stages of development,
thus making it necessary for a new test to take place, e.g. a regression test. This can
alter the interface of an existing test object. In order to allow you to reuse test data that
has already been entered, the Interface Data Assign Editor IDA allows the assignment of
old interface elements to new ones. This way, old test data can be reused automatically.
6.10.1 Structure of the IDA perspective
pane
location
(default)
function
Test Project view
upper left
Displays your test project. For editing your test project
switch to the Overview perspective.
Properties view
lower left
Displays the properties of your test project, e.g. sources to
the test object.
Compare view
right
Displays the interface and the changes of the interface.
You can assign the changes by drag & drop.
Table 6.208: Structure of the IDA perspective
6.10.2 Test Project view
6.2.2 Test
Project view
The Test Project view displays your test project which you organized within the Overview
perspective.
Important: We recommend to do any changes of the test project structure
within the Test Project view of the Overview perspective. The view layout of
this perspective is optimized for this purpose!
302
TESSY 3.1 Manual
6.10 IDA: Assigning interface data
6.10.3 Properties view
The Properties view displays all the properties which you organized within the Overview
perspective. Most operations are possible.
6.2.3
Properties view
For changing a source switch to the Properties view within the Overview perspective.
6.10.4 Compare view
Figure 6.152: Compare view
6.10.4.1 Status indicators
indicator status / meaning
The test object has changed. You see these test objects, but there is no
operation possible. You have to start a reuse operation.
The test object is newly available since the last interface analysis. You have
to add test cases and test steps and enter data for a test.
The test object has been removed or renamed. You still see these test
objects, but there is no operation possible. You have to assign this test
object to any other and start the reuse operation.
Table 6.209: Status indicators of the Compare view
TESSY 3.1 Manual
303
6 Working with TESSY
6.10.4.2 Comparing interfaces and assigning changes
Within the Compare view you can see the old interface of our test object and the new
one. The red exclamation mark within the new interface indicates the need to assign this
interface object before starting the reuse.
The title of the view shows the old name versus the newly assigned name.
To assign changes:
Þ
Use the context menu or just drag and drop from the left side (see figure 6.153).
The red exclamation mark turns to a green check
.
Figure 6.153: Use drag and drop in IDA
To commit assignments:
Þ
Click on
(Commit) in the menu bar of the Compare view.
The data of all test cases and test steps will be copied from the old interface
to the current test object interface.
The test object changes to yellow
to be executed again.
304
to indicate that all test cases are ready
TESSY 3.1 Manual
6.10 IDA: Assigning interface data
Please notice the following habits:
•
Removed and changed test objects require a reuse operation before you can further
operate on them.
•
Those test objects that remained unchanged will automatically be reused, e.g. they
will be ready to use without further activities required.
•
Removed test objects will only be displayed as “removed”, if they did contain any
test cases and test steps.
TESSY 3.1 Manual
305
6 Working with TESSY
6.11 SCE: Component testing
The component test feature is only used for integration testing. You do not
need this feature for unit testing.
Figure 6.154: Perspective SCE - Scenario Editor
The component test feature within TESSY supports testing of several functions (representing the software component) that interact with themselves as well as with underlying
called functions (of other components). The main difference to unit testing of individual functions is the focus of testing on the external interface of the component instead
of internal variables or control flow. You should be familiar with the overall usage of
TESSY for the normal unit testing. Some features like usercode and stub functions are
still available for component testing, but the respective editors will be found at different
locations.
The component test feature allows creating calling scenarios of functions provided by a
software component. Within these scenarios, the internal values of component variables
and any calls to underlying software functions can be checked. TESSY provides the
Scenario Editor (SCE) for this purpose. All scenario-related inputs are available through
the SCE. Instead of having individual test objects and test cases for the component
functions, the component test itself provides a special node called “scenarios” seen as one
306
TESSY 3.1 Manual
6.11 SCE: Component testing
test object. The test cases belonging to the scenarios node are the different scenarios for
the component.
Within one scenario, you can set global input variables, call component functions, check
the calling sequence of underlying software functions and check global output variables.
The content of each scenario may be divided into the following parts:
•
setting the input variables
•
calling component functions
•
checking calls to underlying functions
•
setting/checking variables during scenario execution
•
executing usercode and eval macros
•
checking the output variables
The Usercode Editor (UCE) is not available for component testing, because the prolog/epilog code and definitions/declarations sections can be edited directly within the
SCE. You will find C-code fragments that can be added into the scenario control flow.
Also the code for stub functions can be edited directly within SCE.
6.11.1 Creating component tests
The component test management is based on TESSY modules alike a unit test. In
contrary to unit testing you will probably use multiple source files instead of only one file.
Other parts of the testing process stay basically the same:
Þ
Create a new module as described in section 6.2.2.3 Creating tests.
Þ
Include all the source files, include paths and defines necessary to analyze the
source code of the component.
Þ
Activate “Component” as kind of test (see figure 6.155).
TESSY 3.1 Manual
307
6 Working with TESSY
Figure 6.155: Component test
In contrast to normal unit tests, you will only see one special test object called
“Scenarios” (see figure 6.156).
Figure 6.156: Scenarios of a component test
308
TESSY 3.1 Manual
6.11 SCE: Component testing
6.11.2 Preparing the test interface
The interface of the component is a summarized interface of all the non-static component
functions:
Figure 6.157: Interface of the scenarios
lists the interface to the underThe External Functions section marked with the icon
lying software functions, if any external function is called from the component. These
external functions can be replaced by stub functions like within the normal unit test.
lists all the component funcThe Component Functions section marked with the icon
tions, i.e. the functions visible from outside the component. Local static functions will
not be listed here. The meaning of the status indicators for component functions is as
follows:
status
indicator
status / meaning
Function is not used for component test.
The variables used by this function are not available within the component
test interface of the scenario. These variables are set to IRRELEVANT.
The variables used by this function will be available within the scenario and
the passing direction may be adjusted.
Table 6.216: Status indicators of the Interface view of a component test
TESSY 3.1 Manual
309
6 Working with TESSY
6.11.3 Designing the test cases
Testing a component requires a set of scenarios that stimulate the component and check
the behavior of the component. Such a scenario contains calls to component functions
and other possible actions and expected reactions of the component. A scenario can be
seen as a test case for the component. Therefore, TESSY displays the list of scenarios
within the Test Item view like normal test cases but with a different icon. There are two
possibilities for creating scenarios: Either by creation them ad hoc or by developing them
systematically using the classification tree method supported by CTE within TESSY.
After synchronizing the CTE test cases there will be the respective number of scenarios
within TESSY. You can add additional scenarios using the context menu within the
scenario list. To edit the scenario, start the scenario editor SCE. The (empty) scenarios
will be displayed within SCE providing the specification and description of the designed
scenario test cases.
6.11.4 Executing the scenarios
After implementing the scenarios within SCE, execute the scenarios:
Þ
Select the desired scenario test cases and execute the test using the Execute
Test button
within the toolbar.
6.11.5 Editing scenarios
After completing the interface settings, you can edit the test cases for the component
test, i.e. the test scenarios.
6.11.5.1 Configuring the work tasks
The time based scenario description within SCE is based on time steps that represent
the cyclic calls to a special handler function of the component. Such a handler function
controls the behavior of a time-sliced component implementation.
The handler function needs to be selected as work task prior to executing any scenarios:
Þ
Select the desired function.
Þ
Click on
(Set as Work Task) in the tool bar.
The icon of the function will change from
310
to
(see figure 6.158).
TESSY 3.1 Manual
6.11 SCE: Component testing
Figure 6.158: Two component functions were set as work task within the Component
Functions view
You can select one or more of the component functions.
You can select several component functions as work tasks. This will be useful
when testing several components together which all have a handler function.
The Work Task Configuration view allows more detailed settings for the work tasks.
Figure 6.159: Work Task Configuration view
You can drop component functions directly into this view to configure them as work
tasks. The view provides the following global settings:
•
Time Unit (default is “ms”) which is just the display representation to be used
within the GUI and reports.
TESSY 3.1 Manual
311
6 Working with TESSY
•
Mode Variable Name (not used by default) which optionally provides calling
the work tasks depending on the value of the selected variable. All scalar
variables can be selected here.
For each work task, you can specify the following settings:
•
Start Time: Determines the point in time where this work task shall be called
the first time for each scenario. The default is 0 ms which causes the work
task being called immediately starting with the first time step.
•
Cycle Time: Determines the elapsed amount of time after which the work
task shall be called again. The default is 10 ms which causes the work task
being called for every 10 ms time step.
•
Mode: If a global Mode Variable Name is selected, you can specify for which
value of this variable the respective work task shall be called. During test
execution, this work task will only be called within its specified start and cycle
time, if the mode variable has the specified value.
The order of appearance within the Work Task Configuration view reflects the actual
calling sequence of the work tasks for each time step of the scenario. You can reorder
the work tasks via drag and drop.
Another global setting is the calculated cycle time which depends on the cycle times of
the given work tasks. It will be calculated automatically from the cycle times of the given
work tasks.
Figure 6.160: Calculated cycle time
312
TESSY 3.1 Manual
6.11 SCE: Component testing
Within the example in figure 6.160, the resulting global cycle time (i.e. the step width
of the time steps of the scenarios) will be 10 ms, because this is the greatest common
divisor of all the given work task cycle times (i.e. 20 and 50 ms in this example).
6.11.5.2 Adding Function Calls
Stimulating calls to component functions or checking of calls to underlying external
functions can be added to time steps:
Þ
Drag and drop the functions from the component functions onto the desired
time step (see figure 6.161).
Figure 6.161: Adding Function Calls
There are some settings required for the function calls depending on the kind of function:
•
component function: Parameter values need to be provided.
•
component function: The return value has to be checked directly (for scalar
types) or assigned to a variable for later evaluation.
•
external called function: The expected time frame of the call to these functions needs to be specified. This defines the time range starting from the
current time step, where a call to this function is rated as successful with
respect to the calling sequence.
6.11.5.3 Entering test data for time steps
You can set input values or check output values of any variable at every time step of the
scenario. According to your settings within TIE you have access to all variables available
TESSY 3.1 Manual
313
6 Working with TESSY
within the component interface. The test data can be entered within the Test Data view
of the scenario perspective. When you select a time step, the Test Data view provides
a column named like the time step for entering either new test data values or editing
existing ones (see figure 6.162)
Figure 6.162: The Test Data view of ’Scenarios’
The Test Data view provides most of the editing features like for the normal unit testing.
After entering any values, the icon of the respective time step will change indicating the
test data status. The Test Data view shows columns for all time steps that contain test
data plus one column for the currently selected time step.
Time step indicator icons for test data (see also figure 6.163):
314
•
Grey indicator: Some input values are assigned but some are still missing and
need to be provided. Select “*none*” for input values of time steps that you
do not want to assign.
•
Yellow indicator: At least all input values are assigned for this time step. The
output values do not need to be assigned to execute a scenario.
TESSY 3.1 Manual
6.11 SCE: Component testing
Figure 6.163: Indicator icons for the test data
All time steps with test data need to have a yellow indicator
before the scenario can be executed!
Important:
The icon of the scenario will change to yellow if there are no more time steps with a grey
indicator.
6.11.6 Evaluating scenarios
Any scenario has two different tasks to fulfill:
•
The stimulation of the component like any external application would do it.
This includes normal behavior as well as abnormal behavior which should
check the error handling of the component.
•
Checking the reaction of the component caused by the scenario stimulation.
We will examine the different possibilities to check expected behavior of the component
under test. There are at least the following methods available:
•
Checking return values of component functions called while stimulating the
component.
•
Checking the values of global variables (of the component).
TESSY 3.1 Manual
315
6 Working with TESSY
•
Checking the calling sequence of underlying external functions of the component. This would check the interface to any underlying components used by
the component under test.
•
Checking parameters of calls to underlying external functions (implemented
as stub functions).
The following sections describe the required settings for the above mentioned check
methods.
6.11.6.1 Checking return values of component functions
When dragging component functions into the scenario, you need to provide the parameter values. For scalar values, you can simply add decimal or floating point numbers
depending on the type of variable. You can also provide a symbolic name of a variable
with the corresponding type. This name will be added into the test application without
any checking. If the symbolic name does not exist, there will be error messages when
compiling the test application. Either provide a value (for scalar return value types) or
specify the symbolic name of a variable which the return value shall be assigned to (in
this case, the variable provided should be of the same type like the return value type).
6.11.6.2 Checking the calling sequence
The calling sequence of calls to underlying external functions may be checked on an
abstract level within the scenario. Not the absolute calling sequence will be evaluated,
but the existence of function calls within a given period of time within the scenario. This
provides a robust mechanism for call trace checking that ignores the internal implementation of the component. How does it work? You specify the following information within
the scenario for each expected function call:
•
The time step where you expect the call at the earliest.
•
The number of expected consecutive calls to the function (default is 1).
•
Optionally a period of time (the time frame) from that starting point where the
invocation of the function call is still successful with respect to the expected
behavior of the component.
Both these settings are available for each expected call to an external function. The time
frame is zero by default indicating that the expected function call shall take place within
the same time step.
316
TESSY 3.1 Manual
6.11 SCE: Component testing
If you specify the time frame as 60 like within the example above, this indicates that
the expected call could take place within time step 20ms, 30ms or up to 80ms to be
successful.
The exact sequence of the calls to those functions will not be examined, any of them
may be called within the given time frame interval. The report shows the result of the
evaluation of the call trace for the example above. The actual call trace entry contains
the time step where this call occurred, the expected call trace entry shows the expected
time frame period.
The following table shows the possible evaluation results for the call trace of the example
calls to function crossed_50() and crossed_75().
time step
Result for call to
crossed_50() [40 ms]
Result for call to
crossed_75() [40-80
ms]
40ms
ok
ok
50ms
failed
ok
60ms
failed
ok
70ms
failed
ok
80md
failed
ok
90ms
ok
failed
Table 6.227: example: possible evaluation results
If you need to check the exact calling sequence, you should set the time frame to zero.
Other functions called in between the expected function calls are ignored. On the other
hand, the time frame provides you with a powerful way to describe expected behavior of
the component without knowing details about the exact implementation.
6.11.6.3 Checking if a function is not called
You may check that a function is not called within a given time interval. The example below checks that the function crossed_75()is not called within 100ms after the stimulation
of the component by setting the expected call count to zero.
TESSY 3.1 Manual
317
6 Working with TESSY
Figure 6.164: A function is not called
The crossed icon shows the special value of the expected call count, indicating a check
that the function shall not be called.
6.11.6.4 Checking stub function parameters
Because called external functions need to be replaced by stub functions, you can check
the parameter values like during unit testing, depending on the type of stub function you
choose.
318
TESSY 3.1 Manual
6.12 Backup, restore, version control
6.12 Backup, restore, version control
With TESSY you can easily backup modules into a directory and check in into a version
control system. Modules can also be restored from that directory which facilitates checking out modules from the version control system onto another computer and restoring
the test database.
You can backup individual modules, folders or whole test collections. The backups will
be stored as tmb-files. Restoring the files is either possible within the original folder or
as well from another location.
6.12.1 Backup
Þ
In the menu bar select “File” > “Database Backup” > “Save. . . ”.
The Save Database dialog will be opened with your module already selected
(see figure 6.165).
Figure 6.165: Save Database dialog
Þ
Decide, which modules you want to save by either selecting them separate or
pressing the button “Select All”.
TESSY 3.1 Manual
319
6 Working with TESSY
Þ
Decide, if you want to save the coverage settings, test report options or dialog
settings from the Windows > Preferences menu.
Þ
If you have linked your test cases with any requirement documents, you can
choose to save the referenced requirement documents as well. In this case the
requirements will be saved within the TMB-file.
Þ
Click “OK”.
Backup
The “Backup Folder” displays the backup directory of the current project. We
recommend to use this directory for any backup and restore operations.
Figure 6.166: Files of the backup
6.12.2 Restore
6.12.2.1 Restore into the original location
Þ
Select “File” > “Database Backup” > “Restore. . . ”.
The Restore Database dialog will be opened.
Þ
Select the directory with the backup.
The box “Modules” now shows the hierarchy of modules that can be restored
from the given TMB-files within the backup directory (see figure 6.167).
Þ
If there are any requirement document backups, the respective requirement
documents will appear within the box “Requirements”.
Make sure you ticked the boxes with the requirements to import
them!
320
TESSY 3.1 Manual
6.12 Backup, restore, version control
Þ
Click “OK”.
Figure 6.167: Restore Database dialog
6.12.2.2 Restore into another location
You can also restore TMB backup files into another than the original location: If you
select any folder for which there are no corresponding TMB backup files, restore any of
the available TMB files as children of this folder. The original test collections and folders
of the TMB files will be restored as sub folders of the current folder instead.
6.12.3 Version control
We recommend to save backups of all test relevant files into a version control system on
a regular basis. At least when the test development is completed, the whole test setup
should be saved as backup.
TESSY 3.1 Manual
321
6 Working with TESSY
Version Control
Þ
Follow the steps described above to create the necessary files.
Þ
Save the following files and contents of directories into your version control
system:
PDBX file
Contents of the config directory
Contents of the backup directory
Figure 6.168: Data and files within the project directory
The directory work contains only temporary files created during development
and execution of the tests. You can delete this complete directory to save disk
space after the testing work is completed.
The directory persist contains the current databases of the test project. This directory
and the sub directories will be restored when restoring TMB backup files. The valuable
contents of this directory will be saved into the TMB files created during the backup
process.
When you restore the whole project onto another computer, the directory persist will
be restored from the TMB backup files.
322
TESSY 3.1 Manual
6.13 Command line interface
6.13 Command line interface
TESSY provides a command line interface which allows writing batch script files that
control various operations within a TESSY project. The command line operations are
available by invoking an executable program called “tessycmd.exe”.
The program can be called either from a DOS command line shell or from a DOS batch
script or other script formats that support calling DOS executables.
Before invoking any tessycmd.exe commands you need to start TESSY. The tessycmd.exe
will connect to a running instance of TESSY in order to execute any commands. You can
run TESSY either in GUI mode with a graphical user interface (when started normally
using TESSY.exe) or in headless mode without a GUI (when started using tessyd.exe).
For information about the usage of TESSY together with continuous integration
servers like Jenkins refer to the application note “Continuous Integration with
Jenkins” (“Help” > “Documentation”).
6.13.1 Starting TESSY in headless mode
For test automation on continuous integration servers or nightly builds it is required
to start TESSY in headless mode (i.e. without displaying a GUI). TESSY provides a
special starter application for this purpose called tessyd.exe. When invoking tessyd.exe
within your batch script, it will start TESSY in headless mode and wait until the TESSY
application is ready to received commands via tessycmd.exe.
At the end of your script you should shutdown TESSY using the same tessyd.exe application with the parameter “shutdown”. The calling sequence for running batch tests
would be like follows:
tessyd.exe --file <tessy.pdbx file>
tessycmd <commands>
tessyd.exe shutdown
When running TESSY in headless mode, the console output will be written into
a file “console.log” within the directory:
%USERPROFILE%\tessy_31_workspace\.metadata
TESSY 3.1 Manual
323
6 Working with TESSY
6.13.2 Invoking tessycmd.exe
The executable that provides all command line operations is available within the TESSY
installation directory: Program Files\Razorcat\[TESSY version]\bin\tessycmd.exe
Þ
Start a DOS shell.
Þ
Change to the directory “bin”.
Þ
Call the executable.
Figure 6.169: DOS command line shell
6.13.3 Usage of tessycmd.exe
The available commands provide means to create, select and list TESSY objects, i.e. a
project, test collection, folder, module, test object. After invoking any create commands,
the respective new TESSY object will be selected. You can invoke further commands to
manipulate any previously created or selected TESSY objects.
You need to call all commands according to the following sequence:
324
•
Connect to TESSY.
•
Select or create TESSY objects.
•
Invoke commands to start operations on the selected TESSY objects.
TESSY 3.1 Manual
6.13 Command line interface
•
Disconnect from TESSY.
If you are not connected, invoking any commands will fail.
Multiple connects will also cause an error.
Important:
The current state (connection and selection of TESSY objects) of the tessycmd.exe
executable is managed by the currently running TESSY application. If you restart TESSY,
the state of tessycmd.exe will be reset to the initial state, i.e. disconnected.
6.13.4 Commands
command
operation
tessycmd -h
displays a complete list of the available
commands
tessycmd -f <name of pdbx file>
imports and opens the project referred by the
given .pdbx file
tessycmd -p <name of project>
opens the given project (must be already
available within the project list)
tessycmd connect
connects to the running TESSY instance
tessycmd list-projects
lists the available projects
tessycmd disconnect
disconnects from TESSY
Table 6.234: Excerpt of the possible commands of the command line interface
To execute tessycmd.exe within any directory, add the directory “bin” of the
TESSY installation to the windows path environment variable.
6.13.5 Example: DOS script
You will find the following example DOS script within the TESSY installation directory:
Program Files\Razorcat\TESSY_3.1\Examples\CommandLine\cmd_line_example.bat
TESSY 3.1 Manual
325
6 Working with TESSY
The script is prepared to import TESSY backup files (TMB-files) into the currently open TESSY
project. It will create a new test collection “Examples” and import the existing TMB files into a
newly created folder. After the import, it executes the imported modules:
326
Þ
Start TESSY, create a new project and open this project.
Þ
Start a DOS command shell.
Þ
Change to the bin directory of the TESSY installation:
C:\Program Files\Razorcat\[TESSY Version, e.g. TESSY_3.1]\bin
Þ
Invoke the DOS batch script “cmd_line_example.bat”. Alternatively, double-click on
the file “cmd_line_example.bat” which invokes the DOS script within a new DOS
shell. There is a pause command at the end which causes the DOS shell to remain
open after the execution of the script.
TESSY 3.1 Manual
7 Troubleshooting
If you have troubles with errors or do not know how to proceed:
•
Check this manual and make sure that you have operated correctly.
•
Check section 7.2 Solutions for known problems.
•
Check our application notes that are available in the Help menu of TESSY (“Help”
> “Documentation”).
•
Check our website for
http://www.razorcat.com.
commonly
asked
questions
and
current
issues
7.1
Contacting the TESSY support . . . . . . . . . . . . . . . . . . . . . 328
7.2
Solutions for known problems . . . . . . . . . . . . . . . . . . . . . . 332
7.2.1
TESSY does not start or gives errors when starting . . . . . . 332
7.2.2
TESSY gives errors when quitted . . . . . . . . . . . . . . . . 333
7.2.3
License server does not start or gives errors . . . . . . . . . . 334
TESSY 3.1 Manual
327
7 Troubleshooting
7.1 Contacting the TESSY support
If you have further questions or if there is a problem you could not solve with the documentations
descrobed above, please contact our Technical Support per e-mail: [email protected]
Include in your support request e-mail:
•
your contact data
•
a short description of your question or problem
•
the TESSY Support File, if you get errors
The TESSY Support File (tgz-file) contains information about test object
including data, compiler, project settings etc. It helps the support to detect the
cause of your problem.
Creating the TESSY Support File
Þ
In TESSY, select the module or test object that is causing the problem.
Þ
Click “Help” in the menu bar.
Þ
“Support” > “Create Support File”
Þ
Tick the box “Preprocessed sources”, if possible.
Important: The box “Preprocessed Sources” is not ticked by default.
This avoids that confidental sources might be included accidentally.
Whenever you can afford to provide the sources to the support, tick
the box “Preprocessed Sources”. In most cases it is necessary for
successful problem investigation.
328
TESSY 3.1 Manual
7.1 Contacting the TESSY support
Figure 7.1: Dialog for creating the TESSY Support File
Þ
Click “OK”.
Þ
Choose a folder and a name for the file and click “Save”.
The TESSY Support File (tgz-file) is created.
Tipps for a better TESSY Support File
1. Reduce unnecessary information:
Þ
Before reproducing the problem, switch to the Console view of the perspective
“Overview”.
Þ
In the tool bar click on the icon
(Clear Console).
All messages will be deleted.
2. Enable TESSY to display additional information:
TESSY 3.1 Manual
329
7 Troubleshooting
Þ
In the main menu bar select “Help” > “Logging”.
Þ
Select a process, the level (if selectable) and “on” as the table beneath “Table Name”
explains (see table below).
It is possible to enable logging for all process steps.
Figure 7.2: Dialog for logging settings
The additional information can relate to different process steps within TESSY. Enable the logging
of the information you suspect the problem to stem from:
Process step
Log if . . .
Process Creation
parts of TESSY do not start correctly or TESSY is not able
to start the test system (e.g. debugger).
Parser
problems occur during analysis of the source code to determine
test objects and their interfaces. Often caused by incorrect
syntax.
Instrumenter
problems occur during instrumentation of the source code to
determine code coverage.
continue next page
330
TESSY 3.1 Manual
7.1 Contacting the TESSY support
Process step
Log if . . .
Makefile Commands
the test application (slave) or the test driver (master) cannot
be created or are created incorrectly.
Target Communication
problems occur in the communication between TESSY and
the debugger (e.g. the test system).
High level
you want to log the general TESSY activities. Seldom required
to find a problem.
Low level
you want to log debugger-specific activities. Often very useful.
Table 7.7: Information to log and add to TESSY Support File
Þ
You can save the settings for logging with ticking the box “Remember current
settings . . . ”.
3. Reproduce the problem:
Þ
Do the actions again that lead to the problem (e.g. opening the module).
Þ
Keep the respective element selected that caused the problem (e.g. the test
object in case of errors while executing) when creating the support file.
4. Create the support file, now including all log messages.
TESSY 3.1 Manual
331
7 Troubleshooting
7.2 Solutions for known problems
7.2.1 TESSY does not start or gives errors when starting
Error message:
diverse errors, maybe none
Error description:
TESSY does not start or displays exceptions within all GUI windows
(views).
Specific occurrence
or requirement:
Error occurs when starting TESSY or while in use.
Possible cause:
There might be a problem due to corrupted files needed for the
Eclipse TESSY product startup.
Solution:
Delete the following directories in given order. After every deletion try to start TESSY
again. If it fails, delete the next directory.
Important: Close TESSY completely before deleting any of those directories!
The following example path names reflect a TESSY version 3.1.2. You need to
adjust the path names for the TESSY version you are currently using!
1.
Delete folder %userprofile%\.tessy_v3.1.2.
2.
Delete the file %appdata%\Razorcat\Tessy\3.1.2\preferences.xml.
Important: This will reset your preference settings to the defaults!
3.
Delete folder %userprofile%\.tessy_31_workspace\.metadata.
Important: This will reset your window layout of the GUI to the
default settings!
332
4.
Delete folder %userprofile%\.tessy_v3.1.2.
5.
Delete folder %userprofile%\.tessy_31_workspace.
TESSY 3.1 Manual
7.2 Solutions for known problems
6.
Delete the file %appdata%\Razorcat\Tessy\3.1.2\preferences.xml.
Important: After this you need to re-import all your projects into
the project list again! The most simple way to do this is to doubleclick on the respective “tessy.pdbx” file.
7.2.2 TESSY gives errors when quitted
Error message:
SQLException
SQL State: 08006
Error Code: 40000
Insufficient data while reading from the network - expected a
minimum of 6 bytes and received only 0 bytes. The
connection has been terminated.
SQLException
SQL State: 08001
Error Code: 40000
java.net.ConnectException: Fehler beim Herstellen der
Verbindung zu Server localhost auf Port 1527 mit Meldung
Connection refused: connect.
Error description:
When quitting TESSY, one of the error messages above is
displayed.
Specific occurrence
or requirement:
Error occurs when quitting TESSY.
Possible cause:
TESSY v3.0 and TESSY v3.1 were startet at the same time.
Solution:
If you want to use both versions of TESSY at the same time, you can change the configfile:
Important: The functions of the command line tool are limited if you use
both TESSY versions at the same time! The tool works with the TESSY version
that was startet at last.
TESSY 3.1 Manual
333
7 Troubleshooting
Þ
Open the config file of TESSY 3.1 under
%APPDATA%\Razorcat\Tessy\3.1.x\config\tessy.conf.
Þ
Remove the comma in front of the server port from the database.
# Port to use by derbyd
TESSY_DERBYD_PORT=40000
7.2.3 License server does not start or gives errors
Error message:
Diverse, e.g. A license server is not running.
Error description:
The license server does not start, or you get an error when
starting it.
Specific occurrence
or requirement:
-
Possible cause:
Corrupt/incorrect license key.
Solution:
Check your license key:
334
Þ
Start the License Manager manually, if it has not startet yet: “Start” > “All
Programs” > “TESSY 3.x” > “Floating License Manager”.
Þ
Click on
Þ
Check the error message (see figure 7.3).
(Check) to check your license key file.
TESSY 3.1 Manual
7.2 Solutions for known problems
Figure 7.3: License key check unsuccessful: license key is incorrect for the host id
In many cases you can already determine the problem with the help of the error message.
In case of the error “No maching hostid for key” the license key does not match to the
host id of your computer:
Þ
Configure the correct license key file in the manager: Click on
and select the correct license key file. Click “OK”.
Þ
Click on
Þ
If the error still appears, contact our support (see Contacting the TESSY support) to get a new license key file.
TESSY 3.1 Manual
(Configure)
to check the license key file again.
335
Appendix
TESSY 3.1 Manual
337
A Abbreviations
API
C0
C1
CTE
CTM
CV
DC
DOS
EPC
FAQ
FC
GUI
GUID
HTML
IDA
IEC
ISO
MC/DC
MCC
OBT
PDB
PDBX
QTS
RQMT
SCE
SIL
TBS
TC
TD
TDB
TDE
TEE
TIE
TMB
338
Application Programming Interface
Statement Coverage
Branch Coverage
Classification Tree Editor
Classification Tree Method
Coverage Viewer
Decision Coverage
Disk Operating System
Entry Point Coverage
Frequently Asked Questions
Function Coverage
Graphical User Interface
Global Unique Identifier
Hyper Text Markup Language
Interface Data Assigner
International Electrotechnical Commission
International Standards Organization
Modified condition/decision coverage
Multiple condition coverage
Original binary test
TESSY Project Database (TESSY Version < 3)
TESSY Project Database (TESSY Version >= 3)
Qualification Test Suite
Requirement
Scenario Editor
Safety Integrity Level
TESSY Batch Script
Test Case
Test Definition
Test Database
Test Data Editor
Test Environment Editor
Test Interface Editor
TESSY Module Backup
TESSY 3.1 Manual
A Abbreviations
TS
UCE
XML
Test Step
User Code Editor
Extensible Markup Language
TESSY 3.1 Manual
339
B Glossary
Batch Testing A testing procedure in which multiple test objects are executed automatically one after each other without further user interaction.
Branch Coverage Is usually abbreviated “C1”. Roughly spoken: Branch Coverage reveals, if all branches were executed, for example, an if-instruction has two branches,
the then-branch and the else-branch.
C1 Test During a C1 test, each branch of the test object will be instrumented with a
counter to monitor, how often a branch of the program is run through.
Classification Tree The objective of the Classification Tree Method is to determine a
sufficient but minimum number of test cases. It is a systematic approach to test
planning by test case specifications and priorizations.
Code Coverage A test object is considered to consist of items like branches, conditions, etc. Code coverage measures, how many of the items were exercised during
the tests. This number is related to the total number of items and is usually
expressed in percent. TESSY features C1 coverage (branch coverage) and C2
coverage (MC/DC: Modified Condition)
Component Testing is the test of interacting test objects, i.e. interacting functions in
the sense of C. These functions can be a (single) calling hierarchy of functions, but
we will consider this mainly as unit testing. We consider as a component mainly
a set of functions that interact e.g. on common data and do not necessarily call
each other. Component testing then is testing of such a set of functions. The
units do not need to be in a calling hierarchy; they may only interact on data, like
push() and pop() of the abstract data type “stack”. A component according to
this specification may also be called a “module”, and its testing “module testing”
respectively.
Debugger A computer program that is used to test and debug other programs (the
“target” program). The code to be examined might alternatively be running on an
instruction set simulator (ISS), a technique that allows great power in its ability to
halt when specific conditions are encountered but which will typically be somewhat
slower than executing the code directly on the appropriate (or the same) processor.
340
TESSY 3.1 Manual
B Glossary
Some debuggers offer two modes of operation - full or partial simulation, to limit
this impact.
Enums Type of the C language specification which allows to define a list of aliases which
represent integer numbers.
Expected Values Values expected to be calculated by the test object. The result values
are checked against the expected values after the test run.
Hysteresis Dependence of a system not just on its current environment but also on its
past. This dependence arises because the system can be in more than one internal
state.
Interface Data Assign editor (IDA) If the interface elements of the test object have
changed, you can assign the new interface elements to the old. Your test data will
be assigned automatically.
Input Values Function parameters, global and external variables which have effect on
the behavior of the function.
Interface Description Information about the passing direction and type of interface
elements (parameter, global variables and extern variables). TThe interface description is determined automatically by TESSY and is made visible / changeable
in the TIE.
Integration Testing can be considered either as unit testing for a calling hierarchy of
functions or as a component testing for a set of interacting functions not necessarily
calling each other. Component testing is integration testing of the functions in the
component.
Modified Condition / Decision Coverage (MC/DC) MC/DC coverage takes the structure of a decision into account. Each decision is made up from conditions, which
are combined by logical operators (and, or, not). Roughly spoken, to get 100 percent MC/DC for a decision, each condition in the decision requires a pair of test
cases, that
• differs in the Boolean value for that condition, and
• has the same boolean value for all other conditions, and
• produces true and false in the outcome of the whole decision
n conditions require n+1 test cases
TESSY 3.1 Manual
341
B Glossary
Module A TESSY module comprises primarily of the test object (in C a function in the
sense of C) and source files, compiler settings, interface description and test data.
You can pool modules in projects.
Output Values The same as an expected value in the TESSY context. Both terms are
used in equivalence within this manual. The output (repectively expected) values
are evaluated against the actual result values after the test run.
Project Root See explanatory box on page 28.
Regression Testing Regression testing is the repetitive running of already successfully
completed test cases. The intention of regression testing is to verify that modifications and enhancements to a test object do not break the already successfully
completed tests.
Requirement Documented need of what a test should perform and important input
for the verification process. Requirements show what elements and functions are
necessary for the test.
Requirement Management Management of different types of requirements that need
to be covered by at least one test.
Requirement, Functional Describes the features, specific behavior, business rules and
general functionality that the proposed system must support.
Requirement, Non-Functional Specifies criteria that can be used to judge the operation of the test.
Search Query Search definitions processed by a search engine.
Stub Function Piece of code used to stand in for some other programming functionality.
A stub may simulate the behavior of existing code (such as a procedure on a remote
machine) or be a temporary substitute for yet-to-be-developed code.
System Testing Test of the application (software or software and hardware) as a whole.
Test Data Editor (TDE) With the TDE you can enter the input values and expected
values for the test run.
TESSY Support File Contains information about test objects including data, compiler,
project settings etc. It helps the support to detect the cause of a problem. In section
Contacting the TESSY support it is explained how to create a TESSY Support File.
342
TESSY 3.1 Manual
B Glossary
Test Case Element that encapsulates the abstract test definition, e.g. the specification
and description of a test, and the concrete test data managed within test steps.
Test Definition Describes a test to be performed on the test system in textual format.
A test definition abstractly describes the inputs and the expected outcome of a
test and refers to a list of requirements which shall be validated with this test.
Test Driver C-source files generated by TESSY for the test execution. These files are
compiled and linked in order to build an application that prepares the input data,
call the test object and store the actual result data.
Test Environment Information about the test object, the compiler used, the target
debugger or emulator and more settings.
Test Object The function to be tested.
Test Run One execution of a test object with the given test cases. The result of a test
run is stored within an XML result file that may be further processed by external
tools.
Test Suite A collection of test objects with test scenarios and/or test cases that were
created to fulfill a certain test objective.
Test Interface Editor (TIE) With the TIE you can view all interface elements and review or set the passing direction and/or other information of the interface elements.
Usercode In the usercode you can enter C code, which is executed before or after test
cases/test steps during the execution of a test object.
Workspace The space at local disk where the TESSY application reads and writes
data. Place for configuration and temporary report data. Project data can be
saved separately.
TESSY 3.1 Manual
343
C List of Figures
344
0.1
0.2
0.3
0.4
0.5
0.6
0.7
Core workflow of TESSY . . . . .
New Test Project view . . . . . . .
New traceability of requirements .
New tabular Test Data Editor . . .
New Test Data view . . . . . . . .
Defining coverage measurements .
Automatically generated test steps
.
.
.
.
.
.
.
.
.
.
.
.
.
.
.
.
.
.
.
.
.
.
.
.
.
.
.
.
.
.
.
.
.
.
.
.
.
.
.
.
.
.
.
.
.
.
.
.
.
.
.
.
.
.
.
.
.
.
.
.
.
.
.
xxi
xxv
xxvi
xxvii
xxviii
xxix
xxx
1.1
1.2
1.3
1.4
1.5
1.6
1.7
1.8
1.9
1.10
1.11
1.12
1.13
1.14
1.15
1.16
1.17
InstallAware Wizard . . . . . . . . . . . . . . . . . . . . . . . . . .
License Agreement . . . . . . . . . . . . . . . . . . . . . . . . . . .
Setup Type . . . . . . . . . . . . . . . . . . . . . . . . . . . . . . .
Destination Folder . . . . . . . . . . . . . . . . . . . . . . . . . . .
TESSY Testarea Folder . . . . . . . . . . . . . . . . . . . . . . . .
Program folder and user selection . . . . . . . . . . . . . . . . . . .
Installing process of TESSY . . . . . . . . . . . . . . . . . . . . . .
Installation is completed . . . . . . . . . . . . . . . . . . . . . . . .
Starting TESSY 3.x . . . . . . . . . . . . . . . . . . . . . . . . . .
Starting the key request . . . . . . . . . . . . . . . . . . . . . . . .
License key request popup window . . . . . . . . . . . . . . . . . .
Form for the license key request . . . . . . . . . . . . . . . . . . . .
Configure menu of the license server . . . . . . . . . . . . . . . . .
License key check successful: this license key is correct . . . . . . .
The license info shows the possible days for checking out the license
Checking out the TESSY license . . . . . . . . . . . . . . . . . . .
Determine the amount of days for the check-out . . . . . . . . . . .
.
.
.
.
.
.
.
.
.
.
.
.
.
.
.
.
.
.
.
.
.
.
.
.
.
.
.
.
.
.
.
.
.
.
.
.
.
.
.
.
.
.
.
.
.
.
.
.
.
.
.
2
2
3
3
4
4
5
5
6
7
7
8
9
10
12
12
13
3.1
3.2
3.3
3.4
3.5
3.6
3.7
3.8
3.9
Loading TESSY . . . . . . . . . . . . . .
Path of the workspace . . . . . . . . . . .
Creating a new project . . . . . . . . . . .
Selecting a folder for the project root. . .
Creating a new project . . . . . . . . . . .
Project Example1 is created. . . . . . . .
Context menu of the Select Project dialog
Project identifier . . . . . . . . . . . . . .
Project Example1 is created. . . . . . . .
.
.
.
.
.
.
.
.
.
.
.
.
.
.
.
.
.
.
.
.
.
.
.
.
.
.
.
23
23
24
25
27
28
29
31
31
.
.
.
.
.
.
.
.
.
.
.
.
.
.
.
.
.
.
.
.
.
.
.
.
.
.
.
.
.
.
.
.
.
.
.
.
.
.
.
.
.
.
.
.
.
.
.
.
.
.
.
.
.
.
.
.
.
.
.
.
.
.
.
.
.
.
.
.
.
.
.
.
.
.
.
.
.
.
.
.
.
.
.
.
.
.
.
.
.
.
.
.
.
.
.
.
.
.
.
.
.
.
.
.
.
.
.
.
.
.
.
.
.
.
.
.
.
.
.
.
.
.
.
.
.
.
.
.
.
.
.
.
.
.
.
.
.
.
.
.
.
.
.
.
.
.
.
.
.
.
.
.
.
.
.
.
.
.
.
.
.
.
.
.
.
.
.
.
.
.
.
.
.
.
.
.
.
.
.
.
.
.
.
.
.
.
.
.
.
.
.
.
.
.
.
.
.
.
.
.
.
.
.
.
.
.
.
.
.
.
TESSY 3.1 Manual
List of Figures
3.10
3.11
3.12
3.13
3.14
3.15
3.16
3.17
3.18
3.19
33
34
35
36
37
38
38
39
39
3.20
TESSY notifies, that a database update is necessary . . . . . . . . . . . .
A database update is necessary . . . . . . . . . . . . . . . . . . . . . . .
TESSY interface and its terminology . . . . . . . . . . . . . . . . . . . .
Open other perspectives . . . . . . . . . . . . . . . . . . . . . . . . . . .
Test Project view within the Overview perspective . . . . . . . . . . . . .
Adding views to a perspective . . . . . . . . . . . . . . . . . . . . . . . .
Move the views separately. To switch back, use “Reset”. . . . . . . . . . .
To switch back all positions of views and perspectives use “Reset Workbench”.
Minimizing and maximizing views . . . . . . . . . . . . . . . . . . . . . .
Maximized view with minimized views on the right and the restore-button
on the left . . . . . . . . . . . . . . . . . . . . . . . . . . . . . . . . . .
Using the context menu with right click. . . . . . . . . . . . . . . . . . .
4.1
4.2
4.3
4.4
4.5
4.6
4.7
4.8
4.9
4.10
4.11
4.12
4.13
4.14
4.15
Initial equivalence partitioning for “ice warning” . . . . . . . . .
Repeated equivalence partitioning for “ice warning” . . . . . . .
A possible CT for “ice warning” . . . . . . . . . . . . . . . . . .
Result of the CTM: tree (above) with combination table (below)
The problem “is_value_in_range” depicted graphically . . . . .
The initial CT with three test-relevant aspects . . . . . . . . . .
The CT for is_value_in_range, 2nd step . . . . . . . . . . . .
The CT for is_value_in_range, 3rd step . . . . . . . . . . . . .
A first specification for the range in the combination table . . . .
A second specification for the range in the combination table . .
The CT for is_value_in_range, 4th step . . . . . . . . . . . . .
The third range specification provokes a wrap-around . . . . . .
The completed CT for is_value_in_range . . . . . . . . . . . .
The completed test case specification . . . . . . . . . . . . . . .
An alternative test case specification . . . . . . . . . . . . . . .
.
.
.
.
.
.
.
.
.
.
.
.
.
.
.
.
.
.
.
.
.
.
.
.
.
.
.
.
.
.
54
55
56
57
58
58
59
59
60
60
61
62
63
65
66
5.1
5.2
5.3
5.4
5.5
5.6
5.7
5.8
5.9
5.10
5.11
5.12
5.13
5.14
Operational sequences in TESSY . . . . . . . . . . . . . . . . . . . . .
Creating the new project “Example1”. . . . . . . . . . . . . . . . . . . .
New project “Example1” is created . . . . . . . . . . . . . . . . . . . .
Test collection “Is_value_in_range” with an example folder and module
GNU GCC compiler is selected by default. . . . . . . . . . . . . . . . .
The source code of the C-Function to be tested . . . . . . . . . . . . .
Adding the C-source file. . . . . . . . . . . . . . . . . . . . . . . . . .
Analyzing the module, that is the C-source file. . . . . . . . . . . . . .
The function of the C-source is displayed as child of the module. . . . .
Perspective TIE - Test Interface Editor . . . . . . . . . . . . . . . . . .
The inputs and outputs are already defined . . . . . . . . . . . . . . . .
Test Items view . . . . . . . . . . . . . . . . . . . . . . . . . . . . . .
Three test cases were added in the Test Items view . . . . . . . . . . .
Data is entered, test step turns yellow and test case is ready to run. . .
.
.
.
.
.
.
.
.
.
.
.
.
.
.
70
72
72
73
74
74
75
76
76
77
78
79
79
81
TESSY 3.1 Manual
.
.
.
.
.
.
.
.
.
.
.
.
.
.
.
.
.
.
.
.
.
.
.
.
.
.
.
.
.
.
.
.
.
.
.
.
.
.
.
.
.
.
.
.
.
40
41
345
List of Figures
5.15
5.16
5.17
5.18
5.19
5.20
5.21
5.22
5.23
5.24
5.25
5.26
5.27
5.28
5.29
5.30
5.31
5.32
5.33
5.34
5.35
5.36
5.37
5.38
5.39
5.40
5.41
5.42
5.43
5.44
5.45
5.46
5.47
5.48
5.49
5.50
5.51
5.52
5.53
5.54
5.55
5.56
346
Entering data for test object is_value_in_range . . . . . . . . . .
The test cases are ready to test . . . . . . . . . . . . . . . . . . .
TDE after test run is_value_in_range . . . . . . . . . . . . . . .
Test results of is_value_in_range . . . . . . . . . . . . . . . . .
Selecting Branch and MC/DC Coverage for test run . . . . . . . .
Execute Test dialog while running the test . . . . . . . . . . . . .
The Coverage Viewer displays the coverage of is_value_in_range
Branch coverage is_value_in_range . . . . . . . . . . . . . . . .
Decision coverage is_value_in_range . . . . . . . . . . . . . . .
Code section of the if branch of the first decision . . . . . . . . .
Code section of the second decision . . . . . . . . . . . . . . . . .
Creating the folder for reports . . . . . . . . . . . . . . . . . . . .
Content of the test report is_value_in_range . . . . . . . . . . .
Importing a requirement . . . . . . . . . . . . . . . . . . . . . . .
Import dialog . . . . . . . . . . . . . . . . . . . . . . . . . . . . .
The new requirement document . . . . . . . . . . . . . . . . . . .
Changing the alias of the new requirement document . . . . . . .
Comment for the initial revision of the commit . . . . . . . . . . .
Linking test cases with requirements . . . . . . . . . . . . . . . .
Test Definition view within TDE with linked requirement . . . . .
Editing the settings of a Planning Coverage Report . . . . . . . .
Dialog of the settings for the Planning Coverage Report . . . . . .
Planning coverage report of the IVIR requirement document . . . .
Generating a Test Details Report . . . . . . . . . . . . . . . . . .
Part of the generated test report of is_value_in_range . . . . . .
Creating an Execution Coverage Report . . . . . . . . . . . . . . .
Coverage Report of is_value_in_range . . . . . . . . . . . . . .
Overview perspective after test run (with requirements) . . . . . .
Use the context menu to edit a source . . . . . . . . . . . . . . .
Editing the C-source file is_val_in_range.c . . . . . . . . . . . .
Changed C-source file of is_value_in_range . . . . . . . . . . . .
Adding a “delete” and “new” object . . . . . . . . . . . . . . . . .
Changed and new test objects of is_value_in_range . . . . . . .
Remove the code for test object “deleted”. . . . . . . . . . . . . .
Changed and new test objects of is_value_in_range . . . . . . .
Changed, deleted and new test object of is_value_in_range . . .
Use drag and drop in IDA . . . . . . . . . . . . . . . . . . . . . .
CTE with the root “is_value_in_range” . . . . . . . . . . . . . .
Creating a new classification with the context menu . . . . . . . .
Renaming the new classification . . . . . . . . . . . . . . . . . . .
Classifications of is_value_in_range . . . . . . . . . . . . . . . .
Simple classification tree for is_value_in_range . . . . . . . . . .
.
.
.
.
.
.
.
.
.
.
.
.
.
.
.
.
.
.
.
.
.
.
.
.
.
.
.
.
.
.
.
.
.
.
.
.
.
.
.
.
.
.
.
.
.
.
.
.
.
.
.
.
.
.
.
.
.
.
.
.
.
.
.
.
.
.
.
.
.
.
.
.
.
.
.
.
.
.
.
.
.
.
.
.
.
.
.
.
.
.
.
.
.
.
.
.
.
.
.
.
.
.
.
.
.
.
.
.
.
.
.
.
.
.
.
.
.
.
.
.
.
.
.
.
.
.
.
.
.
.
.
.
.
.
.
.
.
.
.
.
.
.
.
.
.
.
.
.
.
.
.
.
.
.
.
.
.
.
.
.
.
.
.
.
.
.
.
.
82
82
83
84
85
85
86
87
88
89
90
91
92
93
94
94
95
95
97
98
98
99
100
101
102
102
103
105
105
106
106
107
107
108
109
110
111
112
113
114
114
115
TESSY 3.1 Manual
List of Figures
5.57
5.58
5.59
5.60
5.61
5.62
5.63
5.64
Entering data in CTE . . . . . . . . . . . . . . . . . . . . . . . . . . . .
Entering more data in CTE . . . . . . . . . . . . . . . . . . . . . . . . .
Blue dots indicate that “range_start” elements contain data . . . . . . . .
Creating test cases in the test item list . . . . . . . . . . . . . . . . . . .
Defining test cases in the combination table of CTE . . . . . . . . . . . .
Completed table with all test cases for example “is_value_in_range” . . .
Test data is displayed when selecting a test case in the combination table
Test data displayed within TDE . . . . . . . . . . . . . . . . . . . . . . .
116
117
118
118
119
120
121
121
6.1
6.2
6.3
6.4
6.5
6.6
6.7
6.8
6.9
6.10
6.11
6.12
6.13
6.14
6.15
6.16
6.17
6.18
6.19
6.20
6.21
6.22
6.23
6.24
6.25
6.26
6.27
6.28
6.29
6.30
6.31
6.32
6.33
Menu bar of TESSY . . . . . . . . . . . . . . . . . . . . . . . .
Preferences menu of TESSY . . . . . . . . . . . . . . . . . . .
Pre-defined coverage instrumentation settings . . . . . . . . . .
Overview perspective . . . . . . . . . . . . . . . . . . . . . . .
Test Project view within the Overview perspective . . . . . . . .
The function of the C-source is displayed as child of the module.
Test Execution Settings . . . . . . . . . . . . . . . . . . . . . .
Coverage displayed within the Test Project view . . . . . . . . .
Creating a report . . . . . . . . . . . . . . . . . . . . . . . . .
Context menu “Define Batch Operation” . . . . . . . . . . . . .
Defining the batch operation . . . . . . . . . . . . . . . . . . .
Selecting all text objects . . . . . . . . . . . . . . . . . . . . . .
Editing the settings of each batch operation . . . . . . . . . . .
Saving the settings of a batch operation as TBS-file . . . . . . .
Import settings of data import . . . . . . . . . . . . . . . . . .
Export settings of data export . . . . . . . . . . . . . . . . . . .
Properties view . . . . . . . . . . . . . . . . . . . . . . . . . .
The Sources pane in the Sources tab of the Properties view . . .
The Compiler pane in the Sources tab of the Properties view . .
The Setting tab of the Properties view with module selected . .
The Setting tab of the Properties view with C-source file selected
The Coverage tab of the Properties view . . . . . . . . . . . . .
Selection of the coverage measurement in the pull-down menu .
Defining coverage measurements . . . . . . . . . . . . . . . . .
The Attributes tab of the Properties view . . . . . . . . . . . .
Creating a new attribute . . . . . . . . . . . . . . . . . . . . . .
Requirements Coverage view . . . . . . . . . . . . . . . . . . .
Test Items view . . . . . . . . . . . . . . . . . . . . . . . . . .
First test case with one test step. . . . . . . . . . . . . . . . . .
Selecting the test case generator. . . . . . . . . . . . . . . . . .
A new test case generator is created. . . . . . . . . . . . . . . .
The test steps were generated and are ready to be executed. . .
Selecting “Change Test Case Type to Normal” . . . . . . . . . .
127
128
131
132
133
137
139
141
144
146
146
147
147
148
149
150
151
152
153
155
156
156
157
158
159
160
161
161
164
165
165
166
166
TESSY 3.1 Manual
.
.
.
.
.
.
.
.
.
.
.
.
.
.
.
.
.
.
.
.
.
.
.
.
.
.
.
.
.
.
.
.
.
.
.
.
.
.
.
.
.
.
.
.
.
.
.
.
.
.
.
.
.
.
.
.
.
.
.
.
.
.
.
.
.
.
.
.
.
.
.
.
.
.
.
.
.
.
.
.
.
.
.
.
.
.
.
.
.
.
.
.
.
.
.
.
.
.
.
.
.
.
.
.
.
.
.
.
.
.
.
.
.
.
.
.
.
.
.
.
.
.
.
.
.
.
.
.
.
.
.
.
.
.
.
.
.
.
.
.
.
.
.
.
.
.
.
.
.
.
.
.
.
.
.
.
.
.
.
.
.
.
.
.
.
347
List of Figures
6.34
6.35
6.36
6.37
6.38
6.39
6.40
6.41
6.42
6.43
6.44
6.45
6.46
6.47
6.48
6.49
6.50
6.51
6.52
6.53
6.54
6.55
6.56
6.57
6.58
6.59
6.60
6.61
6.62
6.63
6.64
6.65
6.66
6.67
6.68
6.69
6.70
6.71
6.72
6.73
6.74
6.75
348
The test case and test steps originally being generated. . . . . . . .
Test cases created by CTE . . . . . . . . . . . . . . . . . . . . . .
All test cases will be renumbered . . . . . . . . . . . . . . . . . . .
Test Results view . . . . . . . . . . . . . . . . . . . . . . . . . . .
Evaluation Macros view . . . . . . . . . . . . . . . . . . . . . . . .
Console view . . . . . . . . . . . . . . . . . . . . . . . . . . . . . .
Preference “Show console on error” . . . . . . . . . . . . . . . . . .
Perspective C/C++ . . . . . . . . . . . . . . . . . . . . . . . . . .
Opening the C/C++ perspective . . . . . . . . . . . . . . . . . . .
Editor view within the C/C++ perspective . . . . . . . . . . . . . .
Opening the C/C++ perspective . . . . . . . . . . . . . . . . . . .
Project Explorer view within the C/C++ perspective . . . . . . . .
Outline view within the C/C++ perspective . . . . . . . . . . . . .
Requirement Management perspective . . . . . . . . . . . . . . . .
RQMT Explorer view . . . . . . . . . . . . . . . . . . . . . . . . .
Double clicking on a requirement opens the requirement editor . . .
Importing requirements . . . . . . . . . . . . . . . . . . . . . . . .
Import dialog . . . . . . . . . . . . . . . . . . . . . . . . . . . . . .
The new requirement document . . . . . . . . . . . . . . . . . . . .
The asterix and a mouseover shows the status “new”. . . . . . . . .
Committing options . . . . . . . . . . . . . . . . . . . . . . . . . .
Comment for the initial revision of the commit . . . . . . . . . . . .
After the commit . . . . . . . . . . . . . . . . . . . . . . . . . . .
Double click on the RQMT opens the requirement editor . . . . . .
The first requirement was modified . . . . . . . . . . . . . . . . . .
The first requirement has the version 2.0 . . . . . . . . . . . . . . .
The requirement document was modified . . . . . . . . . . . . . . .
Changing the alias of the new requirement document . . . . . . . .
The alias of a requirement is used in various views . . . . . . . . . .
Requirements List view . . . . . . . . . . . . . . . . . . . . . . . .
Double clicking on a requirement opens the Requirement Editor . . .
Requirements Editor with test and a figure . . . . . . . . . . . . . .
Test Means view . . . . . . . . . . . . . . . . . . . . . . . . . . . .
VxV Matrix view . . . . . . . . . . . . . . . . . . . . . . . . . . . .
Link Matrix view . . . . . . . . . . . . . . . . . . . . . . . . . . . .
Adding Test Cases to Link Matrix view . . . . . . . . . . . . . . . .
Link Matrix view with suspicious elements . . . . . . . . . . . . . .
Suspicious Elements view . . . . . . . . . . . . . . . . . . . . . . .
Suspicious test object and test cases . . . . . . . . . . . . . . . . .
Suspicious test object and linked modified requirements . . . . . . .
Selecting the suspicious test case shows the modified requirement(s)
Comparing the versions of the requirement . . . . . . . . . . . . . .
.
.
.
.
.
.
.
.
.
.
.
.
.
.
.
.
.
.
.
.
.
.
.
.
.
.
.
.
.
.
.
.
.
.
.
.
.
.
.
.
.
.
.
.
.
.
.
.
.
.
.
.
.
.
.
.
.
.
.
.
.
.
.
.
.
.
.
.
.
.
.
.
.
.
.
.
.
.
.
.
.
.
.
.
.
.
.
.
.
.
.
.
.
.
.
.
.
.
.
.
.
.
.
.
.
.
.
.
.
.
.
.
.
.
.
.
.
.
.
.
.
.
.
.
.
.
167
167
168
168
169
169
170
172
173
174
175
175
176
179
180
181
183
183
185
185
186
186
186
187
187
188
188
189
189
190
190
191
192
193
194
196
197
197
198
199
199
200
TESSY 3.1 Manual
List of Figures
6.76
6.77
6.78
6.79
6.80
6.81
6.82
6.83
6.84
6.85
6.86
6.87
6.88
6.89
6.90
6.91
6.92
6.93
6.94
6.95
6.96
6.97
6.98
6.99
6.100
6.101
6.102
6.103
6.104
6.105
6.106
6.107
6.108
6.109
6.110
6.111
6.112
6.113
6.114
6.115
6.116
6.117
Attached Files view . . . . . . . . . . . . . . . . . . . . . . . . . . . .
Attributes view . . . . . . . . . . . . . . . . . . . . . . . . . . . . . . .
Editing the requirement settings within the Attributes view . . . . . . .
Changing the “Content Type” attribute to HTML . . . . . . . . . . . .
History view . . . . . . . . . . . . . . . . . . . . . . . . . . . . . . . .
Differences view . . . . . . . . . . . . . . . . . . . . . . . . . . . . . .
Related Elements view . . . . . . . . . . . . . . . . . . . . . . . . . . .
View Document Preview . . . . . . . . . . . . . . . . . . . . . . . . . .
HTML editing within the inline editor (WYSIWYG and plain HTML) . .
Requirements Coverage view . . . . . . . . . . . . . . . . . . . . . . .
Options of refreshing . . . . . . . . . . . . . . . . . . . . . . . . . . .
Test Environment Editor (TEE) . . . . . . . . . . . . . . . . . . . . . .
Call of the Test Environment Editor (TEE) . . . . . . . . . . . . . . . .
Configuration file . . . . . . . . . . . . . . . . . . . . . . . . . . . . .
Visualizing all items within TEE . . . . . . . . . . . . . . . . . . . . . .
Compiler and targets possible to use in TESSY . . . . . . . . . . . . . .
Enabled and disabled configurations within TEE . . . . . . . . . . . . .
Attribute settings of the Eclipse target . . . . . . . . . . . . . . . . . .
Enable compiler . . . . . . . . . . . . . . . . . . . . . . . . . . . . . .
Adding an environment to a configuration file by using the context menu
Adding an environment to a configuration file by drag and drop . . . . .
Perspective TIE - Test Interface Editor . . . . . . . . . . . . . . . . . .
Information of passing direction and type . . . . . . . . . . . . . . . . .
Interface view . . . . . . . . . . . . . . . . . . . . . . . . . . . . . . .
White arrow indicating further levels, black arrow when expanded . . . .
Resetting passing directions . . . . . . . . . . . . . . . . . . . . . . . .
Setting the data format . . . . . . . . . . . . . . . . . . . . . . . . . .
Using an array parameter as pointer . . . . . . . . . . . . . . . . . . .
Array as pointer NULL . . . . . . . . . . . . . . . . . . . . . . . . . .
Create a stub function within the context menu . . . . . . . . . . . . .
CTE perspective . . . . . . . . . . . . . . . . . . . . . . . . . . . . . .
Classification Tree view . . . . . . . . . . . . . . . . . . . . . . . . . .
Creating a new classification with the context menu . . . . . . . . . . .
Creating test cases in the test item list . . . . . . . . . . . . . . . . . .
Classification Tree with test data for class h . . . . . . . . . . . . . . .
The first two test cases are read only and created within the CTE . . .
Showing data of a tree node . . . . . . . . . . . . . . . . . . . . . . .
Variable assignments in classification trees . . . . . . . . . . . . . . . .
TDE perspective . . . . . . . . . . . . . . . . . . . . . . . . . . . . . .
Type information of the variable long range_start . . . . . . . . . . . .
Test Data view . . . . . . . . . . . . . . . . . . . . . . . . . . . . . . .
Test step 1.1 is selected and undefined values are highlighted in yellow .
TESSY 3.1 Manual
.
.
.
.
.
.
.
.
.
.
.
.
.
.
.
.
.
.
.
.
.
.
.
.
.
.
.
.
.
.
.
.
.
.
.
.
.
.
.
.
.
.
200
202
203
204
204
205
206
206
208
208
209
212
214
215
218
219
219
220
223
224
224
229
231
231
233
236
237
238
239
240
242
244
246
248
249
250
251
252
254
257
257
260
349
List of Figures
6.118
6.119
6.120
6.121
6.122
6.123
6.124
6.125
6.126
6.127
6.128
6.129
6.130
6.131
6.132
6.133
6.134
6.135
6.136
6.137
6.138
6.139
6.140
6.141
6.142
6.143
6.144
6.145
6.146
6.147
6.148
6.149
6.150
6.151
6.152
6.153
6.154
6.155
6.156
6.157
6.158
350
Clicking in the cell opens the available enums . . . . . . . . . . . . . . .
Entering values as vector for an advanced stub . . . . . . . . . . . . . . .
Entering evaluation mode “unequal” within the inline editor . . . . . . . .
Generator test case 4 has a range value from 6 to 9 for parameter v1 . . .
Four test steps are generated for every value within the range “6 to 9”. . .
Selecting “Change Test Case Type to Normal” . . . . . . . . . . . . . . .
The test case and test steps originally being generated. . . . . . . . . . .
Test Definition view within TDE with linked requirement . . . . . . . . .
Declarations/Definitions view . . . . . . . . . . . . . . . . . . . . . . . .
Prolog/Epilog view . . . . . . . . . . . . . . . . . . . . . . . . . . . . .
Call sequence of the usercode parts . . . . . . . . . . . . . . . . . . . . .
Prolog/Epilog functions . . . . . . . . . . . . . . . . . . . . . . . . . . .
Editing C code . . . . . . . . . . . . . . . . . . . . . . . . . . . . . . . .
Call the popup menu by pressing CTRL + space . . . . . . . . . . . . . .
Usercode Outline view . . . . . . . . . . . . . . . . . . . . . . . . . . . .
Plots view . . . . . . . . . . . . . . . . . . . . . . . . . . . . . . . . . .
Creating a new plot with the context menu . . . . . . . . . . . . . . . . .
Creating a new plot . . . . . . . . . . . . . . . . . . . . . . . . . . . . .
Adding variables to a plot . . . . . . . . . . . . . . . . . . . . . . . . . .
Plots view with a plot and two variables . . . . . . . . . . . . . . . . . .
Uncheck variables for a better overview . . . . . . . . . . . . . . . . . . .
Highlighted upper value for variable sine_value . . . . . . . . . . . . . .
Perspective CV - Coverage Viewer . . . . . . . . . . . . . . . . . . . . .
Results of the EPC are displayed within the Test Project view . . . . . . .
Coverage results within the CV perspective (component testing) . . . . .
Test Project view within the CV perspective . . . . . . . . . . . . . . . .
Called Functions view . . . . . . . . . . . . . . . . . . . . . . . . . . . .
Flow Chart view . . . . . . . . . . . . . . . . . . . . . . . . . . . . . . .
Unreached code branch is marked blue . . . . . . . . . . . . . . . . . . .
Statement coverage . . . . . . . . . . . . . . . . . . . . . . . . . . . . .
Branch coverage . . . . . . . . . . . . . . . . . . . . . . . . . . . . . . .
MC/DC coverage view . . . . . . . . . . . . . . . . . . . . . . . . . . . .
MC/DC coverage . . . . . . . . . . . . . . . . . . . . . . . . . . . . . .
IDA perspective . . . . . . . . . . . . . . . . . . . . . . . . . . . . . . .
Compare view . . . . . . . . . . . . . . . . . . . . . . . . . . . . . . . .
Use drag and drop in IDA . . . . . . . . . . . . . . . . . . . . . . . . . .
Perspective SCE - Scenario Editor . . . . . . . . . . . . . . . . . . . . . .
Component test . . . . . . . . . . . . . . . . . . . . . . . . . . . . . . .
Scenarios of a component test . . . . . . . . . . . . . . . . . . . . . . .
Interface of the scenarios . . . . . . . . . . . . . . . . . . . . . . . . . .
Two component functions were set as work task within the Component
Functions view . . . . . . . . . . . . . . . . . . . . . . . . . . . . . . . .
263
264
267
269
269
270
271
273
274
275
275
276
277
278
280
281
282
282
283
284
285
285
286
288
289
290
291
292
295
296
297
298
299
301
303
304
306
308
308
309
311
TESSY 3.1 Manual
List of Figures
6.159
6.160
6.161
6.162
6.163
6.164
6.165
6.166
6.167
6.168
6.169
Work Task Configuration view . . . . . . .
Calculated cycle time . . . . . . . . . . .
Adding Function Calls . . . . . . . . . . .
The Test Data view of ’Scenarios’ . . . .
Indicator icons for the test data . . . . . .
A function is not called . . . . . . . . . .
Save Database dialog . . . . . . . . . . .
Files of the backup . . . . . . . . . . . .
Restore Database dialog . . . . . . . . . .
Data and files within the project directory
DOS command line shell . . . . . . . . .
7.1
7.2
7.3
Dialog for creating the TESSY Support File . . . . . . . . . . . . . . . . 329
Dialog for logging settings . . . . . . . . . . . . . . . . . . . . . . . . . . 330
License key check unsuccessful: license key is incorrect for the host id . . 335
TESSY 3.1 Manual
.
.
.
.
.
.
.
.
.
.
.
.
.
.
.
.
.
.
.
.
.
.
.
.
.
.
.
.
.
.
.
.
.
.
.
.
.
.
.
.
.
.
.
.
.
.
.
.
.
.
.
.
.
.
.
.
.
.
.
.
.
.
.
.
.
.
.
.
.
.
.
.
.
.
.
.
.
.
.
.
.
.
.
.
.
.
.
.
.
.
.
.
.
.
.
.
.
.
.
.
.
.
.
.
.
.
.
.
.
.
.
.
.
.
.
.
.
.
.
.
.
.
.
.
.
.
.
.
.
.
.
.
.
.
.
.
.
.
.
.
.
.
.
.
.
.
.
.
.
.
.
.
.
.
.
.
.
.
.
.
.
.
.
.
.
.
.
.
.
.
.
.
.
.
.
.
.
.
.
.
.
.
.
.
.
.
.
311
312
313
314
315
318
319
320
321
322
324
351
D List of Tables
352
0.1
0.2
Where to find - matters of the several parts of the TESSY manual . . . . xviii
Font characters . . . . . . . . . . . . . . . . . . . . . . . . . . . . . . .
xx
2.1
2.2
Changes in handling with TESSY 2.9 and TESSY 3.x . . . . . . . . . . .
How to import previous projects in TESSY 3.x . . . . . . . . . . . . . . .
17
19
3.1
3.7
3.9
3.12
3.20
File system and databases of TESSY . . . .
Options of the Project Configuration dialog
Tool bar options of the Select Project dialog
Handling of projects with equal names . . .
Shortcuts and key functions . . . . . . . . .
.
.
.
.
.
22
26
29
32
42
5.18
Entering data for test object is_value_in_range. . . . . . . . . . . . . .
81
6.1
6.2
6.3
6.4
6.5
6.6
6.7
6.19
6.22
6.31
6.38
6.45
6.46
6.54
6.57
6.60
6.62
6.63
6.64
6.69
6.77
File menu options . . . . . . . . . . . . . . . . . . . .
Window menu options . . . . . . . . . . . . . . . . . .
Preferences menu options . . . . . . . . . . . . . . . .
Help menu options . . . . . . . . . . . . . . . . . . . .
Structure of the Overview perspective . . . . . . . . .
Tool bar icons of the Test Project view . . . . . . . . .
Status indicators of the Test Project view . . . . . . .
Reports available within TESSY . . . . . . . . . . . . .
Available settings of the reports . . . . . . . . . . . . .
General tab of Properties view . . . . . . . . . . . . .
Options of module settings in Properties view . . . . .
Tool bar icons of the Test Items view . . . . . . . . . .
Status indicators of the Test Items view . . . . . . . .
Tool bar icons of the Console view . . . . . . . . . . .
Structure of the C/C++ perspective . . . . . . . . . .
Tool bar icons of the Outline view . . . . . . . . . . .
Structure of the Requirement Management perspective
Tool bar icons of the RQMT Explorer view . . . . . . .
Status indicators of the RQMT Explorer view . . . . .
Possible formats of requirement sources . . . . . . . .
Tool bar icons of the Requirements List view . . . . . .
.
.
.
.
.
.
.
.
.
.
.
.
.
.
.
.
.
.
.
.
.
.
.
.
.
.
.
.
.
.
.
.
.
.
.
.
.
.
.
.
.
.
.
.
.
.
.
.
.
.
.
.
.
.
.
.
.
.
.
.
.
.
.
.
.
.
.
.
.
.
.
.
.
.
.
.
.
.
.
.
.
.
.
.
.
.
.
.
.
.
.
.
.
.
.
.
.
.
.
.
.
.
.
.
.
.
.
.
.
.
.
.
.
.
.
.
.
.
.
.
.
.
.
.
.
.
.
.
.
.
.
.
.
.
.
.
.
.
.
.
.
.
.
.
.
.
.
.
.
.
.
.
.
.
.
.
.
.
.
.
.
.
.
.
.
.
.
.
.
.
.
.
.
.
.
.
.
.
.
.
.
.
.
.
.
.
.
.
.
.
.
.
.
.
.
.
.
.
.
.
.
.
.
.
.
.
.
.
.
.
.
.
.
.
.
.
.
.
.
.
.
.
.
.
.
.
.
.
.
.
.
.
.
.
.
.
.
.
.
.
.
.
.
.
.
.
.
.
.
.
.
.
.
.
.
.
.
.
.
.
.
.
.
.
.
.
.
.
.
.
.
.
.
.
.
.
.
.
.
.
.
.
.
.
.
127
128
130
131
133
134
135
143
145
152
155
162
163
170
173
177
180
181
182
184
190
TESSY 3.1 Manual
List of Tables
6.80
6.81
6.82
6.83
6.89
6.92
6.93
6.96
6.98
6.100
6.103
6.106
6.107
6.108
6.113
6.119
6.121
6.122
6.123
6.127
6.140
6.141
6.142
6.154
6.155
6.156
6.157
6.169
6.170
6.172
6.178
6.185
6.186
6.188
6.195
6.202
6.204
6.208
6.209
6.216
6.227
6.234
Tool bar icons of the Test Means view . . . . . . . . . . . . . . . . . . .
Tool bar icons of the VxV Matrix view . . . . . . . . . . . . . . . . . . .
Tool bar icons of the Link Matrix view . . . . . . . . . . . . . . . . . . .
Status indicators of the Suspicious Elements view . . . . . . . . . . . . .
Tool bar icons of the Suspicious Elements view . . . . . . . . . . . . . . .
Tool bar icons of the Attached Files view . . . . . . . . . . . . . . . . . .
Tool bar icons of the Attributes view . . . . . . . . . . . . . . . . . . . .
Tool bar icons of the Histroy view . . . . . . . . . . . . . . . . . . . . . .
Tool bar icons of the Document Preview . . . . . . . . . . . . . . . . . .
Tool bar icons of the Requirements Coverage view . . . . . . . . . . . . .
Selected elements within Requirement Management and displayed contents
Structure of TEE . . . . . . . . . . . . . . . . . . . . . . . . . . . . . .
Tool bar icons of the TEE . . . . . . . . . . . . . . . . . . . . . . . . . .
Status indicators of TEE . . . . . . . . . . . . . . . . . . . . . . . . . .
Contents, functions and storage location of configuration files . . . . . . .
Meanings of flags in the attribute properties . . . . . . . . . . . . . . . .
Structure of TIE . . . . . . . . . . . . . . . . . . . . . . . . . . . . . . .
Icons of the Interface view . . . . . . . . . . . . . . . . . . . . . . . . . .
Status indicators of the Interface view . . . . . . . . . . . . . . . . . . .
Possible passing directions of the interface elements . . . . . . . . . . . .
Structure of the CTE perspective . . . . . . . . . . . . . . . . . . . . . .
Tool bar icons of the Classification Tree view . . . . . . . . . . . . . . . .
Structure of Classification Tree view . . . . . . . . . . . . . . . . . . . .
Structure of TDE . . . . . . . . . . . . . . . . . . . . . . . . . . . . . .
Tool bar icons of the Test Data view . . . . . . . . . . . . . . . . . . . .
Status indicators of the Test Data view . . . . . . . . . . . . . . . . . . .
Interface elements and icons of the Test Data view . . . . . . . . . . . .
Options of initializing values . . . . . . . . . . . . . . . . . . . . . . . . .
Initialization values for data types . . . . . . . . . . . . . . . . . . . . . .
Evaluation modes . . . . . . . . . . . . . . . . . . . . . . . . . . . . . .
Value assignments for pointers . . . . . . . . . . . . . . . . . . . . . . .
Available types of evaluation macros . . . . . . . . . . . . . . . . . . . .
Operators of evaluation macros . . . . . . . . . . . . . . . . . . . . . . .
Tool bar icons of the Plots view . . . . . . . . . . . . . . . . . . . . . . .
Structure of CV . . . . . . . . . . . . . . . . . . . . . . . . . . . . . . .
Tool bar icons of the Test Items view . . . . . . . . . . . . . . . . . . . .
Elements of the Flow Chart view . . . . . . . . . . . . . . . . . . . . . .
Structure of the IDA perspective . . . . . . . . . . . . . . . . . . . . . .
Status indicators of the Compare view . . . . . . . . . . . . . . . . . . .
Status indicators of the Interface view of a component test . . . . . . . .
example: possible evaluation results . . . . . . . . . . . . . . . . . . . . .
Excerpt of the possible commands of the command line interface . . . . .
TESSY 3.1 Manual
192
193
194
195
198
201
202
205
207
209
210
214
216
217
221
227
230
232
232
235
243
245
245
255
258
259
260
265
266
267
272
279
279
281
287
293
294
302
303
309
317
325
353
List of Tables
7.7
354
Information to log and add to TESSY Support File . . . . . . . . . . . . 331
TESSY 3.1 Manual
Index
Advanced Stub Functions, 240, 264
Advanced Stubs, 240, 264
Array Plot, 281
Assigning changed Interface, 109
Attributes
Adding, 225
Editing, 225
View, 202
Backup, 319
Location, 26
Batch
Operation, 145
Test, 145, 340
Branch Coverage View, 87, 297
C Code
Editing, 277
Entering, 276
C-source file
Analyzing the, 75
Editing the, 105
C/C++, 172
C1 Test, 340
Check-out TESSY Floating License, 11
Classes
Creating, 246
Classification
Creating, 246
Tree, 340
Tree Editor, 242
Tree View, 244
Cloning a project, 28
Code Coverage, 340
Command Line Interface, 323
TESSY 3.1 Manual
Committing Requirements, 185
Compare View, 110, 303
Compiler, 218
GNU GCC, 74, 218
GNU GCC (C++), 218
Component Functions View, 311
Component Testing, 340
Config File, 22
Configuration
Enabling, 222
Configuration File, 22, 25, 220
Assigning a, 227
Console View, 169
Context Menu, 41
Continuous Integration, xxx
Coverage
Branch Coverage, 140, 156, 286, 340
Code, 340
Decision Coverage, 140, 156, 286
Entry Point Coverage, 140, 156, 286
Function Coverage, 140, 156, 286
Instrumentation, 128, 140, 156, 286
Measurements, 128, 156, 286
Modified Condition / Decision Coverage, 140, 156, 286, 341
Multiple Condition Coverage, 140,
156, 286
Safety Standards, 128
Settings, 128, 140, 156
Statement Coverage, 140, 156, 286
Viewer, 86, 286
CTE, 242
CV, 86, 286
Data Format
355
Index
Setting the, 236
Database Location, 26
Database Update, 33
Debugger, 340
Decision Coverage View, 298
Declarations/Definitions View, 274
Delete
Compiler, 216
Environment, 216
Folder, 41
Module, 41
Target, 216
Test Case, 41
Dialog Settings, 128
Differences View, 200, 205
Directories Settings, 128
DO-178B, 128
Edit Source, 105
Editing
HTML of Requirements, 207
Editor View, 174
Entering Plots, 281
Entry Point Coverage (EPC), 287
Enums, 263, 341
Equal Named Projects, 31
Eval Macros, 278
Eval Modes, 266
Evaluation
Macros, 278
Macros View, 169
Modes, 266
Executing a Test, 138
Expected Values, 341
Exporting
Coverage Instrumentation Settings,
128
Test Data, 148
File System, 22
Flow Chart, 292
Flow Chart View, 87
Format
356
Data (TIE), 236
Formats
Requirements, 184
Function Coverafe (FC), 287
Generating
Test Cases, 164, 268
Test Driver, 138
Generator Test Case, 164, 268
GNU GCC (C++) Compiler, 218
GNU GCC Compiler, 74, 218
Help
by Problems, 327
Menu, 131
Hysteresis, 341
IDA, 104, 301, 341
IEC 61508, xxi, 128
Importing
Coverage Instrumentation Settings,
128
Requirements, 93
Test Data, 148
Include Path, 154
Inheritance of attributes, 215
Inline Mode, 262
Input Values, 341
Instrumentation Settings, 140
Integration Testing, 341
Interface
Changes, 104
Data Assign Editor, 104, 301
Description, 341
ISO 26262, xxi, 128
License Key File, 6
License Key Request, 6
Link Matrix view, 194
Location
Backup, 26
Database, 26
Project, 26
TESSY 3.1 Manual
Index
Maximum Criterion, 57
MC/DC, 341
MC/DC Coverage View, 87, 298
MCC Coverage View, 300
Menu Bar, 35
Minimum Criterion, 57
Module, 73, 341
Multiple Stub Calls, 264
Outline View, 176
Output Values, 342
Overview Perspective, 73, 132
PDB-File, 22
Perspective, 36
C/C++, 172
CTE, 242
CV, 86, 286
IDA, 104, 301
Overview, 73, 132
Requirement Management, 93, 179
SCE, 306
TDE, 80, 254
TEE, 73, 212
TIE, 77, 229
Perspective Bar, 36
Plots
Entering, 281
Setting Properties, 282
View, 281
Pointers, 237, 271
Project
Clone a, 28
Creating a, 24
Database, 22
Directory, 30
Equal named, 31
Location, 26
Root, 22, 75
Settings, 128
Template, 30
Project Explorer View, 175
Prolog/Epilog View, 275
TESSY 3.1 Manual
Properties View, 151, 230, 256
Registration, 6
Regression Testing, 104, 301, 342
Rename, 41
Renumbering Test Cases, 168
Repeat Count, 275
Report
Creating a, 91, 142
Directories, 128
Execution Coverage, 142
Names, 128
Planning Coverage, 98, 142
Test Details, 91, 142
Test Overview, 142
Requirement, 342
Alias, 188
Committing, 185
Coverage, 208
Creating, 180
Editing, 187
Engineering, 180
Formats, 184
Functional, 342
HTML Editing, 207
Import, 182
Importing, 93
Linking of, 208
Management, 93, 178, 342
Non-Functional, 342
Renaming Document, 188
Sources, 184
Versioning of, 204
Requirements List View, 190
Restore, 319
Reuse, 104, 301
RQMT Explorer View, 94, 180, 184
Running a Test, 138
Save Data, 319
Saving Changes, 36
SCE, 306
Scenario Editor, 306
357
Index
Search Query, 342
Settings
Coverage, 128
Dialog, 128
Directories, 128
Project, 128
Report, 128
Shortcuts, 41
Source
Analyzing the, 75
Editing the, 105
Root, 25
Statement Coverage View, 296
Status Bar, 40
Stub
Advanced, 240, 264
Creating, 240
Functions, 138, 239, 342
Support, 327
Support File, 327
Suspicious Elements, 196, 197
System Testing, 342
Target, 218
Target Passing, 237
TDE, 80, 254, 342
TEE, 73, 212
Template Project, 30
TESSY Support File, 327
Test
Definition, 343
Definition View, 273
Driver, 343
Environment, 343
Environment Editor, 73, 212
Execution, 138
Interface Editor, 77, 229, 343
Items View, 78, 161
Means view, 192
Project View, 73, 133
Regression, 342
Results View, 168
358
Run, 138, 343
Step Plot, 281
Suite, 343
System, 342
Test Case, 342
Generator, 164, 268
Plot, 281
Renumbering, 168
Test Data
Editor, 80, 254, 342
Exporting, 148
Importing, 148
View, 257
Test Object, 76, 343
Changing Interface, 105
External Functions, 233
External Variables, 233
Global Variables, 233
Local Functions, 233
TIE, 77, 229, 343
Tool Bar, 36
Troubleshooting, 327
Type Information, 230, 256
Type Modifier, 230, 256
Updating a database, 33
Usercode, 275, 280, 343
Usercode Outline View, 280
Using array as pointer, 238
Vector Values, 264
Version Control, 185, 188, 190, 319
View, 37
Attached Files, 200
Attributes, 202
Branch (C1) Coverage, 87, 297
Classification Tree, 244
Compare, 110, 303
Component Functions, 311
Console, 169
Decision Coverage, 298
Declaration/Definition, 274
Differences, 200, 205
TESSY 3.1 Manual
Index
Document Preview, 206
Editor, 174
Evaluation Macros, 169
Flow Chart, 87
History, 204
Interface, 77
Link Matrix, 194
MC/DC Coverage, 87, 298
MCC Coverage, 300
Outline, 176
Plots, 281
Project Explorer, 175
Prolog/Epilog, 275
Properties, 74, 151, 230, 256
Related Elements, 206
Requirements Coverage, 208
Requirements List, 190
Reset Position, 38
RQMT Explorer, 94, 180, 184
Statement (C0) Coverage, 296
Suspicious Elements, 197
Test Data, 80, 257
Test Definition, 273
Test Items, 78, 161
Test Means, 192
Test Project, 73, 133
Test Results, 168
Usercode Outline, 280
VxV Matrix, 193
Work Task Configuration, 311
Work Task Configuration View, 311
Work Tasks, 310
Workspace, 22, 343
TESSY 3.1 Manual
359