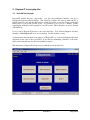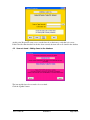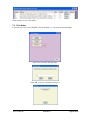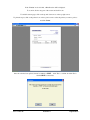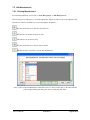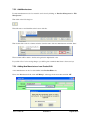
1
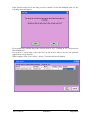
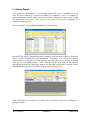
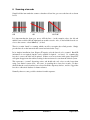
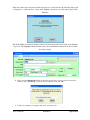
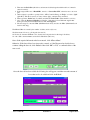
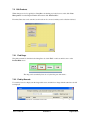
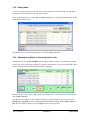
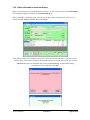
VIVITECH Ltd.
Westgate Lodge, Low Street, North Wheatley
Nottinghamshire, England DN22 9DS
Tel: +44 (0)1427 881277 Fax: +44 (0) 8702 885898
E-mail: [email protected]
www.vivitech.co.uk
User Instruction Manual
& Tips
Version 3.24
3rd Nov 2011
Table of Contents
1.
REVISION HISTORY .................................................................................................3
2.
INTRODUCTION ........................................................................................................3
3.
DISPENS-IT IN EVERYDAY USE..............................................................................4
3.1
An initial run-through..................................................................................................................................... 4
4.
SHOW ITEM QUEUE .................................................................................................5
4.1
Dispensing an Item .......................................................................................................................................... 6
4.2
Item not found: Adding items to the database ............................................................................................. 7
4.3
Missing or Illegible Barcodes........................................................................................................................ 10
5.
HISTORY SEARCH .................................................................................................11
6.
SCANNING A BARCODE........................................................................................12
7.
DATA MANAGEMENT ............................................................................................13
7.1
Stock-IT Incoming......................................................................................................................................... 13
7.1.1
Checking-in Stock ..................................................................................................................................... 13
7.1.2
Adding Extra Stock to Items Already in the Database.......................................................................... 17
7.2
Edit Products ................................................................................................................................................. 18
7.2.1
Find Drugs................................................................................................................................................. 18
7.2.2
Find by Barcode ........................................................................................................................................ 18
7.2.3
Find by Name ............................................................................................................................................ 19
7.2.4
Adjusting Drug Details or Correcting Stock Levels .............................................................................. 19
7.2.5
Save Changes............................................................................................................................................. 20
7.2.6
Delete a Barcode or Associate Groups .................................................................................................... 21
7.3
Stock Level Check ......................................................................................................................................... 22
7.4
Print Orders ................................................................................................................................................... 23
7.5
Edit Manufacturers ....................................................................................................................................... 25
7.5.1
Existing Manufacturers............................................................................................................................ 25
7.5.2
Add Manufacturer.................................................................................................................................... 26
7.5.3
Adding New Manufacturer from Product Edit...................................................................................... 26
7.6
Edit Suppliers................................................................................................................................................. 27
8.
BACKUP ..................................................................................................................28
8.1
Change backup location ................................................................................................................................ 29
9.
FAQ’S & TIPS ..........................................................................................................30
VIVITECH
DISPENS-IT
Page 2 of 32
1. Revision History
Version 3.24
New version incorporating Mars-IT and Stock-IT updates
2. Introduction
Vivitech’s Dispens-IT software is designed to help eliminate human error in the dispensary by
making use of the barcodes that now appear on almost every item.
Quite simply, Dispens-IT intercepts and stores the details of each prescribed item as it is output
from the surgery’s prescribing software and withholds the printing of the item label until
dispensary staff has scanned the barcode of the item. If the barcode matches the item’s
description, the label is printed normally. If it does not, a warning message prompts the user to
investigate.
Introducing this simple extra step in the dispensing process typically takes only a second or two
per item. This can save hours of time in manual cross checking. In addition, a complete historical
log of all dispensed items is maintained, including the scanned barcodes, and this history may be
easily queried and printed using familiar PC-based tools.
By interfacing only at the labels level, Dispens-IT can be used with all the popular GP clinical
data systems.
The barcode database is populated during the initial period of use within each individual surgery
and maintained as part of normal operation. There are no expensive subscriptions to database
providers and no lengthy update procedures to endure.
VIVITECH
DISPENS-IT
Page 3 of 32
3. Dispens-IT in everyday Use
3.1
An initial run-through
Dispens-IT actually has two components – not only the push-button interface, but also a
background program called LabelCap. The LabelCap software will start up when the PC is
initially turned on, and will then hide itself as a little icon on the system tray (at the bottom right
hand corner of your screen near the clock). It is LabelCap’s job to act as a “dummy” printer,
capturing the medication labels printed by your GP system. There should be no need to interact
with LabelCap.
So let’s start up Dispens-IT and try it out for the first time. Your Vivitech Engineer will have
installed a “Start Dispens-IT” icon on your desktop. Double click this to start.
As mentioned in the Introduction, the purpose of Dispens-IT is to assist in checking that the items
dispensed are the same as those prescribed. It does this by maintaining a database of the items’
names and storing the barcodes associated with those names.
The main menu of Dispens-IT will present you with the screen shown below.
VIVITECH
DISPENS-IT
Page 4 of 32
4. Show Item Queue
When a label is dispensed from the GP system it is captured by the LabelCap software and the
information is stored in a queue database within Dispens-IT. Click on the “Show item Queue”
button on the main menu screen and you will be presented with a list of the items held in the
queue database as shown below.
The ‘Items in Queue’ screen shows all the items in the queue sent from the GP system. The items
can be viewed, put on hold, selected for processing or even deleted from the queue within this
screen.
By placing a tick in the box (by simply clicking on it) for hold or select, a particular selection of
items can be chosen for processing. This is particularly useful if certain items are out of stock or a
patient has arrived for prescription collection before processing has taken place.
The list can be sorted by any of the columns - name, item or date received.
Each label can be viewed prior to printing and items can be deleted if required.
VIVITECH
DISPENS-IT
Page 5 of 32
4.1
Dispensing an Item
To dispense items from the queue, first select the items by clicking in the ‘Select’ column against
the items to be dispensed. A tick will appear along with the station number (terminal no.); in this
case the station is ‘D1’. Now click on the ‘Process Item(s)’ button.
At the initial setup of Dispens-IT the items and history databases are empty. The first time that an
item is dispensed, the item and its associated barcode must be entered into the items database. A
screen allowing you to update this information will now appear.
N.B. It is critical that you have the correct item in your hand at this point.
If it is the correct item and it has a barcode then click on the ‘Update’ button.
The ‘Process Item’ screen will now be shown
VIVITECH
DISPENS-IT
Page 6 of 32
At this point, Dispens-IT wants you to scan the barcode on the item to verify that it is correct.
If this is the first time that the barcode has been scanned, the item will not be found in the database
4.2
:
Item not found: Adding items to the database
The item and the barcode now need to be associated…
Click the ‘Update’ button.
VIVITECH
DISPENS-IT
Page 7 of 32
The ‘Product Edit’ screen will now appear
The barcode scanned is shown in the ‘Barcode’ field and the item is shown in the ‘Associated
products’ list. The product manufacturer should be entered into the ‘Manufacturer’ field; the
pack size should be entered into the ‘Pack size’ field. Then click on the ‘Close & Save’ button. A
label will then be printed.
Te next screen shown is the ‘Stock-IT outgoing’ screen.
Click on the ‘OK’ to delete the items from stock.
VIVITECH
DISPENS-IT
Page 8 of 32
If the current stock level for the drug you have scanned is below the minimum value set, the
following screen will appear:
If you would like to add the drug to the order list click on “Yes”. Clicking on “No” will print your
label immediately.
If you chose to add an item to the order list, you will now be asked to choose your preferred
supplier from a drop down list.
When complete, click “Close & Save” (below). Your label will now be printed.
VIVITECH
DISPENS-IT
Page 9 of 32
4.3 Missing or Illegible Barcodes
Sometimes barcodes are missing or damaged – what then?
If the item does not have a barcode (a few products don’t!) or if the barcode label is unreadable,
you can click on the ‘Update’ Button then on the next screen click on the ‘Print’ button
VIVITECH
DISPENS-IT
Page 10 of 32
5. History Search
As it performs its main function of item checking, Dispens-IT creates a comprehensive log of
items dispensed, which may be queried and filtered in a multitude of ways: for example, by
patient, manufacturer, period of time, item name etc. in any combination. A report can be created
and printed with a few clicks of the mouse to assist with product re-calls, complaints and
computer downtime periods.
To access the history, click ‘Dispensing History’ on the main menu:
Dispens-IT will start by listing the historical information of all the items dispensed. Each field
can be selected for filtering for specific information. For instance, if it is necessary to find out
which patients have been given a certain drug, then start typing the name of the drug in the drop
down box above the ‘Item’ column, or click on the arrow in the drop down box and select the
drug required from the list. The history database will then filter out all entries except the selected
drug. Further filtering can be achieved by using the other drop down boxes.
After all filtering has been applied you can then print a report based on the selected filtering to a
plain paper printer
VIVITECH
DISPENS-IT
Page 11 of 32
6. Scanning a barcode
Simply hold the item under the scanner so that the red laser line goes across the barcode as shown
below.
OK
OK
NOT OK
It is important that the beam goes across ALL the lines – in the examples above, the left and
middle scans would be OK, the right hand one would not work. Also, do not hold the barcode too
close to the scanner – about 100mm (4”) is ideal.
There is a certain “knack” to scanning, which you will soon acquire after a little practice. Simply
pass the barcode on the item under the scanner and wait for the “beep”.
In its simplest installation form, Dispens-IT requires only the barcode to be scanned. Batch ID
information is not required (but this can be enabled if required – see later!). So, assuming the
barcode is correct, the label will be printed. If there are no more items in the queue, Dispens-IT
will again disappear into the taskbar, waiting for the next item to be sent from the clinical system.
This represents a “normal” dispensing action, and should take only a few seconds longer than
using your clinical system alone. Of course, in spending those extra few seconds, you have
checked that the correct item has been selected from the dispensary shelves, and also logged the
barcode to a historical database for future reference.
Naturally, there are some possible variations from this sequence.
VIVITECH
DISPENS-IT
Page 12 of 32
7.
7.1
Data Management
Stock-IT Incoming
7.1.1 Checking-in Stock
When new stock needs to be added to Stock-IT, click ‘Stock IT’ from the DispensIT menu >
then click ‘Stock-IT Check-in’.
At this point the following form will be displayed; the Barcode must be scanned to continue
further.
Note: to clear any existing listings on the screen, click ‘Clear’ or to go back to the previous
screen, click ‘Close’.
VIVITECH
DISPENS-IT
Page 13 of 32
If the barcode has never been entered before because it is a new barcode, the following dialog will
be displayed… if the barcode is correct, click ‘Update’, otherwise to go back and try again, click
‘Rescan’.
The Product Edit screen will be displayed; this is the most important screen of the stock checkingin process. The highlighted fields must have the correct information written for the barcode that
has been scanned.
1. Firstly, enter the Manufacturer name. If the name already exists, it can be selected from the list…
otherwise click “Add Manufr” and enter the new name there and click ‘OK’.
2. If there are any notes to be applied, they can be entered here also.
VIVITECH
DISPENS-IT
Page 14 of 32
3. Then enter the Pack Size (this is the total amount of tablets/capsules within each box, it must be
entered correctly).
4. If the surgery makes use of Batch-ID’s, enter it to ‘Current Batch ID’, otherwise move onto next
part.
5. On the right, it is possible to specify if it is a ‘CD’ (Controlled Drug), is ‘Fridge’ or if it is a ‘Split’
(Split Box). Tick the box next to it if any of these apply, otherwise leave un-ticked.
6. Then type in the ‘Pack Cost’ (Cost Price) and then the ‘Pack Value’ (How much it is sold for)
7. Also, select the Preferred Supplier from the list... if the drug is from a different supplier that
hasn’t previously been included in the list, click ‘Add Supplier’
8. The next stage is to enter the ‘Min’ (Minimum Stock level), and also the ‘Max’ (Maximum Stock
level for that drug).
The Min and Max is counted by the number of tablets, and not by boxes.
56 tablets means 2 boxes (e.g. if the pack size was 28)
Or if it was 28, it means minimum 1 box, because the total pack size for this drug is 28 tablets.
28 * 20 = 560 so the maximum total would be 560 tablets (20 boxes)
Once all the required information has been entered, click ‘Close & Save’.
Otherwise, If the barcode has been incorrectly scanned, or if the Dispenser has decided not to
continue adding the barcode, click ‘Delete’> then click ‘OK’ or ‘Yes’ to confirm deletion of the
new record.
Once the barcode has been added, the following box will appear > and then enter the amount of
boxes that need to be added and click ‘Add Stock’.
VIVITECH
DISPENS-IT
Page 15 of 32
Now, type in the number of Packs (boxes) to be added to stock and click ‘Add Stock’. To go back
and edit the barcode again, click ‘Edit Product’.
NOTE: If the barcode has already been associated (linked) with a drug name, it will appear in the
Grid with the Pack Size and Stock. If it hasn’t been scanned and linked to a drug name already, it
will automatically link the next time the barcode is processed during a full dispense of the drug
and it will appear blank in the Grid View (List).
The ‘Group Tot’, is automatically calculated, it adds up any associated drugs including the
existing one to give the full total.
If further barcodes must be registered, simply click ‘Clear’ and then scan the next barcode in and
follow the same process. In order to exit the Stock-IT incoming, click ‘Close’.
VIVITECH
DISPENS-IT
Page 16 of 32
7.1.2 Adding Extra Stock to Items Already in the Database
If a barcode has already previously been recorded, then only the ‘Packs to add to stock’ need to be
entered > then click ‘Add Stock’.
If the drug has been merged with a substitute group, all the drug names within that group will also
be displayed. The Group total will collectively be displayed also.
The new quantity will be displayed and also the total for the group.
VIVITECH
DISPENS-IT
Page 17 of 32
7.2
Edit Products
When changes need to be applied for a Drug/Barcode that has previously been recorded, click ‘Data
Management’ from the DispensIT main menu > then click ‘Edit Products’.
From here, Barcodes can be searched, stock levels can be corrected, and they can be edited and deleted.
7.2.1 Find Drugs
The quickest method to find the desired drug/barcode, click ‘Find’ on the bottom left corner on the
Product Edit screen.
The drug can be searched by barcode or by the first part of the name…
7.2.2 Find by Barcode
To search by barcode, simply scan the drug at this screen, and the list of drugs with the same barcode will
be displayed.
VIVITECH
DISPENS-IT
Page 18 of 32
7.2.3 Find by Name
To search a drug by the name instead, type in part of the drug name and click ‘Search’, this will display
and drugs that have that phrase in any part of the drug title.
If the search should be more specific, tick the ‘Match start only’ box, this will only find the drugs, which
begin with the search criteria.
Then from the list, select the drug name/barcode and click ‘Jump to Selected’.
7.2.4 Adjusting Drug Details or Correcting Stock Levels
After the previous step, the Product Edit mode is displayed, at this point the record is Read-only which
means it can only be viewed but not Edited. To make Stock Adjustments to the record, click ‘Edit’. This is
useful if stock was taken from the dispensary without scanning it.
Note: If required, it is possible to change another associated product, select the barcode from the list and
click ‘Jump to Selected’.
Once Edit has been clicked, the Product Edit form allows for the information to be changed. Now the
Manufacturer, Batch-ID (if needed), Current Stock Level, Pack Cost, Pack Value, Supplier, Min and
Max all can be adjusted. These have been highlighted in the screenshot below.
VIVITECH
DISPENS-IT
Page 19 of 32
7.2.5 Save Changes
To save changes, first check if the information has been entered accurately, then click ‘Save’.
If changes are made to a record, and those are not saved before closing it, a save dialog will appear. Click
‘Yes’ to confirm save, or ‘Cancel’ to continue Edits. Clicking ‘No’ will exit the Product Edit screen.
Once this has been saved, the record will revert back to read-only, and ‘Edit’ must be clicked again if
further changes need to be made.
VIVITECH
DISPENS-IT
Page 20 of 32
7.2.6 Delete a Barcode or Associate Groups
If there is an item in the wrong group this must be deleted, to do this, follow the steps from the Find Drugs
section until the drug/barcode appears in the Product Edit Mode.
Then, from the list of drugs in the grid, select the barcode that was incorrectly entered (or the one to be
deleted) and click ‘Jump to Selected’. Then click ‘Delete’.
There will be a dialog box, which gives the option to delete the barcode itself (left), or the entire group of
substitute drugs. Note if these are deleted, the information must be re-taught the next time it is scanned.
‘This Barcode’ deletes the individual drug, however if ‘Entire Group’ is clicked the following
confirmation is given (right) then click ‘OK’.
VIVITECH
DISPENS-IT
Page 21 of 32
7.3
Stock Level Check
As part of the stock control system, Stock-IT enables the re-ordering of stock that has fallen below the
minimum level.
To make use of this, go to the Main Menu of DispensIT, click ‘Stock-IT’ > then click ‘Stock Level Check’.
This displays all of the items that need reordering. The Min is the minimum stock level; the Deficit is the
amount it is under.
To order more of the drug, click on ‘Order’ next to the Drug Name.
If the drug name has other substitute drugs that are in the same group, these will appear in the list. The
Barcodes are also displayed. To re-order the stock, double click under the ‘Order’ column and enter the
quantity needed against the barcode. Then select the ‘Supplier’ from the list. When this is done, click ‘Save
& Close’.
The total ordered quantity is displayed in the list; now repeat steps for the other drugs.
VIVITECH
DISPENS-IT
Page 22 of 32
When that has been done, click ‘Close’.
7.4
Print Orders
To print the new orders, click ‘Stock-IT’ > tick the ‘Preview’ box > and then click ‘Print Orders’.
Then enter your initials and click ‘OK’.
Click ‘OK’ on the next confirmation dialog box.
VIVITECH
DISPENS-IT
Page 23 of 32
If the ‘Preview’ mode is ticked, a Print Preview will be displayed.
To zoom in, click on any part of the screen and it will zoom.
To switch between pages, click on the up and down arrow on the top right corner.
To print the report, click on the printer icon on the top left corner > select the printer you want to print to
and click ‘Print’.
Once the order has been printed, it must be marked as SENT… click ‘Yes’ to confirm. Or click ‘No’ to
mark it SENT at a later date.
VIVITECH
DISPENS-IT
Page 24 of 32
7.5
Edit Manufacturers
7.5.1 Existing Manufacturers
From the DispensIT home screen, click on ‘Data Management’ > ‘Edit Manufacturers’
The following screen will appear, to scroll through the list, drag the scroll-bar down on the right hand side.
The buttons on the bottom enable you to move through the list quickly…
This button will take you to the first entry in the list
This button looks back at the previous entry
This button looks at the next entry
This button will take you to the last entry in the list
This button creates a new line to add another manufacturer.
Once you have found the Manufacturer name that needs to be edited, double click on the name until the
pointer begins flashing and then type in the new name and click ‘Save’.
VIVITECH
DISPENS-IT
Page 25 of 32
7.5.2 Add Manufacturer
If a new manufacturer needs to be entered it can be done by clicking on ‘Database Management’ > ‘Edit
Manufacturer’.
Then click on the following icon
This will create a new blank line at the bottom of the list.
Then double click on the 2nd column, and write down the name of the new manufacturer and click ‘Save’.
The new name will be added to the list and organised in alphabetical order.
If you click ‘Close’ before saving changes, you will be given a reminder that it hasn’t been saved yet.
7.5.3 Adding New Manufacturer from Product Edit
A new manufacturer can also be added whilst in the Product Edit mode.
Next to the Manufacturer field, click ‘Add Manuf’r’ > then type in the new name and click ‘OK’.
VIVITECH
DISPENS-IT
Page 26 of 32
7.6
Edit Suppliers
If a new Supplier needs to be entered it can be done by clicking on ‘Database Management’ > ‘Edit
Supplier’.
Then click on the following icon…
This will create a new row, then fill in the fields “Name, Address, Post Code, Phone, Fax” etc… to see the
rest of the fields that need to be entered, use the scroll bar at the bottom (this has been highlighted in
green).
Once the information has been entered in all the blank fields, click ‘Save’.
To Edit any existing supplier details, double click on the field that needs to be changed (until the icon starts
flashing) and then make the changes that need to be made and click ‘Save’.
VIVITECH
DISPENS-IT
Page 27 of 32
8. Backup
It is highly recommended that backups be made at the end of every day on any DispensIT machine. To
make a backup, click on ‘Backup Databases’ from the DispensIT menu.
Now to make a backup of all the files, click ‘Backup All’.
It will ask to confirm the file replace of older backup files; click ‘Yes’ on all prompts.
Once the backup is successful, click ‘OK’ on the confirmation dialog box.
VIVITECH
DISPENS-IT
Page 28 of 32
8.1
Change backup location
To change the backup location click on ‘ … ‘
Then select a new location and click ‘OK’.
Now to test the backup of an individual file, click ‘Backup’ and click ‘Yes’ to confirm.
VIVITECH
DISPENS-IT
Page 29 of 32
9. FAQ’s & Tips
Most of the time, issues can be resolved without having to contact the helpdesk. If problems are
encountered whilst using DispensIT, below are some suggestions on how to deal with them…
1. No Labels are being captured within the DispensIT Queue
Check if LabelCap is running (on the bottom right corner, near the time).
or
Yellow LabelCap instructions:
If LabelCap is already running, right click on the LabelCap icon and click ‘Quit’ and then ‘Yes’
when it asks to confirm.
Green LabelCap Instructions:
Double click on the green LabelCap icon to open LabelCap in the middle of your screen. Double
Click on any area within the LabelCap box then Click on ‘File’ then ‘Exit’
Now click on ‘Shutdown’ on the red caution promt.
VIVITECH
DISPENS-IT
Page 30 of 32
All LabelCap Users:
When the LabelCap icon disappears from your screen, click on Start > Programs > Startup >
‘LabelCap’ > then go back into your GP system, and print a label to DispensIT as normal. Ensure
that you click on ‘Refresh List’ in the DispensIT queue to check if labels are there.
If the labels still don’t appear in the ‘Item Queue’ or ‘Popup Mode’, contact the helpdesk.
2. Barcodes are not being scanned
Check if the Barcode reader is placed correctly in the cradle and the cradle is placed flat on the
desk it is resting on (there should be a green light when not in use) > Scan the barcode again.
Or
Follow the cable along from the barcode reader to the back of the machine to check whether the
cable has been disconnected. If it is unplugged, insert the cable into the USB port again. If it is
already plugged in, make sure it is firmly in place. Following this, exit DispensIT and reload it
again, then continue normal operation.
Then to test the barcode reader is working, click on ‘Data Management’ > ‘Edit Products’ >
‘Find’ > and Scan barcode. If it is connected properly, it will scan, otherwise it will display an
error.
3. Labels don’t print after being scanned out
•
•
•
•
•
Check if the Printer is switched on, it should have green light.
If the light appears Red, check there are enough labels, and the lid is closed properly (or check
if there is a label jam).
Sometimes switching off the printer and back on again, clears the error (the switch is on the
back, near the bottom.
Check the power lead is connected
Check if the USB/Parallel cable is connected to the Printer and the PC.
If problems continue to persist, contact the helpdesk.
VIVITECH
DISPENS-IT
Page 31 of 32
This manual has been presented to you in loose format so that future additions can be incorporated
easily.
If you would like more information about a specific feature of Dispens-IT please contact Vivitech
either by telephone 01427 881277, fax 01427 883018 or e-mail [email protected].
Each suggestion will be taken seriously and when covered will be despatched to all Dispens-IT
users.
Visit our website for latest developments: www.vivitech.co.uk
VIVITECH
DISPENS-IT
Page 32 of 32