1
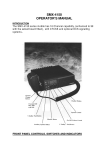
PM160 User Manual This product is marked with: ENGLISH PM160 0168 ! in accordance with the Class II product requirements specified in the R+TTE Directive, 1999/5/EC. "We hereby declare that the above named product is in conformity to all the essential requirements of Directive 1999/5/EC". French Translation Nous déclarons que le produit référencé ci-dessus satisfait aux exigences R&TTE 1999/5/EC qui lui sont applicables. Spanish Translation Certificamos que el aparato es conforme con lo establecido en las disposiciones de la Directiva 1999/5/CE. German Translation "Wir möchten hiermit bekanntgeben, daß das oben genannte Produkt in Übereinstimmung mit allen erforderlichen Bedürfnissen der 1999/5/EC Direktive seht" 1 ENGLISH 2 INDEX INTRODUCTION . . . . . . . . . . . . . . . . . . . . . . . . . . . . . .3 KEY FEATURES . . . . . . . . . . . . . . . . . . . . . . . . . . . . . .3 SIGNALLING OPTIONS . . . . . . . . . . . . . . . . . . . . . . . .3 DESCRIPTIONOF RADIO . . . . . . . . . . . . . . . . . . . . . . .4 NOTES TO THE USER . . . . . . . . . . . . . . . . . . . . . . . . .5 WARNINGS . . . . . . . . . . . . . . . . . . . . . . . . . . . . . . . . . .5 PREPARING FOR USE . . . . . . . . . . . . . . . . . . . . . . . . .5 CONTROLS AND INDICATORS . . . . . . . . . . . . . . . . .6 FRONT PANEL . . . . . . REAR PANEL . . . . . . . STATUS LED . . . . . . . . AUDIBLE MESSAGES . . . . . . . . . . . . . . . . . . . . . . . . . . . . . . . . . . . . . . . . . . . . . . . . . . . . . . . . . . . . . . . . . . . . . . . . . . . . . . . . . . . . . . . . . . . . . . . . .6 .6 .7 .7 USING THE PM160 . . . . . . . . . . . . . . . . . . . . . . . . . . .7 RECEIVE ONLY ALERT . . . . . . . . . . . . . . . . . . . . . . .7 SWITCHING THE RADIO ON . . . . . . . . . . . . . . . . . . . .7 RECEIVING A CALL . . . . . . . . . . . . . . . . . . . . . . . . . . .8 MAKING A CALL . . . . . . . . . . . . . . . . . . . . . . . . . . . . . .8 BUSY . . . . . . . . . . . . . . . . . . . . . . . . . . . . . . . . . . . . . .8 TRANSMIT TIME OUT TIMER . . . . . . . . . . . . . . . . . . . .8 TRANSMIT LOCK-OUT . . . . . . . . . . . . . . . . . . . . . . . . .9 MONITOR/TONE DEFEAT . . . . . . . . . . . . . . . . . . . . . .9 CHANGE CHANNEL . . . . . . . . . . . . . . . . . . . . . . . . . . .9 SCANNING & PRIORITY LOOKBACK . . . . . . . . . . . . . .9 ADDITIONAL INFORMATION . . . . . . . . . . . . . . . . . .10 ACCESSORIES . . . . . . . . . . . . . . . . . . . . . . . . . . . . . .10 VOICE PRIVACY . . . . . . . . . . . . . . . . . . . . . . . . . . . . .10 ENGLISH INTRODUCTION KEY FEATURES State of the art microprocessor control 99 fully synthesised channels 3 LEDs instantly shows the status of a channel Full scanning features with priority scan Front panel speaker Standard vehicle DIN mounting size Encryption option Selective Calling Option SIGNALLING OPTIONS Continuous Tone Coded Squelch Signalling (CTCSS) and Digitally Coded Squelch (DCS) CTCSS/DCS helps to screen you from calls intended for other users or user groups. It is also used in some systems to access wide-area repeaters. 3 ENGLISH DESCRIPTION OF RADIO 4 1 2 3 4 5 6 7 8 9 10 11 12 13 14 15 16 On/Off Volume Switch Channel Up/Down TX LED Busy LED Call LED 2 Digit LED Channel Display Scan Button Scan Indicator LED Monitor Button Option Button Priority Button Priority Indicator LED Microphone Socket Antenna Socket DC Supply External Speaker Socket Keep the exterior of the radio clean using a soft damp cloth. Do not use chemical cleaners, aerosol sprays or petroleum based products as they may damage the radio housing. ENGLISH NOTES TO THE USER WARNINGS The use of an attachment not recommended or supplied by Maxon may cause damage to equipment or injury to personnel. Never attempt to disassemble, modify or repair the unit unless the work is carried out by a qualified technician. Incorrect assembly, modification or repair may cause irreparable damage to your unit. For service or repair always return your radio to an authorised Maxon dealer. Maxon Sewon Europe Ltd. draw your attention to the provisions within the UK Highway Code, Section 43: `You MUST exercise proper control of your vehicle at all times. Do not use a hand-held telephone or microphone while you are driving. Find a safe place to stop first. Do not speak into a hands-free microphone if it will take your mind off the road. You MUST NOT stop on the hard shoulder of a motorway to answer or make a call, except in an emergency. Never transmit when people are near the antenna: holding or being close to the antenna may cause injury. Never use the radio transmitter without the correct antenna securely connected or a suitable load attached. Never use the radio in close proximity to sensitive medical equipment. Always switch off the radio if you are near to an explosive atmosphere or where electrical detonation may occur. Always install all equipment in accordance with MAXON SEWON Europes installation instructions. PREPARING FOR USE Unpack the radio and check that you have received the following items: PM160 mobile radio Microphone Power lead Mounting kit Microphone clip 5 ENGLISH 6 CONTROLS AND INDICATORS FRONT PANEL (1) On/Off switch: with volume control (2) Channel up/down: press Up or Down keys to select . (3) TX LED: illuminates red when transmitting (4) Busy LED: illuminates amber when channel is in use (5) Call LED: illuminates green when receiving (6) 2 digit LED channel display: indicates current channel Number (7) Scan button: press this to start/stop scanning (8) Scan indicator LED: illuminates when scanning (9) Monitor button: The monitor button allows a channel to be monitored. This button if enabled, may be used to assist clarity if the audio chops on and off whilst receiving. (10) Option button: switches in the scrambling option if fitted. If your radio has been upgraded with an encryption module, further functions become available. Pressing the Option button makes the radio transmit and receive in scrambled mode. Releasing the button switches the radio back to normal, clear, mode (see VOICE PRIVACY). (11) Priority button: activates/deactivates priority scanning (12) Priority indicator LED: illuminates when PM160 is in Priority Scan mode (13) Microphone socket: plug the fist microphone in here. REAR PANEL (14) Antenna socket: This is the connection point for a 50 ohm antenna. (15) DC Supply (16) External speaker socket: This is the connection point for an external loudspeaker for the radio. The front panel speaker is muted when the external speaker is connected. Status Desc. Tx Busy Call Normal Power on ready Scan Pri Channel Busy On ENGLISH STATUS LED Receiving Correct Error CTCSS/DCS On On Transmit On Tx-lock out Flash On Poss Scanning On General error Flash AUDIBLE MESSAGES Audible alerts, such as high and low tones, of long and short duration, may be used. Your radio controller will be able to give you details of the alerts used in your system. USING THE PM160 Note: The availability of the functions described in this section is dependent on the set-up of your radio. Please consult your Dealer or Supervisor for further information. RECEIVE ONLY ALERT Your radio may be set-up to receive on a channel but not to transmit. If the PTT is pressed on such a channel, the radio will beep and the TX LED (3) will flash red. SWITCHING THE RADIO ON Switch the radio on by turning the volume control clockwise until its clicks. An audible alert sounds on completion of the automatic self-test. 7 ENGLISH 8 RECEIVING A CALL On receipt of a call, the Busy LED (4) will illuminate yellow. Wait until the incoming message has finished before starting your own transmission. Press and hold the fist microphone PTT button (located on the side of the microphone) while making a transmission speak clearly with the microphone approximately 5 to 8 cms away release the PTT button to listen. The TX LED (3) illuminates red whenever your radio is transmitting. If your radio has been set-up for Transmit Time Limiting, your radio will return to the Receive state after this transmit period. If your radio has been set-up for Transmit Lockout, you will not be able to transmit if the channel is busy (Busy LED (4) on) MAKING A CALL Before transmitting, it is recommended that you monitor the channel to ensure that it is not in use. Select the channel using or and press the Monitor button. If the channel is clear, press the microphone PTT button. The TX LED will turn red. Speak to the party you are trying to call. Listen to the acknowledgement from the called party and then speak into the microphone in a normal manner. Release the PTT button to listen. BUSY When your radio receives a signal above a preset minimum level, the Busy LED will illuminate yellow to tell you that there is activity on the channel you are switched to. Your radio may be set up so that you hear who is talking straight away or it may be set up to prevent this until the correct CTCSS/DCS code is received. Receiving CTCSS/DCS Your radio may be set-up so that only calls with the radios specified code will be heard. In normal operation, the radio will remain quiet until the correct CTCSS/DCS code is received. The status LED will glow green, the loudspeaker will open and the message will be heard. TRANSMIT TIME OUT TIMER If set-up, your radio will stop transmitting after a preset period of time. An audible alert is heard at the end of the period. Your radio may be set-up to disable the transmitter when the channel is busy. If the PTT button is pressed, an audible alert will sound and the status LED will flash yellow. ENGLISH TRANSMIT LOCK-OUT MONITOR/TONE DEFEAT Your radio may be set-up to either allow or dis-allow monitoring of a channel. Short presses of the Monitor button will toggle the monitor mode on and off. When on, the radio will continue to receive even if the signal is very low. This may assist clarity if the radio is operating at the limit of its range. CHANGE CHANNEL The PM160 can access a maximum of 99 channels. Select the channel using or . SCANNING & PRIORITY LOOKBACK Note: Your radio may or may not be configured for scanning. Please ask your Dealer or System Supervisor for specific details. What is scanning? Your radio is switched into Scan mode by selecting the scan channel (see Dealer/System Supervisor for details). When scan commences, it cycles through a set of channels. It is pre-programmed to stop at any busy channel. When activity stops on this channel, the radio waits a pre-determined time to allow you to respond. If you dont transmit, the radio will then continue with the scan. Removing a channel from the scan list If your radio is always stopping on an unwanted channel, press the Monitor button while the scan has stopped on the channel to remove it from the scan list. Note: Scan list is reset when the radio is turned off then on, or when the scanning is re-selected. What is priority lookback? If your radio is programmed for priority lookback, your Dealer/System Supervisor will have assigned a priority channel, and one or more lookback channels, press the PRI Key (11) to enter priority lookback mode. The radio will periodically check the priority channel for activity. If the priority channel becomes busy, the radio will monitor this channel in preference to the current channel. 9 ENGLISH 10 ADDITIONAL INFORMATION ACCESSORIES A full range of Maxon accessories are available to use with this product. Please contact your Maxon Reseller for more information or visit www.maxon.co.uk VOICE PRIVACY Your radio may be upgraded with one of two voice privacy options which provide protection against unauthorised eavesdroppers. The Single Frequency Inversion Scrambler provides medium level speech security, and the Rolling Code Scrambler provides high level speech protection against the most determined opponents. Clear/Secure mode Once upgraded, the Option button (10) is used to toggle the radio between clear and secure modes. Press the Option button once to enter secure mode. Press it a second time to enter clear mode. Secure Mode When the Option button is In, your radio will be switched to the secure mode. All transmissions will now be scrambled. Receive Mode If your radio has inversion scrambling fitted, to listen to scrambled messages, the Option button must be In. Radios with rolling code scrambling will switch into the correct receive mode automatically. NOTES: When using inversion scrambling, all radios in a system must have the Option button switched to the same state to allow correct operation. When using the the rolling code scrambler, your radio will automatically switch between clear and secure modes when receiving a transmission. This transmits data at the start of every transmission and you should pause for about half-asecond after depressing the PTT button before speaking into the microphone. If your radio has been upgraded with the SOP55-01 Selcall Module, a range of additional signalling options is available. These features can reduce the time spent receiving messages meant for other radios and makes better use of the radio channel. With the Selcall option fitted, the operation of the radio will change. An instruction sheet with further details on the operation of the radio with Selcall is included with the module. ENGLISH SOP55-01 FIXED SELCALL MODULE 11 ©2002 By Maxon Europe Ltd. All Rights Reserved UM-PM160-44