1
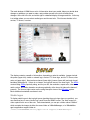
Vidal van Bergen User Manual Jim Worrall and Vidal van Bergen 2013 July 31 Version 0.7α11 Introduction ViMediaManager is a media manager for Mac OS X, allowing you to gather, store, and manage information, extra art, trailers and television tunes for your movie, television & anime collections, and can be used on it’s own, or in combination with XBMC, YAMJ, and Boxee. System requirements o An Apple Macintosh Intel computer o Mac OS X 10.5 or greater o An active internet connection Features: o Manage your movie, television and anime collections. o Download media metadata from TheMovieDB.org, IMDb.com, TheTVDB.com, RottenTomatoes.com and AniDB.net in your language (local language only available on items for which the respective database provides localised information). o Create, update, and edit NFO metadata; scans media for file info (codecs, resolution, etc) and is saved with the media. o Get trailers, posters, fanart, banners, clearart, character art, disc art, logo’s, thumbnails, extra thumbs, extra fanart, trailers and theme songs for your movies and series from the aforementioned sources, Youtube.com, HD-Trailers.net, televisiontunes.com, and Fanart.tv. o Extra art chooser for downloading and choosing images to use for posters, backdrops, etc. o o Extra media chooser for downloading trailers and television tunes. o Shows television and anime airing status, and next episode air date information thanks to TVRage.com. A feature-rich episodes manager that displays all known television and anime episodes, allowing you to keep track of which episodes you've already watched, and to edit and save NFO metadata with the episode files. o o o o Set manager for creating and editing movie sets/collections. o …and more! Automatically rename files and folders according to highly customisable preferences. Keep your collections clean and organised. Find more to watch with recommendations from RottenTomatoes, TheMovieDB and IMDb. Experimental software ViMediaManager is still a work in progress. The developer cannot be held responsible for loss of data, system crashes, or a zombie apocalypse outbreak during the use of this experimental software J 2 Table of Contents Quick Start!...........................................4 Main Display !........................................6 Display!.............................................................7 Studio logos!................................................7 List !...................................................................8 TV shows in the list!.....................................9 Contextual menu in list items!....................11 Toolbar!...........................................................12 Edit Metadata!.....................................18 Edit Movie Metadata!.....................................19 Summary !..................................................20 Information!................................................21 People!.......................................................22 Images!......................................................22 Trailer!........................................................23 Recommendations!....................................23 Edit TV Metadata!...........................................24 Series Metadata Editor!..............................24 Episode Metadata Editor!...........................25 Preferences!........................................26 General!.....................................................27 Extras!........................................................29 Movies!.......................................................31 TV Shows/Anime!.......................................32 Services!....................................................33 Troubleshooting & Tips!....................34 Troubleshooting!............................................35 Support!..........................................................35 Development!.............................................35 Tips 'n Tricks!.................................................36 Quick tips!..................................................36 Quick tricks!................................................37 3 Chapter 1 Quick Start Most people make the mistake of thinking design is what it looks like. People think it’s this veneer — that the designers are handed this box and told, ‘Make it look good!’ That’s not what we think design is. It’s not just what it looks like and feels like. Design is how it works. Steven Paul Jobs Quick Start First start At first start, a splash screen allows you to tell ViMM what media to work with. Just follow the onscreen instructions to begin! You may specify a media player (XBMC, YAMJ, or Boxee). This adjusts NFO file rules and default file naming preferences accordingly. Add media If you later want to add or remove media, choose ‘ViMediaManager ➢ Preferences’ from the menu bar, or use the shortcut (⌘-,). Choose the type of media from the toolbar. Click the ‘+’ button, browse to your media folder, and click OK. To remove media from ViMM’s control, select the path and click the ‘–‘ button (this does not delete any files). Close the Preferences window. Update the list After adding or removing media, you may need to update the list (add new items and remove items ViMM can no longer find (see also Updating vs. Refreshing the List). To update, o click ‘Update List’ in the toolbar at the top of the window, o choose ‘Update List’ from the ‘File’ menu or the ‘Action’ menu (gear icon below the list), o or use the keyboard shortcut, ⌘-R. Put movies in folders ViMM will list items that are in separate folders (see Finder view at right). Because of all the files and naming conventions, media must be in their own folder, not “flat” or loose in the added folder. If movies need to be “folderized”, use ‘Tools ➢ Put Movies in Folders’. This creates folders and moves appropriate files into them. Then update or refresh the list to see the new additions. Check your preferences Once you’re ready, read the Preferences chapter and set your preferences the way you want them. Preferences affect how and what ViMM manages, renames, downloads, deletes, and displays. There are a lot of cool settings there that allow you to fine-tune the power of ViMM! Fetch metadata and images In ViMM, fetching (often called scraping) first identifies your items with matching items in the online databases. Next, data and images about the items are downloaded. The information is saved to an NFO file in the item’s folder along with the images (organized appropriately). First choose the type of media from the left side of the toolbar: ‘Movies’, ‘TV Shows’ or ‘Anime’. To download metadata and images, click ‘Fetch Metadata’. Then, in the popup menu, choose to fetch for only the selected item or for all items missing an NFO file. 5 Chapter 2 Main Display We are drowning in information, while starving for wisdom. The world henceforth will be run by synthesizers, people able to put together the right information at the right time, think critically about it, and make important choices wisely. E. O. Wilson The main window of ViMM shows a lot of information about your media, helps you decide what changes or additions you want to make, and provides access to the tools to make those changes. At the left is the list, and at the right is a detailed display of images and info. At the top is a toolbar where you can select media types and choose tools. First choose whether to list movies, TV shows, or anime. Display The display contains a wealth of information, depending on what is available. Images include the poster (upper left), studio or network logo, movie or TV show logo, and for TV shows, character art (upper right). Next we have clearart (lower right), banner (lower left) and main fanart/ backdrop (background). If there is no clearart, the logo will move to the lower right. The MPAA content rating, IMDb popularity rating, and for your file, the resolution, aspect ratio, video and audio codecs, and audio channels are shown graphically at the lower left (above the banner if present). The icons at right center are the rating descriptor icons of the Kijkwijzer system. Much additional metadata are shown in text. Studio logos To display studio logos in the top right corner (pushing the movie logo down one position), you can download one or more “studio logo” packs from the XBMC forums. The ‘Help’ menu provides a quick link to one of the sets. Once downloaded, you can put a folder named “Studios” which contains the images in either the same folder as ViMediaManager, or in ViMediaManager's application support folder at: /Users/YOURUSERNAME/Library/Application Support/ViMediaManager/ 7 List The list itself can be set to show 1, 2, or 3 lines per item, with additional lines displaying more information. The poster is optionally shown at the left after the item has been fetched (or at least an NFO created with a poster available). If not, a film icon is shown instead and is colorcoded: grey means no NFO file, otherwise it will be blue if unwatched and red if it has been watched. The upper line shows the item name. A list of all icons and their meaning can be seen in ‘Preferences ➢ Extras’. Movies At the right of the first line is the IMDb rating. Icons in the second line indicate, by dark vs. light grey, whether you have the poster image, fanart/backdrop, extra fanart, discart, logo, clearart, banner, thumb, trailer, and subtitles. Then follows the resolution and the lock icon if you have locked the movie. The third line shows the duration, file size, and codecs. TV shows At the right of the first line is again the IMDb rating, except when the list is sorted by ‘Next Aired’. Then it shows how many days left until the next episode inside a red ribbon, or “Tomorrow”, or time left in hours or minutes in plain text. Instead of icons for discart, trailer, subtitle, extra thumbs and resolution, there are icons for character art, theme song, and season art. If you locked the show, that will be the final icon The third line shows the next/last aired episode information. Updating vs. refreshing the list Updating the list means adding new items if ViMM finds them and removing items it can no longer find. Refreshing nukes the list and recreates it from scratch. This will take longer with a large media library, but will give you a clean start. To Update, click ‘Update List’ in the toolbar at top, choose ‘Update List’ from the ‘File’ menu or the ‘Action’ menu (gear icon below the list), or use the keyboard shortcut ⌘-R. To Refresh, click ‘Update List’ in the toolbar while pressing the alt/option key, choose ‘File ➢ Refresh List’, or use the keyboard shortcut ⇧-⌘-R. Searching/finding in the list At the top of the list is a search bar. Typing anything here will limit the list to items with titles containing that text. In the movies list, global actions such as ‘Fetch Missing Metadata’, ‘Clean’, and ‘Download All Missing Images’ will act only on the subset of items determined by the search term. 8 TV shows in the list When sorted by ‘Next Aired’, TV shows are arranged in sections with headings as shown below. ViMM will match If you sort by ‘Show Status’, Finder label colours to the 'Next Aired' colours if you check shows are in sections based on ‘Preferences ➢ TV Shows/Anime ➢ Finder Labels’. TVRage using the icons below: TODAY Currently airing Pilot Ordered THIS WEEK Within 7 days In Development THIS MONTH Within 30 days New Series UPCOMING A set air date, but beyond 30 days Returning Series TO BE ANNOUNCED Without a set air date On Hiatus FUTURE Premiere in the future (grouped in list under ‘To Be Announced’) TBD/On The Bubble ENDED No new episodes will be aired Final Season UNKNOWN No informaEon available, or not yet scraped Canceled/Ended Pilot Rejected At right you can see the TV show sections in action when the list is sorted by ‘Next Aired’ and ‘Show Status’. 9 There are many other sorting options (see right). Among them is sorting by ‘Episode Files’. This sorts the list by the number of episode files you have locally, and adds the number of such files on the right side of each entry. In the TV list, you can update episodes a variety of ways. In the ‘File > Update Metadata menu, or from the ‘Update Metadata’ toolbar button, you can potentially update all the shows in the List. Choose ‘All Episodes’ to update the episode guide and all episode files of all shows, or ‘New Episodes’ to only update shows with any local episodes that don’t have a matching NFO file, or a matching thumbnail image yet. To update the episode guide and associated files for an individual show, select that show in the List, then right/control-click on it and choose ‘Update > Episodes’ from the contextual menu (see below right). 10 Contextual menu in list items When you right- or control-click on a list item, a contextual menu appears with some powerful options. Many are also available from the main menu and the toolbar. Except for ‘Update List’, ‘Sort By’, and ‘Extras ➢ Download All Missing Images’, all work only on the currently selected (highlighted) item in the list. Update List See UpdaEng vs. Refreshing the List above. Sort By u Check it out – many useful opEons here! Fetch Metadata Gets metadata/art for the selected item (see Toolbar below). Manual Search . . . See ‘Manual Search’ under Toolbar below. Edit Metadata . . . Yet another way to open the Edit Metadata window! Update u Updates various kinds of metadata for the selected item (see Toolbar be-‐ low). Lock When you 'lock' a show or movie, either here or from the 'Tools' menu, ViMM will not update it. This is especially useful when you’ve made some special changes to a movie or ended show that you want to protect from ‘Update All’ or ‘Update All Episodes’ acEons. You can sEll edit locked items manually in the Metadata Editor, and you can sEll update show status and update raEngs. A locked item will display a mini-‐lock icon in the list. Mark as Watched/ Toggles the watched status of an item (keyboard shortcut ⌘-‐T; for details Unwatched see TroubleshooEng & Tips). This will show only in movie and episode lists. Rename SelecOon Renames an item based on your renaming preferences. If an item hasn’t been fetched, ViMM won't have the informaEon needed to rename the se-‐ lected item, so this is greyed out. Based on ‘Preferences ➢ General ➢ Re-‐ name’, it will only rename folders, or both folders and files. Share u Share movie informaEon in your Facebook or Twi\er account! Search the Web u Offers opEons to search various database sites for parEcular or general in-‐ formaEon about the selected item. Extras u Shows the same menu as the ‘Extras’ toolbar bu\on (see Toolbar below). Reveal in Finder Opens the folder containing your item and selects it. Watch Movie Opens the movie file in your default player (Movies only). Watch Trailer Opens the trailer file in your default player (Movies only). Remove Movie/TV This will delete the selected item and associated files and folders from your Show/Anime . . . library, placing them in the trash. 11 Toolbar The left side of the toolbar is used to choose which type of media to list and work with. The rest provides access to a number of common actions. Fetch Metadata Click to get the popup menu at right. If you choose ‘Selection’, ViMM will search online for the currently selected item and get information and art (as selected in ‘Preferences ➢ Extras’). If the search matches multiple items online, the manual search window will appear, allowing you to choose before proceeding. Depending on your settings in ‘Preferences ➢ Extras ➢ Replace existing images’, you have the option to replace or retain images or be asked first. If an NFO file exists, it will be replaced with the new information. If you choose ‘All Items Without Metadata’, ViMM will get information and art for all items in the current list without NFO files (generally items that have not yet been fetched). Items that have NFO files will be untouched. In this mode ViMM chooses the first search result found, which is generally correct if the files/folders have reasonable names. If an item is misidentified, select it and do a ‘Manual Search’. Update Metadata Unlike the list contextual menu, this button provides options to update all items in the list. Updating applies only if the selected item was previously fetched. ViMM uses the database ID in the NFO file instead of searching on the item's name. The options in this popup menu depend on whether you are viewing movies or TV shows/anime. If movies (right), you can choose to update the selection or all items in the list, or just the ratings for either. Updating ratings specifically updates the TMDb/IMDb User Ratings, TMDb/IMDb User Votes, IMDb Top250 Status, IMDb MPAA Rating, and RottenTomatoes Critics & User Ratings. For TV shows and anime, you have more options (right). Selection: Like 'Fetch Metadata'. Rather than replacing existing images, it will only fetch missing ones. It preserves several metadata elements, such as titles, genres, tagline, and set/set order. Rating: This updates TVDB/IMDb User Rating, TVDB/IMDb User Votes, and TVDB/IMDb MPAA Rating 12 Show Status: Updates the next/previous episode air date and next/previous episode title, labels the finder item per preferences, and updates the series status. Episodes: Updates the episode guide (see Episodes Manager), renames episode files, downloads thumbs, writes the NFO file and moves episodes into season folders per preferences. New Episodes: This will only update shows that have local episodes without a matching NFO file, or a matching thumbnail image. In other words, episodes you have added to your collection that need to be recognized by ViMM and fetched. Fetching vs. updating metadata When you ‘Fetch Metadata’, the NFO file, if present, will be completely overwritten, and any changes you made through the Edit Metadata window or other ways, such as plot description, title, actors, etc., will be lost. When you ‘Update Metadata’, certain elements are preserved: 1. Title 2. Sort Title 3. Original Title 4. Genres 5. Tagline 6. Set & Set Order 7. Watched Status Manual Search Manual search allows you to identify and select an item from all the options found before fetching metadata. This is useful when an item is challenging to identify. Enter the title (and year if known) and hit the Enter key. Review the plots and posters of potentially correct items, search various websites for the selected item if you wish (using the drop-down “Search the Web” menu), and when you’ve found what you want, click on ‘OK’ to fetch it. The same window also appears automatically when you ‘Fetch Metadata’ for a selected item and ViMM doesn't find anything or has more than one result. In this case the search may already show a list of possible matches. If the correct item is not shown, you can modify the search. You can also put an IMDb ID in the search field. TVDB ID's also work while in the TV list since they're generally at least 5 numbers in length, and titles generally aren't. TMDb is unfortunately a little more variable with their ID lengths, however you can always insert an ID by starting a search with “id:” (without the quotes) and directly follow it with the ID numbers from TVDB or TMDB. 13 Extras ‘Extras’ opens a drop-down menu that allows you to download missing or any specific artwork (below left). Media must be fetched/scraped (i.e., have a NFO file) before using these commands. A setting in ‘Preferences ➢ Extras’ determines whether these options replace existing images and whether ViMM asks first. All options act only on the selected item except ‘Download All Missing Images’. Download Missing Images for Selection – This will check local images for the currently selected item, then look for and download any types that are not found. Download Missing Images for All – This does the same for all items in the current list section. Download individual images – Following is a series of commands to download specific art types. When multiple choices are available online or when only one is available and you already have a local image, thumbnails will be downloaded and presented along with resolution information in an image picker (above right) for you to examine and choose the one you want. If it finds a pre-existing image of the selected type, ViMM will ask whether you want to replace it or cancel. Download Extra Thumbs and Backdrops – Downloads all available thumbs or backdrops/ fanart (subject to maximum set in ‘Preferences ➢ Extras ➢ Download Max’) and places them in extrathumbs or extrafanart folders. Download Trailer – Allows you to preview and pick among available trailers based on information from TMDb and HD-Trailers.net. Also see ‘Edit Metadata ➢ Trailer’. Download Theme Song – For TV/Anime, this appears in place of ‘Download Trailer’. ViMM will find theme songs from televisiontunes.com, allowing you to preview and download a ‘theme.mp3’ file that can be used in conjunction with XBMC’s ‘TvTunes’ add-on. Edit Metadata Opens a window to edit metadata and images for the currently selected item. See next chapter. Update List Adds new items to the list if ViMM finds them and removes items it can no longer find. ‘Refreshes’ the list if you hold alt/option while pressing the button See Updating vs. Refreshing the List above for details, and other ways to do it. 14 Clean Opens a dialog to move particular types of files to the trash for all items that are available in the current section (not limited to those you may have selected through the search bar). It is also available via the ‘Tools ➢ Clean All’ menu. Be careful with this one! There is no undo! Your choices are: All – Removes NFO files, images, trailers, theme.mp3 files, .txt, .crc, .md5, .url and other files. It leaves behind the movie and subtitle files. Metadata – Removes the NFO files, containing data about the media. Images – Removes images, including extrathumbs, extrafanart, and actor thumbs. Trailers/Theme Songs – Removes trailers and theme.mp3 files. When movies are listed, “Trailers” will be the option; when TV shows or anime are listed, “Theme Songs”. Other – Removes .txt, .crc, .md5, .url and a bunch of other miscellaneous files. Sets Manager You can open the Sets Manager (or the following Episodes Manager) by clicking on the Toolbar button, using the ⌘-E shortcut, or by selecting it from the ‘Window’ menu. The sets manager is actually pretty smart! When you have a set of movie items, like the “Back to the Future” trilogy, all you have to do is type “Back to the Future” in the text field on the bottom right, then press the ‘+’ button. The sets manager will then automagically find all the movie items with that name in their title, add them to the set, and order them based on their release date (experimental: you can override this and change the order by dragging movie items within a set). If it doesn't find items that you want in the set, you can drag 'n drop movie items from the left side onto the set name. 15 Episodes Manager ‘Episodes’ opens the Episodes Manager, with a wealth of information and tools for your TV and anime episodes in a sleek design. (Quick Tip: Holding 'alt/option' while pressing the 'Episodes' button will instead 'Update Episodes'.) Choose the season, specials, or all episodes. The corresponding artwork will be shown on the right, and can be changed with the small arrow on the lower right. Right- or control-click on a season to mark the whole season as (un)watched or to reveal it in the Finder (if a season folder is available). Tips & Tricks: 1. You can drag and drop im-‐ ages from the Finder into the selected season image, and ViMM will handle the rest. 2. ⌘-‐T will quickly toggle the watched status of a selected episode or even an enDre season. Click the ‘Show’ button to see a list of episodes and air dates in the chosen season. The film icon at the left will be grey if no local episode file is available, blue if unwatched, and red when it has been watched. Episode titles are shown in a font that depends on the genre (most noticeable with a ‘western‘ show). The episode thumb and related metadata appears on the right. 16 The first icon in the upper right shows the watched status (which can be toggled in the contextual menu or by clicking the icon). Watched status will be saved across episode information updates, and you don’t need a local file to mark an episode as watched, making it ideal for keeping track of what you’ve seen when catching up on a show, or watching an older series. Right- or control-clicking on an episode brings up a contextual menu that allows you to open the Episode Metadata Editor, change the watched status, reveal the episode in the Finder, and play or remove the episode. The latter gives you a further option of moving the episode files to the Trash. The Episode Metadata Editor (see next chapter) can be opened by doubleclicking or right/control-clicking on an episode or by clicking on the pencil icon. TV Guide ViMM comes equipped with it's own TV Guide that can show you not just the shows you currently have in you library, but also all the shows in your area. Just click on ‘TV Guide’ in the Toolbar. If necessary, choose your geographical area, and what subset of shows you want to see based on a variety of criteria. Choose a show to see information on the show and the particular episode. Just for fun, see what shows people in other countries are watching! Another handy use is discovering new shows by selecting the 'Pilots' option in the lower right. Some pilots even have trailers you can view right in the TV Guide window. You can add a new show to your library: select a show in the TV Guide, choose the source folder you want to add the show to on the lower left, then click “Add Folder”. When you go back to the main display, update the list to see the new show, then fetch metadata for the show. Search bar and sortable fields Add show to your library Pick a country and filter shows 17 Chapter 3 Edit Metadata If you don't like something, change it. If you can't change it, change your attitude. Maya Angelou Edit Movie Metadata Here you can view and edit the data and text that appear in the NFO file and display, as well as download art, trailers, and explore recommendations based on the selected item. To open the window: ▷ double-click a fetched item in the list (if there is no NFO file, double-clicking will ‘Fetch Metadata’ instead), ▷ click ‘Edit Metadata’ in the toolbar at the top of the window, ▽ choose ‘Edit Metadata’ from o the ‘View’ menu o the ‘Action’ menu (gear icon below the list), o or the contextual menu (right- or control-click on a list item); ▷ or use the keyboard shortcut ⌘-I. At the bottom left of the window, you can press the ‘Previous” or ‘Next’ buttons to browse through your collection. Any changes you made will be saved to the NFO before moving to the next item. To switch panes, you can click on the toolbar icons or use ⌘-1 through ⌘-6 to select a pane. Be aware that if you later fetch or update metadata, edits that you make here may be lost. For details see ‘Fetching vs. updating metadata’ under ‘Main Display ➢ Toolbar’. 19 Summary In this pane, you can review some basic information about your media item. The upper section shows the poster image, title, outline, the Rotten Tomatoes critics’ score (the percentage of approved Tomatometer critics who gave it a positive score and the corresponding fresh/rotten icon), and audience score (percentage of Rotten Tomato users who rated it 3.5 or better out of 5 stars and corresponding upright/spilled popcorn icon). This section also shows the ranking if a movie is in IMDb’s Top 250 list. The middle section shows file details and linked ID numbers from all databases with entries for the selected movie. The movie can be opened in a database by clicking on the respective ID. The lower section shows the file path. 20 Information Here you can edit much of the information that appears in the NFO file and in many displays in ViMM and your media player. The “Rating” is that of IMDb. Enter Premiered dates as yyyy-mm-dd. For taglines, you will see a clickable triangle that offers choices if more than one tagline is available, courtesy of IMDb. For genres, you can enter your own or click the triangle, which drops down a list of commonly used genres (localised by your system's settings). The menu also has options to transform all genres to lowercase, uppercase, or titlecase. A ‘Tag(s)’ field is available for a new XBMC feature that allows use of Tags as another flexible option for organizing movies and TV shows. 21 People Here you can view, add and edit the actors and URLs or paths to their photos, as well as names of other important creators of the media. URLs are gotten automatically, but you can add missing ones or change existing ones if you find a better image. Images Here you can view most types of art that you have (not extra fanart or extra thumbs) and download more. Choose the type of art in the drop-down menu. If you don’t have that type, or want to see what is available, you can use the ‘Download’ button. As with the ‘Extras’ dialog, you will get an image picker when multiple options are available. Choose the one you want. Files will be placed in the folder and renamed according to your preferences. Pretty awesome, huh? Add your artwork You can add your own artwork for your own videos or when the artwork found automatically seems inadequate. You can do this in the Finder just by naming it appropriately and placing it in the corresponding folder. But another way is through ViMM. When you are in the ‘Edit Metadata ➢ Images’ pane, select the type of artwork. You can browse to and choose a local file with the ‘Open’ button. Or just drag and drop your image on the image area. Again, files will be copied, placed, and renamed appropriately. Voilà! 22 Trailer The Trailer pane provides a movie viewer that will automatically display your local trailer if: (a) you have one; (b) you are using the Cocoa version of ViMM, and; (c) the trailer file is Quicktimecompatible. The ‘Download’ button opens the same trailer downloading window that you get from the toolbar by clicking ‘Extras > Download Trailer’. If you already have a trailer, it will be the first item, simply named “Trailer”. To delete it, select it and click the ‘Delete’ button in the lower left. Otherwise, choose the trailer and resolution that you want. Preview it online or download it directly. It will be placed in the movie folder and named according to your preferences, replacing the existing trailer if present. Recommendations ViMM gets movie recommendations from several databases for each media item. Here you can explore them and look for them online. In the list at the left, review the recommendations, organized by database. Click on one, and ViMM will show a poster and other information about it. To learn more or to purchase it, click on the triangle at the lower right and choose a web site to open in your browser with a URL directly to the recommendation! 23 Edit TV Metadata Two metadata viewers/editors are available for TV Shows and Anime. First is the Series Metadata Editor, accessed the same ways as the Movie Metadata Editor when a TV show is selected in the list. Second is the Episode Metadata Editor, accessed through the Episode Manager. Series Metadata Editor The Series Metadata Editor is similar to the one for movies, with the same number and type of panes. Above are shown the Summary pane and the Theme Songs pane. The summary pane shows previous/next episode and air date information, network, duration, and database IDs. The show can be opened in a database by clicking on the respective ID. The Theme Songs pane replaces the Trailers pane used for movies. Click the triangle to see options for theme songs for the selected show. Click on ‘Preview’/‘Stop’ to control playing of the chosen song, and ‘Download’ to place it in the show folder. 24 Episode Metadata Editor The Episode Metadata Editor is accessed through the Episodes Manager. It contains information specific to each episode and allows editing of most information. 25 Chapter 4 Preferences Actions have their preference, not according to the transient pleasure or pain that accompanies or follows them here, but as they serve to secure that perfect durable happiness hereafter. John Locke 26 Preferences Window Access preferences via the ‘ViMediaManager ➢ Preferences’ menu item, or by the keyboard shortcut ⌘-, (Command+comma). Preferences are important for adding media and controlling and understanding how ViMM affects organization and supporting files. There are six preference panes, chosen by the icons at the top. General Database Language ViMM will automagically prefer metadata in your chosen language, when available, over IMDb information, which is primarily in English. However, if you choose English, ViMM will generally prefer IMDb or AniDB data over TMDb/TVDB data. Media Player Customizes the NFO file for XBMC, YAMJ, or Boxee. If you change this after selecting a media player in the splash screen, you may want to also set file/folder naming preferences appropriate for your player as well. Rename and Move When renaming single items or the whole list, rename folders only, or also the contained files. If you choose ‘Folders” only’, when fetching or updating, ViMM will download metadata and images, but will not rename files and will not move episode files from their original location into season folders. Windows compatible file naming When renaming, avoid characters that are illegal in file/directory names under Windows. 27 Keep media folders organized This will automagically rename files and/or folders (depending on your choice in the ‘Rename & Move’ option above) while fetching or editing name-relevant metadata. Names are based on the renaming patterns in other preferences panes, as well as the metadata. For TV shows it will also move episodes into “Season ##” folders. This will only apply to new items that are added; it won't change any existing items unless you fetch/update information for them or edit metadata used for the name. It basically does the same as ‘Tools ➢ Batch Rename’, but does it during fetching information, or while editing metadata, so you don't have to run ‘Batch Rename’ every time you make a change and want to keep your folder and/or file names pretty. Dark UI This provides an alternative look for displaying your movie and show information and graphics in the main display. Some transparent art is designed to appear on a dark background, and this may highlight some of the art better than the default UI. Automatically Check for Updates You want the latest version, don’t you? J 28 Extras Options table Here you can set options for each kind of artwork, trailers, theme songs, internal subtitles and resolution. ‘Auto Download’ sets whether to download each extra automatically while fetching or updating. Auto-downloading trailers for many movies may take a long time. You can always manually download art and trailers through the Extras menus, even if you don’t have that type checked here. ‘Display in media list’ sets whether to display the presence of the item in the main list, using the icons at the left. ‘Size’ allows you to choose the size of certain kinds of art (see details below) or trailer resolution to download. ‘Movie File Names’ lets you choose how to name images and trailers. By default, actor images are stored as web links in the NFO file and cached locally in the Application Support folder. Choosing to auto-download them will instead download and store the image in an “actors” folder in each item folder. It will also write the path to the NFO file so media players will use the local file instead of connecting to the internet. If the movie folder is moved, the paths will be invalid, but you can ‘Update’ your item's information to correct this. 29 Size Choose whether to store art at small, medium, large, or original size. The sizes are selected from standard sizes used by TMDb. For TV images, TVDB doesn’t use the same sizes , but ViMM will try to adjust pictures to the sizes listed below. For movies, ViMM can select these sizes (width in pixels): ▽ Posters o Small! o Medium! o Large! o Original! 154 342 500 original width ▽ Backdrop/Fanart o Small! 300 o Medium! 780 o Large! 1280 o Original! original width Download Max Specify a maximum number of extra thumbs, extra backdrops, and actor thumbs to download per movie or show, if you wish. Show poster images in the media list Show the poster image instead of the film icon at the left side of the list entry (movies only). This will be small, depending on whether you choose the list to display 1, 2, or 3 lines of information. This option may slow ViMM, depending on your system and the size of your library. Clear Cache ViMM “caches” smaller copies of images in its application support folder. This makes things much faster to open and appear in the user interface. If it seems ViMM is displaying old information, you may need to clear the cache. This immediately removes cached poster, backdrop/ fanart, and actor images. No images will be deleted from media folders. The metadata caches (MovieDB.xml, TVShowsDB.xml and the episode guides) are not cleared. Replace existing images When fetching, either using ‘Fetch Metadata’ or after a manual search, this option tells ViMM whether to delete existing art: ‘Ask first’, ‘Delete’, or ‘Never’. If you choose to delete art, it will be moved to the Trash before beginning to fetch. If you have a lot of artwork that is not readily replaced from online databases, you may want to set this to ‘Never’. Default Trailer Source Choose a default source for downloading trailers (handy for automatic downloading) from YouTube, Apple, AOL, or Yahoo. Download Recommendations Let ViMM know if you want it to download and show you movie and series recommendations based on each media item. 30 Movies Folder adding area See Quick Start ➢ Add Media if you need help with this. Folder/File Renaming Pattern Tell ViMM how to rename movie folders and files. Click for an explanation of the tags (see right). Renaming is only done if ‘Keep media folders organized’ is checked in the General preference pane and you fetch or update for new information, or if you choose to rename a selected file or all files from the contextual menu or the ‘Tools’ menu. NFO File Name A variety of self-explanatory options for renaming NFO files. Movie List Size Specify the height of each movie in the list as 1, 2, or 3 lines, each one adding additional information and allowing the poster image (if enabled in ‘Preferences ➢ Extras’) to be larger. Lookup Search online databases based on folder name instead of movie file name. TV shows and anime are always searched by folder name. 31 TV Shows/Anime These preference panes are similar to the Movies pane except there is no option for naming of trailers, posters, and backdrops, and no list size option. There are additional options for: Episode Rename Pattern If you don't want to rename your episode files, but still want to automagically rename movie files, you can leave the ‘Episode Rename Pattern’ option empty. That will still organize your episode files into season folders, but leave the file name alone. Default Thumb XBMC generally uses the file in the first <thumb> tag of the NFO file as a thumbnail/poster image. This setting will determine which image you want to put at the top of the <thumb> list. Copy to “folder.jpg” Whatever file is named “folder.jpg” is used by XBMC as a thumbnail image when browsing in file mode. When renaming, this will copy the chosen file type and name the copy “folder.jpg”. Finder Labels This option applies color labels in the Finder, outside of ViMM, to color-code the status of shows just as in ViMM’s list. Finder labels will be changed when fetching information, or by selecting ‘Update ➢ Show Status’ from other the contextual menu for a single item, or the ‘File’ menu for all items. The colors are the same as those used for the icons in the list of the main display window when sorted by ‘Next Aired’. Completed Downloads (TV Shows only) If you specify a folder here, ViMM will check it before updating your episode information. If TV show episodes are found, they will be moved to the appropriate TV show folder and incorporated into the update. Minimum Genre Weight (Anime only) AniDB has a weight rating added to genres, because users there have a habit of adding a lot of genres. “Heavy” genres (with a lot of weight) are those that have been chosen more often to match the anime item than “light” genres. The higher the number you use here, the fewer but more fitting genres will be added to your metadata and displayed. 32 Services The ‘Services’ pane allows you to customize ViMM’s interface with various online services. General Rating - Here you can choose a rating service to use when fetching information for ratings that appear in the list and the main display. The default is IMDb. If you change it, subsequent fetches will use the alternate rating source (TMDb/TVDb, Rotten Tomato Critics, or Rotten Tomato Audience). TMDb Recommendations - Choose how many recommendations to download from TMDb. See ‘Edit Metadata > Recommendations’. Rotten Tomatoes Enable Rotten Tomatoes and choose whether to download recommendations based on each media item (see Recommendations in the last pane of the Metadata Editor) and whether to get ratings that appear in the list, the main display, and the info pane of the Metadata Editor. IMDb Download Complete Cast - When disabled (unchecked), ViMM only downloads the cast that you see on the first page of a movie on IMDb, for example: http://www.imdb.com/title/tt0088763/. When enabled, ViMM downloads the complete cast from the fullcredits page, for example: http://www.imdb.com/title/tt0088763/fullcredits Trakt.tv Trakt.tv helps keep a record of what movies and TV shows you’ve watched. Provide a trakt.tv login, and ViMM will automagically start updating the site with items you mark as “watched”. Fanart.tv Enable/disable downloading images from fanart.tv. 33 Chapter 5 Troubleshooting & Tips If you could kick the person in the pants responsible for most of your trouble, you wouldn't sit for a month. Theodore Roosevelt Troubleshooting Reset preferences It may occasionally be necessary to reset your preferences to resolve an issue. To do this, close the program and delete the following file: /Users/YOURUSERNAME/Library/Preferences/com.vidalvanbergen.vimediamanager-alpha.plist The file will be recreated when ViMM is restarted. Reset application To completely reset the application to factory-fresh condition, in addition to discarding your preferences file as described above, also trash (but save your ‘Studios’ folder if you made one): /Users/YOURUSERNAME/Library/Application Support/ViMediaManager Uninstall Remove the two items above and the application itself. That’s it! Clear the cache ViMM “caches” or saves data and images in its application support folder. This makes things much faster to open and appear in the user interface. If it seems ViMM is displaying old information, you may need to clear the cache. To do so, go to ‘Preferences ➢ Extras’, and click the ‘Clear Cache’ button on the lower right. Support ViMediaManager is a work in progress and depends upon the support of its users to report bugs, suggest feature requests, language translations, and other contributions to the project. You can either send me an email at [email protected] or make a forum post in ViMediaManager XBMC User forums. You can also stay up to date by following ViMediaManager on Twitter @ViMediaManager and/or Facebook's ViMediaManager Page. Development Other ways to support development, besides donating money, are by donating your time to test developmental builds, filing bug reports, suggesting features or by translating ViMediaManager into your own language. You can find nightly notes, translation tools and files in my dropbox folder https://www.dropbox.com/sh/2s3f8uhh8jh1l0q/0seaBWnMqs and the latest nightly builds at http://www.mediafire.com/ViMediaManager. Stay up to date with the RSS feed. 35 Tips 'n Tricks Quick tips o In the thumbnail viewer that you get when choosing images, you may have noticed the slider for resizing the thumbnails. This slider “sticks” on certain sizes (64, 128, 256, 384). Holding the Command key (⌘) will temporarily “unstick” the slider. o In the ‘Edit Metadata ➢ People’ pane, the stars next to a few people in the list come from the ‘Stars’ list that IMDb provides. These names are also shown with stars on the main display. o If you have home movies or other media that can’t be found in the databases, no NFO will be created during fetching. But you can just open the Metadata Editor and start entering your own information, creating an NFO. When you edit metadata, ViMM will probe the file and add the file info (resolutions, codecs, etc). You can also add your own art as described under ‘Edit Metadata ➢ Images’. You can even enter URLs to actor thumbnails under ‘Edit Metadata ➢ People’. Local paths will work here also (e.g., “/Users/jim/ actors/jon_smith.jpg”), and will be recognized and used by XBMC. o When you toggle watched/unwatched status in the list’s contextual menu, ViMM changes two tags in the NFO file. When you choose ‘Mark as Watched’, <watched> is set as “true” and <playcount> as 1. ‘Mark as Unwatched’ removes the tags. Some media players, such as YAMJ, use the <watched> flag. XBMC uses <playcount> to determine watched status. However, to enable XBMC to import that tag, you must enable <importwatchedstate> (set as true) in XBMC’s advancedsettings.xml. o The Kijkwijzer content icons are part of a system from the Netherlands that provides advice to parents. Kijkwijzer shows by means of pictogrammes (see right) what the principal reasons are that a film or television programme may be harmful for children. DiscriminaEon Drug/alcohol abuse Fear Coarse language Sex Violence 36 About images Image terms and guidelines compiled from TMDb, Fanart.tv, and XBMC. Most image types can be smaller than specified and will be scaled up, but aspect ratio (W / H) is important. XBMC wiki suggests some types should have a tbn extension but jpg and png seem to work for almost all purposes. Art type Shape W / H Poster/Thumbnail Season Poster Actor Character art DiscArt Studio logo 0.67 1.00 Ext. Notes 1000×1500 jpg Size is original submission per TMDb guide-‐ lines; usually much smaller versions are used, W/H varies from 0.65 to 0.71 400×578 any 512×512 jpg jpg png Transparent background 1000×1000 png Transparent background 1.48 161×109 1.78 500×281 1000×562 500×281 1000×562 1920×1080 1280×720 Thumb/Landscape ClearArt Usual size W × H Fanart/Backdrop Logo itself should be up to 125×82, pasted png on transparent background 161×109. jpg Transparent background. HD ClearArt is the png 2x size Size is original per TMDb guidelines; any jpg size will be scaled up Logo/ClearLogo 2.58 400×155 800×310 png rename a jpg as png. HD Logo is the 2x size. Banner 5.41 1000×185 jpg May have a transparent background. Can Quick tricks o The contextual menu you get when right-clicking (or control-clicking) an item in the list can also be summoned by right-clicking on the “information” display area on the right side, so either right-click on a selected list item, or almost anywhere else within the window. o When an item doesn't have information fetched yet, double clicking it in the list fetches metadata for the selected item. If it does have metadata, double clicking it will open up the metadata editor. o In the ‘Edit Metadata ➢ Summary’ pane, clicking on the database index labels will open up the default browser with links to those items in their respective databases. o Right-clicking these labels opens up a short menu with the option to copy the link instead of opening it. o Just for a surprise, try alt/option-clicking on some of the contextual menus and little leftpointing triangles. 37