1
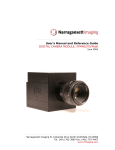
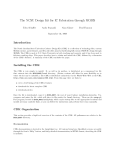
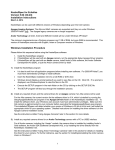
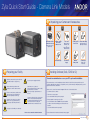
Zyla Quick Start Guide - Camera Link Models
2 Unpacking your Camera and Accessories
2
1
Zyla sCMOS Camera
(Camera Link version)
Zyla 5.5: 3-tap or 10-tap
Zyla 4.2: 10-tap
Software or Driver
CD and User
Manual on CD
3
PCIe Card
Zyla 3-tap version:
Neon PCIe Card
or
Zyla 10-tap version:
Karbon PCIe Card
Anti-Static Strap
1 Preparing your Facility
Camera Link Cable(s)
Multi I/O
Timing Cable
Coolant Pipes
Zyla 3-tap version (x1)
Zyla 10-tap version (x2)
Water cooled
models only
3 Installing Software (Solis, SDK3 or iQ)
Handle the camera and accessories with care.
Zyla sCMOS weighs 1.0 kg [2 lb 2 oz].
Use correct power supply and cables.
Store between -10°C and 50°C.
Zyla 5.5 (all models), Zyla 4.2 (water cooled):
operate between 0°C and 35°C
Zyla 4.2 (air cooled): operate between 0°C
and 27°C
Observe anti-static precautions when
installing the controller card and camera.
Ensure 100 mm clearance around camera
and power supply vents (Do not block
vents when operating on benchtop).
Operation of the camera close to intense
pulsed sources (e.g. plasma and X-ray
sources) may compromise performance.
PS-12 Power
Supply
Country Specific
Power Cord
1
2
For water cooled models- the coolant system
must be connected and water temperature
set above the dew point before the camera
is switched on. Refer to the dew point
information in the user manual before use.
You must have administrator access on your PC to perform this installation.
The same instructions cover the installation procedure for Andor’s Solis, SDK or iQ software, which is used in
conjunction with third party software. If you are planning to run your camera through a third party interface you will
require the Andor Drivers, called SDK3.
Switch on the PC, insert CD and run the “setup.exe” file on the CD or download location.
• Confirm the version of software.
• Follow the on screen prompts.
• Select the installation directory when prompted.
• When prompted for camera type select Zyla.
• On the final window click on “Install”. During the installation
a number of other windows will appear as various drivers are
installed.
• Click on the finish button when prompted.
Keep dry, <70% humidity non-condensing.
Refer to the user manual for further information.
For more information visit: andor.com/software/software_support/
Please turn over
4
6
Installing the Camera Framegrabber (PCIe) Card
Ensure that the Camera ON/OFF switch is in the OFF
position AND your PC is switched OFF.
Ensure your PC is powered off. Ensure anti-static precautions
using anti-static strap provided. Keep all screws safe.
• For Water Cooled models, ensure the coolant system is connected
before the camera is switched on- please refer to the user manual.
1. Unplug all cables from the rear of the computer.
2. Open the PC enclosure to gain access to the expansion slots.
3. Locate a suitable PCIe slot:
• Zyla 5.5 3-tap with Neon PCIe card: use x16, x8 or x4 PCIe slots
• Zyla 5.5 and Zyla 4.2 10-tap with Karbon PCIe card: use x16 or x8 PCIe
slots ONLY
If you are unsure which slot is correct, please consult the PC user manual.
• Insert the 12V DC power cable into the power connector at the rear
of the camera, ensure the orientation is correct. NEVER forcibly
insert the connector.
Fasten the Card
to the slot with
a screw
Unused filler brackets
4. Remove the filler bracket corresponding to the slot you intend to use.
5. Remove the controller card carefully from its protective ESD packaging and
insert the card connector fully into the expansion slot.
CL1
Gently press the
card into
the slot
6. Ensure the card’s mounting bracket is flush with any other mounting or filler
brackets to either side of it, then secure the controller card in place.
PCI Slot
7. Replace the computer cover and secure with mounting screws if applicable.
8. Reconnect any accessories you were using previously.
CL2
ISA Slot
(Karbon PCIe card only)
NOTES:
• Zyla 10-tap can not be run in 3-tap mode.
• Do not connect any other device to the Framegrabber (PCIe) card as this may interfere with normal camera
operation or performance.
• Camera operation with PCIe cards not supplied by Andor cannot be guaranteed.
5
Connecting your Camera and Switching it on
Zyla 3 and 10-tap version Connections
• For Zyla 3 and 10-tap versions, insert Camera Link Cable CL1
connector labelled ‘CL1 CAM’ into camera connector CL1.
• Insert the other end of the cable labelled ‘CL1 PC’ into PCIe card
connector CL1.
• For Zyla 10-tap version only, also insert Camera Link Cable
CL2 connectors labelled ‘CL2 CAM’ and ‘CL 2 PC’ into the CL2
connectors of the camera and PCIe card respectively.
Please refer to diagrams in both Steps 4 and 6 to identify the
locations of the CL1 and CL2 connectors.
I/O 15-Way
D Type
Connector
12V DC
Power
Connector
• If required, connect the I/O expander cable to the I/O 15 way D type
connector.
CL1
connector
CL2
connector
(10-tap only)
ON/OFF
Switch
• Switch the camera ON using the ON/OFF switch. You should hear
an audible confirmation (a short beep followed by a long beep).
• Turn ON the PC.
• Start your software.
• Start acquiring data.
NOTES:
• If you need to adjust the C-mount, refer to the Zyla user manual.
Installing the PCI Card Device Driver
Troubleshooting
Restart your PC
Camera buzzer does not sound on start-up
If you are running Windows 7 or 8, the drivers will be installed automatically during start-up.
and
NOTE: In Windows 7 and 8, allowing the computer to enter sleep mode will cause the Camera
Link card to hang after wakeup. If this happens, the software will no longer be able to connect
to the camera and a reboot will be required to reset the PCIe card. Users should deactivate sleep
mode functions of the PC where possible (refer to Windows 7 or 8 help on your PC).
•
The camera buzzer should be audible momentarily (as a short beep followed by a long beep) when the camera
is switched to ON.
•
If this does not occur, ensure that power is connected to the camera and the ON/OFF switch is set to ON.
Camera is not recognized by PC
•
Ensure camera is switched to ON (The camera must be powered up before the software is initiated).
If you are running Windows Vista you may be asked to specify the directory containing the
Bitflow drivers. These are located in ‘C:\Bitflow SDK 5.60\PlugAndPlay’.
•
Check that the camera cable(s) are securely and correctly connected between the camera head and the PCIe
card in the PC (shown in step 6).
If you are running Windows XP, the ‘Found New Hardware Wizard’ dialog will be displayed
following boot up. When prompted ‘Can Windows connect to Windows Update to search for
software?’, select ‘No’ and click on Next. Select ‘Install the software automatically’ option and
click on ‘Install’. The Camera drivers will now be installed.
•
Check that the PCIe card and drivers have been installed properly
(Control Panel – System – Hardware – Device Manager – Imaging Devices).
If you are running Linux, please refer to the SDK CD. Any distribution specific differences will be
noted in the installation instructions. Further support is available at
andor.com/support.
For additional troubleshooting information please refer to the user manual on the CD provided and
for technical information about the Zyla sCMOS go to: andor.com/zyla
MAN-06734
ZQSG 0915 R1