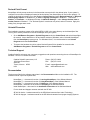
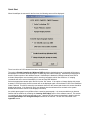
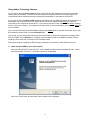
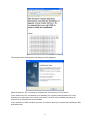
1
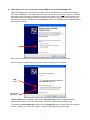
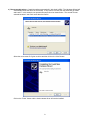
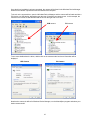
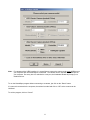
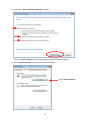
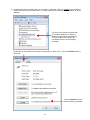
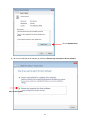
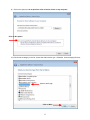
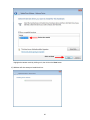
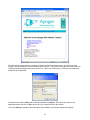
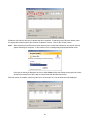
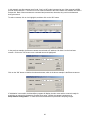
KestrelSpec for Echelles
Version 5.62 (32-bit)
Installation Instructions
March 4, 2014
KestrelSpec can be used with different versions of Windows depending upon the CCD camera:
Apogee Imaging Systems: The Alta and AltaF cameras are supported and they run under Windows
2000/XP/Vista/7 only. The Apogee legacy cameras are no longer supported.
Andor Technology: all CCD, ICCD and EMCCD models will run under Windows XP/Vista/7.
The minimum requirements are a Pentium processor and 1 GB of RAM, but more RAM is recommended. This
version of KestrelSpec executes with English, Asian or European versions of Windows.
Windows Installation Procedure
Please follow this sequence before using the KestrelSpec software:
1. Install the KestrelSpec program
2. If KestrelSpec will be used with an Apogee camera, run the appropriate Setup Apogee Driver program.
3. If KestrelSpec will be used with an Andor camera, install Andor’s Solis software, the Andor Software
Development Kit (SDK), or just the Andor camera driver by itself.
1) Install the KestrelSpec program
•
It is best to exit from all application programs before installing new software. For 2000/XP/Vista/7, you
must have administrator privilege to install software.
•
Insert the KestrelSpec installation CD into a CD-ROM or DVD drive
•
Windows should display a prompt asking if you want to view files on the CD. Click OK. If no prompt is
displayed, use Windows Explorer to view the files on the CD.
•
Execute the SETUP program in the main folder on the CD by clicking on the SETUP.EXE file
•
The SETUP program will lead you through the installation process.
2) Install any required drivers and the camera library for an Apogee camera if an Alta camera will be used
For the Alta cameras, the current version for the software driver is v5.4, which is installed by running the
SetupApogeeSoftware.exe program in the Apogee Drivers folder on the KestrelSpec installation CD. To
install the software driver, your Windows user account must have administrator privileges. Make sure the
Alta camera is not connected to your computer before executing the SetupApogeeSoftware.exe program.
This installation program will detect whether your version of Windows is 32-bit or 64-bit and it will install the
appropriate driver for your operating system. Detailed instructions for installing the driver software is in the
Apogee Camera Installation Guide.
See the instructions entitled “Using Apogee Cameras” later in this section for more details.
3) Install any required camera drivers for an Andor Technology camera with a PCI or USB2 interface
For all Andor cameras, including the “classic” models, the camera driver is installed by installing Andor’s
Solis software, the Andor SDK (Software Development Kit), or by installing the driver directly from the
KestrelSpec installation CD.
See the instructions entitled “Using Andor Technology Cameras” later in this section for details on installing
the driver for your camera. For further reference, see the section for installing/reinstalling the Andor camera
driver on Windows 7.
1
Decimal Point Format
KestrelSpec will only accept numbers in the format that uses a period for the decimal point. If your system is
configured so commas are displayed instead of decimal points, then KestrelSpec will not function properly. To
change the decimal point setting, go to the Windows Control Panel and select Regional Settings, or Regional
and Language Options on Windows XP, or Clock, Language and Region in Windows 7. Then select
Number, or Customize… on Windows XP/Vista, or Additional Settings… under Change the date, time or
number format on Windows 7. The "Decimal Symbol" must be set to a period, and not a comma. Apply this
setting if any changes were made.
Uninstall Procedure
The installation procedure creates a file called INSTALL.LOG in the same directory as the KestrelSpec files.
This log file is used by Windows to remove KestrelSpec from your system.
•
Go to Add/Remove Programs or Unistall Programs under the Control Panel and select KestrelSpec
for removal. As an alternative on XP and earlier versions of Windows, select “Uninstall KestrelSpec”
from the KestrelSpec program group. For Windows Vista/7, it is recommended to use Unistall
Programs under the Control Panel.
•
To remove the hardware key driver, select Sentinel System Driver Installer for removal under
Add/Remove Programs or Unistall Programs under the Control Panel.
Technical Support
Catalina Scientific welcomes your comments, suggestions and questions concerning the use of KestrelSpec for
Windows. Here is our contact information:
Catalina Scientific Instruments, LLC
1870 West Prince Road
Suite #21
Tucson, Arizona 85705
USA
Phone: (520) 571-8000
FAX: (520) 571-0120
E-mail: [email protected]
Web: www.catalinasci.com
Documentation
The document files for the software manual are in the Documentation folder on the installation CD. The
software manual is split into separate files:
KestrelSpec_1 – document for section 1, Learning KestrelSpec, of the Software Manual
KestrelSpec_2 – document for section 2, Using KestrelSpec, of the Software Manual
KestrelSpec_3 – document for section 3, Reference, of the Software Manual
KestrelScript – document for the section on Scripting in the Software Manual
Install KestrelSpec – document for the Installation Instructions of the Software Manual
For the Andor and Apogee cameras used with the SE 200:
SE 200 for Andor – hardware manual for the SE 200 and cameras from Andor Technology
SE 200 for Apogee – hardware manual for the SE 200 and cameras from Apogee Imaging Systems
2
Quick Start
When KestrelSpec is executed for the first time, the following screen will be displayed:
There is a choice of CCD cameras from three manufacturers.
The option to Enable KestrelScript (Windows DDE) should be checked whenever commands will be sent to
KestrelSpec from another Windows program via DDE (Dynamic Data Exchange). KestrelScript is described in
detail in another section of this software manual. KestrelScript is disabled by default because when DDE is
activated, KestrelSpec must constantly poll for incoming commands, which uses CPU time. If scripting
commands will not be sent to KestrelSpec, it’s best to leave DDE disabled.
Select the appropriate camera option and click on the “OK” button. If the option to “Always display this prompt
at startup” is left unchecked, then this screen will not be displayed again until the Kestrel.ini file in the installation
folder is deleted. This INI file stores the user-entered choices for the camera and whether this screen should be
displayed at startup. If the Kestrel.ini file is ever deleted, then the software will be set back to the system
defaults and the above screen will be displayed at startup.
An echelle spectrograph is very different from a scanning spectrograph. It is recommended that you become
familiar with the software by reviewing the Learning KestrelSpec section of the software manual. This section
is a tutorial with demo images and spectral curves. Using the SE 200 system is described in detail in both the
Learning KestrelSpec and Using KestrelSpec sections of the manual. The SE 100 is described in the
Appendix section.
3
Using Andor Technology Cameras
If your camera came with Andor’s Solis software, then follow the Solis installation instructions to install the
camera driver and software. Once the driver and software are installed, make sure the Solis program can
communicate with the camera and acquire images before KestrelSpec is executed for the first time.
If your camera came with Andor’s SDK (Software Development Kit), the SDK will install all the interface files so
KestrelSpec can communicate with your Andor camera. Be sure to install the SDK before the camera is
connected to your computer and powered on. If your camera uses a PCI card, install the SDK before installing
the PCI card in your computer. It’s important to have the driver for the card already on your computer before the
card is installed.
If your camera came with just the KestrelSpec software and neither Solis nor the SDK from Andor, skip to step
2) to install the camera driver from the KestrelSpec CD.
If you prefer, you can load the driver directly from the KestrelSpec CD because it’s faster than installing either
Solis or the SDK. But for Windows 7, it is highly recommended that Solis or the SDK be installed, because
installing just the driver files could result in an incomplete install.
Follow these steps for installing the SDK and then installing the camera driver, either USB2 or PCI card:
1) Install the Andor SDK for your camera model
Insert the Andor SDK CD in your disk drive. If the installation program doesn’t automatically start, run the
setup.exe program on the CD. The following screen will be displayed:
Click on the “Next” button and the Andor camera models will be displayed:
4
Select the model that matches your camera. In this example, an iKon camera is being installed. Place a
check in the box for your camera model and click on the “Next” button.
Enter a Destination Folder for the Andor SDK and click on the “Next” button.
The SDK and camera driver files will be installed.
An HTML screen will then be displayed after the files have been copied to your computer:
5
This window can be closed and the final dialog box will be displayed:
Select the option for “No, I will restart my computer later” and click on the “Finish” button.
If your camera has a PCI card interface, then shutdown your computer now and install the PCI card
according to the instructions in the camera user manual. Once the card is installed, then reboot the
computer so the camera driver can be installed.
If your camera has a USB2 interface, then there is no need to reboot your computer after installing the SDK
and interface files.
6
2) Install the driver for your camera either from the SDK files or from the KestrelSpec CD
Follow the instructions in the camera user manual to connect the camera to your computer using either a
PCI card or a USB2 port. If the camera has a PCI card, then be sure to power off the computer, install the
board and connect the camera according to the camera user manual, then power on the computer. Once
the computer has booted and the camera is connected, then power on the camera. When the camera is
powered on the first time, Windows will acknowledge that it found new hardware and the Hardware Wizard
will prompt for the driver:
Click on the “No, not this time” radio button as shown above, then click on the “Next” button.
On the next screen, Windows will prompt for the location of the driver for the camera:
SDK
option
KestrelSpec
CD option
If Andor’s SDK has been installed, select the first (Recommended) option to “Install the software
automatically” and then click on the “Next” button. Continue to option a) on the following page.
To install from the KestrelSpec CD, select the second (Advanced) option to “Install from a list or specific
location”, and then click on the “Next” button. Continue to option b) on the following page.
7
a) Recommended option to “Install the software automatically” with Andor’s SDK: The Hardware Wizard will
automatically locate the driver for the camera. If only one file is found, then the wizard will go ahead
and install it. In this example, two potential files were found as shown below. The second file was
selected because it was more recent than the first file:
Select the most recent file if given a choice and then click on the “Next” button.
Click on the “Finish” button and the Andor camera driver will now be installed.
8
b) Advanced option to “Install from a list or specific location” from the KestrelSpec CD: The Hardware Wizard
will prompt for the location of the driver file. Direct the Wizard to either the PCI or USB folder under
“Andor Drivers” on the KestrelSpec installation CD loaded in your disk drive:
If your camera has a PCI card, use the “Browse” button and go to the PCI folder under “Andor Drivers”
on the KestrelSpec CD. Otherwise, go to the USB folder. Then click on “Next”.
In the example shown on this page, the Andor camera had a PCI interface card.
When the Wizard has finished, it will display a message similar to this one:
Click on the “Finish” button to exit the Hardware Wizard.
Whenever a hardware driver has just been installed, it is highly recommended that the computer be
shutdown and rebooted to make sure it is a “clean” install. Rebooting the computer is especially
important for a camera with a PCI interface.
9
Once the driver installation has been completed, the camera will be listed in the Windows Device Manager
whenever the camera is powered on and connected to the computer.
To check on the camera driver, open the Windows Device Manager and the camera will be listed as either a
PCI device or a USB device, depending upon the type of interface your camera uses. In this example, the
camera on the left has a USB interface and the one on the right has a PCI card:
USB camera
PCI camera
To see more details about the driver, double click on the camera model and more information will be
displayed:
USB Camera
PCI Camera
Now that the camera is defined in Windows Device Manager, run the KestrelSpec program and select your
Andor camera model:
10
Note:
For cameras with a USB2 interface, it is a good idea to connect the camera to the same USB2 port on
your computer each time KestrelSpec is executed. The camera can be used with any USB2 port on
your computer. But every time it is switched to a new port, the Hardware Wizard will prompt you to
install the driver.
To run the KestrelSpec program without connecting to a camera, just click on the “Demo” button.
If a camera is connected to the computer, then select its model and click on “OK” so the camera can be
initialized.
To exit the program, click on “Cancel”.
11
How to Install/Reinstall the Andor USB or PCI Camera Driver on Windows 7
For Windows 7, it is best to install either the Andor SDK or Andor’s SOLIS software because they will install the
PCI or USB device driver for any Andor camera. Always install the SDK or SOLIS before connecting the
camera to the computer. However, it is possible to install or reinstall any camera driver using just the driver files
for either a PCI or USB camera.
These driver files are in the following folders on two disks:
Andor SDK disk:
KestrelSpec disk:
Device Drivers folder, PCI and USB subfolders
Andor Drivers folder, PCI and USB subfolders
If the Andor SDK has been installed, then the camera driver files reside in the SDK’s installation folder. The
camera drivers can only be installed by a user with Administrator privilege.
Follow these step-by-step instructions to install/reinstall the driver for either a PCI or USB Andor camera.
1) Open the Advanced System Settings option under the Windows Control Panel. Click on the
Windows Start button, then click on Computer, then click on the System properties option.
The Control Panel window will be displayed with these options in the upper lefthand corner:
Click on Advanced system settings to go to System Properties
2) Click on the Device Installation Settings button under the Hardware tab of the System Properties
window:
Click on Device Installation Settings
12
3) Configure the Device Installation Settings as follows:
Click on the Save Changes button, and the System Properties window will reappear.
4) Open the Device Manager from the System Properties window:
Click on Device Manager
13
5) If installing the driver for the first time, go on to step 6. Otherwise, if this is a reinstall, then uninstall the
driver for the currently connected camera. Find the Andor device that needs to be reinstalled, as in this
example:
The Andor Luca camera is marked with
an ! because Windows 7 is having a
problem recognizing the camera driver.
This current driver first needs to be
uninstalled, before it can be properly
reinstalled
Double click on the camera name, which in this example is “Andor Luca”. Click on Uninstall under the
Driver tab:
Click on Uninstall to remove
the driver causing a problem.
14
Confirm the uninstall and be sure to delete the driver files:
Click on OK to remove
the problem device driver.
Once the camera is removed from the Device Manager, disconnect the camera and power it off.
6) Whether the driver is being reinstalled or the driver is being installed for the first time, make sure the
camera is connected to the computer and powered on.
The camera will be unrecognized in Device Manager and it should be marked as an unknown device:
The Andor camera is unknown because
Windows 7 cannot find its driver, which
will be installed in the next step.
If you can’t find the camera device, then scan for hardware changes under the “Action” menu option.
7) Double click on the “Unknown device” so the driver can be updated:
15
Click on Update Driver
8) Be sure to locate the driver manually by clicking on Browse my computer for driver software:
Click on this option
16
9) Click on the option to Let me pick from a list of device drivers on my computer:
Click on this option
10) If Andor has a category in the list, choose the Andor device type. Otherwise, choose Imaging Devices:
Select a device type
Click on Next
17
Then click the Next button.
11) Andor will not appear in the Manufacturer list unless Andor was chosen as a device type. But it doesn’t
matter because you need to select Have Disk…:
Click
12) Browse to whatever folder has the Andor USB or PCI driver files. They can be on the Andor SDK disk
or the KestrelSpec installation disk, or on the computer hard drive if the Andor SDK was installed. The
Locate File dialog box wants the Setup Information file (*.inf) for either a PCI camera (atmcd.inf) or USB
camera (andor-libusb.inf).
This example for the USB Luca camera uses the andor-libusb.inf file from the KestrelSpec installation
disk:
18
Click to open
13) Click on the OK button so the driver files in the selected folder will be loaded:
Click
14) Windows should now recognize the appropriate camera, which is the Andor Luca in this example:
19
Select the model
Click on Next
Highlight the camera model by clicking on it, then click on the Next button.
15) Windows will then attempt to install the driver:
20
16) If successful, a message similar to the following will be displayed:
Click
Click on the Close button and the camera is ready to use on Windows 7.
In the Device Manager, the camera should now be recognized:
21
Using Apogee Cameras
Apogee Alta Cameras – USB2 and Ethernet Cameras
The Alta cameras have either an Ethernet or USB interface, but neither camera requires an INI file because all
the parameters for operating an Alta camera are stored in the camera head. The USB camera requires that the
“Apogee Ascent USB Camera” driver be installed. When the USB driver is properly installed, the Windows
Device Manager will have the USB camera listed as a device whenever the camera is powered on and
connected to a USB2 port on the computer:
Both entries will
be present for a
single camera.
As long as the device entries for the USB camera do not have any yellow exclamation marks (!) or question
marks (?), then Windows recognizes the camera and the KestrelSpec program will be able to communicate with
it via the USB interface. The Device Manager can be accessed through the Control Panel. Under the Control
Panel, select System and then click on the Hardware tab and click on the Device Manager button.
The Ethernet cameras don’t require a driver because they are not attached to any one particular computer, but
are unique devices on the local network. Since they are not attached to a single computer, they do not appear
in the Device Manager like USB cameras do. An Ethernet camera is connected to a hub, router or switch via a
network cable and then powered on so it becomes an attached device on the network. The network must have
a router or server that automatically assigns IP addresses to network devices. This process of assigning
addresses is called DHCP, or Dynamic Host Configuration Protocol. Verify the presence of a DHCP router or
server by checking the documentation for the network or consulting the network administrator. Commercial
routers typically have a way to determine the IP addresses for any attached devices on the network. Consult
the router documentation or the network administrator to determine the IP address for the attached Ethernet
camera.
Ethernet cameras can be configured through any common web browser as long as the camera’s IP address is
known. Enter the IP address into the Address bar of the Internet browser. The camera will reply with its own
web page of settings as shown on the next page:
22
The camera home page contains a snapshot of useful information about the system, all of which can help
Apogee’s technical support if ever the camera requires service. The camera home page also contains links for
configuring network settings, serial ports, reboots, etc. When one of these links is selected, an authentication
dialog box will be displayed:
The default user name is admin and the default password is configure. Enter these two values in the
appropriate boxes and click on OK to access any of the optional links for the camera.
The online Help page contains useful information about modifying the camera configuration settings.
23
Situations may occur in which a network camera requires a “hard reset” to return the camera’s configuration
settings to their default values. For example, a network camera may need its IP address hardcoded on one
local network to avoid conflicts with other network devices. However, that particular address may not be
available if the camera is moved to another local network. In situations like this, the camera’s configuration
settings can be reset to their default values so the camera can be assigned an IP address on the new network.
A “hard reset” is performed using the RESET button on the camera:
Power off the camera. Push the RESET button on the side of the camera and hold the button down
while the camera is powered on. Continue to hold the button down until the red lights on the camera
start to blink as they normally do when the camera is ready to initialize.
This procedure should return the camera configuration settings to their default values. The camera can be
configured again using a Web browser once its new IP address is known.
When the KestrelSpec program is first executed, there is a prompt for the type of camera interface:
Select Demo to run
the program without
connecting to the
camera.
If the Address and Port for an Ethernet camera have not yet been verified or if the Device ID for a USB camera
has not yet been verified, click on the “Discover” button. A dialog box to search for either a USB or Ethernet
camera, or both types of cameras, will be displayed:
24
Enable the check box for the type of camera that will be searched. If searching for an Ethernet camera, enter
the appropriate network mask or the camera’s IP address, if known. Click on the “Search” button.
Note:
When searching for an Ethernet camera, there may be a conflict with a firewall or any Internet security
system protecting the computer. If this conflict occurs, a message may be displayed similar to this:
Kestrel.exe is attempting to access the Internet.
If this type of warning is displayed, be sure to select Permit to allow the Kestrel.exe program file to have
access to the network so it will be able to communicate with the Ethernet camera.
When the search is complete, which may take up to 10 seconds or so, a list of cameras will be displayed:
25
In this example, two Alta cameras were found. One is a U47 model connected to one of the computer’s USB2
ports at device Identifier 0. The other is an E47 model connected to the local network at IP address 192.168.0.4
and port 80. Both of these cameras are connected and powered on, otherwise, they could not be detected
during the search.
To select a camera, click on it to highlight it, and then click on the “OK” button:
In the previous example, the Ethernet camera was selected at IP address 192.168.0.4 on the local area
network. Click on the “OK” button once a selected camera is highlighted:
Click on the “OK” button to initialize the selected camera, which in the above example is the Ethernet camera:
If initialization is successful, the KestrelSpec program will display its main menu and the camera is ready for
acquisition as soon as the temperature reaches its set point. Monitor the camera’s temperature in
Setup:Camera Configuration… to make sure it has reached the set point before acquiring images.
26