1
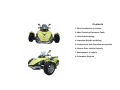
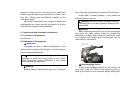
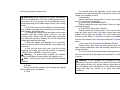
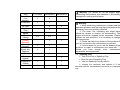
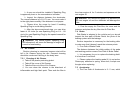
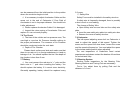
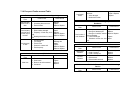
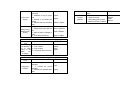
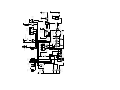
SERIES MOTOR VEHICLE
USER’S MANUAL
notice.
No one can copy, quote or print any part of the
Manual without permission from the producer.
Dear Sir or Madam,
Please contact the dealers if you have any
Thank you very much for your choice of the vehicle.
problems
This vehicle is manufactured according to the full
maintenance.
survey of market demand. We hope that it will bring you
driving pleasure.
Please read the manual carefully before driving
because it will help you learn the basic knowledge of
structure, function, operation and maintenance of the
Vehicle, which will be of great help for you to keep it in
good condition and drive more safely.
The materials and pictures provided in the Manual
is the latest information made according to the newest
products. There possibly are differences between the
contents in the manual and the actual situation of
Vehicle as a result of the improvement or changes of the
products. But the user has to operate by the real
situation. The producer preserves the rights revision of
the Manual at any time, with no further information or
about
the
Vehicle’s
operation
and
▲ Warning: Drivers and Parents should
read and follow the rules in Section 4 before driving
vehicle, which is about the important events and
safety.
Abide by nation (area) local law and statute
prescriptive item.
B
3
0
9
0
Contents
1. Brief Introduction to vehicle
2. Main Technical Parameter Table
3. Vehicle Assemblage
4. Important Events and Safety
5. Components and Operation Introduction
6. How to Drive vehicle Properly
7. Maintenance of vehicle
8. Schematic Diagram
1. Brief Introduction to vehicle
1.1 Brief Introduction
strength with reliable safety.
◆ Front independent suspension and articulated
and complicated shock-absorber in the rear frame are
adopted, which is comfortable and is of great help to
prolong the life of the components of the whole vehicle.
◆ Front wheel and rear axle hydraulic disk arrester
is adopted, which has a good effect and easy and soft
operation.
◆ This type of vehicles has taken an engine with
high efficiency and low oil consumption.
◆ The electrical system is simple and reliable as well,
which is a leisure and entertainment vehicle based on
good function.
◆ Continuously variable transmission engine is
adopted in the vehicle, better and convenient customer
in energy usage.
1.2 Engine and Frame Identification Numbers
1.Protect plate
2.Speedmeter
3.Rear mirror
4.Fueltank
5.Front
shock absorber
6. Seat 7. Foot rest
8.Exhaust system
9. Rear
tire 10.Rear fender 11.Rear lamp 12.Armrest 13. Front fender 14.
Front tire 15. Ignition switch
◆
The shape of this Vehicle for leisure and
entertainment is new and unique. The frame is welded
with excellent steel pipe, which is high in structural
Engine Identification Number: Please remember
Engine Identification Number for the check when
necessary. The location of Engine Identification Number
is at the top side of the engine transmission shell.
Frame Identification Number: Frame Identification
Number is the unique number for all the vehicles and
please make a record for the check when necessary. It is
under the cushion on the framework and shell.
2. Main Technical Parameter Table
Item
Size
Weight
Parameters
L×W×H
(mm)
2480×1685×1130
Axle Base (mm)
1540
Dry Weight (Kg)
230
Loading
Capacity
160kg(2 person)
Type
Single Cylinder, Four Strokes,
Liquid Cooling
Form of Transmission
CVT(with back gear)
Displacement
ml
Highest Speed km/h
Rated Power
kW
Max Torque
Nm
Idling Speed
r/min
Type/Air Pressure
Front
Type/Air Pressure
Rear
244
110
10.5(7000 r/min)
17.6/(5500 r/min)
1500±100
Engine
Power
Tire
Electrical
System
Capacity
3. Vehicle Assemblage
Battery
165/70R-13 79T 40P.S.I
165/70R-13 79T 40P.S.I
12V
12Ah
Safety Fuse
25A
Oil tank(L)
8
1. Take off the cover and fixing poles by using
wrench.
2. Take out Handlebar and pan head cruciform slot
screws or hexangular flange face screws and install
Handlebar on the Handlebar fixing base. Fasten the
screw and put on the cover of Handlebar.
3. If it is equipped,put the protective small plastic
jacket into the pipe of goods shelf, put the screw bolt
backings into the hexangular flange face screws and
then fix the goods shelf with the backing screw.
4. If it is equipped,put the protective large plastic
jacket into the pipe of bodywork, put the screw bolt
backings into the hexangular flange face screws and
then fix the protective pipes with the backing screw.
5. Take the oil tank from the box and fix on the oil
output mouth. Fix oil tank on the supporter by
hexangular flange face screws. Put one end of
non-burning rubber oil-input pipe into the oil-output
mouth. Take off the dust-free cover on the mouth of the
carburetor, put the other end to the input oil mouth on
the carburetor.
6. Take out the hexangular screws and hexangular
flange face nuts and fix the seat.
7. Connect the wires by the plugs and screw nuts
which on the poles of the battery to the corresponding
place (attention: the positive wire connects to the
positive pole of the battery, black wire connects to the
negative pole of the battery). Tighten the screws.
8. Plug in the joints of all lights on proper position.
Check and make sure that every screw is tight and
then you can prepare to use the vehicle.
4. Important Events and Safety
This Vehicle is not a toy and it will cause danger if
driving improperly. Please abide by the following
suggestions strictly to avoid the injury.
◆ You mustn’t drive at an excessive speed. You
must control the speed properly according to the road
situation, the field of vision, your driving experiences and
your operating conditions.
◆ Keep a proper gap with the other vehicles to
avoid collision.
◆ Please examine the vehicle before driving,
making sure that it is in the condition that safe driving
can be obtained. You can inspect according to the
process and maintenance specified in the Manual and
the explanation attached to the components, making
sure that all the joints are tightened and safe.
◆ Before starting the engine, you must make sure
that the driver is on the seat and the vehicle is in the
controllable state.
◆ You must drive with defined loading capacity,
with no over-loading driving.
◆Never carry a passenger who is too young to
hang up the armrest. A multi-seats vehicle can only
carry defined number of persons, don’t pick up more.
◆The passenger can only sit on the passenger
seat, never sit on other location and must grip the
armrest tightly during driving..
◆ You must put your hands on Handle all the time
when driving and make sure that the running direction is
under your control.
◆ You must abide by the operating procedures
and methods when turning the vehicle.
◆ You must practice the low-speed turning before
you conduct the high-speed operation. Please don’t turn
at an excessive speed.
◆ You must do warming-up exercises before
driving the vehicle.
Please read the Manual and all the warning notes
carefully before driving and operate by following strictly
the procedures and methods.
◆ Don’t lend the vehicle to anybody that can’t
drive it.
◆ You mustn’t drive the vehicle on the freeway.
◆ You mustn’t drive vehicle under the influence of
drink or anesthesia agents because this will badly
reduce you judging ability and cause serious injury and
even death.
◆ You must drive on the slippery and steep road
after mastering the skills of driving for it is dangerous to
do so. Attention: driving on the slippery, broken stone or
soft road will prolong the braking distance.
◆ You must drive on the strange road slowly and
carefully.
◆ You must learn how to drive vehicle in a proper
way and a qualified training coach is a necessity. The
driver must be more than 16 years old and of adequate
understanding, intelligence and judging ability for
controlling the driving safely.
◆ You must add petrol to the oil tank before you
drive it for the first time. If it is two-stroke engine, you
must add the petrol with proper quantity of engine oil
and the ratio of petrol and engine oil is 25:1. If it is
four-stroke engine, you must add the engine oil in time
according to the requirement of the engine. Attention:
please don’t add the fuel when the engine is in operation
or it is hot. You must keep the source of heat and the
flame away from the oil tank.
◆ You must adopt the tires of size and type
defined in the Manual and keep the tire at the defined air
pressure. The proper air pressure can ensure the
reliable braking and turning.
◆ Please don’t change the position and the state
of the components or add any attachments at your will.
◆ You mustn’t operate the engine in a closed
environment because end gas from it will be dangerous
to life.
◆ It is dangerous for any parts of body or clothes
to touch the engine, noise deadener or any other
revolving parts. Please keep away from them.
◆ You must follow the local suggestions and rules
to drive the vehicle in helmet and protection clothes.
◆ You must pull the helmet on the head. When
driving, with no hand, foot or head overstepping verge of
the vehicle.
◆ You must follow the rules and the regulations of
the sports ground or the local authorities when driving
for pleasure.
◆ Please don’t drive the vehicle if your body
dimension or health status are not suitable.
◆ Please keep the vehicle far away from the
resource of heat and fire if you store it for a short time.
Please empty the petrol in the oil tank if you store it for a
long time. Please store the Manual properly for the
necessary usage.
◆ Certain experiences are required to repair and
maintenance the vehicle and all the actions of its kind
must be done under the safe conditions.
5. Components and Operation Introduction
5.1 Location of Components
See Picture 1.1
when step hard forward and the vehicle will slow down.
Avoid hard or sudden braking, it may cause the
vehicle to skid or overrun.
▲ Warning: Be sure to apply the brake carefully,
if leaning over to one side. Improper braking could
lead to skid.
☆ parking
When near the parking lot, turn on the turning light
and check the traffic behind. Close the throttle grip
completely and apply brake. After the vehicle has come
to a complete stop, switch off the turning light, turn the
main switch to off position.
5.2 Operation of Components
☆ Handlebar
Handlebar is used to control the direction of the
vehicle and the vehicle will turn right or left according to
the corresponding operation.
▲ Warning: You must keep the hands grip
handlebar to avoid the losing control of the vehicle
when driving the vehicle. Otherwise it may cause
serious accidents even death.
☆ Gear-engaging Device
☆ Braking
Braking Pedal is operated by right foot. It will work
If there is gear-engaging device in your Vehicle, you
must make clear the function and operating ways of
each gear so that you can avoid the danger arising from
the unexpected running.
The reverse gear controller for this vehicle is near
the front left footrest.
☆ Right Control Panel
▲Warning:
Attention:You must stop when change reversed gear.
☆ Exhaust
1.Starting switch
Exhaust system have been added accelerant and
second-time air valve, which improved the exhaust .
☆ Left Control Panel
1. High/Low beam
2.Turn signal light
3. Horn button
2.Light switch
3.Electric start
☆ Start button
Turn the Ignition Key clockwise to the first gear.
Engine-start: Electric Start,you can start the engine
by press the Electric Start button to run the engine.
Flameout: If you want to stop the engine, you can
press the red function Switch until it stops.
☆ Speed meter
1. Water temperature meter 2. Speed meter 3. turn
signal show
4. Oil meter
5. Beam/pressure warning
6. Distance
show
7. Gear shifts show
☆Oil Tank (Cover)
There is a blowhole on Oil Tank Cover, which
should not be blocked.
Please add the petrol no more than the neck
bottom of oil feeding mouth when adding.
You must fasten Oil Tank Cover after finishing
adding petrol.
6. How to Drive Vehicle Properly
▲ Special Attention:
1. The petrol in the oil tank and the engine oil in the
engine have been emptied for the safe transportation.
Before starting, please add petrol and engine oil to the
defined place.
2. If the vehicle has gear shift then you must shift the
gear into the correct position before starting the vehicle
and then run with the necessary gear.
6.1 Preparations before Driving
Such preparations are necessary as receiving the
proper training and guidance, checking your vehicle and
making sure that it is in good condition and learning the
rules of driving safely. You must put on the protecting
equipment, such as helmet and long-sleeve clothes.
6.2 Vehicle Check before Driving
It is necessary for you to spend few minutes on
checking your vehicle before driving so that you can
save time and keep safe in the long-way driving. This
includes the following items:
a. Adding of engine oil
If you use it for the first time, you must add petrol and
engine oil in it. The petrol number is 90 or above.
You must add oil to the engine in time according to
the using requirement and the engine oil number is:
*Crank case: SAE15W/40SE, 1.2±0.05L;
*Gear case:85W/90, 0.375±0.025L;
▲ Warning:
Attention: Please don’t add petrol or engine oil
when the engine is running and keep the oil tank
away from the heat resources and flame.
b. Quantity of Petrol
You must add petrol in time if the quantity of petrol is
not adequate so that it will not break down on the way.
You should check the leakage of Oil Tank.
c. Adding of cooling liquid
When you use it for the first time or when the
cooling liquid is not enough, you must add cooling liquid
to the radiator. The cooling liquid must be mixed by a
specific ratio. It is 60% water and 40% coolant in
summer and 50%:50% in winter. The water must be
distilled water or boiled water. You should be careful and
slow to open the cover of radiator when adding cooling
liquid for the water maybe is hot.
▲ Attention:Before starting the engine, the radiator
must be checked to be full of the cooling liquid and you
must add if it is not enough. You must add the cooling
liquid according to the follow steps if there is no cooling
liquid.
1. Get off the cover of the radiator, loosen the lathe
dog of heat water pipe that connecting the carburetion
and radiator, get off the pipe.
2. Prepare the cooling liquid according to the ration
required, add the cooling liquid, until you can see
cooling liquid outflow from the water pipe connecting
the carburetor and the radiator, put on the carburetor
rubber pipe and the lathe dog.
3. Start the engine and operate for 2-3 minutes,
add the cooling liquid to the radiator, and tighten the
cover of it.
4. Pull out the water jug cover, add the cooling
liquid to the water jug until the surface is between
“UPPER” and “LOWER”, recover the cover.
▲ Warning : To avoid being scalded, the radiator
cover is forbidden to loosen when the engine is hot.
▲ Note : cooling liquid must be antirust and resisting
frostbite.
d. Brake
Please check the operation of the brake and adjust
the free path when necessary.
e. Tires
You should check the tightness of the screw bolt
and screw nut, the state and the air pressure of the tires
to see if it is suitable to drive
f. Accelerator
Please check the accelerator if it can move freely
and if it can resume its position.
g. Ignition Key and Blanket Switch
Please check the joints and plugs if they are tight
and work properly.
h. Screw Bolt, Screw Nut, Fastener
Please check the wheel axles to see if the screw
bolts are tight and to see if the other screw bolts and
screw nuts are tight and reliable. You must make sure
that the screw bolts of Handlebar is tight and reliable
and the front wheels turn in the same direction of Handle
freely.
i. The Lower Part of Vehicle and Exhaust System
Please check and clear the dust, plants and the
other foreign substances that will possibly cause fire or
wrong operation.
You must clear all the faults before driving and you
can also ask help from the dealer of franchiser if you fail
to do so.
▲ Warning: It will increase the possibility of the
accidents if you don’t check the vehicle and clear the
faults before driving. You should check it according to
the procedures and maintenance in the Manual and
make sure that the vehicle is in good and safe
condition.
6.3 Steps of Start the Engine
☆ Put the vehicle on the flat place and unlock it.
☆ Then push the starting button of the engine, with
no more than 8 seconds every time.
Please press slightly Gas Handle and repeat the
above-mentioned steps if you fail to start it for several
times.
6.4 Running-in
The new vehicle must experience the running-in
period before normal use. The running-in period is
during the first 1000km traveling distance. The oil in
engine must be replaced after running-in.
Mileage (Km)
0~500
500~800
800~1000
Limit of Speed(Km/h)
40
70
Reaching the max speed gradually
Please don’t run at a too fast speed or even tread
Gas Handle to the bottom in the first few weeks driving
the new vehicle. The right way to run in the engine will
be of great help for the life and performance. It will be
better to run in the engine at a various revolving speed.
6.5 Driving
You should choose a safe and flat place without any
obstacles and vehicles to conduct the initial driving.
After starting the engine and allowing running for a
moment for warming-up, you can drive by grasping
Handle, seeing the front ways and treading Gas Handle
gradually.
6.6 Turning
You should control the speed properly when turning
and it will be difficult to run in the expected direction and
track if you run at an excessive speed.
You should use greaser and Braking properly to
ensure the security when turning. And you should lurch
to the turning direction.
▲ Attention: You should practice the turning at a
low speed firstly and increase the speed gradually
to get familiar with the operating features of the
vehicle.
6.7 Stop
It will be better for you to choose a flat place to park
the vehicle.
When parking, you should loosen greaser and tread
Braking, reducing the speed until it stops.
After parking the Vehicle, you can loosen the brake
so that you can avoid the automatic moving.
7. Maintenance of Vehicle
7.1 Routine Maintenance
The following is the routine maintenance table. It is
made according to the general situation and you must
conduct the maintenance more frequently if the driving
environment is worse and dust is more.
Routine Maintenance Table
Notes: I-Inspection, clean, adjust and lubricate or
replace when necessary, C-Clean, R-Replace,
L-Lubricate
Item
Petrol Pipe
Line
System*
Accelerator*
Maintenance
Monthly
Annual
in 1st Week Maintenance Maintenance
I
I
I
I
Air Filter
C
Sparkling
Plug
Engine Idle
Speed
Drive
Chains
Braking Disk
Fretting
Quantisty
Braking
System*
Screw Bolt,
Screw Nut,
Fastener
I
Tires
Turning
System
Front
Suspension
System
Engine Oil*
I
I
I, L
I, L
I
I
I
I
I
I
I
I
I
I
I
I
▲ Warning:
1. When conducting maintenance, please read the
operation guidance and warning signs and prepare the
necessary tools and auxiliary materials.
2. The clean, flat, ventilating and bright place
should be chosen to conduct the maintenance. The
engine should be stopped unless necessary. Please
choose the real products if it is necessary to change
the components.
3. Please ask help from dealers of the producer if
you can not conduct the maintenance by yourself.
4. It will be better for you to ask the dealers of the
producer to repair or maintenance the items with “*”,
unless you have enough tools, maintenance
parameters and experiences.
7.2
I
I
▲ Warning: You should cut off the engine when
conducting maintenance and otherwise it will possibly
damage the moving and hot parts.
R
Sparking Plug
☆ Take off the cap of Sparkling Plug.
☆ Dust the tray of Sparkling Plug.
☆ Take out Sparkling Plug by wrench.
☆ Inspect the electrode and replace it if the
electrode and the nonconductor are burnt in a improper
way.
☆ A new one should be installed if Sparkling Plug
is apparently burnt or the nonconductor is broken.
☆ Inspect the distance between the electrodes.
The normal distance is 0.61-0.71 mm. You must make it
to the right place carefully if the distance is not proper.
☆ Please drive the screw by hand if installing
Sparkling Plug to avoid sliding-filament.
☆ After the above-mentioned step, you can drive
fasten it 1/2 circle (for new Sparkling Plug) or 1/4 – 1/8
circle (for used Sparkling Plug) by the special wrench for
Sparkling Plug.
▲ Attention: You should tighten Sparkling Plug
and otherwise it will cause the damage of engine as
a result of overheating.
7.3
Air Cleaner
Routine cleaning is necessary because dust will be
left in Air Cleaner during the use. Frequent cleaning
should be conducted if driving in the dusty area.
7.3.1 Cleaning of Air Cleaner
☆ Take off the plastic protecting jacket.
☆ Take off the cover of Air Cleaner.
☆ Take the filter out of the of Air Cleaner.
☆ You can clean the cleaner in the dissolvent of
inflammable and high flash point. Then soak the filter in
the clean engine oil for 5 minutes and squeeze out the
rest engine oil.
▲ Attention: You should not tighten it to squeeze out
the rest engine oil and the otherwise will damage the
filter.
☆ Dust the empty Air Filter Box, the cover and the
entrance and place the dry filter into Air Filter Box.
7.4 Brake
Disk Brake is adopted in the vehicle and you should
inspect the free path of Brake Pedal, the joints of the
braking system and the leakage.
Routine inspection is necessary for the braking disks
to make sure that it doesn’t reach the extreme points.
☆ Free Path of Brake Pedal
The distance between the initial position of the pedal
and working position means Free Path of Brake Pedal.
☆ It is necessary for you to replace the braking disk if
it is less than 3 mm thick.
☆ Please replace the braking pedal if it is not active.
Please pay attention to spring, screw bolt, linchpin and
the pipe when replacing.
7.5 Accelerator
☆ The Free Path of Accelerator is 3– 5 mm, which
can be measured from the initial position to the position
where the revolution begins to rise.
☆ It is necessary to adjust Accelerator Cable and the
screw nut in the end of Carburetor if Free Path of
Accelerator is not in its proper distance. You should lock
it after adjustment.
☆ Please replace Accelerator Cable if it is damaged.
☆ Inspect the return spring of Accelerator Pole and
replace if it can not work properly.
7.6 Tire Check
☆ The tires of the vehicle are low pressure ones, The
over-high or over-low Air Pressure benefits nothing to
the proper performance. The measure of Air Pressure
should be conducted under the cool state.
☆ Depth of Tire Checker
Please check surface and side and make sure that
there is no crack on it, no foreign substances in it and no
leakage of air. You should replace the tire if the depth of
tire checker is less than 2 mm.
7.7 Battery
☆ You must connect the red wire to “+” pole and the
black wire to “-” pole when installing the battery. You
should replace the battery if it cannot store electricity.
Generally speaking, battery should be replaced every
2-3 years.
☆ Safety Wire
Safety Fuse must be installed in the safety wire box.
If safety wire is frequently damaged, there is possibly
a short circuit or over-loading.
The change of Safety Wire:
a. Open safety wire box and take out the safety wire
plate.
b. Insert the new safety wire plate into safety wire box.
c. Resume the cover of safety wire box.
7.8 Carburetor
The idle speed adjusting screw bolt on Carburetor is
used to adjust the speed of idle speed. Tighten the
screw and the speed will slow down; loosen the screw
and the speed will speed up. You must adjust the speed
to the lowest stable position when adjusting.
The rest inspections of Carburetor need certain
experiences and please contact the dealers of franchiser
for technicians’ help.
7.9 Steering System
Routine screw inspections for the Steering Pole,
Steering Machine and Turning Pole are necessary.
Toe-in: You adjust them by pulling Pole and the
distance is 3-6 mm.
7.10 Frequent Faults-removal Table
Faults-removal Table for Direction Signal Lights
Phenomenon of
Cause of Fault
Faults-removal
Fault
Direction lights
doesn’t work or
flash.
Flash frequency
is not the same
or flash only on
one side.
Low frequency
of flash
Phenomenon of
Fault
Mute Horn
1、Fuse is broken.
2、Connecting wires are loose.
3、Flash is broken.
1、Wire disconnects.
2、Either of bulbs damaged.
3、Frequency of flash relay is too
high.
4、Steering switch doesn’t connect
well.
1、Wire disconnects
2、Low voltage
3、Fuse is loose.
4、Parts don’t connect well.
5、Flash frequency
Replace
Tighten
Repair or Replace
Repair
Replace
Repair or Replace
Repair or Replace
Repair
Recharge the
battery
Tighten
Repair or Replace
Repair or Replace
Faults-removal Table for Horn
Cause of Fault
Faults-removal
1、Fuse broke.
2、Parts loosen.
3、Button is not well connected.
4、Horn broke.
Replace
Tighten
Improve
Replace
Low Quality
Sound
1、Bad connection and increased
resistance
2、Joints damaged.
3、Membrane is broken.
Improve
Adjust or Replace
Replace
Faults-removal Table for Discharge Pipe and Noise
Deadener
Phenomenon of
Cause of Fault
Faults-removal
Fault
Tighten
1、Loose joints of exhaust pipe
Replace
2、Damage of deadener pad
3、Damage of manifold, exhaust Repair or Replace
Poor function of
pipe and deadener
noise deadener
Tighten
4、Loose exhaust pipe
5 、 Deadener touches the kart Adjust
body
Faults-removal Table for Water Meter and Sensors
Phenomenon of
Cause of Fault
Faults-removal
Fault
1、Loose of inserting parts
Repair or adjust
Wrong hand
2、Faults of sensors
Replace
indication
3、Faults of heating coil
Replace
1、Broken wire
Repair
No hand
2、Broken sensor
Replace
indication
3、Broken double metal coil
Replace
Faults-removal Table for Front Suspension and Steering
Device
Phenomenon of
Cause of Fault
Faults-removal
Fault
Hard to steer
Swing of
Steering
Handlebar slant
one-sided
Shock of
steering
Too fast or
uneven
weariness of
tires
1、Insufficient air in front tire
2、Deadlock of ball lock
3、Front wheel locates improperly
1、Different tire pressure
2、Swing wheels
3、Too much run-out tolerance
4、Loose wheel hub nut
5 、 Weariness and damage of
bearings
6、Loose ball locks
7、Loose steering device screws
1、Different weariness of tires
2、Brake problem of one side
3、Different air pressure of tires
4、Uneven steering pulling bar
5、Front wheel locates improperly
1、Damage of shock absorber
2、Different air pressure of tires
3、Weariness of ball locks
4、Weariness and damage of front
bearing
5、Loose front wheel
6、Loose handlebar
1、Insufficient air pressure
2 、 Different diameters of front
wheels
3、Loose or weariness of wheel
bearing
4、Swing wheels
5、Uneven caused by tire change
Adjust air pressure
Replace
Adjust to regulations
Adjust air pressure
Repair or Replace
Replace
Tighten
Replace
Replace
Tighten
Replace
Repair or Adjust
Adjust air pressure
Replace
Adjust to regulations
Adjust or Replace
Fill air to Regulations
Replace
Replace
Tighten
Tighten
Fill air to regulations
Adjust or Replace
Noisy steering
device
Adjust to regulations
Tighten
Tighten
Replace
Replace
Add oil
Faults-removal Table for Brakes
Phenomenon of
Fault
Too much free
path
Cause of Fault
Faults-removal
1、Too much space between shoe
& drum
2、Air in the braking path of oil
3、Oil leakage
4、Not enough braking liquid
5、Serious weariness of braking
drum
6、Distortion of braking shoe
Adjust to regulations
7、Ineffective rubber bowl of braking
cylinder
8、Weariness of braking shoe
No smooth
braking
Replace
Replace
Adjust
6、Front wheel locates improperly
1、Loose screws
2、Loose steel plate spring
3、Damage wheel bearing
4、Weariness of ball locks
5、Insufficient lubricant
Shock when
braking
1 、 Weariness of main braking
cylinder
2、Improper installment of brake
3、Soft or broken of return spring
4、Damage of braking pump
5 、 Brake handle cable or bar
problem
6、Improper braking space
1、Damage of wheel bearings
2、Distortion of steering joints and
rear hub
Empty air
Repair to cause
Add oil and empty air
Replace
Repair or Replace
Replace
Replace
Replace
Re-install
Replace
Replace
Repair or Replace
Adjust to regulations
Replace
Replace
Noise when
braking
Wrong running
direction when
braking
1、Too smooth or foreign things on
friction pad
2、Weariness or loose of friction
pad
3、Damage of front wheel hub
bearing
4、Distortion and loose of braking
plate
1、Different air pressure of tires
2、Different bake space right and
left
3、Water in brake or leakage of
pump
4、Loose wheel hub bearing
Repair or Replace
Replace
Replace
Replace or Tighten
Adjust to regulations
Adjust to regulations
Repair or Replace
Tighten or Replace
Faults-removal Table for Oil Pressure Warning Light
Phenomenon of
Cause of Fault
Faults-removal
Fault
The warning light 1、Bulb is broken.
Replace
of oil pressure is 2、Fuse is broken.
Replace
not on when 3、Wire is broken.
Repair
turning on the
Replace
4、Oil pressure sensor is broken.
ignition
key
(un-started)
Faults-removal Table for Burning Oil and Sensors
Phenomenon of
Cause of Fault
Faults-removal
Fault
1 、 Connecting parts connect Tighten
improperly.
Wrong hand
2 、 It connects the ground Repair
indication
improperly.
3、Damage joints, distorted metal Replace
plate
No hand
indication
4、Irregular moving of floats in
sensor
1、Wire is broken.
2、Broken of winding
3、Bad inserting parts of sensor
4、Resistance of sensor is broken.
Repair or Replace
Repair
Replace
Repair
Replace
M
f an
S pa rk
P lu g
F la me ou t
R el ay
Ho r n
T u rn in g Li gh t
S w it ch
Bl i nk U ni t
F ro nt L ef t
t ur ni ng l ig h t
Ha za r d
Sw it c h
3
Sm a ll L am p
Hi gh B e am
Di pp ed H e ad li gh t
M
Se le ni um
Re ct if ie r
St ar t er M ot er
St ar te r R el ay
Fr on t Ri g ht
tu rn in g l ig ht
M ag ne to
2
C ar bu r et or
E nr ic h me nt
J et V e lv e
1
Ig ni ti o n
Sw it ch
Tr ig ge r
H or n
S wi tc h
En gi ne S t ar te r
St uf f
HI GH -V OL T AG E BA G
Temperature Switch
1
2
S pe ed Me te r
Hi gh /D r ip pe d
Sw it ch
3
Fu se
B a tt er y
T em pe ra tu re
M et er
L ig ht
S wi tc h
Sp ee d
Se ns or
F u el
M e te r
R ea r L ef t
T ur ni n g Li gh t
R e ar L ig ht
Br ak e L ig ht
Fu e l
Se n so r
Re ar R ig h t
Tu rn in g L ig ht
Br ak e li gh t
Sw it ch
Te mp er a tu re
Sw it ch
此页为封二
中性
250MB-2 Series
Motor Vehicle
USER’S MANUAL