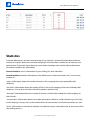
1
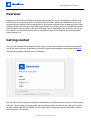
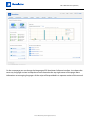
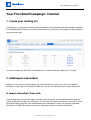
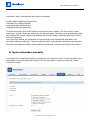
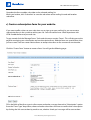
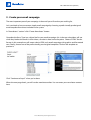
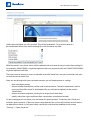
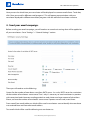
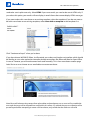
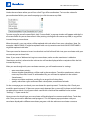
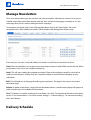
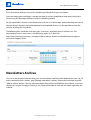
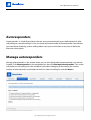
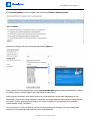
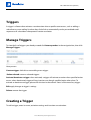
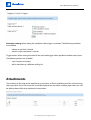
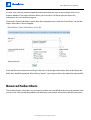
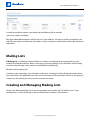
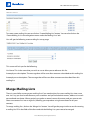
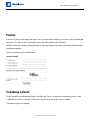
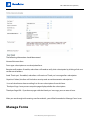
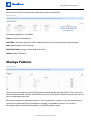
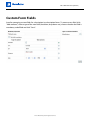
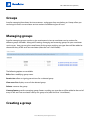
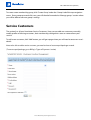
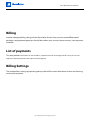
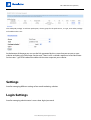
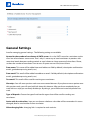
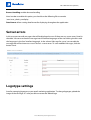
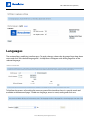
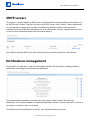
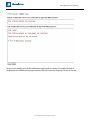
 PG Newsletter Software
User’s Guide
© PilotGroup.Net 2010
Call 1-866-620-1919 (toll free)
Overview
Welcome to PG Newsletter Software, powerful web-based all-in-one E-mail Marketing software that
will allow you to easily design HTML and text based newsletters, deliver personalized emails to your
target audiences through mailing and target lists, and improve your business by boosting your e-mail
advertising and communication. Now even more, besides just sending out your company’s newsletter
and promotions, you can launch your own Newsletter Service and charge your customers for using it.
This software user manual describes how to manage the script, use its features and avoid problems
while working on it.
Getting started
Once you are through with installation of the script, you will need to either rename or remove folder
‘install’ for security reasons (installation instructions are provided separately and can be found here.).
The following window will appear after installation:
You will need to enter login/password you created during installation process to access PG Newsletter
Software. The first page you get provides you with the possibility to move to everyday tasks, displays
recently created newsletters, mailing lists, lists quick statistics diagram covering subscribers’ activity
and newsletters sent recently.
© 2010 Pilot Group Ltd. All rights reserved.
Call 1-866-620-1919 (toll free)
On the same page you can change the language of PG Newsletter Software interface. Just choose the
necessary language version in drop-down menu located at the top right corner of the page. More
information on managing languages of the script will be provided in a separate section of the manual.
© 2010 Pilot Group Ltd. All rights reserved.
Call 1-866-620-1919 (toll free)
Your First Email Campaign. Tutorial.
1. Create your mailing list
A mailing list is a group of newsletter recipients gathered by a common name (for example, a mailing
list called Marketing). When you send out a newsletter to a mailing list, all members of the mailing list
receive the message.
To create a mailing list, click the “Create Mailing List” button under the “Mailing Lists” section.
2. Add/import subscribers
Before you can send an email campaign you need someone to send it to. In step 1 we created a
mailing list. In this step we will look at 3 different ways you can add subscribers to your mailing list:
a) Import subscribers from a file
If you already have a list of subscribers in a file on your computer, you can upload that file into the
system and add subscribers to a mailing list. To start, you will need to export your subscriber list from
your other mailing program. You should export your subscriber list into a CSV (comma separated
value) file. A CSV file will contain a list of your subscribers’ details in a line-by-line format.
© 2010 Pilot Group Ltd. All rights reserved.
Call 1-866-620-1919 (toll free)
Subscribers’ data is indicated per line further, for example:
Andrew;Jefferson;[email protected];
Lisa;Martin;[email protected];
Andy;Garcia;[email protected];
Cindy;McCain;[email protected];
To import subscribers from a file, click the “Import Subscribers” button. This will start the “Import
Subscribers” wizard. Choose the mailing list you want to import subscribers to, enter delimiter used in
the imported file, choose whether the imported file contains headers, and then choose the CSV file
from your computer.
Once your file is loaded, you will be able to map the fields in the imported file with fields in PG
Newsletter Software mailing list. The text on the left of the screen displays the fields in the imported
file. Select the mailing list field to which each field should map. Once you are through, click ‘Import’.
b) Type in subscribers manually.
If you only have a handful of subscribers to add to your list, you can use the “Create Subscriber” form
to add them in manually. Move your mouse over the “Subscribers” section and click the “Create
Subscriber” button:
© 2010 Pilot Group Ltd. All rights reserved.
Call 1-866-620-1919 (toll free)
Complete the form to add a subscriber to the selected mailing list.
When you’re done, click “Subscribe” to save the subscriber to the mailing list and add another
subscriber.
c) Create a subscription form for your website.
If you want to offer visitors to your web site a way to sign up to your mailing list, you can create a
subscription form in the system to add to your site. You will need to have a little experience with
HTML to add the form to your web site.
To get started, click the “Manage Forms” link under the menu section ‘Forms’. This will take you to the
page for managing your subscription and unsubscription forms. Website forms are special forms that
you can create. You can create website forms to accept subscribers or for someone to unsubscribe.
Click the “Create Form” button to create a form. You will get the following page:
Fill in the fields of the form: type in a form name and make sure you choose the “Subscription” option
from the “Form Type” drop-down, choose whether subscribers will have to confirm their subscription
by clicking the link sent to them by email or not; whether ‘thank you’ message will be sent to them
© 2010 Pilot Group Ltd. All rights reserved.
Call 1-866-620-1919 (toll free)
after subscription, if security code will be used and the lists they will be able to subscribe to. Enter the
content of the confirmation email and ‘thank you’ message. When you are done, click the “Save”
button.
Once you’ve created your form you’ll be taken back to the “Manage Forms” page. Simply click the “Get
HTML” link next to your new form and paste that code into your website to add the subscription form
to your site.
If you decide to use some custom fields in your forms, you will need to create them. To do that, go to
the section ‘Forms’ > ‘Custom Form Fields’. The page lists all the custom form fields created. To add a
new one, click ‘Add attribute’, you will get the following page:
Enter the name of the new custom field, choose whether it will be obligatory to fill it while
subscribing, and choose type of the field and its values, if necessary. Click ‘Save’ to save new form field.
To add new custom form field to your form, you should now go to ‘Manage Forms’ section and click
‘Edit form fields’ against the necessary form. You will get a page that will list on the left current custom
fields on the form and other available custom fields on the right. To add a custom field to a form, dragand-drop it from right column to the left one.
© 2010 Pilot Group Ltd. All rights reserved.
Call 1-866-620-1919 (toll free)
3. Create your email campaign.
The most important part of your campaign is the email you will send to your mailing list.
Let’s now look at how to create a simple email campaign by choosing a professionally predesigned
email template from those included in the system.
In “Newsletters” section” click “Create Newsletter” button.
Complete the form. Type in a subject line for your email campaign: this is the text subscribers will see
when they look at the emails in their inbox, so make it short and to the point. Choose “HTML” for the
format. In this example we will create a basic HTML-only email campaign with graphics and formatted
text. Finally, choose one of the professionally pre-designed templates. Click on the template to
preview it.
Click “Continue to Step 2” when you’re done.
When the next page loads, you will see the newsletter editor. You can enter your newsletter content
here:
© 2010 Pilot Group Ltd. All rights reserved.
Call 1-866-620-1919 (toll free)
Under the email editor you will see a link ‘Tags of Personalization’. To insert the value of a
personalization field in your email campaign just click the necessary field:
When the email is sent, these values will be replaced with real values from your subscriber mailing list.
For example, %BASIC:EMAIL% might be replaced with [email protected] and %BASIC:FIRSTNAME%
might be replaced with John.
There you can also choose to insert unsubscribe and ‘tell a friend’ links into your newsletter with your
custom text put on these links.
After you are through with your newsletter content, you will need to enter its settings:
‐
‐
‐
‐
enter newsletter priority
choose whether attachments will be used in the newsletter. To add an attachment, select a
necessary file or files listed. To add another file, you will need to upload it in the section
‘Attachments’
choose newsletter recipients: mailing list or target list of subscribers
specify subscribers type: confirmed their subscription, unconfirmed or both.
On the same page you can check your newsletter for spam keywords. To do that, click ‘Check your
email for spam keywords’. If there are spam words detected, the system will list them and will advise
to replace these words. List of spam words used for this check can be modified in the section
“Settings” > “Spam words list”.
© 2010 Pilot Group Ltd. All rights reserved.
Call 1-866-620-1919 (toll free)
Here you can also check how your newsletter will be displayed in common email clients. To do that,
click ‘View your email in different email programs’. This will open a popup window with your
newsletter displayed in different newsletter programs with the advice on newsletter structure.
4. Send your email campaign.
Before sending your email campaign, you will need to set some basic settings that will be applied to
all your newsletters. Go to “Settings” > “General Settings” section:
There you will need to set the following:
Quotes for the number of newsletters sent from SMTP server - As a rule, SMTP-server has restrictions
to the number of newsletters sent at once. That`s why it`s necessary to send newsletters in portions
with some time breaks between sending periods to send a letter to a large amount of subscribers.
Please, set here the number of newsletters sent at once. If quotas are not used, insert 0 here.
From name/From email addresses which will be used in newsletters sent to identify who newsletter
was received from and from what email address.
Test email which will be used for delivering test newsletters to.
© 2010 Pilot Group Ltd. All rights reserved.
Call 1-866-620-1919 (toll free)
There are also other settings such as type of dispatch, date format, enabling/disabling bounce
handling and other. Once you are through with indicating these settings, you will need to set SMTP
server info that will be used for sending out newsletters. Go to Settings’ > ‘SMTP Servers’ section.
There you will see a list of SMTP servers used. “Priority” shows sequence of its use from the very
beginning. Principle is the following: system will use smtp server with priority ‘1’ for sending
newsletters, then it will connect automatically to next server from the list, in case of server connection
failure while newsletter delivery.
Now when all the necessary settings are ready, you can send your newsletter. Go to ‘Manage
Newsletters’ Section where you will see a list of your newsletters. Next to the Newsletter we created
you will see the “Send” Button. Click it, when the new page loads, choose the mailing list you want to
send your campaign to. Finally, click “Continue” to send the email campaign to your subscribers.
Congratulations, you’ve just created and sent your first email campaign!
© 2010 Pilot Group Ltd. All rights reserved.
Call 1-866-620-1919 (toll free)
Control panel
Before starting an email campaign, it is advised that you try to familiarize yourself with the interface of
the application. Below is a list of all current options in the interface of the program with descriptions of
their functionality.
The navigation menu allows you to quickly navigate to a section that you need for specific functions.
Each section has several elements that form a second level to allow you to navigate within a certain
section into a subcategory.
The first page you will see when you login to Newsletter Software is the home page of your control
panel. It gives you statistics at a glance and navigation to all aspects of the program.
Newsletters. Creating and managing newsletters.
A newsletter is a regularly distributed publication generally about one main topic that is of interest to
its subscribers. Many newsletters are sent out by clubs, churches, societies, associations, and
businesses, especially companies, to provide information of interest to their members, customers or
employees. Before you can create a newsletter, make sure that you have a mailing list created.
Creating Newsletter
To create a newsletter, click ‘Create a Newsletter’ link on the ‘Newsletters’ tab in the navigation menu.
Complete the form. Type in a subject line for your email campaign: this is the text subscribers will see
when they look at the emails in their inbox, so make it short and to the point. Choose format for your
newsletter: text, html or html and text. Select HTML and Text if you want emails to be sent with both
HTML and plain text elements. Email clients that can display HTML messages use the HTML element,
and clients that cannot display HTML use the plain text element. Select Text if you want emails you
© 2010 Pilot Group Ltd. All rights reserved.
Call 1-866-620-1919 (toll free)
send to be sent in plain text only. Select HTML if you want emails you send to be sent in HTML only. If
you select this option, your emails will not display in email clients that cannot display HTML messages.
If you want to base this newsletter on an existing template, select the template. If you do not want to
base this newsletter on an existing template, select Start with no template in the templates list.
Click “Continue to Step 2” when you’re done.
If you have chosen WYSIWYG Editor, it will provide you a clean and simple user interface which should
be familiar to users who worked on common desktop text editors like Microsoft Word or Open Office.
In case of Textarea you will need to enter html code manually. This is how newsletter creation page
looks like in case we choose to use email editor to create newsletter:
Note: Be careful when pasting content from other editor and word processors as most will try to add their
own code that may not be compatible or valid within this editor. It is advised that you test a portion of the
pasted layout before attempting to create a full newsletter, only to find that the code was not valid.
© 2010 Pilot Group Ltd. All rights reserved.
Call 1-866-620-1919 (toll free)
Under the newsletter editor you will see a link ‘Tags of Personalization’. To insert the value of a
personalization field in your email campaign just click the necessary field:
To enter a tag for one of custom fields, click ‘Custom fields’, a pop-up window will appear with the list
of custom fields for you to choose from. After putting a tick against the necessary field, its tag will be
inserted into your newsletter.
When the email is sent, tag values will be replaced with real values from your subscribers’ data. For
example, %BASIC:EMAIL% might be replaced with [email protected] and %BASIC:FIRSTNAME%
might be replaced with John.
There you can also choose to insert ‘unsubscribe’ and ‘tell a friend’ links into your newsletter with your
custom text put on these links.
Note: if you enter a ‘Webversion’ tag into a newsletter, make sure the newsletter is added to
‘Newsletters archive’, otherwise the web version will not be displayed after a recipient clicks the link
inserted by the tag.
After you are through with your newsletter content, you will need to enter its settings:
‐
‐
‐
‐
enter newsletter priority;
choose whether attachments will be used in the newsletter. To add an attachment, select a
necessary file or files listed. To add another file, you will need to upload it in the section
‘Attachments’;
choose newsletter recipients: mailing list or target list of subscribers;
specify subscribers type: confirmed their subscription, unconfirmed or both.
On the same page you can check your newsletter for spam keywords. To do that, click ‘Check your
email for spam keywords’. If there are spam words detected, the system will list them and will advise
to replace these words. List of spam words used for this check can be modified in the section
“Settings” > “Spam words list”.
Here you can also check how your newsletter will be displayed in common email clients. To do that,
click ‘View your email in different email programs’. This will open a popup window with your
newsletter displayed in different newsletter programs with the advice on newsletter structure.
© 2010 Pilot Group Ltd. All rights reserved.
Call 1-866-620-1919 (toll free)
Manage Newsletters
This is the section where you can see the list of your newsletters, edit them or remove. Once you’ve
created a newsletter you will be familiar with the ‘edit’ section of managing a newsletter as it is the
same page that you saw when creating the email campaign.
To manage a newsletter click on the ‘Manage Newsletters’ link on the ‘Newsletters’ tab in the
navigation menu. All available newsletters will be listed on the Manage Newsletters page.
From here you can view, send, edit, delete newsletters or add them to newsletters archive.
View: The view link allows you to preview the newsletter content in both HTML and text format. When
you click the ‘view’ link, a new window will pop up.
Send: This will start sending the selected newsletter. Choose the mailing or target list you want to
send your newsletter to. Finally, click the “Continue” button to send the email campaign to your
subscribers.
Edit: This will lead you to the page for editing your newsletter. This page is the same as the create
newsletter page.
Delete: To delete a newsletter, simply click on the delete button. A confirmation popup will appear to
make sure that you wish to delete the newsletter.
Test: This button is used for sending a test newsletter. Just click ‘Test’ button of the chosen newsletter,
to test it. Test email address is set in the section ‘Settings’ > ‘General Settings’. To start actual sending,
click ‘Send’ button.
Delivery Schedule
© 2010 Pilot Group Ltd. All rights reserved.
Call 1-866-620-1919 (toll free)
This is the section that you can use for scheduling the dispatch of your newsletters.
Once you create your newsletter, it can be sent now or can be scheduled to send at any time in the
future using PG Newsletter Software’s built-in scheduling wizard.
All you need to do is choose a newsletter to be sent out on a certain date, choose the date and mark if
the newsletter’s dispatch should be repeated in some period of time. It is also possible to enter the
time for sending your newsletter.
The following files should be set to cron jobs: /cron/cron_send.php (every 5 minutes run). The
command for a run in most cases is the following: wget -q -O /dev/null
http://your_host.com/cron/cron_send.php. If these settings do not run Schedule feature, apply to
your server Support Team.
Newsletters Archive
This is the section where you can keep your sent newsletters and have them displayed on your site. To
add a newsletter to this section, go to ‘Manage newsletters’ section, choose the newsletter and click
“Add to archive” button. You can make newsletters from archive available on your website. Just insert
the link to it on your site page. Clicking it, site visitor will be able to view the newsletter right from the
website.
© 2010 Pilot Group Ltd. All rights reserved.
Call 1-866-620-1919 (toll free)
Autoresponders
Autoresponders is a kind of newsletters that are sent out automatically at pre‐defined intervals after
subscribing to a certain mailing list. You can create unlimited number of autoresponders to automate
your newsletter marketing system sending follow-ups to your subscribers at any time in the future
after their subscription.
Manage autoresponders
Manage autoresponders is the section where you can view details about autoresponders you already
created. Click Autoresponders in the navigation bar, then click Manage Autoresponders. This screen
will display a list of mailing lists, the number of subscribers belonging to the mailing list, and the
number of autoresponders associated with each list. Select a mailing list and click Next>>
© 2010 Pilot Group Ltd. All rights reserved.
Call 1-866-620-1919 (toll free)
You will get a list of autoresponders of the selected mailing list:
Here you can:
Create an autoresponder: click this to begin defining a new autoresponder for this mailing list
Delete the selected autoresponder(s): remove the autoresponder (or autoresponders). Note: The
autoresponder cannot be retrieved.
Activate/deactivate an autoresponder: when activated, an autoresponder will be sent to contacts at
the specified time; when deactivated, an autoresponder will not be sent to subscribers. To activate or
deactivate an autoresponder, please click the icon in the column ‘Status’ of the necessary
autoresponder.
View: preview the autoresponder.
Edit: apply changes to autoresponder settings and content.
Delete: remove the autoresponder.
Creating an Autoresponder.
Take the following steps to create an autoresponder:
© 2010 Pilot Group Ltd. All rights reserved.
Call 1-866-620-1919 (toll free)
Click Autoresponders in the navigation bar and select Create an Autoresponder.
Select the mailing list for this autoresponder and click Next>>.
Enter a name for the autoresponder in the Autoresponder Name field. Enter autoresponder’s subject
(it will be used as an email subject when delivered to subscribers).
Select type of subscribers that should receive this autoresponder (confirmed subscription or not
confirmed), choose when autoresponder should be sent (right after the subscription or some definite
time later), choose autoresponders format and select a template, if you would like to create this
autoresponder using a template.
The next screen is similar to the one used for creating ordinary newsletters. Here you should add
content to your autoresponder and click ‘Save Autoresponder’.
© 2010 Pilot Group Ltd. All rights reserved.
Call 1-866-620-1919 (toll free)
Triggers
A trigger is a feature that activates a certain action when a specific event occurs, such as adding a
subscriber to a new mailing list when they click a link or automatically send a personalized email
response to all subscribers who opened a certain newsletter.
Manage Triggers
To view the list of triggers you already created click Autoresponders in the navigation bar, then click
Manage Triggers:
Here you can:
Create a trigger: click this to start adding a new trigger.
Delete selected: removes selected triggers.
Activate/deactivate a trigger: when activated, a trigger will activate an action when specified action
occurs; when deactivated, trigger will stay inactive even though specified action takes place. To
activate or deactivate a trigger, please click the icon in the column ‘Status’ of the necessary trigger.
Edit: apply changes to trigger’s settings.
Delete: remove the trigger.
Creating a Trigger
To add a trigger, enter its name, activation settings and its actions on activation:
© 2010 Pilot Group Ltd. All rights reserved.
Call 1-866-620-1919 (toll free)
Activation settings allow setting the condition when trigger is activated. The following conditions
are available:
‐
‐
when a certain link is clicked
when a certain newsletter is viewed
Trigger actions allow setting an action for the activated trigger when specified condition takes place.
The following actions are available:
‐
‐
send a certain newsletter
add a subscriber to a different mailing list
Attachments
The section lists files that can be attached to a newsletter. It allows uploading new files and removing
those you don’t need. Files from this list will be displayed on newsletter creation page where you will
be able to choose files to be attached to a newsletter.
© 2010 Pilot Group Ltd. All rights reserved.
Call 1-866-620-1919 (toll free)
Templates
This is the section where newsletter templates are stored. You can create new templates, edit existing
ones or remove those you don’t need. Newsletter templates are used to save your time and efforts.
You can create a template if your future newsletters will be based on your company standards or will
just correspond to the same layout criteria. You won’t have to create the same layout for each of your
newsletters.
You can create or edit templates in the same way newsletters are created or edited.
The options available to you once you have created a template are as follows:
View: This allows you to see a preview of the template. This opens up in a new window.
Edit: This allows you to change the name and the template format and then view the WYSIWYG and/or
text editor to view the template and make appropriate changes to it.
Delete: This will show a pop up option box to confirm your decision to delete a template.
Note: Deleting templates is permanent. Make sure that you really want to delete before you do.
You can also set the template to be global; in this case the template will be available to all Newsletter
Service Customers. If the template is not marked as global, it will not be visible to Newsletter Service
customers:
© 2010 Pilot Group Ltd. All rights reserved.
Call 1-866-620-1919 (toll free)
Statistics
Track the effectiveness of your email campaign using ‘Statistics’ section of PG Newsletter Software.
Statistics are reports about the newsletter campaigns and subscribers to allow you to measure your
performance. If you know more about your newsletter campaigns you are then able to plan better
newsletters based on this information.
General Statistics covers information on your mailing lists and subscribers.
Sent Newsletters provides information on the effectiveness of each newsletter sent. You can view
number of:
‘opens’ (information about the number of emails in this campaign that were opened by their
recipients)
‘link clicks’ (information about the number of links in this email campaign that were clicked by their
recipients. You can also see which individual recipients clicked a link)
‘forwards’ (information about the number of contacts who have forwarded this email campaign to
their friends.)
‘unsubscribes’ (information about the number of contacts who have unsubscribed using a link in this
email campaign. You can also see the email address of each contact.) etc of each newsletter you sent.
‘errors’ (information on number of recipients who did not receive a newsletter due to some error while
the sending process)
© 2010 Pilot Group Ltd. All rights reserved.
Call 1-866-620-1919 (toll free)
‘failed’ (information on the number of newsletters that have not yet been sent; to complete the
sending process to the list of failed, click the button ‘Send’ at the bottom of the page).
Autoresponders Statistics provides statistics for your autoresponders.
Subscribers
Before you can send any newsletters to a mailing list, you will need to have subscribers in the mailing
list.
What is a subscriber?
A subscriber is a person that has indicated that they would like to receive information from you by
subscribing to a mailing list. They can either subscribe using an online form or you may input their
details manually.
Note: It is very important to make sure that the subscriber wants to be on your mailing list. When you first
login to the control panel, there will not be any subscribers in your mailing lists.
Adding a subscriber
If you have an existing mailing list in another application or you receive mailing list subscriptions
manually, then you can add subscribers one by one if you prefer. Once you click ‘Create Subscriber’
from the navigation menu, the following page will appear:
© 2010 Pilot Group Ltd. All rights reserved.
Call 1-866-620-1919 (toll free)
Fill in all ‘fields’ in this page. The asterisk next to a field name indicates that the field is required. Enter
subscriber’s details, choose which mailing list you want to add the new subscriber to.
If you mark the option ‘Notify the user on a subscription’, then the subscribed person will get a
notification about the subscription.
Importing subscribers
This application allows you to quickly subscribe a group of emails from an existing list.
Choose ‘Import Subscribers’ from the navigation menu under the ‘Subscribers’ section.
© 2010 Pilot Group Ltd. All rights reserved.
Call 1-866-620-1919 (toll free)
To start, you will need to export your subscriber list from your other mailing program. You should
export your subscriber list into a CSV (comma separated value) file. A CSV file will contain a list of your
subscribers’ details in a line-by-line format.
Subscribers’ data is indicated per line further, for example:
Andrew;Jefferson;[email protected];
Lisa;Martin;[email protected];
Andy;Garcia;[email protected];
Cindy;McCain;[email protected];
To import subscribers from a file, click the “Import Subscribers” button. This will start the “Import
Subscribers” wizard. Choose the mailing list you want to import subscribers to, enter delimiter used in
the imported file, choose whether the imported file contains headers, and then choose the CSV file
from your computer.
Once your file is loaded, you will be able to map the fields in the imported file with fields in PG
Newsletter Software mailing list. The text on the left of the screen displays the fields in the imported
file. Select the mailing list field to which each field should map. Once you are through, click ‘Import’.
Exporting subscribers
© 2010 Pilot Group Ltd. All rights reserved.
Call 1-866-620-1919 (toll free)
In some cases you may need to export the information that you have in the mailing lists for use in
another database. The export function allows you to create a CSV file to help you export this
information for use in another program.
Choose the ‘Export Subscribers’ option from the navigation menu under the ‘Subscribers’ tab and the
Export Subscribers Form will appear.
Enter the file name, choose the mailing list that you wish to export information from and indicate the
fields that should be exported. After clicking “export”, you will get a link to download the exported file.
Bounced Subscribers
The section displays subscribers list to whom newsletter was not delivered due to some problem. Here
you can view what caused the problem with delivering a newsletter and remove selected subscribers:
© 2010 Pilot Group Ltd. All rights reserved.
Call 1-866-620-1919 (toll free)
In order to enable this option, you should set the following file to crontab:
/cron/cron_check_email.php
Messages about bounced errors will be sent to a ‘From’ address. Once this cron file is executed, it will
pull these messages into ‘Bounced subscribers’ section so that you could decide what to do with these
subscribers.
Mailing Lists
A Mailing List is a collection of email addresses used by an individual or an organization to send
material to multiple recipients. When a message is sent to a mailing list, all subscribers of the mailing
list receive the message, unless otherwise specified through filtering.
Why do I need a mailing list?
In order to start a campaign, you will need a mailing list. A mailing list holds all the information about
your subscribers. The application can then send a newsletter to the subscribers of the list and give you
statistics for this mailing list once you have sent the newsletter.
Creating and Managing Mailing Lists
Click on the ‘Manage Mailing Lists’ from the navigation menu under the Tab ‘Mailing Lists’. If you
already have 1 or more mailing lists, these will be listed in a table as shown below:
© 2010 Pilot Group Ltd. All rights reserved.
Call 1-866-620-1919 (toll free)
To create a new mailing list you can click on ‘Create Mailing List’ button. You can also click on the
‘Create Mailing List’ in the navigation menu under the ‘Mailing Lists’ tab.
You will get the following create mailing list set up page:
This screen will ask you for the following:
List Name: This is the name that you wish to use to allow you to reference this list.
Autoreply on subscription: The message that will be sent after someone subscribed to this mailing list.
Autoreply on unubscription: The message that will be sent after someone unsubscribed from this
mailing list.
Merge Mailing Lists
There is a possibility to merge your mailing lists if you need to joint 2 or more mailing lists into a new
one. Let’s say you send a newsletter to your customers and you include their names, addresses in each
personalized newsletter. After a period, you gather a second source of contacts and you want to mix
these two contact lists into a single list, allowing you to produce a single newsletter for all your
contacts.
To merge mailing lists, click on the ‘Merge List’ button. You will get the page similar to one for creating
a mailing list. Fill in the fields of the form and tick the Mailing Lists you want to be merged.
© 2010 Pilot Group Ltd. All rights reserved.
Call 1-866-620-1919 (toll free)
Forms
A form is a part of a web page that allows a user to input information by answering a set of predefined
questions. This form is then submitted to allow the information to be collected.
The forms that are created in the application are closely linked with the personalization field functions
and their properties.
Here is an example of a standard form:
Creating a form
To get started, click the ‘Manage Forms’ link from the ‘Forms’ section of the navigation menu. If you
would like to create a new form, click on the “Create Form” link in the ‘Forms’ section.
The following form will appear:
© 2010 Pilot Group Ltd. All rights reserved.
Call 1-866-620-1919 (toll free)
The following information should be entered:
Name of the new form.
Form type: subscription or unsubscription form.
Require confirmation: if enable, subscribers will need to verify their subscription by clicking a link sent
to their email address.
Send ‘Thank you’: if enabled, subscribers will receive a ‘Thank you’ message after subscription.
Captcha: if ticked, the form will include a security code to avoid automatic subscriptions.
Lists to Subscribe to: choose mailing lists for new subscriptions from this form.
Thankyou Page: here you can setup the page displayed after the subscription.
Thankyou Page URL: if you have a page with the ‘thank you’ message, you can enter it here.
After you are through with entering new form details, you will be forwarded to ‘Manage Forms’ area.
Manage Forms
© 2010 Pilot Group Ltd. All rights reserved.
Call 1-866-620-1919 (toll free)
Here you can view all your forms both subscription and unsubscription.
The following options are available:
View: preview the selected form.
Get HTML: the option generates HTML code of the form to be inserted into your website pages.
Edit: apply changes to form settings.
Edit Form Fields: manage custom fields of the form.
Delete: removes the form.
Manage Patterns
Here you can and or edit the rules for filling this or that field in the subscription form. The system will
check whether the field is filled in accord with these rules. If the field was filled incorrectly, the user will
get a corresponding message.
When you create text or textarea attribute in “Form Components” section, you can specify pattern to
control the inserted data for this component (example - email address format). This section is
designed to allow you create these patterns using PREG patterns syntax.
© 2010 Pilot Group Ltd. All rights reserved.
Call 1-866-620-1919 (toll free)
Custom Form Fields
Area for managing custom fields for subscription/unsubscription forms. To create a new field, click
"Add attribute", choose type of the new field (checkbox, drop-down etc), choose whether the field is
mandatory to be filled and click "Save":
© 2010 Pilot Group Ltd. All rights reserved.
Call 1-866-620-1919 (toll free)
Groups
Area for managing Newsletter Service customers and groups they may belong to. Groups allow you
to distinguish access to newsletter service sections for different types of users.
Managing groups
Area for managing groups used to assign certain permissions to newsletter service sections for
different groups members. Along with creating, managing and removing groups for your newsletter
service users, here you can also create footer for the group: anything you type there will be added to
the end of every HTML and Text newsletter (after the user`s html footer).
The following options are available:
Edit: allows modifying group name
Permission: allows assigning permissions for a selected group
View users list: displays users of the selected group
Delete: removes the group
Create a footer: area for managing groups footer: anything you type there will be added to the end of
every HTML and Text newsletter sent by this group user (after the user`s html footer).
Creating a group
© 2010 Pilot Group Ltd. All rights reserved.
Call 1-866-620-1919 (toll free)
To create a new membership group, click ‘Create Group’ under the ‘Groups’ tab of the top navigation
menu. Enter group name and click save, you will then be forwarded to ‘Manage groups’ section where
you will be able to edit new group’s settings.
Service Customers
The section lists all your Newsletter Service Customers. Here you can add new customers manually,
modify profiles of existing customers, their membership, change their status or remove from your
service.
To add a new customer, click ‘Add’ button, you will get a page where you will need to enter new user’s
details.
Note: to be able to add a service customer, you need to have at least one paid package created.
(To create a paid package, go to ‘Billing’>’Types of Payments’ section)
© 2010 Pilot Group Ltd. All rights reserved.
Call 1-866-620-1919 (toll free)
Billing
Area for managing billing settings of your Newsletter Service. Here you can create different paid
packages, setup payment gateways that will be used on your service, choose currency, view payments
made etc.
List of payments
This area provides information on the members` payments listed in chronological order. Here you can also approve or decline payments that require manual approve. Billing Settings
The section allows setting up payment gateways that will be used in Newsletter Service and choosing
currency for payments.
© 2010 Pilot Group Ltd. All rights reserved.
Call 1-866-620-1919 (toll free)
To activate a payment system, click the selected one from the list of available payment systems:
On the next page enter payment system account details and put a tick against ‘Use this payment
system’. Clicking ‘Save’ you will make this payment system available on your Newsletter Service for
processing payments.
To choose currency for your service, select the one you want to use from drop-down menu and click
‘Save’. You can also add another currency, to do that fill in its name, symbol and abbreviation.
Types of payments
Area allows you to manage paid packages your newsletter service will provide. You can create packages different in number of days users can use the service and number of newsletters that can be sent. You can also create combination packages that would include both: limitation in time and number of newsletters sent. © 2010 Pilot Group Ltd. All rights reserved.
Call 1-866-620-1919 (toll free)
Click ‘Add paid package’ to add new paid option, choose group for the paid service, its type, enter what package will include and its cost: At the bottom of the page you can see the link generated by the system that you can put on your
website to display your Newsletter Service rates. There is also a seamless option to insert Newsletter
Service rates – get HTML code of the table with the rates to put on your website.
Settings
Area for managing different settings of our email marketing solution.
Login Settings
Area for managing administrator’s access data: login/password:
© 2010 Pilot Group Ltd. All rights reserved.
Call 1-866-620-1919 (toll free)
General Settings
Area for managing general settings. The following settings are available:
Quotes for the number of sent letters of SMTP server: As a rule, SMTP-server has restrictions to the
num• ber of newsletters sent at once. That`s why it`s necessary to send newsletters in portions with
some time breaks between sending periods to send a letter to a large amount of subscribers. Please,
set here the number of newsletters sent at once. If quotas are not used, insert 0 here.
From name: This name will be added into email addresser field by default (subscription confirmation
emails, gratitude expressing emails, etc.)
From email: This email will be added into addresser email • field by default (subscription confirmation
emails, gratitude expressing emails, etc.)
Test email: This email will be used for receiving test newsletters
Show tips: You will see a question mark near some control element. If you place a mouse-pointer over
this question mark, you will see a brief info about this element. After you learn completely how to
work with our script you can freely disable tips. By doing it, you will have an increased speed of site
work.
Type of dispatch: Choose the type of mail transfer agent that will be used for sending out
newsletters.
Action with the subscriber: here you can choose whether a subscriber will be removed or his status
changed, after he unsubscribes from a newsletter
Allow changing links: changing links is required to track statistics
© 2010 Pilot Group Ltd. All rights reserved.
Call 1-866-620-1919 (toll free)
Bounce handling: enables bounce handling
Note: In order to enable this option, you should set the following file to crontab:
/cron/cron_check_email.php
Date format: allows setting date format for displaying throughout the application
Server errors
In this area you can edit messages that will be displayed to users if there are any server errors listed in
the table. You can translate the message into all interface languages of the site clicking the links with
the languages in the line 'Interface language'. In the column 'Message for a user' you can edit the
message that will be shown to a user if there is a server error. To save modified messages, click the
button 'Save'.
Logotype settings
Area for managing logotype за your email marketing application. To change logotype, upload the
image of the new logo. It is also possible to restore the default logo:
© 2010 Pilot Group Ltd. All rights reserved.
Call 1-866-620-1919 (toll free)
Languages
The section allows modifying interface texts. To apply changes, choose the language from drop-down
menu and click `Edit selected language file`. A drop-down will appear with all language files of the
selected language.
To faciliate the process of searching for necessary part of the interface, there is a special search tool
available at the bottom of page. To add new language, enter its name, coding and click save.
© 2010 Pilot Group Ltd. All rights reserved.
Call 1-866-620-1919 (toll free)
SMTP servers
This section is used for indicating SMTP servers info that will be used for sending out newsletters. Go
to ‘SMTP Servers’ section. There you will see a list of SMTP servers used. “Priority” shows sequence of
its use from the very beginning. Principle is the following: localhost will be used if no server is
indicated. System will connect automatically to server with greater “Priority” number from server list,
in case of server connection failure while newsletter delivery.
Click ‘Add’ to add new SMTP server info. Fill in the necessary fields and click the “Save’ button.
Notifications management
The section lists notifications used in PG Newsletter Software. The area allows enabling/disabling
notifications and changing content of each notification.
To enable/disable a notification, click the icon in the column ‘Status’ against the necessary
notification. This will either enable or disable the notification. If there is a green tick, then it is active, in
case there is a red cross, then it is disabled.
To edit the text of the notification, click ‘Edit’, you will get the following screen:
© 2010 Pilot Group Ltd. All rights reserved.
Call 1-866-620-1919 (toll free)
Here you can modify texts of the notification subject and its content. To modify the text of
notifications of a different language interface, click the necessary language version at the top.
© 2010 Pilot Group Ltd. All rights reserved.
Call 1-866-620-1919 (toll free)
Spam Words List
Area for managing spam words which are used to check newsletters against spam words. Here you can see a list of spam words, you can add new words or remove those you don’t need. Spam words should be separated by a comma: © 2010 Pilot Group Ltd. All rights reserved.