1
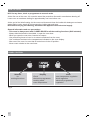
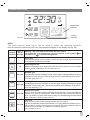
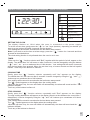
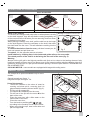
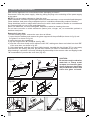
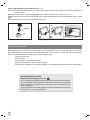
600mm Electric Multi-function Oven Manual MODEL IOS6WE3 - White IOS6SE3 - Stainless Steel Installation and Operation INDEX pag. pag. General warnings 2 Description and use of accessories 15 Technical features 3 Cleaning and maintenance 16 Installation 4 Servicing informations 17 How to cook 6 Electrical diagram 19 Oven cooking chart 14 RECORD HERE FOR EASY REFERENCE Model Colour Serial Number Installation Date Dealer's Name and Address GENERAL WARNINGS Read carefully all the instructions contained in this booklet. It provides you with important information regarding the safe installation, use and maintenance of the appliance as well as useful advice for getting the best out of your oven. Keep this booklet in a safe place for future reference. The manufacturer pays particular attention when printing its instruction manual however misprints may occur. If the texts are unclear, please contact the service centre for explanations. WARNING: Before using the appliance, do not forget to remove the protecting parts of the appliance. After removing the packing, check that the appliance is not damaged in any way. Be careful not to leave the packing materials (plastic sheeting, expanded polystyrene etc.) in reach of children, as they can be dangerous. IMPORTANT: do not use the oven door handle to move the appliance, such as when removing it from the packaging. WARNING Remember ovens get hot: some parts naturally become very hot, notably the glass oven door and the protective strip. KEEP CHILDREN AWAY FROM Oven AT ALL TIMES AND WARN THEM ABOUT THE DANGER. When connecting or using appliances connected to a plug near your oven KEEP THE MAINS CABLE FAR FROM HOT SURFACES OF THE OVEN. 2 IMPORTANT This appliance must be used exclusively for cooking food and for no other purpose. Any other use of the appliance (such as heating a room) is incorrect and therefore dangerous. The manufacturer can not be considered responsible for possible damages arising from a wrong installation or incorrect. - Installation and maintenance have to be done by qualified staff only. - The appliance should only be used for the cooking of food and not for any other use. - The safety of this appliance is assured only when it is correctly connected to a good system of previewed grounding, like from the norms. - When in use the appliance becomes very hot. Do not touch the heated elements inside the oven. - Do not touch the appliance with humid or wet hands or feet. - Do not use the appliance barefoot. - Do not pull the feeding cable in order to detach the plug from socket. - Do not leave the apparatus exposed to atmospheric agents (rain, sun and so on). - Do not allow the appliance to be used by children. - Dont let children sit down or play with the oven door. Do not use the drop down door as a stool to reach above cabinets. - Care should be taken to avoid touching heating elements inside the oven. Keep from sitting and put heavy objects on the oven door when it is open. Make sure that the oven is on the closed mode (off) when the appliance is not in use. WARNING - Accessible parts will become hot when in use. To avoid burns and scalds children should be kept away. WARNING This appliance is not intended for use by persons (including children) with reduced physical, sensory or mental capabilities, or lack of experience and knowledge, unless they have been given supervision or instruction concerning use of the appliance by a person responsible for their safety. Children should be supervised to ensure that they do not play with the appliance. Young children and infirm persons should not be left unsupervised in the vicinity. WARNING A steam cleaner is not to be used cleaning this appliances. The manufacturer reserves the right to make modifications that may be necessary and useful, without prejudicing essential safety and working features. The manufacturer can not be considered responsible for possible damages arising from a wrong installation or incorrect use of the appliance. TECHNICAL FEATURES IMPORTANT: The rating data plate is attached to the front of the oven. The appliance must be installed in accordance with the requirements of AS/NZS 3000. Supply voltage 220 - 240 V~ Oven capacity (l) 60 lt 50 Hz 3 INSTALLATION We recommend that installation, connection and preparation of the cabinet are carried out by a qualified technician accordingly with the instructions of this booklet and with the installation requirements or regulations in force in the user's Country How to remove packing After having removed internal and external packing ensure that the apparatus is intact and not damaged. If you are not sure do not use the oven, and call your Retailer. Some points are protected with a plastic coating. It is absolutely necessary to eliminate this covering before using the appliance. The elements used for packing (cardboard, bags, polystyrene, cards) must be kept away from children because they are a potential source of danger. Installation, regulation, transformation, maintenance should only be done by qualified personnel only. INSTALLING THE APPLIANCE For the most efficient air circulation, the oven should be fitted according to the dimensions shown in fig. 2. FITTING THE APPLIANCE Fit the appliance into its surround (beneath a work-top or above another appliance) by inserting screws into the 2 holes that can be seen in the frame of the oven when the door is open (fig. 2). IMPORTANT The panels of the adjoining furniture should be heat resistant. Particularly when the adjoining furniture is made of veneered wood, the adhesives should be able to withstand a temperature of 100°C. Plastic materials or adhesive which cannot withstand this temperature will become deformed or unstuck. To comply with safety regulations, once the appliance has been fitted it should not be possible to make contact with the electrical parts. All parts which offer protection should be fixed in such a way that they cannot be removed without the use of a tool. sc re sc w re fig. 2 4 w Screws fitting ELECTRICAL CONNECTION The appliance must be installed by a suitably qualified person in accordance with these instructions and with the requirements of the Australian Wiring Rules AS/NZS 3000. Fixed wired installations are to be provided with suitable isolation means in accordance with the said rules. Any plug socket installed for the purpose of connecting the appliance to supply must be readily accessible when the appliance is installed. Before making the connection, make sure that: 1) the safety circuit-breaker and the electrical system are able to withstand the load of the appliance (see nameplate). 2) the power supply system has an earth connection in good working order in accordance with the regulations in force; IMPORTANT The wires in the mains lead are coloured in accordance with the following code: GREEN & YELLOW .....................................................................EARTH BLUE........................................................................................NEUTRAL BROWN ...........................................................................................LIVE Electric power ....................1,5 mm2 core cable (15 amp. Fuse required) Should conform to local authority requirements. Also refer to rangehood manufacturers recommendations. This appliance is supplied with a plug & cord, simply plug into a 3 pin household socket outlet witch is properly earthed. WARNING: THIS APPLIANCE MUST BE EARTHED. The flexible mains lead and plug must not be in contact with hot surfaces. 5 HOW TO COOK N.B. Set any timer, clock or programmer to manual mode. At the first use of the oven, its normal to smeel the protective oils used in manufacture burning off. Leave oven on maximum setting for approximately one hour before use. At the end of the initial heating, let the oven cool down and clean the inside with detergent and warm water. Before using, wash all grid accessories, baking-pan and trays. N.B. Before carryng out cleaning, disconnect the appliance from electrical supply. General information and use precautions - This oven is always used with CLOSED DOOR for all the cooking functions (Grill included). - Always hold the handle in the middle, to open the oven door. - When you open the oven door, beware hot vapour. - Use protective gloves to insert or to extract containers from the oven. - Use containers resistant to the temperatures indicated on the oven display. - After use of the oven, be sure that all controls are in the off position.. - Never roast or bake on the oven base. PANEL CONTROL Selector for cooking functions. Fig. 4 6 Display -Clock -electronic programmer -cooking mode -oven temperature. Knob -oven temperature regulation -clock regulation -electronic programmer regulation. COOKING FUNCTIONS temperature indicator Fig. 4A cooking indicator NOTE: The oven selector knob (fig.4) can be used to select the following functions. Note: the functions selected and the oven temperature will appear on the display (see fig. 4A). Temp. °C Cooking min 40 indicators max 260 Warning : the oven must be used with the door closed. To change the oven temperature, turn the selector to the symbol increase, or to to lower the temperature. to Oven light Turn the control knob to this position to switch on the oven light, which will remain lit throughout the following functions. 40 Defrosting with fan Ambient temperature air is distributed inside the oven to defrost food more quickly without protein adulteration. (Pre-set value 40 °C). 50 ÷ 200 Medium grill Selecting this function switches on the central upper heating element for direct radiation of heat over food This function must be used between 50 to 200°C (Pre-set value 200 °C). 50 ÷ 200 Large grill Selecting this function switches on the two upper heating elements for direct radiation of heat over food. This function must be used between 50 to 200°C. (Pre-set value 200 °C). 50 ÷ 260 Natural convection Both the lower and upper heating elements operate together. This is the traditional cooking, very good for roasting joints, ideal for biscuits, baked apples and crisping food. You obtain very good results when cooking on a shelf adjusting the temperature from 50 to 260 °C (pre-set value 180 °C). 50 ÷ 260 Fan oven Both the fan and the circular heating element operate together. The hot air adjustable between 50 and 260 °C is evenly distributed inside the oven. This is ideal for cooking several types of food (meat, fish) at the same time without affecting taste and smell. It is indicated for delicate pastries. (Pre-set value 170 °C). 7 8 50 ÷ 260 Fan-assisted natural convection Both the top and bottom elements are on, as is the fan. This is the conventional cooking method, excellent for a variety of foods. It produces good results for cooking on one level -- ideal for biscuits, cakes and canapés -- with the temperature adjustable from 50 to 260°C. (Pre-set value 185 °C). 50 ÷ 200 Fan assisted total grill The air which is heated by the grill heating element is circulated by the fan and so helps to distribute the heat. The fan assisted grill replaces perfectly the turnspit. You can obtain very good results also with large quantities of poultry, sausage, red meat. This function must be used between 50 to 200°C. (Pre-set value 200 °C). 50 ÷ 260 Lower heating element This function is particularly indicated for cooking from the bottom, warming up food or sterilizing glass jars. It is also indicated for food requiring long and slow cookings, i.e. casserole. This function can be used between 50 and 260 °C. (Pre-set value 220 °C). INSTRUCTIONS FOR USE OF CONTROL DEVICES (display LCD) Minute minder Clock Start of cooking Cooking time End of cooking Fig. 4B Defrosting Turnspit Key lock SETTING THE TIME OF DAY When the oven is first connected to the power supply, the display shows 00.00 and the led indicator flashes. To set the desired time, turn the knob (fig. 4B) clockwise to the symbol or anticlockwise to the symbol depending on whether you wish to increase or decrease the time. To confirm the time set, press the knob or wait for 5 seconds. Important: unless this operation is performed, it will not be possible to set the ovens cooking functions. Note: if you wish to set the time of day later, press the selector knob (fig. 4B) until the time indicator flashes and then proceed as described above. After setting, the timer is set to operate in manual mode. MINUTE MINDER Press the selector (fig.4B) until the minute minder indicator flashes, then set the desired cooking time by turning the knob clockwise to the symbol or anticlockwise to the symbol depending on whether you wish to increase or decrease the time. To confirm the time set, press the knob or wait for 5 seconds. The display will show the set time and the indicator will remain lit. At the end of the set time, an acoustic signal sounds and the indicator flashes. Press the selector knob (fig.4B) to stop the acoustic signal. COOKING TIME Important: cooking time can only be set if the cooking function selector knob (fig.4) is turned to a cooking position! Bear in mind, furthermore, that is the cooking function selector knob is turned to zero during a cooking programme, the entered setting will be cancelled! Setting: press the selector knob (fig.4B) until the symbol flashes. Set the desired cooking time by turning the knob clockwise to the symbol or anticlockwise to the symbol depending on whether you wish to increase or decrease the time. To confirm the set time, press the selector knob (fig.4B) or wait for five seconds. The display will show the symbol with the set time and the symbol with the time at which the oven will switch off. Start of cooking is indicated by the symbol , which lights up on the display. At the end of the set time the oven switches off automatically, an acoustic signal sounds and the indicator flashes. Press the selector knob (fig.4B) to stop the acoustic signal and turn the function selector (fig.4) to zero to exit cooking time setting. 9 COOKING END TIME Important: cooking end time can only be set if the cooking function selector knob (fig.4) is turned to a cooking position! Bear in mind, furthermore, that is the cooking function selector knob is turned to zero during a cooking programme, the entered setting will be cancelled! Setting: press the selector knob (fig.4B) until the symbol flashes. Set the cooking end time by turning the knob clockwise to the symbol or anticlockwise to the symbol depending on whether you wish to increase or decrease the time. To confirm the set time, press the selector knob (fig.4B) or wait for five seconds. The display will show the symbol with the set cooking end time and the symbol with the cooking time. Start of cooking is indicated by the symbol , which lights up on the display. At the end of the set time the oven switches off automatically, an acoustic signal sounds and the indicator flashes. Press the selector knob (fig.4B) to stop the acoustic signal and turn the function selector (fig.4) to zero to exit cooking end time setting. COOKING TIME AND COOKING END TIME Press the selector (fig.4B) until the symbol flashes. Set the desired cooking time as described at COOKING TIME. Press the selector knob (fig.4B) until the symbol flashes. Set the desired cooking end time as described in the paragraph COOKING END TIME. The oven will begin cooking based on the calculation of cooking end time minus cooking time. For example, if cooking end time is set at 12.00 and a cooking time of 1.30h is set, the oven will begin cooking at 10.30 and will switch off at 12.00. Start of cooking is indicated by the symbol , which lights up on the display. At the end of the set time the oven switches off automatically, an acoustic signal sounds and the indicator flashes. Press the selector knob (fig.4B) to stop the acoustic signal and turn the function selector (fig.4) to zero to exit cooking time and cooking end time setting. CANCELLING PROGRAMMES Programmes can be cancelled at any time by re-selecting the previously selected functions and turning the selector knob (fig.4B) anticlockwise to the symbol zero , resetting the time to zero. SETTING THE KEY LOCK If you activate the key lock, the timer can no longer be used to set the time or programmes. Neither the time of day nor an elapsing minute minder nor an active cooking programme can be modified. However, the set functions will operate accurately. Proceed as follows to activate the key lock: Press the selector knob (fig.4B) until the symbol flashes. To confirm, turn the selector knob anticlockwise to the symbol for about 3 seconds. Only the acoustic signal emitted at the end of a cooking programme can be stopped, no other functions can be changed. To deactivate the key lock, turn the selector knob (fig.4B) anticlockwise to the symbol for around 3 seconds. On the display, the indicator for the key lock function switches off. ADJUSTING THE DISPLAY BRIGHTNESS The brightness of the display can be adjusted between 4 different brightness settings by turning the selector knob (fig.4B) anticlockwise to the symbol or clockwise to the symbol . Note: adjustment can be made only when the function selector (fig.4) is set to zero. 10 PANEL CONTROL (touch control model ) 6 1 7 2 3 8 4 5 1 = oven temperature regulation. 5 = cooking function programmer. 2 = Oven on .3 = clock regulation - electronic 6 = temperature indicator. programmer regulation. 4 = selector functions programmer. 7 = Display programmer. 8 = cooking indicator. Fig. 5 Turning the oven on and off Press the button . On will appear on the display and the ovens internal light will come after two seconds. If no cooking function is set within the following minute, the oven sets itself to OFF automatically. Controls lock. Every time the oven is turned off, the controls lock is automatically activated (child safety). When the lock is active the lock symbol appears on the temperature display. Deactivate the lock by pressing the button for a few seconds to use the oven. The lock can be activated even while the oven is in use by pressing the button for a few seconds. The following cooking functions can be set by using the programmer (Fig. 5): Note: the functions selected and the oven temperature will appear on the display (see fig. 5). Temp. °C Cooking min 40 indicators max 260 Warning : the oven must be used with the door closed. Note: gently press the keys (sensors) the oven temperature. to increase or decrease Oven light The ovens internal light comes on automatically when the oven is turned on and remains on during other functions too. Pr 01 dEF Defrosting with fan Ambient temperature air is distributed inside the oven to defrost food more quickly without protein adulteration. 40 ÷ 60 NOTE: It is possible to turn on the ovenfs bottom heating element by varying the temperature between 40 and 60 °C if you want to speed up the defrosting process. 50 ÷ 200 Medium grill (turnspit according to the model ). Selecting this function switches on the central upper heating element for direct radiation of heat over food. This function must be used between 50 to 200°C. (Pre-set value 200 °C). Pr 02 11 Pr 03 50 ÷ 200 Large grill (turnspit according to the model ). Selecting this function switches on the two upper heating elements for direct radiation of heat over food. This function must be used between 50 to 200°C. (Pre-set value 200 °C). 50 ÷ 260 Medium Fan-assisted Grill The air warmed up by the grill element (medium) is pumped by the fan which then conveys it onto the food. This function guarantees good results with poultry, sausages and red meat. This function must be used between 50 to 200°C. (Pre-set value 200°C). 50 ÷ 200 Fan assisted total grill The air which is heated by the grill heating element is circulated by the fan and so helps to distribute the heat. The fan assisted grill replaces perfectly the turnspit. You can obtain very good results also with large quantities of poultry, sausage, red meat. This function must be used between 50 to 200°C. (Pre-set value 200 °C). 50 ÷ 260 Natural convection Both the lower and upper heating elements operate together. This is the traditional cooking, very good for roasting joints, ideal for biscuits, baked apples and crisping food. You obtain very good results when cooking on a shelf adjusting the temperature between 50 and 260 °C (pre-set value 180 °C). 50 ÷ 260 Fan oven Both the fan and the circular heating element operate together. The hot air adjustable between 50 and 260 °C is evenly distributed inside the oven. This is ideal for cooking several types of food (meat, fish) at the same time without affecting taste and smell. It is indicated for delicate pastries. (Pre-set value 170 °C). 50 ÷ 260 Fan-assisted natural convection Both the top and bottom elements are on, as is the fan. This is the conventional cooking method, excellent for a variety of foods. It produces good results for cooking on one level -- ideal for biscuits, cakes and canapés -- with the temperature adjustable from 50 to 260°C. (Pre-set value 185 °C). 50 ÷ 260 Fan with lower heating element The air warmed up by the lower heating element is pumped by the fan which then conveys it onto the food at a temperature of between 50 and 260°C. This function is good for sterilising foods (pre-set value 220°C). 50 ÷ 260 Turning on the ovens top heating element. It can be used to reheat cooked food by placing the oven rack on the second level from the top, or to defrost bread, pizza or pasta by placing the oven rack on the first level from the bottom . This function works at temperatures of between 50 and 260°C. (Pre-set value 220°C). 50 ÷ 260 Fan with top heating element The air warmed up by the top heating element is pumped by the fan which then conveys it onto the food at a temperature of between 50 and 260°C. (Pre-set value 220°C). 50 ÷ 260 Fan oven (energy saving function) The fan and circular heating element are on at the same time. Hot air (temperature of between 50 and 260 °C) is conveyed uniformly on all levels. This function is ideal for cooking different types of food (meat or fish) for a long time. (Pre-set value 170 °C). Pr 04 Pr 05 Pr 06 Pr 07 Pr 08 Pr 09 Pr 10 Pr 11 Pr 12 12 INSTRUCTIONS FOR USE OF CONTROL DEVICES Display programmer A (touch control model) bELL Minute minder dur Cooking time End End of cooking hour Clock Take off time Add time Function setting A Programmed function Oven on SETTING THE CLOCK The display flashes on 12:00 when the oven is connected to the power supply. To set the correct time, gently press the " " or " " keys (sensors), depending on whether you want to go up or down and after 4 seconds set the minutes. Your settings will be stored 4 seconds after the last button was pressed. Note: if you wish to set the time at a later stage, press the " " button for 4 seconds and then proceed as described above. The clock setting function is only allowed when the oven is not in use. TIMER Skim over the " function selector until "Bell", together with the symbol of a bell, appear on the display. The default time "90" will come on after 2 seconds. It can be changed by using the buttons " " and " " up to a maximum time of 180 minutes . Your settings will be stored 4 seconds after the last button was pressed. When the set time is up, a buzzer sounds and the bell symbol flashes. Touch any of the buttons to silence it. COOKING TIME Gently press the " " function selector repeatedly until "dur" appears on the display. The default time "90" will come on after 2 seconds. It can be changed by using the " " and " " buttons up to a maximum time of 180 minutes. Your settings will be stored 4 seconds after the last button was pressed. The " " symbol appears on the display when the cooking starts. When the set time is up, the oven will switch off automatically, the alarm will sound and the " " indicator will flash. Touch any of the buttons to silence it. STOP COOKING Gently press the " " function selector repeatedly until "End" appears on the display. The stop cooking default time will appear on the display (equal to a time between the correct time + default time). It can be changed by using the " " and " " buttons up to a maximum of 23 hours and 59 minutes. Your settings will be stored 4 seconds after the last button was pressed. The " " symbol appears on the display when the cooking starts. When the set time is up, the oven will switch off automatically, the alarm will sound and the " " indicator will flash. Touch any of the buttons to silence it. 13 COOKING TIME AND STOP Gently press the function selector repeatedly until "dur" appears on the display. Set the desired cooking time as described in the paragraph COOKING TIME. Gently press the selector again until Stop appears on the display and set the stop cooking time as described in the paragraph STOP COOKING. A will appear on the display . Cooking will start at a time calculated as the time of cooking stop minus the cooking time. E.g.: if the cooking stop time is set for 12.00 and the cooking time is set as 1.30hr, the oven will come on at 10.30am and will switch off at 12.00. A (automatic), the temperature and the previously set cooking function will all be shown on the display during the delayed start phase, whilst the temperature bar will remain switched off to indicate that the oven is currently not in use. When the set time is up, the oven will automatically switch off. The " A" and " " symbols will flash and the bell will sound. Touch any of the buttons to silence it. Oven cooking chart Function Meats Roast veal Roast pork Filet Poultry Roast chicken Scones Bread Pastres Biscuits Sponge cake Small cake Cakes Apple-pie °C Minutes 4 4 5 190 190 230 130 130 6+6 Grill per gir. Fan oven Fan oven 2 3/5 4 230 190 180 85/90 20/22 25/30 Fan oven Fan oven Fan oven 3/5 4 4 200 150 160 15 50 25 Fan oven 4 190 45 Fan oven Fan oven Grill Level The values shown (temperatures and cooking times) are approximate and may vary depending on the type of meat and its thickness. 14 DESCRIPTIONS OF ACCESSORIES Oven accessories A B C front part A = wire shelves B = Drip dray (optional) C = Grill pan set NOTE: oven shelves Warning: the positions for shelves are The shelves are designed with stop-locks so when placed correctly on the shelf supports, they will stop before coming completely out Bump of the oven and will not tilt when you are removing food from them or placing food on them. When placing cookware on a shelf, pull the shelf out to the bump on the shelf support. Place the cookware on the shelf, then slide the shelf back into the oven. This will eliminate reaching into the hot oven. To remove the shelves from the oven, pull them forward you, tilt fig. 5 front end upward and pull them out. To replace, it in the opposite manner as before. Install shelves by locating them in the horizontal guide rails on the oven walls. The raised portion of the shelf is to be facing the rear wall of the oven (fig. 5). 5 4 3 2 Warning Always set the grill grid in the highest possible rack (but not too close to the heating element: fatty foods get smoke and may start a fire) place a pan in the lowest possible rack for collecting juice. If a grease fire should occur in a pan put out the flame placing a lid on the pan: NEVER THROW WATER ON A GREASE FIRE. COOLING MOTOR - some models are equipped with tangential cooling motor. TURNSPIT (optional) The turnspit is an optional available only in some models. Central turnspit see figure. 7. Diagonal turnspit see figure. 7A. Use of the turnspit . - Thread the chicken or the cubes of meat for roasting on below spit L, ensuring that it is gripped safely between the two forks F (fig. 5). - Put the spit on support G, . - Put support G completely into the oven. - Fit the end of the spit into the motor M at the back of the oven - Place the oven tray with a little water on the lowest shelf of the oven. - Close the oven door. - Turn the knob to position grill ( - according to the models) to start up the motor. - When removing the spit, wear oven mitts and pull out support G. M F fig. 7 L G M L F G fig. 7 A 15 CLEANING AND MAINTENANCE Wait until the appliance has cooled down before attempting to clean it. Disconnect it from the power supply, either by pulling the plug out or switching off the power supply at the mains. NOTE: Do not use steam cleaners to clean the oven. Clean enamelled, chromed or painted parts with warm water and soap, or non-corrosive liquid detergent. Clean stainless steel parts using methylated spirit of a suitable commercially produced solution. Clean aluminium panels or edges with cotton wool or with a cloth soaked in vaseline or a seed-based oil. Clean and then go over it with methylated spirit. Never use abrasives, corrosive detergents, bleaches or acids for cleaning the oven. Do not leave corrosive or acidic substances (lemon juice, vinegar, etc.) on enamelled, painted or stainless steel parts. Removal of oven door To make cleaning easier, remove the oven door as follows: 1) open the door halfway and remove the glass stoppers A, the profile B (as shown in fig. 8) and the glass C, as shown in fig. 8A. 2) open the oven door completely. 3 ) flip the hinge hooks "A" outwards (see fig. 8B). 4) shut the oven door slowly until it reaches hooks "A", making sure these are locked into slots "B" of the oven door, as shown in fig. 8C. 5) Using both hands, push the oven door lightly inwards, toenable the door hinges "C" to come away from the slots "D" (see fig. 8D) and pull the door towards you until it is released from the oven. After cleaning it, reposition it correctly following the abovesteps in the reverse order and flipping hooks "A" inwardsbefore you shut the oven door (fig. 8E). Fig. 8 B A CAUTION: Do not use rough or abrasive materials or sharp metal scrapers to clean the glass doors of the oven since they may scratch the surface and cause the glass to break. Fig. 8A C A A B C A A D Fig. 8B 16 Fig. 8C Fig. 8D Fig. 8E Side opening door. N.B.: The doors opening direction (right-hand or left-hand) can be changed. Warning: this operation must be carried out by skilled staff during assembly. 1) Open the oven door and undo the two screws in the block A (see figure 9). (N.B.: when block A is unscrewed, the bottom of the door is left completely free. Two people are therefore needed for this operation, one to hold the door firmly while the screws are undone). 2) Reassemble the door on the required side of the oven, use the new block A (accessory supplied with the appliance) and reverse the above instructions. A A Fig. 9 17 Oven light (depending on model) fig. 10 - 11. Warning: Ensure that the appliance is switched off before replacing the lamp to avoid the possibility of electric shock. When the oven is cool, reach the light glass cover and unscrew it as shown in fig. 10 - 11. Replace the bulb with a new one with the same specifications and screw the cover back until is hand tight. Bulb replacement is not covered by your Guarantee. A T300°C A A 1 Fig. 10 2 Fig. 11 Servicing informations Before calling the service be sure you know how to operate your oven: it may help you in explaining the malfunction to the serviceman and check that there is not a power cut (with the fuse still working). When you call for service or order parts do not forget to give: model of your oven serial number colour (when in enamelled version) part name or/and description of the problem your full name, address, home phone number, (or/and business phone number if appropriate). ENVIRONMENTAL NOTES Disposal of packaging materials Do not dispose of packaging materials with normal household waste. These materials are recyclable and should be sorted (e.g. cardboard, plastic sheeting, polystyrene) and disposed of in accordance with local regulations. The only proper use of this appliance is that for which it was expressly designed, as a cooking appliance. 18 19 Tipolitografia Montagnani - Modena (Italy) - Cod. 537924 0708