1
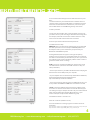
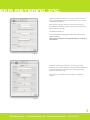
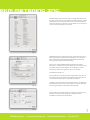
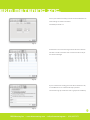
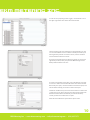
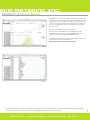
eKM Metering Inc.
EKM Dash 1.8.3.0 User Manual
The EKM Dash is our desktop software solution for your meter data
management. It is intended to give you the tools to easily visualize,
log, email, and export your data in a number of different ways. You
can use it to read your meters directly with your own computer or
link it to your EKM Push account to seamlessly retrieve your data
from the cloud.
Download the software at one of these web links:
Windows: http://dash.ekmmetering.com/EKMDash/win.zip
Mac OSX: http://dash.ekmmetering.com/EKMDash/mac.zip
Linux: http://dash.ekmmetering.com/EKMDash/lin.zip
For EKM Dash setup tutorials, and lots of other helpful information,
please visit our online Knowledge Base at:
https://help.ekmmetering.com/support/home
(Fig. 1)
(Fig. 2)
If you have any questions, email them to [email protected]. Please include screenshots of your main Dash window and settings window.
You can also send us more information using the “Send Diagnostic Information” under the Help menu.
EKM Metering Inc. – www.ekmmetering.com – [email protected] – (831)425-7371
1
eKM Metering Inc.
Index
Page Topic
3
4
4
4
4
5
5
5
5
6
6
6
6
7
7
7
7
8
8
8
9
9
10
10
10
11
11
11
12
Adding a Meter
Setting communication method
USB Converter (Fig. 5)
iSerial (Fig. 6)
EKM Push (Fig. 7)
Setting Read Interval (Fig. 8)
Setting Country & Time Zone
Editing a Meter (Fig. 9)
Setup (Fig. 10)
General Settings (Fig. 11)
Advanced Settings
General (Fig. 12)
LCD Display (v.4 meters only) (Fig. 13)
Pulse (v.4 meters only) (Fig. 14)
Control (v.4 meters only) (Fig. 15)
Rates
Time Of Use (Fig. 16)
Seasons (Fig. 17)
Holidays (Fig. 18)
Schedules (Fig. 19)
Data (Fig. 20)
wattvision (Fig. 21)
Events (Fig. 22)
Email settings (Fig. 23)
Creating a Report (Fig. 24)
Email Options (Fig. 25)
Setting a Schedule (Fig. 26)
Creating a Trigger (Fig. 27)
Dashboard (Fig. 28)
If you have any questions, email them to [email protected]. Please include screenshots of your main Dash window and settings window.
You can also send us more information using the “Send Diagnostic Information” under the Help menu.
EKM Metering Inc. – www.ekmmetering.com – [email protected] – (831)425-7371
2
eKM Metering Inc.
Upon first opening the EKM Dash you will see a blank window. In
order to see your meter data you will first need to add you meter
and communication setting.
(Fig. 3)
To begin, click on the “Meters” button in the top left of the window
and then click “Add Meter.”
(Fig. 4)
3
EKM Metering Inc. – www.ekmmetering.com – [email protected] – (831)425-7371
eKM Metering Inc.
A new smaller window will appear with a few text boxes for you to
fill in:
1. Click the button for your method of meter communications. To
read your meter locally with a USB adapter, click “USB.” To read your
meter over the internet with an iSerial device, click “iSerial.” If you
have an Omnimeter and an EKM Push gateway, select “Push.”
2. Name your meter
3. Enter your meter number. This is the S/N number on the face of
your meter. You only enter the integers that follow the leading zeros.
For example, meter S/N 00000010068 could be entered as 10068,
meter 000300000694 could be entered as 300000694.
(Fig. 5)
4. Choose your meter model from the drop-down list.
5. Communications setup:
EKM Push: Enter your User Key for the Push Device associated with
the meter you want to read. For example: MTAxMDoyMDIw. Your
User Key was sent to you via email when you purchased your
Omnimeter and EKM Push system.
Clicking “Add All” (which will appear to the right of input key
window, once your user’s key is inserted) will allow you to add all of
the meters associated with your Push User Key at once. If you choose
this method you will need to individually edit the meters in order to
give them custom names or settings.
USB: If you have a computer with USB ports and also have one of
our USB converters (do not use other USB converters as they are
often problematic):
(Fig. 6)
º Connect your meters to your USB to RS-485 Converter and plug the
USB converter into the USB port of your computer.
*If your computer does not automatically download the USB drivers,
download the USB drivers from FTDI found here:
http://www.ftdichip.com/Drivers/VCP.htm
º In the Serial Port drop-down list select your USB Com Port. This can
be any number from COM 2 to COM 24 or some reference to USB.
iSerial: In the iSerial Address text box enter the IP address of your
iSerial. This can either be the IP address on the LAN network (if you
are reading it locally, for example 192.168.1.123), the remote internet
public static IP address (for example 144.145.187.30), or your
internet name (for example meters.ekmmetering.com).
The default IP address is 192.168.1.125
Enter the iSerial Port (Default is 50000).
(Fig. 7)
For more information on setting up you iSerial device check out
these PDFs:
http://documents.ekmmetering.com/EKM-iSerial-TCP-IP-to-Serial-Converter-Spec-Sheet.pdf
http://documents.ekmmetering.com/EKM_Dash_Setup_Instructions.pdf
4
EKM Metering Inc. – www.ekmmetering.com – [email protected] – (831)425-7371
eKM Metering Inc.
7. Select your Read Interval. If you would like to store less data on
your computer you can select a slower read rate according to your
needs.
Note: Push meters are set to the fastest read interval by default,
typically every 1 minute.
8. Similarly, select your Country and Time Zone from the appropriate
drop-down lists.
9. Click “OK” to begin to read your meter. You should begin to see
reads come in to the Dash within a few seconds.
Note: If you have a Push meter reading on the fastest read interval
this can sometimes take a bit longer because it is pulling the latest
1000 reads into the Dash. Alternatively, you can opt to check the box
to only pull the latest 1 read.
(Fig. 8)
To edit your meter or make additional settings, click the “Meters”
button in the upper left corner of the main window. Then click on
“Edit Meter.”
(Fig. 9)
A new window will come up with a number of icons across the top.
From here you can navigate through the settings options for your
meter.
Note: The available icons will vary depending on your meter model
and communications settings. The example shown here is the
settings window for an Omnimeter Pulse v.4.
(Fig. 10)
EKM Metering Inc. – www.ekmmetering.com – [email protected] – (831)425-7371
5
eKM Metering Inc.
The General Settings are where you can set your meter’s date and
time, set the demand period, reset max demand, and, on v.4 meters,
set the Resettable kWh to 0.
After you enter a change, click “Set” to enter the change in your
meter. When prompted for a password, enter the password into the
field provided and click “OK.”
The default password is “0”.
For more information regarding max demand, this link has some
helpful information:
https://www.nationalgridus.com/niagaramohawk/non_html/eff_ele
c-demand.pdf
(Fig. 11)
The Advanced Settings are where you can change your meter
number(we do not recommend this), change your meter number(we
do not recommend this), change CT ratio, and change the pulse
output ratio (v.4 meters only).
These changes are instituted in the same way as in the General
Settings.
(Fig. 12)
6
EKM Metering Inc. – www.ekmmetering.com – [email protected] – (831)425-7371
eKM Metering Inc.
The Omnimeter Pulse v.4 has the ability to change what displays on
the meter’s LCD screen. To choose what you want to display, click the
“LCD Display” tab and check the boxes next to the data values that
you want to display on you meter’s screen. When you are ready, click
“Set” to enter these settings in your meter.
(Fig. 13)
The Omnmeter Pulse v.4 has the ability to count pulses from up to 3
pulse output devices. From the Pulse Settings you can select your
pulse output meter model (Template), Which will automatically
enter your pulse output meter’s Pulse Value.
You can also change the Omnimeter Pulse’s Pulse Input Ratio.
billing units, and the pulse ratio. The default ratio is 1:1000(for every
1000 pulses input, the pulse register will increment by 1 on the
meter). If you chake a change to the ratio, click “Set Now.”
The default password is “0”.
If you would like to convert your pulse output meter’s units you can
use the Converted Value portion of this window. This will allow you
to convert from cubic meters to cubic feet, for example.
(Fig. 14)
In addtion to the main Pulse Count, the Dash now has an additional
resettable Pulse Count for each pulse input. You can reset this pulse
count using the button at the bottom of this window.
The v.4 meters also have the ability to control up to 2 external relay
switches. From the Control Settings you can flip the switch
on/off(open/closed) and set the duration.
(Fig. 15)
EKM Metering Inc. – www.ekmmetering.com – [email protected] – (831)425-7371
7
eKM Metering Inc.
From the Rates Settings you can set your TOU tariff under the
Schedules tab. Click “Set” to enter the changes when you are ready.
Use this to keep track of how much power you use for different time
periods of the day. These settings are stored in the meters.
(Fig. 16)
You can set your season under the Seasons tab.
These settings are stored in the meters.
The default password is “0”.
For more information regarding season tariffs, this link has some
helpful information:
http://www.pge.com/en/mybusiness/rates/rateinfo/index.page
(Fig. 17)
You can also set you holidays under the Holidays tab.
These settings are stored in the meters.
The default password is “0”.
(Fig. 18)
8
EKM Metering Inc. – www.ekmmetering.com – [email protected] – (831)425-7371
eKM Metering Inc.
Choose your weekend or holiday overrides under the Overrides tab.
These settings are stored in the meters.
The default password is “0”.
(Fig. 19)
Click the Data icon to view the usage totals for the last six months.
This data is stored in the meters and is recorded on the last day of
the month at midnight.
(Fig. 20)
If you are interested in sending your meter data to wattvision.com,
click the Wattvision icon and follow the steps provided.
You must first sign up at wattvision.com to get your ID and API key.
(Fig. 21)
EKM Metering Inc. – www.ekmmetering.com – [email protected] – (831)425-7371
9
eKM Metering Inc.
In order to set up reporting and/or triggers, click the Events icon in
the upper right hand corner of the main Dash window.
(Fig. 22)
Start by entering your email settings by clicking the Email icon. You
can use our Dashmail service to send to 35 emails per month if you
have registered your Dash. To use this service, click the check box
next to Dashmail and then click save.
If you want to send more than 35 emails per month, or you haven’t
registered your Dash, enter your personal SMTP settings into the
fields provided and then click save.
(Fig. 23)
To create and schedule a report, first click on the Reports icon. Next
click on the + button in the bottom left hand corner of the window.
Now name your report, click the checkbox to enable the report, and
indicate which meter(s) you want to include in the report.
The Values checkboxes let you choose which values to include in the
.csv file that you can opt to attach to your email report. The Records
field at the bottom of the window lets you indicate how many
records you want to include in the csv report.
Enter the email address that you want the report sent to.
(Fig. 24)
EKM Metering Inc. – www.ekmmetering.com – [email protected] – (831)425-7371
10
eKM Metering Inc.
To make changes to the body or your report email, click “E-Mail
Options...”
The text box on the left represents what will be included in your
email report. The codes that appear like “%...%” will be replaced with
the appropriate corresponding values from your meter. You can add,
edit, or delete any of the text you wish. You can also insert value
codes using the tool on the right of the window.
To attach a .csv spreadsheet to your email report, click the checkbox
provided.
Click “OK” when you are ready to continue.
(Fig. 25)
To schedule your report, click “Set Schedule.” From this window you
can schedule your report to be sent by day of the month, day of the
week, hour of the day, and minute of the hour. When you are
satisfied with you schedule, click “OK.”
You have now setup a report. You can click “Run Report” to verify
that you have your email and report settings correct. When you are
ready, click “Save” to finish setting up your report. You can always
make changes later if you need to.
(Fig. 26)
In order to setup triggers, which are simply alerts based on one or
more data parameters, click the Triggers icon.
The initial setup is similar to reports: click the + button, name the
trigger, click the checkbox to enable the trigger, click the meter(s)
that you want to apply the trigger to, and enter an email address
that you want the alert sent to.
Enter the period. This is the number of reads, that need to happen in
a row, in which the rule(s) of the trigger are satisfied.
Click “Add Rule” to create a trigger parameter. Select the data value,
as well as the level that will set of the trigger, from the drop down
menus. You can add as many trigger parameters as you wish. If you
want the alert triggered for any of the rules you add, select “Any”
from the drop-down menu next “Match.”
(Fig. 27)
EKM Metering Inc. – www.ekmmetering.com – [email protected] – (831)425-7371
11
eKM Metering Inc.
To view a visual representation of your data, click “Show Dashboard”
at the top right of the Dash header.
Real Time Chart:
You can select up to two different data types (Watts, Volts, Amps,
etc.) from the four drop-down lists provided.
In order to change the number of reads displayed, click “Edit” at the
top right of the widget and enter the number of reads you want
displayed.
Comparison Chart:
You can select to display hours, days or months for two different
time periods.
(Fig. 28)
In order to change the type of data displayed, click “Edit” at the top
right of the widget and select the desired data type from the
drop-down menu.
Please note: pulse data, from water or gas meters, will only display
for EKM Push users. This data will not display on the Comparison
Chart for iSerial or USB Converter users.
12
EKM Metering Inc. – www.ekmmetering.com – [email protected] – (831)425-7371
eKM Metering Inc.
Index
Page Topic
3
4
4
4
4
5
5
5
5
6
6
6
6
7
7
7
7
8
8
8
9
9
10
10
10
11
11
11
12
Adding a Meter
Setting communication method
USB Converter (Fig. 5)
iSerial (Fig. 6)
EKM Push (Fig. 7)
Setting Read Interval (Fig. 8)
Setting Country & Time Zone
Editing a Meter (Fig. 9)
Setup (Fig. 10)
General Settings (Fig. 11)
Advanced Settings
General (Fig. 12)
LCD Display (v.4 meters only) (Fig. 13)
Pulse (v.4 meters only) (Fig. 14)
Control (v.4 meters only) (Fig. 15)
Rates
Time Of Use (Fig. 16)
Seasons (Fig. 17)
Holidays (Fig. 18)
Schedules (Fig. 19)
Data (Fig. 20)
wattvision (Fig. 21)
Events (Fig. 22)
Email settings (Fig. 23)
Creating a Report (Fig. 24)
Email Options (Fig. 25)
Setting a Schedule (Fig. 26)
Creating a Trigger (Fig. 27)
Dashboard (Fig. 28)
If you have any questions, email them to [email protected]. Please include screenshots of your main Dash window and settings window.
You can also send us more information using the “Send Diagnostic Information” under the Help menu.
EKM Metering Inc. – www.ekmmetering.com – [email protected] – (831)425-7371
13