1
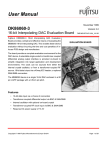
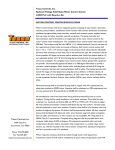
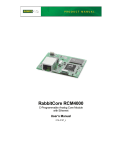
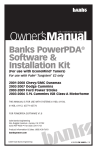
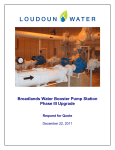
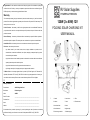
Congratulations! You have made an excellent choice of this quality product. Our commitment to quality also RVSS will provide you with a warranty against defects as follows. RV Solar Supplies Warranty POWERING FREEDOM includes our service. Should you, contrary to expectations, experience defects due to manufacturing faults, The workmanship warranty (wiring and accessories) and solar controller warranty is 1 year from the date of 120W (2 x 60W) 12V purchase. Solar cells are guaranteed to generate power for more than 20 years at 80% of rated output. The warranty does not cover a fuse. FOLDING SOLAR CHARGING KIT Proof of Purchase – this warranty is valid for the original purchase and is not transferrable. Please keep your purchase docket, tax invoice or receipt as the best proof of purchase, and as proof of date on which the USER MANUAL purchase was made. Extent of Warranty – this warranty is limited to defects in workmanship or parts. All defective products or parts will be repaired or replaced. This warranty does not cover batteries or any other consumable items. Normal Wear & Tear – this warranty does not cover normal wear and tear to the products or parts. Exclusions – this warranty does not cover: - Any defects caused by an accident, misuse, abuse, improper installation or operation, lack of reasonable care, unauthorized modification, loss of parts, tampering or attempted repair by a person not authorized by the distributor. - Any product that has not been installed, operated or maintained in accordance with the manufacturers operating instructions provided with this product. - Any product that has been used for purposes other than domestic use - Any damage caused by hail, improper power input or improper cable connection. To Make a Claim – this warranty against defects is provided by RV Solar Supplies, 4/57 Neumann Rd, Capalaba, Queensland 4157. Phone (07) 3390 3700. If a defect in the goods appears within 12 months, you are entitled to claim a warranty. Please contact or send all warranty claims to RV Solar Supplies. Warranty Certificate Product Name 120W Folding Solar Panel Brand Name RV Solar Supplies Model 120WP3 Date of Purchase _______________________________________________________ Purchased from _______________________________________________________ Name _______________________________________________________ Address _______________________________________________________ We recommend that you attach a photocopy of your receipt showing the date of purchase to this warranty certificate and keep for your reference. In the events of a fault please call RVSS on (07) 3390 3700. 1 1. Handle 6. Junction box 11. Fuse 2. Latches 7. Label 12. Protective case 3. Aluminium frame 8. Cable 4. Aluminium stand 9. Alligator clips 5. Solar charge controller 10. Anderson plugs Installation 1. 2. Q. Can the kit charge two or more 12V batteries connected in parallel (“+” to “+”, “-“ to “–“)? Unzip the protective case and remove the folded solar panel. Unclip the two latches on the side of the A. Yes, it’s possible if the batteries have the same type and capacity and are always used together wired in unit and unfold the two panels outward. Extend the support legs and lock in place using the wing nut. parallel as a single 12V battery bank. Pull the controller swivel bracket from the back of the panel (it is connected by Velcro) and allow it to Q. Is there any risk that the solar kit will over charge my battery? move freely (this keep heat away from the back of the panel). A. One of the functions of the solar charge controller is to ensure that your battery is not over charged. Fully extend battery leads and connect the battery clips to the + positive (red) & - negative (black) battery Q. Can I extend the battery leads? terminals on a 12v battery. Ensure that the connections are secure. A. Yes, it’s possible – please choose the same size of cable for extension and no more than 5 meters. Note: The kit should be connected to a battery generating at least 6V to start the solar controller. If Q. Do I need to clean the solar panels? your 12V battery is fully discharged, charge it for a short period of time by other means to reach 6V. A. Yes, it is recommended for better performance. Dust & dirt should firstly be swept off the panel surface 3. When you connect the kit to the battery, the LCD display on the solar controller will turn on automatically. using a soft brush and then use a wet cloth to wipe the panel surface to remove remaining dirt & grime. 4. To select the battery type: Press the menu button and scroll through using the Up and Down buttons to Q. Can rain damage the solar kit? sub menu 5. Rated Value. Keep pressing the Enter button to scroll down to ‘Type’. Use the Up and Down A. The solar panels are fully waterproof (IP66 class), but the controller is not. We recommend protecting the button to change the battery type seal, gel, flooded (note if it asks for a password keeping pressing kit from rain whenever possible, because regular contact with water might lead to rust on some of the fittings. Enter). Once you have selected battery type, press Enter again. It will prompt you to SAVE the parameters. Press Enter again to save. The Menu button will take you back to the main menu. To receive Troubleshooting more detailed instructions on how to select battery type email us at [email protected]. Check all connections to ensure they are secure and clean 5. Find a clear sunlit area free from over hanging branches, obstructions or shading. Check polarity of the battery connection and make sure the battery generates at least 6V 6. Place the solar kit into that area facing the sun (the top left LED on the controller should be green). Ensure the solar panels are exposed to sufficient light – ideally position them to face the sun directly For more information refer to the Troubleshooting section of the solar controller manual (skip anything Tips: - Refer to the included solar controller manual for details about the use of the controller. - To maximise the output, move the kit regularly to track the suns position throughout the day. - At the main menu use the Up and Down buttons to scroll through the different screens. The “PV” screen Security indicates the panels output (volts/amps), the “BATT” screen indicates the battery’s status. Leaving the solar panel unattended may result in theft. Consider attaching a padlocked chain to the panel The controller can be bypassed (taken out of circuit) using the Anderson plugs provided IF the RV has frame and securing the other end to a permanent structure for security. - which relates to load work in the controller manual as the load terminals of the controller are not used) its own voltage regulator built it. Refer to Caution label on the panel. Putting unregulated solar power (~18V) directly into a 12V lead acid battery will overcharge it leading to gassing and eventual destruction. Specifications Specifications FREQUENTLY ASKED QUESTIONS Q. What type of batteries can be used with this kit? Cells Model Max. Max. Max. Open short weight power power power circuit circuit voltage current voltage current type A. Any sealed lead acid, gel or flooded 12V battery (typically used in caravans, motorhomes, boats etc.) Q. Can this kit charge a 24V battery? A. No, this kit is designed to charge a 12V battery. Technically it’s possible to change solar panel connections Net Folded size 120WP3 mono mm Kg W V A V A 505*770*60 16 120 17.5 6.86 21.6 7.40 to enable the kit to work in 24V mode but this should only be done by an appropriately qualified person Specifications under standard test conditions (STC): 1000W/m2, AM 1.5, 25 °C. Specifications are stated for Note: unauthorised modification to 24V will void the warranty. the solar panels only without the effect of the charge controller.