1
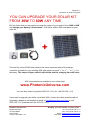
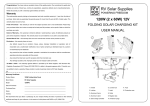
30W 12V solar charging kit
Instruction manual
Dear Customer,
Thank you very much for choosing Photonic Universe products! This manual explains the installation of
your solar kit and answers some frequently asked questions. Please read this manual carefully before
setting up the system.
Remember, all work should be carried out by an appropriately qualified person. Precautions and safety
measures should be taken in all cases.
Contents of the package
№
1
2
3
4
5
6
Item
30W polycrystalline solar panel with 5m cable
5A solar charge controller
2m battery cable with crocodile clips (used between the controller and your battery)
5A fuse in a holder (installed on the battery cable)
Instruction manual for the solar controller
Instruction manual for the kit
Quantity
1
1
1
1
1
1
Installation of the solar kit
1. Before you install the solar kit, please make sure your 12V battery is not fully discharged. The
battery should produce at least 6V - this voltage is required to start the solar charge controller. If
your battery is fully discharged, please charge it by other means first for a short period of time.
2. Connect your 12V battery to the solar charge controller using battery cable with crocodile clips:
− On the solar controller end, fix bare ends of the cable using screw terminals
− On the battery end, use crocodile clips attached to the cable
Battery “+” should be connected to “+” battery terminal of the controller, battery “-“ should be
connected to “-“ battery terminal of the controller.
Please note: crocodile clips are provided for temporary use only. For permanent connection we
recommend using special battery terminals or your existing battery connectors.
3. Connect solar panel to the solar charge controller: “+” lead should be connected to “+” solar
terminal of the controller, “-“ lead should be connected to “-“ solar terminal of the controller. Your
solar kit should start charging the battery. For maximum output make sure the solar panel is
located outdoors and exposed to as much sunlight as possible without any shading. Even a small
shaded area can reduce the output significantly (e.g. leaves, trees etc.).
4. If needed, you can connect any 12V load or appliances to load terminals of the solar controller
(“+” to “+”, “-“ to “-“), for example 12V light bulbs. Make sure the total current drawn by the
load does not exceed 5A.
Your 12V load or appliances can also be connected directly to your battery, however in this case
the discharge protection function of the solar controller won’t work (the controller won’t be able to
cut off the load automatically when it’s over discharging the battery).
5. The solar panel and its connection box at the back are waterproof and can be used outdoors in
any weather conditions. Solar charge controller is not waterproof and should always be used
indoors.
6. Please refer to the solar controller manual for information on how to operate the controller.
Photonic Universe Ltd
- Bringing you the benefits of solar power -
Registered office:
13 David Mews
Porter Street
London W1U 6EQ UK
Tel: +44 (0) 203 150 11 11
Fax: +44 (0) 203 150 12 12
Email: [email protected]
Web shop: www.photonicuniverse.com
Load
Please note that the maximum current allowed for the solar charge controller is 5A. If you are using the
load terminals of the solar controller, please make sure your load is not drawing more than 5A from your
battery. Install a fuse into the load circuit as recommended in the solar controller manual.
Common positive / negative ground of vehicles and boats
Most vehicles (including motorhomes and caravans) and boats typically have a common ground
connection when the vehicle body (or boat hull) is used as a shared connection point by the engine,
generator, battery, lights and other system components. When installing the solar kit on such vehicles /
boats, please pay attention to the following recommendations.
To avoid any short circuits or conflicts between you vehicle / boat system and the solar kit system, you
should never ground the solar panel (i.e. never connect it to your vehicle body / boat hull). The solar
panel cable should be fully electrically isolated from your vehicle body / boat hull and should be
connected directly to the solar controller.
Similarly, if you are using the load terminals of the solar controller, your load should be fully isolated from
the vehicle body / boat hull and should be connected directly to the solar controller.
If required, your battery can remain connected to the vehicle / boat system when the solar charging kit is
connected to it (in parallel). It should not cause any interference with the solar controller except when you
are charging the battery by the engine. In such cases the following might happen:
- The voltage in the battery circuit will increase due to the generator charging your battery
- The solar controller will treat this as if the battery was fully charged and will cut the solar panel off
temporarily (or reduce its output) to prevent overcharging of your battery
- When you stop charging by you engine, the solar kit will resume charging automatically.
Frequently asked questions
Q. What type of batteries can be used with this kit?
A. Any sealed, gel of flooded 12V DC battery with capacity larger than 20Ah.
Q. Can this kit charge a 24V battery?
A. No, this kit is designed for charging a 12V battery.
Q. Can the kit charge two 12V batteries connected in parallel?
A. It’s possible but only for batteries always wired together as a single 12V battery bank (batteries should
have the same type and capacity).
Q. Is there any risk that the solar kit will overcharge my battery?
A. The solar charge controller has a built-in overcharge protection function – it will ensure that your
battery is not overcharged.
Q. Can I leave the solar kit connected to the battery overnight? I heard that power might flow back into
the solar panel and discharge the battery.
A. The solar charge controller will prevent any reverse current flow, so your battery will not get discharged
during the night.
Q. If I want to disconnect the system, how do I do this?
A. Disconnection should follow the order reverse to the order of connection. Solar panel should be
disconnected from the charge controller first, and then the charge controller should be disconnected from
the battery.
Photonic Universe Ltd
- Bringing you the benefits of solar power -
Registered office:
13 David Mews
Porter Street
London W1U 6EQ UK
Tel: +44 (0) 203 150 11 11
Fax: +44 (0) 203 150 12 12
Email: [email protected]
Web shop: www.photonicuniverse.com
Q. If I disconnect the solar panel from the charge controller, can I leave the controller connected to the
battery?
A. Yes, the solar charge controller can remain connected to the battery without the solar panel.
Q. I need to shorten / extend the solar panel cable. Is this possible?
A. Yes, it’s possible. If you are extending the solar panel cable please make sure you use cable with the
same cross section and your connections are secure (soldering is recommended) and well isolated.
Q. Can the solar kit be used for positive / negative ground vehicles / boats?
A. The solar kit can be used in both positive and negative ground vehicles and boats. As per the above
note, please make sure that the solar panel (and load if you are using the load terminals of the solar
controller) are fully electrically isolated from the body of your vehicle / boat hull.
Q. What is the difference between polycrystalline and monocrystalline solar panels?
A. The difference relates to the process of solar cells manufacturing rather than product characteristics.
Monocrystalline solar panels can use the space slightly more efficiently, but polycrystalline solar panels
perform slightly better in hot weather conditions. The difference is not significant.
Q. I want to have more solar power and charge my battery faster – can I upgrade the solar kit?
A. You can easily upgrade this kit from 30W to 60W by adding a similar 30W solar panel to your same
charge controller. The output will double and the charging time will halve. See Appendix for more details.
Q. Do I need to clean my solar panel?
A. Yes. Regular cleaning increases energy yield. Always remember that any shading reduces the output.
Troubleshooting
•
Make sure your battery generates at least 6V. Disconnect any load which might be drawing
power from your battery (also disconnect your battery from the system of your vehicle / boat).
•
Disconnect the kit and leave the controller to cool for 5 min. Check all connections to ensure they
are secure and clean, check polarity of battery and solar panel and reconnect the kit (battery 1st).
•
Ensure the solar panel is exposed to sufficient light – ideally position it to face the sun
•
For more information refer to the Troubleshooting section of the solar controller manual
Warranty
This product is covered by the solar panel workmanship warranty (assembly and wiring) and solar
controller warranty for the period of 1 year after purchase. This warranty is provided by Photonic Universe
Ltd – we will repair or replace any products with defects at our discretion.
Separately, solar cells used in the solar panel are guaranteed to generate at least 80% of nominal power
in 25 years after purchase. This warranty is provided by the solar cells manufacturer.
Disclaimer
Working with electricity and batteries can be dangerous. The information provided in this
manual is for general guidance only. All work should follow the safety standards and
should be carried out by an appropriately qualified person.
Photonic Universe Ltd is not responsible for any damage or injury caused by
inappropriate installation or use of the product.
Photonic Universe Ltd
- Bringing you the benefits of solar power -
Registered office:
13 David Mews
Porter Street
London W1U 6EQ UK
Tel: +44 (0) 203 150 11 11
Fax: +44 (0) 203 150 12 12
Email: [email protected]
Web shop: www.photonicuniverse.com
Appendix 1.
Information on solar kit upgrade
YOU CAN UPGRADE YOUR SOLAR KIT
FROM 30W TO 60W ANY TIME
Did you know that you can easily increase the power of your solar kit from 30W to 60W
and charge your battery 2 times faster? Just add a similar 30W solar panel to your
solar kit:
+
Connect the second 30W solar panel to the same solar terminals of the charge
controller in parallel to your existing 30W solar panel (connect “+” to “+”, “-” to “-”) – it’s
that easy. The output of your solar kit will double and the charging time will halve.
30W solar panels are available in our online shop:
www.PhotonicUniverse.com
You can also order it by phone 0203 150 1111 (int. +44 203 150 1111)
If you want to upgrade your kit by more than 30W, or have any other questions about
upgrading, please do not hesitate to email us [email protected] or call
0203 150 1111 (international +44 203 150 1111).
Photonic Universe Ltd
- Bringing you the benefits of solar power -
Registered office:
13 David Mews
Porter Street
London W1U 6EQ UK
Tel: +44 (0) 203 150 11 11
Fax: +44 (0) 203 150 12 12
Email: [email protected]
Web shop: www.photonicuniverse.com