1
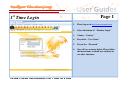
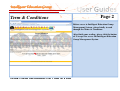
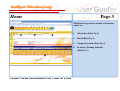
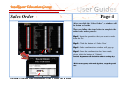
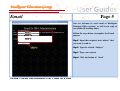
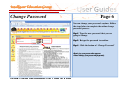
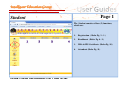
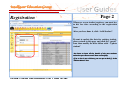
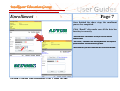
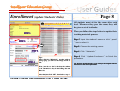
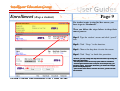
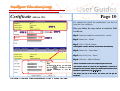
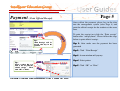
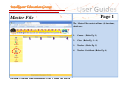
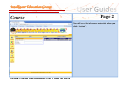
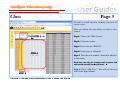
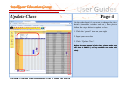
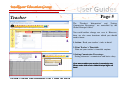
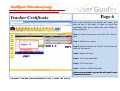
User Manual Of Intelligent Management System
Home Page Introduction
Intelligent Education Group
Page 1
1st Time Login
User Manual Of Intelligent Education Management System / Guideline For Home Page
1.
Please log on to http://www.imaedu.com
2.
Select the button of “Member Login”
3.
Choose “ Country”
4.
Key in the “User Name”
5.
Key in the “Password”
6.
You will see an image below. Please follow
the instructions to enroll new students or
use other functions.
Intelligent Education Group
Term & Conditions
Page 2
Before access to Intelligent Education Group
Management System, please kindly to read
through the Terms & Conditions.
After finish your reading, please click the button
of ‘I Accept’ for access the Intelligent Education
Group Management System
User Manual Of Intelligent Education Management System / Guideline For Home Page
Intelligent Education Group
Home
Page 3
The Home Page consists of four (4) functions,
which are:
User Manual Of Intelligent Education Management System / Guideline For Home Page
1.
Sale Order (Refer Pg. 4)
2.
Email (Refer Pg. 5)
3.
Change Password (Refer Pg. 6)
4.
Franchise Training Schedule
(Refer Pg. 7)
Intelligent Education Group
Sales Order
Page 4
After you click the “Sales Order”, a window will
be shown as beside.
Then you follow the steps below to complete the
online sales order process:
Step 1: Input the quantities that you want to order
from the list
Step 2: Click the button of ‘Order Now’
Step 3: Order confirmation window will pop up
Step 4: Once the confirmation has been made,
please click the button of ‘Submit’.
Our Sale Department will deal with it within 3 working days.
days.
•We do not accept any order made by phone, except the special
case.
User Manual Of Intelligent Education Management System / Guideline For Home Page
Intelligent Education Group
Email
Page 5
You are welcome to send email to Intelligent
Principal Office anytime; we will try to reply to
you within 48 working hours.
Follow the steps below to complete the E-mail
process:
Step 1: Input the recipients into “others” that
you want to send to.
Step 2: Type the related “Subject”
Step 3: Type your content
Step 4: Click the button of ‘Send’
User Manual Of Intelligent Education Management System / Guideline For Home Page
Intelligent Education Group
Change Password
Page 6
You can change your password anytime. Follow
the steps below to complete the online change
password process:
Step 1: Type the new password that you are
going to change.
Step 2: Retype the password to confirm
Step 3: Click the button of ‘Change Password’
•Don’t give your password to anyone.
•Please change your password frequently.
User Manual Of Intelligent Education Management System / Guideline For Home Page
Intelligent Education Group
Franchise Training Schedule
Page 7
Follow the steps below to complete the online
training register process:
Step 1: Click the month and the date
Step 2: “Training Schedule Listing” will pop up
Step 3: The training course and the time will be
shown if the training is available.
Step 4: Select the course
Step 5: Fill in the trainee’s FULL NAME
Step 6: Click the button of ‘Register Training’
•The training course will be cancelled automatically if the
enrolment is more than 16 trainees or less than required
numbers.
•Your enrolment should be made before 2 days.
User Manual Of Intelligent Education Management System / Guideline For Home Page
User Manual Of Intelligent Management System
Student Introduction
Intelligent Education Group
Page 1
Student
The Student consists of four (5) functions,
which are:
User Manual Of Intelligent Education Management System / Guideline For student
1.
Registration ( Refer Pg. 2 - 3 )
2.
Enrollment (Refer Pg. 4 - 9)
3.
IMA & IPS Certificate (Refer Pg. 10)
4.
Attendant (Refer Pg. 11)
Intelligent Education Group
Registration
Page 2
Whenever a new student registers, you must key
in his/ her data according to the registration
form.
After you have done it, click “Add Student”.
If want to update the data for existing student,
please return to this page and click the “pencil”
icon, then modify the data follow with “ Update
student”
•You have to input all the details of the new students
otherwise you cannot enroll them successfully.
successfully.
•If he or she is not a Chinese, you can put a dash (-) in the
“Chinese Name” box
box..
User Manual Of Intelligent Education Management System / Guideline For student
Intelligent Education Group
Registration (Update Student’s Information)
Page 3
Besides, you can update
information anytime.
your
students’
Tip 1: You just search the student by full name or
keyword and click the “pencil” icon.
Tip 2: Select “Update Student” after changing the
student’s data.
Tip 3: If you are continue to key in new student
data, please click “New Student”.
Tip 4: You also can check the student statistics list
by click “Current Student”, “All Student” &
“Drop Student”
User Manual Of Intelligent Education Management System / Guideline For student
Intelligent Education Group
Enrollment
Page 4
After add the student’s detail, click
“Enrollment” and select the new added
student’s name by click the icon.
Then you follow the steps below to enroll the
student process:
Step 1: Search the new student and click the “
pencil ” icon.
Step 2: Select “IMA Course”
Step 3: Choose “Time Table” (details refer Page 5)
Step 4: Choose “Materials” (refer Page 6)
Step 5: Select the “calendar” to select the date that
student attends the first class.
Step 6: Click “Add Enrollment”
User Manual Of Intelligent Education Management System / Guideline For student
Intelligent Education Group
Enrollment (Time Table)
Page 5
Click “Time Table”, then choose the class by
click on the student’s fee in the pop-up a
window
Tip 1: Click the selected student’s fee ( eg. Ngoi
Chai Yeo 120 ), means you going to enroll in the
selected teacher’s class and the monthly course
fee is RM120.
Tip 2: If you wish to check whether the class if full,
please click
, after click this icon, it will popup a window and show how many students are in
the class.
User Manual Of Intelligent Education Management System / Guideline For student
Intelligent Education Group
Enrollment(Materials)
Page 6
Click “Materials”, select the materials for the
student and key in the correct start date
Then you follow the steps below to select the
material process:
Step 1: Tick the level of materials
Step 2: Select the “calendar” to select the date that
start date for the materials
Step 3: Key in the bar code in the column
Step 4: Confirmed all the information, click “ OK ”
User Manual Of Intelligent Education Management System / Guideline For student
Intelligent Education Group
Enrollment
Page 7
Once finished the above steps, the enrollment
process has completed.
Click “Enroll” after make sure all the data has
been key in correctly.
•You should select “All Students” or else you can’t see the new
student’s name.
•The “Course”, “Timetable” and “Teaching Materials” are important
for the enrolment. You cannot miss any of them.
•Please make sure you have created the class or else it will be blank.
User Manual Of Intelligent Education Management System / Guideline For student
Intelligent Education Group
Enrollment (update Students’ Data)
Page 8
All students must sit for the exam after each
level. Whenever they pass the exam, they will
be given a set of textbooks.
Then you follow the steps below to update their
teaching materials process:
Step 1: Input the student’s name or click “ pencil
” icon to select it.
Step 2: Choose the existing course
Step 3: Click “ Materials ”
Tips:
Tips:
After click the “Materials”, another window
will poppop-up, you will see the image shown as
left..
left
Next, just choose the books that the student
took, remember to key in the billing date and
Barcode..
Barcode
After that just click “OK”, then back to step 4.
User Manual Of Intelligent Education Management System / Guideline For student
Step 4: Click “ Update Enrolment ” to finish this
procedure.
The “Recover the old barcode” is only used for the dropped students
who return to the course afterwards
afterwards..
Intelligent Education Group
Enrollment (drop a student)
Page 9
If a student wants to stop his/ her course, you
have to go to “Enrolment”.
Then you follow the steps below to drop their
course process:
Step 1: Type the student’s name and click “pencil”
icon.
Step 2: Click “ Drop ” in the function.
Step 3: Choose the drop date & write the reason
Step 4: Click “Drop” to finish this procedure.
•However, you may change the drop date and reason by clicking the
date in the “Drop Date”
Date”..
•The “Drop Date” means the last day of the student’s attendance.
• Even though a student wants to stop the course temporarily, you
also have to drop this student. Otherwise, you will be still charged
for the monthly Royalty Fee.
• If the student comes back to continue the course, you have to redo
the enrolment.
User Manual Of Intelligent Education Management System / Guideline For student
Intelligent Education Group
Certificate (IMA & IPS)
Page 10
If a student has passed the examination, you have to
claim his / her certificate.
Then you follow the steps below to claim the IMA
Certificate:
Step 1: Type the student’s name & click “ pencil ”
Step 2: Select the “ Grade ”
Step 3: Click “Check” button.
“Starting Date” and the “Barcode” will be shown automatically
automatically..
Step 4: Select the “ Exam Date ”
Step 5: Key in his / her “ Score ”
Step 6: Click the “ Add Certificate ”
Tips:
Tips:
If data key in wrong, you can click
the icon
to modify it, click
“Update Certificate” to save the
action..
action
•You are not allowed to select the certificate of the same level.
level.
•The students’ names are correct in the “Registration”, otherwise it
will influence the outcome
outcome.. Besides, the initials of the student’s name
should be in capital letter (e
(e..g. Teo Jin Heng
eng)).
•The sooner you key in the results, the sooner you will get the
certificates..
certificates
User Manual Of Intelligent Education Management System / Guideline For student
Intelligent Education Group
Page 11
Attendance
This is a function for you to print out a list of
students’ attendance.
It can be sorted by the teacher’s name.
Then you follow the steps below to generate the
attendant list:
Step 1: Choose the course
Step 2: Select the teacher
Step 3: Select the date
Step 4: Click “Generate” to finish this procedure.
•The date is always the beginning of the month.
•“ Rep
Rep” in the list of students’ attendance means the
replacement class.
•Every teacher has their own copy of students’
attendance. Thus, they can arrange the replacement class
attendance.
for the students who are absent
absent..
User Manual Of Intelligent Education Management System / Guideline For student
User Manual Of Intelligent Management System
Account Introduction
Intelligent Education Group
Page 1
Account
The Account page consists of four (5) functions,
which are:
User Manual Of Intelligent Education Management System / Guideline For Account
1.
Extra Payment ( Refer Pg. 2 )
2.
Refund (Refer Pg. 3)
3.
Payment(Refer Pg. 4 - 6 )
4.
Replacement (Under Construction)
5.
Teacher Replace (Under Construction)
Intelligent Education Group
Extra Payment
Page 2
Extra Payment means extra charge for the
Photostat Exercise and stationery which you sell
in the centre.
Please follow the steps below to do the extra
payment:
Step 1: Select the student name by click the “
pencil ” icon.
Step 2: Select the billing date and the
Step 3: Select the reference date
Step 4: Select an item that the student buys from
the “Description”.
•Most of the amount will be shown automatically
automatically..
•For those the amount shows “0.00
00”,
”, that means you
have to key in the price by yourself.
yourself.
Tips:
• If you want to check whether the extra payment has been made or not, you can
use the “Searching Records”. Click on the “Search” after you have selected the
date, you will see a list of items that the student has bought.
User Manual Of Intelligent Education Management System / Guideline For Account
Step 5: Click the “Add Extra Payment”
Intelligent Education Group
Page 3
Refund
Refund means giving discount to the students.
This will happen either because of the return of
goods or discount allowed for the teaching
materials for the opening ceremony.
Please follow the steps below to do the refund:
Step 1: Select the student name by click the “
pencil ” icon.
Step 2: Select the Refund Date
Step 3: Select the Reference Date
Step 4: Key in the Description
Step 5: Key in Amount
Tips:
• You can check the transaction by using the “Searching Records”. Please click on
“Search” after you have chosen the date. You will see a list of discount allowed to
the student.
User Manual Of Intelligent Education Management System / Guideline For Account
Step 6: Click “ Add Refund ”
You are advised to do the “Refund” before the posting
date (the 20th of each month)
month)..
Intelligent Education Group
Page 4
Payment (Make & Check Payment)
Payment is used to check the payment of
students. Once you get the student’s fee, you
should key in the data and print out the official
receipt to the parents.
Please follow the steps below to make the
payment:
Step 1: Select the student name by click the “
pencil ” icon.
Step 2: Key in the month and year of payment
Step 3: Click “ Search”
•you will see the “Total Amount”
Amount” of the payment.
•click the “Check Bill” to see the personal account of the
student..
student
Step 4: Key in the Payment Details
Step 5: Click “ Add Payment”
Step 6: Payment record is generated
User Manual Of Intelligent Education Management System / Guideline For Account
Intelligent Education Group
Page 5
Payment ( Print Official Receipt)
Once collect the payment, please key in the data
into the management system (refer Page 4) and
print the official receipt for the students at the same
time.
Tips:
Tips:
“Print Receipt” will be
showed after key in the
payment..
payment
To print the receipt just click the “Print receipt”
button after “add payment”. Please follow the steps
below to print official receipt:
Step 1: After make sure the payment has been
generated
Step 2: Click “ Print Receipt”
Step 3: A new window will pop up
Tips:
Tips:
Select a printer that you
wish to use for print the
official receipt . Then
click “OK” or “Print”
User Manual Of Intelligent Education Management System / Guideline For Account
Step 4: Select printer
Step 5: Click “OK” or “Print”
Intelligent Education Group
Page 6
Payment (Reprint & Checking Payment)
To check the payment for the particular student can
through the following instruction:
Step 1: Select the student name by click the “
pencil ” icon.
Step 2: Key in the month and year of the payment
that you wish to check
Step 3: Click “ Search Date”
To reprint the Official Receipt for the particular
student can through the following instruction:
Step 1- Step2
Step2 : As above mentioned
Step 3.1 : Click “ select”
Step 4: Type your “Verify Password”
Step 5: Click “Print Receipt”
User Manual Of Intelligent Education Management System / Guideline For Account
User Manual Of Intelligent Management System
Master File Introduction
Intelligent Education Group
Page 1
Master File
The Master File consists of four (4) functions,
which are:
User Manual Of Intelligent Education Management System / Guideline For Master File
1.
Course ( Refer Pg. 2)
2.
Class (Refer Pg. 3 – 4)
3.
Teacher (Refer Pg. 5)
4.
Teacher Certificate (Refer Pg. 6)
Intelligent Education Group
Course
Page 2
You will see a list of course materials when you
click “Action”.
User Manual Of Intelligent Education Management System / Guideline For Master File
Intelligent Education Group
Class
Page 3
In order to enroll any new students, you have to
create a class.
Then you follow the steps below to create a class
process:
Step 1: Choose the “IMA Course”.
Step 2: Select the teacher
Step 3: Key in the fee “RM120”.
Step 4: Select type as “Monthly”
Step 5: Tick the new student’s timetable which is
in blue mark.
session.. And
Each class can only for A teacher and A session
each session can only consist of 2 hours.
hours.
Step 6: Click “Add Class”. You will see the new
class in the right column.
User Manual Of Intelligent Education Management System / Guideline For Master File
Intelligent Education Group
Update Class
Page 4
On the other hand, if you want to change the class
details (timetable, teacher and etc.), then please
follow the steps below to update a class:
1. Click the “pencil” icon on your right
2. Input your new data
3. Click “Update Class”.
Before do some amend of the class, please make sure
this class is EMPTY ( no any students are under this
class) .
User Manual Of Intelligent Education Management System / Guideline For Master File
Intelligent Education Group
Teacher
Page 5
The “Teacher’s Information” and “Setting
Commission Percentage” are controlled by the
Global Principal Office.
You could neither change nor save it. However,
there are also some functions which you should
need to know:
1. Action: Read your teacher’s info. in detail.
2. Print Teacher’s Timetable:
Print out your teacher’s timetable anytime.
3.Setting Commission Percentage:
Setting instructor’s commission and basic salary.
If you want to adjust your teacher’s commission rate,
please send a letter to the Global Principal Office via
email..
email
User Manual Of Intelligent Education Management System / Guideline For Master File
Intelligent Education Group
Page 6
Teacher Certificate
After your instructor has passed the exam, you
have to key in the data in order to claim the
certificate, then please follow the steps below to
claim certificate:
Step 1: Select the teacher and click the “Action”
icon.
Step 2: Choose the course
Step 3: Click the button of “Enroll” (it will show all
levels of the course. )
Step 4: Select the level
Step 5: Fill in the exam date
Step 6: Fill in the score
Step 7: Click the “Add Certificate”
If there are any mistakes, you can click the “pencil” in the
“Function” to correct it
it..
User Manual Of Intelligent Education Management System / Guideline For Master File