1
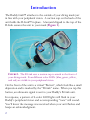
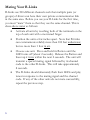
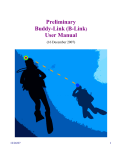
i
Introduction
The Buddy-Link™ attaches to the outside of your diving mask just
in line with your peripheral vision. A suction cup on the back of the
unit holds the B-Link™ in place. A lanyard clipped to the top of the
B-Link secures the unit to your mask (Figure 1).
FIGURE 1. The B-Link uses a suction cup to attach to the front of
your diving mask. Four different color LEDs (blue, green, yellow,
and red) are visible in your peripheral vision.
On the front of the unit is a virtual “Button”, which feels like a small
depression and is marked by the “B-Link” name. When you tap this
button, an ultrasonic signal is sent to your Buddy’s B-Link unit.
In response, a pattern of 4-color LED lights will flash in your
Buddy’s peripheral vision and a corresponding “tone” will sound.
You’ll know the message was received when your unit flashes and
beeps an acknowledgment.
2
Getting Started
There four different color LEDs (blue, green, yellow, and red)
located behind the suction cup that are used for signaling,
configuring, and readout. Also, there is a blue LED located on the
top of the B-Link (“Top-Blue”), which serves as a beacon.
The Virtual “Button”
The B-Link is controlled via a single virtual “Button”. This is a recess
located on the side opposite the suction cup and indicated by the
“B-Link” name and two concentric circles. When you “press” the
Button, your finger blocks an infrared light beam, which activates the
Button. (There are no moving parts or seals to leak underwater.) The
B-Link responds to your button-press by turning on one of its LEDs.
FIGURE 2. Tapping the virtual Button on your B-Link causes the
LEDs on your Buddy’s unit to flash and a tone to sound.
If pressing the Button ever fails to light one of the LEDs while
underwater, then an air bubble has become trapped. Wipe the
Button depression, or tap more vigorously, to dislodge the bubble.
3
Tapping the B-Link’s Button, once or multiple times, initiates different
functions. The Button may also be pressed and Held to perform
certain operations. For proper recognition of multiple taps, the
duration of each tap should be roughly the same. Taps (single or
multiple) are recognized when you stop tapping and release the Button.
Attaching the Buddy-Link
The B-Link uses a suction cup that attaches to the front of your
diving mask in the corner of the faceplate. While submerged, your
B-Link is held securely to your mask by the water pressure. Use
the accompanying Lanyard for extra security, especially between
dives. Figure 3 shows how to attach the plastic Lanyard Clip to
the stainless steel terminals on the top of the B-Link. Attach the
loop end of the Lanyard to your mask strap (as shown in Figure 1).
FIGURE 3. Hook the plastic Lanyard Clip on the B-Link’s stainless
steel terminals, and attach the safety Lanyard to the mask strap.
4
Turning Your B-Link On/Off
The B-Link is activated automatically when submerged. While activated,
the blue LED on the top of the unit flashes once every 4 seconds.
The B-Link can be activated above water by touching both of the
terminals on the top of the unit with a moistened finger.
The B-Link enters low-power Sleep mode after 5 minutes of
inactivity above water. (It is always ON while submerged.) In
Sleep mode, one of the LEDs flashes faintly once per second. The
LED color indicates the battery charge (see Indicators, below).
Your B-Link can be forced to enter Sleep mode by pressing and
holding the Button for approximately 10 seconds, until the unit
flashes all four LEDs in quick sequence.
FIGURE 4. The B-Link turns On automatically underwater, and
Sleeps after 5 minutes of inactivity above water. Blinking red LED
indicates the battery charge is too low to turn on.
If the B-Link has shut down because of insufficient battery charge,
the red LED will flash faintly every 4 seconds, and the unit will
refuse to wake up. At this point, the only way to activate the unit
is to recharge the battery.
5
Mating Your B-Links
B-Links use 500 different channels such that multiple pairs (or
groups) of divers can have their own private communication link
in the same area. Before you use your B-Links for the first time,
you must “mate” them so that they use the same channel. This is
done above water as follows:
6
•
Activate all units by touching both of the terminals on the
top of each unit with a moistened finger.
•
Position the units a few inches apart. Note that B-Links
can communicate reliably more than 100 feet underwater,
but no more than 1 foot in air.
•
Choose one unit. Press and hold its Button until the
LED turns off (about 2 seconds). Release the Button and
then tap it twice within the next 2 seconds. The unit will
transmit a special mating signal followed by its channel
code to the other B-Links. This will take approximately
8 seconds.
•
The B-Links should alternately flash their LEDs and play
tunes in response to the mating signal and the channel
code. If any of the other units do not mate successfully,
repeat the previous step.
FIGURE 5. Start Mating by turning all units on and positioning them
close together. Press and hold the Button of one unit until the LED
turns off. Then tap twice within 2 seconds.
Note that this procedure works with a group of B-Links as well as
a pair. Simply position all of the B-Links close together, and
perform the mating procedure above.
7
Signals
You may send two different private signals to your Buddy’s B-Link
by tapping once or twice. One tap causes the LEDs and the audio
tone on your Buddy’s unit to “whoosh” up and down. Two taps
cause the LEDs to pulse on and off with the notes of the audio tune.
There is a third Public signal that can be activated by tapping the
Button 4 times. Any B-Links within range, independent of their
mated channels, will respond by twinkling their red and yellow
LEDs. The audio tone sounds like a French police siren.
FIGURE 6. You may send two different Private signals by tapping
once or twice. Tapping 4 times sends a Public signal.
You determine the significance of the different signals in
agreement with your Buddy. For instance, you may agree that 1
tap means “look up, I want your attention” and 2 taps mean
“come to me”.
8
Features
Automatic Acknowledgement and Resend
When you send a signal to your Buddy’s B-Link, it automatically
sends an acknowledgement back to you. When your B-Link
receives the acknowledgement, it flashes all 4 color LEDs (appears
white) for a tenth of a second to indicate that your Buddy received
your signal. If your B-Link does not receive an acknowledgement,
it resends your signal and waits again for an acknowledgement.
There is no flash if your B-Link still does not receive an
acknowledgement.
FIGURE 7. Your Buddy’s B-Link automatically sends an
Acknowledgement to tell you that your signal was received.
Signal Strength / Range Indication
Your B-Link measures the signal strength whenever it receives a
valid message. The signal strength is only a rough measure of
distance to your Buddy, but the stronger the signal is, the closer
your Buddy is. Moreover, if your Buddy is out of range, then you
cannot signal each other in case of an emergency.
9
The color of the LED that lights when you press the Button gives you
an indication of whether your Buddy is near or far. Blue and green
mean your Buddy is nearby, yellow means your Buddy is within
signaling range, and red means your Buddy may be too far away.
FIGURE 8. Whenever you press the button, or after initiating a “silent
ping”, the LED color reflects the signal strength and corresponding
distance to your Buddy.
You can update the range estimate to your Buddy by initiating an
exchange (“ping”) that does not flash the LEDs in your Buddy’s
unit. Simply press and hold the Button until the LED turns off,
release the Button, and then tap once. If your Buddy is within
signaling range, you will see 1, 2, 3, or 4 flashes of the blue, green,
yellow, or red LED. The color and number of flashes indicate, in
order, an estimate of how far away your Buddy is. If the red LED
lights for about 2 seconds, then the signal level is too low to
receive a valid message.
10
Automatic Dimming for Night Dives
Your B-Link automatically dims the light output of all its LEDs
when it senses a low light environment such as on a night dive, or
in a wreck or a cave. Note that the switch back and forth between
low and high light levels is intentionally slow.
500 Private Channels
There are 500 separate private channels available for pairs or groups
of B-Links to use. The channel that is chosen is determined by the
serial number of the B-Link that initiates the mating. Although very
unlikely, this can result in two groups of divers using the same
channel in the same area.* The rule to remember: separately mate
together all of the new pairs (or groups) that are formed from a
group you break apart.
Whenever you trigger mating, your B-Link’s channel code will be
reset according to its own serial number. If you inadvertently
trigger mating without your Buddy’s B-Link nearby (this cannot
happen underwater), you should explicitly mate your B-Link with
your Buddy’s unit again.
*
If diver Alice uses her B-Link to initiate mating with divers Bob
and Cherie, and then initiates mating with new diving buddy Dave,
then both pairs of buddies, Alice / Dave and Bob / Cherie will be
using the same channel.
11
Recharging the Battery
Your B-Link uses a rechargeable lithium polymer battery that is
capable of operating for up to 15 dives (600 minutes) before
recharging (depending on how often you communicate with your
Buddy). However, the maximum range of operation is obtained
with a fully charged battery.
Your B-Link comes with a DC-to-DC Converter for powering its
Charging Station. The Converter can use any type of AA cell
batteries, but works especially well with Energizer Lithium, Duracell
Ultra, and NiMH rechargeables. You may also power the Charging
Station from any 5 volt USB power source, such as a personal
computer or an AC-to-USB power adapter. A normal USB port
should be capable of supplying the necessary 100 ma of current.
FIGURE 9. Use the supplied cable to connect the DC-to-DC
Converter to the Charging Station.
To recharge your B-Link, remove the unit from your mask and
unhook the safety lanyard from the stainless steel terminals. Insert the
top end with the terminals into the Charging Station, and align the
suction cup with the notch in the Charging Station. Press the B-Link
into the Charging Station until you feel it click into place.
12
Connect the miniature plug end of the supplied cable to the DC-toDC converter. Connect the other end of the cable (USB mini-B)
to the base of the Charging Station (Figure 9).
FIGURE 10. LEDs indicate charging status.
When power is supplied to the Charging Station, a green LED in
the base will glow. While the battery is recharging, the yellow LED
in the B-Link will glow. If the battery is mostly discharged, the
yellow LED will delay glowing for a minute. When the battery is
fully recharged, the green LED in the B-Link will flash on and off
once per second. Charging a fully discharged battery will take less
than 2 hours.
To remove the B-Link from the Charging Station, use your thumb
and index finger to grasp the suction cup and the bottom lip and
pull firmly.
13
Checklist
Above Water
•
Check that all B-Links have adequate battery charge.
•
Confirm that all B-Links are mated together.
Entering Water
•
Wipe the Virtual Button depression to remove any
bubbles.
After Dive
•
Rinse all B-Links and wipe them dry.
Indicators
Above Water
Low-Power Mode: One of the LEDs flashes faintly once per
second. The color indicates battery
charge:
Blue
- Full battery charge.
Green - Battery charge good for
multiple dives.
Yellow - Recharge after current dive.
Red
- Recharge before using.
Unit will not activate until
recharged.
14
Battery Charge:
When first activated, one of the LEDs
flashes for a second. The color indicates
battery level as per Low-Power mode.
Mating Signal:
The receiving units will flash their LEDs
and play a tune in response to the
initiating B-Link.
Underwater
Signal Strength:
The blue, green, yellow, or red LED lights
up whenever the Button is pressed. The
color indicates signal strength:
Blue / Green - Ample signal strength;
Buddy nearby.
Yellow
- Reduced signal strength.
Red
- Marginal or no signal;
Look for Buddy.
Both Above and Underwater
Activated:
The Blue-Top LED flashes once every
4 seconds.
Transmitting:
The Blue-Top LED lights while transmitting,
then flashes once per second for 10 seconds.
In Charging Station
Charging:
The yellow LED (in the B-Link) glows
continuously.
Fully Charged:
The green yellow LED (in the B-Link)
flashes on and off once per second.
15
Proper Care
Between dives, your B-Link should be rinsed and dried. Leaving
your B-Link where it will stay wet will cause the battery to run
down, since B-Links turn on when submerged.
Avoid dropping or banging your B-Link on hard surfaces. The
ultrasonic transducer is made of a ceramic material and can crack if
abused.
FIGURE 11. Between dives, your B-Link should be rinsed and dried.
The suction cup is User replaceable, if necessary. Use a screwing
motion to remove the old one and insert the supplied replacement.
16
Options
Sound On/Off
The Sound generator can be toggled On or Off while above water
as follows:
•
Press and hold the B-Link’s Button for about 2 seconds,
until the LED turns off, and then Release the Button.
•
Within 2 seconds, press and hold the Button again for
another 2 seconds, until the LED turns off, and then
Release the Button.
•
Tap the Button Once within the next 2 seconds. The
B-Link will play a tune if the sound has toggled On. A
short beep will indicate the sound has turned Off.
FIGURE 12. To toggle Sound ON or OFF, press and hold the Button
until the LED turns off, twice. Then tap once within 2 seconds.
17
FIGURE 13. B-Links are delivered in a water-resistant Pelican case
with molded polyurethane foam liner, and includes 2 B-Link units,
2 Lanyards, a Charging Station, a DC-to-DC Converter, and a
connecting cable.
18
Specifications
Manufactured in:
Battery:
Battery Life:
Dives per charge:
Terminals:
Encapsulation:
Signal:
Operational Range:
B-Link Weight:
Package Weight:
U.S.A.
Rechargeable Lithium Polymer
Greater than 500 recharges
Approximately 10
Stainless steel
Polyurethane
58 KHz ultrasonic
Greater than 100 feet,
Omni-directional
19 grams (2/3 ounce)
10 ounces
Affinity Devices, Inc.
5950 Lucas Valley Road
Nicasio, CA 94946
415-662-2256 Phone
415-662-2056 Fax
www.affinitydevices.com
© Affinity Devices, Inc. 2008-2009 – all rights reserved
0509
19
LED Matrix
Indicators
Top-Blue
Full battery
charge
Low-Power
Transmitting
Green
Yellow
Faint Flash
Battery good
for multiple
dives
Recharge after
dive
Red
Recharge
battery
before using
1 Second Flash
Turning-on
Activated
Blue
Full battery
charge
Battery good for
multiple dives
Recharge after
dive
Flashes every 4 secs.
While sending, then
flashing for 10 secs.
While Button is Pressed & Silent Ping Response
Signal
Strength
Ample signal strength,
Buddy nearby
Mating Signal
In Charger
Reduced signal Marginal signal,
strength
find Buddy
Combination Flash and Tune in response to initiating B-Link
Recharged
Charging
Signal Responses
Single Tap
4-color mix “Whooshing”
Double Tap
4-color mix pulses w/ tune
Tap 4 Times
2-color “Twinkling” (R-Y)
QQQQQQQQQQQQQQQQQQQQQ