1
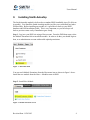
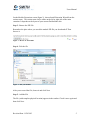
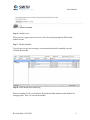
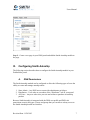
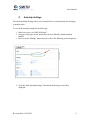
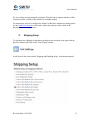
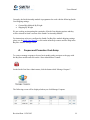
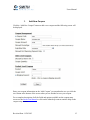
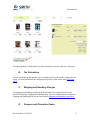
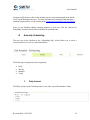
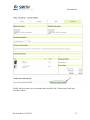
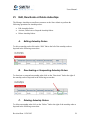
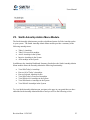
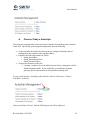
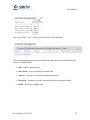
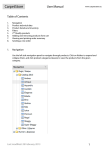
Users Manual Smith Autoship™ v.3.00.26 User’s Manual Revision Date: 11/20/2013 1 Users Manual Table of Contents I. Introduction ................................................................................................................. 3 II. Installing Smith Autoship ........................................................................................... 4 III. Configuring Smith Autoship .................................................................................... 7 A. DNN Permissions ................................................................................................. 7 B. Autoship Admin Settings ..................................................................................... 8 C. Autoship Settings ................................................................................................. 9 IV. Smith Cart BuyNow Module Autoship Setup ....................................................... 10 A. Adding Autoship Products ................................................................................. 11 B. Tax Setup............................................................................................................ 12 C. Shipping Setup ................................................................................................... 13 D. Coupon and Promotion Code Setup ................................................................... 14 1. Add New Coupon ........................................................................................... 15 V. Autoship Order Creation ........................................................................................... 16 A. Adding Autoship Products to the Cart ............................................................... 16 B. Tax Calculation .................................................................................................. 17 C. Shipping and Handling Charges ......................................................................... 17 D. Coupons and Promotion Codes .......................................................................... 17 E. Autoship Scheduling .......................................................................................... 18 1. Daily Interval .................................................................................................. 18 2. Weekly Interval .............................................................................................. 19 3. Monthly Interval ............................................................................................. 19 4. Yearly Interval ................................................................................................ 19 5. Date Ranges .................................................................................................... 19 F. Billing Information ................................................................................................ 21 G. Confirmation Page.............................................................................................. 22 VI. Edit, Deactivate or Delete Autoships ..................................................................... 24 A. Editing Autoship Orders..................................................................................... 24 B. Deactivating or Suspending Autoship Orders .................................................... 24 C. Deleting Autoship Orders................................................................................... 24 VII. Smith Autoship Admin Menu Module .................................................................. 25 A. Process Today’s Autoships ................................................................................ 26 B. Managing Autoship Orders ................................................................................ 27 VIII. Extensions/Customizations ................................................................................ 29 Revision Date: 11/20/2013 2 Users Manual I. Introduction Smith Autoship provides the ability to automatically deliver your products to a customer on a predetermined schedule and charge the credit card with each shipment. As a Merchant, the Smith AutoShip helps you create recurring revenue from your clients and earn customer’s loyalty for your products and services. Smith Autoship provides the power and flexibility for the admin or customer to manage: Customer Autoship Information Creating Autoship Orders Delivery Schedules Automated Recurring Billing Credit Card Information Product Subscriptions Purchasing Products Activating, deactivating and deleting Autoship Orders Free Trials And more! It can be used for a variety of business applications to control the flow of product billing and shipping at regular intervals. With Smith Autoship the store admin or customer can control every aspect of the billing and shipping process. What are the requirements? Smith Cart shopping cart module Smith Autoship module Authorize.Net Payment Gateway This manual will guide you step-by-step through installation, setup, and use of the module. Revision Date: 11/20/2013 3 Users Manual II. Installing Smith Autoship The Smith Autoship module is delivered as a standard DNN installable zip or PA (Private Assembly). You install the Smith Autoship module just like you would install any other DNN module. Before installing any module it’s a good idea to back up your DNN database and DNN installation folder. This is very important, as you can always roll back to previous status easily if installation goes wrong. Step 1 - Log in to your DNN site using a Host account. From the DNN host menu, select the Module Extensions link to install the module. In order to do that, you should login as host, or an administrator account with module upload permissions. Figure 1 - DNN Host Menu You can reach Module Extensions from the Host menu item as shown in figure 1 above. Install the new module from the Host -> Modules menu in DNN. Step 2 - Install New Module Figure 2 - Module Extensions screen Revision Date: 11/20/2013 4 Users Manual On the Module Extensions screen (figure 2), choose Install Extension Wizard from the actions menu. This action menu can be either on the left or right side of the main container. It depends on the layout of your current DotNetNuke skin. Step 3 - Browse the ZIP File Remember the place where you saved the module ZIP file you downloaded? Then browse it. Figure 3 - Browse for the module Step 4 - Pick the file Figure 4 - Pick your module After you accessed the file, choose it and click Next. Step 5 - Add the File The file (with complete physical location) appears in the textbox. Check it once again and then click Next. Revision Date: 11/20/2013 5 Users Manual Figure 5 – Install New Module Step 6 – Install it now! When you see it appear on text area box, click Next and go through the DNN install module wizard. Step 7 - Module Installed If you do not see any error messages, it means that the module is installed correctly. Click the Return link. Step 8 – DNN Install New module log When everything is OK, you should see the Smith Autoship module on the Module list on upper panel. Now you can use the module. Revision Date: 11/20/2013 6 Users Manual Step 9 – Create a new page in your DNN portal and add the Smith Autoship module to the page. III. Configuring Smith Autoship The following section describes how to configure the Smith Autoship module in your DotNetNuke portal. A. DNN Permissions The Smith Autoship module can be configured to allow the following types of users the ability to create and manage autoship orders: 1. Store Admin – Any DNN user account with administrator privileges. 2. Distributers – Users who are a member of the “Distributer” role in your portal. 3. All Users – Any user who visits your site and wishes to purchase an autoship product. Because Smith Autoship is integrated with the DNN user profile and DNN role permissions security the types of users and groups that you can allow or deny access to the Smith Autoship module are limitless. Revision Date: 11/20/2013 7 Users Manual B. Autoship Admin Settings Navigate to the page in your portal that you have added the Smith Autoship Module to. Hover your mouse over the “Manage” button and click the “Edit Autoship Admin Settings” link as illustrated in the following screen shot. After clicking the “Edit Autoship Admin Settings” link the following screen is displayed. From the dropdown menu, select the page in your portal that contains your Smith BuyNow module and click “Set BuyNow Page Name.” This will point the autoship module to the products and settings in your BuyNow module. Revision Date: 11/20/2013 8 Users Manual C. Autoship Settings The Smith Autoship Settings allow you to control the level of permissions for managing Autoship orders. To access the autoship settings do the following: 1. Make sure you are in “DNN Edit Mode” 2. Navigate to the page in your portal that you have added the Smith Autoship Module. 3. Hover over the “Manage” button and you will see the following screen displayed: 4. Click the “Edit Autoship Settings” link and the following screen will be displayed: Revision Date: 11/20/2013 9 Users Manual Users can edit Autoships – Check this box to allow end-users to edit their own Autoship orders. Users can delete Autoships – Check this box to allow end-users to delete their own Autoship orders. Users can activate/deactivate Autoships – Check this box to allow end-users to activate or deactivate their own Autoship orders. Can’t Edit Autoship Text – When the “Users can edit Autoships” box is NOT checked, this text will be displayed if a user attempts to edit an Autoship order. Can’t Delete Autoship Text – When the “Users can delete Autoships” box is NOT checked, this text will be displayed if a user attempts to delete an Autoship order. Can’t Activate/Deactivate Autoship text - When the “Users can activate/deactivate Autoships” box is NOT checked, this text will be displayed if a user attempts to activate or deactivate an Autoship order. IV. Smith Cart BuyNow Module Autoship Setup The Smith Autoship module is integrated with Smith Cart and requires that Smith Cart be installed in your portal before completing the Autoship setup. The Smith Autoship module is integrated with Smith Cart in the following areas: Product Management – Adding, updating and deleting products Tax Setup – Configuring the type of tax you want to charge on autoship orders. Revision Date: 11/20/2013 10 Users Manual Shipping Setup - Configuring the type of shipping you want to charge on autoship orders. Coupons/Promotion Code Management - Adding, updating and deleting coupons. Offering discount amounts or discount percentages. A. Adding Autoship Products Creating and managing autoship products is done using the Smith Cart product setup screen. To setup an autoship product follow these steps: 1. Navigate to the Smith Cart BuyNow module and click on the “Admin Menu” button: 2. From the Smith Cart Admin Menu click the “Add Products” button: 3. Enter your product information on the “Add Products” screen and make sure you click the save button at the bottom of the screen when you are finished to save your product. For a complete description of all the fields and options available on the product setup screen see the Smith Cart Manual or click on the inline help context sensitive help on the product setup screen. Revision Date: 11/20/2013 11 Users Manual B. Tax Setup To configure how tax is charged on autoship orders, navigate to the page with the BuyNow module and click on the “Cart Settings” button: Scroll down to the section titled “Tax Setup” section and expand it. Currently, the Smith Autoship module is programmed to work with the following Smith Cart tax settings: Flat Tax All Orders Apply EU VAT Regulations Apply EU VAT Regulations By Product Revision Date: 11/20/2013 12 Users Manual We are working on integrating the remainder of Smith Cart tax options and they will be released in future versions of the Smith Cart Autoship module. For instructions on how to configure the Smith Cart BuyNow module tax settings please see the Smith Cart Manual or click on the inline help context sensitive help in the BuyNow module settings screen. C. Shipping Setup To configure how shipping is charged on autoship orders, navigate to the page with the BuyNow module and click on the “Cart Settings” button: Scroll down to the section titled “Shipping and Handling Setup” section and expand it. Revision Date: 11/20/2013 13 Users Manual Currently, the Smith Autoship module is programmed to work with the following Smith Cart Shipping settings: Custom Ship Methods By Weight Shipping By Wieght We are working on integrating the remainder of Smith Cart shipping options and they will be released in future versions of the Smith Cart Autoship module. For instructions on how to configure the Smith Cart BuyNow module shipping settings please see the Smith Cart Manual or click on the inline help context sensitive help in the BuyNow module settings screen. D. Coupon and Promotion Code Setup To create or manage coupons to be used on Autoship orders, navigate to the page with the BuyNow module and click on the “Store Admin Menu” button: On the Smith Cart Store Admin menu, click the button titled “Manage Coupons” : The following screen will be displayed when you click Manage Coupons. Revision Date: 11/20/2013 14 Users Manual 1. Add New Coupon Click the “Add New Coupon” button to add a new coupon and the following screen will be displayed. Enter your coupon information on the “Add Coupon” screen and make sure you click the save button at the bottom of the screen when you are finished to save your coupon. For a complete description of all the fields and options available on the coupon setup screen see the Smith Cart Manual or click on the inline help context sensitive help on the coupon setup screen. Revision Date: 11/20/2013 15 Users Manual V. Autoship Order Creation To create an Autoship order, navigate to the page with the Autoship module and you will see the following Autoship Management screen: Click the “Add New Autoship” button to create a new Autoship order and the following screen will be displayed: A. Adding Autoship Products to the Cart To add autoship products to your cart, enter the quantity desired for a product and click the “Add” button to add the product to the Autoship Cart. After adding autoship products to your cart your screen should looking similar to the following screen shot: Revision Date: 11/20/2013 16 Users Manual The added products will then show up in the Autoship cart on the right side of the page. B. Tax Calculation The tax calculation in the autoship cart is charged based on your Smith Cart BuyNow tax setup. For more information on configuring tax please see the section titled Tax Setup above. C. Shipping and Handling Charges The shipping and handling calculation in the autoship cart is charged based on your Smith Cart BuyNow shipping and handling setup. For more information on configuring shipping and handling please see the section titled Shipping and Handling Setup above. D. Coupons and Promotion Codes Revision Date: 11/20/2013 17 Users Manual Coupons and Promotion codes in the autoship cart are setup and managed in the Smith Cart Coupon Management screen. For more information on setting up and managing autoship coupons please see the section titled Coupon and Promotion Code Setup above. After you are finishing adding autoship products to your cart, click the “Proceed to Scheduling” button to checkout and schedule the autoship order. E. Autoship Scheduling The next step in the checkout is the “Scheduling Step” which allows you to select a recurring interval, as well as a start and end date. The following recurring interval are supported: Daily Weekly Monthly Yearly 1. Daily Interval The Daily option sets the Autoship order to recur after a specified number of days. Revision Date: 11/20/2013 18 Users Manual 2. Weekly Interval The Weekly option sets the Autoship order to recur after a specified number of weeks. You can configure which day of the week that the Autoship will occur. 3. Monthly Interval The Monthly option sets the Autoship order to recur on a monthly basis. You can configure a specific day of the month or a day of the week. 4. Yearly Interval The Yearly option sets the Autoship order to occur on an annual basis, determined by specific days and months. 5. Date Ranges The Smith Autoship module supports the following data range variables: Start Date – Select a start date for your subscription. The first shipped order will be based on the start date you select. Revision Date: 11/20/2013 19 Users Manual No End Date – Select this option to allow the Autoship order to recur indefinitely. End After Occurances – Select this option to limit the Autoship to a fixed number of occurances. End By – Select this option to cause the Autoship to end on the specified date. After you have configured your start and end dates, click the “Proceed to Billing” button in order to continue. Revision Date: 11/20/2013 20 Users Manual F. Billing Information The next step in the autoship checkout is the “Billing Step” which allows you to select a enter your billing and shipping information. Fill out billing and shipping information. Type in your credit card information, or choose a saved credit card number. Revision Date: 11/20/2013 21 Users Manual You can type in a separate shipping address or click the checkbox titled “Billing Address as Shipping Address” to use the billing address for shipping. Click the “Proceed to Confirmation” button in order to continue. G. Confirmation Page The autoship checkout confirmation page displays a summary of your entire Autoship order. You can review the products, billing, shipping, tax and totals. Please see the following screen shot of the autoship checkout confirmation page: Revision Date: 11/20/2013 22 Users Manual Finally, choose a name for your Autoship order and click the “Confirm and Create New Autoship” button. Revision Date: 11/20/2013 23 Users Manual VI. Edit, Deactivate or Delete Autoships The Manage Autoship screen allows customers or the Store Admin to perform the following operations on Autoship orders: Edit Autoship Orders Activate, Deactivate or Suspend Autoship Orders Delete Autoship Orders A. Editing Autoship Orders To edit an autoship order click on the “Edit” link to the left of the autoship order as depicted in the following screen shot: B. Deactivating or Suspending Autoship Orders To deactivate or suspend an autoship order click on the “Deactivate” link to the right of the autoship order as depicted in the following screen shot: C. Deleting Autoship Orders To delete an autoship order click on the “Delete” link to the right of the autoship order as depicted in the following screen shot: Revision Date: 11/20/2013 24 Users Manual VII. Smith Autoship Admin Menu Module The Smith Autoship Admin menu provides a dashboard status of all the Autoship orders in your system. The Smith Autoship Admin Menu module provides a summary of the following autoship items: Today’s Autoships Today’s Processed Autoships Active Autoships in the System Inactive Autoships in the System All Autoships in the System In addition to the Autoship Dashboard Summary listed above the Smith Autoship Admin Menu module allows the Autoship Admin the following functionality: View/Edit Today’s Autoships Process All of Today’s Autoships Process Selected Autoship Orders View/Edit Today’s Processed Autoships View/Edit Active Autoships in the System View/Edit Inactive Autoships in the System View/Edit All Autoships in the System To view Smith Autoship Admin menu, navigate to the page in your portal that you have added the Smith Autoship Admin Module to and you will see the following screen: Revision Date: 11/20/2013 25 Users Manual A. Process Today’s Autoships Processing an Autoship Order creates and order in Smith Cart and charges the customers credit card. Specifically, processing an autoship order does the following: Creates an Order in Smith Cart based on the pre configured autoship interval configured by the customer or the autoship admin. Populates the following Smith Cart Tables: o Smith_StoreOrders o Smith_StoreOrdersDetails o Smith_Payment History Charges the customers credit card o Currently, Authorize.Net is the only Payment Gateway integrated with the Smith Autoship module. If you would like us to add other payments gateways please send an email to [email protected]. To process all of today’s Autoship orders click the “Process” link next to “Today’s Autoships” as follows: After you click the “Process” link the following screen will be displayed: Revision Date: 11/20/2013 26 Users Manual Click the “OK” button to process all of today’s autoship orders. B. Managing Autoship Orders The Smith Autoship Admin Dashboard allows the autoship admin to view and manage all autoship orders in the system. Today’s Autoships – View and manage Today’s Autoship orders. Today’s Processed Autoships – View and manage all processed Autoship orders for the day. Active Autoships in the System – View and manage all existing and active Autoship orders. Inactive Autoships in the System – View and manage all existing and inactive Autoship orders. All Autoships in the System – View and manage all existing Autoship orders. To view Autoship orders on any of the different autoship line items below click the “View” link next to Autoship line item. Revision Date: 11/20/2013 27 Users Manual After you click the “View” link the following screen will be displayed: The Autoship Management Screen provides the autoship admin to perform the following actions on autoship orders: Edit – Edit the Autoship order. Place Order – Process individual Autoship order. Activate – Activate or resume the Autoship subscription. Deactivate – Suspend or stop the Autoship subscription without deleting it. Delete – Delete the Autoship order. Revision Date: 11/20/2013 28 Users Manual VIII. Extensions/Customizations The Smith Autoship module can be extended to fit your business requirements. If you’re interested in receiving a quote for customizations please request a quote using the following link: http://www.smith-consulting.com/services/requestaquote.aspx Revision Date: 11/20/2013 29