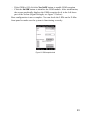
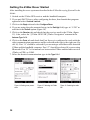
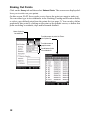
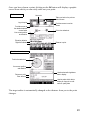
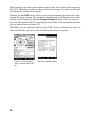
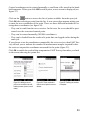
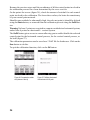
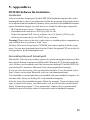
1
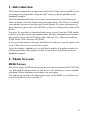
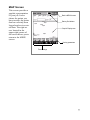
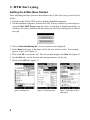
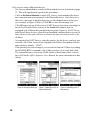
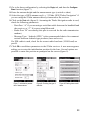
THALES NAVIGATION
FAST Survey
™
Field Guide
www.thalesnavigation.com
Printed in France.
Part Number: 630887-01, Revision A.
No part of this publication or the computer programs described in it may be reproduced, translated, stored in a retrieval system, or transmitted in any form or by any
means, electronic, mechanical photocopying, recording, or otherwise, without prior
written permission of Thales Navigation. Your rights with regard to this publication
and the computer programs are subject to the restrictions and limitations imposed
by the copyright laws of the United States of America (“U.S.A.”) and/or the jurisdiction in which you are located. For information on translations and distribution
outside the U.S.A. please contact Thales Navigation.
© 2003 Thales Navigation, Inc. All rights reserved. Z-Max and FAST Survey are
trademarks of Thales Navigation. All other product and brand names are trademarks
of their respective holders.
Table of Contents
Introduction.....................................................................1
Main Screens ...................................................................1
MENU Screen ..................................................................... 1
File tab ....................................................................................... 2
Equip tab.................................................................................... 3
Surv tab...................................................................................... 4
COGO tab.................................................................................. 5
Road tab..................................................................................... 6
MAP Screen......................................................................... 7
RTK Surveying ...............................................................8
Getting the Z-Max Base Started .......................................... 8
Getting the Z-Max Rover Started ...................................... 14
Logging Points................................................................... 17
Staking Out Points............................................................. 18
Logging Points in Continuous Mode................................. 21
Localization (or Calibration, or Local Grid) ..................... 22
Post-Processing Surveying ...........................................25
Static Mode........................................................................ 25
Kinematic Mode ................................................................ 26
File Management ............................................................... 27
Appendices.....................................................................29
PDT8100 Software Re-Installation ................................... 29
Introduction ............................................................................. 29
Re-installing Microsoft ActiveSync®..................................... 29
Disconnecting the IR (Beam) Com Port.................................. 31
Installing the Bluetooth Driver................................................ 31
Re-installing FAST Survey Software ................................ 35
Authorizing FAST Survey................................................. 36
After Registering FAST Survey ........................................ 37
i
ii
1. Introduction
This manual explains how to implement and use the Z-Max system in RTK or postprocessing surveying modes, using the FAST Survey software installed on the
handheld computer.
Note that this manual focuses on two basic survey functions: Store Points and
Stakeout Points. Note also that the functions supported by FAST Survey to control
conventional systems are not discussed in this manual. For more information on
these functions, please refer to the FAST Survey Reference Manual provided on CDROM.
Likewise, the procedure to download land survey projects from the GNSS Studio
software is not discussed in this manual either. For more information on this procedure, please refer to the GNSS Studio Office Software User Manual provided on
GNSS Studio Office Software CD-ROM.
If you need information to help you install the base and rover systems, please refer
to the Z-Max Surveying System Pocket Guide.
In the last chapter (Appendices), you will find a number of installation and re-installation procedures that might be useful to you in case of problems with your
handheld computer.
2. Main Screens
MENU Screen
This screen shows 5 different tabs giving access to the main functions of FAST Survey. Although all function titles on each tab are self-explanatory, a more detailed
definition of these functions is provided in the next pages.
The right arrow located in the upper-right corner of the MENU screen allows you
to access the MAP screen (see page 7).
1
File tab
Job: Allows you to select an existing coordinate file
for your job or to create a new coordinate file. A job
consists of real-time data only. Several types of files
are associated with a job (.crd, .rw5,.inf, etc.).
Job Settings: Allows you to set configuration options for data collection
List Points: Lists all of the points in the current coordinate file (.crd)
Configure Reading: Allows you to select settings
and preferences that apply to observations taken in
the field
Feature Code List: Used to define feature code
lists
Data Transfer: Prepares FAST Survey for transferring data to and from a PC
Import/Export ASCII: Allows you to import an ASCII file to job data or export
job data to an ACSII file
Delete File: Allows you to remove any existing file from any directory to free up
memory on the handheld computer
Add Job Notes: Allows you to enter job notes as ASCII text
Exit: Will exit the FAST Survey program.
2
Equip tab
Instrument: Allows you to set the equipment type
that you will be using (Z-Max, Z-Xtreme)
Configure Base: Sets up the base antenna and
record the correct antenna height, the antenna type
and the methods used for localizing
Configure Rover: Used to set the rover receiver to
the correct parameters and to instruct the receiver
that it is a rover
Receiver Utilities: Resets and/or troubleshoots the
GPS receiver. Sets radio/GSM parameters.
Localization: Allows you to align on a local coordinate system
Monitor Skyplot: Allows you to review position
and quality of data
Tolerances: Allows you to set operating tolerances
Comm Setup: Allows you to specify communication parameters for the handheld
computer to be able to communicate with the GPS receiver (serial cable, Bluetooth)
About FAST Survey: Allows you to view information about FAST Survey and
change your registration.
3
Surv tab
Store Points: Principal data collection routine
(gives access to the Point Logging function)
Stakeout Points: Allows you to stakeout to a selected point by guiding you to the point with a series of commands and directions (Point Stakeout
function)
Stakeout Line/Arc: Opens a secondary dialog
where you can choose between Stake Line, Stake
Centerline, Stake Arc (3 points) and Stake Arc (PC,
R, PT)
Offset Stakeout: Will stake out up to 2 user defined horizontal offsets to a centerline at any station as well as an unlimited number of offsets per
station if you are using a predefined Cutsheet Station and Offset List
Elevation Difference: Will report a cut/fill in comparison with your current location to a design surface at any location within a project
Auto by Interval: Allows you to acquire and store data at a set interval value of
either distance or time (Point Logging performed at regular intervals of time or distance)
Log Static Data: Allows you to log static raw data to the data card for use with
GNSS Studio Post Processing software.
4
COGO tab
Keyboard Input: Allows you to manually enter or
edit coordinates in the current job file or the current
control file
Inverse: Reports the bearing and horizontal distance between any two user specified points that are
contained within the current job
Areas: Calculates the area of a closed figure that is
defined internally by user-entered point numbers
contained within the current job or by a polyline
picked from the screen
Intersections: Allows for the calculation and storing of points based upon standard surveying practices of Bearing-Bearing, Bearing-Distance, or
Distance-Distance Intersection calculations
Point Projection: Allows you to calculate the station and offset of any entered or
surveyed point relative to a known centerline or baseline
Station Store: A pure calculation routine that will create point numbers based on a
station and offset from an alignment
Translate, Rotate, Scale: Allows you to translate, rotate, and/or scale points in the
current job
Calculator: Eliminates the need to carry a separate calculator in the field. The calculator can be used to do scientific computations, standard calculations, conversions, triangle calculations including angles, and curve calculations.
Process Raw File: Creates a raw file (.RW5) that contains various lines of survey
data similar to a surveyor’s field book
Point in Direction: Allows for manual entry of angles and distances and calculates
sideshots or traverses from a known occupied point.
5
Road tab
Input/Edit Centerln: Used to enter new centerlines and recall/edit existing centerline files
Draw Centerline: Draws the selected centerline on
the screen
Input/Edit Profile: Allows field entry of vertical
alignment files for roads, sewers and other types of
alignments
Draw Profile: Draws the selected profile on the
screen
Input/Edit Template: Used to enter templates, for
roads, levees, ditches and other such earthwork
Draw Template: Draws the selected template on
the screen
Slope Staking: Used to calculate and stake out the location of the “catch point”
where fill slopes or cut slopes contact the original ground
Cross Section Survey: Collects as-built cross sections of roads or other alignments
and stores them as points
Road Utilities: Converts centerlines, profiles and cross sections from other formats
to the formats used by FAST Survey
Template Stakeout: Designed to stakeout specific stations and offsets along a centerline.
6
MAP Screen
This screen provides a
graphic representation
of your job. It also
shows the points you
have to stake, the points
that have already been
logged and receiver status data. The right arrow located in the
upper-right corner of
the screen allows you to
return to the MENU
screen.
Back to MENU screen
Battery life indicator
Graphic Display area
Viewing parameters
Zoom settings
7
3. RTK Surveying
Getting the Z-Max Base Started
After installing the base system as described in the Z-Max Surveying System Pocket
Guide:
1. Switch on the Z-Max GPS receiver and the handheld computer
2. On the handheld computer, launch the FAST Survey software by selecting successively Start, FAST Survey using the stylus. A message is displayed asking you
whether you wish to continue the last open job, select an existing job or create a
new job.
3. Choose Select New/Existing Job. A new screen is now displayed.
4. In the Name field, type in the name of the job you wish to create. For example,
type in “tuto1.crd” (figure 1).
5. Then click OK to create the job. The screen then displays the Units tab (figure 2).
6. On the Units tab, set the desired units and parameters for the job.
7. Click on the GPS tab (figure 3).
Figure 1- Naming a job
8
Figure 2- Choosing the units
Figure 3- Choosing the coordinate system
8. On the GPS tab, choose the coordinate system to be used in the job as well as
the geoid model. Note that the coordinate system and the geoid model may have
been uploaded earlier to the handheld computer using one of the GNSS Studio
tools (see GNSS Studio Office Software User Manual for more information)
9. Click OK located on top of the screen.
If you are using the handheld computer for the first time, or if the handheld was last
connected to another type of equipment (other GPS receiver type, total station, etc.),
you now have to select the type of equipment (Z-Max) connected to the handheld.
Otherwise, skip to step 13 directly (page 11).
10.Select the Equip tab, then the Instrument function, and finally select “Ashtech/
Thales” from the scroll-down menu
11.Select the Configure Base function and choose “Z-Max” from the Receiver Type
scroll-down menu.
If FAST Survey cannot detect the Z-Max receiver, the following message will
be displayed:
In this case, you will have to check that you are using the right port to communicate with the Z-Max receiver. You will do this by clicking on the Equip tab and
selecting the Comm Setup function (see figure 4 on next page).
12.a) If you are using a serial data cable:
COM4
- Select the port on the handheld computer that is connected
to the Z-Max receiver. COM1 is the port located next to
the keyboard. COM4 is the port located on top of the
handheld, above the screen (PDT 8100).
Warning! You will not be allowed to use COM4 until you
install the IR Com Disconnect driver (see page 31).
COM1
9
b) If you are using a Bluetooth device:
- It is first recommended to search for Bluetooth devices as described on page
33. This will significantly speed up the procedure.
- Click on Set Port to Bluetooth so that FAST Survey can automatically detect
the communication port assigned to the Bluetooth device. Once the port is
detected, a message is displayed giving you the identification of this port
(see example in figure 5 below). Click OK to close this message box.
- Click OK again (on top of the screen). FAST Survey then starts searching for
the devices located in the vicinity of the handheld computer that are
equipped with a Bluetooth communication system (figure 6). FAST Survey
then lists all these devices. Should your handheld computer detect several of
these devices, then you will have to choose the one you want to work with
(Z-Max).
- As requested by FAST Survey, enter the passkey for the device you have just
selected. All Z-Max receivers are shipped from Thales Navigation with the
same passkey, namely “12345”.
- If the passkey has been changed, you can read it from the Z-Max by sending
the $PASHQ,BTH command to the Z-Max receiver via a serial data cable.
The command can be sent from GNSS Studio’s WinComm utility (refer to
the GNSS Studio Office Software User Manual for more information on this
utility).
Figure 4- Setting the serial port
10
Figure 5- Detecting the port assigned to Bluetooth
Figure 6- Searching for the ZMax receiver
13.Go to the base configuration by selecting the Equip tab, and then the Configure
Base function (figure 7)
14.Enter the antenna height and the measurement type (vertical or slant)
15.Select the type of GPS antenna used, i.e. “[Z-Max GPS] Thales Navigation” if
you are using the Z-Max antenna directly connected to the receiver.
16.Click on the Ports tab (figure 8). Assuming the Thales Navigation radio is used,
check the following parameters:
- Data Port: “A” if you are using a serial data cable between the handheld and
the receiver; or “C” if you are using Bluetooth.
- Radio Port: “B” necessarily (this port is reserved for the radio transmission
modem)
- Message Type: “Ashtech (CPD)” is the recommended choice for communications between Ashtech-type products (base and rover).
If a PDL radio is used, check for the correct radio baud rate (19200 baud) on
port B.
17.Click OK to send these parameters to the Z-Max receiver. A new menu appears
asking you to enter the initialization position for the base. Several options are
possible to enter this position as prompted on the screen (figure 9).
Figure 7- Initialization parameters of base antenna
Figure 8- Choosing the type of
radio link
Figure 9- Entering base coordinates
11
18.Choose the option that suits you and enter this position. When you are done
with entering the base position, FAST Survey then displays the WGS84 coordinates of this position (figure 10), after making the transformation to WGS84 if
necessary.
19.Click the Yes button. Fast Survey then asks you to enter a point ID (4 characters
max.).
20.Enter a Point ID and click Yes. Then FAST Survey asks you whether you want
to verify the radio parameters or not
21.Click Yes to display the current radio parameters (figure 11). In the US, a channel/frequency table will be shown. In Europe, a single channel will be displayed
along with the corresponding frequency.
22.a) If you are using a UHF radio:
- Select the desired frequency channel
- Click the Set Radio button to configure the radio.
b) If you are using the integrated GSM modem:
- Check the selected band (figure 12): For North America and some other
countries, you should select “1900”. For Europe and some other countries,
you should select “900/1800”.
Figure 10- WGS84 coordinates
of base position
12
Figure 11- Thales Navigation
radio parameters as shown outside the US
Figure 12- Base GSM screen
- If the GSM is Off, click the Turn On/Off button to enable GSM reception
- Click the Set GSM button to initialize the GSM module. After initialization,
the screen graphically displays the GSM reception level in the left-lower
part of the screen (Signal Strength, see figure 13 below).
Base configuration is now complete. You can check the LEDs on the Z-Max
front panel to make sure the system is functioning correctly.
Figure 13- GSM reception level
13
Getting the Z-Max Rover Started
After installing the rover system as described in the Z-Max Surveying System Pocket
Guide:
1. Switch on the Z-Max GPS receiver and the handheld computer
2. If you quit FAST Survey after configuring the base, then launch that program
again and select Continue Last Job.
3. Click on the Equip tab and select Configure Rover
4. If you are using the pole-mounted setup, in the Rod Hgt field, type in “1.226” m
and check the Vertical option (figure 14)
5. Click on the Receiver tab and check that the receiver used is the Z-Max (figure
15). Also, select the “[Z-Max GPS UHF] Thales Navigation” antenna in the
Antenna Type field.
6. Click on the Ports tab and check that Fast Survey is configured to work with the
right communication parameters and the selected radio type is the right one (figure 16). Port “A” should be selected if you are using a serial data cable between
Z-Max and the handheld computer. Port “C” should be selected if you are using
Bluetooth. Port “D” is for internal use between the Z-Max and the radio receiver
(Thales or PDL) or GSM.
7. Select the desired communication type in the Type field.
Figure 14- Setting rover parameters
14
Figure 15- Selecting the Z-Max
antenna
Figure 16- Selecting the radio
link
8. Click the OK button located on top of the screen. If you get the following message on the screen, check that the Z-Max receiver is powered on. If a serial data
cable is used, check that the connection between the handheld computer and the
receiver is correct.
9. Click OK, return to the rover configuration function by first clicking on the Equip
tab, selecting Comm Setup and setting the displayed parameters. Then, still on the
Equip tab, select the Configure Rover function and set the displayed parameters
(same as with base, steps 11 and 12).
After initializing the Z-Max’s GPS section, FAST Survey prompts you to check
the settings of the radio link
10.If you agree to check the radio settings, then FAST Survey will display the
radio parameters last used. Regardless of whether you are using a UHF Thales
radio or a PDL radio, the screen will look like figure 17 (on next page).
11. a) If you are using a UHF radio:
- Select the desired frequency channel
- Click the Set Radio button to configure the radio.
b) If you are using the integrated GSM modem:
- Check that the GSM status reading is “ON” or else, click on the Turn On/Off
button
- Check the selected band (figure 18 on next page): For North America and
some other countries, you should select “1900”. For Europe and some other
countries, you should select “900/1800”.
15
- Enter the base phone number (figure 18)
- Click on the Set GSM button to initialize the built-in GSM module
- Click on the Dial button to call the base. After the connection to the base is
established, the GSM module status reads “ON LINE” (figure 19).
Rover configuration is now complete. You can check the LEDs on the Z-Max
front panel to make sure the system is functioning correctly.
You can also monitor the Z-Max receiver from the handheld computer using
FAST Survey’s Equip tab>Monitor Skyplot function (figure 20).
Figure 17- Radio parameters
Figure 18- Rover GSM screen
Current position
Computation uncertainties
GPS constellation geometry
Position solution status
Number of satellites received
Radio link quality
Figure 20- Receiver Monitor
screen
16
Figure 19- Connected GSM
module
Logging Points
Click on the Survey tab and then select Store Points. The screen now displayed allows
you to log all your points. The figure below summarizes all the functions available
from that screen.
Logging point
(general case)
Logging point
with offset
Logging point with
position averaging
Provides access to
monitor screen
Current status of
position solution
Graphic Display area
GPS antenna height
These 2 fields to
enter the point
name and the
point description
Current position and related
quality figures displayed here
Viewing parameters
Zoom settings
17
Staking Out Points
Click on the Survey tab and then select Stakeout Points. The screen now displayed allows you to stake out your points.
On this screen, FAST Survey asks you to choose the point you want to stake out.
You can either type in its coordinates in the Northing, Easting and Elevation fields,
or select a pre-defined point from the points list (see page 2). You can also, define
graphically this point by clicking on the point on the graphic screen, or define that
point according to azimuth, slope and horizontal distance.
Name of point to
be staked out
Provides access to points list. Example of points list:
Provides access to
graphic screen
Coordinates of point
to be staked out
18
Once you have chosen a point, clicking on the OK button will display a graphic
screen from which you can easily stake out your point:
Stakeout screen
Next point
Takes you back to the point selection screen
Logs the point
Provides access to
the detailed stakeout
screen below
Your current position
and direction
Elevation deviation
Right/Left indicator
Provides access to monitor
screen
Point to be staked out
Distance to point
Detailed stakeout screen
Point to be staked out
Your current position
and direction
Distance to point
Point Azimuth
Used to select which guidance
data to display
Used to select which data to
display for the point: coordinates or quality data
The target radius is automatically changed as the distance from you to the point
changes.
19
When getting closer to the point, markers appear at the four corners of the target (see
figure 21) informing you that you have arrived at the target. You can now materialize and log the position of this point.
Clicking on the STORE button allows you to start performing measurements to determine the target position. The number of measurements will depend on the value
entered earlier through the File tab>Configure Readings function. Once the position
has been determined, FAST Survey displays the results of the computation so that
you can check them (see figure 22).
Click OK if you are satisfied with the results. FAST Survey will then save these results and will take you back to the stakeout screen for the next point.
Figure 21- 4 markers indicate
that you have arrived at the target
20
Figure 22- Computation results
Logging Points in Continuous Mode
On the Surv tab, select the Auto by Intervals function. Two
different modes are possible: Time or Distance (see figure opposite).
If you choose Distance, enter the increment value, according to the chosen unit, in the Value field. If you choose
Time, enter the increment value, in seconds, in the same
field.
Enter a point Id. for the start point in the Starting Pt Number
field. This field will increment after each point logging.
You do not need to define a name finishing with a figure.
FAST Survey will place one anyway when incrementing
this field.
Press OK to switch to the graphic screen (see figure below) and to start logging the
first point.
The S button lets you instantly log the position of a point. The X button allows you
to pause data logging in continuous mode. If data logging in continuous mode is
paused, you can still continue to log points in manual mode using the S button. Click
the X button again (changed into a right arrow during pause) to resume data logging
in continuous mode. If you come back to the main menu by clicking on MENU, then
data logging in continuous mode is automatically stopped.
Used to log a point’s
position manually
Used to pause/resume
data logging
Point Id. incremented
automatically
21
Localization (or Calibration, or Local Grid)
This operating mode is used in the following cases:
- The coordinate system should be unknown or its characteristics are not accurate
enough.
- The base station is operated on a reference point whose position only results
from a position determination in autonomous GPS mode.
- A local coordinate system is used for field operations.
In either of these 3 cases, you will have to calibrate your system before starting your
job, using control points. The use of 3 control points or more is highly recommended to achieve horizontal calibration. This number should be raised up to 4, or more,
to ensure vertical calibration, as this will guarantee the consistency of your control
points.
Click on the Equip tab and select Localization. The screen that now appears is described below.
Points list
Deletes the selected point
Edits the selected point
Adds a new point to the list
Enables/disables the selected
point for/from the calibation
process
Loads a points list from the
specified *.dat file
Saves the current points list as
a *.dat file
Shows the geographic or plane coordinates of the selected point
22
Provides access to Solution
Monitoring screen
Control coordinates can be entered manually or read from a file stored in the handheld computer. When you click ADD to add a point, a new screen is displayed (see
figure 23).
Click on the
button to access the list of points available from the open job.
Click OK after selecting a point from the list. A new screen then appears asking you
to enter the true coordinates of the point. There are three different methods for entering these coordinates (see figure 24).
- They can be read from the rover receiver. In this case, the rover should be positioned over the concerned control point.
- They can be entered manually (WGS84 coordinates).
- They can be loaded from the results of a point that was logged earlier during the
same job.
If you choose to use the coordinates computed by the rover receiver, then FAST Survey will ask you to indicate the number of measurement samples required before
the receiver outputs the coordinates measured for the point (figure 25).
Click OK to enable the result of that computation. FAST Survey then takes you back
to the screen showing the points list.
Figure 23- Adding a control
point to be involved in the calibration process (control coordinates)
Figure 24- Three methods to
enter a control point’s true coordinates
Figure 25- Defining the number
of samples
23
Resume the previous steps until the coordinates of all the control points involved in
the calibration process have been determined by the rover receiver.
On the points list screen (figure 26), check the amount of residual for each control
point involved in the calibration. The lower these values, the better the consistency
of your control point network.
Should some residuals be abnormally high, the relevant point(s) should be deleted
using the Delete button, or removed from the calibration process using the On/Off button.
Warning! At least 3 points are required to compute residuals in a horizontal system,
and at least 4 points in a horizontal + vertical system.
The On/Off button gives access to a menu allowing you to enable/disable the selected
control point for the horizontal control process, for the vertical control process, or
for both (figure 27).
The calibration parameters can be saved as a *.DAT file for further use. Click on the
Save button to do this.
To quit the calibration function, click on the OK button.
Figure 26- Computation residuals (columns 3 and 4)
24
Figure 27- Defining Horizontal/
Vertical control for a point
4. Post-Processing Surveying
Static Mode
In this mode, the receiver is installed and operated at a stationary point throughout
the logging sequence.
Click on the Surv tab and select the Log Static Data function. If no data logging is in
progress, a menu (figure 28) is then displayed on the handheld computer’s screen.
Otherwise, you should first stop the data logging sequence in progress by clicking
on the Close File button.
Select Start File and then enter the logging parameters (elevation mask, default=10°;
data logging interval, from 0.1 to 999 seconds) (figure 29).
Check that the antenna height value is correct, otherwise change it by clicking on
the Change Antenna button.
Click OK to start a new data logging sequence. To stop logging data, click on the
Close File button.
Figure 28- Static surveying
main menu
Figure 29- Logging parameters
25
Kinematic Mode
Start data logging as explained previously in Static mode. Once data logging has begun, you can go to the point you want to log and stay stationary on that point
(“Stop&Go” method). The occupation time on each point can be preset or not (see
figure 30).
Once the receiver is placed over the point, select Tag New Site from the menu and enter the characteristics of the point (figure 30).
Click OK. A new screen appears showing the time spent logging data on the point
(occupation time; figure 31).
Select Stop Point Logging before moving away from the point. FAST Survey will then
ask you to validate the data logged on that point. The time spent logging raw data
on a point (occupation time) depends on the logging interval used. With a one-second logging interval, an occupation time of 10 to 15 seconds will allow you to
achieve centimetric accuracies.
If you are surveying a trajectory, walk to the next point taking care to keep the receiver in vertical position to avoid satellite loss. The level of accuracy achieved will
depend on the distance between the reference point used and your working area. Accuracy will also depend on your ability to maintain good working conditions thus
letting the system log raw data without any disruption.
When you are done with your job, click on the Close File button to close the file being
logged.
Figure 30- Entering the charateristics of the point
26
Figure 31- Occupation time
File Management
Use the File Manager button on the Log Static Data menu (Surv tab) to list and manage
the files stored on the receiver’s SD card. See figure below.
Files list
Number of files on SD card
Free memory space on SD
card
Deletes the selected file
Used to format the SD card
27
28
5. Appendices
PDT8100 Software Re-Installation
Introduction
After several days keeping the Symbol PDT8100 handheld computer idle with a
discharged battery, there is an important risk that the programs and peripheral drivers be absent from the handheld’s memory when you turn on the handheld computer
again. Should this happen, you will have to re-install the following components:
- IR Com disconnect driver: 8100mononscan.reg file
- SocketBluetooth card driver: BTCEeng120F.exe file
- Thales Navigation FAST Survey software: SurvCE_Symbol_ENG.exe file
- Software protection device for FAST Survey software
Warning! Please observe the above order when re-installing these components as
you will then have to perform a “hard” reset.
All these files can be found on the CD-ROM that comes together with the equipment. You can also download them from the Thales Navigation FTP site at the following address: ftp://ftp.thalesnavigation.com/
Re-installing Microsoft ActiveSync®
Microsoft® ActiveSync® provides support for synchronizing data between a Windows-based desktop computer and Microsoft® Windows® CE based portable devices. Before you can transfer any files between the desktop PC and the PDT8100,
your desktop PC must have Microsoft ActiveSync installed and running.
If you have lost ActiveSync, then you should re-install it. First, download ActiveSync’s latest version from Microsoft (web site: http://www.microsoft.com/).
You should have a serial cable that was included with your handheld computer. Attach this cable from your desktop PC to the handheld computer.
After the ActiveSync installation starts, follow the prompts. If you need more assistance to install ActiveSync, visit Microsoft’s web site for the latest install details.
Select “Partnership prompt” (“New partnership” window) that is automatically
launched when ActiveSync makes a connection with the handheld computer.
29
Auto Connection
If the default settings are correct, ActiveSync should automatically connect to the
handheld computer. You may see a dialog on the handheld computer asking you if
you want to connect. Press Yes.
Manual Connection
If nothing happens when you connect the cable:
- Check to see if you have the following icon in your system tray:
.
- If you see this icon, right click on it and choose Connection Settings. You should
see a dialog box as shown in figure 31.
- Click the first toggle at the top that says “Allow Serial cable or infrared connection to this COM port”. Then choose the correct COM port below (usually this
will be COM1). Now you should see a dialog on the handheld computer that
says “Connect to desktop?”. Choose Yes.
- If you see this icon in the system tray:
, you are connected. When you do
get connected, you should see a dialog box as shown in figure 32. If your first
attempt to get connected fails, you may just need to unplug/re-plug the COM
port on the handheld computer to get the connection.
Figure 31- Connection Settings dialog box
30
Figure 32- Dialog box indicating that connection is effective
Disconnecting the IR (Beam) Com Port
THIS IS VERY IMPORTANT!
- Using ActiveSync, copy the 8100monoscan.reg file from the CD-ROM to the
PDT8100 handheld computer’s MyPocketPC folder.
- Perform a cold start-up of the handheld as explained below: Remove the battery
door located at the back of the handheld and press simultaneously the Func key
and the Reset key (using the stylus to press Reset). The Reset key is located near
the upper-right corner of the battery.
- Close the battery door and switch on the handheld by pressing (On/Off red
key). After about 10 seconds, the handheld computer will re-start. It will then
ask you to calibrate the touch-sensitive screen. Once this operation is complete,
DO NOT perform a new cold start-up or else you would lose all programs and
drivers you have just installed.
- On the field terminal, click on Start, then on Settings. Click on the Connections tab
in the lower part of the screen. Click on the Beam icon and disable the Receive all
incoming beams and select discoverable mode option.
Installing the Bluetooth Driver
- Copy the BTCEeng120F.exe file in a temporary folder of your desktop PC and
double-click on that file to run installation. You may also directly double-click
on this filename.
- Click OK in the Winzip self-Extractor window. This decompresses the file and
automatically launches installation. First the Welcome dialog box opens.
- In this box, click the Next button. This opens the “Software License Agreement”
dialog box.
- In this box, click Yes after agreeing to the terms of the software license. This
opens the “Start Copying Files” dialog box.
- In this box, click Yes. This starts the data file transfer.
- Once file transfer to the handheld computer is complete, click Yes. After decompressing and installing the Bluetooth driver, the content of the handheld computer screen should be as shown in figure 33 (see next page).
- Click the Next button. The “Give your PDA a name” dialog is now displayed
(see figure 34 on the next page).
31
- Do not change anything on this screen. Just click the Next button. The “Disable
IrDA” dialog box is now displayed (see figure 35).
- Again, do not change anything on this screen. Just click the Next button. The
“Choose your ports” dialog box now opens in which you have to make the
choices shown in figure 36 below. Then click Next to access the next dialog.
- Click Finish in this dialog box. When the warning message appears (see figure
37), click OK. The only thing you have to do now is to reset the handheld software (see next page).
32
Figure 33- Socket Bluetooth
Welcome screen
Figure 34- Entering a name for
the PDA
Figure 36- “Choose your ports”
screen
Figure 37- Warning message
asking you to reset the PDA
Figure 35- Disabling IrDA
Resetting Handheld Software
- Press simultaneously Func, End and
(Light). You can then set the Bluetooth
communication parameters so they agree with your Thales Navigation Z-Max
receiver(s). Follow the instructions below.
- First have all your Z-Max receivers present in the vicinity of the handheld computer and then turn them on.
- Click on the Bluetooth icon located in the right-lower corner of the screen (see
below).
Bluetooth Icon
- Select Advanced Features, and then Bluetooth Devices.
- On the Bluetooth Devices screen, click on the “Bluetooth Device Detection”
icon located at the bottom of the screen (see below).
Device Detection Icon
- Successively click the Next button on the two screens that follow in the procedure. The handheld computer then starts a routine to find all the nearby units
equipped with a Bluetooth device (see figure 38 on the next page).
After a few seconds, a new screen is displayed showing the list of the units that
were detected during the routine (see example in figure 39 on the next page).
33
- Check the units you really want to use in the field and click the Next button.
- Then type in the passkey for each of the selected units (see figure 40 below).
The default passkey for any Thales Navigation Z-Max receiver is “12345” (see
also page 10).
- Click the Reply button to proceed to the next unit and to the next screen.
- After entering the passkey for each of the units, a new screen is displayed (see
figure 41 below). You have to click the Finish button. The screen now lists the
names of the units that can communicate with the handheld computer (see figure 42 below).
- Click on the cross button in the upper-right corner of the screen to quit the program.
Figure 38- Searching for Bluetooth devices
Figure 39- Listing the detected
units
Figure 40- Typing in the passkey for a unit
IMPORTANT!
Running this procedure is highly
recommended as this will result
in faster searching and communication times between your
various Bluetooth devices!
Figure 41- Congratulations
screen
34
Figure 42- Selected units for
use with the handheld
Re-installing FAST Survey Software
Before you install FAST Survey, close all running applications on the handheld
computer.
- Connect the handheld computer to the desktop PC and ensure that the ActiveSync connection is made.
- Insert the CD into the CD-ROM drive on the desktop PC.
If Autorun is enabled, the startup program begins. The startup program lets you
choose the version of FAST Survey to install.
To start the installation process without using Autorun, choose Run from the
Windows Start Menu. Enter the CD-ROM drive letter, and setup. For example,
enter d:\launch (where d is your CD-ROM drive letter)
- On the desktop PC, the Welcome dialog appears.
- Press Next.
- On the next dialog, you must read and accept the FAST Survey End User
License Agreement. If you agree with the EULA, press Yes. If you do not agree
with the EULA, press No and the installation program will quit.
- On the next dialog box, type in your name and your company name and then
press Next
- The next dialog box asks you to confirm the installation directory. Press Yes.
- At this point, the necessary files will be copied to the handheld computer. A dialog box shows you the progress.
- After this has completed, the Installing screen will appear on the handheld computer showing the installation progress. When this dialog box disappears, the
installation is complete.
35
Authorizing FAST Survey
The first time you start FAST Survey, you are prompted to register your license of
the software. If you do not register, FAST Survey will remain in demo mode for 50
uses and then quit functioning.
- Choose Yes to start the registration process or No to register later.
- If you choose Yes, the dialog shown above will appear. FAST Survey registration is done via the Internet at the following address: www.thalesnavigation.com
- Enter the professional products section and then enter the register/login section.
If you are not a registered user, you must do so before proceeding.
- After registering and creating a user profile, please enter the product registration
section. Fill in the information in the fields provided. This information will be
used to validate and process your software activation keys.
- After you submit this information, a request confirmation will be sent to the
email you provided. Keep this for your permanent records. In 24-72 hours your
change key will be emailed to the address that you submit. If there is a problem
processing your request, a Thales Navigation representative will call using the
phone number provided in the user profile.
- If you do not have access to email, you may continue to use the program without any restrictions until such time that you are able to register. Alternately, you
may phone or fax the registration information to the Thales Navigation office in
your region - your registration information will be phoned or faxed back to you.
Thales Navigation Professional Products
Tel: 800-922-2401 (U.S.)
Tel 408-615-3907 (International)
Tel +33 (0) 2 28 09 3800 (Europe, Middle East, Africa and Asia)
- After you receive your change key, enter it and press OK.
36
After Registering FAST Survey
After you register FAST Survey, you need to perform a RAM Backup. If you do not
do this, then your authorization code will be lost next time the computer reboots. To
perform a RAM backup, choose the Start button, then Programs, then Utilities, then
Backup RAM.
If you cannot find this on your Start menu, then open the Control Panel, and choose
RAM Backup.
RAM backup is not needed if you are using a Symbol PDT8100.
Hardware Notes
If FAST Survey quits responding, you can reset the hardware by following the applicable procedures described below.
- Ranger: Tap the Start button, then choose Programs, Utilities, Reset, Soft Reset.
You can also press and hold the power button down for approximately 5 seconds.
- Juniper Allegro: You press and hold the On\Off button down for approximately 5 seconds.
- Other hardware: See the hardware documentation.
Color Screens
FAST Survey 1.21 or greater enables viewing of color. Any red, green, blue or other
colored entities in DXF files will retain the color when viewed within FAST Survey.
Points will appear with black point numbers, green descriptions and blue elevations.
Dialogs and prompting will utilize color throughout FAST Survey.
The Symbol PDT 8100 is not fitted with a color screen and so does not support colored entities from DXF files.
37
38
Part Number: 630887-01 Rev. A
Thales Navigation, Inc.
Corporate Headquarters, Santa Clara, CA, USA
+1 408 615 5100 • Fax +1 408 615 5200
Toll Free (Sales in USA/Canada) 1 800 922 2401
Email [email protected]
In South America +56 2 234 56 43 • Fax +56 2 234 56 47
In China +86 10 6566 9866 • Fax +86 10 6566 0246
European Headquarters, Carquefou, France
+33 2 28 09 38 00 • Fax +33 2 28 09 39 39
Email [email protected]
In Germany +49 81 6564 7930 • Fax +49 81 6564 7950
In Russia +7 095 956 5400 • Fax +7 095 956 5360
In UK +44 870 601 0000 • Fax +44 208 391 1672
In the Netherlands +31 78 61 57 988 • Fax +31 78 61 52 027
Web site www.thalesnavigation.com