1
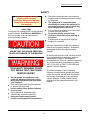
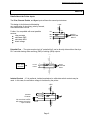
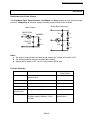
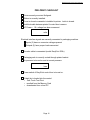
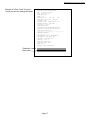
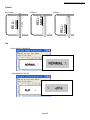
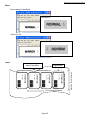
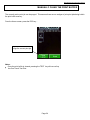
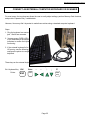
USER'S MANUAL
for
EasyPrint S32 Printers
December 1, 2010
Bell-Mark Sales Company
331 Changebridge Road
Pine Brook, NJ 07058
Tel: 973.882-0202
Fax: 973.808-4616
MM1100
April 08, 2011
COPYRIGHT © BELL-MARK, INC 2011 Pine Brook, NJ 07058
Bell-Mark EasyPrint S32 User's Manual
Table of Contents
SAFETY .................................................................................................................. III
PRINTER CONNECTIONS ...................................................................................... 1
EASYPRINT S32 - Typical System Configuration ............................................................. 1
AIR PRESSURE REGULATOR & SETTING .................................................................... 3
MAINS CONNECTION (AC POWER) ............................................................................... 4
INTERFACE CONNECTIONS ........................................................................................... 5
INPUTS ....................................................................................................................... 6
ENCODER INPUT ....................................................................................................... 8
OUTPUTS ................................................................................................................... 9
PRE-PRINT CHECKLIST ....................................................................................... 12
FEATURES & FUNCTIONS ................................................................................... 13
THE TOUCH-SCREEN .................................................................................................... 14
SETTING TIME & DATE .................................................................................................. 15
ONE-TOUCH TEST PRINT ............................................................................................. 16
ETHERNET TCP/IP SETUP ............................................................................................ 18
USB CONNECTION ........................................................................................................ 19
SERIAL RS232 CONNECTION ....................................................................................... 19
SENDING A PRINT JOB ................................................................................................. 20
STORING A PRINT JOB ................................................................................................. 21
RUN PRINT JOB (from Removable Memory) ................................................................. 22
REMOTE / LOCAL MODE ............................................................................................... 23
CONTRAST SETTING .................................................................................................... 24
PRINTER MECHANICS SETTINGS ............................................................................... 25
Print Speed ................................................................................................................ 25
Head Down ................................................................................................................ 25
Ribbon Start .............................................................................................................. 25
Ribbon Stop ............................................................................................................... 25
Ribbon Retract .......................................................................................................... 25
Ribbon Savings ......................................................................................................... 25
LABEL SETUP ................................................................................................................. 27
Label Offset ............................................................................................................... 27
X-Offset ..................................................................................................................... 27
Flip Label ................................................................................................................... 27
Mirror Label ............................................................................................................... 27
Lanes ......................................................................................................................... 27
Gap ............................................................................................................................ 27
Multi-Pack .................................................................................................................. 27
Ribbon Savings ......................................................................................................... 32
MANUALLY CLEAR THE PRINT BUFFER ..................................................................... 34
CONNECT AN EXTERNAL COMPUTER KEYBOARD OR SCANNER ......................... 35
Electrical Block Diagram ........................................................................................ 37
I
Bell-Mark EasyPrint S32 User's Manual
II
Bell-Mark EasyPrint S32 User's Manual
SAFETY
Disconnect electrical power and pneumatic
supplies before performing services or repairs
on the printer.
The printer and its component parts
should only be used for the purposes for
which they were sold, and for which they
were designed and constructed.
Do not wear loose clothing, such as neckties
or shirts with loose sleeves.
Do not wear jewelry such as rings,
necklaces or bracelets when working on
the printer.
Pull back and tie long hair that might get
caught in the machine.
Before working on the printer,
please read this section
thoroughly. Always keep personal
safety in mind while working on
the machine.
Safety Flags
Throughout this manual we will use the following
graphic symbols, CAUTION and WARNING to
alert the operator to any and all known or
perceived safety concerns.
We have endeavored to make this instruction
manual as accurate as possible. Illustrations,
photographs and text have been carefully
checked.
THIS SAFETY WARNING POINTS OUT
AREAS THAT CAN CAUSE PERSONAL
INJURY OR DAMAGE TO THE MACHINE.
All instructions should be read, carefully studied
and understood before attempting operation,
maintenance or repair of the equipment
described herein. If there is a question regarding
any of the information presented here, please
call 717-292-5641 or FAX 717-292-5686 and
request Technical Support.
THIS SAFETY WARNING POINTS
OUT AREAS THAT CAN CAUSE
SERIOUS INJURY.
Due to the variability of local conditions,
customer procedures and operator skill levels,
neither the authors, nor Bell-Mark Corporation
assume any responsibility for any accidents,
injuries, damages, or other losses incurred
resulting from the material presented in this
manual.
Do not operate this equipment while
under the influence of alcohol or while
taking any medications that may impair
your judgment.
Only trained personnel should be allowed
to operate this equipment.
Use the safety covers that are installed
on the printer.
Do not attempt to defeat the safety
switches and equipment interlocks.
Keep your fingers away from the
printer’s moving parts during operation.
III
Bell-Mark EasyPrint S32 User's Manual
IV
Bell-Mark EasyPrint S32 User's Manual
PRINTER CONNECTIONS
EASYPRINT S32 - Typical System Configuration
General Configuration
or
Rear
view
Example: EP S32c on a
packaging machine
Page 1
Bell-Mark EasyPrint S32 User's Manual
Whether the mlp, c, or i type printer - there are a minimum of 3 connections for operation:
1. Electrical umbilical (to the control box)...
Use only the genuine Bell-Mark
cables. Using another cable will
risk permanent damage to the
equipment and possibly fire.
2.
Always turn off power to the control
box when connecting or
disconnecting cables.
Air Supply... use 6 mm OD plastic air line.
6 mm
EY1109 Cable
6 mm
EY1034 Cable
3. AC Mains Supply... See details below.
Page 2
Bell-Mark EasyPrint S32 User's Manual
AIR PRESSURE REGULATOR & SETTING
MLP printers have internal air regulators.
C and I printers have external air regulators
Adjuster
Gauge
Lock
AIR IN
Loosen the lock, adjust, retighten the lock.
increase
Typically, adjust pressure
between 3 -to- 5 bars
(0.3 – 0.4 MPa)
Page 3
Bell-Mark EasyPrint S32 User's Manual
MAINS CONNECTION (AC POWER)
Power Requirements:
100-240 VAC 50/60Hz 1Ø with Earth
400 watts
CAUTION
Fuse: Internal, not user-serviceable.
Use the power cord furnished with your BellMark printer. Connect the wires to the AC
power terminals in your packaging machine.
This system is not designed for connection to a polyphase power system.
Packaging Machine
Control Cabinet
WRONG
BRN
L
BLU
GRN/YEL
N
WRONG
Terminal block
N
OK
Disclaimer: This is to be done in accordance with local and national electrical codes
by a qualified technician.
Note: Voltage selection by the EY3500/1 control box is automatic.
Page 4
Bell-Mark EasyPrint S32 User's Manual
INTERFACE CONNECTIONS
Bell-Mark EY1269 Interface Cable
attached to printer control box
Packaging Machine
connector
Page 5
Bell-Mark EasyPrint S32 User's Manual
INPUTS
Details About the Printer Inputs
The Print, Remote Enable, and Sync inputs all have the same input structure.
This design is fault-tolerant withstanding
any combination of mis-wiring, polarity reversal,
or accidental short circuits.
2.2K
+48V
24V
VH
Further, it is compatible with most possible
sources:
relay contacts
solid-state PNP
solid-state NPN
direct voltage
IN+
OPTO
COUPLER
INPUT
4.8K
IN-
2.2K
VL
0
Potential-Free - The opto-coupler circuit is "potential-free" can be directly driven without fear by a
PLC controller having either sourcing (PNP) or sinking (NPN) outputs.
2.2K
+48V
24V
From host
controller
+
OPTO
COUPLER
INPUT
4.8K
2.2K
12-24V
INPUT
0
Isolated Contact - If it is preferred, isolated mechanical or solid-state switch contacts may be
used. In this case, the excitation voltage is furnished by the printer.
2.2K
+48V
24V
VH
No more than 24VDC
will appear across the
open contacts
IN+
IN-
4.8K
VL
2.2K
Isolated
Contacts
0
Page 6
Bell-Mark EasyPrint S32 User's Manual
Remote Enable – You may connect a control signal from the packaging machine that provides a
means of enabling or disabling the printer.
Asserting the input establishes the “enable printer” condition. This signal must be constantly held to
maintain the enabled state.
Print Input - Connect a control signal from the packaging machine that signals the printer it must
now print.
Asserting the input pulse triggers the printer to print once.
Sync Input – This input can have three uses:
Reset the counter variable - For a print job that uses the counter variable, a control signal pulse
from the packaging machine can indicate to the printer it must now reset the count to the
beginning.
Multi-Pack reset - For a print job that uses the Multi-Pack feature, a control signal from the
packaging machine can indicate to the printer it must now reset the label to start printing the first
package.
Force printer reboot – to start the printer from a known condition including clearing any existing
print job, a control signal from the packaging machine must hold this signal for 3 seconds or
more.
Page 7
Bell-Mark EasyPrint S32 User's Manual
ENCODER INPUT
Only for C-type (continuous) printers
The printer supports encoders:
10 pulses per millimeter
12 pulses per millimeter *standard
NPN Open-collector output
Single or dual channel
5VDC, 12VDC, or 24VDC -powered
ENCODER
JACK
4
3
8
+5
+12
+5
3.3K
ENCODER
POWER
+24
9
10K
CH-A
+5
0
1
CH-B
3.3K
7
10K
Only CH-A is required for operation. However, dual-channel encoders may be connected.
The voltage sources furnished by the printer as well as the common, are all protected by 0.6A
automatically-resetting protection.
Page 8
Bell-Mark EasyPrint S32 User's Manual
OUTPUTS
Details About the Printer Outputs
The Print Mode, Fault, Guard-Cassette, Low Ribbon, and Home outputs all have the same output
structure. Ready-Busy is the same except a normally-closed contact is also available.
Ready-Busy Output only
Most Outputs
PROTECTION
1 AMP
N.C.
SNUBBER
10
0.1
CONTACT
1 AMP
10
0.1
N.O.
10
0.1
Notes:
The printer’s relay contacts are rated for low-voltage use – below 48 volts AC or DC.
The contact protection device is automatically-resetting.
With printer AC power = OFF, all N.O. relay contacts will be open.
Function Summary
Output
Condition
Normally-Open
Contact State
closed-circuit
Print Mode
Print job is loaded/activated, printer is
armed to print.
Fault
The printer has one or more faults
closed-circuit
Guard-Cassette
The guard or cassette is closed
closed-circuit
Low Ribbon
The ribbon is nearly finished
closed-circuit
Home (I & MLP
printers only)
The print carriage is home
closed-circuit
Ready-Busy
The printer is printing
open-circuit
The print stroke is finished – OK to
pull web
closed-circuit
Page 9
Bell-Mark EasyPrint S32 User's Manual
Print Mode - Connect this control signal from the printer to indicate to the packaging machine that
a print job has been loaded and the printer is in the print mode, without problems – regardless of
idling or actively printing.
A closed circuit indicates the printer is in the print mode.
Fault - Connect this control signal from the printer to indicate to the packaging machine that the
printer has a fault.
A open circuit indicates the printer is free from problems.
A closed circuit indicates the printer is experiencing a fault. Some possible problems are:
! Cover/Cassette open
! No air pressure
! Ribbon broken
! Invalid label
Notes:
The relay contacts open when the cassette (or cover) is opened. However, Bell-Mark
recommends that Fault not be used to signal this condition. See Guard Output.
It is possible for a host computer to read back the specific error code from the printer. See
the RCMH statement in the BMPL (Bell-Mark Printer Language) Handbook.
Guard-Cassette - Connect this control signal from the printer to indicate to the packaging machine
that the printer’s cassette or cover is closed.
A open circuit indicates the printer’s cassette (or cover) is open.
A closed circuit indicates the printer’s cassette (or cover) is closed.
Low Ribbon - Connect this control signal from the printer to indicate to the packaging machine that
the printer’s ribbon is nearing the end. This is not considered a fault or a problem, only a warning.
A closed circuit indicates the printer’s ribbon will soon end.
Home - Connect this control signal from the printer to indicate to the packaging machine that the
printer’s carriage is physically home (I-type and MLP-type printers).
A closed circuit indicates the printer’s carriage is home.
Note:
The carriage being home does not indicate the printer is Ready.
Page 10
Bell-Mark EasyPrint S32 User's Manual
Ready-Busy - The meaning of this signal depends on which printer type is being used:
MLP (for intermittent packaging
machines)
READY = the printhead is lifted and it's now OK to advance
the web. But the carriage may not yet be home or able to
accept the next print signal. See HOME OUTPUT below.
I-type (for intermittent packaging
machines)
READY = the printhead is lifted and it's now OK to advance
the web. But the carriage may not yet be home or able to
accept the next print signal. See HOME OUTPUT below.
C-type (for continuous packaging
machines)
READY = the printer is ready to accept the print signal.
Notes:
MLP & I-type - the relay contacts will close (Ready) while the carriage is returning home.
The relay contact will open if a problem exists. However, Bell-Mark recommends that
Busy/Ready not be used to signal a fault condition. See Fault Output.
Page 11
Bell-Mark EasyPrint S32 User's Manual
PRE-PRINT CHECKLIST
Printer securely mounted & aligned.
Ribbon is correctly installed.
Cover is closed or cassette is installed in printer. Latch is closed.
Umbilical cable between printer & control box is secure.
AC Power – 1Φ voltage has been measured:
volts
Electrical interface signals are correctly connected to packaging machine.
Inputs (3) have no excessive voltages present
Outputs (6) have proper loads connected.
Encoder cable is connected (model EasyPrint S32c)
Packaging web is correctly routed through printer bracket.
Air pressure is turned on and at correct pressure:
bars
Power switch of EasyPrint control box is turned on.
A label job is loaded into the control:
o One-Touch Test Print
o recalled from the Memory Card
o downloaded from a host PC
Page 12
Bell-Mark EasyPrint S32 User's Manual
FEATURES & FUNCTIONS
Page 13
Bell-Mark EasyPrint S32 User's Manual
THE TOUCH-SCREEN
EY3501
EY3500
The Bell-Mark touch screen may be displayed either in landscape or portrait orientation depending upon the
model.
The ”Info" box
Go to
previous
screen
Help
Recall a
previouslystored label
Activate/Reactivate
the current label
Access printer
settings and
diagnostics
The "HOME" screen
Page 14
Bell-Mark EasyPrint S32 User's Manual
SETTING TIME & DATE
Steps:
From the Home screen…
1. Press the Maintenance key
2. Press the Advance Setup key
3. Press the Date/Time key
Page 15
Bell-Mark EasyPrint S32 User's Manual
ONE-TOUCH TEST PRINT
Quickly demonstrates the ability of the printer to print.
Generates a printed report listing the various parameters & settings of the printer.
Upon installation, the user may have no functioning labels with which to prove that the printer was successfully
installed. Bell-Mark provides a “built-in” label that can easily be called up.
Steps:
1. From the Home screen… press the ESC key
2. Press the TEST LABEL key
So long as all other print conditions are met, the printer will print a label upon getting a print signal from the
packaging machine or by pressing the MANUAL PRINT key.
Notes:
If the electrical interface connections with the packaging machine have not yet been made, see the
section on REMOTE/LOCAL Mode.
If the “Test Label” key is not shown, another label is already be present. Press the Clear Label key
to revert back to the built-in Test label.
Page 16
Bell-Mark EasyPrint S32 User's Manual
Example of a One-Touch Test print:
(Yours may not look exactly the same)
Bell-Mark 53 I/53 mm
Version V1.56a (Build 0503)
Jan 1 2011 12:47:42
Font Version 5.01
BOOT-SW V1.0d
FPGA: 01
Odometers: H:
195 M:
195
Date/Time: 01:01:11 08:27:52
Trigger: Edge
Darkness: 100 Temperature: 26
Headresistance: 1206 Ohm
X-Offset: 0 pixel
Multi-Index off
Printspeed 250 Backwardspeed 450
Start/Stop Speed Frwd 25 Back 50
Ramp Frwd 25 Back 25
------------------------------------NETWORK SETTINGS
================
MAC-Address: 00:07:4A:1B:BE:FF
IP-Address: 192.168.0.128
Netmask: 255:255:255:0
Gateway: 0.0.0.0
Link Not Connected
Transfer Mode: Auto
DHCP: OFF
Printer Name: LabelPrt01
Odd pixels
Even pixels
Page 17
Bell-Mark EasyPrint S32 User's Manual
ETHERNET TCP/IP SETUP
The EP S32 control may be configured for connection with
an Ethernet LAN.
Bell-Mark furnishes the EasyPrinter with a default IP address
pre-programmed (Class C address):
192 . 168 . 0 . 128
private network address
node address
There is a good chance that this IP address, as-delivered,
will not be compatible with your network.
LAN Connection
The IP-address of the Bell-Mark EasyPrint S32 system is easily reprogrammed using the touch screen. The
following procedure explains how to reconfigure the IP address of the printer.
It is not necessary that the control be connected either to the printer chassis or the Ethernet cable.
Bell-Mark strongly recommends that configuring any device connected to your
LAN be coordinated with your Network Administrator.
From the HOME screen...
1. Press the MAINTENTANCE key
2. Press the ADVANCED SETUP key
3. Press the ETHERNET key
Ethernet Settings Screen
Page 18
Bell-Mark EasyPrint S32 User's Manual
USB CONNECTION
The EP S32 control may be connected as a USB printer.
Your PC should automatically detect the printer.
USB Connection
If Windows "Found New Hardware" wizard opens, just close it. Actual printer configuration is done in the labelmaking software VersaStyle.
SERIAL RS232 CONNECTION
The EP S32 control may be connected a serial port.
9-pin D-Sub
Socket
Pin
Signal
1
n/c
2
TX
3
RCV
4
n/c
5
GND
6
n/c
7
CTS
8
RTS
9
n/c
Default Serial Parameters are:
57600 8 N 1
Page 19
Bell-Mark EasyPrint S32 User's Manual
SENDING A PRINT JOB
You can design labels on your PC using several different possible Windows software applications, for example,
VersaStyle by Bell-Mark.
Once you have designed a label format, send it to the printer. Once the printer receives the data, it will go into
the Print Mode.
Your label
document name
If you need to make printer adjustments, you may press the STOP key to suspend the job and make your
adjustments.
When you send the next print job, the existing one is automatically discarded and the new one becomes active.
Page 20
Bell-Mark EasyPrint S32 User's Manual
STORING A PRINT JOB
The printer supports two types of local removable memory:
Compact Flash Card
Drive A:
USB Flash Drive
Drive U:
Print jobs can be stored to the CF Card or USB Flash Drive using either:
VersaStyle label design software (recommended)
Directly from the touchscreen
From the HOME screen…
- press the MAINTENANCE key
- press the FILE SYSTEM key
Page 21
Bell-Mark EasyPrint S32 User's Manual
RUN PRINT JOB (from Removable Memory)
A label that was previously stored on the CF Card or USB Memory Stick can be recalled. Loading it will
automatically activate the print job.
From the HOME screen… press the SELECT A LABEL key
So long as all other print conditions are met, the printer will print a label upon getting a print signal from the
packaging machine.
Note: If you already know the filename, it is also possible to directly enter the filename using:
the on-screen alphanumeric keypad
a standard computer keyboard
a hand scanner
Page 22
Bell-Mark EasyPrint S32 User's Manual
REMOTE / LOCAL MODE
Normally 2 signals from the packaging machine are required to print:
1. REMOTE ENABLE
2. PRINT
If either the wiring to the packaging machine or packaging machine programming is not yet complete, it is still
possible to print using the local mode.
Page 23
Bell-Mark EasyPrint S32 User's Manual
CONTRAST SETTING
Purpose:
To adjust the heating energy used by the thermal printhead.
Steps:
From the HOME screen… press the MAINTENANCE key
Important Notes:
Bell-Mark recommends for the longest thermal printhead life, use the lowest setting that produces
printing that meets the printing goals. This typically is between 70 - 110.
Print darkness can be affected by things other than the Contrast setting: packaging material dyne level,
ribbon type, air pressure, and printhead mounting angle.
For special applications, contact Bell-Mark to evaluate and advise the use of higher settings.
Page 24
Bell-Mark EasyPrint S32 User's Manual
PRINTER MECHANICS SETTINGS
The action of the printer's carriage, printhead, and ribbon drive are adjustable. Usually these are determined
at installation and do not have to be readjusted.:
Item
Parameters
Description
Print Carriage
Print Speed
How fast the carriage moves across the web material. This
affects machine cycle rate and may affect print quality.
Head (Print Head)
Head Down
How much time in advance of printing should the printhead
be commanded to press down. This anticipation is needed
to compensate for the time delays associated with the head
pneumatics.
Head Up
How much time in advance of the end of printing should the
printhead be commanded to lift up. This anticipation is
needed to compensate for the time delays associated with
the head pneumatics.
Ribbon Start
How much time in advance of printing should the ribbon be
commanded to start. This anticipation is needed to
compensate for the time delays associated with the ribbon
pneumatics or the ribbon stepper motor.
Ribbon Stop
How much time in advance of printing should the ribbon be
commanded to stop. This anticipation may be needed to
compensate for the time delays associated with the ribbon
pneumatics or the ribbon stepper motor.
Ribbon
Ribbon
Retract
C-type only – recovers unused ribbon between images.
Ribbon
Savings
C-type only – reduces ribbon consumption during printing
(continued on next page)
Page 25
Bell-Mark EasyPrint S32 User's Manual
Note: The appearance of the screen will be different depending on the printer model.
Steps:
From the HOME screen…
1. Press the MAINTENANCE key
2. Press the ADVANCED SETUP key
3. Press the MECHANICS key
MLP-only
C-type
only
I-type only
Notes:
Model EP S32c internally calculates Ribbon Start time. This adjustment adds to the internally
calculated value.
The ribbon response is almost always as fast or faster than the Head Down time.
Page 26
Bell-Mark EasyPrint S32 User's Manual
LABEL SETUP
Placement of a label or labels can be controlled by using these parameters and features:
Item
Parameters
Description
label position
Label Offset
How far the carriage should travel before printing begins
X-Offset
label rotation
Flip Label
label mirroring
Mirror Label
step & repeat
Lanes
(MLP only)
Gap
multiple rows or
label sequencing
Multi-Pack
How much to shift the image along the edge of the
printhead
Rotate (or not) the image 180°
Use this if the image in printed on the inside of a clear
package and must show through correctly.
How many times to replicate the image
How much distance between prints
Enables sequential printing of the parts of a label that was
designed in sections
The above are described in more detail on the following pages.
From the HOME screen…
1. Press the MAINTENANCE key
2. Press the LABEL SETUP key
Page 27
Bell-Mark EasyPrint S32 User's Manual
Label Offset
Carriage (printhead)
home position
Label Offset
( mm )
VITAMINS
LOT: 1KQ76
VITAMINS
LOT: 1KQ76
VITAMINS
LOT: 1KQ76
VITAMINS
LOT: 1KQ76
VITAMINS
LOT: 1KQ76
Page 28
VITAMINS
LOT: 1KQ76
VITAMINS
LOT: 1KQ76
VITAMINS
LOT: 1KQ76
Print Carriage Direction
Bell-Mark EasyPrint S32 User's Manual
X-Offset
Flip
Source design (VersaStyle)...
Actual print...
…with printer set Flip ON...
Actual print...
Page 29
BELLMARK
X-Offset -
BELLMARK
X-Offset +
X-axis
BELLMARK
No X-Offset
Bell-Mark EasyPrint S32 User's Manual
Mirror
Source design (VersaStyle)...
Actual print...
with mirror ON...
Actual print...
additional prints generated by the printer
original label
VITAMINS
LOT: 1KQ76
VITAMINS
LOT: 1KQ76
VITAMINS
LOT: 1KQ76
VITAMINS
LOT: 1KQ76
Print Carriage Direction
Page 30
Machine (Web) direction
Lanes
Bell-Mark EasyPrint S32 User's Manual
Gap
VITAMINS
LOT: 1KQ76
VITAMINS
LOT: 1KQ76
VITAMINS
LOT: 1KQ76
VITAMINS
LOT: 1KQ76
Print Carriage Direction
Machine (Web) direction
original label
Gap ( mm )
Multi-Pack
THIRD
LABEL
#MULTIPACK
SECOND
LABEL
#MULTIPACK
FIRST
LABEL
A special text field is used to designate the separation between sections of a multi-pack label design. The text
in this field must be the special keyword #MULTIPACK . This keyword will not be printed.
Synchronization: The hardware input Sync can be used to reset the internal pointer to the overall beginning of
the label.
Important Multi-Pack Notes:
"#MULTIPACK" text field must be a printer font and all upper case letters. Font size is not important.
This feature cannot be used in combination with multiple lanes (MLP printers). Thus
Multi-Pack = ON
Lanes = 1
Page 31
Bell-Mark EasyPrint S32 User's Manual
Ribbon Savings
For EP S32 C models only
Background
Ribbon Saving refers to moving the ribbon at a rate slower than the packaging material.
It is possible to achieve clearly readable images while using less ribbon. If the print quality of the image is
acceptable, it's then possible to save some ink ribbon costs by using Ribbon Saving.
Actual Print
Normal ribbon usage
Ribbon usage is 1:1
with printed image
With 50% Ribbon Saving
Ribbon usage is 1:2
with printed image
To adjust ribbon savings, from the Home screen…
1. Press the Maintenance key
2. Press the Advance Setup key
3. Press the Mechanics key
Page 32
Bell-Mark EasyPrint S32 User's Manual
Notes:
With small amounts of Ribbon Savings, print may actually be improved (appear darker).
Very high settings for percentage Ribbon Saving may make the print appear grey.
At some printing conditions (very high speeds), introducing Ribbon Saving may actually be necessary to
maintain print quality.
Ribbon Saving is not compatible with “sticky” web material. If Ribbon Saving is expected to be used, BellMark strongly recommends that a test be conducted first to determine if the material is compatible.
Page 33
Bell-Mark EasyPrint S32 User's Manual
MANUALLY CLEAR THE PRINT BUFFER
The currently active print job can be purged. This assures there are no vestiges of prior print jobs being held in
the print buffer memory.
From the Home screen, press the ESC key…
press Clear Label to
purge the current print job
Notes:
Once the print buffer is cleared, pressing the TEST key will now call up
the One-Touch Test Print
Page 34
Bell-Mark EasyPrint S32 User's Manual
CONNECT AN EXTERNAL COMPUTER KEYBOARD OR SCANNER
For most cases, the touch screen allows the user to easily adjust settings, perform Memory Card functions,
and provide “Operator Entry” variable data.
However, Users may find it important to make these entries using a standard computer keyboard.
Steps:
1. Plug the keyboard con-nector into the
jack. Wait a few moments.
2. You may press CAPS LOCK or NUM
LOCK and observe the keyboard
indicators to confirm the keyboard is
functioning.
3. If the external keyboard is for a nonUS country, see the following page to
configure the printer to recognize this
keyboard.
These keys on the external keyboard are equivalent to the buttons on the printer touchscreen:
Ext. Keyboard Key
Printer
ESC
Enter
ESC
Enter
-------- scroll keys -------→
←
↑
↓
F7
Start/
Stop
Page 35
Bell-Mark EasyPrint S32 User's Manual
Page 36
Bell-Mark EasyPrint S32 User's Manual
PC INTERFACE
USB
SERIAL
SERIAL
PORT 0
USB MEM STICK
USB DEVICE
USB HOST
+5V
USB KEYBOARD
OR BARCODE SCANNER
DC-DC
3.3V
Electrical Block Diagram
NETWORK INTERFACE
LAN
NIC
SH3 CPU
BOARD
EY1268
CF CARD
SOCKET (1)
USB HOST
SERIAL
PORT 1
USB HOST
O/I
SERIAL
PORT 2
TPH
DOVER T/S BOARD EY1261
PRINTER CHASSIS 1
3.3V/5V LEVEL TRANSLATORS
+5VDC
RS232
CONV
SPARE
RS232
CONV
RS232
PORT
RS485 BUS
DATA1 & 2
CONTROL
CONTROL
DOVER 20 BOARD
EY1259
TPH POWER ON
BEEPER
COVER/CASSETTE
BUSY/READY
PRESSURE SW
LOW RIBBON
FAULT
HOME
GUARD
PRINT PUSHBUTTON
TENSION PUSHBUTTON
HEAD SOLENOID 1
HEAD SOLENOID 2
INPUT
SIGNAL
CONDITION
PRINT
REMOTE ENABLE
SYNC
ENCODER
MUX/DEMUX (PIC uP)
BROKEN RIBBON
OUTPUT
SIGNAL
CONDITION
PRINT MODE (JOB ACTIVE)
DC-DC
+48V
Vtph
THERMAL
PRINT
HEAD
TEMP SENSOR DATA
COVER/CASSETTE
RIBBON SOLENOID 1
RIBBON SOLENOID 2
LOW RIBBON
BROKEN RIBBON
PRESSURE SW
PRINT PUSHBUTTON
TENSION PUSHBUTTON
HEAD SOLENOID 1
DRIVERS
+5VDC
PWM
MUX/DEMUX (PIC uP)
LCD/TOUCH
CONTROLLER
RS485 BUS
PRINTER INTERFACE
SPARE
RS485 BUS
LOW RIBBON
PACKING MACHINE INTERFACE
PRINTER ID = 0
(J200-48 = 0V)
DOVER 20 BOARD
EY1260/EY1262
WAS SIGNAL
RS485
PORT
RS232
PORT
LIQUID CRYSTAL COLOR
GRAPHIC DISPLAY
TOUCH PANEL OVERLAY
OPERATOR
INTERFACE
USB MEM STICK
KEYB'D, SCAN'R
RIBBON SOLENOID 1
HOME SENSOR
CARRIAGE HOME
END SENSOR
CARRIAGE END
EN
POWER SUPPLY
100-240VAC / 48VDC
STEPPER
MOTOR DRV
STEPPER 1
DC-DC
+48V
+48V
+48V
+5V
+12V
+24V
STEPPER 2
+48V
Page 37
DC-DC
+48V
+48V
+5V
+24V
STEPPER
MOTOR
Bell-Mark EasyPrint S32 User's Manual
Page 38
Bell-Mark EasyPrint S32 User's Manual
This Page Intentionally Left Blank
Page 39
Bell-Mark EasyPrint S32 User's Manual
Page 40