1
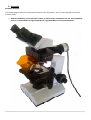
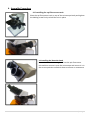
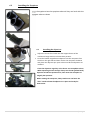
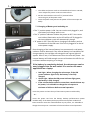
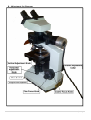
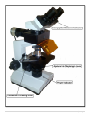
Biological Microscope
Model XSZ-107T
With an Epi-Fluorescence (YX-2) attachment
USER AND OPERATIONAL
MANUAL
This manual is for the biological microscope XSZ-107T. To ensure the safety and optimum performance of this
unit, please ensure a thorough familiarization with this manual so as to become comfortable with the use of this
unit.
1|Page
Novel XSZ-107T with YX-2 Epi- Fluorescence Attachment
Contents
1.
Application ................................................................................................................................................................ 3
2.
Safety Note............................................................................................................................................................ 3
3.
Maintenance and care .......................................................................................................................................... 4
4.
Components of the microscope ................................................................................................................................ 5
5.
Assembly ................................................................................................................................................................... 6
6.
Assembly Procedure ......................................................................................................................................... 7
6.1
Installing the epi-florescence unit................................................................................................................. 7
6.2 Installing the binocular head............................................................................................................................... 7
6.3
Installing the Eyepieces ................................................................................................................................. 8
6.4
Installing the objectives ................................................................................................................................ 8
7.
Connecting the power cords ................................................................................................................................. 9
8.
Adjustment Set Diagram ..................................................................................................................................... 10
.................................................................................................................................................................................... 11
9.
Adjustment and Operation for brightfield microscopy ...................................................................................... 12
9.1
10.
Brightness Adjustment ................................................................................................................................ 12
Focusing on the specimen.............................................................................................................................. 13
10.1
Focus on the specimen ............................................................................................................................... 13
10.2
Condenser adjustment ................................................................................................................................ 13
10.4
Adjusting the interpupillary distance .......................................................................................................... 14
10.5
Adjusting the dioptre .................................................................................................................................. 14
10.6
Adjusting the tension adjustment collar ..................................................................................................... 14
11.
Using the Epi-Florescence attachment for specimen observation ................................................................. 14
11.1
13.
Preparation ................................................................................................................................................. 15
Technical Specifications ...................................................................................................................................... 16
13.1
Main specifications of the microscope XSZ-107T ....................................................................................... 16
13.2
Main specifications of the epi-florescence attachment YX-2 ..................................................................... 16
12.1
Fluorescent Filter Combinations ................................................................................................................. 17
2|Page
1. Application
The XSZ-107 series microscope is a multi-purpose bio-microscope that has been specifically designed for
clinical and chemical examination. The application and use of this series of microscopes is very diverse and
extends to professional research, teaching demonstration, use in medical and health establishments,
laboratories, technology, research and tertiary education facility. Its accessories make the instrument
capable of accomplishing a very diverse and wide range of practical use. The XSZ-107 can be adapted in
many ways including phase contrast, florescence, photography, camera depiction, television and computer
based image processing. The XSZ-107 can also be used for routine work in the fields of biology,
bacteriology, histology, cytology, haematology and pharmacology easily (to name a few).
The microscope unit is used in conjunction with the epi-fluorescent attachment which has been designed
for use with and including our biological microscopes such as the Novel N-400M, Novel N320M and the
Novel XSZ-107CCD.
2. Safety Note
a. Carefully open the box, avoid the accessories dropping to the ground and being damaged.
The epi-fluorescent attachment is a precision instrument.
b. Please ensure that the entire unit is kept out of direct sunlight, high temperatures, humid or
dusty environments.
c. Make certain that the power cords are installed correctly and that all other components are
connected firmly.
d. Do not open any of the lamp housings while they are turned on or for at least 10 minutes
after they have been turned off. These parts are extremely hot and can cause burns if
touched.
e. Always be sure to ground (earth) the equipment.
f. Verify that the voltage and the frequency of the AC mains outlet match the setting of the
voltage switch and the frequency switch on the rear of the power supply units.
g. Always use the power cord provided by NOVEL and make sure that the main switch is
moved to “O” (OFF) before connecting the power cord plug to the wall outlet.
h. To prevent any hazard, always turn the main switch on the power supply unit to “O” (OFF),
unplug the power cord plug from the mains outlet before replacing any bulb or the fuse, and
wait for at least 10 minutes before replacing the bulb.
i. To prevent obstruction of the air flow, it is important to make sure to leave enough space
around and above the lamp housing of the microscope as well as epi-florescence
attachment.
3|Page
Safety Symbols
The following symbols are found on the system. Study the meaning of the symbols and always use
the equipment in the safest possible manner.
Symbol Explanation
Indicates that the surface becomes hot, and should not be touched with bare hands。
Indicates that the high voltage (upper 1KV) inside, improper handing could result in an
electric shock to the use.
Before use, carefully read the user manual .Improper handing could result in personal
injury to the user and/or damage to the equipment.
Indicates that the main switch is ON.
Indicates that the main switch is OFF.
●
This manual is written for the XSZ-107T with an epi-fluorescent attachment YX-2 and before
equipping it with any other ordinary microscope, be sure to learn how to use the microscope.
3. Maintenance and care
3.1 All the lenses have been adjusted properly, please do not dismount any lenses by oneself as this
will render any warranties / guarantees void.
3.2 The nosepiece and coarse / fine focus parts are very delicate and should under no
circumstances be dismantled by anyone who has not received correct training on how to repair
any faults that may occur.
3.3 Keep the units clean at all times. Do not place any hazardous chemicals near the units as the
lenses will get damaged and shall not be replaced under warranty.
3.4 If, under certain circumstances, certain contaminants end up on the lenses (i.e fingerprints, oil
smudges) one can clean these off with a soft cloth, tissue paper or gauze which has been slightly
immersed in pure alcohol or ether. Note that the alcohol or ether is extremely flammable;
please take extra precaution when using this method by keeping the cleaning solution and
cloth or material away from potential sources of electrical spark or fire.
3.5 Do not attempt to use any organic (live) solvents to clean the microscope or epi-florescence
unit and other glass components. To clean the microscope and exterior of the epi-florescence
unit, use of a lint-free, soft cloth slightly moistened with a diluted neutral detergent.
3.6 While in use, if at any moment, some liquid of any form splashes onto the microscope,
immediately switch the unit off and remove any liquid that may still be visible.
3.7 Do not dis-assemble any parts of the microscope or the epi-florescence unit as this will
compromise the function or reduce the overall performance of the unit.
3.8 Always place the unit in a cool, dry level surfaced location. When not in use, keep the unit
covered with the provided dust cover and make sure that the microscope as well as attached
epi-florescence unit has sufficiently cooled before storing away.
4|Page
4. Components of the microscope
5|Page
5. Assembly
Assembly Diagram
The Following figure shows the completed installation of the components: The corresponding figures show the
assembly steps.
•
Before installation, ensure the unit is clean as well as every component, do not store unpacked
units in a room which has high temperatures, high humidity or a dusty environment.
6|Page
6. Assembly Procedure
6.1 Installing the epi-florescence unit
Place the epi-florescence unit on top of the microscope body and tighten
the holding screw firmly to hold the unit in place
6.2 Installing the binocular head
Insert the binocular viewing head into the epi-florescence
unit and then mount it onto the microscope and ensure it is in
the correct position and bolt it down to ensure no movement
7|Page
6.3
Installing the Eyepieces
Insert the eyepiece into the eyepiece tube until they are level with the
eyepiece tubes as shown
6.4
•
•
Installing the objectives
Adjust the coarse focus knob until the support device of the
mechanical stage reaches its lowest limit position.
Screw the lowest magnification objective into the nosepiece from
the left or the right side and then revolve the nosepiece clockwise
and place one objective per open socket until all the objectives are
installed.
Clean the objectives regularly as the lenses are susceptible to dust.
When operating the microscope, always use the 10x (yellow band)
objective to find the specimen first, then rotate the nosepiece to
magnify the specimen.
When rotating the nosepiece, always make sure one hears the
“click” sound to know the objective is in place and ready for
observation.
8|Page
7. Connecting the power cords
•
The cables and power cords are vulnerable when bent or twisted;
never subject the power cords to excessive force.
• Set the main switches to the off “0” position before
connecting any of the power cords.
• Insert the power cord jack into the power of the microscope unit
Safely.
7.1 Charging of Battery and switching on
• The “I“ position power is ON. You can use the unit plugged in, and
the battery will charge while in use.
• The “II” position indicator renders the power as OFF. You cannot
use incident illumination as the LED will be off. If plugged in
the internal battery unit will automatically charge.
• “0” power is OFF. There will be no charging of the battery and no
illumination of the LED even if the unit is plugged in to the AC
mains power supply.
Once charging of the internal battery has commenced, a red power
indicator shall be observed. If the internal battery has reached its full
charge capacity, the red light will extinguish and a green light will
appear. Once in use, if one disconnects from the main AC power – the
internal battery will hold enough current to illuminate the LED for up
to 8 hours without requiring a re-charge.
If the battery is completely drained, the microscope can be
used, plugged into the wall outlet. It is used on the same
application as a laptop.
•
Red Light - When charging the microscope, if the LED
power indicator light is red, the battery is not fully
charged.
• Green Light - When the LED power indicator light green,
the battery is fully charged.
• If the unit has been stored for more than a week without any
AC power, it is advisable to charge the unit up over a
minimum of 18 hours before normal operation.
Insert the power cord into the epi- fluorescence power module safely
- Or Insert the power cord into the battery backup epi-florescence power
module safely. If the battery backup epi-florescence power module has
been stored for more than a week without any AC power, it is advisable to
charge the unit up over a minimum of 18 hours before normal operation.
9|Page
8. Adjustment Set Diagram
10 | P a g e
11 | P a g e
9. Adjustment and Operation for brightfield microscopy
9.1
Brightness Adjustment
9.1.1 Connect the power cord and set the
main power switch on to the (on) position “I” .
9.1.2 Turning the brightness adjustment
knob, increase the brightness of the illumination set to the
users’ satisfaction.
Ensure the epi-florescence
attachment is set to the “0” setting, or in the middle setting
9.1.3
9.1.4 Place the specimen slide on the stage
in the centre and use the stage swing arm to secure the
slide in place.
9.1.5 Turn the vertical and horizontal
adjustment knobs of the mechanical ruler to move the
specimen to the required position.
• Be careful when changing objectives to another
magnification. If you are finished working with a
magnification with a short working distance (i.e. 40x /
100x OIL) and want to change to another one, be aware
that you may touch the specimen.
12 | P a g e
10. Focusing on the specimen
10.1
Focus on the specimen
Focus on the specimen using the 10x objective. To avoid
touching the specimen during focusing, you should raise the
stage to its maximum height adjustment and observe
whether it is close to the objective at first, then using the
fine focus slowly lower the stage while observing through
the eyepieces until a clear crisp image is seen.
10.2
Condenser adjustment
Turn the condenser focusing knob to move the condenser up or
down. Raise the condenser when using the high magnification
objectives, and conversely lower it when using a lower
magnification objective.
•
The condenser and objective are coaxial. The
condenser has been adjusted and pre-set before leaving the
factory, and the maximum height has been pre-set, so the enduser has no need to adjust it oneself.
10.3 Aperture Iris Diaphragm Adjustment
Turn the aperture iris diaphragm lever to adjust the aperture iris
diaphragm.
•
The aperture iris diaphragm is designed for the
adjustment of the numerical aperture, not for
brightness.
•
Generally, setting the aperture iris diaphragm to 70 % –
80 % of the numerical aperture (N.A.) of the objective
in use will provide an image with good contrast. If one
chooses to observe the image of the aperture iris
diaphragm, one can remove one eyepiece and look
down the eyepiece tube. One will observe a dark ring
encroaching from the sides of the tube at the end of the
viewable range.
13 | P a g e
10.4
Adjusting the interpupillary distance
The interpupillary distance range of the microscope head is 55mm ~
75mm.
Push the eyepieces together and then while looking through the
eyepieces, move the distance apart until the left and right fields of view
coincide correctly.
10.5
Adjusting the dioptre
Turn the eyepiece to adjust the dioptre while looking through it.
•
The diopter range of the eyepiece is approximately 5 diopter.
The number aligned to the line on the viewing head is the dioptre in
use.
10.6
Adjusting the tension adjustment collar
Turn the tension adjustment collar with your fingers. When the collar is
turned in the direction of the arrow in the figure displayed tension of the
coarse adjustment knob increases. Turning the collar in the opposite
direction as indicated decreases the tension.
If the stage descends on its own weight of the specimen goes out of
focus for no reason even when brought into focus using the fine
focus adjustment knob – it means that the tension collar needs to
be adjustment with more tension. Turn the tension ring in the
direction indicated and the specimen shall remain in focus.
11. Using the Epi-Florescence attachment for specimen observation
G-excitation filter
G-cutoff filter
Protection filter
B-excitation filter
B-cutoff filter
14 | P a g e
11.1 Preparation
11.1.1 Verify that the plug from the AC mains outlet is connected firmly into the connector of the
power supply units.
11.1.2 Make sure the power cord is connected firmly.
11.1.3 When transmitted light observation is required, pull out the filter system and make the hole
in the light path.
11.1.4 Be sure to use immersion oil when using fluorescent OIL objectives.
11.1.5 When it is required to interrupt observation for a short period, use the shield in the assistant
excitation filter part.
11.1.6 Precautions on the specimen colour fading:
11.1.6.1
The system employs high-intensity excitation light to enable bight
observation of dark fluorescent specimens. As a result, if high-power objectives are
used frequently colour fading of the specimen occurs early, degrading the view
(contrast) of fluorescent images. So it is effective to use the shutter frequently to
avoid illuminating the specimen for a longer period than required.
11.1.6.2
Colour fading of the specimen can also be delayed using commercially
available colour fading preventing agent (DABCO, etc). The use of colour fading
preventing agent is recommended when you perform high-magnification
observation frequently.
★ Note that colour fading prevention agent cannot be used with certain specimens.
12. Switching on Electrical Source of the LED driven epi-florescence unit
•
Set the main switch of the power supply unit to “1” (ON). The LED diode will be at full
capacity immediately after ignition.
•
•
To avoid shortening the burner life, do not turn the burner off and on repeatedly
The LED Diode is at full temperature and efficiency after 30 seconds and the aluminium
holder can warm considerably after about 10 minutes, it is advisable to leave the unit off for
approximately 10 minutes before moving the unit to allow sufficient cooling to occur.
15 | P a g e
13. Technical Specifications
13.1
Main specifications of the microscope XSZ-107T
Optical System
160mm path length
Viewing head
Siedentopf Binocular Head, inclined at 30° Interpupillary distance of
55 – 75mm
Eyepiece
Wide Field Eyepiece
WF 10x / 18
Magnification 10x
Focal length 25mm
Field of View 18mm
Nosepiece
Quadruple nosepiece
Focusing
Coaxial Coarse and Fine Focus adjustment, moving range 20mm, Fine Focus
Division 0.002mm
Condenser
ABBE condenser, NA = 1.25 with iris diaphragm
Stage
Double layer mechanical stage 140mm x 140mm.
Moving range of 75mm x 50mm
Illumination
3.6V 1w Ultra-Bright 350mA LED illumination
Power Supply
AC Input 200V or 110V
DC power output 5.5V
Battery assistance for power outages 3.6V 3800mAh (8 Hours operation)
13.2
Epi-Fluorescent
Illumination
Illumination
Protection Barrier
Power Supply
Objective
Main specifications of the epi-florescence attachment YX-2
Fluorescent Filter Specifications
B Exciting Light Filter System
G Exciting Light Filter System
3w Ultra Bright CREE-XML LED Diode
Barrier to Resist the Ultraviolet Light
Power supplier AC Input 220V/110V
(Interchangeable) 3.6v 1000mA constant current DC output
Power supplier AC Input 220V/110V
(Interchangeable) 3.6v 1000mA constant current DC output with battery
back-up 10000 mAh
160mm Fluorescence Free Objective 10X
160mm Fluorescence Free Objective 20X
160mm Fluorescence Free Objective 40X
160mm Fluorescence Free Objective 100X OIL
Immersion Oil
Vertical Illumination
Fluorescence Free Oil
● Achromatic Optics System
● Filtering System
● Observation Methods
• Fluorescence
• Transmitted Light (Brightfield)
Lamp Housing
● Aluminium Lamp Housing
● CREE XM-L 3w LED Illuminator
16 | P a g e
Operating
Environment
●Indoor Use
●Altitude: Max. 2000m
●Ambient Temperature: 5℃ to 40℃ (41℉ to 104℉)
●Maximum RelaPve Humidity 80% for Temperature Up to 31℃ (88℉)
Decreasing linearly through 70% at 34℃ (93℉), 60 % at 37℃ (99℉) to 50%
relative humidity at 40℃ (104℉)
● Main supply voltage fluctuations not to exceed ±10% of the nominal
voltage
● Pollution Degree 2 (in accordance with IEC 664)
● Installation/ Over voltage Category Ⅱ(in accordance with IEC 664)
12.1 Fluorescent Filter Combinations
excitation
applications
U
·Auto-fluorescence observation
·DAPI:DNA
·Hoechest 332528, 33342:Chromosome
V
·Catecholamines
·5-hydroxy tryptamine
·Tetracycline:Skeleton,Teeth
B
·FITC:Fluorescent antibody method
·Acidine orange:DNA, RNA
·Auramine:Tubercle bacillus
·EGFP,S65T,RSGFP
G
·Rhodamine,TRITC:Fluorescent antibody method
·Propidium iodide:DNA。
·RFP
17 | P a g e