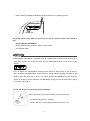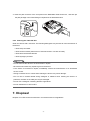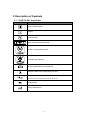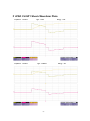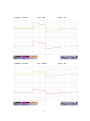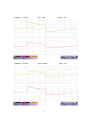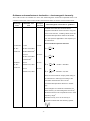
1
Instructions for Use i-PAD CU-SP1 The information in these Instructions for Use applies to the i-PAD CU-SP1. This information is subject to change. Please contact CU Medical Systems, Inc. or its authorized representatives for information on revisions. Revision History Edition 1 Publication Date: July 2011 Document No.: SP1-OPM-E-01 Published by: CU Medical Systems, Inc. Printed in the Republic of Korea Copyright © 2011 CU Medical Systems, Inc. No part of these Instructions for Use may be reproduced without the permission of CU Medical Systems, Inc. Medical Device Directive The i-PAD CU-SP1 complies with the requirements of the Medical Device Directive 93/42/EEC and its revisions. Important: Quick defibrillation is needed if sudden cardiac arrest occurs. Since the chance of success is reduced by 7% to 10% for every minute that defibrillation is delayed, defibrillation must be performed promptly. 1 The i-PAD CU-SP1 is manufactured by: CU Medical Systems, Inc. Dongwha Medical Instrument Complex 1647-1 Dongwha-ri, Munmak-eup, Wonju-si, Gangwon-do, 220-801 Republic of Korea Authorized EU Representative Medical Device Safety Service Schiffgraben 41, 30175 Hannover, Germany Contact Us Product and Order Inquiries Overseas Sales Team CU Medical Systems, Inc. 5F, Cheonggye Plaza, 991-4, Cheonggye, Uiwang, Gyeonggi, Republic of Korea Tel : +82 31 421 9700 / Fax: +82 31 421 9911 E-mail addresses : [email protected] Branch Office of CU Medical Systems, Inc. in Germany Kuester Strasse 6, 30519 Hannover, Germany Tel : +49 511 365 4353 / Fax: +49 511 848 6054 Service and Technical Support Customer Service Team CU Medical Systems, Inc. 5F, Cheonggye Plaza, 991-4, Cheonggye, Uiwang, Gyeonggi, Republic of Korea Tel : +82 31 421 9700 / Fax: +82 31 421 9911 E-mail addresses : [email protected] 2 3 Table of contents INTRODUCTION ........................................................................................................................... 6 OVERVIEW ................................................................................................................................... 7 1. INTRODUCTION .................................................................................................................. 8 1.1 DEVICE DESCRIPTION........................................................................................................... 8 1.2 INDICATED USE .................................................................................................................... 8 1.3 INTENDED USERS ................................................................................................................. 9 1.4 LOCAL PROTOCOL ................................................................................................................ 9 1.5 ADDITIONAL INFORMATION .................................................................................................... 9 2. DEVICE FEATURES .......................................................................................................... 10 3. PREPARATION FOR USE ................................................................................................. 13 3.1 STANDARD PACKAGE CONTENTS......................................................................................... 13 3.2 SETTING UP THE I-PAD CU-SP1 ......................................................................................... 14 4. HOW TO USE THE I-PAD CU-SP1.................................................................................... 16 4.1 CHAIN OF SURVIVAL ........................................................................................................... 16 4.2 PREPARATION FOR DEFIBRILLATION ..................................................................................... 17 4.3 DEFIBRILLATION IN ADULT MODE ......................................................................................... 21 Step 1: Place pads on the patient.......................................................................................... 21 Step 2: Press the Shock Button if instructed. ........................................................................ 22 Step 3: Perform CPR. ............................................................................................................ 24 4.4 5. DEFIBRILLATION PROCEDURES IN PEDIATRIC MODE ............................................................. 26 AFTER USING THE I-PAD CU-SP1 .................................................................................. 27 5.1 MAINTENANCE AFTER EACH USE ........................................................................................ 27 5.2 SAVING AND TRANSFERRING TREATMENT DATA .................................................................... 28 5.2.1 Device Usage .......................................................................................................... 28 5.2.2 Transferring Treatment Data ................................................................................... 28 5.3 DEVICE SETTING ................................................................................................................ 31 5.3.1 CPR Guide Setting .................................................................................................. 31 5.3.2 Setting the CPR Guide ............................................................................................ 31 6. 6.1 MAINTENANCE ................................................................................................................. 33 DEVICE STORAGE .............................................................................................................. 33 4 6.2 MAINTENANCE ................................................................................................................... 34 6.2.1 Device Inspection .................................................................................................... 34 6.2.2 Replacing Supplies ................................................................................................. 34 Disposable Battery Pack..................................................................................................... 34 Replacing the Pads ............................................................................................................. 36 6.2.3 Cleaning the i-PAD CU-SP1.................................................................................... 37 7. DISPOSAL ......................................................................................................................... 37 8. TROUBLESHOOTING ....................................................................................................... 38 8.1 SELF-TESTS ...................................................................................................................... 38 8.2 DEVICE STATUS ................................................................................................................. 40 8.3 TROUBLESHOOTING ........................................................................................................... 41 9. 8.3.1 Troubleshooting While the Device is Operating ...................................................... 41 8.3.2 Troubleshooting While the Device is not Operating ................................................ 42 DEVICE SERVICE .............................................................................................................. 43 APPENDIX .................................................................................................................................. 45 A RESCUE PROTOCOL ............................................................................................................. 45 B PARTS AND ACCESSORIES ................................................................................................. 48 B.1 STANDARD ACCESSORIES ..................................................................................................... 48 B.2 OPTIONAL ACCESSORIES ...................................................................................................... 48 C DESCRIPTION OF SYMBOLS ............................................................................................... 49 C.1 I-PAD CU-SP1 DEFIBRILLATOR ............................................................................................ 49 C.2 I-PAD CU-SP1 PACKAGING .................................................................................................. 50 C.3 ACCESSORIES ...................................................................................................................... 51 C.3.1 Disposable Battery Pack (CUSA1103BB) .................................................................... 51 C.3.2 Pads (CUA1007S, CUA1102S) .................................................................................... 52 D GLOSSARY ............................................................................................................................. 53 E DEVICE SPECIFICATIONS ..................................................................................................... 58 F I-PAD CU-SP1 SHOCK WAVEFORM PLOTS ........................................................................ 66 G ELECTROMAGNETIC COMPATIBILITY................................................................................ 73 5 Introduction These Instructions for Use contain information necessary for the correct use of this device. Please contact us regarding any questions or issues on the use of the device arising from information found in these Instructions for Use [Chapter 9: Device Service]. The company or its authorized distributor is not responsible for any injury incurred by the user or patient due to any apparent negligence or improper use by the user. Hereinafter, "device" refers to [CU-SP1] "We" or “Us" refers to CU Medical Systems Inc. "Pad" refers to defibrillation electrode pad, "Battery Pack" refers to a disposable battery pack. These Instructions for Use emphasizes the safety procedures and precautions for the device use by using the terms below. Please acquaint yourself with the warnings, cautions and references stated in these Instructions for Use in order to safely use the device. Conditions, hazards, or unsafe practices that can result in serious personal injury or loss of life. Conditions, hazards, or unsafe practices that can result in minor or moderate personal injury, damage to the device, or loss of treatment data stored in the device, particularly if precautionary steps are not taken. Used to denote items that are important during installation, operation, or maintenance of the device. 6 Overview Thank you for purchasing the i-PAD CU-SP1. This device can be effectively and safely used for a long period if you familiarize yourself with the instructions, warnings, precautions, and notices contained in these Instructions for Use prior to its use. A defibrillator discharges electric shock with high voltage and current. You must be wellacquainted with the instructions, warnings, and precautions contained in these Instructions for Use. You must follow the instructions, warnings, cautions, and notices in these Instructions for Use when using this device. The manufacturer will not be responsible for any problems involving the device that are caused by the user's negligence. This device shall be serviced only by the manufacturer or its authorized service centers. If the Device is intended to be connected to equipment other than those stated in these Instructions for Use, contact the manufacturer. If this Device does not operate properly, contact the manufacturer or its authorized service center. 7 1. Introduction 1.1 Device Description CU-SP1 is an easy-to-use Semi-Automated External Defibrillator (AED) that is small, light, and portable, and uses a battery. The AED automatically reads the patient's electrocardiogram (ECG) and determines if a cardiac arrest that requires defibrillation has occurred, so that both medical professionals and the general public can easily operate it. Cardiac arrest can occur anytime to anyone at any place and may threaten the patient's life if the appropriate CPR and/or electric shock with a defibrillator are not applied within a few minutes. The i-PAD CU-SP1 is a semi-automated external defibrillator (AED). If connected to a patient, the i-PAD CU-SP1 automatically acquires and analyzes the electrocardiogram (ECG) of the patient for the presence of Ventricular Fibrillation or Ventricular Tachycardia (also known as shockable rhythms). If a shockable rhythm is detected, the device automatically charges itself. Defibrillating shock is delivered when the you press the SHOCK button. The i-PAD CU-SP1 is easy to use. It guides the you throughout a rescue operation using voice prompts and indicators (LED and graphical indicators). The i-PAD CU-SP1 is small, light, highly portable, and battery powered. It is highly suitable for use in public, out-of-hospital settings. 1.2 Indicated Use The i-PAD CU-SP1 is indicated for use on patients that are exhibiting the symptoms of sudden cardiac arrest (SCA) with all of the following signs: a) No movement and no response when shaken b) No normal breathing Do not use the i-PAD CU-SP1 on patients who show either of the following signs: a) Movement or response when shaken b) Presence of normal breathing 8 1.3 Intended Users The i-PAD CU-SP1 is intended for use in or out of the hospital by emergency care personnel or healthcare professionals or laypersons. The manufacturer recommends that users train on the use of the device. 1.4 Local Protocol Please contact your local health authority for information on the requirements of ownership and usage of defibrillators. 1.5 Additional Information Please contact CU Medical Systems, Inc. or its local distributors for any additional information on the i-PAD CU-SP1. 9 2. Device Features Adult/Pediatric Selection Switch Status LCD Defibrillator Pads Connector Pads Storage Compartment i-Button Do Not Touch Patient Indicator CPR Detection Indicator Pad Connector Status Indicator Pad Position Indicators Power Button Adult/Pediatric Selection Shock Button Switch Cover IrDA Port Battery Pack SD Card Port 10 Power Button Turns the device on or off. (When the device is on, a green LED is lit) i-Button Reports device usage (the total hours of the last usage and number of shocks) checks the S/W version downloads events and ECG data via an IrDA and SD Card sets the CPR mode (the number of compressions, breaths and cycles; compression rate per minute; pausing time; detailed guide on/off) and checks for errors Status LCD Displays the current status of the device, battery and pads. Shock Button Delivers defibrillating shock when pressed while flashing in orange. Adult/Pediatric Selects Adult/Pediatric modes. Selection Switch Adult/Pediatric Covers the Adult/Pediatric Selection Switch to prevent Selection Switch accidental switching. Cover Defibrillator Pads Connects with the connectors of the pads. Connector Pad Connector Status Indicates the connection status of the defibrillator pads Indicator connector. Pad Position Indicates the pad position on the patient. Indicators Do Not Touch Patient Warns when not to touch the patient. Indicator 11 CPR Detection Indicates performance of CPR on the patient. Indicator (The indicator is lit if CPR is performed, and flashes if CPR is not performed) Battery Pack The disposable power source of the device. IrDA Port Transmits and receives treatment data between the device and a personal computer. SD Card (External Port for copying device records to a SD card. Memory) Port Pad Storage Stores pads. 12 3. Preparation for Use 3.1 Standard Package Contents The following are the standard package contents of this device CU-SP1 Semi-automatic External Defibrillator Instructions for Use 1 Battery Pack (Disposable) 1 Pack of Adult Pads (Disposable) Please contact the manufacturer for replacement supplies (refer to Appendix B: Parts and Accessories of these Instructions for Use). 13 Only parts and accessories recommended and approved by CU Medical Systems, Inc. must be used with the i-PAD CU-SP1. Using unapproved parts and accessories may compromise the safety and effectiveness of the i-PAD CU-SP1. Extra battery packs and pads are recommended. 3.2 Setting up the i-PAD CU-SP1 Do the following to set up the i-PAD CU-SP1 ①Open the package and verify that it contains all the items listed in the packing list. ②Familiarize yourself with the device features by referring to [Chapter 2: Device Features] of these Instructions for Use. ③Insert the battery pack into the battery compartment on the device as shown in the figure below. As the battery pack is inserted, the device starts a self-test. If the device status is normal, is shown on the Status LCD. If , or is displayed on the Status LCD after the self- test, please refer to [Chapter 8: Troubleshooting] of these Instructions for Use. ④If you have a carrying case, please safely store the Device in the carrying case. If you want to purchase the carrying case, please contact us by referring to [Appendix A: Accessories] of these Instructions for Use. 14 ⑤Storage and maintenance considerations: • Refer to Section 6.1: Device Storage for proper device storage instructions. • When the device is in storage, check the Status LCD periodically to ensure that the device is in good condition. • Store the CU-SP1 in accordance with your local emergency first aid protocol. • Store the device in an easy-to-access location where its Status LCD can be checked periodically and its technical alarms can be easily heard (e.g. alarm on low battery or other device problems). • It is also recommended to place an emergency use telephone near the device‟s storage area so that emergency medical services can be easily called during emergencies. • Store the accessories along with the device in the device‟s carrying case for easy and quick access. Electromagnetic interference may affect the performance of the device. While the device is in use, it should be kept away from devices that cause electromagnetic interference. Devices that may cause such interference include motors, X-ray equipment, radio transmitters, and cell phones. Refer to [Appendix E: Electromagnetic Compatibility] of these Instructions for Use for more information. The use of accessories or cables other than those referred to in these Instructions for Use may increase electromagnetic radiation from the device or reduce the device‟s electromagnetic immunity. Only accessories and cables that are authorized by the manufacturer should be used with the i-PAD CU-SP1. 15 4. How to Use the i-PAD CU-SP1 4.1 Chain of Survival If you think that you are witnessing someone go down in sudden cardiac arrest, perform the chain of actions recommended by the American Heart Association (AHA) in its Chain of Survival emergency response to sudden cardiac arrest. 1 2 3 4 5 1. Immediate recognition and activation of the emergency response system. • Check for a response by tapping the victim on the shoulder and shouting at the victim. • Activate the community emergency response system (e.g. call 911 or the equivalent service in your locality) 2. Early CPR • Perform CPR. 3. Early defibrillation • Use this device (i-PAD CU-SP1). Using this device can be summarized in 3 steps: After pressing the Power Button, Step 1: Place pads on the patient. Step 2: Press the Shock Button if instructed by the device. Step 3: Perform CPR. 4. Effective advanced life support – Perform advanced care in order to restore spontaneous circulation. 5. Integrated post-cardiac arrest care – Transfer the patient to a medical institution or a specialized facility If finding and/or operating the defibrillator takes time, monitor the patient's status until the defibrillator is available, perform CPR if necessary. 16 4.2 Preparation for Defibrillation ① Set the Adult/Pediatric Selection Switch to match the victim. Adult victim • Open the switch cover • Set the switch to adult defibrillation mode as shown in the following picture Child victim (victim is under 25kb or 8 years old) If the pediatric pads are attached, the i-PAD CU-SP1 automatically adjusts its defibrillation energy output for pediatric defibrillation regardless of the position of the Adult/Pediatric Selection Switch (i.e. the output will be pediatric even if the selection switch is set to adult) If there are no pediatric pads for the pediatric patient, adult pads may be used. Ensure that the Adult/Pediatric Selection Switch is set to Pediatric Mode. If the switch has not been set yet, move it to Pediatric Mode as shown in the figures below • Open the switch cover 17 • Set the switch to pediatric defibrillation mode as shown in the following picture If a young victim is over 25kg or 8 years old, or if you are not sure of the exact weight or age: • DO NOT DELAY TREATMENT • Set the Adult/Pediatric Selection Switch to Adult mode. • Use the adult pads. Never perform defibrillation in pediatric mode to a patient who is either heavier than 25 kg or older than 8 years old. Ensure the slide key for Adult/Pediatric Mode is as shown on the bottom. You can switch the adult/pediatric selection switch before or after turning on the i-PAD CUSP1. However, the defibrillation mode should be changed before placing the pads on the patient. Once the pads are in place, you cannot change the defibrillation mode anymore. When the mode is correctly selected, the defibrillation energy is set to an adult value (150 J) or pediatric value (50 J). ② Turn the device on by pressing the Power Button. When the power turns ON the following occurs in sequence: the beeper will beep for 1 seconds Voice instruction: “Call emergency Medical services, now” 18 ③ Remove clothes from patient's chest. Time is essential for the cardiac arrest patient. Tear or cut clothes if removing them will take time. Dry the patient's skin such that pads can adhere well on the chest. Shave hair on the chest if necessary. ④ Remove the pads package from the Pad Storage Compartment at the bottom of the device. ⑤ Open the pad package. 19 ⑥ Take pads out of the pad package. ⑦ Refer to the pictures on both pads. Adult Pads Pediatric Pads The adhesive material on the pads starts to dry out as soon as the package is opened. Use immediately after opening. Refer to Section 6.2: Maintenance of these Instructions for Use for procedures on how to check the expiration date of the pads and pads maintenance. 20 4.3 Defibrillation in Adult Mode Step 1: Place pads on the patient. ①Remove pad 1 from the single liner and stick the pad to the patient‟s upper chest as shown below. ②Remove pad 2 from the single liner, and stick the pad to the patient‟s side torso as shown below. ③ If the device detects the connection with the patient after placing the pads, follow the voice instruction of the device. Defibrillation can be done even if the pads are reversed. If the locations of pads are switched, follow the next voice instruction without changing the directions of pads. It is more important to begin defibrillation as soon as possible. In the event the pad is not adhering well, check if the adhesive side of the pad is dry. Each pad has an adhesive gel. If the gel does not adhere well, replace it with a new pad. Ensure the patient is not on a wet surface when performing defibrillation. If the patient's skin is wet, dry the skin first prior to using the device. 21 Step 2: Press the Shock Button if instructed. The device acquires and analyzes the patient's ECG immediately after being connected. The device will instruct you not to touch the patient by flashing the Do Not Touch Patient Indicator and by issuing the voice prompt: “Do not touch the patient, analyzing heart rhythm”. After analyzing the ECG, the device will determine whether or not the patient needs defibrillation. Do not move or touch the patient during ECG analysis. If the patient needs defibrillation, the device will do the following: The device announces that a defibrillation shock is needed, and instructs you to keep away from the patient. While the device is charging after a shockable rhythm is detected, the ECG of the patient is continuously acquired and analyzed. The device disarms itself if the ECG rhythm changes to a non-shockable rhythm before shock delivery. When it is charged, the device activates the following indicators in sequence: continuous beep while the Shock Button flashes in orange. the device instructs you to press the flashing orange Shock button; you should press the Shock Button at this time. When the Shock Button is pressed, the device delivers a defibrillating shock to the patient. If defibrillation is properly done, the device reports that an electric shock has been delivered. After shock delivery, the device indicates that you may touch the patient, and the CPR Mode Indicator is lit. Then, the voice instruction for CPR starts. If the flashing Shock Button is not pressed within 15 seconds, the device will cancel the shock delivery and disarm. Then, the device issues CPR instructions. 22 If the patient does not need defibrillation, the device will do the following in sequence: • the device announces that the patient does not need a defibrillating shock and that you may touch the patient. • the CPR Mode Indicator is lit. • voice instruction for CPR starts. Do not touch (you or anybody else) the patient during shock delivery. Before defibrillation, make sure that there is no contact between 1 and 2 below which may provide unwanted pathways for the defibrillating current. • the patient‟s body (such as exposed skin or head or limbs), conductive fluids (such as gel), blood, or saline • metal objects (such as bed frame or stretcher) While analyzing ECG, keep the patient still and minimize movements around the patient. Do not touch the patient and pads while the Do Not Touch Patient Indicator is on. Electrical noise (interference) may delay the ECG analysis. As a safety measure, the device will not deliver a shock until the flashing orange SHOCK button is pressed. If the SHOCK button is not pressed within 15 seconds of the voice instruction to press the SHOCK button, the device will disarm itself (dumps the shock energy in its internal load) and will instruct you to make sure that emergency medical services have been called. The device will then instruct you to begin CPR. During defibrillation, disconnect other medical electrical equipment which has no defibrillationproof applied parts from the patient. If the device malfunctions during a rescue operation, it will instruct you to get a replacement defibrillator and will start the voice instruction for CPR. Have CPR performed until the replacement defibrillator is ready to use. 23 Step 3: Perform CPR. Perform CPR when the i-PAD CU-SP1 instructs you to do so. By default, the CU-SP1 gives voice instruction for CPR during pause for CPR after a shock delivery. When voice instruction for CPR is needed outside of the default setting, press the flashing blue i-Button for at least 20 seconds. [CPR Method] 1. Compression Point Place the heel of your hand in the middle of the patient's chest between nipples (which is the lower half of the sternum), and put the heel of your other hand on top of the first so that your hands are overlapped and parallel. 2. Compression Speed and Depth Compress the chest at least 5 cm deep, and at a rate of at least 100 compressions per minute. 3. Opening the Airway While lifting the patient's chin up, tilt the head backward to open the airway. 4. Artificial Respiration Method Pinch the patient's nose as shown in the figure below, and give the patient enough breath to make the chest rise significantly. 24 If you have not been trained in CPR, you should perform only chest compression or follow the instructions of the emergency medical services‟ agent on the phone. If you are trained for CPR and able to perform artificial respiration, perform the chest compression along with artificial respiration. The CPR guide can be set on an administrator's mode. Refer to [Section 5.3: Device Setting] for more information. While playing the CPR guide, the device does not analyze the patient's ECG. After the CPR guide, the device automatically starts the reanalysis of the patient's ECG. In order to turn the device off after use, press the Power Button for at least 1 second. 25 4.4 Defibrillation Procedures in Pediatric Mode When the patient is older than 1 year and younger than 8 years, defibrillation can be done using the pediatric pads. When the device is in pediatric mode (pediatric pads are connected to the device or the Adult/Pediatric Selection Switch is set to Pediatric), it automatically sets the defibrillation energy to 50 J and provides pediatric CPR guide. Place pads on the middle of the chest and back as illustrated above. Pads are not specific to either chest or back. If there are no pediatric pads for the pediatric patient, use adult pads but set the Adult/Pediatric Selection Switch to Pediatric Mode, and then perform defibrillation according to the voice instructions. Follow the instructions below when giving first aid during pediatric cardiac arrest. • When giving first aid during a pediatric cardiac arrest, ask others to call the emergency medical center and to bring the i-PAD CU-SP1 while you are performing pediatric CPR. • When there is no one else around, perform CPR for 1 to 2 minutes, call emergency medical services, and then get the i-PAD CU-SP1. • If you witnessed the child‟s collapse, call emergency medical services immediately, and then get the i-PAD CU-SP1. 26 5. After Using the i-PAD CU-SP1 5.1 Maintenance After Each Use • Check if the device for signs of damage and contamination. • If there is dirt contamination, see Section 6.2.3 on how to clean the device. • Run a battery insertion test. Refer to Section 8.1: Self-Diagnostic Test for the procedure. If is displayed on the Status LCD after running the test, the device status is normal. • Dispose of the used pads properly. Place a new pouch of defibrillator pads into the pads storage compartment. See to it that the pads are not beyond their expiration date. The iPAD CU-SP1 uses disposable pads. Do not reuse them. Refer to Section 6.2.2: Replacing Supplies on how to replace the pads. You should use only the defibrillator pads provided and recommended by the manufacturer. Do not open the pad package until immediately before use. Since the adhesive material on the pad starts to dry out as soon as the package is opened, the pads may not be usable regardless of the expiration date. 27 5.2 Saving and Transferring Treatment Data 5.2.1 Device Usage This device automatically saves the following treatment data: • ECG data • Usage information The treatment data is automatically recorded in the internal memory. This data is not erased even if the device is turned off. The recorded treatment data may be transferred to a personal computer (PC). This i-PAD CU-SP1 keeps the data of the 5 most recent treatment operations and can save up to 3 hours of ECG data for each rescue operation. ECG data beyond 3 hours will not be recorded. When the device is used more than 5 times, it deletes the oldest treatment data to make room for data from a new treatment operation. It is recommended to transfer treatment data to a PC after each use of the device. If the battery pack is removed while the device is operating, treatment data cannot be properly recorded. If you wish to remove the battery pack, turn the power off by pressing the Power Button for at least 1 second before removing the battery pack. 5.2.2 Transferring Treatment Data The treatment data may be transferred via a SD card or IrDA. The entire treatment data of all patients that is recorded on the device is transferred using only the SD card method, while the treatment data of one patient can be transferred using only the IrDA method. 1. Copying Treatment Data by Using the SD Card ①Format the SD card on the PC to FAT (FAT16) format. ②Open the SD Card Cover on the device and insert the SD card into the port. 28 ③When the i-Button is pressed for more than 1 second in standby mode, the mode changes into administrator mode with voice guide. ④The device then gives you a summary (the total hours of the last device use and the number of defibrillation shocks delivered). ⑤The voice guide gives the S/W version of the device. ⑥When instructed by the voice guide to transfer the treatment history, press the i-Button to copy the data onto the SD card. If there is treatment data in the device’s internal memory: • The device informs you that copying of the treatment data onto the SD card has started, and starts to copy the data. • When copying is completed, the device mode changes to CPR guide setting mode. Refer to Section 5.3: Device Setting for details regarding CPR guide setting. If there is no treatment data in the device’s internal memory: • The device mode changes to CPR guide setting mode after informing you that no treatment data exists. If the file has already been transferred, the device will inform you that the same file exists in the PC. Press the Shock Button to overwrite the existing file in the PC or press the i-Button to cancel the copying of the file. 2. Transferring Treatment Data via IrDA The data may be transferred to a PC using the data management software (CU Expert Ver.3.50 or higher) from the manufacturer. CU Expert includes ECG review and printing functions. ①Position the IrDA adapter to face the IrDA port on the device as shown in the figure below. ②When the i-Button is pressed for at least 1 second in standby mode, the mode changes to administrator mode with a voice guide. 29 ③The device gives the you a summary (the total hours of the last device use and the number of defibrillation shocks delivered). ④The voice guide gives the S/W version of the device. ⑤When instructed to transfer the treatment history, press the i-Button to transfer the data. If there is treatment data in the device’s internal memory: ①The voice guide reports the total number of individual treatment data recorded in the device. ②By default, of a maximum of 5 individual treatment data, the first on the list is the most recent. ③In order to rearrange the order for copying to a PC, press the Shock Button to change the order to most recent last, and then press the i-Button to transfer the selected data. ④Run CU Expert on the PC. Refer to the CU Expert manual for detailed information regarding how to receive data. ⑤The device will be connected with the CU Expert within a few seconds, and data will be automatically transferred. ⑥When copying is completed, the mode changes to CPR guide setting mode. Refer to Section 5.3: Device Setting for details regarding changing CPR guide setting. If there is no treatment data in the device’s internal memory: The device mode changes to CPR guide setting mode after informing you that no treatment data exists. The distance between the IrDA port on the device and the IrDA adapter should be within 30 cm, while their angle should be within ±15°. Also, since external light source affects the IrDA, try to use it in indoors and away from fluorescent and/or incandescent lamps. 30 5.3 Device Setting 5.3.1 CPR Guide Setting The default CPR setting on CU-SP1 is 5 cycles with 30 chest compressions and 2 breaths in accordance with the American Heart Association (AHA) 2010 CPR Guidelines. However, you may customize these. You can set the following: • Number of chest compressions • Number of artificial respirations • Number of cycles • Number of chest compressions per minute • Pausing time • Detailed guide selection 5.3.2 Setting the CPR Guide ①When the i-Button is pressed for at least 1 second in standby mode, the mode changes into administrator mode with a voice guide. ②The device gives you a summary (the total hours of the last device use and the number of electric shocks). ③When instructed to transfer the treatment data, do not press the i-Button, but instead wait for 5 seconds. ④When instructed to set the CPR guide, press the i-Button to enter the CPR guide setting mode. ⑤When instructed to enter a password, enter the set password. Password: press the following buttons in sequence: i-Button i-Button Shock Button i-Button Shock Button Shock Button ⑥The voice guide will give information regarding the current CPR guide setting. ⑦Press the Shock Button to change the setting, or press the i-Button to proceed to the next step. 31 ⑧ Settings can then be changed in the following order: Number of Chest Compressions, Number of Artificial Respirations, Chest Compression rate, Pausing Time, and Detailed Guide Selection. Refer to Table 1: CPR Guide Setting Options below ⑨When the setting is completed, the voice guide will give information regarding the set CPR guide, which may be saved or canceled. ⑩Press the i-Button to save or the Shock-Button to cancel according to voice instructions. ⑪When the CPR guide setting is either saved or canceled, the device automatically shuts down. [Table 1] CPR Guide Setting Options Number Setting Option Range Unit Default Number of 1 Chest Description Perform 30 compressions. 15, 30 15 30 Compression Number of 2 Artificial Give 2 breaths. 0 to 2 1 2 Respiration 3 Number of Cycles Chest 4 Compression Rate 5 Perform 5 cycles of chest 2 to 10 1 5 respiration. 100 to 120 CPR Pause 30 to time 180 sec. Compress the chest at a rate of 5 100 30 sec. 120 sec. Guide 100 compressions per minute. Pause for 120 seconds (2 minutes). Turns on detailed voice Detailed 6 compression and artificial On/Off On Selection instructions for the chest compression and artificial respiration when performing CPR. 32 6. Maintenance 6.1 Device Storage Please refer to the precautions below when storing the Device in order to avoid device damage. Do not operate or store the device in conditions that are beyond the following. specified limits. • Storage Conditions The device is stored together with the defibrillator pads and the battery pack is inserted - ready to be used in an emergency Temperature: 0℃ ~ 43℃ (32℉ ~ 109℉) Humidity: 5% ~ 95% (non condensing) • Transport Environment device only, no defibrillator pads and battery pack included Temperature: -20℃ ~ 60℃ (-4℉ ~ 140℉) Humidity: 5% ~ 95% (a location with no condensation) Do not store the device in areas that are directly exposed to sunlight Do not store the device in areas with highly fluctuating temperatures Do not store the device near heating equipment Do not store the device in areas where there is high vibration (in excess of Road Transportation and Helicopter Minimum Integrity of MIL-STD-810G Method 514.5C) Do not operate or store the device in environments with high concentration of flammable gas or anesthetics. Do not operate or store the device in areas with high concentration of dust Only personnel authorized by the manufacturer may open the device for servicing. There are no user serviceable components inside the device. 33 6.2 Maintenance 6.2.1 Device Inspection The i-PAD CU-SP1 has self-testing capability. The device performs a self-test as soon as the battery is inserted, turns itself off when the test is done, and periodically wakes up to perform the daily, weekly, and monthly self-tests. To initiate a battery insertion self test, remove the battery pack and reinsert. Refer to Section 8.1: Self-Diagnostic Test for more information. Inspect the i-PAD CU-SP1 daily to ensure that it is always ready for an emergency. Check the current status of the device, battery, and pads as displayed on the Status LCD. Refer to Section 8.2: Device Status for information regarding the Status LCD. 6.2.2 Replacing Supplies When the device is in storage, check the battery level indicator and the pad status on the Status LCD daily to ensure that the device is always ready for an emergency. Replace the battery pack or the defibrillator pads when it is depleted or when they go beyond their expiration date, respectively. Disposable Battery Pack Replacement of the Disposable Battery Pack • Replace the battery pack when it becomes depleted. Refer to Chapter 8: Troubleshooting on how to check the battery status. • Dispose of depleted battery packs in accordance with local environmental regulations. • Use only the battery packs recommended and provided by the manufacturer. • The battery pack is disposable. Do not recharge. Replacing the Disposable Battery Pack 1. Remove the discharged battery pack by pulling it out while pressing the lock on the bottom of the device. Refer to the figure below. 34 2. Insert a new battery pack in the direction of the arrow with the label facing upward as shown in the figure below. 3. Push the battery pack until you hear it click into place. Battery Pack Precautions • Do not subject the battery pack to serious physical impact. • Do not attempt to open or break apart the battery pack • Do not let the battery pack come into contact with open flames or hot objects. • Do not short-circuit the terminals of the battery pack. • Keep out of the reach of children. • If any leakage gets in the eye, immediately clean the eye with water and consult with a doctor. • Do not store the battery pack under direct sunlight. • Do not store the battery pack in a wet or very humid place. • Comply with local regulations when disposing of the battery pack. • Do not destroy or incinerate the battery pack. • Never attempt to recharge the disposable battery pack. 35 Replacing the Pads • Check the pad status on the Status LCD daily. Do not use pads that are beyond the expiration date. • Check the pad package for damage. • Check the cable outside the packaging pouch for possible defects. • Only pads provided by the manufacturer should be used with the i-PAD CU-SP1. Replacing Pads 1. Check the expiration date of the pad. Refer to the figure below for checking the expiration date. The expiration date is marked as The expiration date is marked to the left follows: of the “Multifunction Defibrillation MM / YYYY ADULT PADS” label on the pad YYYY – Year package. MM – Month 2. Used or expired pads should be replaced. Hold the top and bottom of the pad connector with your fingers, pull it out, and take the pads out from the Pad Storage Compartment as illustrated below. 36 3. Insert the pad connector of the new pad into the Defibrillator Pads Connector , and then put the pad package in the Pads Storage Compartment as illustrated below. 6.2.3 Cleaning the i-PAD CU-SP1 Clean the device with a soft cloth. The following detergents may be used to clean the exterior of the device: • Dilute soap and water • Dilute chlorine bleach (dilute 30 ml of chlorine bleach in one liter of water) • Dilute ammonia-based cleaners • Dilute hydrogen peroxide Do not immerse the device or its accessories in liquids. Be careful not to allow any liquids to get into the device. If the device is immersed in liquids, immediately contact the manufacturer or its authorized service center. Giving excessive force or shock while cleaning the device may cause damage. Do not use an acetone-based strong detergent or abrasive when cleaning the device. In particular, the filter on the IrDA port may be damaged. Do not use a detergent containing abrasive ingredients. Do not sterilize the i-PAD CU-SP1. 7. Disposal Dispose of CU-SP1 and its accessories in accordance with local regulations. 37 8. Troubleshooting 8.1 Self-Tests The following table lists the self-tests done by the device. Self-Test Type Battery Insertion Test Description Runs when the battery pack is inserted into the device. Perform this test: • Before the device is deployed • After each use • When replacing the battery • When the device is suspected to be damaged CAUTION Do not run this test when you are about to use the device to treat a sudden cardiac arrest victim because this test takes time (around 20 seconds). If a new battery pack is inserted just before a treatment, do the following to cancel this test: • Press the Power Button • Wait for the device to turn OFF. • Press the Power Button again to turn the device ON. Aside from testing its internal systems, the device also tests the following during this self-test: • Shock Button and i-Button – press the buttons one by one when instructed • Defibrillator pads status – the device tests the connection status (whether connected or not) and the expiration date of the defibrillator pads. If no error is detected, will be displayed on the Status LCD. If an error is detected, will be displayed on the Status LCD and the i- Button will flash in red. When the i-Button is pressed as directed by the voice instructions, the device will report the error and turn itself off. Refer to [Section 8.3: Troubleshooting] for more information. 38 Self-Test Type Description Power ON Test The device performs a self-diagnostic test when the Power Button is pressed Run-time Test The device monitors itself in real-time during its operation. Periodic This device performs self-diagnostic tests daily, weekly and monthly. The Self-Diagnostic periodic self-test checks important features of the device such as the Test battery status, pad status and internal circuits. If the device fails to perform any self-test during use and is unable to defibrillate, it will instruct the you to replace the device and start the voice instruction for CPR. In order to check the error, turn the device off by pressing the Power Button. If you press and hold the i-button, the voice will direct the you to press the blinking red i-Button. You can verify the cause of the error via the voice instruction by pressing the i-Button. Refer to [Section 8.3: Troubleshooting] for more information. It is recommended to run the battery insertion test only during the times enumerated in the table above. The battery insertion test consumes battery power and will shorten battery life if done more frequently than necessary. 39 8.2 Device Status The status of the device is indicated by the following symbols: Indicator Status LCD Device Operation Status LCD Device Operation Status LCD Battery Level Indicator Status LCD Battery Level Indicator Status LCD Battery Level Indicator Status LCD Battery Level Indicator Description The device is functioning normally. The device has an error. The battery is fully charged. Less than half battery power remains. Less than a quarter battery power remains. Battery is low. Status LCD The expiration date of the pad is more than Pad Status 3 months. Status LCD Pad Status Status LCD Pad Status Do Not Touch Patient Indicator: Off Do Not Touch Patient Indicator: Light The pad will expire within 3 months. The pad is used or expired. You may touch the patient. You may not touch the patient. CPR Detection Indicator: Light Indicates that CPR is being performed. CPR Detection Indicator: Indicates that CPR is not performed or not Flashing properly performed. i-Button: Flashing in Red Shock Button: Flashing in Orange The device detected an error. Press the i-Button for more information. The device is ready to deliver a defibrillating shock. Press the Shock Button to deliver a shock. 40 Note 8.3 Troubleshooting The device informs you of its current status or of problems via status indicators, beeps, and/or voice instruction. Refer to the following for details: 8.3.1 Troubleshooting While the Device is Operating Symptom/Voice Instruction Cause Status LCD An error has occurred in Device Operation the device. Status LCD Battery Level The battery is low. Indicator Resolution Immediately replace the defibrillator and perform CPR if appropriate. Replace the battery with a new one. Status LCD The pad is expired. Replace the pad with a Pad Status The pad has been used. new one. Voice Prompt : “Low battery”, “Replace the battery with a new The battery is low. Replace the battery with a new one. one.” Voice Prompt : “Plug the pads connector into the device.” Voice Prompt : ” Used pads”, “Replace the pads with a new one” The Pad Connector is Ensure the Pad Connector disconnected is properly connected. The pad has been Replace the pad with a previously used. new one. Voice Prompt : ” The pads are beyond their expiration date”, The pad has expired. Replace the pad with a new one. “Replace the pads with a new one” Voice Prompt : The pad is not properly Check if the pad is ” Press the pads firmly to the bare attached to the patient's securely attached to the skin of the patient” skin. patient's skin. Press the pad firmly to the Voice Prompt : ” No shock delivered” The pad is not properly patient's skin. adhering to the patient's Shave chest hair or wipe skin. off moisture if necessary before attaching the pad. 41 Although an electric shock is needed, the Voice Prompt : ” Shock button was not pressed” Shock Button was not pressed within 15 seconds. Deliver an electric shock by pressing the Shock Button with the next voice instruction. If the problem cannot be solved during an emergency, you should follow the following steps: ①Quickly replace the defibrillator if possible. ②If no replacement device is available, check the patient's condition and perform CPR as necessary. Continuously check the patient's condition and perform CPR until the emergency medical services arrives. 8.3.2 Troubleshooting While the Device is not Operating Symptom Cause Resolution Press the i-Button and hold for at least 1 second. The device then goes into Administration Mode. After going into Administration Mode, the device will issue the voice Status LCD Device Operation instruction “Press the flashing red iSystem error Button” Press the flashing red i-Button and the device will then announce system error and the associated error code. Contact us by referring to [Chapter 9: Device Service]. Status LCD Battery Level Indicator The battery is low. Replace the battery with a new one. The pad is expired. Status LCD Pad Status The pad has been Replace the pad with a new one. used. If the problem is not resolved or if no replacement battery is available, contact the manufacturer (refer to Chapter 9: Device Service) 42 9. Device Service Device Warranty Device Name Model Name Purchase Name Serial No. Distributor Person in Charge This device is warranted by CU Medical Systems, Inc. against defects in materials and workmanship for five full years from the date of original purchase. During the warranty period, we will repair or, at our option, replace at no charge a device that proves to be defective, provided you return the device, shipping prepaid, to us or to our authorized representative. This warranty does not apply if the device has been damaged by accident or misuse or as the result of service or modification by entities other than CU Medical Systems, Inc. or its authorized representatives. IN NO EVENT SHALL CU MEDICAL SYSTEMS BE LIABLE FOR CONSEQUENTIAL DAMAGES. Only devices with serial numbers and their accessories are covered under this warranty. PHYSICAL DAMAGE CAUSED BY MISUSE OR PHYSICAL ABUSE IS NOT COVERED UNDER THE WARRANTY. Items such as cables and modules without serial numbers are not covered under this warranty. Warranty Disclaimer The following renders this warranty null and void: • Servicing by unauthorized personnel. • If the factory seal is broken without proper authorization from CU Medical Systems, Inc. • Failure or damage caused by a fall or external shock after purchase • Damage by natural disasters such as fire, earthquake, flood and/or lightning • Failure or damage by environmental pollution or abnormal voltage • Damage caused by storage in conditions beyond the specified limits. • Failure due to depletion of consumables • Failure caused by sand and/or soil getting inside the device • The purchase date, customer name, distributor name, batch number and other listed information being arbitrarily changed • No proof of purchase provided along with the device warranty • Usage of accessories and parts not recommended by the manufacturer. • Other failure or damage caused by inappropriate operation. 43 Service The i-PAD CU-SP1 must be serviced only by authorized personnel. The i-PAD CU-SP1 will be serviced free of charge during the warranty period. After the warranty period, the cost of material and service shall be shouldered by the user. When the i-PAD CU-SP1 is not operating properly, immediately bring it for servicing to an authorized service center. Please fill out the following table with the necessary information when requesting for service. Device classification Device Name Semi-Automated External Defibrillator i-PAD Model Number Serial Number Date of Purchase Sales Representative Name User Information Address Contact no. Brief description of the problem 44 CU-SP1 Appendix A Rescue Protocol Power ON Voice Prompt: “Call Emergency Medical Services, now.” Pads Connected? NO Voice Prompt: “Plug the pads connector into the device.” YES Voice Prompt: “Adult mode” or “Pediatric mode” Voice Prompt: “Follow the voice prompt calmly.” Voice Prompt: “Remove all clothing from chest and stomach. Rip clothing if necessary.” Voice Prompt: “Take out the pads from the bottom of the device.” Voice Prompt: “Tear open the pads packaging.” Voice Prompt: “Look closely at the picture on each pad.” Voice Prompt: ”Peel off the pad labeled „1‟ and stick to the bare skin of the patient, exactly as shown in the picture.” Voice Prompt: “Peel off the pad labeled „2‟ and stick to the bare skin of the patient, exactly as shown in the picture.” Voice Prompt: “Press the pads firmly to the bare skin of the patient.” 45 PADS ON A A’ Voice Prompt: “Do not touch the patient.” “Analyzing heart rhythm.” i-PAD CU-SP1 detect/decide: ECG Shockable? NO YES Voice Prompt: “Shock advised.” “Stand clear.” Voice Prompt: “Charging now.” Voice Prompt: “No shock advised.” Charging Complete? NO YES Voice Prompt: “Press the flashing orange button, now.” “Deliver shock, now.” YES Within 15 seconds, SHOCK button is:? Voice Prompt: “Shock delivered.” NO Voice Prompt: “Shock button was not pressed.” Voice Prompt: “Be sure Emergency Medical Services have been called.” Voice Prompt: “You may touch the patient.” Voice Prompt: “Begin CPR, now.” B 46 B’ Voice Prompt: “Press the flashing blue i-button for CPR voice prompt.” Within 20 seconds, i-button is:? NO Voice Prompt: Re-analyzing heart rhythm in 2 minutes.” Voice Prompt: “Re-analyzing heart rhythm in 1 minute.” Voice Prompt: “Re-analyzing heart rhythm in 40 seconds.” YES Voice Prompt: “Place the heel of one hand on the center of the chest, between the nipples.” Voice Prompt: “Place the heel of your other hand on top of the first.” Adult Pediatric Adult or Pediatric? Voice Prompt: “Re-analyzing heart rhythm in 20 seconds.” Voice Prompt: “Push the chest down firmly 2 Inches, in time with the beat.” A Voice Prompt: “Push the chest down 2 Inches, in time with the beat.” Voice Prompt: “Beat Sound” Adult Pediatric Adult or Pediatric? Voice Prompt: “Do CPR, now.” Voice Prompt: “Continue chest compressions.” Voice Prompt: “Tilt head, pinch nose and give breath.” Voice Prompt: “Pinch nose, tilt head and give small breaths.” YES NO Voice Prompt: “Breathe” CPR is being Performed? NO Number of Cycle > 5 YES A 47 B Parts and Accessories To order replacement parts and accessories, cite the part and ordering numbers given in the following table. B.1 Standard Accessories Name Part Number Ordering Number Adult Pads (disposable) CUA1007S SP-OA03 Disposable Battery Pack CUSA1103BB SP-OA02 Instructions for Use SP1-OPM-E-01 - B.2 Optional Accessories Pediatric Pads (disposable) CUA1102S SP-OA04 IrDA Adapter IR-220LPLUS SP-OA05 SD Card HD1-CARD-SD SP-OA07 SD Card Reader HD1-CARD-READER SP-OA08 Carrying Case SP1-A-BAG-3010 SP-OA01 PC S/W CU Expert ver. 3.50 or higher SP-OA06 48 C Description of Symbols C.1 i-PAD CU-SP1 Defibrillator Symbol Description Power ON/OFF button i-Button SHOCK button Adult / Pediatric Selection Switch Do Not Touch Patient Indicator CPR Detection Indicator BF type, defibrillation-proof equipment Attention: Refer to accompanying documents. CE Mark; meets the requirements of the European Medical Device Directive 93/42/EEC and its revisions. Serial Number Date of manufacture 49 C.2 i-PAD CU-SP1 Packaging Symbol Description Stack up to 6 cartons high only This side up Keep dry Fragile; breakable Use no hooks Storage Temperature limits: 0℃ to 43℃(32℉ to 109℉) CE Mark; meets the requirements of the European Medical Device Directive 93/42/EEC and its revisions. Serial Number 50 C.3 Accessories C.3.1 Disposable Battery Pack (CUSA1103BB) Symbol Description Lithium Manganese Dioxide battery Lot Number Expiration date and Install by date Do not mutilate the battery or open the battery case Do not expose the battery to high heat or open flames. Do not incinerate the battery. Do not crush the battery Do not dispose of the battery in municipal waste. Follow local regulations on battery disposal Attention: Refer to accompanying documents CE Mark 51 C.3.2 Pads (CUA1007S, CUA1102S) Symbol Description Temperature limits: 0℃ to 43℃(32℉ to 109℉) Lot number Expiration date Order reference number Single use only; do not reuse Do not fold or bend. Contains no latex Expiration Date and Lot number sticker Attention: Refer to accompanying documents CE Mark; meets the requirements of the applicable European directive 52 D Glossary 1 CPR consists of 5 cycles. (When the device is set to 5 1 CPR cycles as default) Refers to 30 chest compressions followed by 2 breaths during 1 Cycle CPR. (When the device is set to the default setting [30:2]) If you specify the number of compression and number of breath, the cycle is performed in accordance with the specified protocol. Refer to [Section 5.3: Device Setting] for detailed setting method. A material used to sharpen and clean the surface of metal, Abrasive glass, stone and wood, which includes emery, quartz powder and glass dust. Do not use these abrasives to clean the device. Adhesive Material The adhesive material on the pad is very important for on the Pad maintaining the optimum adhesion between the skin and pad. (Gel) Therefore, never open the pad package when the pad is not needed, and periodically check the expiration date of the pad. Adult The adult in these Instructions for Use is defined as a person who is older than 8 years or heavier than 25 kg. American Heart The default settings of this device direct the you to perform Association (AHA) CPR immediately after one electric shock in accordance with 2010 CPR the 2010 CPR Guidelines. Also, the CPR guide is composed Guidelines of 5 cycles with the chest compression to artificial respiration ratio of 30:2 (if the device is set to a default setting of 5 cycles, 30:2). If you are not trained in artificial respiration, perform only the chest compression. Refer to [Section 5.3: Device Setting] for the CPR setting. Please contact the manufacturer for additional information. 53 Arrhythmia An abnormal heart rhythm. Battery Pack A disposable battery that supplies power to the i-PAD CUSP1. Cardiac Arrest A patient with cardiac arrest symptoms. This device should be Patient used for the patient with the following symptoms: No response, no movement and no normal breathing. Communication A port that sends and receives data between the device and Port PC. Condensation Moisture has an adverse effect on the device when condensation is formed on the device surface. The device should be stored in a dry environment without excessive humidity. CPR Mode The device provides guidance for CPR while pausing analysis of the patient's ECG such that you can easily perform CPR. The CPR mode on this device complies with AHA's 2010 CPR Guidelines. Refer to [Section 4.3., Step 3: Perform CPR] for more information. Defibrillation Is a process in which an electronic device gives an electric shock to the heart. This helps reestablish normal contraction rhythms in a heart having dangerous arrhythmia or in cardiac arrest. Defibrillator Pads A connector on the device that is used to connect the device Connector with defibrillator pads. Disposable Battery A disposable battery pack that provides power to the device. Pack Never charge this battery pack. ECG An abbreviation for electrocardiogram. A record of the heart's electrical rhythm as detected by the defibrillation pads. 54 Electric Shock This device charges large energy in a short time and performs defibrillation via an electric shock. Error A status in which the device does not properly operate. Refer to [Section 8.3: Troubleshooting] for more information. Fibrillation Refers to an irregularity of the heart causing ineffective circulation. Ventricular fibrillation is accompanied with an acute cardiac arrest. Flashing A status in which the indicator is flashing. i-Button A button to check the most recent device usage, to report error messages, to transfer the ECG and event data, and to change the CPR guide settings. IrDA Port A communication port that sends and receives data between the device and computer. Since this IrDA port utilizes light (infrared), care needs to be taken to reduce interference. Refer to the [CU Expert] manual for more information. Light A status in which the indicator is lit. Operation Mode An on the Status LCD while the device is on indicating that the device is properly operating. Pad The pad stated in these Instructions for Use refers to a pad (disposable) for defibrillation. Pad 1 Refers to a pad that is placed under the right clavicle. Please refer to the picture on the pad. (The position may be switched with pad 2.) Pad 2 Refers to a pad that is placed on the ribs on the patient's lower left chest directly under the armpit. Please refer to the picture on the pad (the position may be switched with pad 1). 55 Pad Connector The connector on the pad that is used to connect the pad with the i-PAD CU-SP1. PC S/W CU Expert PC software used to modify the settings of the i-PAD CU-SP1 (CU-EX1) and to manage treatment data. Refer to the appendix on accessories if you want to purchase this software. Pediatric The child in these Instructions for Use is defined as a person who is older than 1 year and younger than 8 years as well as lighter than 25 kg. Power Button A green button on the front of the device. The device turns on when the Power Button is pressed during Standby Mode, and it turns off when the Power Button is pressed for one second while the device is on. If the Power Button is pressed during the battery insertion test, the battery insertion test is canceled. Device The Device referred to in these Instructions for Use is the iPAD CU-SP1 Semi-Automated External Defibrillator (AED). Pad liner The liner that protects the conductive gel of the pads during storage inside the pads pouch. SD Card An external memory card that could be used to store treatment data (ECG and event) from the internal memory of the device. Self- Test Self diagnostic tests that verify the proper operation of the subsystems of the device. Internal discharge The i-PAD CU-SP1 dumps the charge in its defibrillating (disarm) capacitor into an internal load If you do not press the Shock Button or if the device determines that the patient does not need an electric shock due to the change in the patient's ECG. 56 Semi-Automated External A device that delivers a defibrillating shock after analyzing and recognizing a shockable rhythm. You must concur with Defibrillator (AED) Shock Button the shock delivery by pressing the SHOCK button. The button that you must press to deliver an electric shock to a cardiac arrest patient. Standby Mode The mode of the i-PAD CU-SP1 when the Power Button is OFF but the battery pack is inserted. If is shown on the Status LCD while the device is in standby mode, the device is ready to be used as needed in an emergency). We Refers to CU Medical Systems Inc. 57 E Device Specifications Model Name: CU-SP1 Physical Category Nominal Specifications Dimensions 260㎜ x 256㎜ x 69.5㎜ (Width x Length x Height) Weight 2.4㎏ (Including the battery pack and pads) Environmental Category Nominal Specifications Operational Status (The device is in emergency use) Temperature: 0℃ ~ 43℃ (32℉ ~ 109℉) Humidity: 5% ~ 95% (non condensing) Storage Status (The device is stored together with the defibrillator pads and the battery pack is inserted - ready to be used in an emergency) Temperature: 0℃ ~ 43℃ (32℉ ~ 109℉) Humidity: 5% ~ 95% (non condensing) Transport Status (device only, no defibrillator pads and battery pack included) Temperature: -20℃ ~ 60℃ (-4℉ ~ 140℉) Humidity: 5% ~ 95% (non condensing) Altitude 0 to 15,000 feet (operational and storage) Drop Withstands 1.2-meter drop to any edge, corner, or surface Vibration Operating: Meets MIL-STD-810G Fig.514.5C-17, random Standby: Meets MIL-STD-810G Fig.514.5C-18, swept sine(helicopter) Sealing IEC 60529: IP55 ESD Meets IEC 61000-4-2:2001 Meets IEC 60601-1-2 limits, method EN 55011:2007 +A2:2007, EMI (Radiated) Group 1, Class B Meets IEC 60601-1-2 limits, method EN 61000-4-3:2006 +A1:2008 Level 3 EMI (Immunity) (10V/m 80MHz to 2500MHz) 58 Defibrillator Category Nominal Specifications Operating Mode Semi-automated Waveform e-cube biphasic (Truncated exponential type) Output Energy Charge Control Charging Time 150 J at 50 Ω load for adults 50 J at 50 Ω load for children Controlled by an automated patient analysis system Within 10 seconds from when the voice instruction, "An electric shock is needed.", is issued. Time from initiation of rhythm analysis (voice instruction: New battery pack “DO NOT TOUCH PATIENT, ANALYZING HEART RHYTHM”) 10 Seconds, typical to readiness for discharge (voice instruction: “PRESS THE New battery pack: 16 shock th FLASHING ORANGE BUTTON, NOW. DELIVER SHOCK, NOW”) discharge 11 Seconds, typical th Time from Power ON to readiness for discharge New battery pack: 16 shock (voice instruction: “PRESS THE FLASHING ORANGE discharge 25 Seconds, typical BUTTON, NOW. DELIVER SHOCK, NOW”) Charging Indicator Time from CPR to Shock Voice Instruction “Press the Flashing Orange Button, Now. Deliver Shock, Now” Flashing Shock Button Beeper At least 6 seconds from the completion of CPR to shock delivery The device performs a self-discharge in the following events: When the patient's ECG changes to a rhythm that does not require defibrillation. When the Shock Button is not pressed within 15 seconds from the completion of the charge. Discharge When the device is turned off by pressing the Power Button for at least second. When the pad is detached from the patient's body or the pad connector is detached from the device. When the impedance of the patient is out of the range of defibrillation (25 Ω ~ 175 Ω) Shock Delivery Shock is delivered if the SHOCK button is pressed while the CU-SP1 is armed. Shock Delivery Adult pads in the anterior-anterior position Vector Pediatric pads in the anterior-posterior position Patient Isolation Type BF, defibrillation protected 59 A B C current(A) D time(ms) Biphasic Truncated Exponential Type. The shock waveform profile is automatically compensated for the patient‟s transthoracic impedance. A = first phase duration B= second phase duration0 C = interphase duration D = peak current Output Waveform for Adult (150 Joules) Patient Impedance (Ohms, Ω) First Phase duration (milliseconds, ms) Second Phase duration (milliseconds, ms) Peak Current (A) Energy (Joules, J) Energy Accuracy (Joules, J) 25 2.4 2.4 64.5 147.8 150(±15%) 50 4.4 4.4 32.7 149.7 150(±15%) 75 6.3 6.3 22.5 151.5 150(±15%) 100 8.8 8.8 15.9 148.1 150(±15%) 125 10.7 10.7 13.0 149 150(±15%) 150 12.7 12.7 11.0 148.2 150(±15%) 175 15.0 15.0 9.5 148.8 150(±15%) Output Waveform for Child (50 Joules) Patient Impedance (Ohms, Ω) First Phase duration (milliseconds, ms) Second Phase duration (milliseconds, ms) Peak Current (A) Energy (Joules, J) Energy Accuracy (Joules, J) 25 2.3 2.3 35.4 50.2 50(±15%) 50 4.3 4.3 18.4 50.7 50(±15%) 75 6.3 6.3 12.3 49.7 50(±15%) 100 8.5 8.5 9.1 49.5 50(±15%) 125 10.6 10.6 7.3 50.3 50(±15%) 150 12.7 12.7 5.8 49 50(±15%) 175 15.0 15.0 4.9 49.6 50(±15%) 60 ECG Acquisition Category Nominal Specifications Acquired ECG Lead Lead II Frequency Response 1 Hz to 30 Hz ECG Analysis System Category Nominal Specifications Determines the impedance of the patient and evaluates the ECG of the Function patient to determine whether it is shockable or non shockable 25Ω to 175Ω (shock will not be delivered if the patient‟s impedance is Impedance Range beyond this range). Shockable Rhythms Ventricular Fibrillation or Fast Ventricular Tachycardia ECG rhythms excluding ventricular fibrillation and ventricular tachycardia Non Shockable When a rhythm that does not require defibrillation is detected, the device Rhythms directs you to perform CPR. Prepare for shock delivery of pause for CPR, depending on the results of Analysis Protocol analysis. Sensitivity and Meets ANSI/AAMI DF80 guidelines Specificity 61 ECG Analysis System - ECG Database Test 90% One ECG Minimum Test Performan Rhythm Rhythms test sample ce goal Class Shock No Shock Observed Sided Lower Decision Decision Performance Confidence sample size size Limit 97.26% SHOCKABLE >90% Coarse VF 200 219 213 6 (213/219) 95% sensitivity sensitivity 81.02% >75% Fast VT 50 137 111 26 (111/137) 76% sensitivity sensitivity 100 Normal Sinus 100% > 99% minimum Rhythm 100 0 100 (arbitrary) NON SHOCKABLE (100/100) 97% specificity specificity AF,SB, SVT, heart 99.54% 30 > 95% (arbitrary) specificity block, 219 1 218 idioven- (218/219) 98% specificity tricular PVC‟s 96.21% > 95% Asystole 100 132 5 127 (127/132) specificity specificity 62 93% Control Devices, Indicators, Voice Instructions Category Nominal Specifications Control Devices Power Button, i-Button, Shock Button, Adult/Pediatric Selection Switch Status LCD Displays device status, battery level and pad status Do Not Touch Patient Indicator: Lights when the defibrillator is analyzing or delivering an electric shock. Pad Patch Position Indicators: Flashes when the defibrillator is turned on; turns off when the pad is attached on the patient. Pad Connector Status Indicator: Flashes when the defibrillator is turned on and the pad connector is not connected; lights when the pad connector is connected. Indicator CPR Detection Indicator: Lights if CPR is detected; flashes if CPR is not detected. Shock Button: Flashes orange when the defibrillator is charged and ready to deliver a shock. Blue i-Button: Flashes when guiding CPR, transferring the treatment history and setting the CPR mode. Red i-Button: Flashes when an error occurs. Speaker Voice instruction output (the volume varies depending on the ambient noise.) Beeper Various beeping output The battery level is automatically performed during periodic self tests, power Battery Level ON self-test, and run-time self-test. Low Battery Shown on the Status LCD, announced via voice instruction, and indicated via Indicator the flashing red i-Button Voice Instruction Guides the user via voice instructions. 63 Self-Diagnostic Test Power On Self-Test, Run-time Self-Test Auto Daily, Weekly, and Monthly Self-Test Battery Pack Insertion Test (done when the user inserts the battery pack into Manual the battery pack compartment of the device) Disposable Battery Pack (CUSA1103BB) Category Nominal Specifications 12V DC, 2.8Ah Li-MnO2, Disposable: Standard Battery Type 12V DC, 4.2Ah Li-MnO2, Disposable: Long-life Standard - At least 50 shocks for a new battery or 4 hours of operating time at room temperature Capacity Long-life - At least 200 shocks for a new battery or 8 hours of operating time at room temperature Standard - At least 3 years from the date of manufacture if stored and Standby Life (After Inserting the Battery) maintained in accordance with the instructions in this document. Long-life - At least 5 years from the date of manufacture if stored and maintained in accordance with the instructions in this document. Operating Temperature: 0℃ ~ 43℃ (32℉ ~ 109℉) Temperature Ranges Storage Temperature: -20℃ ~ 60℃ (-4℉ ~ 140℉) Adult Defibrillation Pad (CUA1007S) Category Nominal Specifications Type Adult Electrode Area 120 cm Cable Length Total 120 cm (Inside the pouch: 95 cm, Outside the pouch: 25 cm) Shelf life At least 36 months from the date of manufacture 2 64 Pediatric Defibrillation Pad (CUA1102S) Category Nominal Specifications Type Pediatric Electrode Area 46.43 cm Cable Length Total 120 cm (Inside the pouch: 80 cm, Outside the pouch: 40 cm) Shelf life At least 30 months from the date of manufacture 2 Data Storage and Transfer Category Nominal Specifications IrDA For PC communications Internal Memory Data 5 individual treatments, up to 3 hours per treatment Capacity External memory. Data may be copied from the internal memory to the SD SD Card Card. 65 F i-PAD CU-SP1 Shock Waveform Plots Impedance: 25 Ohms Impedance: 25 Ohms Type: Adult Type: Pediatric 66 Energy: Energy: 149J 50J Impedance: 50 Ohms Impedance: 50 Ohms Type: Adult Type: Pediatric 67 Energy: 150J Energy: 50J Impedance: 75 Ohms Impedance: 75 Ohms Type: Adult Type: Pediatric 68 Energy: 151J Energy: 51J Impedance: 100 Ohms Impedance: 100 Ohms Type: Adult Type: Pediatric 69 Energy: 150J Energy: 50J Impedance: 125 Ohms Impedance: 125 Ohms Type: Adult Type: Pediatric 70 Energy: 150J Energy: 50J Impedance: 150 Ohms Impedance: 150 Ohms Type: Adult Type: Pediatric 71 Energy: 150J Energy: 50J Impedance: 175 Ohms Type: Adult Impedance: 175 Ohms Type: Pediatric 72 Energy: 150J Energy: 50J G Electromagnetic Compatibility Guidance and manufacturer’s declaration – electromagnetic emissions The i-PAD CU-SP1 is intended for use in the electromagnetic environment specified below. The customer or the user of the i-PAD CU-SP1 should assure that it is used in such an environment. Emissions Test Compliance Electromagnetic environment - guidance The i-PAD CU-SP1 uses RF energy only for its RF Emissions CISPR 11 Group 1 internal function. Therefore, its emissions are very low and are not likely to cause any interference in nearby electronic equipment. RF Emissions CISPR 11 Harmonic emissions IEC 61000-3-2 Class B The i-PAD CU-SP1 is suitable for use in all Not applicable and those directly connected to the public lowvoltage power supply network that supplies Voltage fluctuations / flicker emissions establishments, including domestic establishments Not applicable buildings used for domestic purposes. IEC 61000-3-3 The i-PAD CU-SP1 should not be used adjacent to or stacked with other equipment. If adjacent or stacked use is necessary, the i-PAD CU-SP1 should be observed to verify normal operation in the configuration in which it will be used. 73 Guidance and manufacturer’s declaration – electromagnetic immunity The i-PAD CU-SP1 is intended for use in the electromagnetic environment specified below. The customer or the user of the i-PAD CU-SP1 should assure that it is used in such an environment. IEC 60601-1 test Complianc Electromagnetic level e level environment - guidance Immunity Test Electrostatic ±6 kV Floors should be wood, concrete or Contact ceramic tile. If floors are covered ±6 kV Contact discharge (ESD) with synthetic material, the relative IEC 61000-4-2 ±8 kV air ±8 kV air humidity should be at least 30% ±2 kV for power Electrical fast Mains power quality should be that supply lines Not ±1 kV for input/output Applicable transient/burst IEC 61000-4-4 of a typical commercial or hospital environment lines ±1 kV differential Surge Mains power quality should be that Not mode of a typical commercial or hospital IEC 61000-4-5 Applicable ±2 kV common mode environment. <5 % UT (>95% dip in Mains power quality should be that U T ) for of a typical commercial or hospital 0.5 cycles Voltage dips, short interruptions and voltage variations environment. If the user of the i40 % UT (60% dip in U T ) for 5 cycles on power supply 70 % UT (30% dip in input lines U T ) for 25 cycles PAD CU-SP1 image intensifier Not requires continued operation during Applicable power mains interruptions, it is recommended that the i-PAD CU- IEC 61000-4-11 SP1 image intensifier be powered <5 % UT (>95% dip in from an uninterruptible power U T ) for 5 s supply. 3 A/m 3 A/m Power frequency magnetic fields Power frequency should be at levels characteristic of (50/60 Hz) a typical location in a typical magnetic field commercial or hospital IEC 61000-4-8 environment. NOTE UT is the a.c. mains voltage prior to application of the test level. 74 Guidance and manufacturer’s declaration – electromagnetic immunity The i-PAD CU-SP1 is intended for use in the electromagnetic environment specified below. The customer or the user of the i-PAD CU-SP1 should assure that it is used in such an environment. Immunity IEC 60601 Test Complia Test level nce level Electromagnetic environment - guidance Portable and mobile RF communications equipment should be used no closer to any part of the i-PAD CU-SP1, including cables, than the recommended separation distance calculated from the equation applicable to the frequency of the transmitter. Recommended separation distance Conducted 3 Vrms RF IEC 150 kHz to 80 MHz 61000-4-6 3 Vrms outside ISM bands √ a 10 Vrms 10 Vrms √ 150 kHz to 80 MHz in ISM bands a Radiated 10 V/m RF IEC 80 MHz to 2,5 GHz 10 V/m √ 80 MHz ~ 800 MHz √ 800 MHz ~ 2,5 GHz 61000-4-3 20 V/m 20 V/m 80 MHz to 2,5 GHz where P is the maximum output power rating of the transmitter in watts (W) according to the transmitter manufacturer and d is the recommended separation distance in metres (m) b Field strengths from fixed RF transmitters, as c deter-mined by an electromagnetic site survey , should be less than the compliance level in each d frequency range . Interference may occur in the vicinity of equipment marked with the following symbol: 75 NOTE 1. At 80 MHz and 800 MHz, the higher frequency range applies. NOTE 2. These guidelines may not apply in all situations. Electromagnetic propagation is affected by absorption and refection from structures, objects and people. The ISM (industrial, scientific and medical) bands between 150 kHz and 80 MHz are 6,765 a MHz to 6,795 MHz; 13,553 MHz to 13,567 MHz; 26,957 MHz to 27,283 MHz; and 40,66 MHz to 40,70 MHz The compliance levels in the ISM frequency bands between 150 kHz and 80 MHz and in the frequency range 80 MHz to 2.5 GHz are intended to decrease the likelihood that b mobile/portable communications equipment could cause interference if it is inadvertently brought into patient areas. For this reason, an additional factor of 10/3 is used in calculating the recommended separation distance for transmitters in these frequency ranges Field strengths from fixed transmitters, such as base stations for radio (cellular/cordless) telephones and land mobile radios, amateur radio, AM and FM radio broadcast and TV broadcast cannot be predicted theoretically with accuracy. To assess the electromagnetic c environment due to fixed RF transmitters, an electromagnetic site survey should be considered. If the measured field strength in the location in which the i-PAD CU-SP1 is used exceeds the applicable RF compliance level above, the CU-SP1 should be observed to verify normal operation. If abnormal performance is observed, additional measures may be necessary, such as reorienting or relocating the i-PAD CU-SP1 d Over the frequency range 150 kHz to 80 MHz, field strengths should be less than [V1] V / m. 76 Recommended separation distances between portable and mobile RF communications equipment and the CU-SP1 The i-PAD CU-SP1 is intended for use in an electromagnetic environment in which radiated RF disturbances are controlled. The customer or the user of the i-PAD CU-SP1 can help prevent electromagnetic interference by maintaining a minimum distance between portable and mobile RF communications equipment (transmitters) and the i-PAD CU-SP1 as recommended below, according to the maximum output power of the communications equipment. Separation distance according to frequency of transmitter [m] Rated maximum output 150 kHz to 80 MHz 150 kHz to 80 outside ISM bands MHz in ISM bands power of 80 MHz to 800 MHz GHz √ √ 800 MHz to 2,5 √ √ transmitter E1 = E1 = E1 = E1 = 10 V/m 20 V/m 10 V/m 20 V/m 0.12 0.12 0.06 0.23 0.16 0.11 0.38 0.38 0.19 0.73 0.36 1 0.35 1.20 1.20 0.60 2.3.0 1.15 10 1.11 3.79 3.79 1.90 7.27 3.64 100 3.50 12.00 12.00 6.00 23.00 11.50 [W] V1 = 3 Vrms V2 = 10 Vrms 0.01 0.06 0.1 For transmitters rated at a maximum output power not listed above, the recommended separation distance d in meters (m) can be determined using the equation applicable to the frequency of the transmitter, where P is the maximum output power rating of the transmitter in watts (W) according to the transmitter manufacturer. NOTE 1) At 80 MHz and 800 MHz, the separation distance for the higher frequency range applies. NOTE 2) The ISM (industrial, scientific and medical) bands between 150 kHz and 80 MHz are 6,765 MHz to 6,795 MHz; 13,553 MHz to 13,567 MHz; 26,957 MHz to 27,283 MHz; and 40,66 MHz to 40,70 MHz. NOTE 3)An additional factor of 10/3 is used in calculating the recommended separation distance for transmitters in the ISM frequency bands between 150 kHz and 80 MHz and in the frequency range 80 MHz to 2.5 GHz to decrease the likelihood that mobile/portable communica tions equipment could cause interference if it is inadvertently brought into patient areas. NOTE 4) These guidelines may not apply in all situations. Electromagnetic propagation is affected by absorption and refection from structures, objects and people 77