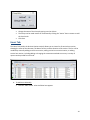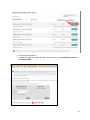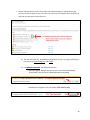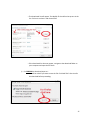
1
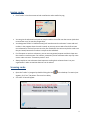
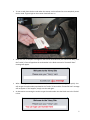
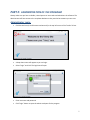
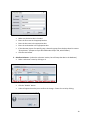
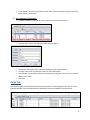
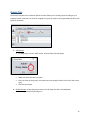
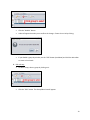
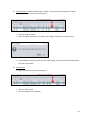
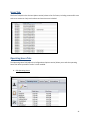
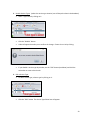
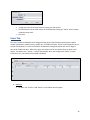
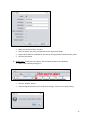
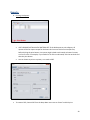
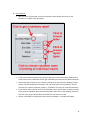
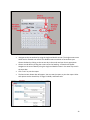
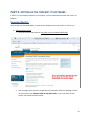
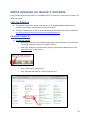
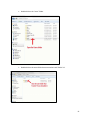
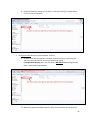
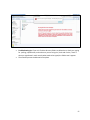
The Trackin’ It! Program Manual 639 Isbell, Suite 220 Reno, Nevada 89509 (775) 825-1900 www.nevadavolunteers.org The Trackin’ It! Program Manual TABLE OF CONTENTS Part 1: Using Trackin’ It! Page 3 to 6 How does it work? Page 3 Issuing cards Page 4 Scanning Cards Page 4 Part 2: Administration of the Program Page 7 to 33 Administrator Login Page 7 Workspace Overview Page 8 Volunteers Tab Page 9 Cards Tab Page 11 Groups Tab Page 12 Hours Tab Page 14 Scans Tab Page 21 Operating Hours Tab Page 21 Service Types Tab Page 22 Workstations Tab Page 24 Users Tab Page 26 Reports Page 29 Closing the Workspace and the Program Page 33 Part 3: Setting up the Trackin’ It! Software Page 35 to 47 Download MySQL Page 34 Install Trackin’ It! Page 45 Part 4: Removing the Trackin’ It! Software Page 48 to 57 Copy the Database Page 48 Uninstall Trackin’ It! Page 48 Uninstall MySQL Page 52 2 Welcome to the Trackin’ It! Program! Trackin’ It! is a software program that allows nonprofits to easily track the hours that their volunteers provide in service to the organization. Why is this important? Volunteer hours can be an important indicator of how effective a nonprofit is in fulfilling its mission. The labor of volunteers not only provides meaningful work to further the goals of the organization, but those hours can be included when the nonprofit applies for grants or does fundraising. One hour of volunteer labor is valued at about $21, so tracking every hour a volunteer gives to an organization can really add up. Trackin’ It! has been created for Nevada Volunteers through the tireless effort of a very talented and dedicated volunteer, Fred Barrie. Fred is a computer programmer who has been working with computers for over 20 years. Despite having a full-time job commitment, Fred has donated hundreds of hours to write this program from scratch. Working with several local organizations, he has refined it to suit the needs of nonprofits, addressing issues as they arise. Nevada Volunteers is very excited to share Trackin’ It! with you to help you reduce the time and energy required to gather volunteer service hour statistics that can be so vital to your organization’s success. PART 1: USING TRACKIN’ IT! How does it work? The basic idea behind Trackin’ It! is the use of a scannable card to easily enter start and stop times for every volunteer service session. Each volunteer is issued a card with a unique number that is read by a scanner at the beginning and end of their shift. The scans are recorded in a computer database, which keeps track of the time and date for each card issued. Reports can be generated from this database based on either an individual’s volunteer hours or a summary of hours served by all volunteers. 3 Issuing cards: • Each Trackin’ It! card set comes as both a wallet size and a smaller key tag. • You can give the volunteer both cards or keep the wallet size on file near the scanner (with their name written on it) in case they forget theirs. Your designated Trackin’ It! Administrator(s) will need to enter the volunteer’s name and card number in the program when the card is issued, so you may want to wait a few shifts to issue new volunteers a card until you are sure they are committed. You cannot recycle the cards once they are issued, because the number is unique to that individual. For infrequent or one time volunteers, you can use one general purpose card that is kept near the scanner to track everyone. For instance, community service volunteers who may only come once or twice can use a “community service” card. Always explain to new volunteers how important tracking their volunteer hours is to your organization in order to motivate them to scan in and out. • • • Scanning cards: • • Open the Trackin’ It! program by double clicking the icon appears, click “run.” Be patient. There can be a delay. A Trackin’ it! box will appear. on the desktop. If a security box 4 • To scan a card, place the bar code under the scanner so the red laser line runs completely across the bar code. A green light on the scanner head will turn on. • When the scan is complete a red light on the scanner head will flash, the scanner will beep, and the Trackin’ It! box will populate the card number in the blank area and a “Successful Scan” message will appear. • When scanning the card, make sure not to remove the card from the laser light too quickly. You will not get the card number populated in the Trackin’ It! box and the “Successful Scan” message will not appear. If this happens, simply scan the card again. An alternative to scanning the card is to type the card number into the blank area in the Trackin’ It! box. • 5 • • It is best not to have the Administrative section of the program open when doing a scan. If it is, and the scan won’t take, close the administrative screen and scan again. If the scanner gives an error message that says “Your Trackin’ It! card is not found please see the Volunteer Coordinator,” check to make sure the card has been issued and then close the program down and reopen it. Helpful Hints: • • Sometimes you may need to have a paper record of volunteer hours as well. For instance, in the case of community service volunteers, you may need to fill in specific paperwork for the court and therefore a paper record for their service that captures all necessary information may be helpful. You may also need to have a paper schedule of regular volunteers to refer back to in case the volunteer forgets to scan out. In this case, you can check the schedule to see when that volunteer’s shift was scheduled to end and then manually enter the duration of the service for that shift. 6 PART 2: ADMINISTRATION OF THE PROGRAM Always make sure you have a reliable, trained person to issue cards and administer the software. The administrator will have access to the complete database so they need to be someone you can trust. Administrator Login: • Click the tool icon (a small hammer and wrench) in the top left corner of the Trackin’ It! Box. • • A drop down menu will appear so you can login. Select “login” and click. The login box will open. • • Enter username and password. Click “login” button to open the admin workspace for the program. 7 Workspace Overview: There are 5 different icons in the administrator workspace representing different sections of the program. Each icon contains tabs that allow the administrator to input information relevant to that section. The information below provides a general overview. Specific information about each tab follows the overview. 1. Volunteer Options Icon: • Volunteers Tab: Allows you to view a list of volunteers, add new volunteers, make volunteers inactive, or edit a volunteer’s information, including assigning new cards. • Cards Tab: Shows a list of card holders that includes names, assigned card numbers, and dates cards were assigned. • Groups Tab: Allows you to create groups according to your programs needs. Volunteers can then be assigned to a group so reports can be generated specific to that group of volunteers. 2. Service Options Icon: • Hours Tab: Allows you to view a list of service hour entries, showing the name of the volunteer, the date of service, and the duration of the service. This list can be modified by manually adding service hour entries, making service hour entries inactive, or editing service hour entries, including adding or changing the comments attached to an entry. 8 • Scans Tab: Shows a list of all scans, including unsuccessful scans with error comments. Only card numbers and scan times are included. 3. Configuration Options Icon: • Options Tab: For the programmer’s use. • Operating Hours Tab: Allows you to set regular hours for volunteering with a start and stop time. This is useful if the volunteer forgets to scan out. Trackin’ It! will use the standard stop time as the end time for the service entry. • Service Types Tab: Allows you to create classifications for service hours entries according to the type of work that was accomplished. • Workstations Tab: Allows you to add new workstations to your Trackin’ It! system. 4. Users Icon: • Users Tab: Allows you to designate individuals to update/administer certain aspects of the Trackin’ It system for your organization. 5. Print Reports Icon: • Print Report Button: Allows you to print reports of the data in the Trackin’ It database for your organization. Volunteers Tab: The Volunteers Tab (within the Volunteer Options section) allows you to add, edit, and disable a volunteer entry. This is the tab to use when assigning Trackin’ It! cards. You can print a list of volunteers from this tab. 1. Add Volunteers: • To add volunteers, click the “Add” button. A Volunteer Editor box will appear. 9 • • • • • • Make sure the Active Box is checked. Enter the first name in the appropriate box. Enter the last name in the appropriate box. Enter the card number in the appropriate box. If the volunteer is part of a specific group, choose the group from the drop down list next to “Group Name.” (Groups set-up is described under Groups Tab, which follows.) Click the save button. 2. Disable a Volunteer: (makes the volunteer inactive, but still keeps the data in the database) • Select a volunteer’s name by clicking on it. • • Click the “Disable” button. A Box will appear that asks you to confirm the change. Choose Yes or No by clicking. 10 • If you disable a volunteer by mistake, use the “Edit” button (see below) and click the Active Box to create a check mark. 3. Edit a Volunteer’s Information: • To edit a volunteer’s information, select a volunteer’s name by clicking on it. • Click the “Edit” button. The Volunteer Editor box will appear. • • • Change the information that is needed by typing over the old information. To assign a new card to a volunteer, enter the new card number. The volunteer can be made inactive or reactivated by clicking the “Active” box to remove or add the check mark. Click Save. • Cards Tab: The Cards Tab (within the Volunteer Options section) provides a list of assigned cards. This list can be printed if needed. Cards are assigned on the Volunteers Tab by clicking Add or the Edit button. 11 Groups Tab: The Groups Tab (within the Volunteer Options section) allows you to create groups according to your programs needs. Volunteers can then be assigned to a group so reports can be generated specific to that group of volunteers. 1. Add Groups: • To add groups, click the “Add” button. A Group Editor box will appear. • • • Make sure the Active Box is checked. Enter the name of the group in the blank box (even though the box is small it will still accept type) Click the save button. 2. Disable Groups: (makes the group inactive, but still keeps the data in the database) • Select a group name by clicking on it. 12 • • Click the “Disable” button. A Box will appear that asks you to confirm the change. Choose Yes or No by clicking. • If you disable a group by mistake, use the “Edit” button (see below) and click the Active Box to create a check mark. 3. Edit a Group: • To edit a Group, select a group by clicking on it. • Click the “Edit” button. The Group Editor box will appear. 13 • • • Change the name of the Group by typing over the old one. The Group can be made inactive or reactivated by clicking the “Active” box to remove or add the check mark. Click Save. Hours Tab: The Hours Tab (within the Services Options section) allows you to view a list of service hour entries, showing the name of the volunteer, the date of service, and the duration of the service. This list can be modified by manually adding service hour entries, making service hour entries inactive, or editing service hour entries, including adding or changing the comments attached to an entry. A variety of reports can be printed from this tab. 1. To Add Hours Manually: • Click the “Add” button. A Service Editor box appears. 14 2. The first choices to make are from the Volunteer, Service Type and Time Frame drop downs. The Time Frame is important for inputting the time data in the form that you need, depending on the circumstances. DO THIS BEFORE YOU INPUT THE TIME INFORMATION. • Choose a volunteer. a) To the right of the “Volunteer” heading, choose a volunteer’s name from the drop down list. • b) Select a name with the cursor by clicking on it. The chosen name will show up next to the word “Volunteer.” Choose a Service Type. a) To the right of the “Service Type” heading, choose a service type from the drop down list. If you have not designated Service Types (found in the Configurations Options Section), you will only have one choice “Default Service.” b) Select a type with the cursor by clicking on it. The chosen type will show up next to the words “Service Type.” 15 • Choose a Time Frame (Make this choice before selecting time/dates). a) To the right of the “Time Frame” heading, choose a time frame from the drop down list. b) There are five different choices: o SCAN: Scan is the time period between two different scan records. Use this option for adding a time record with a start and stop time on a particular day. o MONTH, QUARTER, OR YEAR: All three of these choices are for entering a volunteer’s hours as one entry, without start and stop times. For instance, if a volunteer has served for 10 hours in December, the duration will be entered once (as 10:00) no matter how many individual dates that represented. The start time/date will automatically be recorded as the first day of December and the end time/date will automatically be recorded as the last day of December. These options are useful under special circumstances when the time has been served by the volunteer, but precise information is not available. Choosing QUARTER will register hours for a complete quarter in one entry. Choosing YEAR will register hours for a complete year in one entry. o PREVIOUS: Previous is useful for entering time served for dates before the Trackin’ System was in use by your organization. It is helpful for those volunteers that need a record of past service, as well as a way to capture historical volunteer hours if your organization has a need to include this data for any reason. c) After selecting the time frame from the list, the chosen time frame will show up next to the words “Time Frame.” 16 • • • Choose a start time and date. a) Click the arrow next to the date. A calendar will appear. b) Navigate to the correct date by using the single and double arrows. o The single arrows move either back or forward one month. o The double arrows move back or forward one year. Choose the date by clicking on the correct day in the month and year that is appropriate. c) If you are using the time frame of Month, Quarter, or Year, just choose a day in that month, quarter, or year, and the program will generate the start and end dates for that month, quarter, or year. d) If you are using the time frame of Previous, no dates will be assigned to the hours record for that entry, just a duration. When done, click the arrow next to the date to collapse the calendar. Check to see if the date is accurate. 17 • • • Set the time by typing in the information needed according to which time frame you chose. a) If you chose Month, Quarter, Year, or Previous for the time frame, only type in the duration box. Enter the cumulative total of volunteer hours for that time period. You must use the hh:mm format for the numbers so it will save correctly. Enter a zero for a placeholder for single digits (1 to 9). That means that 2 hours and 5 minutes would be entered as 02:05. Also, the entry is limited to 4 digits, so 99:99 is the largest block of time that can be entered. b) If you chose Scan for the time frame, enter the start and end times. The program should calculate the duration. Make sure to use a zero for a placeholder for single digits (1 to 9) and designate AM or PM. That means that 8:05 in the morning would be entered as 08:05 AM. Add Comments if needed by inserting the cursor and typing in the comment box. You can delete the default comments by selecting and using the delete button on the keyboard. Click Save 18 3. To Disable Hours: (makes the hours entry inactive—it will not be used to generate a report) • Select a service hours entry by clicking on it. • • Click the “Disable” button. A Box will appear that asks you to confirm the change. Choose Yes or No by clicking. • If you disable an entry by mistake, use the “Edit” button (see below) and click the Active Box to create a check mark. 4. To Edit Hours: • Select a service hours entry by clicking on it. • • Click the “Edit” button. The Service Editor box will appear. 19 • • • This is the same box used to add hours. Edit as needed by typing over the old information or changing the time and date. You can change the duration of the service by selecting the time and typing in the new time. Be sure to use the same format with a 0 to act as a placeholder for single digits (1-9). The service entry can be made inactive or reactivated by clicking the “Active” box to remove or add the check mark. Click Save. 5. To Approve Hours • To approve hours select the service entry that needs to be approved. • Click the approve button. A check box will automatically be placed in the approved column. 20 Scans Tab: The Scans Tab (within the Services Options section) shows a list of all scans, including unsuccessful scans with error comments. Only card numbers and scan times are included. Operating Hours Tab: The Operating Hours Tab (within the Configurations Options section) allows you to edit the operating hours that were input when Trackin’ It! was installed. 1. Edit Operating Hours: 21 • • To edit Operating Hours, select a day of the week by clicking on it. Click the “Edit” button. The Operating Hours Editor box will appear. • • Change the hours typing over the old ones. Click Save. Service Types Tab: The Service Types Tab (within the Configurations Options section) allows you to create classifications for service hours entries according to the type of work that was accomplished. This differs from groups because it relates to the specific volunteer work performed and not the group the volunteer belongs to. 1. Add Service Types: • To add service types, click the “Add” button. A Service Type Editor box will appear. • • • Make sure the Active Box is checked. Enter the name of the service type in the blank box. Add a comment if desired. Click the save button. 22 2. Disable Service Types: (makes the service type inactive, but still keeps the data in the database) • Select a type name by clicking on it. • • Click the “Disable” button. A Box will appear that asks you to confirm the change. Choose Yes or No by clicking. • If you disable a service type by mistake, use the “Edit” button (see below) and click the Active Box to create a check mark. 3. Edit a Service Type: • To edit a service type, select a type by clicking on it. • Click the “Edit” button. The Service Type Editor box will appear. 23 • • • Change the name of the service type by typing over the old one. The Service Type can be made inactive or reactivated by clicking the “Active” box to remove or add the check mark. Click Save. Workstations Tab: The Workstations Tab (within the Configurations Options section) allows you to add new workstations to your Trackin’ It! system. This is only applicable if a volunteer is assigned to one of several computer workstations. 1. Add Workstations: • To add workstations, click the “Add” button. A Workstation Editor box will appear. • • • Make sure the Active Box is checked. Enter the name of the workstation in the blank box. Add a comment if desired. Click the save button. 24 2. Disable Workstations: (makes the workstation inactive, but still keeps the data in the database) • Select a workstation name by clicking on it. • • Click the “Disable” button. A Box will appear that asks you to confirm the change. Choose Yes or No by clicking. • If you disable a workstation by mistake, use the “Edit” button (see below) and click the Active Box to create a check mark. 3. Edit a Workstation: • To edit a workstation, select a station by clicking on it. • Click the “Edit” button. The Workstation Editor box will appear. 25 • • • Change the name of the workstation by typing over the old one. The Workstation can be made inactive or reactivated by clicking the “Active” box to remove or add the check mark. Click Save. Users Tab: The Users Tab allows individuals to be assigned varying levels of the following administrative duties: modify configuration; modify service; modify user; or modify volunteer. A user can be assigned to one or several of these duties, or even to all of them. Passwords are assigned to allow each user to login to their level of administration. When they login, only those icons for the sections they can work in will appear. The default user, “admin”, is set up automatically when you configure the Trackin’ It! upon installation. This one should not be edited or disabled. 1. Add User: • To add a user, click the “Add” button. A User Editor box will appear. 26 • • • • Make sure the Active Box is checked. Enter the name, user name, and password in the appropriate boxes. Choose which duties are allowed for the user by clicking the boxes beside the duty name. Click the save button. 2. Disable User: (makes the user inactive, but still keeps the data in the database) • Select a user name by clicking on it. • • Click the “Disable” button. A Box will appear that asks you to confirm the change. Choose Yes or No by clicking. 27 • If you disable a user by mistake, use the “Edit” button (see below) and click the Active Box to create a check mark. 3. Edit a User: • To edit a user, select a user by clicking on it. • Click the “Edit” button. The User Editor box will appear. • • Change the name of the user or user name by typing over the old one. The User can be made inactive or reactivated by clicking the “Active” box to remove or add the check mark. Modify which duties are applicable, if necessary, by clicking on the boxes to check or uncheck. Click Save. • • 28 Reports: 1. Printing List Reports: • • • USE THE PRINT BUTTON ON THE BOTTOM LEFT of the Workspace to print a Report. All reports will be list reports except for the hours tab. You must click on an icon/tab first, before clicking the print button. List reports might include cards issued, volunteers’ names, or a list of scans. For example, if you need a list of all the cards issued, click the cards tab and then the print button. You can choose to print to a printer, or to make a PDF. To create a PDF, choose PDF from the drop down menu next to “Name” and click print. 29 • For a PDF, choose where to save the file. 30 2. Hours Reports: • With the Hours Tab selected, click the print button on the bottom left corner of the workspace. The Report box will appear. • • • • If you want a summary report listing only the total hours, click the Summary Report box to create a check mark. Otherwise you will get a detailed report with specific dates and entries. Choose the type of report that you want by clicking the arrow next to the heading “Group.” Choose from the drop down list between “All” (for total hours of all volunteers); “Group” (for hours for a specific volunteer group); or “Individual” (for hours for a specific volunteer). If you choose either a Group report or an Individual report, you will have to select the name of the group or individual report from the drop down menu next to the heading “Selection.” Click the arrow to get the drop down list and click on the name you need. Choose a start date by clicking the arrow next to the heading. A calendar will appear. 31 • • • • Navigate to the correct date by using the single and double arrows. The single arrows move either back or forward one month. The double arrows move back or forward one year. Choose the date by clicking on the correct day in the month and year that is appropriate. Choose an end date by clicking the arrow next to the heading. A calendar will appear. Navigate to the correct date by using the single and double arrows in the same way as with the start date. Click “Print” to print the report. The Service Hour Viewer box will appear. You can save the report or print the report. Other tool options are the Actual Size, Fit Page, Fit Width, and Zoom tools. 32 Closing the Workspace and the Program: • • To close the WORKSPACE, click the “x” in the top right corner of the WORKSPACE. To close the PROGRAM, click the “x” in the top right corner of the WELCOME BOX. 33 PART 3: SETTING UP THE TRACKIN’ IT! SOFTWARE: If Trackin’ It is not already installed on your computer, you must download and install the Trackin’ It! software. Download MySQL: The first step is to download MySQL , an open source database server that Trackin’ It! uses to run. 1. Download From Server: • Go to the internet and browse to http://dev.mysql.com/downloads/mysql/ • Look through the list of versions to download on the bottom half of the webpage. Choose the version that says: Windows (x86, 32-bit), MSI Installer. Even if you have a 64-bit system, still choose the 32-bit version. 34 • • Click the Download Button. A registration page will appear. You don’t need to register. Click “No thanks, just take me to the downloads!” 35 • You will need to select a mirror site to make your download quicker. Simply select a site from the list that is closest to you. San Jose, CA, is the choice for Nevada. Click the HTTP link after the city (San Jose) to select that site. a) The next few steps vary, depending on the browser that you are using. Following are instructions for Internet Explorer and Firefox. b) For INTERNET EXPLORER the download steps are: o A box will appear asking if you want to run or save when downloading. Choose SAVE. Give time for the download before proceeding. o Another box will appear. This time choose VIEW DOWNLOADS. 36 o The Downloads list will appear. The MySQL file should be the top one in the list. Click on it to select it and choose RUN. o If the downloads list does not appear, navigate to the download folder on your computer and open the file there. c) For FIREFOX the download steps are : o You will be asked if you want to save the file. Click SAVE FILE. Give time for the download before proceeding. 37 o A Downloads box will appear. Double click the MySQL file at the top of the list. o If the downloads list does not appear, navigate to the download folder on your computer and open the file there. o A security warning box will appear. Click RUN. 2. Complete the Set-up Wizard: • The MySQL Setup Wizard will appear. Click NEXT. 38 • Click to check the box for “I accept the terms in the License Agreement.” Click NEXT. 39 • For the Setup Type choose TYPICAL and then click NEXT. • It is time to begin installation. Clink INSTALL. You may get a security warning box asking if you want to allow changes made to your computer. If so, click YES. The installation could take time, so be patient. 40 • A MySQL Enterprise box will appear. You can ignore this. Just click NEXT. • It will be followed by a second MySQL Enterprise box. Click NEXT again. 41 • The final box of the Set-up Wizard appears. Make sure the “Launch the MYSQL Instance Configuration Wizard” box is checked and then click FINISH. Another security warning box may pop up. If so, click YES. 3. Configuration Wizard: • The final leg of the download and installation process is the Configuration Wizard. When the box pops up, click NEXT. 42 • Select “Standard Configuration” for Configuration Type and then click NEXT. • Select “Include Bin Directory in Windows PATH.” Also, keep “Install as Windows Service” selected as well. Click NEXT. 43 • You will need to choose a security password. WRITE IT DOWN IN A SAFE PLACE. This will be the root password to the MySQL server and you will need it to install Trackin’ It! Type in your password and retype it to confirm it. Make sure that you leave UNCHECKED the “Enable root access from remote machines” box to keep that disabled. You don’t want that to happen. Click NEXT. • The final box will appear. Only click EXECUTE. The computer does the rest. When it has finished, all the circles in the list will be checked. The configuration could take time, so be patient. • After this has happened, you simply click FINISH. 44 Install Trackin’ It!: 1. Now it is time to install the Trackin’ It! software. • The latest version of Trackin’ It! is on the website: http://aergia.org. Click the link “Launch Vinny” to install it. (Vinny was the working name for Trackin’ It! before it was completed.) • You will be asked if you want to the save the file. Click SAVE FILE. Then Click OK. Give the program time to download before proceeding. 45 • A Downloads box will appear. For Firefox, double click the “Vinny” file at the top of the list. For Internet Explorer, click “run.” The program should install. • A Trackin’ It! icon will appear on your desktop and a configuration box will also appear. • • Leave “localhost” as is, or you can type in the host location of the computer if you know it. Type the password you created when installing MySQL into the password box where there are asterisks (type right over the *****) and hit the enter key. When the correct password is entered, the “Done” bar will become clickable. Click “Done.” 46 • A box will appear to initialize the database. Type your organization name, and change the location to whatever is appropriate. The location will appear on the scan box, so name it accurately. • Set up the times that your organization operates by clicking a day to select it. The line will turn blue. Then double click a time slot and type in the new time in the same format as shown. When done, click “save.” Trackin’ It! is now installed. • 47 PART 4: REMOVING THE TRACKIN’ IT! SOFTWARE: If you should need to uninstall Trackin’ It! and MySQL from one computer to move them to another, use these instructions. Copy the Database 1. The database is physically located in the directory “C:\ProgramData\MySQL\MySQL Server 5.5\data” that resides on the computer running the program. 2. To copy the database you or your IT person should follow the MySQL instructions located here: http://dev.mysql.com/doc/refman/5.0/en/copying-databases.html Uninstall Trackin’ It! 1. Uninstall the Program: • Make sure Trackin’ It! is closed before beginning. (If the uninstall fails, you may need to turn off the computer and turn it on again to clear it.) • Open your computer’s Control Panel by clicking on the Microsoft Office Button in the lower left corner of your monitor. • • Find “Control Panel” and click on it. Find “Programs and Features” in the list and click on it. 48 • Find the Trackin’ It! icon and “Vinny Application” in the list and select it by clicking on it. Click the Uninstall button at the top. • A box will appear asking if you are sure you want to uninstall. Click OK. 49 • If another box appears telling you that Trackin’ It! (Vinny) needs to be closed, just click OK. The computer will uninstall Trackin’ It! and it should disappear from the list of programs in the “Programs and Features” list. 2. Delete Program Directory: • The .vinny directory must be deleted. To find it: a) Click the Microsoft Button again in the lower left corner of your monitor and choose “Computers” from the list. • Double click the OS(C:) hard drive. 50 • Double click on the “users” folder. • Double click on the users folder that was used to install Trackin’ It!. 51 • • • You should see a folder named .vinny. Click on the .vinny folder to select it. Right-click and choose delete. If there is a second vinny folder, delete that as well. The second folder is a backup of the database. Uninstall MySQL: 1. Uninstall the Program: • Make sure MySQL is closed before beginning. • Open your computer’s Control Panel by clicking on the Microsoft Office Button in the lower left corner of your monitor. 52 • • Find “Control Panel” and click on it. Find “Programs and Features” in the list and click on it. • Find MySQL in the list and select it by clicking on it. Click the Uninstall button at the top. 53 • A box will appear asking if you are sure you want to uninstall. Click YES. • If another box appears telling you that MySQL needs to be closed, just click OK. The computer will uninstall MySQL and it should disappear from the list of programs in the “Programs and Features” list. 2. Delete Two Program Directories: • The Program Files Directory must be deleted. To find it: a) Click the Microsoft Button again in the lower left corner of your monitor and choose “All Programs” at the bottom of the list. 54 b) A new menu will appear. Choose “Accessories.” c) From the list of Accessories, choose Windows Explorer. This is different than Internet Explorer for the internet. This Explorer helps you search your computer files. d) At the top left of the box, insert your cursor in the blank area next to the word “Libraries” by clicking once. e) The word “Libraries” should highlight, then type the path name for the folder you need: o If you have a 32-bit Computer, type C:\Program Files\MySQL (note: there is a space between Program and Files) o If you have a 64-bit computer, type C:\Program Files (x86)\MySQL (note: there is a space between Program and Files) o If you aren’t sure which type of computer you have, try one and then the other until you see the Program Directory Folder for MySQL. 55 f) • Delete the folder by clicking on it to select it, then right-clicking it. Choose delete from the menu that appears. The Program Data Directory must be deleted. To find it: a) Go back to the spot you typed in to find the previous directory, insert the cursor, and put in the path name for the second directory by typing C:\ProgramData\MySQL (note: this time there is NO SPACE between Program and Data. It should read ProgramData.) b) When the Program Data folder appears, delete it as you did for the first directory. 56 • • Troubleshooting tip: If you can’t find the directory folders to delete them, check your typing for spelling, capitalization, and make sure you are using the \ slash and not the / slash. If what you type doesn’t match exactly what needs to be typed, the folders won’t appear. The uninstall process should now be complete. 57