1
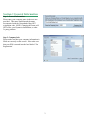
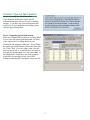
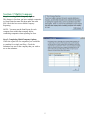
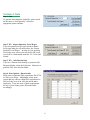
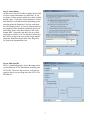
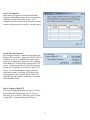
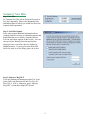
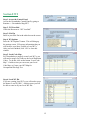
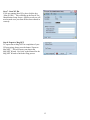
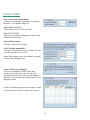
Greenshades Mag.NET
Package User Manual
Steps From within your accounting package
Microsoft Great Plains or Thinkware Darwin
Mag.NET Package User Manual
Greenshades Software
7800 Belfort Parkway
Suite 220
Jacksonville, FL 32256
(904) 807-0160
www.greenshades.com
If you have any questions about steps in this documentation, please contact technical
support by email at [email protected] or by phone at 904-807-0160.
Table of Contents
Section 1 General Information.................................................................................... 3
Section 2 Special Information..................................................................................... 4
Section 3 Multi-Company........................................................................................... 5
Section 4: Suta ............................................................................................................ 6
Section 5: New Hire .................................................................................................... 9
Section 6 401k........................................................................................................... 10
Section 7 EVS ........................................................................................................... 11
Section 8 W2 ............................................................................................................. 12
Section 9 1099........................................................................................................... 14
2
Section 1 General Information
Step 1. General Information.
Please enter your company name in the text area
provided. This name should match the name
accompanied with the Greenshades Mag.NET
registration code. NOTE: Changing this name will
NOT affect your Dynamics Installation, or other
3rd party products.
Step 2. Company Info
Please make sure that your company information is
filled out correctly on this screen. Also make sure
that your EIN is entered into the box labeled ‘Tax
Registration’.
3
Section 2 Special Information
Step 1. Accessing Special Information
Some magnetic media types require special
information that does not exist in your accounting
package. If you have any special information that
needs to be on your magnetic media filings, please
click the Special Info button.
Step 2. Completing Special Information
Select the Company ID, Jurisdiction, and Mag Media
Type to filter out special information that you know
is not required for your filings based on your
jurisdiction and magnetic media type. If your filings
do require special information, please enter them into
the ‘Value’ field. If you are unsure what a specific
piece of special info is, it probably does not apply to
you and you should simply leave the value blank. If
the information is required by one of the magnetic
media files you attempt to create, you will be
informed when Mag.NET attempts to create that file.
4
Section 3 Multi-Company
Step 1 Accessing Multi-Company Options
This feature is for when you have multiple companies
in Great Plains but must file them under the same
EIN. Check the box next to Multi-Company
Reporting.
NOTE: You must run the Suta Report for each
company from within that company before
combining companies when reporting for Suta.
Step 2. Completing Multi-Company Options
Check the export box for companies you would like
to combine for a single tax filing. Check the
Submitter box next to the company that you wish to
use as the submitter.
5
Section 4: Suta
Step 1. Suta
To generate Suta magnetic media files, please check
the box next to ‘Suta Quarterly’. Select the
appropriate quarter end date.
Step 2. W2 – Export Quarterly Local Wages
If you run quarterly local wages instead of annual
local wages then you will need to have the ‘Export
Quarterly Local Wages’. In order for your quarterly
local wages to be correct you will need to fill out all
your local w-2 information under the ‘W-2 Year End’
section.
Step 3. W2 – ASO Darwin Only
If you are a Darwin client needing to generate ASO
Magnetic Media, please check this box. Otherwise to
generate PEO, leave this box blank.
Step 4. State Options -- Darwin Only
Many states require that PEO corporations file SUTA
as if they were ASOs. Additionally, many states
require that any officers within PEO corporations be
filed as if they were in an ASO, but not the other
employees. If you are aware of these requirements
for any of your clients, please fill out this table
accordingly.
6
Step 5. Suta Options
On this screen you will be able to change the location
of where certain information is pulled from. If you
are unsure of these options, please leave them as their
default values. If you have certain Employee Classes
that should be excluded from Suta Reporting, please
enter them into the Employee Class box, and check
the 1099 Employee box. If you use Darwin and have
any employees that should be considered officers for
Suta Filing, please enter their Employee IDs in the
bottom table. Nonprofits who have not set up their
employees as subject to SUTA and thus (incorrectly)
have SUTA reports with zero taxable wages should
check the ‘Read Suta Wages from State Wage File
for Non Profit Organizations’ box.
Step 6. Edit Suta IDs
This is a standard Dynamics Screen that maps states
to miscellaneous SUTA information, including state
SUTA IDs. Please use this screen to verify that all
states for which you are filing have their SUTA Tax
ID filled out.
7
Step 7. Tax Deposits
Some states are required to check that individual
employee withholding amounts tie out to the amount
withheld and paid to the taxing agency. This
information should be filled out each quarter with the
correct tax deposits that you made to a taxing agency.
Step 8. Run Suta Reports
By pressing this button, a standard Great Plains Suta
Report will be generated. This report MUST NOT be
modified. If you use a modified Suta report, please
make sure to change this report back to the standard
Great Plains SUTA report before running the SUTA
report. Clients must run the Great Plains Suta report
in order for Greenshades to accurately report SUTA
wages. It is recommended that clients record the
totals listed on the Great Plains SUTA Report and
compare them to the totals that will be reported by
Mag.NET after the magnetic media file is created to
affirm that they match.
Step 9. Export to Mag.NET
If you are planning on running any other Tax Types,
please follow the directions for that Tax Type (i.e.
New Hire, W2, or 1099’s). Otherwise, press ‘Export
to Mag.NET’ to launch the Mag.NET Wizard
8
Section 5: New Hire
Step 1 New Hire
To Generate New Hire, please check the box next to
New Hire Reporting. Enter in the Beginning Date
and Ending Date for which you would like New Hire
magnetic media generated.
Step 2. New Hire Options
Some states require additional information about
company medical coverage of identifying parents and
dependents that are covered by company policies.
You can select these options on this screen. You can
also specify the Waiting Period in days that the
employee has to wait before they are eligible for
Health Insurance. If you need to enter in the EIN
Suffix for Iowa New Hire filing, please do so here.
Step 3. Export to Mag.NET
If you are planning on running any other Tax Types,
please follow the directions for that Tax Type (i.e.
Suta, W2, or 1099’s). Otherwise, press ‘Export to
Mag.NET’ to launch the Mag.NET Wizard.
9
Section 6 401k
Step 1. 401k
To generate 401k magnetic media, check the box
next to 401k Reporting. Enter the beginning pay date
and the ending pay date for which would like to
generate a 401k report.
Step 2. 401k Options
Select the correct 401k Vendor from the Drop down
list. Next enter the Pension Plan Number. If you
need to read 401k wages from PayCode records
instead of History, please check this box (if you are
unsure what source to use for 401k information, it is
recommended that you use the History tables by
leaving the box unchecked). If your 401k plan
requires that corporate owners be distinguished,
please add owners to the table along with what
percentage they own.
Step 3. 401k Code Map
Use this screen to correctly map the paycodes you
have set up within GreatPlains for various 401k
deductions and benefits to Greenshades 401k codes.
Step 4. Export to Mag.NET
If you are planning on running any other Tax Types,
please follow the directions for that Tax Type (i.e.
Suta, W2, or 1099’s). Otherwise, press ‘Export to
Mag.NET’ to launch the Mag.NET Wizard.
10
Section 7 EVS
Step 1. EVS
The Social Security Administration has an Electronic
Verification Service that ensures that all employees
have correctly reported their SSNs, genders, and
DOBs to the employer. Using this service ensures
not only that employers have accurate records of all
employees, but also that the SSA will not reject any
W2 tax forms due to incorrect employee information.
To take advantage of the EVS system, an employer
must register with the SSA, at which point they will
be issued a ‘Requester ID Code’. This code must be
filled into the EVS section of the Greenshades form.
Once filled in, Greenshades is able to produce
magnetic media ready for submission to the SSA
(called a request file). Upon receipt of an employer’s
diskette, the SSA will locate any inconsistencies
between the employer’s records and the national
registrar and send a magnetic media file back to the
employer containing the problems (called a response
file). The employer can load and read the response
file by using Greenshades’ EVS webpage, located at
http://www.greenshades.com/FedEvs.
Step 2. Export to Mag.NET
If you are planning on running any other Tax Types,
please follow the directions for that Tax Type (i.e.
Suta, W2, or 1099’s). Otherwise, press ‘Export to
Mag.NET’ to launch the Mag.NET Wizard.
11
Section 8 W2
Step 1. Access the Control Panel
Access the Greenshades Control Panel by going to
Routines -> Greenshades Mag.NET.
Step 2. W2 Year End
Check the Box next to “W2 Year End”
Step 3. SSA Pin
Enter in your SSA Pin in the white box on the screen.
Step 4. W2 Options
Press the “W2 Options” button. This will bring up
the options screen. Fill out any information that you
will need for your State, Federal or Local W2’s.
After you have finished, click “Ok” to close this
window.
Step 5. Local Code Map
For Greenshades to properly create Local W2’s, you
will need to map Local Codes to the Local Deduction
Codes. To do this, click on the button “Local Code
Map”. On this screen you can create your Local
Code Map, or Create your OPT Map for
Occupational Privilege Tax.
Step 6. Local W2 IDs
If you are creating Local W2’s you will need to press
the button “Local W2 IDs”. On this screen you will
be able to enter in all your Local W2 IDs.
12
Step 7. State W2 IDs
If you are running State W2s, pleas click the box
“State W2 IDs”. This will bring up the Payroll Tax
Identification Setup Screen. On this screen you will
need to make sure your State ID has been entered in
correctly.
Step 8. Export to Mag.NET
To export data to Mag.NET for completion of your
W2 processing, please press the button “Export to
Mag.NET.” This will export your data to the
Mag.NET Wizard. Now refer to the Manual for the
Mag.NET Wizard to finish the filing process.
13
Section 9 1099
Step 1. Access the Control Panel
Access the Greenshades Control Panel by going to
Routines -> Greenshades Mag.NET.
Step 2. 1099 Year End
Check the box next to “1099 Year End”.
Step 3. TCC & NCC
Enter in your companies Transmitter Control Code
and Name Control Code.
Step 4. 1099 Creation
Press the “1099 Creation” button.
Step 5. Default Amount Box
To setup your default box for 1099 vendors you will
have there amount boxes to fill in.
Note: These settings can be overwritten by using the
Vendor Class Mapping Screen.
Step 6. Vendor Class Mapping
If you have established Vendor Classes that
appropriately describe the type of vendor and
payment amount box their 1099 amount should be
applied to, you can map them by pressing the “Class
Mapping” button.
On the Class Mapping Screen you can specify which
payment box you want each vendor class to go to.
14
Step 7. Create / Edit 1099
To Have Greenshades pull in all your 1099s located
in Great Plains or Darwin, press the “Create 1099
File” but ton. You can specify options for this by
checking the box next to that option. For instance,
checking the box next to “Include Vendors Paid Less
then $600” will include all your normal vendors plus
the ones that were paid less then $600.
To edit 1099s inside Greenshades after creating the
1099 file, press the “Edit 1099 File” button. This
will bring up the 1099 Editor. From this screen you
will be able to edit all fields of the vendors you
pulled into Greenshades.
Note: By pressing the “Clear 1099 File” button, this
will clear all 1099s out of Greenshades and you will
need to run the Create 1099s process again.
Step 8. Import 1099 Data
For information on the “Import 1099 Data” Section
please refer to the manual for Importing 1099s.
Step 9. Close
After you have finished creating and editing your
1099s, close this screen by pressing the “X” in the
upper right corner.
Step 10. Export to Mag.NET
To export your 1099 data to the Mag.NET wizard
and complete your 1099 filing, press the “Export to
Mag.NET” button.
You will need to follow the directions found in the
Manual for the Mag.NET wizard from this point.
15
16