1
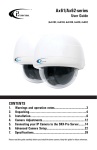
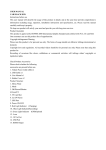
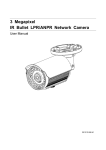
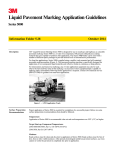
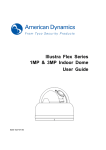
Car Camcorder BS-F110 User Manual 16 2 15 Notes _______________________________________________________________ _______________________________________________________________ _______________________________________________________________ _______________________________________________________________ _______________________________________________________________ _______________________________________________________________ _______________________________________________________________ _______________________________________________________________ _______________________________________________________________ _______________________________________________________________ _______________________________________________________________ _______________________________________________________________ _______________________________________________________________ _______________________________________________________________ _______________________________________________________________ _______________________________________________________________ _______________________________________________________________ _______________________________________________________________ Contents About this Guide WEEE Notice Notes on Installation Caution 1. Introduction 1.1 Features 1.2 Package Contents 1.3 Product Overview 2. Getting Started 2.1 Inserting the Memory Card 2.2 Connecting to Power 2.3 Installing in Vehicles 2.4 Powering the Device On/Off 3. Using the Car Recorder 3.1 Recording Videos and Taking Snapshots 3.2 Playing Videos and Photos 4. Adjusting the Settings 4.1 Using the Menu 4.2 Menu Tree 5. Specifications _______________________________________________________________ _______________________________________________________________ _______________________________________________________________ _______________________________________________________________ _______________________________________________________________ _______________________________________________________________ _______________________________________________________________ 14 3 About this Guide The contents of this document are for information purpose and are subject to change without prior notice. We made every effort to ensure that this User Guide is accurate and complete. However, no liability is assumed for any errors and omissions that may have occurred. The manufacturer reserves the right to change the technical specifications without prior notice. WEEE Notice Disposal of Waste Electrical and Electronic Equipment and/or Battery by users in private households in the European Union This symbol on the product or on the packaging indicates that the product can not be disposed of as a household waste. You must dispose of your waste equipment and/or battery by handling it over to the applicable take-back scheme for the recycling of electrical and electronic equipment and/or battery. For more information about recycling of this equipment and/or battery, please contact your city office, the shop where you purchased the equipment or your household waste disposal service. The recycling of materials will help to conserve natural resources and ensure that it is recycled in a manner that protects human health and environment. Notes _______________________________________________________________ _______________________________________________________________ _______________________________________________________________ _______________________________________________________________ _______________________________________________________________ _______________________________________________________________ _______________________________________________________________ _______________________________________________________________ _______________________________________________________________ _______________________________________________________________ _______________________________________________________________ _______________________________________________________________ _______________________________________________________________ _______________________________________________________________ _______________________________________________________________ _______________________________________________________________ Notes on Installation 1. Install the front-view camera near the rear-view mirror to obtain the best open-field view. 2. Make sure that the lens is within the wiping range of the windscreen wiper to ensure a clear view even when it rains. 3. Install the rear-view camera either on the dashboard to observe the interior, or on the rear window to observe the road. 4. Do not touch the lens with your fingers. Finger grease may be left on the lens and will result in unclear videos or snapshots. Clean the lens on a regular basis. 5. Do not install the device on a tined window. Doing so may damage the tint film. 4 _______________________________________________________________ _______________________________________________________________ _______________________________________________________________ _______________________________________________________________ _______________________________________________________________ _______________________________________________________________ _______________________________________________________________ _______________________________________________________________ _______________________________________________________________ 13 6. Make sure that the installation position is not hindered by the tinted window. Caution 5. Specifications Use the branded charger only Dual-channel Super HD recording (2304x1296 @ 30fps) Never disassemble by yourself Never short-circuit the battery Dispose of the battery properly Exposing the battery to open flames can cause explosion 1. Introduction Thank you for purchasing this advanced Car Recorder. This device is specifically designed for real-time video and audio recording when driving 1.1 Features Copyright ©2015 All rights reserved. All other marks, products or company names mentioned in this guide are trademarks of their respective companies. 12 Wide angle lens 120 degrees 2.0” LCD color screen Support MicroSD card up to 32Gb HDR and WDR functions External GPS 1.2 Package Contents The package contains the following items: Car Recorder - 2 pcs Controller Hub Bracket - 2 pcs Car Adapter USB Cable Mini HDMI Cable GPS Logger AV-out Cable - 3 pcs Sticker - 2 pcs User Manual 5 1.3 Product Overview 4.2 Menu Tree Refer to the below table for details on menu items and available menu options. Car Recorder Note: To operate the device, press the corresponding buttons (6~7) according to guide icons shown on the screen. Controller 6 11 Recording all other types of videos 1. Short press the Record Button on the Camera. Or choose the channel wanted on the Controller and short press the Ok Button to start recording. 2. Press the OK Button again on the Controller, or the Record Button on the Camera to stop recording. Note: The video file is saved for every 1, 3 or 5 minutes of recording. The device saves the recording in the memory card. If the memory card is full, the oldest file in the memory card is overwritten. To turn off the Microphone when the recording is in process, short press the Down Button on the Controller. Hub Taking Snapshots You can also use this device to take snapshots of the current scene. Press Camera Button to enter the to take a snapshot. 3.2 Playing Videos and Photos 1. Press the Mode Button on the Controller to enter the Playback Mode. 2. Press the Up/Down button to select the video files and photo files. 3. Press OK button to play or pause the video. 4. Press the Mode Button to exit Playback Mode. 4. Adjusting the Settings Using the Menu You can customize the video recording and other general settings via the onscreen display (OSD) menu. Please mind, you have to set the Menu Settings for each camera separately. 1. Press the Menu Button on the Controller to enter the menu interface. 2. Press the Up/Down Button to select a menu option and press the OK Button to enter the selected menu. 3. Press the Up/Down Button to select the desired setting and press the OK Button to confirm the setting. 4. Press the Mode Button to exit the Menu. 10 GPS Logger 7 2. Getting Started 2.1 Inserting the Memory Card Insert the memory card and push it until it clicks into place. To remove the memory card Push to eject the memory card out of the slot. Note: Do not remove or insert the memory card when the device is turned on. This may damage the memory card. 2.2 Connecting to Power 2. Position the sticker on the windshield with the sticky surface and press for a moment. Make sure the base is securely attached to the place. 3. Attach the second camera on the rear window, using the sticker. 4. Hold the camera firmly on the windshield and press for a moment until the sticker sticks to the glass. Make sure the base is securely attached to the place. 2.4 Powering the Device On/Off Auto Power On/Off Once the vehicle engine is started, the device automatically turns on if the switch is in ON position on the Controller. If the Automatic Record Function is enabled, the recording will automatically start right after the device turns on. Once the vehicle engine shuts down, the device automatically saves the recording and turns off the power. Manual Power On/Off To manually turn on the power, chose the camera with the help of Channel Switch and long press the POWER Button. To turn off, press and hold the POWER Button for at least 2 seconds. Use only the supplied Car Adapter to power up the device and charge the built-in-battery. 1. Connect the cameras to the corresponding slots on the hub. 2. Connect one end of the Car Adapter to the USB Connector of the device. 3. Plug the other end of the Car Charger to the cigarette lighter socket of your vehicle. 3. Using the Car Recorder 3.1 Recording Videos Recording videos while driving When the vehicle engine starts up the device automatically turns on and starts recording. Recording will automatically stop when the engine is switched off. Or, press the OK Button to stop recording manually. 2.3 Installing in Vehicles Mounting to Windshield 1. Attach the device to the bracket base with sticker. Make sure the device is securely locked in place. 8 Note: On some cars, the recording will continue when the engine is switch off. If this happens, do one of the following: 1. Manually turn off the cigarette lighter. 2. Remove the car adapter from the cigarette lighter. 9