1
Linux driver
for
MCXUNI, MCXPCI, MCXCPCI and WAN-HDLC products ranges
Table of contents
1
ABOUT MCXUNI, MCX(C)PCI & WAN-HDLC CARDS ......................................... 2
1.1
1.2
2
Supported cards .......................................................................................................... 2
Cards firmwares ......................................................................................................... 2
INSTALLING THE DRIVER FOR V2.6 KERNELS .................................................. 3
2.1
OS versions ................................................................................................................ 3
2.2
Firmware selection ..................................................................................................... 3
2.3
Recompiling the driver ............................................................................................... 3
2.4
Installation .................................................................................................................. 4
2.5
Creating devices ......................................................................................................... 4
2.6
Testing the driver and card ......................................................................................... 5
2.7
Unloading the driver................................................................................................... 5
2.8
Miscellaneous changes ............................................................................................... 6
2.8.1 Driver version 1.2 ................................................................................................... 6
2.8.2 Driver version 1.4 ................................................................................................... 6
2.8.3 Driver version 1.4.6 ................................................................................................ 6
2.8.4 Driver version 1.4.8 ................................................................................................ 6
2.8.5 Driver version 1.4.10 .............................................................................................. 6
2.8.6 Driver version 1.4.12 .............................................................................................. 6
2.9
Limits ......................................................................................................................... 6
2.10 Known bugs................................................................................................................ 6
3
INSTALLING THE DRIVER FOR V2.2 AND V2.4 KERNELS................................ 7
3.1
3.2
3.3
3.4
3.5
3.6
3.7
3.8
4
OS versions ................................................................................................................ 7
Firmware selection ..................................................................................................... 7
Recompiling the driver ............................................................................................... 7
Installation .................................................................................................................. 7
Creating devices ......................................................................................................... 7
Uninstalling the driver ................................................................................................ 8
Limits ......................................................................................................................... 8
Known bugs................................................................................................................ 8
USING THE DRIVER ..................................................................................................... 9
4.1
System calls ................................................................................................................ 9
4.1.1 Open function ......................................................................................................... 9
4.1.2 Read fonction ......................................................................................................... 9
4.1.3 Write function ...................................................................................................... 10
4.1.4 Select fonction ...................................................................................................... 10
4.1.5 Close fonction ...................................................................................................... 10
4.1.6 Ioctl fonction ........................................................................................................ 11
4.2
Using HDLC/ABM (a.k.a. LAP-B) and HDLC/NRM............................................. 12
4.3
C programming examples and tools ......................................................................... 14
4.4
Firmware upgrade tool ............................................................................................. 15
16-oct-2013
Linux driver manual for MCXPCI boards
DTUS046 rev A8
Page 2 of 15
1 About MCXUNI, MCX(C)PCI & WAN-HDLC cards
1.1 Supported cards
The driver supports the following ACKSYS cards :
•
MCXUNI/570 and MCXPCI/570 (-2 and –4), WAN-HDLC (/4 and
/4C), MCXCPCI/570 (-2, -4, -2R, -4R) cards with the MCXMULTIPROTOCOLE firmware
•
MCXUN1/BP, MCXPCI/BP MCXUNI/S and MCXPCI/S with either
the standard firmware or the MCX-MULTIPROTOCOLE firmware
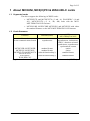
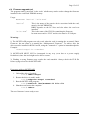
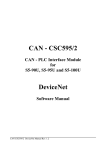
1.2 Cards firmwares
Firmware
Standard (basic)
Runmode
Serial communications format
1
asynchronous
MCXMULTIPROTOCOLE
2
asynchronous, isochronous,
HDLC, character-oriented
synchronous, asynchronous
synchronized, custom
option
option
standard feature
MCXPCI/BP, MCXUNI/BP
standard feature
MCXPCI/S, MCXUNI/S
standard feature
MCXPCI/570, MCXUNI/570 reduced functionality(*)
MCXCPCI/570
WAN-HDLC
reduced functionality(*)
standard feature
WAN-HDLC/4C
(*) global card commands (RELRP) are available but not channel commands (VINIT…)
02-oct-2008
Linux driver manual for MCXPCI boards
DTUS046 rev A7
Page 3 of 15
2 Installing the driver for v2.6 kernels
2.1 OS versions
The driver was tested with the following kernels:
•
•
•
•
Debian 3.1 (sarge) i386, preemptive kernel v2.6.8 with SMP.
Debian 4 (etch) i686, preemptive kernel v2.6.18 with SMP.
SuSE 10.0 x86_64, preemptive kernel 2.6.13 with SMP.
RedHat 4.2.1.3 (nash) i386, kernel v2.6.19-11.EL (smp/preemption
unknown).
• RedHat Fedora Core 9 (sulphur) i686, kernel 2.6.25 with SMP.
• OpenSuSE 11.3 preemptive kernel 2.6.34-12 with SMP.
32-bits executables compiled for the i386 architecture are supported when run
in the x86_64 architecture.
2.2 Firmware selection
The RUNMODE constant in the mcx.h file controls the default choice for the
firmware to be activated at card startup. To change the default you could
change the RUNMODE value and recompile the driver.
Preferably, you may select the firmware at module load time using the
“runmode=…” option.
Refer to the “Cards firmwares” section to select the correct value for the run
mode.
2.3 Recompiling the driver
WARNING: a Linux driver must be compiled for the exact kernel
configuration on which it will be used. Otherwise module load warnings or
errors, and even system crashes can happen.
To compile the driver you do not need root privilege; but you need it to install
it and run it.
You must have the kernel source tree installed and configured. Usually you
should use the config file located in the /boot directory of the target computer.
Also, you must have the GCC compiler installed (the version which is
recommended by your Linux distribution provider).
•
•
•
•
Use the command prompt.
Extract the driver source files to a directory of your choice.
go to this directory.
type “make” to compile the driver.
Unusual kernel source tree location: you can customize the “Makefile” file
used by “make” and “make install” if your distribution uses an unusual kernel
source tree. Check the KDIR directory which indicates the kerne sources
location, and use the O=… argument to indicate where the kernel configuration
and compilation output reside, if this is different from KDIR.
02-oct-2008
Linux driver manual for MCXPCI boards
DTUS046 rev A7
Page 4 of 15
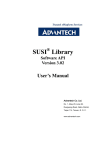
2.4 Installation
Make sure that the board is correctly installed in your computer, and that the
serial connectors box, if any, is plugged in the card.
•
type “insmod mcxpci.ko” to check for correct loading of the module.
If a MCXPCI card is installed in the computer, its LEDs
should stop blinking wildly and LED 0 should blink at a onesecond rate.
The driver supports options to select the firmware to run (basic
or multiprotocol) and the initial electrical interface for all
ports.
Example:
insmod mcxpci.ko runmode=2 ifmode=8
Runmode is 1 or 2: see section 1.2.
Ifmode is working only in runmode 2 and the available values
are described in the Multiprotocol manual, in the RSMDE
command.
The default values are runmode=2 (multiprotocol firmware)
and ifmode=0 (RS232).
If the devices connected to the serial ports of the card are not
all RS232, you should use ifmode=8 (tri-state mode).
•
You can check the kernel log to find information about the cards
detected by the driver (usually in “/var/log/messages”, the name may
depend on the Linux distribution).
•
Type “rmmod mcxpci” to check for correct unloading of the module.
•
type “make install” to copy the module to your /lib/module directory
and run depmod.
After that you should be able to run “modprobe mcxpci”
from any directory to load the module. If this fails, the module
was not copied to the correct subdirectory in /lib/modules. Run
“uname –r” to know the name of the correct subdirectory,
move the module there and rerun depmod.
2.5 Creating devices
The driver is designed to work with the “sysfs” kernel option and the “udev”
package. Together they will handle the creation of the cards device nodes in
/dev. Use of the “mknod” command is deprecated. Beware that the default
rules for udev will create nodes that are accessible only with root privilege.
In the driver source directory there is a “mcxpci.rules” file that you can drop
to /etc/udev/rules.d”. udev will then create the required devices for you each
time the driver starts. It has been tested with Debian sarge and Debian etch.
Recent kernels create the needed devices without using mcxpci.rules.
The device class used in “sysfs” for the driver is named “mcx”. Character
devices are used. The major device number, if needed, can be found in
/sys/class/mcx/*/dev or in /proc/devices.
02-oct-2008
Linux driver manual for MCXPCI boards
DTUS046 rev A7
Page 5 of 15
For each card having N serial channels, two series of N+1 device nodes are
created. One serie allows to identify the slot in which the card is inserted, so as
to be independent of later insertion of more cards. The other serie is compatible
with older versions of the driver, and names the channels sequentially through
any number of cards. This way of naming was dropped in kernel 2.6.34.
The first, slot-dependant, serie is named “/dev/mcxBBSS-CC” where BB is a
PCI bus identifier, SS is a PCI slot identifier, CC is a channel identifier. CC is
01 to NN to represent a card with NN serial channels. CC has the special value
00 to allow access to the card itself without specifying a channel. CC is also the
minor device number.
The second, slot-order-dependant, serie was dropped in kernel 2.6.34. The
devices are named “/dev/mcxXX” where XX is a number in the range 00 to
(number of available channels + number of available cards). 00 allows access
to the first card found, 01..NN to the NN serial channels of the first card, NN+1
to the second card, NN+2..MM+NN+2 to the MM serial channels of the second
card, and so on.
2.6 Testing the driver and card
You can make a simple transmit/receive test in the following manner.
•
Load the driver as explained above. We will suppose that the port
devices are named /dev/mcx0405-01, /dev/mcx0405-02 and so on.
•
Go to the “utils/testloop” directory and insure that testloop is compiled
(otherwise compile it with “make testloop”).
•
Go to the “examples” directory and compile initall (“make initall”).
•
Remove any cable connected to your equipments. Instead plug in a
loopback connector consisting in only a TxD/RxD strap (pin 2 to pin 3).
•
Initialize the port:
./initall 1 0 e RS232 100
•
Run a loopback test:
../utils/testloop/testloop mcx0405-01 0 100
(where mcx0405-01 is the name of the port in /dev). This test runs forever,
sending numbered frames to the port, receiving its own frames, checking for
errors and displaying data throughput every 10 seconds.
2.7 Unloading the driver
“rmmod mcxpci” uninstalls the driver and reboots the boards. If you reload
the module immediately, there will be a long delay while the card is running its
self-test.
02-oct-2008
Linux driver manual for MCXPCI boards
DTUS046 rev A7
Page 6 of 15
2.8 Miscellaneous changes
2.8.1 Driver version 1.2
• Ioctl control codes: MCX_IOC_CMD_AUTO, MCX_IOC_GETCARD
and MCX_IOC_GETCONF ioctl.
• User-mode write buffers greater than channel buffers are now handled.
• Much better signal handling.
• The default behaviour of read() is now to wait for incoming data.
Interrupt conditions IT2 and IT7 are now set by default. This allows the
channels to be used from standard Linux utilities like “cat”. A driver
compile-time option allows to set back the old behaviour.
• No driver-imposed limits on the number of cards.
2.8.2 Driver version 1.4
• Support for the HDLC link layer protocols (LAP/B, ABM, NRM).
• Handling of control signal state changes as events detected by the poll
and select system calls.
• MCX_IOC_GETEVENTS and MCX_IOC_SETEVENTS ioctl.
2.8.3 Driver version 1.4.6
• Compilation warnings removed.
• New INSMOD option for settable initial electrical common interface.
• A new tool allows upgrading the card firmware under Linux.
2.8.4 Driver version 1.4.8
• Support for RedHat with kernels < 2.6.18.
2.8.5 Driver version 1.4.10
• Support for kernel 2.6.32.
2.8.6 Driver version 1.4.12
• Support for kernel 2.6.34.
• Corrections for firmware download with multiple cards.
• Removal of the second way (the one independent of PCI slot) to name
cards.
2.9 Limits
The driver is supported only on i386 and x86_64 architectures. Other
architectures have not been tested, they may work if they support access to a
PCI memory region through a kernel virtual pointer.
2.10 Known bugs
Command timeout is not correctly handled on kernels prior to 2.6.13. However
commands should never timeout on cards with correctly set serial connectors.
The “/dev/mcxXX” way of naming ports is known to not work in some 2.6
kernels, such as 2.6.32. You can use udev rules or mknod to overcome this
issue.
02-oct-2008
Linux driver manual for MCXPCI boards
DTUS046 rev A7
Page 7 of 15
3 Installing the driver for v2.2 and v2.4 kernels
3.1 OS versions
The driver was tested in the following conditions:
•
•
•
Mandrake 7.2 kernel 2.2.17
Mandrake 8.0 kernel 2.4.3-20
Redhat 7.2 kernel 2.4.7-10
3.2 Firmware selection
The RUNMODE constant in the mcx.h file controls the default choice for the
firmware to be activated at card startup. To change the default you must change
the RUNMODE value and recompile the driver.
Refer to the “Cards firmwares” section to select the correct value for the run
mode.
3.3 Recompiling the driver
Type : make install within a directory which contains the Makefile,
mcxpcidr.c, cmd.h, mcx.h, mcxpci.h, sysdep.h, typegc.h files
3.4 Installation
Make sure that the board is well installed in your computer.
From the correct directory, type : insmod mcxpcidr
The driver itself detects the MCXPCI boards, installs them and writes boards
information in the file /var/log/messages
3.5 Creating devices
Each channel or line of the board is represented by a character type device.
It is possible to create a device with a major/minor number by using the
“mknod” command.
The major number is given by the system and is written in the
/var/log/messages file upon driven installation completion, for example :
« FIN d’initialisation MCXPCI => OK (mcx_major= 254) »
Upon driver installation completion, it is necessary to keep the major number
and then create the devices.
The driver takes the minor number of the device as line number, it is
recommended to name a device depending to its minor number.
For example, the « mknod /dev/mcx01 c 254 1 » command creates the
/dev/mcx01 device is character mode with a major equal to 254 and a minor
equal to 1, which is the first line of the board.
Thus, the « mknod /dev/mcx04 c 254 4 » command creates the /dev/mcx04
device which is the fourth line of the board.
Example for a PC with MCXPCI/570-4 boards installed :
• The minor number of a line on the first board varies from 1 to 4.
• The minor number of a line on the second board varies from 5 to 8.
Example for a PC with MCXPCI/BP-32 boards installed :
• The minor number of a line on the first board varies from 1 to 32.
• The minor number of a line on the second board varies from 33 to 64.
02-oct-2008
Linux driver manual for MCXPCI boards
DTUS046 rev A7
Page 8 of 15
3.6 Uninstalling the driver
The « rmmod mcxpcidr » uninstalls the driver and reboots the boards.
It is necessary to wait for the end of the boards reset cycle (LEDS goes from
left to right quickly again and again) displays before reinstalling the driver with
the « insmod mcxpcidr ».
3.7 Limits
•
All the firmware commands (except rinit) indefinitely wait for the end of
command interrupt, it means that there’s no timeout mechanism
implemented.
• A board dedicated command (not a command specifying a channel) should
be always sent to a real channel (it concerns GOADR, MBOOT , NOPER,
RELRP, RMEMO, RSTAT…).
• The maximum number of channel supported with a single PC is 127.
• All the installed boards within a same PC must use the same firmware
(standard or MCX-MULTIPROCOLE), mixing firmware is not supported.
3.8 Known bugs
Some people encountered driver installation failure, « insmod mcxpcidr »
returns an error.
This issue occurs only after trying to uninstall the driver using the « rmmod
mcxpcidr » command.
02-oct-2008
Linux driver manual for MCXPCI boards
DTUS046 rev A7
Page 9 of 15
4 Using the driver
4.1 System calls
4.1.1 Open function
As per Linux documentation. Open can fail if called with a device node name
associated with a minor device number out of range. When issued to an nonyet-opened port, open() runs the RXENB (if opened read/write) and MINTR on
the channel.
4.1.2 Read fonction
read : reads received frames. read() can be blocking or not depending on
whether the file was opened with the O_NONBLOCK flag or not.
Use the “select” system call to avoid waiting indefinitely with a blocking read.
In synchronous modes (bisync, HDLC…), read() reads a frame. In
asynchronous mode, read() reads n characters (see the RDBUF command of
the board built-in firmware).
read() returns a 32 bits value:
- All zeroes if the link is down in HDLC stateful protocols
- 8 bits (bits 24-31) error code composed of either:
• for asynchronous communications, 8 bits indicating the kind of
error in the received data. See the description for IT5 interrupt
in asynchronous mode, in the firmware user manual;
• for synchronous communications, 4 bits (bits 28-31) indicating
the a combination of flaws incurred by the received frame.
0x00 = frame is good
0x10 = frame closed by an ABORT instead of a flag
0x20 = character buffer overflow in the USART
0x40 = CRC error
0x80 = frame buffer overflow in the card memory.
See the description for RDBUF in synchronous mode, in the
firmware user manual code;
• zero, if the returned data incurred no error.
If an error happened, read() returns –1 and sets errno to either:
- EFAULT if the given buffer is invalid (incorrectly allocated);
- EAGAIN if non-blocking I/O is required and reading would block;
- EIO in case of a card command error;
- EINTR if a signal was received while processing the system call.
Example:
int ReadLen, Error;
char RxBuf[1024]; // buffer where the driver will write received frame
ReadLen = read(fd, RxBuf, sizeof(RxBuf));
If (ReadLen < 0) {
perror(“read”);
} else {
// error code, 0= no error
Error = (unsigned)ReadLen >>24;
Number of read bytes = ReadLen &0x0FFFFFF;
}
02-oct-2008
Linux driver manual for MCXPCI boards
DTUS046 rev A7
Page 10 of 15
4.1.3 Write function
write : sends a frame and returns the length successfully written to the transmit
buffer of the card, or it returns –1 if an error happened, in which case errno is
set to:
- EFAULT if the given buffer is invalid (incorrectly allocated);
- EBUSY if transmit buffer is full (only in kernels 2.4)
- EAGAIN if non-blocking I/O is required and writing would block
- EIO in case of card command error
write() finishes when the board sends the End Of Command Interrupt and not
when the frame is completely transmitted.
The SyncWrite flag of the MCX_IOC_SETCONF ioctl blocks the write()
system call until the frame is completely transmitted on the line.
Example:
char TxBuf[1024];
// transmit buffer
int txlen, txsent;
// number of characters to send
txlen = whatever depending on the app;
txsent = write(fd, TxBuf, txlen);
If (txsent < 0) {
perror(“write”);
} else {
Number of bytes successfully written = txsent;
}
4.1.4 Select fonction
select : waits (with time-out) until a “read” or “write” operation is possible
without blocking.
“read” select waits for the IT1 interrupt event which indicates that a
synchronous frame or some asynchronous characters has been received
allowing to start a nonblocking read. Also, a HDLC link down state triggers
this event, and the following read() calls will return 0 (end of file indication).
“write” select waits for the IT7 interrupt event which indicates that the transmit
buffer is empty, hence the previous write is complete (all characters sent).
“exception” select waits for the IT6 interrupt event which indicates either that a
control signal changed, or that the link state changed when using the HDLC
stateful protocols. Use the MCX_IOC_SETEVENTS ioctl control code to
individually enable the events. Once triggered, the events stay around (they
retrigger forever) until ioctl is called with the MCX_IOC_GETEVENTS
control code.
4.1.5 Close fonction
close : closes the channel and runs the RXENB, CLRRX, MINTR commands
of the firmware.
RXENB disables reception, CLRRX clears receive buffers, MINTR disables
any interrupt sources from the target channel.
02-oct-2008
Linux driver manual for MCXPCI boards
DTUS046 rev A7
Page 11 of 15
4.1.6 Ioctl fonction
MCX_IOC_SETCONF configures a channel by running the PROTO, RSMDE, STSIG,
VINIT, MINTR, ALLOC, RXENB commands according to the
parameters of the “Mcx_Line_CONFIGURE” structure.
When the board runs the basic firmware (instead of the
MULTIPROTOCOL firmware), the PROTO command is ignored.
In synchronous mode, the “ALLOC” command is called only if
TxBufSize and/or RxBufSize are not equal to zero in the
Mcx_Line_CONFIGURE structure.
To set a protocol not directly supported by MCX_IOC_SETCONF,
use MCX_IOC_CMD ioctl and execute the following commands :
PROTO, RSMDE, MINTR, VINIT, RXENB (and PRCTL for
protocols which requires connect/disconnect procedures).
A group of macros are available to set the parameters for the
HDLC protocols in the Mcx_Line_CONFIGURE structure. See
“mcx.h”.
MCX_IOC_CMD
writes to the board any command supported by the card firmware
and waits for the end of command interrupt. All commands are
fully documented in the relevant firmware user’s manual.
Command parameters must be filled in the mcc_cmd structure.
If the send_data and send_data_leng parameters of the mcc_cmd
structure are not null, application data pointed to by send_data is
written to the card “data” area..
If return_data and ret_data_leng are not null, the card “data” area is
written back to the application return_data buffer.
In kernels 2.2 and 2.4, commands like RELRP, RSTAT… which
are not channel- specific, are always sent to channel 1.
New ioctl codes supported in 2.6 kernels:
MCX_IOC_GETCONF reads back the structure set by a previous MCX_IOC_SETCONF.
MCX_IOC_CMD_AUTO writes to the board any command supported by the standard or the
MCX-MULTIPROTOCOLE firmwares and changes bits 0-6 of
parameter 1 to the channel number which matches the current file
descriptor. The functionality is the same as MCX_IOC_CMD but
allows to write channel-independent code.
MCX_IOC_GETCARD obtains general information about the card and channel associated
to the current file descriptor. Before using this ioctl you must set up
a Mcx_Card structure and set its mc_size element to
sizeof(Mcx_Card).
MCX_IOC_SETEVENTS sets a mask of card events that will trigger the exception event in
the poll()/select() system calls. Only the selected events will wake
up these system calls. The initial mask is empty (nothing triggers
select exceptions). See the “test_abm.c” example code.
MCX_IOC_GETEVENTS reads a mask of the events which happened since last use of this
ioctl code. Also, clears the pending events, so that a future call to
select() will wait for a new event.
02-oct-2008
Linux driver manual for MCXPCI boards
DTUS046 rev A7
Page 12 of 15
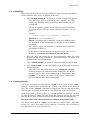
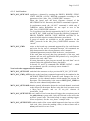
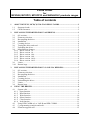
4.2 Using HDLC/ABM (a.k.a. LAP-B) and HDLC/NRM
You are urged to refer to the sample programs “test_abm.c” and “test_nrm.c”.
To use this mode, you must first set up the port with an ioctl using the
MCX_IOC_SETCONF code.
You should set MCX_IOC_SETEVENTS in order to detect link state changes
in a select() without a busy-wait.
You can check the current link state or change
MCX_IOC_CMD_AUTO ioctl using the PRCTL command.
it
with
a
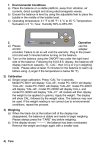
Driver states
OFF
128
UP
DOWN
COMPLETE
UP FAIL
DOWN
GO-UP
132
REMOTE
DISC/FRMR
GO_DN
134
LINK
ERROR
UP SUCCESS
DOWN
ON
129
Software generated transitions
Board generated transitions
There are four states in the driver: MCX_LINK_OFF, MCX_LINK_ON,
MCX_LINK_GO_UP, MCX_LINK_GO_DN. The state changes can result
from a user program action (calling PRCTL) or from a card or remote action
(link error detection, close by remote).
02-oct-2008
Linux driver manual for MCXPCI boards
DTUS046 rev A7
Page 13 of 15
New state
Triggered by
MCX_LINK_OFF
• MCX_IOC_SETCONF switching to a stateful protocol
• MCX_IOC_CMD_AUTO with PRCTL HDLCLNKDN command
(if the disconnection occurs after the command has finished)
• State interrupt, failure of an attempted connection by PRCTL
HDLCLNKUP
• State interrupt, disconnection following a fatal transmission error
• State interrupt, successful disconnection request by PRCTL
HDLCLNKDN
(down, disconnected)
MCX_LINK_GO_UP
• MCX_IOC_CMD_AUTO with PRCTL HDLCLNKUP command
(connection in progress) • State interrupt, temporary disruption following a recoverable error
MCX_LINK_ON
(up, connected)
MCX_LINK_GO_DN
• MCX_IOC_CMD_AUTO with PRCTL HDLCLNKUP command
(if the connection occurs before the end of the command)
• State interrupt, reception of a request or acknowledgement of a
connection
• MCX_IOC_CMD_AUTO with PRCTL HDLCLNKDN command
(break in progress)
Effect of state changes
No action is taken when the state change is caused by the application. The table below
summarizes the action taken when a state change is interrupted.
New state
MCX_LINK_OFF
Action
MCX_IT6_EVLINK signaled to select() if specified by an earlier
MCX_IOC_SETEVENTS ioctl.
Any further read() will return 0 characters
Any write() will return early with an incomplete byte count.
MCX_LINK_ON
02-oct-2008
MCX_IT6_EVLINK signalled if specified by an earlier
MCX_IOC_SETEVENTS ioctl.
Linux driver manual for MCXPCI boards
DTUS046 rev A7
Page 14 of 15
4.3 C programming examples and tools
All programs described below are available from the distribution media. To compile an
example program “XXX.c” type “make XXX” (without the .c extension).
initall
Initialize one or more channels in asynchronous, bisync or HDLC modes.
mcxdbg
For those writing their own firmware, this sets up a debugging port.
Usage: mcxdbg /dev/config-port debug-channel
rtx
Send frame and loop on receive.
relrp
Return board information, see the RELRP command in the firmware user’s
manual for more information.
Usage:
relrp /dev/mcxBBSS-CC
/dev/mcxBBSS-CC is the port number CC of the board in PCI bus BB slot SS.
rstat
Return information about communication channels; see the RSTAT command
in the firmware user’s manual for more information.
rsmde
Set the electrical interface of a selected channel to whatever.
Usage:
rsmde /dev/mcxBBSS-CC number
where number is 0 for RS232, 1 for RS422, and so on. See the RSMDE
command in the firmware user’s manual for more information.
testloop
(Kernel 2.6 only): multithreading send frame and loop on receive, displays
channel receive throughput, similar to the Windows version of testloop.
test_abm
test_nrm
(Kernel 2.6 only): a small app that opens a MCXPCI port, sets it to
HDLC/ABM (resp. NRM) and RS422, requests the establishment of the link,
then waits for input from the standard input or the port. Data from the port is
displayed, data from the standard input is sent to the port.
Usage:
test_abm [options] /dev/mcxBBSS-CC RemoteAddress
test_nrm [options] /dev/mcxBBSS-CC LocalAddress
Where RemoteAddress is either 1 or 3. Using address 3 will make test_abm
issue a passive connection call (establish a server), while using address 1 will
issue an active connection call (establish a client). In NRM mode LocalAddress
can be anything; use the proposed commands to listen, call the remote or
disconnect.
You may use it by connecting together two MCXPCI ports with a crossed (data
and clocks) RS422 cable, and running it twice, one in passive link mode, one in
active link mode. In “test_abm” The link mode is deduced from the address
value (1 is active, 3 is passive).
Options can be –2 (set to RS232), –4 (set to RS422), -b baudcode (the codes are
described in the VINIT command of the Multiprotocol documentation).
02-oct-2008
Linux driver manual for MCXPCI boards
DTUS046 rev A7
Page 15 of 15
4.4 Firmware upgrade tool
The program named ‘mcxflash’ in the ‘tools’ subdirectory can be used to change the firmware
installed in the card Flash EPROM memory.
Usage:
MCXFLASH “Device” “File.FLH”
“Device”
“ File.FLH”
This is the name of the generic device associated with the card,
namely /dev/MCXBBSS-00.
BBSS depends on the PCI bus and slot where the card was
installed.
This is the name of the FLH file containing the firmware.
Its name must end in “.FLH” and its size must be 512 kibytes.
Warnings :
1) The MCXFLASH program can only work when the card is running the so-named “Basic
Firmware, but not when it is running the “Multiprotocol Firmware”. To achieve this, the
driver must be installed in RUN01 mode, using the “runmode=1” option in insmod/modprobe.
Example:
insmod mcxpci.ko runmode=1
2) MCXFLASH MUST NOT be interrupted in any way (even due to a power supply
breakdown) since the card might not be able to restart.
3) Flashing a wrong firmware may render the card unusable. Always check the FLH file
before trying to load it with MCXFLASH.
Four-steps guide to MCXFLASH
1. Unload the driver if needed:
root# rmmod mcxpci
2. Restart the driver in run01 mode:
root# modprobe mcxpci runmode=1
3. Run the MCXFLASH program:
root# mcxflash /dev/mcxBBSS-00 file.flh
4. Shutdown and restart the computer:
root# reboot
The new firmware is now ready to use.
02-oct-2008
Linux driver manual for MCXPCI boards
DTUS046 rev A7