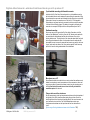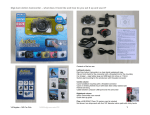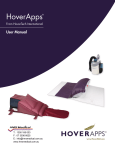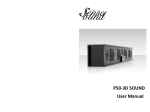
1
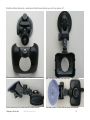
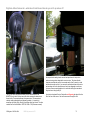
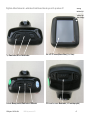
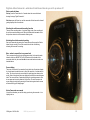
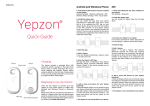
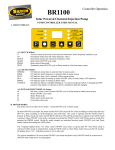
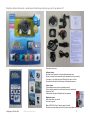
Digi-Cam Action Camcorder – what does it look like and how do you set it up and use it?
Contents of the box are:
Lefthand column
Digi-Cam Action Camcorder in a clear plastic waterproof case
Clip-on front shield for the camcorder with a threaded link for the mounting
Car charger – cigar lighter plug and USB lead (44 inches or 112cm)
Suction pad mounting for the windscreen with threaded connector
Centre column
Cycle handlebar mounting with a threaded connector
Cycle or climbing helmet mount with black foam sticky backed pad
Helmet belt fixing
Cable between computer USB point and the camcorder
Righthand column
Action Camcorder user manual
Quick start up guide
Plus a 4GB SDHC Class 10 memory card is included
Not shown: two strips each with four 3/8” diameter velcro pads with sticky backs
V8 Register – MG Car Club
140926-digi-cam-note-VS1
1
Digi-Cam Action Camcorder – what does it look like and how do you set it up and use it?
Clip-on front shield for the camcorder with a threaded link for the mounting
Back of the front shield where camcorder clips in – four side clips
Suction pad mounting for the windscreen with threaded connector
Camcorder located in the front shield with power lead connected
V8 Register – MG Car Club
140926-digi-cam-note-VS1
2
Digi-Cam Action Camcorder – what does it look like and how do you set it up and use it?
Suction pad can be easily placed, removed and repositioned to help find the
optimum viewing position alongside the rear view mirror. They also allow the
complete camcorder and mount to be removed easily, either for security or to be
transferred to another vehicle. If you remove the camcorder but leave the suction
pad mounting unit fixed to the windscreen, then it does telegraph to car thieves
you have a screen mounted gadget so it is worth either locking the camcorder in
the glove box or taking it with you.
The Digi-Cam on the suction pad mounting fixed to the windscreen of an
MGBGTV8 just to the left of rear view mirror which minimises the obstruction to
forward vision. The power lead drops to the power socket. This camcorder is
relatively small compared with many alternative models – it’s a small unit
measuring only 68mm (W) by 46mm (H) and 28mm thick front to back. The video
resolution on the Vehicle Mode is 720P VGA 1280 x 720 (30 frames a second).
V8 Register – MG Car Club
140926-digi-cam-note-VS1
A protective clear plastic film rip off strip with a red finger tag has been left on the
left of the face of the screen – the touch screen works through the film!
3
Digi-Cam Action Camcorder – what does it look like and how do you set it up and use it?
Working
indicator light
Indicator light
when charging
Top: Power button, MIC and Shutter button
Back: LCD TFT screen (40mm x 30mm). (Front: Lens)
Underside: Memory card slot, Reset hole and USB socket
RHS viewed from screen: Mode switch. (LHS: wrist strap eyelet)
V8 Register – MG Car Club
140926-digi-cam-note-VS1
4
Digi-Cam Action Camcorder – what does it look like and how do you set it up and use it?
Start up and shut down
Start up: press the Power button for 3 seconds when the screen will activate
showing the image “Digital Camcorder”.
Shut down: press the Power key and the camcorder will shut down with a farewell
greeting displayed for a few moments.
Selecting the vehicle mounted recording function
There are three recording modes – the picture taking mode, video recording and
the vehicle mounted recording mode. Sliding the Mode switch downwards to the
third position selects the vehicle mounted recording mode.
Activating the vehicle mounted recording
Start up the camcorder by pressing the Power button and then press the Shutter
button to begin recording. You will see a small red solid red circle flashing
indicating the camcorder is recording.
Note – when to connect the in-car power lead
The in-car power lead from the cigar lighter/power socket (in the central console
below the radio in an MGBGTV8) to the USB socket on the underside of the
camcorder should only be connected after the camcorder has been turned on as
described above.
Screen display
The screen on the back of the camcorder (facing the driver) will maintain a display
for a limited period to enable the user to set up the camcorder – the date and time
of day. The screen has a touch-screen feature for selecting options shown on the
screen. After a limited period the screen display will end and the screen will appear
blank. The screen will turn off automatically during the recording process in order
to save power and to avoid a distraction for the driver. The user can restore the
screen display by simply briefly pressing the Power button again when the screen
will start and bring up the display again.
Action Camcorder user manual
It has all the information you need for setting up and using the camcorder – it is a
helpful guide too.
V8 Register – MG Car Club
140926-digi-cam-note-VS1
5
Digi-Cam Action Camcorder – what does it look like and how do you set it up and use it?
Cycle handlebar mounting with threaded connector
Included in the Digi-Cam Action Camcorder pack is a cycle handlebar mounting
with a threaded connector so the waterproof case enclosing the camcorder. Using
this combination the camcorder can be attached to either a bicycle or a motor bike.
When used in this way the camcorder runs off the built in 3.7V rechargeable
lithium battery as no power lead can be connected, so before using the camcorder
it will need to be sufficiently charged. The battery is charged by connecting the
camcorder to a computer USB point with the cable provided as part of the kit.
Dashboard mounting
Some users may prefer to mount their Digi-Cam Action Camcorder on the flat
surface of their dashboard. To do this you use the 3/8” diameter velcro pads with
one set attached to the dashboard and the other to the base of the cycle or
climbing helmet mount. The sticky backs of the velcro pads attach quite firmly and
the locking action between the faces of velcro pads secures the camcorder but
also enable the user to remove the camcorder and mount very easily by the clever
“ripping” action as the two faces of the Velcro pads are parted. Some users may
prefer not to have the sticky pads attached to their dashboard.
Microphone on or off?
Some alternative dash cam models do have a set up routine that enables users to
disable the microphone to avoid conversations or driver comments on other road
users to be recorded. At present the software is set to have the mic always on so
the Digi-Cam Action Camcorder does not have the facility to disable the
camcorder speaker. So take care!
Fixing a dash cam to the windscreen
See our separate note on the legal requirements and also note the latest update of
the Highway Code (2014) does warn about putting things in front of the driver
which might obscure their view, largely brought about by the recent increase in the
use of satnav devices in vehicles - the Vehicle Maintenance section says
"windscreens and windows must be kept clean and free from obstructions to
vision".
[link to a copy of the legal windscreen issues on the V8 website - TBD]
V8 Register – MG Car Club
140926-digi-cam-note-VS1
6