1
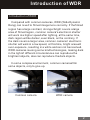
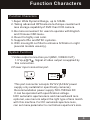
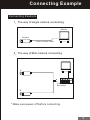
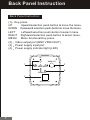
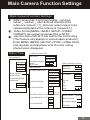
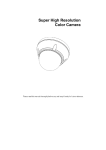
DPS Super Wide Dynamic Camera
User Manual
Super WDR High Resolution Color Camera
Super WDR High Resolution Day&Night Camera
Content
Content
Safe Warnings
Notice
Introduction of WDR
Function Character
System Functions
Connecting Example
Back Panel Instruction
Main Camera Function Settings
Menu Tree
Basic Operations
Menu Instruction
Production Specifications
Remove Common Troubles
1
1
2
4
4
6
7
8
8
10
10
14
15
Warning
To prevent fire or shock hazard,do not expose
the unit to rain or moisture.
The symbol is intended to alert the user to the
presence of important operating and
maintenance(servicing)instructions in the
literature accompanying the appliance.
The symbol is intended to alert the user to
the presence of uninsulated"dangerous
voltage"within the product's enclosure that
may be of sufficient magnitude to result in
a risk of electric shock to persons.
!
CAUTION
RISKOF ELECTRIC
SHOCKDO NOTOPEN
!
CAUTION To reduce the risk of electric
shock, do not remove cover or back no
user serviceable parts inside refer
servicing to qualified service personnel
CAUTION:
To prevent electric shocks
and risk of fire hazards .
Do not use other than
specified power source.
NOTICE
1.To reduce the risk of electric shock, do not remove cover.
2.No user servicable part inside. Refer servicing to qualified
service personal.
3.This device should only be operated with the power supply
included with the kit or provided as an accessory.
1
Introduction of WDR
Introduction of WDR
Compared with common cameras, WDR (Wide Dynamic
Rang) can revert to filmed image more correctly. If the filmed
region has a large contrast, stronger bright covers a large
area of filmed region, common camera's electronic shutter
will work in a higher speed after lighting, at the same time,
dark region will be darker, even black, on the contrary, If
the dark covers a larger area, common cameras' electronic
shutter will work in a low speed, at this time, bright area will
over-exposure, resulting in a white and can not be resolved.
WDR cameras is using some kind technologies, making dark
in the light of different circumstances can reproduce the
brightest objects, also can reproduce the dark objects.
In some complex environment, common cameras film
some objects, only to give up.
Common camera
WDR camera
2
Introduction of WDR
Common camera
BLC ON
Common camera
BLC OFF
WDR CAMERA
Above features of WDR camera can be more suitable for
the using of some environment has large brightness
contrast, such as ATM automated teller machine, the
entrance of the building, wharf, etc.
3
Function Characters
Function Characters
1.Super Wide Dynamic Range, up to 120dB.
2. Taking advanced DPS camera technique needs much
less storage capability of DVR than CCD camera.
3. Be more convenient for users to operate with English
and Chinese OSD menu.
4. Revert to highly real color.
5. Supports PAL and NTSC systems.
6. With moving IR cut filter to enhance S/N ratio in night
(several models use only).
System Function
1.Video output connection port (BNC, VIDEO OUT)
1.0 Vp-p@75 , Signal of video output is supplied by
this connection.
2.Power input connection port.
DC 12V
AC 24V
DC 12V
This port connector accepts DV12V (AC24V power
supply only suitable for specifically cameras)
Recommendation power supply: 500-1500mA DC
It can be operated with specification voltage.
3.DC automatic aperture lens and manual board lens
optional, use menu to adjust the right type of lens match
with this machine. For DC automatic aperture lens,
can set menu parameter to control lens aperture's size.
4
System Function
4. Power supply indicator light (LED)
When the power supplies normally, power indicator
light will light up.
5. Automatic IRIS lens interface (AUTO IRIS)
1
3
Plug
2
PIN
6
AUTO IRIS lens wire
4
If the cable is
thick or the plug
cover does not fit
properly cut this
rib away
Lens plug
SIGNAL
DAMPDAMP+
DRIVE+
DRIVE+
Assisted Focus Knob
To a certain ratio, if using C or CS lens can not focus,
please adjust this knob.
Assisted Focus Knob
Auto Iris Interface
Lens (FTP Client)
Knob Fixing Screw
7
5
Dust Guard
Unload the dust guard before installing lens.
Do not bring or leave the camera after unloading the
dust guard.
Connecting Example
Connecting Example
1
The way of single camera connecting.
Monitor
Camera
Video Coaxial Cable
2
The way of Muli-camera connecting.
A
Video Sequential
Switching
B
* Make sure power off before comecting.
6
Back Panel Instruction
Back Panel Instruction
(1) Key-press
UP
Upward selection push-button to move the menu.
DOWN Downward selection push-button to move the menu.
LEFT
Leftward selection push-button to select menu.
RIGHT Rightward selection push-button to select menu.
MENU
Menu functional Key-press.
(2) Video output port (BNC VIDEO OUT)
(3) Power supply input port
(4) Power supply indicator light (LED)
UP
VIDEO OUT
1
LEFT MENU RIGHT
DOWN LED
3
AC24V/DC12V
7
2
4
Main Camera Function Settings
Main Camera Function Settings
: WDR camera has 4 optional models : common
indoor outdoor user-defined (Details of the
reference manual 1.1) ; Also can select region to be
optimized (Details of the reference manual 4.3).
Video format (MENU->BASIC SETUP->VIDEO
FORMAT), Set signal system as PAL or NTSC.
Use line lock of AC 24 V can control the color rolling
(This feature only applies to some models products).
Enter MENU (MENU->SETUP->SYNC->LINE LOCK),
and regulate vertical phase until the color rolling
phenomenon disappear.
Menu Tree
WDR CAMERA
1.2 EXPOSURE SETUP
AE PREFs
HIGHLIGHTS
SHADOWS
WDR MODE
NORMAL
INDOOR
OUTDOOR
CUSTOM
DYNAMIC RANGE
BIAS
AGC LIMIT
LOWLIMIT
IMAGE ADJUST
HIGHLIMIT
AWB
2.1WHITE BALANCE
ATW Xtnd
IMAGE ADJUST
ATW Desat
BASIC SETUP
MANUAL WHITE BALANCE
ADJ MODE
KELVIN
R/B
MANUAL
ADVANCED SETUP
LANGUAGE
WHITE BALANCE LIMITS
2.2RESOLUTION
ENGLISH
520TVL
540TVL
KELVIN
R/B
RED
CHINESE
2.3D/N CONTROL
EXIT MENU
DAY
NIGHT
BLUE
AUTO
2.4VIDEO LEVEL 80-150(INCREASING 5)
2.5HORIZONTAL FLIP
ON
INPUT DELAY 1-20SEC
IN NIGHT GAIN
OFF
OUT NIGHT GAIN
2.6COLOR BAR
ON
OFF
D/N LIMIT
8
Menu Tree
BASIC SETUP
3.1VIDEO STANDARD
PAL
NTSC
3.2LENS SELECT
AI THRESH
AI THRESH
DC
DC GAIN
MANUAL
DC GAIN
WDR CAMERA
WDR MODE
LOW
3.3AGC
AI THRESH
NORMAL
MEDIUM
INDOOR
HIGH
OUTDOOR
CUSTOM
IMAGE ADJUST
3.4SHUTTER LIMIT OFF/X2/X4/X8/X16/X32
LINELOCK
3.5SYNC
BASIC SETUP
ADVANCED SETUP
V PHASE
INTERNAL
LINELOCK
3.6.ID SETUP
CAMERA ID SETUP
LANGUAGE
ENGLISH
CHINESE
CAMERA ID:
WDR CAMERA
ID POSITION
UP-LEFT/UP-CENTER/UP-RIGHT
/DOWN-LEFT/DOWN-RIGHT
ON
OFF
ID DISPLAY
EXIT MENU
ADVANCED SETUP
SHARPNESS
4.1SHARPNESS
DETAIL BOOST
ON
OFF
NOISE REDUCTION
ON
OFF
SHARPNESS
APERTURE
LINEARITY
4.2GAMMA
GAMMA MODE
4.3BACKLIGHT MODE
NORMAL
ZONE SET
OUT
MANUAL
OFF
MANUAL
BLC ZONE ADJUST
4.4RESTORE FACTORY SETTINGS
RESTORE FACTORY SETTINGS
NO
SAVE/EXIT
5.1
9
SAVE
EXIT
RESET
YES
Basic Operation
Basic Operation
MENU tree totally include : MENU UP DOWN LEFT
RIGHT five key-press, Hold MENU key three seconds to
enter MENU SETUP. The MENU with " " express having
submenu. The MENU with "." express can be operated but
no submenu, Press EXIT key to exit MENU, Hold MENU
key three seconds to exit menu.
Menu Instruction
1.1 WDR MODE
Normal: To obtain the high quality image;Indoor: Use
for office or similar environments; Outdoor: Use for
bright sunshine environments; Custom.
1.2 EXPOSURE SETUP
Exposure AE PREFs:Select the region to optimize image;
Dynamzc Range:Select the maximum value of dynamic;
BIAS:Adjust the image brightness; AGC Limit: Adjust the
multiple of AGC, make sure the image brightness and
noise Size in the low illumination.
1.3 Language
Chinese and English menu switch.
2.1 WHITE BALANCE
AWB: In accordance with different color temperature
can be automatic white balance mode of action (ATW);
White Balance limit: When the color temperature
changes in a limited range, and then can determine their
maximum and minimum by white balance ; Auto white
balance: Use (AWB) when the color temperature has a
larger range. Manual white balance: in complex
10
Menu Instruction
environment, when the effects of using ATW or AWB are
not well, choose manual white balance to select an
appropriate mode. When the color temperature
environment is stable, and then can select the color
temperature mode to adjust color temperature value.
If the overall environment is fixed-tone, red and blue
patterns can be selected and adjust the value of red
and blue color temperature excursion.
2.2 RESOLUTION
520 TV-lines and 540 TV-lines can be switched,
520 TV-line is soft, low-resolution, 540 TV-lines 'edge
has slight sawtooth, high-resolution.
2.3 D/N CONTROL
Day: colorful all the time. Night: Black & White all the
time: Auto: Colorful and Black & White can be switched.
Customizable delay switch, switch mode gain, and the
image has the largest gain at night.
2.4 VIDEO LEVEL
Video Level can be setting; the compensation of longdistance signal transmission attenuation
2.5 HORIZONTAL FLIP
Change the lens image right or left position.
2.6 COLOR BAR
Be able to monitor the color calibration, so that the mon
itor shows the more true color.
3.1 VIDEO STANDARD
P Format, N Format two kinds optional.
3.2 LENS SELECT
DC automatic aperture lens and manual camera lens
optional, when use DC AUTO aperture lens, be able to
11
Menu instruction
enter DC lens adjustment to adjust Auto aperture gain .
and adjust AUTO gain to start level control the camera
correct action.
3.3 AGC
AGC can be defined as low, medium, and high.
3.4 SHUTTER LIMIT
Shutter limit function also is used in low-light; improve
the image brightness through sacrificing the speed of
image response in low-light environment. The higher
multiples, brighter the image is, the image response
time is longer.
3.5 SYNC
Select SYNC when use DV 12 V, if use AC 24V, then can
use function line locking, through level phase adjustment
to inhibit the image 's color rolling.
3.6 ID SETUP
Press MENU key to move the menu rightward, Press
LEFT RIGHT to switch letters, as to get needful title,
and be capable of setting whether display title and the
display position.
4.1 SHARPNESS
Through sharpness adjustment to adjust the image
noise , edge profile, resolution etc.
4.2 GAMMA
Set gray level, the typical value is Y=0.45
4.3 BACKLIGHT MODE
If the needful subject became dark as a result of bright
background, this feature can be strong backlight
compensation. The pane express this region need
backlight compensation. Press MENU key to switch
blocks model adjustment: white pane can move region,
12
Menu Instruction
green pane can enlarge region, red pane to narrow
region, Hold MENU key three seconds to return last
menu.
4.4 RESTORE FACTORY SETTINGS
Restore factory default value.
5.1 SAVE /EXIT
Save: Save users' settings, and exit MENU; EXTE: Exit
Menu without saved; RESET: Reset camera, restore last
saved parameter.
13
Product Specifications
Product Specifications
Image Sensor
1/3" Pixim Orca,DPS
Signal System
PAL/NTSC Compatible
Effective Pixels
PAL:720 540
NTSC:720 540
Resolution
Color: 540 TV lines Black&White: 570 TV lines (level)
Min.illumination
0.5 Lux F1.2;0.08 Lux/F1.2 (32X slow shutter)
S/N Ratio
> 48 dB
Dynamic Range
101 dB (Typical Value), 120 dB (Max Value)
Control Mode
OSD Menu Control Mode
White Balance
Auto tracking/ Auto / Manual White Balance
Color Temperature Range
Auto 2000 K to 11.000 K
Auto Gain
Low/ Normal / High
Color&Black Switching Yes (With moving IR cut filter)
Video Out-put
Gamma Correction
No (Without moving IR cut filter)
1.0Vp-p (Video Range ValueAdjustment)@75
Adjustment
Aperture Control
DC Drive
Lens Interface
C/CS Type
Synchronization Mode
INT /Line locking
INT
Power Supply
AC 24 V/ DC 12 V
DC 12 V
Operating Temperature
-10 ~+50
Storage Temperature
-30 ~+60
All specification subject to change without notice.
14
Troubles
²Remove
ú¹
Ææ
·Common
¸ñ
Remove Common Troubles
Number
1
Trouble
Causation
Remove ways
No power supply
Plug power
Power supply not well
Chang power supply
No picture
2
No picture
Video line is not
connected
Connect video line
3
Unclear picture
Check the lens or image
sensor whether be
polluted
Use soft cloth to clear
4
Abnormal picture
color
Check image menu 's
white balance settings
whether is correct
Reset white balance
5
Monitor contrast
Adjust monitor contrast
Image contrast too imbalance
weak
Camera is placed in
Change the
strong bright background position of camera
All specification subject to change without notice.
15