1
DA-683 Linux User’s Manual
First Edition, January 2011
www.moxa.com/product
© 2011 Moxa Inc. All rights reserved.
Reproduction without permission is prohibited.
DA-683 Linux User’s Manual
The software described in this manual is furnished under a license agreement and may be used only in accordance with
the terms of that agreement.
Copyright Notice
Copyright ©2011 Moxa Inc.
All rights reserved.
Reproduction without permission is prohibited.
Trademarks
The MOXA logo is a registered trademark of Moxa Inc.
All other trademarks or registered marks in this manual belong to their respective manufacturers.
Disclaimer
Information in this document is subject to change without notice and does not represent a commitment on the part of
Moxa.
Moxa provides this document as is, without warranty of any kind, either expressed or implied, including, but not limited
to, its particular purpose. Moxa reserves the right to make improvements and/or changes to this manual, or to the
products and/or the programs described in this manual, at any time.
Information provided in this manual is intended to be accurate and reliable. However, Moxa assumes no responsibility for
its use, or for any infringements on the rights of third parties that may result from its use.
This product might include unintentional technical or typographical errors. Changes are periodically made to the
information herein to correct such errors, and these changes are incorporated into new editions of the publication.
Technical Support Contact Information
www.moxa.com/support
Moxa Americas
Moxa China (Shanghai office)
Toll-free: 1-888-669-2872
Toll-free: 800-820-5036
Tel:
+1-714-528-6777
Tel:
+86-21-5258-9955
Fax:
+1-714-528-6778
Fax:
+86-21-5258-5505
Moxa Europe
Moxa Asia-Pacific
Tel:
+49-89-3 70 03 99-0
Tel:
+886-2-8919-1230
Fax:
+49-89-3 70 03 99-99
Fax:
+886-2-8919-1231
Table of Contents
1. Introduction...................................................................................................................................... 1-1 Overview ...........................................................................................................................................1-2 Software Specifications .......................................................................................................................1-2 Software Components .........................................................................................................................1-3 2. Software Configuration ..................................................................................................................... 2-1 The Read-only file system....................................................................................................................2-2 Starting from a VGA Console ................................................................................................................2-2 Connecting from a Telnet Console.........................................................................................................2-3 Connecting from an SSH Console..........................................................................................................2-4 Windows Users ...........................................................................................................................2-4 Linux Users ................................................................................................................................2-4 Adjusting the System Time ..................................................................................................................2-4 Setting the Time Manually ............................................................................................................2-5 NTP Client ..................................................................................................................................2-5 Updating the Time Automatically ...................................................................................................2-6 PTP Slave ..........................................................................................................................................2-6 Enabling and Disabling Daemons ..........................................................................................................2-7 Setting the Run-Level........................................................................................................................ 2-10 Cron—Daemon for Executing Scheduled Commands.............................................................................. 2-10 Inserting a USB Storage Device into the Computer ............................................................................... 2-11 Inserting a Compact Flash card .......................................................................................................... 2-12 Checking the Linux Version ................................................................................................................ 2-12 APT—Installing and Removing Packages .............................................................................................. 2-12 Device Suspend................................................................................................................................ 2-14 Wake on LAN ................................................................................................................................... 2-15 3. Managing Communications ............................................................................................................... 3-1 Detecting Network Interfaces ...............................................................................................................3-2 Changing the Network Settings ............................................................................................................3-2 Changing the “interfaces” Configuration File ...................................................................................3-2 Adjusting IP Addresses with “ifconfig” ............................................................................................3-3 Telnet/FTP Server ...............................................................................................................................3-3 DNS Client .........................................................................................................................................3-4 Apache Web Server ............................................................................................................................3-6 Default Homepage.......................................................................................................................3-6 Disabling the CGI Function ...........................................................................................................3-6 Saving Web Pages to a USB Storage Device....................................................................................3-7 IPTABLES ..........................................................................................................................................3-9 IPTABLES Hierarchy ................................................................................................................... 3-10 IPTABLES Modules ..................................................................................................................... 3-10 Observe and Erase Chain Rules ................................................................................................... 3-11 Define Policy for Chain Rules....................................................................................................... 3-12 Append or Delete Rules .............................................................................................................. 3-12 NAT (Network Address Translation)..................................................................................................... 3-13 NAT Example ............................................................................................................................ 3-13 Enabling NAT at Bootup.............................................................................................................. 3-14 PPP (Point to Point Protocol)............................................................................................................... 3-14 Connecting to a PPP Server over a Simple Dial-up Connection......................................................... 3-15 Connecting to a PPP Server over a Hard-wired Link........................................................................ 3-16 Checking the Connection ............................................................................................................ 3-16 Setting up a Machine for Incoming PPP Connections ...................................................................... 3-17 PPPoE.............................................................................................................................................. 3-18 NFS (Network File System) Client ....................................................................................................... 3-21 SNMP (Simple Network Management Protocol) ..................................................................................... 3-21 OpenVPN ......................................................................................................................................... 3-22 Ethernet Bridging for Private Networks on Different Subnets........................................................... 3-22 Ethernet Bridging for Private Networks on the Same Subnet ........................................................... 3-25 Routed IP ................................................................................................................................. 3-26 4. Programmer Guide ............................................................................................................................ 4-1 RTC (Real Time Clock).........................................................................................................................4-2 UART ................................................................................................................................................4-2 Digital I/O .........................................................................................................................................4-2 WDT (Watch Dog Timer)......................................................................................................................4-4 5. System Recovery............................................................................................................................... 5-1 Recovery Environment ........................................................................................................................5-2 Recovery Procedure ............................................................................................................................5-2 A. Software Components ....................................................................................................................... A-1 B. IEEE 1588 Configuration ................................................................................................................... B-1 Getting Started ..................................................................................................................................B-2 Configuration the PTP Settings .............................................................................................................B-2 Wizard Settings...........................................................................................................................B-3 Basic Settings .............................................................................................................................B-5 Advanced Settings.......................................................................................................................B-7 Monitoring ................................................................................................................................ B-12 1
1.
Introduction
Thank you for purchasing a Moxa DA-683 x86 ready-to-run embedded computer. This manual introduces the
software configuration and management of the DA-683-LX, which runs the Linux operating system. For
hardware installation, connector interfaces, setup, and upgrading the BIOS, please refer to the “DA-683
Hardware User’s Manual.”
Linux is an open, scalable operating system that allows you to build a wide range of innovative, small footprint
devices. Software written for desktop PCs can be easily ported to the Linux computer with a GNU cross compiler
and a minimum of source code modifications. A typical Linux-based device is designed for a specific use, and
is often not connected to other computers, or a number of such devices connect to a centralized, front-end host.
Examples include enterprise tools such as industrial controllers, communications hubs, point-of-sale terminals,
and display devices, which include HMIs, advertisement appliances, and interactive panels.
The following topics are covered in this chapter:
Overview
Software Specifications
Software Components
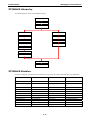
Product Name
Introduction
Overview
DA-683 embedded computers are based on the Intel Atom D510 x86 processor and feature two serial ports,
dual 10/100 or 10/100/1000 Mbps LAN ports, four USB 2.0 hosts, and CF socket. The DA-683 series offers both
VGA and DVI-I outputs, making it exceptionally well suited for industrial applications such as SCADA and
factory automation.
The DA-683's two RS-232 ports make it ideal for connecting a wide range of serial devices, and the dual
10/100/1000 Mbps Ethernet ports offer a reliable solution for network redundancy, which taken together
promise continuous data communication and management operations. For added convenience, the DA-683
comes with 4 DIs and 4 DOs for connecting digital input/output devices. In addition, the SD, SATA HDD, and
USB ports provide DA-683 computers with data buffering and storage expansion, which provide the necessary
reliability for industrial applications.
Pre-installed with Linux, the DA-683 Series provides programmers with a friendly environment for developing
sophisticated, bug-free application software at a lower cost.
The DA-683's DPP-T models support a wide operating temperature range of -40 to 70°C for use in harsh
industrial environments.
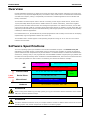
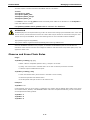
Software Specifications
The Linux operating system pre-installed on the DA-683 embedded computer is the Debian Lenny 5.0
distribution. The Debian project is a worldwide group of volunteers who endeavor to produce an operating
system distribution that composed entirely of free software. The Debian GNU/Linux follows the standard Linux
architecture, making it easy to use programs that meet the POSIX standard. Program porting is possible with
the GNU Tool Chain provided by Moxa. In addition to Standard POSIX APIs, device drivers for Moxa UART and
other special peripherals are also included. The following is a software architecture example:
AP
User Applications
API
Protocol Stack
Daemon (Apache, Telnet, FTPD)
Application Interface (POSIX, Socket, Secure Socket)
TCP, IP, UDP, CMP, ARP, HTTP, SNMP, SMTP
File
System
Linux
Kernel
Device Driver
Micro Kernel
Hardware
CF, USB, UART, RTC, VGA
Memory Control, Schedule, Process
RS-232, Ethernet, CompactFlash, SATA, USB
ATTENTION
Refer to http://www.debian.org/ and http://www.gnu.org/ for information and documentation of the Debian
GNU/Linux and free software concept.
ATTENTION
The above software architecture is only an example. Different models or different build revisions of the Linux
operating system may include components not shown in the above graphic.
1-2
Product Name
Introduction
Software Components
The DA-683-LX pre-installed Debian Lenny 5.0 Linux distribution. For the software components, see Appendix
A.
1-3
2
2.
Software Configuration
In this chapter, we explain how to operate a DA-683-LX computer directly or your desktop. There are three
ways to connect to the DA-683-LX computer: through VGA monitor, by using Telnet over the network, or by
using an SSH console from a Windows or Linux machine. This chapter describes basic Linux operating system
configurations. The advanced network management and configuration will be described in the next chapter
“Managing Communications.”
The following topics are covered in this chapter:
The Read-only file system
Starting from a VGA Console
Connecting from a Telnet Console
Connecting from an SSH Console
Windows Users
Linux Users
Adjusting the System Time
Setting the Time Manually
NTP Client
Updating the Time Automatically
PTP Slave
Enabling and Disabling Daemons
Setting the Run-Level
Cron—Daemon for Executing Scheduled Commands
Inserting a USB Storage Device into the Computer
Inserting a Compact Flash card
Checking the Linux Version
APT—Installing and Removing Packages
Device Suspend
Wake on LAN
Product Name
Software Configuration
The Read-only file system
The root file system(/) in Moxa’s embedded system is mounted as read-only for prevent unexpected crash. If
you want to make it writable temporarily, please following the steps:
1. make the root file system (/) writable
Moxa:~# mount -o remount,rw /
2. perform your operations, such as apt-get and disk-access
3. umount it as read-only
Moxa:~# umount /
Starting from a VGA Console
Connect the display monitor to the DA-683-LX VGA connector, and then power it up by connecting it to the
power adaptor. It takes about 30 to 60 seconds for the system to boot up. Once the system is ready, a login
screen will appear on your monitor.
To log in, type the login name and password as requested. The default values are both root.
Login: root
Password: root
Moxa login: root
Password:
Last login: Wed Dec 22 19:02:16 2010 from 192.168.3.120
####
####
###
####
######
###
####### ######
###
####
####
###
###
###
###
###
##
###
####
##
##
###
####
# ##
###
###
# ##
###
##
## ###
## ##
##
##
##
#
##
##
##
###
##
##
#
##
###
###
#####
###
##
###
##
###
##
###
##
##
##
###
######
#
##
##
######
##
##
####
### ##
## ##
####
##
#
####
##
##
#
########
#
###
##
###
#######
###
###
###
###
#
## ##
##
#
##
#
###
##
#
##
##
####### ###########
######
For further information check:
2-2
Product Name
Software Configuration
Connecting from a Telnet Console
The DA-683-LX computer comes with six Ethernet ports named LAN1 to LAN6. The default IP addresses and
netmasks of the network interfaces are as follows:
Default IP Address
Netmask
LAN 1
192.168.3.127
255.255.255.0
LAN 2
192.168.4.127
255.255.255.0
LAN 3
192.168.5.127
255.255.255.0
LAN 4
192.168.6.127
255.255.255.0
LAN 5
192.168.7.127
255.255.255.0
LAN 6
192.168.8.127
255.255.255.0
Before using the Telnet client, you should change the IP address of your development workstation so that the
network ports are on the same subnet as the IP address for the LAN port that you connect to. For example, if
you connect to LAN 1, you could set your PC’s IP address to 192.168.3.126, and the netmask to 255.255.255.0.
If you connect to LAN 2, you can set your PC’s IP address to 192.168.4.126, and the netmask to
255.255.255.0.
Use a crossover Ethernet cable to connect your development workstation directly to the target computer, or
use a straight-through Ethernet cable to connect the computer to a LAN hub or switch. Next, use a Telnet client
on your development workstation to connect to the target computer. After a connection has been established,
type the login name and password as requested to log on to the computer. The default values are both root.
Login: root
Password: root
2-3
Product Name
Software Configuration
Connecting from an SSH Console
The DA-683-LX computer supports an SSH Console to offer users with better security over the network
compared to Telnet.
Windows Users
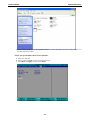
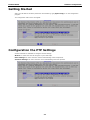
Click on the link http://www.chiark.greenend.org.uk/~sgtatham/putty/download.html to download PuTTY
(free software) to set up an SSH console for the DA-683-LX in a Windows environment. The following screen
shows an example of the configuration that is required.
Linux Users
From a Linux machine, use the ssh command to access the V2101-LX’s console utility via SSH.
#ssh 192.168.3.127
Select yes to open the connection.
[root@bee_notebook root]# ssh 192.168.3.127
The authenticity of host ‘192.168.3.127 (192.168.3.127)’ can’t be established.
RSA key fingerprint is 8b:ee:ff:84:41:25:fc:cd:2a:f2:92:8f:cb:1f:6b:2f.
Are you sure you want to continue connection (yes/no)? yes_
Adjusting the System Time
The DA-683-LX has two time settings. One is the system time, and the other is provided by an RTC (Real Time
Clock) built into the DA-683-LX’s hardware.
2-4
Product Name
Software Configuration
Setting the Time Manually
Use the date command to query the current system time or set a new system time. Use hwclock to query the
current RTC time or set a new RTC time.
Use the following command to set the system time.
# date MMDDhhmmYYYY
MM: Month
DD: Date
hhmm:
Hour and Minute
YYYY:
Year
Use the following command to write the current system time to the RTC.
# hwclock –w
MOXA:~# date
Wed Dec 16 03:34:46 CST 2009
MOXA:~# hwclock
Wed 16 Dec 2009 03:35:16 AM CST
-0.017600 seconds
MOXA:~# date 121616352009
Wed Dec 16 16:35:00 CST 2009
MOXA:~# hwclock –w
MOXA:~# date ; hwclock
Wed Dec 16 16:36:12 CST 2009
Wed 16 Dec 2009 03:38:13 AM CST -0.016751 seconds
NTP Client
The DA-683-LX has a built-in NTP (Network Time Protocol) client that is used to initialize a time request to a
remote NTP server. Use ntpdate to update the system time.
#ntpdate time.stdtime.gov.tw
#hwclock –w
Visit http://www.ntp.org for more information about NTP and NTP server addresses.
MOXA:~# date ; hwclock
Wed Dec 16 16:36:12 CST 2009
Wed 16 Dec 2009 03:38:13 AM CST -0.016751 seconds
MOXA:~#
MOXA:~# ntpdate time.stdtime.gov.tw
16 Dec 03:49:48 ntpdate[2510]: step time server 220.130.158.52 offset 155905087.9
84256 sec
MOXA:~#
MOXA:~# hwclock -w
MOXA:~# date ; hwclock
Wed Dec 16 03:51:07 CST 2009
Wed 16 Dec 2009 03:51:07 AM CST
-0.016771 seconds
MOXA:~#
2-5
Product Name
Software Configuration
ATTENTION
Before using the NTP client utility, check your IP address and network settings (gateway and DNS) to make
sure an Internet connection is available.
Updating the Time Automatically
This section describes how to use a shell script to update the time automatically.
Example shell script for updating the system time periodically
#!/bin/sh
ntpdate time.stdtime.gov.tw
# You can use the time server’s ip address or domain
# name directly. If you use domain name, you must
# enable the domain client on the system by updating
# /etc/resolv.conf file.
hwclock –w
sleep 100
# Updates every 100 seconds. The min. time is 100 seconds.
# Change 100 to a larger number to update RTC less often.
Save the shell script using any file name. For example, fixtime.
How to run the shell script automatically when the kernel boots up
Because the root file system is mounted in Read-only mode, we need to re-mount it using writable permission.
# mount -o remount,rw /dev/hda1 /
Copy the example shell script fixtime to directory /etc/init.d, and then use chmod 755 fixtime to change
the shell script mode.
# chmod 755 fixtime
Next, use vi editor to edit the file /etc/inittab.
# vi /etc/inittab
Add the following line to the bottom of the file:
ntp : 2345 : respawn : /etc/init.d/fixtime
After you finish writing or modifying the code, remember to execute “umount /” to change the root directory
back to Read-only mode.
# umount /
Use the command #init q to re-initialize the kernel.
# init q
PTP Slave
The DA-683-LX has a built-in PTP ( Precision Time Protocol) slave that is used to initialize a time request to a
remote PTP server. Use ptpv2d to update the system time.
# ptpv2d –g
2-6
Product Name
Software Configuration
The DA-683-LX comes with a GUI-based configuration tool for IEEE 1588v2 settings. Please refer to the
Appendix B for detailed configuration procedure.
Enabling and Disabling Daemons
The following daemons are enabled when the DA-683-LX boots up for the first time.
snmpd
SNMP Agent Daemon
telnetd
Telnet Server/Client Daemon
inetd
Internet Daemons
ftpd
FTP Server/Client Daemon
sshd
Secure Shell Server Daemon
httpd
Apache WWW Server Daemon
Type the command ps –ef to list all processes currently running.
2-7
Product Name
Software Configuration
Moxa:~# ps -ef
UID
PID
PPID
C STIME TTY
TIME CMD
root
1
0
0 00:02 ?
00:00:00 init [2]
root
2
0
0 00:02 ?
00:00:00 [kthreadd]
root
3
2
0 00:02 ?
00:00:00 [migration/0]
root
4
2
0 00:02 ?
00:00:00 [ksoftirqd/0]
root
5
2
0 00:02 ?
00:00:00 [watchdog/0]
root
6
2
0 00:02 ?
00:00:00 [migration/1]
root
7
2
0 00:02 ?
00:00:00 [ksoftirqd/1]
root
8
2
0 00:02 ?
00:00:00 [watchdog/1]
root
9
2
0 00:02 ?
00:00:00 [events/0]
root
10
2
0 00:02 ?
00:00:00 [events/1]
root
11
2
0 00:02 ?
00:00:00 [cpuset]
root
12
2
0 00:02 ?
00:00:00 [khelper]
root
13
2
0 00:02 ?
00:00:00 [netns]
root
14
2
0 00:02 ?
00:00:00 [async/mgr]
root
15
2
0 00:02 ?
00:00:00 [pm]
root
17
2
0 00:02 ?
00:00:00 [sync_supers]
root
18
2
0 00:02 ?
00:00:00 [bdi-default]
root
19
2
0 00:02 ?
00:00:00 [kintegrityd/0]
root
20
2
0 00:02 ?
00:00:00 [kintegrityd/1]
root
21
2
0 00:02 ?
00:00:00 [kblockd/0]
root
22
2
0 00:02 ?
00:00:00 [kblockd/1]
root
23
2
0 00:02 ?
00:00:00 [kacpid]
root
24
2
0 00:02 ?
00:00:00 [kacpi_notify]
root
25
2
0 00:02 ?
00:00:00 [kacpi_hotplug]
root
26
2
0 00:02 ?
00:00:00 [ata/0]
root
27
2
0 00:02 ?
00:00:00 [ata/1]
www-data
2707
2664
0 00:03 ?
00:00:00 /usr/sbin/apache2 -k start
www-data
2708
2664
0 00:03 ?
00:00:00 /usr/sbin/apache2 -k start
www-data
2709
2664
0 00:03 ?
00:00:00 /usr/sbin/apache2 -k start
www-data
2710
2664
0 00:03 ?
...
root
2720
2700
root
2724
root
2745
2536
1 00:21 ?
root
2747
2745
0 00:21 pts/0
2
0 00:15 tty1
0 00:15 ?
00:00:00 /usr/sbin/apache2 -k start
00:00:00 -bash
00:00:00 [flush-8:0]
00:00:00 sshd: root@pts/0
00:00:00 -bash
To run a private daemon, you can edit the file rc.local as follows:
Because the root file system is mounted in Read-only mode, you need to re-mount it with write permission.
MOXA:~# mount -o remount,rw
Type cd /etc/ to change directories.
MOXA:~# cd /etc/
Type vi rc.local to edit the configuration file with vi editor.
MOXA:/etc/# vi rc.local
Next, add the application daemon that you want to run. We use the example program tcps2-release, which
you can find in the CD to illustrate, and configure it to run in the background.
2-8
Product Name
Software Configuration
# !/bin/sh
# Add the daemon you want to run
/root/tcps2-release &~
After you finish writing or modifying the code, remember to execute “umount /” to change the root directory
back to Read-only mode.
MOXA:~# umount /
You should be able to find the enabled daemon after you reboot the system.
Moxa:~# ps -ef
UID
PID
PPID
C STIME TTY
TIME CMD
root
1
0
0 00:02 ?
00:00:00 init [2]
root
2
0
0 00:02 ?
00:00:00 [kthreadd]
root
3
2
0 00:02 ?
00:00:00 [migration/0]
root
4
2
0 00:02 ?
00:00:00 [ksoftirqd/0]
root
5
2
0 00:02 ?
00:00:00 [watchdog/0]
root
6
2
0 00:02 ?
00:00:00 [migration/1]
root
7
2
0 00:02 ?
00:00:00 [ksoftirqd/1]
root
8
2
0 00:02 ?
00:00:00 [watchdog/1]
root
9
2
0 00:02 ?
00:00:00 [events/0]
root
10
2
0 00:02 ?
00:00:00 [events/1]
root
11
2
0 00:02 ?
00:00:00 [cpuset]
root
12
2
0 00:02 ?
00:00:00 [khelper]
root
13
2
0 00:02 ?
00:00:00 [netns]
root
14
2
0 00:02 ?
00:00:00 [async/mgr]
root
15
2
0 00:02 ?
00:00:00 [pm]
root
17
2
0 00:02 ?
00:00:00 [sync_supers]
root
18
2
0 00:02 ?
00:00:00 [bdi-default]
root
19
2
0 00:02 ?
00:00:00 [kintegrityd/0]
root
20
2
0 00:02 ?
00:00:00 [kintegrityd/1]
root
21
2
0 00:02 ?
00:00:00 [kblockd/0]
root
22
2
0 00:02 ?
00:00:00 [kblockd/1]
root
23
2
0 00:02 ?
00:00:00 [kacpid]
root
24
2
0 00:02 ?
00:00:00 [kacpi_notify]
root
25
2
0 00:02 ?
00:00:00 [kacpi_hotplug]
root
26
2
0 00:02 ?
00:00:00 [tcps2-release]
root
27
2
0 00:02 ?
00:00:00 [ata/0]
root
28
2
0 00:02 ?
00:00:00 [ata/1]
www-data
2707
2664
0 00:03 ?
00:00:00 /usr/sbin/apache2 -k start
www-data
2708
2664
0 00:03 ?
00:00:00 /usr/sbin/apache2 -k start
www-data
2709
2664
0 00:03 ?
00:00:00 /usr/sbin/apache2 -k start
www-data
2710
2664
0 00:03 ?
00:00:00 /usr/sbin/apache2 -k start
...
root
2720
root
2724
root
2745
2700
2
2536
0 00:15 tty1
0 00:15 ?
1 00:21 ?
00:00:00 -bash
00:00:00 [flush-8:0]
00:00:00 sshd: root@pts/0
2-9
Product Name
Software Configuration
Setting the Run-Level
To set the Linux run-level and execution priority of a program, use the following command (because the root
file system is mounted in Read-only mode, we need to re-mount it with write permission).
MOXA:~# mount -o remount,rw
Edit a shell script to execute /root/tcps2-release and save to tcps2 as an example.
#cd /etc/rc2.d
#ln –s /etc/root/tcps2 S60tcps2
or
#ln –s /etc/root/tcps2 k30tcps2
MOXA:~# cd /etc/rc2.d
MOXA:/etc/rc2.d#
MOXA:/etc/rc2.d# ls
S19nfs-common
S25nfs-user-server
S20snmpd
S55ssh
S24pcmcia
S99showreadyled
S99rmnologin
MOXA:/etc/rc2.d#
MOXA:/etc/rc2.d# ln –s /root/tcps2-release S60tcps2
MOXA:/etc/rc2.d# ls
S19nfs-common
S25nfs-user-server
S99rmnologin
S20snmpd
S55ssh
S99showreadyled
S24pcmcia
S60tcps2
The command SxxRUNFILE has the following meaning:
S:
xx:
Start the run file while Linux boots up.
A number between 00-99. The smaller number has a higher priority.
RUNFILE:
The script file name
The command KxxRUNFILE has the following meaning:
K:
Start the run file while Linux shuts down or halts.
xx:
A number between 00-99. The smaller number has a higher priority.
RUNFILE:
The script file name
To remove the daemon, remove the run file from /etc/rc2.d by using the following command:
MOXA:~# rm –f /etc/rc2.d/S60tcps2
After you finish writing or modifying the code, remember to execute “umount /” to change the root directory
back to Read-only mode.
MOXA:~# umount /
Cron—Daemon for Executing Scheduled
Commands
The Cron daemon will search /etc/crontab for crontab files.
2-10
Product Name
Software Configuration
Cron wakes up every minute and checks each command to see if it should be run in that minute. When
executing commands, output is mailed to the owner of the crontab (or to the user named in the MAILTO
environment variable in the crontab, if such a user exists).
Modify the file /etc/crontab to set up your scheduled applications. Crontab files have the following format:
mm
h
dom
mon
dow
user
command
minute
hour
date
month
week
user
command
0-59
0-23
1-31
1-12
0-6 (0 is Sunday)
For example, if you want to launch a program at 8:00 every day
#minute hour
date
month
dow
*
*
*
*
8
user
command
root
/path/to/your/program
The following example demonstrates how to use Cron to update the system time and RTC time every day at
8:00.
1. Write a shell script named fixtime.sh and save it to /home/.
#!/bin/sh
ntpdate time.stdtime.gov.tw
hwclock –w
exit 0
2. Change mode of fixtime.sh
# chmod 755 fixtime.sh
3. Modify /etc/crontab file to run fixtime.sh at 8:00 every day.
Add the following line to the end of crontab:
* 8 * * * root /home/fixtime.sh
Inserting a USB Storage Device into the
Computer
Since mounting USB storage devices manually can be difficult, a Debian package named usbmount to mount
the USB drivers automatically. usbmount relies on udev to mount USB storage devices automatically at
certain mount points. The USB storage devices will be mounted on /media/usb0, /media/usb1, etc.
MOXA:~# mount
/dev/hda1 on / type ext2 (rw,errors=remount-ro)
tmpfs on /lib/init/rw type tmpfs (rw,nosuid,mode=0755)
proc on /proc type proc (rw,noexec,nosuid,nodev)
sysfs on /sys type sysfs (rw,noexec,nosuid,nodev)
procbususb on /proc/bus/usb type usbfs (rw)
udev on /dev type tmpfs (rw,mode=0755)
tmpfs on /dev/shm type tmpfs (rw,nosuid,nodev)
devpts on /dev/pts type devpts (rw,noexec,nosuid,gid=5,mode=620)
/dev/hdb2 on /home type ext2 (rw)
nfsd on /proc/fs/nfsd type nfsd (rw)
rpc_pipefs on /var/lib/nfs/rpc_pipefs type rpc_pipefs (rw)
/dev/sda1 on /media/usb0 type vfat
(rw,noexec,nodev,sync,noatime,gid=25,dmask=0007,fmask=0117)
/dev/sdb1 on /media/usb1 type vfat
(rw,noexec,nodev,sync,noatime,gid=25,dmask=0007,fmask=0117)
2-11
Product Name
Software Configuration
Note that usbmount is a light-weight solution on text mode and does not fully support gnome desktop
environment. For better supportability, you can install gnome-volume-manager instead of usbmount:
MOXA:~# mount -o,remount rw /
MOXA:~# apt-get remove usbmount
# apt-get install gnome-volume-manager
MOXA:~# umount /
ATTENTION
Remember to type the command # sync before you disconnect the USB storage device. If you do not issue the
command, you may lose data.
ATTENTION
Remember to exit the /media/usb0 or /media/usb1 directory when you disconnect the USB storage device. If
you stay in /media/usb0 or /media/usb1, the automatic un-mount process will fail. If that happens, type #
umount /media/usb0 to un-mount the USB device manually.
Inserting a Compact Flash card
Moxa’s DA-683 computers support the CF card for extensive storage. Because the CF slot does not support
hot-plug function, please shutdown the device and insert the CF card into the slot.
After rebooting, the CF card will auto mount at /media/cfn(here n is the number of partition).
This is because a udev rule to support this feature in /etc/udev/rules.d/96-moxa.rules:
…
# CF automount for DA-683
KERNEL=="sd*[1-9]" KERNELS=="1:0:1:0", RUN+="/bin/mount /dev/%k /media/cf%n"
ATTENTION
If you do not want to mount CF card automatically, just comment the rule in
/etc/udev/rules.d/96-moxa.rules.
Checking the Linux Version
The program uname, which stands for “Unix Name” and is part of the Unix operating system, prints the name,
version, and other details about the operating system running on the computer. Use the -a option to generate
a response similar to the one shown below:
MOXA:~# uname -a
Linux Moxa 2.6.32 #1 SMP Thu Nov 18 13:13:04 CST 2010 i686 GNU/Linux
MOXA:~#
APT—Installing and Removing Packages
APT is the Debian tool used to install and remove packages. Before installing a package, you need to configure
the apt source file, /etc/apt/sources.list, which is located in the read-only partition.
2-12
Product Name
Software Configuration
Mount the root file system with write permission.
MOXA:~# mount -o remount,rw
Next, configure the /etc/apt/sources.list using vi editor.
MOXA:~# vi /etc/apt/sources.list
#
# deb cdrom:[Debian GNU/Linux 5.0.2a _Lenny_ - Official i386 NETINST Binary-1
20090817-16:43]/ lenny main
#deb cdrom:[Debian GNU/Linux 5.0.2a _Lenny_ - Official i386 NETINST Binary-1
20090817-16:43]/ lenny main
deb http://ftp.us.debian.org/debian/ lenny main
deb-src http://ftp.us.debian.org/debian/ lenny main
deb http://security.debian.org/ lenny/updates main contrib
deb-src http://security.debian.org/ lenny/updates main contrib
deb http://volatile.debian.org/debian-volatile lenny/volatile main
deb-src http://volatile.debian.org/debian-volatile lenny/volatile main
Update the source list after you configure it.
MOXA:~# apt-get update
MOXA:~#
Once you indicate which package you want to install (openswan, for example), type:
MOXA:~# apt-get install openswan
MOXA:~#
Use one of the following commands to remove a package:
(a) For a simple package removal:
MOXA:~# apt-get remove openswan
MOXA:~#
(b) For a complete package removal:
MOXA:~# apt-get remove openswan --purge
MOXA:~#
If the installation is complete, remember to umount the root directory back to read-only mode.
MOXA:~# umount /
MOXA:~#
ATTENTION
The APT cache space /var/cache/apt is located in tmpfs. If you need to install a huge package, link
/var/cache/apt to USB mass storage or mount it to an NFS space to generate more free space. Use df –h to
check how much free space is available on tmpfs.
2-13
Product Name
Software Configuration
Moxa:~# df -h
Filesystem
Size
rootfs
Used Avail Use% Mounted on
1.5G 1001M
udev
10M 748K
/dev/sda1
1.5G 1001M
440M
70% /
9.3M
8% /dev
440M
70% /
tmpfs
501M
0
501M
0% /lib/init/rw
tmpfs
501M
0
501M
0% /dev/shm
none
501M
19M
482M
4% /tmp
/dev/sda2
270M
130M
126M 51% /home
ATTENTION
You can free up the cache space with the command # apt-get clean
MOXA:~# apt-get clean
MOXA:~#
Device Suspend
The DA-683-LX supports ACPI S3 (suspend to ram), You should enable option S3 in the BIOS, and use
“pm-suspend --qurik-s3-bios --qurik-s3-mode” command.
After suspend, you can press the power button to wake up the computer.
MOXA:~# pm-suspend --qurik-s3-bios --qurik-s3-mode
If you login in as administrator (root) in X windows, you can use System -> Shutdown> Suspend to suspend
your device. Note: This does not work for non-root users,.
Some components on Moxa’s embedded computer may need to be reset after resuming. You can write a simple
script in the directory /usr/lib/pm-utils/sleep.d/ to complete this procedure. For example, you could
create a script 99serial for your application.
#!/bin/sh
case "$1" in
hibernate|suspend)
echo "close AP and tty ports which are opened"
echo "operations before serial ports suspend"
;;
thaw|resume)
echo "restart AP"
echo "operations after serial ports resume"
;;
Note: If you want to see how to execute the script, start rsyslogd with command “/etc/init.d/rsyslogd start” and
view the file /var/log/pm-suspend.log.
2-14
Product Name
Software Configuration
Wake on LAN
The DA-683-LX supports wake on LAN, a feature to wake up a device for suspend (S3) and shutdown (S5).
To check the WOL support on Ethernet port x, type “ethtool ethx” (x is the port number).
Moxa:/# ethtool eth0
Settings for eth0:
Supported ports: [ TP ]
Supported link modes:
10baseT/Half 10baseT/Full
100baseT/Half 100baseT/Full
1000baseT/Full
Supports auto-negotiation: Yes
Advertised link modes:
10baseT/Half 10baseT/Full
100baseT/Half 100baseT/Full
1000baseT/Full
Advertised auto-negotiation: Yes
Speed: 100Mb/s
Duplex: Full
Port: Twisted Pair
PHYAD: 0
Transceiver: internal
Auto-negotiation: on
Supports Wake-on: pumbg
Wake-on: ug
As you can see, the default WOL support is ug (wake on unicast message and Magic packet).
We suggest that you only enable wake up on magic packet. Modify the default setting with the command
“ ethtool -s ethx wol g.”
The following example illustrates how to wake up on suspend (S3):
1. Moxa embedded computer
Enable S3 options in BIOS
Get its MAC by issuing “ifconfig ethx” (x is the port number)
Suspend to RAM with command “pm-suspend --quirk-s3-bios”
2. Remote computer
Issue ‘etherwake -b mac_of_this_device to wake up it.
For example:
etherwake -b 00:90:e8:00:d7:07
The following example illustrates how to wake up on shutdown (S5):
1. Moxa embedded computer
Shutdown you computer with “shutdown -h now”
2. Remote computer
Issue ‘etherwake -b mac_of_this_device to wake up it.
For example:
etherwake -b 00:90:e8:00:d7:07
2-15
3
3.
Managing Communications
The DA-683-LX ready-to-run embedded computer is a network-centric platform designed to serve as a
front-end for data acquisition and industrial control applications. This chapter describes how to configure the
various communication functions supported by the Linux operating system.
The following topics are covered in this chapter:
Detecting Network Interfaces
Changing the Network Settings
Changing the “interfaces” Configuration File
Adjusting IP Addresses with “ifconfig”
Telnet/FTP Server
DNS Client
Apache Web Server
Default Homepage
Disabling the CGI Function
Saving Web Pages to a USB Storage Device
IPTABLES
IPTABLES Hierarchy
IPTABLES Modules
Observe and Erase Chain Rules
Define Policy for Chain Rules
Append or Delete Rules
NAT (Network Address Translation)
NAT Example
Enabling NAT at Bootup
PPP (Point to Point Protocol)
Connecting to a PPP Server over a Simple Dial-up Connection
Connecting to a PPP Server over a Hard-wired Link
Checking the Connection
Setting up a Machine for Incoming PPP Connections
PPPoE
NFS (Network File System) Client
SNMP (Simple Network Management Protocol)
OpenVPN
Ethernet Bridging for Private Networks on Different Subnets
Ethernet Bridging for Private Networks on the Same Subnet
Routed IP
Product Name
Managing Communications
Detecting Network Interfaces
Linux systems use udevd to detect new network interfaces, including Ethernet interfaces and wireless
interfaces. The result is saved in /etc/udev/rules.d/70-persistent-net.rules. The content is similar to the
following:
# PCI device 0x10ec:0x8168 (r8168)
SUBSYSTEM=="net", ACTION=="add", DRIVERS=="?*",
ATTR{address}=="00:90:e8:00:00:20", ATTR{dev_id}=="0x0", ATTR{type}=="1",
KERNEL=="eth*", NAME="eth0"
# PCI device 0x10ec:0x8168 (r8168)
This file shows system has detected two Ethernet interfaces now.
ATTENTION
When replacing or connecting a network interface, the system may keep the old record in
/etc/udev/rules.d/70-persistent-net.rules and that cause network interfaces are detected abnormally. To solve
this problem, clear the file /etc/udev/rules.d/70-persistent-net.rules and reboot the system.
Changing the Network Settings
The DA-683-LX computer has six 10/100/1000 Ethernet ports named LAN1 to LAN6. The default IP addresses
and netmasks of the network interfaces are as follows:
Default IP Address
Netmask
LAN 1
192.168.3.127
255.255.255.0
LAN 2
192.168.4.127
255.255.255.0
LAN 3
192.168.5.127
255.255.255.0
LAN 4
192.168.6.127
255.255.255.0
LAN 5
192.168.7.127
255.255.255.0
LAN 6
192.168.8.127
255.255.255.0
These network settings can be modified by changing the interfaces configuration file, or they can be adjusted
temporarily with the ifconfig command.
Changing the “interfaces” Configuration File
1. Type cd /etc/network to change directory.
MOXA:~# cd /etc/network
2. Type vi interfaces to edit the network configuration file with vi editor. You can configure the DA-683-LX's
Ethernet ports for static or dynamic (DHCP) IP addresses.
MOXA:/etc/network# vi interfaces
Static IP Address
As shown in the example shown below, the default static IP addresses can be modified.
3-2
Product Name
Managing Communications
# The loopback network interface
auto lo
iface lo inet loopback
# The primary network interface
auto eth0
iface eth0 inet static
address 192.168.3.127
netmask 255.255.255.0
broadcast 192.168.3.255
auto eth1
iface eth1 inet static
address 192.168.4.127
netmask 255.255.255.0
broadcast 192 168 4 255
Dynamic IP Address using DHCP
To configure one or both LAN ports to request an IP address dynamically, replace static with dhcp and then
delete the rest of the lines.
# The primary network interface
auto eth0
iface eth0 inet dhcp
After modifying the boot settings of the LAN interface, issue the following command to activate the LAN settings
immediately.
# /etc/init.d/networking restart
MOXA:~# /etc/init.d/networking restart
Adjusting IP Addresses with “ifconfig”
IP settings can be adjusted during run-time, but the new settings will not be saved to the flash ROM without
modifying the file /etc/network/interfaces. For example, type the command # ifconfig eth0
192.168.1.1 to change the IP address of LAN1 to 192.168.1.1.
MOXA:~# ifconfig eth0 192.168.1.1
MOXA:~#
Telnet/FTP Server
In addition to supporting Telnet client/server and FTP client/server, the DA-683-LX also supports SSH and sftp
client/server. To enable or disable the Telnet/ftp server, you need to edit the file /etc/inetd.conf.
1. Mount the root file system with write permission.
MOXA:~# mount -o remount,rw
3-3
Product Name
Managing Communications
2. Type # cd /etc to change the directory.
MOXA:~# cd /etc
3. Type # vi inetd.conf to edit the configuration file.
MOXA:/etc# vi inetd.conf
Enabling the Telnet/TFTP Server
The following example shows the default content of the file /etc/inetd.conf. The default is to “enable the
Telnet/tftp server:”
telnet
stream
tcp
nowait
telnetd /usr/sbin/tcpd
/usr/sbin/in.telnetd
tftp
dgram
udp
wait
nobody
/usr/sbin/tcpd
/usr/sbin/in.tftpd
/srv/tftp
Disabling the Telnet/TFTP Server
Disable the daemon by typing “#” in front of the first character of the row to comment out the line. For example,
to disable the TFTP server, use the following commands:
telnet
stream
tcp
nowait
telnetd /usr/sbin/tcpd
/usr/sbin/in.telnetd
#tftp
dgram
udp
wait
nobody
/usr/sbin/tcpd
/usr/sbin/in.tftpd
/srv/tftp
After you finish writing or modifying the code, remember to execute “umount /” to change the root directory
back to Read-only mode.
MOXA:~# umount /
DNS Client
The DA-683-LX supports DNS client (but not DNS server). To set up DNS client, you need to edit three
configuration files: /etc/hostname, /etc/resolv.conf, and /etc/nsswitch.conf.
/etc/hostname
1. Mount the root file system with write permission.
MOXA:~# mount -o remount,rw
2.
Edit
/etc/hostname:
MOXA:~# vi /etc/hostname
MOXA
3. After you finish writing or modifying the code, remember to execute “umount /” to change the root directory
back to Read-only mode.
MOXA:~# umount /
3-4
Product Name
Managing Communications
4. Re-configure the hostname.
MOXA:~# /etc/init.d/hostname.sh start
5. Check the new hostname.
MOXA:~# hostname
/etc/resolv.conf
This is the most important file that you need to edit when using DNS. For example, before you using # ntpdate
time.stdtime.gov.tw to update the system time, you will need to add the DNS server address to the file. Ask
your network administrator which DNS server address you should use. The DNS server’s IP address is specified
with the nameserver command. For example, add the following line to /etc/resolv.conf (assuming the DNS
server’s IP address is 168.95.1.1):
nameserver 168.95.1.1
MOXA:/etc# cat resolv.conf
#
# resolv.conf
This file is the resolver configuration file
# See resolver(5).
#
#nameserver 192.168.1.16
nameserver 168.95.1.1
nameserver 140.115.1.31
nameserver 140.115.236.10
/etc/nsswitch.conf
This file defines the sequence of files, /etc/hosts or /etc/resolv.conf, to be read to resolve the IP address.
The hosts line in /etc/nsswitch.conf means use /etc/host first and DNS service to resolve the address.
# /etc/nsswitch.conf
#
# Example configuration of GNU Name Service Switch functionality.
# If you have the `glibc-doc-reference' and `info' packages installed, try:
# `info libc "Name Service Switch"' for information about this file.
passwd:
compat
group:
compat
shadow:
compat
hosts:
files dns
networks:
files
protocols:
db files
services:
db files
ethers:
db files
rpc:
db files
netgroup:
nis
3-5
Product Name
Managing Communications
Apache Web Server
Default Homepage
The Apache web server’s main configuration file is /etc/apache2/sites-enabled/000-default, with the
default homepage located at /var/www/apache2-default/index.html.
Save your own homepage to the following directory:
/var/www/apache2-default
Save your CGI page to the following directory:
/var/www/apache2-default/cgi-bin/
Before you modify the homepage, use a browser (such as Microsoft Internet Explorer or Mozilla Firefox) from
your PC to test if the Apache web server is working. Type the LAN1 IP address in the browser’s address box to
open the homepage. For example, if the default IP address 192.168.3.127 is still active, type:
http://192.168.3.127/
To test the default CGI page, type:
http://192.168.3.127/cgi-bin/w3mmail.cgi
Disabling the CGI Function
The CGI function is enabled by default. If you want to disable the function, modify the file
/etc/apache2/sites-enabled/000-default.
1. Mount the root file system with write permission.
MOXA:~# mount -o remount,rw
Type
2.
# vi/etc/apache2/sites-enabled/000-default
to edit the configuration file.
Comment on the following lines:
#ScriptAlias /cgi-bin/ /var/www/apache2-default/cgi-bin/
#<Directory "/var/www/apache2 default/cgi-bin/">
# AllowOverride None
# Options ExecCGI -MultiViews +SymLinksIfOwnerMatch
# #Order allow,deny
# Order deny,allow
# Allow from all
#</Directory>
MOXA:/etc# vi /etc/apache2/sites-available/default
#ScriptAlias /cgi-bin/ /var/www/apache2-default/cgi-bin/
#<Directory "/var/www/apache2 default/cgi-bin/">
#
AllowOverride None
#
Options ExecCGI -MultiViews +SymLinksIFOwnerMatch
#
#Order allow,deny
#
Order deny,allow
#
Allow from all
3-6
Product Name
Managing Communications
3. After you finish
writing or modifying the code, remember to execute “umount /” to change the root
directory back to Read-only mode.
MOXA:~# umount /
4. Re-start the
apache server.
MOXA:~# /etc/init.d/apache2 restart
ATTENTION
When you develop your own CGI application, make sure your CGI file is executable.
Saving Web Pages to a USB Storage Device
Some applications may have web pages that take up a lot of storage space. This section describes how to save
web pages to the USB mass storage device, and then configure the Apache web server’s DocumentRoot to open
these pages. The files used in this example can be downloaded from Moxa’s website.
1. Prepare the web pages and then save the pages to the USB storage device. Click on the following link to
download the web page test suite: http://www.w3.org/MarkUp/Test/HTML401.zip.
2.
Uncompress the zip file to your desktop PC, and then use FTP to transfer it to the DA-683-LX's
/media/usb0 directory.
3. Mount the root file system with write permission.
MOXA:~# mount -o remount,rw /dev/hda1 /
4.
Type
# vi/etc/apache2/sites-enabled/000-default
to edit the configuration file.
MOXA:/etc# vi /etc/apache2/sites-enabled/000-default
5. Change the DocumentRoot directory to the USB storage directory /media/usb0/www.
3-7
Product Name
Managing Communications
...
<VirtualHost *:80>
...
...
DocumentRoot /media/usb0/www
<Directory />
Options FollowSymLinks
AllowOverride None
</Directory>
...
...
ScriptAlias /cgi-bin/ /media/usb0/www/cgi-bin/
<Directory "/media/usb0/www/cgi-bin/">
AllowOverride None
Options ExecCGI -MultiViews +SymLinksIfOwnerMatch
Order allow,deny
Allow from all
</Directory>
...
</VirtualHost>
...
<VirtualHost *:443>
...
...
DocumentRoot /media/usb0/www
<Directory />
Options FollowSymLinks
AllowOverride None
</Directory>
...
...
ScriptAlias /cgi-bin/ /media/usb0/www/cgi-bin/
<Directory "/media/usb0/wwwz/cgi-bin/">
AllowOverride None
Options ExecCGI -MultiViews +SymLinksIfOwnerMatch
6. Use the following commands to restart the Apache web server:
#cd /etc/init.d
#./apache2 restart
7. Open your browser and connect to the DA-683-LX by typing the current LAN1 IP address in the browser’s
address box.
8. After finishing modification or writing, remember to execute “umount /” to change the root directory back
to Read-only mode.
MOXA:~# umount /
9. Re-start the apache server.
MOXA:~# /etc/init.d/apache2 restart
ATTENTION
Visit the Apache website at http://httpd.apache.org/docs/ for more information about setting up Apache
servers.
3-8
Product Name
Managing Communications
IPTABLES
IPTABLES is an administrative tool for setting up, maintaining, and inspecting the Linux kernel’s IP packet filter
rule tables. Several different tables are defined, with each table containing built-in chains and user-defined
chains.
Each chain is a list of rules that apply to a certain type of packet. Each rule specifies what to do with a matching
packet. A rule (such as a jump to a user-defined chain in the same table) is called a target.
The DA-683-LX supports three types of IPTABLES: Filter tables, NAT tables, and Mangle tables.
Filter Table—includes three chains:
INPUT chain
OUTPUT chain
FORWARD chain
NAT Table—includes three chains:
PREROUTING chain—transfers the destination IP address (DNAT).
POSTROUTING chain—works after the routing process and before the Ethernet device
process
to transfer
the source IP address (SNAT).
OUTPUT chain—produces local packets.
Sub-tables
Source NAT (SNAT)—changes the first source IP address of the packet.
Destination NAT (DNAT)—changes the first destination IP address of the packet.
MASQUERADE—a special form for SNAT. If one host can connect to the Internet, then the other computers that
connect to this host can connect to the Internet when the computer does not have an actual IP address.
REDIRECT—a special form of DNAT that re-sends packets to a local host independent of the destination IP
address.
Mangle Table—includes two chains
PREROUTING chain—pre-processes packets before the routing process.
OUTPUT chain—processes packets after the routing process.
Mangle tables can have one of three extensions—TTL, MARK, TOS.
3-9
Product Name
Managing Communications
IPTABLES Hierarchy
The following figure shows the IPTABLES hierarchy.
Incoming
Mangle Table
NAT Table
Local Host
Other Host
Mangle Table
Mangle Table
Filter Table
Filter Table
Local
Mangle Table
Mangle Table
NAT Table
Filter Table
NAT Table
Outgoing
IPTABLES Modules
DA-683-LX supports the following sub-modules. Be sure to use the module that matches your application.
arptable_filter.ko
arp_tables.ko
arpt_mangle.ko
ip_conntrack_amanda.
ip_conntrack_ftp.ko
ip_conntrack_h323.ko
ip_conntrack_irc.ko
ip_conntrack.ko
ip_conntrack_netbios_ns.
ip_conntrack_netlink.ko
ip_conntrack_pptp.ko
ko
ko
ip_conntrack_proto_sctp.
ko
ip_conntrack_sip.ko
ip_conntrack_tftp.ko
ip_nat_amanda.ko
ip_nat_ftp.ko
ip_nat_h323.ko
ip_nat_irc.ko
ip_nat.ko
ip_nat_pptp.ko
ip_nat_sip.ko
ip_nat_snmp_basic.ko
ip_nat_tftp.ko
ip_queue.ko
iptable_filter.ko
iptable_mangle.ko
iptable_nat.ko
iptable_raw.ko
ip_tables.ko
ipt_addrtype.ko
ipt_ah.ko
ipt_CLUSTERIP.ko
ipt_dscp.ko
ipt_DSCP.ko
ipt_ecn.ko
ipt_ECN.ko
ipt_hashlimit.ko
ipt_iprange.ko
ipt_LOG.ko
ipt_MASQUERADE.ko
ipt_NETMAP.ko
ipt_owner.ko
ipt_recent.ko
ipt_REDIRECT.ko
ipt_REJECT.ko
ipt_SAME.ko
ipt_TCPMSS.ko
ipt_tos.ko
ipt_TOS.ko
ipt_ttl.ko
ipt_TTL.ko
ipt_ULOG.ko
3-10
Product Name
Managing Communications
The basic syntax to enable and load an IPTABLES module is as follows:
# lsmod
# modprobe ip_tables
# modprobe iptable_filter
#modprobe iptable_mangle
#modprobe iptable_nat
Use lsmod to check if the ip_tables module has already been loaded in the DA-683-LX. Use modprobe to
insert and enable the module.
Use
iptables, iptables-restore, iptables-save
to maintain the database.
ATTENTION
IPTABLES plays the role of packet filtering or NAT. Be careful when setting up the IPTABLES rules. If the rules
are not correct, remote hosts that connect via a LAN or PPP may be denied. We recommend using the VGA
console to set up the IPTABLES. Click on the following links for more information about IPTABLES.
http://www.linuxguruz.com/iptables/
http://www.netfilter.org/documentation/HOWTO//packet-filtering-HOWTO.html
Since the IPTABLES command is very complex, to illustrate the IPTABLES syntax we have divided our
discussion of the various rules into three categories: Observe and erase chain rules, Define policy rules, and
Append or delete rules.
Observe and Erase Chain Rules
Usage:
# iptables [-t tables] [-L] [-n]
-t tables: Table to manipulate (default: ‘filter’); example: nat or filter.
-L [chain]: List List all rules in selected chains. If no chain is selected, all chains are listed.
-n: Numeric output of addresses and ports.
# iptables [-t tables] [-FXZ]
-F: Flush the selected chain (all the chains in the table if none is listed).
-X: Delete the specified user-defined chain.
-Z: Set the packet and byte counters in all chains to zero.
Examples:
# iptables -L -n
In this example, since we do not use the -t parameter, the system uses the default “filter” table. Three chains
are included: INPUT, OUTPUT, and FORWARD. INPUT chains are accepted automatically, and all connections
are accepted without being filtered.
# iptables –F
# iptables –X
# iptables –Z
3-11
Product Name
Managing Communications
Define Policy for Chain Rules
Usage:
# iptables [-t tables] [-P] [INPUT, OUTPUT, FORWARD, PREROUTING, OUTPUT, POSTROUTING]
[ACCEPT, DROP]
-P: Set the policy for the chain to the given target.
INPUT: For packets coming into the DA-683-LX.
OUTPUT: For locally-generated packets.
FORWARD: For packets routed out through the DA-683-LX.
PREROUTING: To alter packets as soon as they come in.
POSTROUTING: To alter packets as they are about to be sent out.
Examples:
#iptables –P INPUT DROP
#iptables –P OUTPUT ACCEPT
#iptables –P FORWARD ACCEPT
#iptables –t nat –P PREROUTING ACCEPT
#iptables –t nat –P OUTPUT ACCEPT
#iptables -t nat –P POSTROUTING ACCEPT
In this example, the policy accepts outgoing packets and denies incoming packets.
Append or Delete Rules
Usage:
# iptables [-t table] [-AI] [INPUT, OUTPUT, FORWARD] [-io interface] [-p tcp, udp, icmp, all] [-s
IP/network] [--sport ports] [-d IP/network] [--dport ports] –j [ACCEPT. DROP]
-A: Append one or more rules to the end of the selected chain.
-I: Insert one or more rules in the selected chain as the given rule number.
-i: Name of an interface via which a packet is going to be received.
-o: Name of an interface via which a packet is going to be sent.
-p: The protocol of the rule or of the packet to check.
-s: Source address (network name, host name, network IP address, or plain IP address).
--sport: Source port number.
-d: Destination address.
--dport: Destination port number.
-j: Jump target. Specifies the target of the rules; i.e., how to handle matched packets.
For example, ACCEPT the packet, DROP the packet, or LOG the packet.
Examples:
Example 1: Accept all packets from the lo interface.
# iptables –A INPUT –i lo –j ACCEPT
Example 2: Accept TCP packets from 192.168.0.1.
# iptables –A INPUT –i eth0 –p tcp –s 192.168.0.1 –j ACCEPT
3-12
Product Name
Managing Communications
Example 3: Accept TCP packets from Class C network 192.168.1.0/24.
# iptables –A INPUT –i eth0 –p tcp –s 192.168.1.0/24 –j ACCEPT
Example 4: Drop TCP packets from 192.168.1.25.
# iptables –A INPUT –i eth0 –p tcp –s 192.168.1.25 –j DROP
Example 5: Drop TCP packets addressed for port 21.
# iptables –A INPUT –i eth0 –p tcp --dport 21 –j DROP
Example 6: Accept TCP packets from 192.168.0.24 to DA-683-LX's port 137, 138, 139
# iptables –A INPUT –i eth0 –p tcp –s 192.168.0.24 --dport 137:139 –j ACCEPT
Example 7: Log TCP packets that visit DA-683-LX's port 25.
# iptables –A INPUT –i eth0 –p tcp --dport 25 –j LOG
Example 8: Drop all packets from MAC address 01:02:03:04:05:06.
# iptables –A INPUT –i eth0 –p all –m mac --mac-source 01:02:03:04:05:06 –j DROP
ATTENTION
In Example 8, remember to issue the command # modprobe ipt_mac first to load the module ipt_mac.
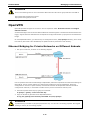
NAT (Network Address Translation)
The NAT (Network Address Translation) protocol translates IP addresses used on one network into IP addresses
used on a connecting network. One network is designated the inside network and the other is the outside
network. Typically, the DA-683-LX connects several devices on a network and maps local inside network
addresses to one or more global outside IP addresses, and un-maps the global IP addresses on incoming
packets back into local IP addresses.
ATTENTION
Click on the following links for more information about NAT.
http://www.netfilter.org/documentation/HOWTO//packet-filtering-HOWTO.html
NAT Example
The IP address of all packets leaving LAN1 are changed to 192.168.3.127 (you will need to load the module
ipt_MASQUERADE):
3-13
Product Name
Managing Communications
Enabling NAT at Bootup
In most real world situations, you will want to use a simple shell script to enable NAT when the DA-683-LX
boots up. The following script is an example.
#!/bin/bash
# If you put this shell script in the /home/nat.sh
# Remember to chmod 744 /home/nat.sh
# Edit the rc.local file to make this shell startup automatically.
# vi /etc/rc.local
# Add a line in the end of rc.local /home/nat.sh
EXIF= “eth0”
#This is an external interface for setting up a valid IP address.
EXNET= “192.168.4.0/24” #This is an internal network address.
# Step 1. Insert modules.
# Here 2> /dev/null means the standard error messages will be dump to null device.
modprobe ip_tables
2> /dev/null
modprobe ip_nat_ftp 2> /dev/null
modprobe ip_nat_irc 2> /dev/null
modprobe ip_conntrack
2> /dev/null
modprobe ip_conntrack_ftp 2> /dev/null
modprobe ip_conntrack_irc
2> /dev/null
# Step 2. Define variables, enable routing and erase default rules.
PATH=/bin:/sbin:/usr/bin:/usr/sbin:/usr/local/bin:/usr/local/sbin
export PATH
echo “1” > /proc/sys/net/ipv4/ip_forward
/sbin/iptables -F
/sbin/iptables -X
/sbin/iptables -Z
/sbin/iptables -F -t nat
/sbin/iptables -X -t nat
/sbin/iptables -Z -t nat
/sbin/iptables -P INPUT ACCEPT
/sbin/iptables -P OUTPUT ACCEPT
/sbin/iptables -P FORWARD ACCEPT
/sbin/iptables -t nat -P PREROUTING ACCEPT
/sbin/iptables -t nat -P POSTROUTING ACCEPT
/sbin/iptables -t nat -P OUTPUT ACCEPT
# Step 3. Enable IP masquerade.
#ehco 1 > /proc/sys/net/ipv4/ip_forward#modprobe ipt_MASQUERADE#iptables –t nat –A
POSTROUTING –o eth0 –j MASQUERADE
PPP (Point to Point Protocol)
PPP (Point to Point Protocol) is used to run IP (Internet Protocol) and other network protocols over a serial link.
PPP can be used for direct serial connections (using a null-modem cable) over a Telnet link, and links
established using a modem over a telephone line.
Modem/PPP access is almost identical to connecting directly to a network through the DA-683-LX Ethernet port.
Since PPP is a peer-to-peer system, the DA-683-LX can also use PPP to link two networks (or a local network
to the Internet) to create a Wide Area Network (WAN).
3-14
Product Name
Managing Communications
ATTENTION
Click on the following links for more information about PPP.
http://tldp.org/HOWTO/PPP-HOWTO/index.html
http://axion.physics.ubc.ca/ppp-linux.html
Connecting to a PPP Server over a Simple Dial-up Connection
The following command is used to connect to a PPP server by modem. Use this command for old ppp servers
that prompt for a login name (replace “username” with the correct name) and password (replace “password”
with the correct password). Note that “debug crtscts” and “defaultroute 192.1.1.17” are optional.
#pppd connect ‘chat -v ““ ATDT5551212 CONNECT ““’ ogin: username word: password’ /dev/ttyS0
115200 debug crtscts modem defaultroute 192.1.1.17
If the PPP server does not prompt for the username and password, the command should be entered as follows.
Replace “username” with the correct username and replace “password” with the correct password.
#pppd connect ‘chat -v ““ ATDT5551212 CONNECT ““’ user username password password
/dev/ttyS0 115200 crtscts modem”
The pppd options are described below:
connect ‘chat etc...’
This option gives the command to contact the PPP server. The chat
program is used to dial a remote computer. The entire command is
enclosed in single quotes because pppd expects a one-word argument
for the connect option. The options for chat are given below:
-v
verbose mode; log what we do to syslog
““
Double quotes—don’t wait for a prompt, but instead do ... (Note that you
must include a space after the second quotation mark)
ATDT5551212Dial the modem, and then ...
CONNECT
Wait for an answer.
““
Send a return (null text followed by the usual return)
ogin: username word: password
Log in with username and password.
Refer to the chat man page, chat.8, for more information about the chat utility.
/dev/
Specify the callout serial port.
115200
The baud rate.
debug
Log status in syslog.
crtscts
Use hardware flow control between computer and modem
(at 115200 this is a must).
modem
Indicates that this is a modem device; pppd will hang up the phone before and after making the call.
defaultroute Once the PPP link is established, make it the default route; if you have a PPP link to the Internet,
this is probably what you want.
192.1.1.17
This is a degenerate case of a general option of the form x.x.x.x:y.y.y.y. Here x.x.x.x is
the local IP address and y.y.y.y is the IP address of the remote end of the PPP connection. If this option is not
specified, or if just one side is specified, then x.x.x.x defaults to the IP address associated with the local
machine’s hostname (located in /etc/hosts), and y.y.y.y is determined by the remote machine.
3-15
Product Name
Managing Communications
Connecting to a PPP Server over a Hard-wired Link
If a username and password are not required, use the following command (note that noipdefault is optional):
#pppd connect ‘chat –v“ “ “ “ ’ noipdefault /dev/tty 19200 crtscts
If a username and password is required, use the following command (note that noipdefault is optional, and
root is both the username and password):
#pppd connect ‘chat –v“ “ “ “ ’ user root password root noipdefault /dev/ttyS0 19200 crtscts
Checking the Connection
Once you have set up a PPP connection, there are some steps you can take to test the connection. First, type:
#/sbin/ifconfig
Depending on your distribution, the command might be located elsewhere. After executing the command, you
should be able to see all of the network interfaces that are UP.
ppp0 should be one of them, and you should recognize the first IP address as your own and the
P-t-P address (point-to-point address, the address of your server). The output is similar to the following:
lo
Link encap Local Loopback
inet addr 127.0.0.1
Bcast 127.255.255.255 Mask 255.0.0.0
UP LOOPBACK RUNNING
MTU 2000
Metric 1
RX packets 0 errors 0 dropped 0 overrun 0
ppp0 Link encap Point-to-Point Protocol
inet addr 192.76.32.3
UP POINTOPOINT RUNNING
P-t-P 129.67.1.165 Mask 255.255.255.0
MTU 1500
Metric 1
RX packets 33 errors 0 dropped 0 overrun 0
TX packets 42 errors 0 dropped 0 overrun 0
Now, type:
#ping z.z.z.z
where z.z.z.z is the address of your name server. The output is similar to the following:
MOXA:~# ping 129.67.1.165
PING 129.67.1.165 (129.67.1.165): 56 data bytes
64 bytes from 129.67.1.165: icmp_seq=0 ttl=225 time=268 ms
64 bytes from 129.67.1.165: icmp_seq=1 ttl=225 time=247 ms
64 bytes from 129.67.1.165: icmp_seq=2 ttl=225 time=266 ms
^C
--- 129.67.1.165 ping statistics --3 packets transmitted, 3 packets received, 0% packet loss
round-trip min/avg/max = 247/260/268 ms
Try typing:
#netstat -nr
This should show three routes similar to the following:
3-16
Product Name
Managing Communications
Kernel routing table
Destination
Gateway Genmask
Flags
Metric
Ref Use
UH
0
0
iface
129.67.1.165
0.0.0.0 255.255.255.255
6
ppp0
127.0.0.0
0.0.0.0 255.0.0.0
0.0.0.0
129.67.1.165
U
0.0.0.0
0
UG
0
0
0 lo
0
6298
ppp0
If your output looks similar but does not have the “destination 0.0.0.0” line (which refers to the default route
used for connections), you may have run pppd without the defaultroute option. At this point, you can try
using Telnet, ftp, or finger, bearing in mind that you will have to use numeric IP addresses unless you have
configured /etc/resolv.conf correctly.
Setting up a Machine for Incoming PPP Connections
Method 1: pppd dial-in with pppd commands
This first example applies to using a modem, and requiring authorization with a username and password.
#pppd /dev/ttyS0 115200 crtscts modem 192.168.16.1:192.168.16.2 login auth
You should also add the following line to the file /etc/ppp/pap-secrets:
*
*
“”
*
The first star (*) lets everyone login. The second star (*) lets every host connect. The pair of double quotation
marks (“”) indicates that the file /etc/passwd can be used to check the password. The last star (*) is to let
any IP connect.
The following example does not check the username and password:
# pppd/dev/ttyS0 115200 crtscts modem 192.168.16.1:192.168.16.2
Method 2: pppd dial-in with pppd script
Configure a dial-in script /etc/ppp/peer/dialin
# You usually need this if there is no PAP authentication
noauth
#auth
#login
# The chat script (be sure to edit that file, too!)
init "/usr/sbin/chat -v -f /etc/ppp/ppp-ttyM0.chat"
# Set up routing to go through this PPP link
defaultroute
# Default modem (you better replace this with /dev/ttySx!)
/dev/ttyM0
# Speed
115200
# Keep modem up even if connection fails
persist
crtscts
modem
3-17
Product Name
Managing Communications
Configure the chat script /etc/ppp/ppp-ttyM0.chat
SAY
'Auto Answer ON\n'
''
ATS0=1
Start the pppd dial-in service.
# pppd call dialin
ATTENTION
If you hope to have auto dial-in service, you can respawn the dial-in service in /etc/inittab.
MOXA:~# mount –o remount,rw /dev/hda1 /
MOXA:~# echo “p0:2345:respawn:pppd call dialin” >> /etc/inittab
MOXA:~# umount /
PPPoE
The following procedure is for setting up PPPoE:
1. Connect the DA-683-LX's LAN port to an ADSL modem with a cross-over cable, HUB, or switch.
2. Log in to the DA-683-LX's as the root user.
3. Edit the file /etc/ppp/chap-secrets and add the following:
“[email protected]”
*
“password”
*
# Secrets for authentication using CHAP
# client
server
secret
IP addresses
# PPPOE example, if you want to use it, you need to unmark it and modify it
"[email protected]"
*
"password"
*
[email protected] is the username obtained from the ISP to log in to the ISP account. password is the
corresponding password for the account.
3-18
Product Name
Managing Communications
Edit the file
4.
/etc/ppp/pap-secrets
“[email protected]”
*
and add the following:
“password”
*
# ATTENTION: The definitions here can allow users to login without a
# password if you don't use the login option of pppd! The mgetty Debian
# package already provides this option; make sure you don't change that.
# INBOUND connections
# Every regular user can use PPP and has to use passwords from /etc/passwd
*
hostname
""
"[email protected]"
*
*
"password"
*
# UserIDs that cannot use PPP at all. Check your /etc/passwd and add any
# other accounts that should not be able to use pppd!
guest
hostname
"*"
-
master
hostname
"*"
-
root
hostname
"*"
-
support hostname
stats
"*"
hostname
"*"
-
# OUTBOUND connections
[email protected] is the username obtained from the ISP to log in to the ISP account. password is the
corresponding password for the account.
5. Edit the file /etc/ppp/options and add the following line:
plugin rp-pppoe
# received.
Note: it is not advisable to use this option with the persist
# option without the demand option.
If the active-filter option is given,
# data packets which are rejected by the specified activity filter also
# count as the link being idle.
#idle <n>
# Specifies how many seconds to wait before re-initiating the link after
# it terminates.
This option only has any effect if the persist or demand
# option is used.
The holdoff period is not applied if the link was
# terminated because it was idle.
#holdoff <n>
# Wait for up n milliseconds after the connect script finishes for a valid
# PPP packet from the peer.
At the end of this time, or when a valid PPP
# packet is received from the peer, pppd will commence negotiation by
# sending its first LCP packet.
The default value is 1000 (1 second).
# This wait period only applies if the connect or pty option is used.
#connect-delay <n>
# Load the pppoe plugin
plugin rp-pppoe.so
# ---<End of File>---
3-19
Product Name
Managing Communications
6. If you use LAN1 to connect to the ADSL modem, add file /etc/ppp/options.eth0. If you use LAN2 to
connect to the ADSL modem, then add /etc/ppp/options.eth1, etc.
name [email protected]
mtu 1492
mru 1492
defaultroute
noipdefault
~
~
Type your username (the one you set in the /etc/ppp/pap-secrets and /etc/ppp/chap-secrets files)
after the name option. You may add other options as desired.
7. Set up DNS.
If you are using DNS servers supplied by your ISP, edit the file /etc/resolv.conf by adding the following lines
of code:
nameserver ip_addr_of_first_dns_server
nameserver ip_addr_of_second_dns_server
For example:
nameserver 168.95.1.1
nameserver 139.175.10.20
MOXA:/etc# cat resolv.conf
#
# resolv.conf
This file is the resolver configuration file
# See resolver(5).
#
nameserver 168.95.1.1
nameserver 139.175.10.20
8. Use the following command to create a pppoe connection:
#pppd eth0
The ADSL modem is connected to the LAN1 port, which is named eth0. If the ADSL modem is connected to
LAN2, use eth1, etc.
9. Type #ifconfig ppp0 to check if the connection is OK. If the connection is OK, you should see the IP
address of ppp0. Use #ping to test the IP address.
ppp0 Link encap Point-to-Point Protocol
inet addr 192.76.32.3
UP POINTOPOINT RUNNING
P-t-P 129.67.1.165 Mask 255.255.255.0
MTU 1500
Metric 1
RX packets 33 errors 0 dropped 0 overrun 0
TX packets 42 errors 0 dropped 0 overrun 0
10. If you want to disconnect it, use the kill command to kill the pppd process.
3-20
Product Name
Managing Communications
NFS (Network File System) Client
The Network File System (NFS) is used to mount a disk partition on a remote machine (as if it were on a local
hard drive), allowing fast, seamless sharing of files across a network. NFS allows users to develop applications
for the DA-683-LX without worrying about the amount of disk space that will be available. The DA-683-LX
supports only NFS client protocol.
ATTENTION
Click on the following links for more information about NFS.
http://www.ietf.org/rfc/rfc1213.txt
http://www.faqs.org/rfcs/rfc1317.html
The following procedures illustrate how to mount a remote NFS Server.
1. Scan the NFS Server’s shared directory.
#showmount
–e
HOST
showmount:
Show the mount information of an NFS Server
-e:
Show the NFS Server’s export list.
HOST:
IP address or DNS address
2. Establish a mount point on the NFS Client site.
#mkdir
–p
/home/nfs/public
3. Mount the remote directory to a local directory.
# mount -t nfs -o nolock 192.168.3.100:/home/public /home/nfs/public
This is where 192.168.3.100 is the example IP address of the NFS server.
SNMP (Simple Network Management Protocol)
The DA-683-LX comes with the SNMP V1 (Simple Network Management Protocol) agent software pre-installed.
It supports RFC 1213 MIB-II. The following example shows an SNMP agent responding to a query from the
SNMP browser on the host site:
***** SNMP QUERY STARTED *****
[root@jaredRH90 root]# snmpwalk -v 1 -c public 192.168.30.128|more
RFC1213-MIB::sysDescr.0 = STRING: "Linux Moxa 2.6.32 683#1 SMP Sat Dec 11 18:12:58
UTC 2010 i686"
RFC1213-MIB::sysObjectID.0 = OID: RFC1155-SMI::enterprises.8691.12.2420
DISMAN-EVENT-MIB::sysUpTimeInstance = Timeticks: (126176) 0:21:01.76
RFC1213-MIB::sysContact.0 = STRING: "\"Jared\""
RFC1213-MIB::sysName.0 = STRING: "Moxa"
RFC1213-MIB::sysLocation.0 = STRING: "\"Fl.8 No.6, Alley 6, Lane 235, Pao-Chiao
Rd., Shing Tien City, Taipei, Taiwan, R.O.C.\""
SNMPv2-MIB::sysORLastChange.0 = Timeticks: (4) 0:00:00.04
SNMPv2-MIB::sysORID.1 = OID: SNMP-FRAMEWORK-MIB::snmpFrameworkMIBCompliance
SNMPv2-MIB::sysORID.2 = OID: SNMP-MPD-MIB::snmpMPDCompliance
SNMPv2-MIB::sysORID.3 = OID: SNMP-USER-BASED-SM-MIB::usmMIBCompliance
SNMPv2-MIB::sysORID.4 = OID: SNMPv2-MIB::snmpMIB
SNMPv2-MIB::sysORID.5 = OID: TCP-MIB::tcpMIB
SNMPv2-MIB::sysORID.6 = OID: RFC1213-MIB::ip
SNMPv2-MIB::sysORID.7 = OID: UDP-MIB::udpMIB
SNMPv2-MIB::sysORID.8 = OID: SNMP-VIEW-BASED-ACM-MIB::vacmBasicGroup
…
3-21
Product Name
Managing Communications
ATTENTION
Click on the following links for more information about RFC1317 RS-232 like group and RFC 1213 MIB-II.
http://www.faqs.org/rfcs/rfc1317.html
http://www.ietf.org/rfc/rfc1213.txt
OpenVPN
OpenVPN provides two types of tunnels for users to implement VPNS: Routed IP Tunnels and Bridged
Ethernet Tunnels.
An Ethernet bridge is used to connect different Ethernet networks together. The Ethernets are bundled into one
bigger, “logical” Ethernet. Each Ethernet corresponds to one physical interface (or port) that is connected to the
bridge.
On each OpenVPN machine, you should carry out configurations in the /etc/openvpn directory, where script
files and key files reside. Once established, all operations will be performed in that directory.
Ethernet Bridging for Private Networks on Different Subnets
1. Set up four machines, as shown in the following diagram.
Host A represents the machine that belongs to OpenVPN A, and Host B represents the machine that belongs to
OpenVPN B. The two remote subnets are configured for a different range of IP addresses. When this
configuration is moved to a public network, the external interfaces of the OpenVPN machines should be
configured for static IPs, or connected to another device (such as a firewall or DSL box) first.
2. Generate a preset shared key by typing the command:
# openvpn --genkey --secret secrouter.key
3. Copy the file that is generated to the OpenVPN machine:
# scp /etc/openvpn/secrouter.key 192.168.8.174:/etc/openvpn
ATTENTION
A preshared key is located at /etc/openvpn/secrouter.key. You can use it for testing purposes. We suggest
creating a new key for non-testing purpose.
3-22
Product Name
Managing Communications
4. On machine OpenVPN A, modify the remote address in the configuration file
/etc/openvpn/tap0-br.conf.
# point to the peer
remote 192.168.8.174
dev tap0
port 1194
secret /etc/openvpn/secrouter.key
cipher DES-EDE3-CBC
auth MD5
tun-mtu 1500
tun-mtu-extra 64
ping 40
5. Next, modify the routing table in the /etc/openvpn/tap0-br.sh script file.
#--------------------------Start--------------------------#!/bin/sh
# value after “-net” is the subnet behind the remote peer
route add -net 192.168.4.0 netmask 255.255.255.0 dev br0
#----------------------------end--------------------------And then configure the bridge interface in /etc/openvpn/bridge.
#!/bin/bash
# Create global variables
# Define Bridge Interface
br="br0"
# Define list of TAP interfaces to be bridged,
# for example tap="tap0 tap1 tap2".
tap="tap0"
# Define physical ethernet interface to be bridged
# with TAP interface(s) above.
eth="eth1"
eth_ip="192.168.8.173"
eth_netmask="255.255.255.0"
eth_broadcast="192.168.8.255"
#gw="192.168.8.174"
...
Start the bridge script file to configure the bridge interface.
# /etc/openvpn/bridge restart
6. On machine OpenVPN B, modify the remote address in configuration file
/etc/openvpn/tap0-br.conf.
# point to the peer
remote 192.168.8.173
dev tap0
secret /etc/openvpn/secrouter.key
cipher DES-EDE3-CBC
auth MD5
tun-mtu 1500
tun-mtu-extra 64
ping 40
up /etc/openvpn/tap0-br.sh
3-23
Product Name
Managing Communications
7. Next modify the routing table in /etc/openvpn/tap0-br.sh script file.
#----------------------------------Start----------------------------#!/bin/sh
# value after “-net” is the subnet behind the remote peer
route add -net 192.168.2.0 netmask 255.255.255.0 dev br0
#---------------------------------- end -----------------------------
And then configure the bridge interface in /etc/openvpn/bridge.
#!/bin/bash
# Create global variables
# Define Bridge Interface
br="br0"
# Define list of TAP interfaces to be bridged,
# for example tap="tap0 tap1 tap2".
tap="tap0"
# Define physical ethernet interface to be bridged
# with TAP interface(s) above.
eth="eth1"
eth_ip="192.168.8.174"
eth_netmask="255.255.255.0"
eth_broadcast="192.168.8.255"
#
"192 168 8 173"
Start the bridge script file to configure the bridge interface.
# /etc/openvpn/bridge restart
ATTENTION
Select cipher and authentication algorithms by specifying cipher and auth. To see which algorithms are
available, type:
# openvpn --show-ciphers
# openvpn --show-auths
8. Start both OpenVPN peers on machine OpenVPN A and OpenVPN B.
# openvpn --config /etc/openvpn/tap0-br.conf&
If you see the line Peer Connection Initiated with 192.168.8.173:5000on each machine, the connection
between OpenVPN machines has been established successfully on UDP port 5000.
ATTENTION
You can create link symbols to start the OpenVPN service at boot time:
# ln -sf /etc/init.d/openvpn /etc/rc2.d/S16openvpn
To stop the service, you should create these links:
# ln -sf /etc/init.d/openvpn /etc/rc0.d/K80openvpn
# ln -sf /etc/init.d/openvpn /etc/rc6.d/K80openvpn
3-24
Product Name
Managing Communications
9. On each OpenVPN machine, check the routing table by typing the command # route
Destination
Gateway
192.168.5.0
0.0.0.0 255.255.255.0
Genmsk
U
Flags
0
Metric
0
0
Ref Use Iface
eth2
192.168.4.0
0.0.0.0 255.255.255.0
U
0
0
0
br0
192.168.3.0
0.0.0.0 255.255.255.0
U
0
0
0
eth0
192.168.30.0
0.0.0.0 255.255.255.0
U
0
0
0
eth3
192.168.8.0
0.0.0.0 255.255.255.0
U
0
0
0
br0
Interface eth1 and device tap0 both connect to the bridging interface, and the virtual device tun sits on top
of tap0. This ensures that all traffic coming to this bridge from internal networks connected to interface eth1
write to the TAP/TUN device that the OpenVPN program monitors. Once the OpenVPN program detects traffic
on the virtual device, it sends the traffic to its peer.
10. To create an indirect connection to Host B from Host A, you need to add the following routing item:
# route add –net 192.168.4.0 netmask 255.255.255.0 dev eth0
To create an indirect connection to Host A from Host B, you need to add the following routing item:
# route add –net 192.168.2.0 netmask 255.255.255.0 dev eth0
Now ping Host B from Host A by typing:
# ping 192.168.4.174
A successful ping indicates that you have created a VPN system that only allows authorized users from one
internal network to access users at the remote site. For this system, all data is transmitted by UDP packets on
port 5000 between OpenVPN peers.
11. To shut down OpenVPN programs, type the command:
# killall -TERM openvpn
Ethernet Bridging for Private Networks on the Same Subnet
1. Set up four machines, as shown in the following diagram.
3-25
Product Name
Managing Communications
2. The configuration procedure is almost the same as for the previous example. The only difference is that you
will need to comment out the parameter up in /etc/openvpn/tap0-br.conf of OpenVPN A and
/etc/openvpn/tap0-br.conf of OpenVPN B.
# point to the peer
remote 192.168.8.174
dev tap0
secret /etc/openvpn/secrouter.key
cipher DES-EDE3-CBC
auth MD5
tun-mtu 1500
tun-mtu-extra 64
ping 40
#up /etc/openvpn/tap0-br.sh
Routed IP
1. Set up four machines, as shown in the following diagram.
2. On machine OpenVPN A, modify the remote address in configuration file /etc/openvpn/tun.conf.
# point to the peer
remote 192.168.8.174
dev tun
secret /etc/openvpn/secrouter.key
cipher DES-EDE3-CBC
auth MD5
tun-mtu 1500
tun-mtu-extra 64
ping 40
ifconfig 192 168 2 173 192 168 4 174
3. Next, modify the routing table in script file /etc/openvpn/tun.sh.
#---------------------------Start---------------------------#!/bin/sh
# value after “-net” is the subnet behind the remote peer
route add -net 192.168.2.0 netmask 255.255.255.0 gw $5
#
d
3-26
Product Name
Managing Communications
4. On machine OpenVPN B, modify the remote address in configuration file /etc/openvpn/tun.conf.
# point to the peer
remote 192.168.8.173
dev tun
secret /etc/openvpn/secrouter.key
cipher DES-EDE3-CBC
auth MD5
tun-mtu 1500
tun-mtu-extra 64
ping 40
ifconfig 192.168.4.174 192.168.2.173
And then modify the routing table in script file /etc/openvpn/tun.sh.
#--------------------------Start---------------------------#!/bin/sh
# value after “-net” is the subnet behind the remote peer
route add -net 192.168.2.0 netmask 255.255.255.0 gw $5
#
end
The first argument of parameter ifconfig is the local internal interface and the second argument is the internal
interface at the remote peer.
$5 is the argument that the OpenVPN program passes to the script file. Its value is the second argument of
ifconfig in the configuration file.
5. Check the routing table after you run the OpenVPN programs, by typing the command # route.
Destination
Gateway
Genmsk
Flags
Metric
Ref
Use Iface
192.168.4.174 *
255.255.255.255
UH
0
0
0
0
tun0
tun0
192.168.4.0
192.168.4.174 255.255.255.0 UG
0
0
192.168.2.0
*
255.255.255.0 U
0
0
0
*
255.255.255.0 U
0
0
0
eth1
192.168.8.0
eth0
3-27
4
4.
The following topics are covered in this chapter:
RTC (Real Time Clock)
UART
Digital I/O
WDT (Watch Dog Timer)
Programmer Guide
Product Name
Programmer Guide
RTC (Real Time Clock)
The device node is located at /dev/rtc. The DA-683-LX supports standard Linux simple RTC control. You must
include <linux/rtc.h>.
1. Function: RTC_RD_TIME
int ioctl(fd, RTC_RD_TIME, struct rtc_time *time);
Description: read time information from RTC. It will return the value on argument 3.
2. Function: RTC_SET_TIME
int ioctl(fd, RTC_SET_TIME, struct rtc_time *time);
Description: set RTC time. Argument 3 will be passed to RTC.
UART
The normal tty device node is /dev/ttyS0 and /det/ttyS1.
The DA-683-LX supports standard Linux termios control with RS-232 serial ports.
Digital I/O
Digital Output channels can be set to high or low. The channels are controlled by the function call
set_dout_state( ). Use the digital input channels to detect the state change of the digital input signal. The DI
channels can also be used to detect whether or not the state of a digital signal changes during a fixed period of
time. This can be done by the function call, set_din_event( ).
Return error code definitions:
#define DIO_ERROR_PORT -1 // no such port
#define DIO_ERROR_MODE -2 // no such mode or state
#define DIO_ERROR_CONTROL -3 // open or ioctl fail
#define DIO_ERROR_DURATION -4 // The value of duration is not 0 or not in the range,
40 <= duration <= 3600000 milliseconds (1 hour)
#define DIO_ERROR_DURATION_20MS -5 // The value of duration must be a multiple of 20
ms
#define DIO_OK 0
DIN and DOUT definitions:
#define DIO_HIGH 1
#define DIO_LOW 0
Moxa functions for DI/DO
Function
int set_dout_state(int doport, int state)
Description
Set the DOUT port to high or low state.
Input
<doport> The DOUT port you want to set. Port starts from 0 to 3
Output
none
Return
refer to the error code
Function
int get_din_state(int diport, int *state)
Description
Get the DIN port state
Input
<diport> The DIN port to get the state of. Port numbering is from 0 to 3
<state> Set high or low state; DIO_HIGH (1) for high, DIO_LOW (0) for low.
<state> Save the current state
Output
<state> DIO_HIGH (1) for high, DIO_LOW (0) for low
Return
Refer to the error code
4-2
Product Name
Programmer Guide
Function
int get_dout_state(int doport, int *state)
Description
Get the DOUT port state
Input
<doport> The DOUT port to get the state of.
<state> Save the current state.
Output
<state> DIO_HIGH (1) for high, DIO_LOW (0) for low
Return
Refer to the error code
Function
int set_din_event(int diport, void (*func)(int diport), int mode, long int duration)
Description
Set the DIN event when the state is changed from high to low or from low to high
Input
<diport> The port that will be used to detect the DIN event.
Port numbering is from 0 to 3. This value depends on your device.
<(*func) (int diport)>
Not NULL: Returns the call back function. When the event occurs, the call back function will
be invoked.
NULL: Clear this event
<mode>
DIN_EVENT_HIGH_TO_LOW (1): From high to low
DIN_EVENT_LOW_TO_HIGH (0): From low to high
DIN_EVENT_CLEAR (-1): Clear this event
<duration>
0: Detect the din event DIN_EVENT_HIGH_TO_LOW or DIN_EVENT_LOW_TO_HIGH
without duration
Not 0: Detect the din event DIN_EVENT_HIGH_TO_LOW or
DIN_EVENT_LOW_TO_HIGH with duration.
Note:
The value of “duration” must be a multiple of 20 milliseconds.
The range of “duration” is 0, or 40 <= duration <= 3600000 milliseconds.
The error of the measurement is 24 ms. For example, if the DIN duration is 200 ms, this
event will be generated when the DIN pin stays in the same state for a time between 176 ms
and 200 ms.
Output
None
Return
Refer to the error code
Function
int get_din_event(int diport, int *mode, long int *duration)
Description
To retrieve the DIN event configuration, including mode
(DIN_EVENT_HIGH_TO_LOW or DIN_EVENT_LOW_TO_HIGH), and the value of “duration.”
Input
<diport> Which DIN port you want to retrieve
<mode> Save the set event.
<duration> The duration the DIN port is kept in high or low state. - return to the current
duration value of diport
Output
<mode>
DIN_EVENT_HIGH_TO_LOW (1): From high to low
DIN_EVENT_LOW_TO_HIGH(0): From low to high
DIN_EVENT_CLEAR(-1): Clear this event
<duration>
The value of duration should be 0 or 40 <= duration <= 3600000 milliseconds.
Return
Refer to the error code
4-3
Product Name
Programmer Guide
Special Note
1. You have to build the moxalib in advance for DI/DO. The moxalib is included in the folder
\example\moxalib in CD.
2. Make sure to link the library libmoxalib for DI/DO programming, and include the header file
moxadevice.h. Only one program at a time can use the DI/DO library.
3. Due to hardware limitation, you need to modify MIN_DURATION as 60 for DA-683-LX.
Examples
Example files tdio.c and Makefile are located in the folder \example\tdio\ on the CD.
WDT (Watch Dog Timer)
Introduction
The WDT works like a watchdog function. You may enable it or disable it. When the WDT function is enabled and
the application does not acknowledge it, the system will reboot. The acknowledgement time can be set between
50 milliseconds to 60 seconds.
How the WDT works
You will need to write your own application to enable the WDT function. Refer to the following APIs for help
writing the application.
The user API
Function
int swtd_open(void)
Description
Open the file handle to control the software watchdog.
Input
None
Output
None
Return
On success, return a file handle. Otherwise, return < 0 value.
Function
int swtd_enable(int fd, unsigned long time)
Description
Enable software watchdog. And you must do swtd_ack() after this procedure
Input
<fd> the file handle, from the swtd_open() return value
<time>
The time you wish to ack software watchdog periodically.
Note: You must ack the software watchdog before timeout. Otherwise, the system will
reboot automatically. The minimal time is 50 msec, the maximum time is 60 seconds. The
time unit is msec.
Output
None
Return
On success, 0 is returned. Otherwise, an error number is return
Function
int swtd_disable(int fd)
Description
Disable the application to ack software watchdog. And the kernel will ack it automatically.
Input
<fd> the file handle from swtd_open() return value.
Output
None
Return
On success, 0 is returned. Otherwise, an error number is return
4-4
Product Name
Programmer Guide
Function
int swtd_get(int fd, int *mode, unsigned long *time)
Description
Get current setting values.
Input
<fd> the file handle from swtd_open() return value.
<*mode>
return the status 1(enable) or 0(disable) of userspace watchdog
<*time>
return the current time period.
Output
None
Return
On success, 0 is returned. Otherwise, an error number is return
Function
int swtd_ack(int fd)
Description
Acknowledge software watchdog.
When software watchdog is enabled, application should execute swtd_ack()
periodically
within user predefined time.
Input
<fd>
Output
None
Return
On success, 0 is returned. Otherwise, an error number is return
Function
int swtd_close(int fd)
Description
Close the file handle.
Input
<fd> the file handle from swtd_open() return value.
Output
None
Return
On success, 0 is returned. Otherwise, an error number is return
the file handle from swtd_open() return value.
Special Note
When you “kill the application with -9” or “kill without option” or “Ctrl+c” the kernel will change to auto ack the
software watchdog.
When your application enables the software watchdog and does not ack, your application may have a logical
error, or your application has made a core dump. The kernel will not change to auto ack. This can cause a
serious problem, causing your system to reboot again and again.
Examples
The example file watchdog.c and Makefile are put at \example\swatchdog\ in CD
4-5
5
5.
System Recovery
The DA-683-LX is installed with the Embedded Linux operating system, which is located in the Flash DOM
(CompactFlash card) shipped with the DA-683-LX computer. Although it rarely happens, you may find on
occasion that operating system files and/or the disk file system are damaged. This chapter describes how to
recover the Linux operating system.
The following topics are covered in this chapter:
Recovery Environment
Recovery Procedure
Product Name
System Recovery
Recovery Environment
The recovery environment includes the DA-683-LX embedded computer and a bootable USB disk with the
recovery programs and system image file.
DA-683-LX
Bootable USB DISK
(recovery programs and
USB Port
system image file
included)
Recovery Procedure
Step 1:
Format an Empty USB Disk.
A. Prepare a USB disk that has at least a 256 MB capacity.
B. Format your USB disk with the HP USB Disk Format Tool. Open the utility and select the device and FAT
file system. You need empty disk only. DO NOT check the option Create a DOS startup disk.
C. Click Start.
ATTENTION
The HP USB Disk Storage Format Tool can be downloaded from many web sites. Do a search on HP USB Disk
Storage Format Tool from any search engine to locate the tool.
Step 2:
Create a Linux Bootable USB Disk.
A. You can find the firmware directory in the Recovery CD shipped with the DA-683-LX computer.
B. Configure Windows Explorer to show hidden files (including protected operating system files).
C. Copy all files in the firmware directory to the root directory of your USB disk.
5-2
Product Name
System Recovery
D. Open a DOS prompt and type D:\syslinux.exe M: to create a bootable Linux disk. In this example, D: is
the USB Disk drive number.
Step 3: Set up the BIOS to Boot from a USB Disk.
A. Insert the USB disk.
B. Power on and press F2 to enter the bios setup menu.
C. Select Boot Legacy and then press Enter.
5-3
Product Name
System Recovery
D. From the setup menu, use “↑” or “↓” to select Boot Type Order
E. Press “+” to move the selection up to the first priority, and press Esc to exit the setup menu.
F. Make sure the first boot device is USB device. If not, press Enter to change it.
G. Select Exit Save & Exit Setup and then press Enter.
H. Choose Y to save to the CMOS and then exit.
5-4
Product Name
Step 4:
System Recovery
Recover the Linux system from a USB Disk.
I. If the BIOS setup is correct, it will boot from the USB disk. Follow the steps below to set up recovery
parameters.
Welcome to PING (Partition Image Is Not Ghost)!
This tool can be used to both backup a Ghost-like image of your hard disk and to
restore your hard disk from such an image. Please, be aware that if you choose to
restore your hard disk. All the data contained on this computer might be lost during
the restoration. You may choose to abort now, by stopping the computer now.
<OK>
J. Choose OK to go to the next step.
K. Choose shut down the DA-683-LX when the restoration is finished.
PING (Partition Image Is Not Ghost)!
When the job is completed, do you want to
Get a shell (root)
Reboot the system
Shutdown
<OK>
<Cancel>
L. Choose restore image from Local disk partition.
PING (Partition Image Is Not Ghost)!
Where do you want to save/restore your image
to/from?
Network share
Local disk partition
<OK>
<Cancel>
5-5
Product Name
System Recovery
M. Choose ### Choose THIS if you want a restoration ###
Choose the partition to backup
Note that you cannot restore a partition to itself. So every partition but one (the
destination) can be checked. Use SPACE to SELECT an entry.
[*] ###Choose THIS if you want a restoration ###
[ ] hda1 Linux (lost+found,home,etc,media,cdrom,usr…)
[ ] hda2 Linux
[ ] sda1
<OK>
<Cancel>
N. Choose the restoration source device sda1.
Choose the partition where to store the back/ where to the backup is stored?
[ ] hda1 Linux (lost+found,home,etc,media,cdrom,usr…)
[ ] hda2 Linux
[*] sda1 (W95 FAT32 (LBA)) (DA683_V1.0_Build_10101611)
<OK>
<Cancel>
O. Enter “\” to choose the root directory of the restoration image.
Enter root directory containing your data (eg.
\mydir\PartImage)
\
<OK>
<Cancel>
5-6
Product Name
System Recovery
P. Choose DA683_V1.0_Build_10101611 for the restoration image.
Action and Available images for restoration …
Choose Create_New_Image if you want a ghost-like images of your partitions.
Choose Backup_Local_Hard_Driver if prefer a zip archive.
DA683_V1.0_Build_10101611
Create_New_Image
Backup_Local_Hard_Driver
<OK>
<Cancel>
Q. When operation is finished, turn off the computer and remove the USB disk.
ATTENTION
DO NOT turn off the power during system recovery, as the system may crash.
5-7
A
A.
acpi-support-base
Software Components
0.109-11
scripts for handling base ACPI events such as the
power button
acpid
1.0.8-1lenny2
Utilities for using ACPI power management
adduser
3.110
add and remove users and groups
alacarte
0.11.5-1
easy GNOME menu editing tool
alsa-base
1.0.17.dfsg-4
ALSA driver configuration files
alsa-utils
1.0.16-2
ALSA utilities
apache2
2.2.9-10+lenny6
Apache HTTP Server metapackage
apache2-mpm-prefork
2.2.9-10+lenny6
Apache HTTP Server - traditional non-threaded
model
apache2-utils
2.2.9-10+lenny6
utility programs for webservers
apache2.2-common
2.2.9-10+lenny6
Apache HTTP Server common files
app-install-data
2008.11.27
Application Installer Data Files
apt
0.7.20.2+lenny1
Advanced front-end for dpkg
apt-utils
0.7.20.2+lenny1
APT utility programs
aptitude
0.4.11.11-1~lenny1
terminal-based package manager
aspell
0.60.6-1
GNU Aspell spell-checker
aspell-en
6.0-0-5.1
English dictionary for GNU Aspell
autoconf
2.61-8
automatic configure script builder
autoconf2.13
2.13-59
automatic configure script builder (obsolete version)
automake
1:1.10.1-3
A tool for generating GNU Standards-compliant
Makefiles
automake1.4
1:1.4-p6-13
A tool for generating GNU Standards-compliant
autotools-dev
20080123.1
Update infrastructure for config.{guess,sub} files
base-files
5lenny4
Debian base system miscellaneous files
base-passwd
3.5.20
Debian base system master password and group files
bash
3.2-4
The GNU Bourne Again SHell
Makefiles
bash-completion
20080705
programmable completion for the bash shell
bc
1.06.94-3
The GNU bc arbitrary precision calculator language
bind9-host
1:9.5.1.dfsg.P3-1+len Version of 'host' bundled with BIND 9.X
ny1
binutils
2.18.1~cvs20080103- The GNU assembler, linker and binary utilities
7
bridge-utils
1.4-5
Utilities for configuring the Linux Ethernet bridge
bsdmainutils
6.1.10
collection of more utilities from FreeBSD
bsdutils
1:2.13.1.1-1
Basic utilities from 4.4BSD-Lite
busybox
1:1.10.2-2
Tiny utilities for small and embedded systems
bzip2
1.0.5-1
high-quality block-sorting file compressor - utilities
capplets-data
1:2.22.2.1-2
configuration applets for GNOME 2 - data files
cdrdao
1:1.2.2-16
records CDs in Disk-At-Once (DAO) mode
console-common
0.7.80
basic infrastructure for text console configuration
Product Name
Software Components
console-data
2:1.07-11
keymaps, fonts, charset maps, fallback tables for
console-tools
1:0.2.3dbs-65.1
Linux console and font utilities
coreutils
6.10-6
The GNU core utilities
cpio
2.9-13
GNU cpio -- a program to manage archives of files
cpp
4:4.3.2-2
The GNU C preprocessor (cpp)
cpp-4.3
4.3.2-1.1
The GNU C preprocessor
cron
3.0pl1-105
management of regular background processing
dbus
1.2.1-5+lenny1
simple interprocess messaging system
dbus-x11
1.2.1-5+lenny1
simple interprocess messaging system (X11 deps)
debconf
1.5.24
Debian configuration management system
debconf-i18n
1.5.24
full internationalization support for debconf
debian-archive-keyring
2009.01.31
GnuPG archive keys of the Debian archive
debian-faq
4.0.4
The Debian FAQ
debianutils
2.30
Miscellaneous utilities specific to Debian
deborphan
1.7.27
program that can find unused packages, e.g. libraries
defoma
0.11.10-0.2
console-tool
Debian Font Manager -- automatic font configuration
framework
deskbar-applet
2.22.3.1-1
universal search and navigation bar for GNOME
desktop-base
5.0.3
common files for the Debian Desktop
desktop-file-utils
0.15-1
Utilities for .desktop files
dhcp3-client
3.1.1-6+lenny3
DHCP client
dhcp3-common
3.1.1-6+lenny3
common files used by all the dhcp3* packages
dialog
1.1-20080316-1
Displays user-friendly dialog boxes from shell scripts
dictionaries-common
0.98.12
Common utilities for spelling dictionary tools
diff
2.8.1-12
File comparison utilities
dmidecode
2.9-1
Dump Desktop Management Interface data
dnsutils
1:9.5.1.dfsg.P3-1+len Clients provided with BIND
ny1
doc-base
0.8.20
utilities to manage online documentation
docbook-xml
4.5-6
standard XML documentation system, for software
dpkg
1.14.25
Debian package management system
and systems
dvd+rw-tools
7.1-3
DVD+-RW/R tools
e2fslibs
1.41.3-1
ext2 filesystem libraries
e2fsprogs
1.41.3-1
ext2/ext3/ext4 file system utilities
eject
2.1.5+deb1-4
ejects CDs and operates CD-Changers under Linux
eog
2.22.3-2
Eye of GNOME graphics viewer program
esound-clients
0.2.36-3
Enlightened Sound Daemon - clients
esound-common
0.2.36-3
Enlightened Sound Daemon - Common files
ethtool
6+20080913-1
display or change Ethernet device settings
evolution-data-server
2.22.3-1.1+lenny2
evolution database backend server
evolution-data-server-commo
2.22.3-1.1+lenny2
architecture independent files for Evolution Data
n
Server
fam
2.7.0-13.3+lenny1
File Alteration Monitor
file
4.26-1
Determines file type using "magic" numbers
findutils
4.4.0-2
utilities for finding files--find, xargs
fontconfig
2.6.0-3
generic font configuration library - support binaries
fontconfig-config
2.6.0-3
generic font configuration library - configuration
ftp
0.17-18
The FTP client
g++
4:4.3.2-2
The GNU C++ compiler
g++-4.3
4.3.2-1.1
The GNU C++ compiler
gcc
4:4.3.2-2
The GNU C compiler
A-2
Product Name
gcc-4.2-base
Software Components
4.2.4-6
The GNU Compiler Collection (base package)
gcc-4.3
4.3.2-1.1
The GNU C compiler
gcc-4.3-base
4.3.2-1.1
The GNU Compiler Collection (base package)
gconf2
2.22.0-1
GNOME configuration database system (support
gconf2-common
2.22.0-1
GNOME configuration database system (common
gdb
6.8-3
The GNU Debugger
gdm
2.20.7-4lenny1
GNOME Display Manager
gdm-themes
0.6.1
Themes for the GNOME Display Manager
gedit
2.22.3-1+lenny1
official text editor of the GNOME desktop
gedit-common
2.22.3-1+lenny1
tools)
files)
environment
official text editor of the GNOME desktop
environment (support
genisoimage
9:1.1.9-1
Creates ISO-9660 CD-ROM filesystem images
gettext-base
0.17-4
GNU Internationalization utilities for the base system
gksu
2.0.0-8
graphical frontend to su
gnome-about
2.22.3-2
The GNOME about box
gnome-applets
2.22.3-3
Various applets for GNOME 2 panel - binary files
gnome-applets-data
2.22.3-3
Various applets for GNOME 2 panel - data files
gnome-control-center
1:2.22.2.1-2
utilities to configure the GNOME desktop
gnome-core
1:2.22.2~5
The GNOME Desktop Environment -- essential
components
gnome-desktop-data
2.22.3-2
Common files for GNOME 2 desktop apps
gnome-doc-utils
0.12.2-1
a collection of documentation utilities for the Gnome
project
gnome-icon-theme
2.22.0-1
gnome-keyring
2.22.3-2
GNOME Desktop icon theme
GNOME keyring services (daemon and tools)
gnome-media
2.22.0-3
GNOME media utilities
gnome-media-common
2.22.0-3
GNOME media utilities - common files
gnome-menus
2.22.2-4
an implementation of the freedesktop menu
gnome-mime-data
2.18.0-1
base MIME and Application database for GNOME.
gnome-mount
0.7-2
wrapper for (un)mounting and ejecting storage
gnome-netstatus-applet
2.12.1-2
Network status applet for GNOME 2
gnome-panel
2.20.3-5
launcher and docking facility for GNOME
gnome-panel-data
2.20.3-5
common files for the GNOME Panel
gnome-power-manager
2.22.1-4
power management tool for the GNOME desktop
gnome-session
2.22.3-2
The GNOME 2 Session Manager
gnome-settings-daemon
2.22.2.1-2
GNOME settings daemon
gnome-system-monitor
2.22.3-1
specification for GN
devices
Process viewer and system resource monitor for
GNOME 2
gnome-terminal
2.22.3-3
The GNOME 2 terminal emulator application
gnome-terminal-data
2.22.3-3
Data files for the GNOME terminal emulator
gnome-user-guide
2.22.1-1
GNOME user's guide
gnome-utils
2.20.0.1-3
GNOME desktop utilities
gnupg
1.4.9-3+lenny1
GNU privacy guard - a free PGP replacement
gpgv
1.4.9-3+lenny1
GNU privacy guard - signature verification tool
grep
2.5.3~dfsg-6
GNU grep, egrep and fgrep
groff-base
1.18.1.1-21
GNU troff text-formatting system (base system
grub
0.97-47lenny2
components)
GRand Unified Bootloader (Legacy version)
A-3
Product Name
Software Components
grub-common
1.96+20080724-16
GRand Unified Bootloader, version 2 (common files)
gstreamer0.10-alsa
0.10.19-2
GStreamer plugin for ALSA
gstreamer0.10-plugins-base
0.10.19-2
GStreamer plugins from the "base" set
gstreamer0.10-plugins-good
0.10.8-4.1~lenny2
GStreamer plugins from the "good" set
gstreamer0.10-x
0.10.19-2
GStreamer plugins for X11 and Pango
gzip
1.3.12-6
The GNU compression utility
hal
0.5.11-8
Hardware Abstraction Layer
hal-info
20080508+git200806
Hardware Abstraction Layer - fdi files
01-1
hicolor-icon-theme
0.10-1
default fallback theme for FreeDesktop.org icon
themes
hostname
2.95
ifenslave
2
utility to set/show the host name or domain name
Attach and detach slave interfaces to a bonding
device
ifenslave-2.6
1.1.0-10
Attach and detach slave interfaces to a bonding
device
ifupdown
0.6.8+nmu1
high level tools to configure network interfaces
initramfs-tools
0.92o
tools for generating an initramfs
initscripts
2.86.ds1-61
Scripts for initializing and shutting down the system
iproute
20080725-2
networking and traffic control tools
iptables
1.4.2-6
administration tools for packet filtering and NAT
iputils-ping
3:20071127-1
Tools to test the reachability of network hosts
iso-codes
3.5.1-1
ISO language, territory, currency, script codes and
their tran
klibc-utils
1.5.12-2
small utilities built with klibc for early boot
libaa1
1.4p5-37+b1
ascii art library
libacl1
2.2.47-2
Access control list shared library
libao2
0.8.8-4
Cross Platform Audio Output Library
libapache2-mod-php5
5.2.6.dfsg.1-1+lenny4 server-side, HTML-embedded scripting language
libapm1
3.2.2-12
Library for interacting with APM driver in kernel
libapr1
1.2.12-5+lenny1
The Apache Portable Runtime Library
libaprutil1
1.2.12+dfsg-8+lenny
The Apache Portable Runtime Utility Library
(Apache 2 module
4
libart-2.0-2
2.3.20-2
Library of functions for 2D graphics - runtime files
libasound2
1.0.16-2
ALSA library
libaspell15
0.60.6-1
GNU Aspell spell-checker runtime library
libatk1.0-0
1.22.0-1
The ATK accessibility toolkit
libatk1.0-data
1.22.0-1
Common files for the ATK accessibility toolkit
libattr1
1:2.4.43-2
Extended attribute shared library
libaudiofile0
0.2.6-7+lenny1
Open-source version of SGI's audiofile library
libavahi-client3
0.6.23-3lenny1
Avahi client library
libavahi-common-data
0.6.23-3lenny1
Avahi common data files
libavahi-common3
0.6.23-3lenny1
Avahi common library
libavahi-glib1
0.6.23-3lenny1
Avahi glib integration library
libavc1394-0
0.5.3-1+b1
control IEEE 1394 audio/video devices
libbeagle1
0.3.5-1+b1
library for accessing beagle using C
libbind9-40
1:9.5.1.dfsg.P3-1+len BIND9 Shared Library used by BIND
ny1
libblkid1
1.41.3-1
block device id library
libbonobo2-0
2.22.0-1
Bonobo CORBA interfaces library
libbonobo2-common
2.22.0-1
Bonobo CORBA interfaces library -- support files
libbonoboui2-0
2.22.0-1
The Bonobo UI library
A-4
Product Name
Software Components
libbonoboui2-common
2.22.0-1
The Bonobo UI library -- common files
libbz2-1.0
1.0.5-1
high-quality block-sorting file compressor library -
libc6
2.7-18lenny2
GNU C Library: Shared libraries
libc6-dev
2.7-18lenny2
GNU C Library: Development Libraries and Header
runtime
Files
libc6-i686
2.7-18lenny2
GNU C Library: Shared libraries [i686 optimized]
libcaca0
0.99.beta14-1
colour ASCII art library
libcairo-perl
1.060-1
Perl interface to the Cairo graphics library
libcairo2
1.6.4-7
The Cairo 2D vector graphics library
libcairomm-1.0-1
1.6.0-1
C++ wrappers for Cairo (shared libraries)
libcamel1.2-11
2.22.3-1.1+lenny2
The Evolution MIME message handling library
libcap1
1:1.10-14
support for getting/setting POSIX.1e capabilities
libcap2
2.11-2
support for getting/setting POSIX.1e capabilities
libcdio7
0.78.2+dfsg1-3
library to read and control CD-ROM
libcdparanoia0
3.10.2+debian-5
audio extraction tool for sampling CDs (library)
libcomerr2
1.41.3-1
common error description library
libcompress-raw-zlib-perl
2.012-1lenny1
low-level interface to zlib compression library
libcompress-zlib-perl
2.012-1
Perl module for creation and manipulation of gzip
libconsole
1:0.2.3dbs-65.1
Shared libraries for Linux console and font
libcpufreq0
004-2
files
manipulation
shared library to deal with the cpufreq Linux kernel
feature
libcroco3
0.6.1-2
a generic Cascading Style Sheet (CSS) parsing and
manipulation
libcucul0
0.99.beta14-1
libcups2
1.3.8-1+lenny8
low-level Unicode character drawing library
Common UNIX Printing System(tm) - libs
libcwidget3
0.5.12-4
high-level terminal interface library for C++ (runtime
libdatrie0
0.1.3-2
Double-array trie library
libdb4.5
4.5.20-13
Berkeley v4.5 Database Libraries [runtime]
libdb4.6
4.6.21-11
Berkeley v4.6 Database Libraries [runtime]
libdbus-1-3
1.2.1-5+lenny1
simple interprocess messaging system
libdbus-glib-1-2
0.76-1
files)
simple interprocess messaging system (GLib-based
shared librar
libdevmapper1.02.1
2:1.02.27-4
libdirectfb-1.0-0
1.0.1-11
The Linux Kernel Device Mapper userspace library
direct frame buffer graphics - shared libraries
libdirectfb-extra
1.0.1-11
direct frame buffer graphics - extra providers
libdmx1
1:1.0.2-3
X11 Distributed Multihead extension library
libdns45
1:9.5.1.dfsg.P3-1+len DNS Shared Library used by BIND
ny1
libdrm2
2.3.1-2
Userspace interface to kernel DRM services -runtime
libdv4
1.0.0-1+b1
software library for DV format digital video (runtime
libebook1.2-9
2.22.3-1.1+lenny2
Client library for evolution address books
libecal1.2-7
2.22.3-1.1+lenny2
Client library for evolution calendars
libedata-book1.2-2
2.22.3-1.1+lenny2
Backend library for evolution address books
libedata-cal1.2-6
2.22.3-1.1+lenny2
Backend library for evolution calendars
libedataserver1.2-9
2.22.3-1.1+lenny2
Utility library for evolution data servers
lib)
libedataserverui1.2-8
2.22.3-1.1+lenny2
GUI utility library for evolution data servers
libedit2
2.11~20080614-1
BSD editline and history libraries
A-5
Product Name
libeel2-2.20
Software Components
2.20.0-7
Eazel Extensions Library (for GNOME2)
libeel2-data
2.20.0-7
Eazel Extensions Library - data files (for GNOME2)
libegroupwise1.2-13
2.22.3-1.1+lenny2
Client library for accessing groupwise POA through
SOAP interf
libenchant1c2a
1.4.2-3.3
a wrapper library for various spell checker engines
libept0
0.5.22
High-level library for managing Debian package
libesd0
0.2.36-3
Enlightened Sound Daemon - Shared libraries
libevent1
1.3e-3
An asynchronous event notification library
libexempi3
2.0.1-1
library to parse XMP metadata (Library)
libexif12
0.6.16-2.1
library to parse EXIF files
information
libexpat1
2.0.1-4+lenny3
XML parsing C library - runtime library
libfam0
2.7.0-13.3+lenny1
Client library to control the FAM daemon
libffi5
3.0.7-1
Foreign Function Interface library runtime
libflac8
1.2.1-1.2
Free Lossless Audio Codec - runtime C library
libfont-afm-perl
1.20-1
Font::AFM - Interface to Adobe Font Metrics files
libfontconfig1
2.6.0-3
generic font configuration library - runtime
libfontenc1
1:1.0.4-3
X11 font encoding library
libfreetype6
2.3.7-2+lenny1
FreeType 2 font engine, shared library files
libfreezethaw-perl
0.43-4
converting Perl structures to strings and back
libfs6
2:1.0.1-1
X11 Font Services library
libgail-common
1.22.3-1
GNOME Accessibility Implementation Library -common modules
libgail18
1.22.3-1
GNOME Accessibility Implementation Library --
libgc1c2
1:6.8-1.1
conservative garbage collector for C and C++
libgcc1
1:4.3.2-1.1
GCC support library
libgconf2-4
2.22.0-1
GNOME configuration database system (shared
libgcrypt11
1.4.1-1
LGPL Crypto library - runtime library
libgdata-google1.2-1
2.22.3-1.1+lenny2
Client library for accessing Google POA through SOAP
libgdata1.2-1
2.22.3-1.1+lenny2
Client library for accessing Google POA through SOAP
shared libraries
libraries)
interface
interface
libgdbm3
1.8.3-3
GNU dbm database routines (runtime version)
libgksu2-0
2.0.7-1
library providing su and sudo functionality
libgl1-mesa-dri
7.0.3-7
A free implementation of the OpenGL API -- DRI
libgl1-mesa-glx
7.0.3-7
libglade2-0
1:2.6.2-1
modules
A free implementation of the OpenGL API -- GLX
runtime
library to load .glade files at runtime
libglib-perl
1:1.190-2
Perl interface to the GLib and GObject libraries
libglib2.0-0
2.16.6-3
The GLib library of C routines
libglib2.0-data
2.16.6-3
Common files for GLib library
libglibmm-2.4-1c2a
2.16.4-1
C++ wrapper for the GLib toolkit (shared libraries)
libglu1-mesa
7.0.3-7
The OpenGL utility library (GLU)
libgmp3c2
2:4.2.2+dfsg-3
Multiprecision arithmetic library
libgnome-desktop-2
2.22.3-2
Utility library for loading .desktop files - runtime files
libgnome-keyring0
2.22.3-2
GNOME keyring services library
libgnome-media0
2.22.0-3
runtime libraries for the GNOME media utilities
libgnome-menu2
2.22.2-4
an implementation of the freedesktop menu
libgnome-window-settings1
1:2.22.2.1-2
specification for GN
Utility library for getting window manager settings
A-6
Product Name
libgnome2-0
Software Components
2.20.1.1-1
The GNOME 2 library - runtime files
libgnome2-canvas-perl
1.002-1+b2
Perl interface to the GNOME canvas library
libgnome2-common
2.20.1.1-1
The GNOME 2 library - common files
libgnome2-perl
1.042-1+b1
Perl interface to the GNOME libraries
libgnome2-vfs-perl
1.080-1+b1
Perl interface to the 2.x series of the GNOME VFS
library
libgnomecanvas2-0
2.20.1.1-1
A powerful object-oriented display - runtime files
libgnomecanvas2-common
2.20.1.1-1
A powerful object-oriented display - common files
libgnomecups1.0-1
0.2.3-3
GNOME library for CUPS interaction
libgnomekbd-common
2.22.0-1
GNOME library to manage keyboard configuration common files
libgnomekbd2
2.22.0-1
GNOME library to manage keyboard configuration -
libgnomekbdui2
2.22.0-1
User interface library for libgnomekbd - shared
libgnomeprint2.2-0
2.18.5-1
shared librar
library
The GNOME 2.2 print architecture - runtime files
libgnomeprint2.2-data
2.18.5-1
The GNOME 2.2 print architecture - data files
libgnomeprintui2.2-0
2.18.3-1
GNOME 2.2 print architecture User Interface runtime files
libgnomeprintui2.2-common
2.18.3-1
GNOME 2.2 print architecture User Interface -
libgnomeui-0
2.20.1.1-2
The GNOME 2 libraries (User Interface) - runtime files
libgnomeui-common
2.20.1.1-2
common files
The GNOME 2 libraries (User Interface) - common
files
libgnomevfs2-0
1:2.22.0-5
GNOME Virtual File System (runtime libraries)
libgnomevfs2-bin
1:2.22.0-5
GNOME Virtual File System (support binaries)
libgnomevfs2-common
1:2.22.0-5
GNOME Virtual File System (common files)
libgnomevfs2-extra
1:2.22.0-5
GNOME Virtual File System (extra modules)
libgnutls26
2.4.2-6+lenny2
the GNU TLS library - runtime library
libgomp1
4.3.2-1.1
GCC OpenMP (GOMP) support library
libgpg-error0
1.4-2
library for common error values and messages in
GnuPG componen
libgpm2
1.20.4-3.1
General Purpose Mouse - shared library
libgsf-1-114
1.14.8-1lenny2
Structured File Library - runtime version
libgsf-1-common
1.14.8-1lenny2
Structured File Library - common files
libgssglue1
0.1-2
mechanism-switch gssapi library
libgstreamer-plugins-base0.10 0.10.19-2
GStreamer libraries from the "base" set
-0
libgstreamer0.10-0
0.10.19-3
Core GStreamer libraries and elements
libgtk2-perl
1:1.190-1
Perl interface to the 2.x series of the Gimp Toolkit
libgtk2.0-0
2.12.12-1~lenny1
The GTK+ graphical user interface library
libgtk2.0-bin
2.12.12-1~lenny1
The programs for the GTK+ graphical user interface
library
library
libgtk2.0-common
2.12.12-1~lenny1
Common files for the GTK+ graphical user interface
library
libgtkmm-2.4-1c2a
1:2.12.7-1
libgtksourceview-common
1.8.5-1
C++ wrappers for GTK+ 2.4 (shared libraries)
common files for the GTK+ syntax highlighting
widget
libgtksourceview1.0-0
1.8.5-1
shared libraries for the GTK+ syntax highlighting
libgtksourceview2.0-0
2.2.2-1
shared libraries for the GTK+ syntax highlighting
widget
widget
A-7
Product Name
Software Components
libgtksourceview2.0-common
2.2.2-1
common files for the GTK+ syntax highlighting
libgtop2-7
2.22.3-1
gtop system monitoring library
libgtop2-common
2.22.3-1
common files for the gtop system monitoring library
libgucharmap6
1:2.22.3-2
Unicode browser widget library (shared library)
libgweather-common
2.22.3-1
GWeather common files
libgweather1
2.22.3-1
GWeather shared library
libhal-storage1
0.5.11-8
widget
Hardware Abstraction Layer - shared library for
storage device
libhal1
0.5.11-8
Hardware Abstraction Layer - shared library
libhtml-format-perl
2.04-2
format HTML syntax trees into text, PostScript or RTF
libhtml-parser-perl
3.56-1+lenny1
A collection of modules that parse HTML text
documents
libhtml-tagset-perl
3.20-2
Data tables pertaining to HTML
libhtml-tree-perl
3.23-1
represent and create HTML syntax trees
libhunspell-1.2-0
1.2.6-1
spell checker and morphological analyzer (shared
libice6
2:1.0.4-1
X11 Inter-Client Exchange library
libidl0
0.8.10-0.1
library for parsing CORBA IDL files
libidn11
1.8+20080606-1
GNU libidn library, implementation of IETF IDN
library)
specifications
libiec61883-0
1.1.0-2
an partial implementation of IEC 61883
libio-compress-base-perl
2.012-1
Base Class for IO::Compress modules
libio-compress-zlib-perl
2.012-1
Perl interface to zlib
libisc45
1:9.5.1.dfsg.P3-1+len ISC Shared Library used by BIND
ny1
libisccc40
1:9.5.1.dfsg.P3-1+len Command Channel Library used by BIND
ny1
libisccfg40
1:9.5.1.dfsg.P3-1+len Config File Handling Library used by BIND
libjpeg62
6b-14
The Independent JPEG Group's JPEG runtime library
libkeyutils1
1.2-9
Linux Key Management Utilities (library)
libklibc
1.5.12-2
minimal libc subset for use with initramfs
libkrb53
1.6.dfsg.4~beta1-5len MIT Kerberos runtime libraries
ny1
ny1
liblcms1
1.17.dfsg-1+lenny2
Color management library
libldap-2.4-2
2.4.11-1+lenny1
OpenLDAP libraries
liblocale-gettext-perl
1.05-4
Using libc functions for internationalization in Perl
liblockfile1
1.08-3
NFS-safe locking library, includes dotlockfile program
liblwres40
1:9.5.1.dfsg.P3-1+len Lightweight Resolver Library used by BIND
ny1
liblzo2-2
2.03-1
libmagic1
4.26-1
data compression library
File type determination library using "magic"
numbers
libmailtools-perl
2.03-1
Manipulate email in perl programs
libmalaga7
7.12-1
An automatic language analysis library
libmetacity0
1:2.22.0-2
library of lightweight GTK2 based Window Manager
libmldbm-perl
2.01-2
Store multidimensional hash structures in perl tied
hashes
libmozjs1d
1.9.0.19-1
The Mozilla SpiderMonkey JavaScript library
libmpfr1ldbl
2.3.1.dfsg.1-2
multiple precision floating-point computation
libmysqlclient15off
5.0.51a-24+lenny2
MySQL database client library
libnautilus-burn4
2.20.0-1
Nautilus Burn Library - runtime version
A-8
Product Name
libnautilus-extension1
Software Components
2.20.0-7
libraries for nautilus components - runtime version
libncurses5
5.7+20081213-1
shared libraries for terminal handling
libncursesw5
5.7+20081213-1
shared libraries for terminal handling (wide character
support
libnet-dbus-perl
0.33.6-1+b1
Extension for the DBus bindings
libnet-lite-ftp-perl
0.54-2
Perl FTP client with support for TLS
libnet-ssleay-perl
1.35-1
Perl module for Secure Sockets Layer (SSL)
libnet-telnet-perl
3.03-3
Script telnetable connections
libnewt0.52
0.52.2-11.3+lenny1
Not Erik's Windowing Toolkit - text mode windowing
libnfsidmap2
0.20-1
An nfs idmapping library
libnotify1
0.4.4-3
sends desktop notifications to a notification daemon
libnspr4-0d
4.7.1-5
NetScape Portable Runtime Library
libnss3-1d
3.12.3.1-0lenny1
Network Security Service libraries
libogg0
1.1.3-4
Ogg Bitstream Library
liboil0.3
0.3.15-1
Library of Optimized Inner Loops
liboobs-1-4
2.22.0-2
GObject based interface to system-tools-backends -
liborbit2
1:2.14.13-0.1
with slang
shared libr
libraries for ORBit2 - a CORBA ORB
libpam-gnome-keyring
2.22.3-2
PAM module to unlock the GNOME keyring upon login
libpam-modules
1.0.1-5+lenny1
Pluggable Authentication Modules for PAM
libpam-runtime
1.0.1-5+lenny1
Runtime support for the PAM library
libpam0g
1.0.1-5+lenny1
Pluggable Authentication Modules library
libpanel-applet2-0
2.20.3-5
library for GNOME Panel applets
libpango1.0-0
1.20.5-5+lenny1
Layout and rendering of internationalized text
libpango1.0-common
1.20.5-5+lenny1
Modules and configuration files for the Pango
libpcap0.8
0.9.8-5
system interface for user-level packet capture
libpci3
1:3.0.0-6
Linux PCI Utilities (shared library)
libpcre3
7.6-2.1
Perl 5 Compatible Regular Expression Library -
libperl5.10
5.10.0-19lenny2
Shared Perl library
runtime files
libpixman-1-0
0.10.0-2
pixel-manipulation library for X and cairo
libpkcs11-helper1
1.05-1
library that simplifies the interaction with PKCS#11
libpng12-0
1.2.27-2+lenny3
PNG library - runtime
libpopt0
1.14-4
lib for parsing cmdline parameters
libpq5
8.3.9-0lenny1
PostgreSQL C client library
librarian0
0.8.1-1
Rarian is a documentation meta-data library (library
package)
libraw1394-8
1.3.0-4
libreadline5
5.2-3.1
librpcsecgss3
0.18-1
library for direct access to IEEE 1394 bus (aka
FireWire)
GNU readline and history libraries, run-time libraries
allows secure rpc communication using the
rpcsec_gss protocol
librsvg2-2
2.22.2-2lenny1
librsvg2-common
2.22.2-2lenny1
SAX-based renderer library for SVG files (runtime)
SAX-based renderer library for SVG files (extra
runtime)
libsasl2-2
2.1.22.dfsg1-23+lenn
Cyrus SASL - authentication abstraction library
y1
libscrollkeeper0
0.3.14-16
Library to load .omf files (runtime files)
libselinux1
2.0.65-5
SELinux shared libraries
libsensors3
1:2.10.7-1
library to read temperature/voltage/fan sensors
libsepol1
2.0.30-2
Security Enhanced Linux policy library for changing
policy bin
A-9
Product Name
Software Components
libsexy2
0.1.11-2+b1
collection of additional GTK+ widgets - library
libshout3
2.2.2-5
MP3/Ogg Vorbis broadcast streaming library
libsigc++-2.0-0c2a
2.0.18-2
type-safe Signal Framework for C++ - runtime
libslab0
0.9.8.svn.20070430-1 beautification app library file
libslang2
2.1.3-3
The S-Lang programming library - runtime version
libsm6
2:1.0.3-2
X11 Session Management library
libsmbclient
2:3.2.5-4lenny12
.1
shared library that allows applications to talk to
SMB/CIFS se
libsmbios-bin
2.0.3.dfsg-1
Provide access to (SM)BIOS information -- utility
binaries
libsmbios2
2.0.3.dfsg-1
Provide access to (SM)BIOS information -- dynamic
library
libsnmp-base
5.4.1~dfsg-12
SNMP (Simple Network Management Protocol) MIBs
libsnmp15
5.4.1~dfsg-12
SNMP (Simple Network Management Protocol) library
libsoup2.4-1
2.4.1-2
an HTTP library implementation in C -- Shared library
libspeex1
1.2~rc1-1
The Speex codec runtime library
libsplashy1
0.3.13-3
Library to draw splash screen on boot, shutdown,
libsqlite3-0
3.5.9-6
SQLite 3 shared library
libss2
1.41.3-1
command-line interface parsing library
libssl0.9.8
0.9.8g-15+lenny5
SSL shared libraries
libstartup-notification0
0.9-1
library for program launch feedback (shared library)
libstdc++6
4.3.2-1.1
The GNU Standard C++ Library v3
libstdc++6-4.3-dev
4.3.2-1.1
The GNU Standard C++ Library v3 (development
and documentati
resume or sus
files)
libsysfs2
2.1.0-5
interface library to sysfs
libtag1c2a
1.5-3
TagLib Audio Meta-Data Library
libtalloc1
1.2.0~git20080616-1
hierarchical pool based memory allocator
libtasn1-3
1.4-1
Manage ASN.1 structures (runtime)
libtext-charwidth-perl
0.04-5+b1
get display widths of characters on the terminal
libtext-iconv-perl
1.7-1+b1
converts between character sets in Perl
libtext-wrapi18n-perl
0.06-6
internationalized substitute of Text::Wrap
libthai-data
0.1.9-4+lenny1
Data files for Thai language support library
libthai0
0.1.9-4+lenny1
Thai language support library
libtheora0
1.0~beta3-1+lenny1
The Theora Video Compression Codec
libtie-ixhash-perl
1.21-2
ordered associative arrays for Perl
libtiff4
3.8.2-11.2
Tag Image File Format (TIFF) library
libtimedate-perl
1.1600-9
Time and date functions for Perl
libtotem-plparser10
2.22.3-1
Totem Playlist Parser library - runtime version
libtrackerclient0
0.6.6-2
metadata database, indexer and search tool - library
libts-0.0-0
1.0-4
touch screen library
liburi-perl
1.35.dfsg.1-1
Manipulates and accesses URI strings
libusb-0.1-4
2:0.1.12-13
userspace USB programming library
libuuid-perl
0.02-3+b1
Perl extension for using UUID interfaces as defined in
libuuid1
1.41.3-1
universally unique id library
libvisual-0.4-0
0.4.0-2.1
Audio visualization framework
libvisual-0.4-plugins
0.4.0.dfsg.1-2
Audio visualization framework plugins
libvoikko1
1.7-2
Finnish spell-checker and hyphenator library
libvolume-id0
0.125-7+lenny3
libvolume_id shared library
libvorbis0a
1.2.0.dfsg-3.1+lenny1 The Vorbis General Audio Compression Codec
e2fspro
A-10
Product Name
libvorbisenc2
Software Components
1.2.0.dfsg-3.1+lenny1 The Vorbis General Audio Compression Codec
libvorbisfile3
1.2.0.dfsg-3.1+lenny1 The Vorbis General Audio Compression Codec
libvte-common
1:0.16.14-4
Terminal emulator widget for GTK+ 2.0 - common
files
libvte9
1:0.16.14-4
Terminal emulator widget for GTK+ 2.0 - runtime
files
libwavpack1
4.50.1-1
libwbclient0
2:3.2.5-4lenny12
an audio codec (lossy and lossless) - library
client library for interfacing with winbind service
libwnck-common
2.22.3-1
Window Navigator Construction Kit - common files
libwnck22
2.22.3-1
Window Navigator Construction Kit - runtime files
libwrap0
7.6.q-16
Wietse Venema's TCP wrappers library
libwww-perl
5.813-1
WWW client/server library for Perl (aka LWP)
libx11-6
2:1.1.5-2
X11 client-side library
libx11-data
2:1.1.5-2
X11 client-side library
libx86-1
1.1+ds1-2
x86 real-mode library
libxapian15
1.0.7-4
Search engine library
libxau6
1:1.0.3-3
X11 authorisation library
libxaw7
2:1.0.4-2
X11 Athena Widget library
libxcb-render-util0
0.2.1+git1-1
utility libraries for X C Binding -- render-util
libxcb-render0
1.1-1.2
X C Binding, render extension
libxcb-xlib0
1.1-1.2
X C Binding, Xlib/XCB interface library
libxcb1
1.1-1.2
X C Binding
libxcomposite1
1:0.4.0-3
X11 Composite extension library
libxcursor1
1:1.1.9-1
X cursor management library
libxdamage1
1:1.1.1-4
X11 damaged region extension library
libxdmcp6
1:1.0.2-3
X11 Display Manager Control Protocol library
libxext6
2:1.0.4-1
X11 miscellaneous extension library
libxfixes3
1:4.0.3-2
X11 miscellaneous 'fixes' extension library
libxfont1
1:1.3.3-1
X11 font rasterisation library
libxft2
2.1.12-3
FreeType-based font drawing library for X
libxi6
2:1.1.4-1
X11 Input extension library
libxinerama1
2:1.0.3-2
X11 Xinerama extension library
libxkbfile1
1:1.0.5-1
X11 keyboard file manipulation library
libxklavier12
3.5-2
X Keyboard Extension high-level API
libxml-parser-perl
2.36-1.1+b1
Perl module for parsing XML files
libxml-twig-perl
1:3.32-1
Perl module for processing huge XML documents in
tree mode
libxml-xpath-perl
1.13-6
Perl module for processing XPath
libxml2
2.6.32.dfsg-5+lenny1
GNOME XML library
libxml2-utils
2.6.32.dfsg-5+lenny1
XML utilities
libxmu6
2:1.0.4-1
X11 miscellaneous utility library
libxmuu1
2:1.0.4-1
X11 miscellaneous micro-utility library
libxpm4
1:3.5.7-1
X11 pixmap library
libxrandr2
2:1.2.3-1
X11 RandR extension library
libxrender1
1:0.9.4-2
X Rendering Extension client library
libxres1
2:1.0.3-1
X11 Resource extension library
libxslt1.1
1.1.24-2
XSLT processing library - runtime library
libxss1
1:1.1.3-1
X11 Screen Saver extension library
libxt6
1:1.0.5-3
X11 toolkit intrinsics library
libxtrap6
2:1.0.0-5
X11 event trapping extension library
libxtst6
2:1.0.3-1
X11 Testing -- Resource extension library
libxv1
2:1.0.4-1
X11 Video extension library
libxxf86dga1
2:1.0.2-1
X11 Direct Graphics Access extension library
A-11
Product Name
libxxf86misc1
Software Components
1:1.0.1-3
X11 XFree86 miscellaneous extension library
libxxf86vm1
1:1.0.2-1
X11 XFree86 video mode extension library
linux-image-2.6-686
2.6.26+17+lenny1
Linux 2.6 image on PPro/Celeron/PII/PIII/P4
linux-image-2.6.26-2-686
2.6.26-19lenny2
Linux 2.6.26 image on PPro/Celeron/PII/PIII/P4
linux-image-2.6.30-bpo.2-686 2.6.30-8~bpo50+2
Linux 2.6.30 image on PPro/Celeron/PII/PIII/P4
linux-libc-dev
Linux support headers for userspace development
2.6.26-19lenny2
linux-sound-base
1.0.17.dfsg-4
base package for ALSA and OSS sound systems
locales
2.7-18
GNU C Library: National Language (locale) data
[support]
lockfile-progs
0.1.11-0.1
Programs for locking and unlocking files and
mailboxes
login
1:4.1.1-6
system login tools
logrotate
3.7.1-5
Log rotation utility
lrzsz
0.12.21-4.1
Tools for zmodem/xmodem/ymodem file transfer
lsb-base
3.2-20
Linux Standard Base 3.2 init script functionality
lsof
4.78.dfsg.1-4
List open files
lzma
4.43-14
Compression method of 7z format in 7-Zip program
m4
1.4.11-1
a macro processing language
make
3.81-5
The GNU version of the "make" utility.
makedev
2.3.1-88
creates device files in /dev
man-db
2.5.2-4
on-line manual pager
manpages
3.05-1
Manual pages about using a GNU/Linux system
mawk
1.3.3-11.1
a pattern scanning and text processing language
menu
2.1.41
generates programs menu for all menu-aware
menu-xdg
0.3
freedesktop.org menu compliant window manager
metacity
1:2.22.0-2
A lightweight GTK2 based Window Manager
metacity-common
1:2.22.0-2
Shared files of lightweight GTK2 based Window
mime-support
3.44-1
MIME files 'mime.types' & 'mailcap', and support
minicom
2.3-1
friendly menu driven serial communication program
mktemp
1.5-9
tool for creating temporary files
mlocate
0.21.1-1
quickly find files on the filesystem based on their
applications
scripts
Manager
programs
name
modconf
0.3.9
Device Driver Configuration
module-init-tools
3.4-1
tools for managing Linux kernel modules
mount
2.13.1.1-1
Tools for mounting and manipulating filesystems
mutt
1.5.18-6
text-based mailreader supporting MIME, GPG, PGP
and threading
myspell-en-us
1:2.4.0-3
English_american dictionary for myspell
mysql-common
5.0.51a-24+lenny2
MySQL database common files
nautilus
2.20.0-7
file manager and graphical shell for GNOME
nautilus-cd-burner
2.20.0-1
CD Burning front-end for Nautilus
nautilus-data
2.20.0-7
data files for nautilus
ncurses-base
5.7+20081213-1
basic terminal type definitions
ncurses-bin
5.7+20081213-1
terminal-related programs and man pages
ncurses-term
5.7+20081213-1
additional terminal type definitions
net-tools
1.60-22
The NET-3 networking toolkit
netbase
4.34
Basic TCP/IP networking system
netcat-traditional
1.10-38
TCP/IP swiss army knife
nfs-common
1:1.1.2-6lenny1
NFS support files common to client and server
A-12
Product Name
notification-daemon
ntpdate
Software Components
0.3.7-1+b1
a daemon that displays passive pop-up notifications
1:4.2.4p4+dfsg-8lenn
client for setting system time from NTP servers
y3
openbsd-inetd
0.20080125-2
The OpenBSD Internet Superserver
openssh-blacklist
0.4.1
list of default blacklisted OpenSSH RSA and DSA keys
openssh-blacklist-extra
0.4.1
list of non-default blacklisted OpenSSH RSA and DSA
openssh-client
1:5.1p1-5
secure shell client, an rlogin/rsh/rcp replacement
openssh-server
1:5.1p1-5
secure shell server, an rshd replacement
openssl
0.9.8g-15+lenny6
Secure Socket Layer (SSL) binary and related
keys
cryptographic too
openssl-blacklist
0.4.2
openvpn
2.1~rc11-1
list of blacklisted OpenSSL RSA keys
virtual private network daemon
openvpn-blacklist
0.3
list of blacklisted OpenVPN RSA shared keys
oss-compat
0.0.4+nmu2
OSS compatibility package
passwd
1:4.1.1-6
change and administer password and group data
pciutils
1:3.0.0-6
Linux PCI Utilities
perl
5.10.0-19lenny2
Larry Wall's Practical Extraction and Report Language
perl-base
5.10.0-19lenny2
minimal Perl system
perl-modules
5.10.0-19lenny2
Core Perl modules
php5-common
5.2.6.dfsg.1-1+lenny4 Common files for packages built from the php5
pm-utils
1.1.2.4-1
utilities and scripts for power management
portmap
6.0-9
RPC port mapper
source
powermgmt-base
1.30+nmu1
Common utils and configs for power management
ppp
2.4.4rel-10.1
Point-to-Point Protocol (PPP) - daemon
pppconfig
2.3.18
A text menu based utility for configuring ppp
pppoe
3.8-3
PPP over Ethernet driver
pppoeconf
1.18
configures PPPoE/ADSL connections
procps
1:3.2.7-11
/proc file system utilities
proftpd
1.3.1-17lenny4
versatile, virtual-hosting FTP daemon
proftpd-basic
1.3.1-17lenny4
versatile, virtual-hosting FTP daemon - binaries
proftpd-mod-ldap
1.3.1-17lenny4
versatile, virtual-hosting FTP daemon - LDAP module
proftpd-mod-mysql
1.3.1-17lenny4
versatile, virtual-hosting FTP daemon - MySQL
module
proftpd-mod-pgsql
1.3.1-17lenny4
psmisc
22.6-1
python
2.5.2-3
versatile, virtual-hosting FTP daemon - PostgreSQL
module
Utilities that use the proc filesystem
An interactive high-level object-oriented language
(default ve
python-beagle
0.3.5-1+b1
Python bindings for beagle
python-cairo
1.4.12-1.2
Python bindings for the Cairo vector graphics library
python-central
0.6.8
register and build utility for Python packages
python-dbus
0.82.4-2
simple interprocess messaging system (Python
interface)
python-fpconst
0.7.2-4
Utilities for handling IEEE 754 floating point special
python-glade2
2.12.1-6
GTK+ bindings: Glade support
python-gmenu
2.22.2-4
an implementation of the freedesktop menu
python-gnome2
2.22.0-1
Python bindings for the GNOME desktop environment
values
specification for GN
python-gnome2-desktop
2.22.0-2
Python bindings for the GNOME desktop environment
python-gobject
2.14.2-2
Python bindings for the GObject library
A-13
Product Name
Software Components
python-gtk2
2.12.1-6
Python bindings for the GTK+ widget set
python-gtksourceview2
2.2.0-1+b1
Python bindings for the GtkSourceView widget
python-libxml2
2.6.32.dfsg-5+lenny1
Python bindings for the GNOME XML library
python-minimal
2.5.2-3
A minimal subset of the Python language (default
python-numeric
24.2-9
Numerical (matrix-oriented) Mathematics for Python
python-pyorbit
2.14.3-2
A Python language binding for the ORBit2 CORBA
python-soappy
0.12.0-4
SOAP Support for Python
python-support
0.8.4lenny1
automated rebuilding support for Python modules
python2.5
2.5.2-15
An interactive high-level object-oriented language
python2.5-minimal
2.5.2-15
A minimal subset of the Python language (version
version)
implementation
(version 2.
2.5)
radeontool
1.5-5
utility to control ATI Radeon backlight functions on
laptops
readline-common
5.2-3.1
GNU readline and history libraries, common files
rsyslog
3.18.6-4
enhanced multi-threaded syslogd
scrollkeeper
0.3.14-16
A free electronic cataloging system for
sed
4.1.5-6
The GNU sed stream editor
sgml-base
1.26
SGML infrastructure and SGML catalog file support
sgml-data
2.0.3
common SGML and XML data
shared-mime-info
0.30-2
FreeDesktop.org shared MIME database and spec
snmp
5.4.1~dfsg-12
documentation
SNMP (Simple Network Management Protocol)
applications
snmpd
5.4.1~dfsg-12
SNMP (Simple Network Management Protocol)
ssh
1:5.1p1-5
secure shell client and server (metapackage)
ssl-cert
1.0.23
simple debconf wrapper for OpenSSL
sudo
1.6.9p17-3
Provide limited super user privileges to specific users
synaptic
0.62.1+nmu1
Graphical package manager
system-tools-backends
2.6.0-2lenny4
agents
System Tools to manage computer configuration -scripts
sysv-rc
2.86.ds1-61
sysvinit
2.86.ds1-61
System-V-like runlevel change mechanism
System-V-like init utilities
sysvinit-utils
2.86.ds1-61
System-V-like utilities
tar
1.20-1
GNU version of the tar archiving utility
tasksel
2.78
Tool for selecting tasks for installation on Debian
tasksel-data
2.78
Official tasks used for installation of Debian systems
tcpd
7.6.q-16
Wietse Venema's TCP wrapper utilities
tcpdump
3.9.8-4
systems
A powerful tool for network monitoring and data
acquisition
telnet
0.17-36
The telnet client
telnetd
0.17-36
The telnet server
tftpd
0.17-16
Trivial file transfer protocol server
time
1.7-23
The GNU time program for measuring cpu resource
usage
traceroute
2.0.11-2
ttf-dejavu
2.25-3
Traces the route taken by packets over an IPv4/IPv6
network
Metapackage to pull in ttf-dejavu-core and
ttf-dejavu-extra
A-14
Product Name
Software Components
ttf-dejavu-core
2.25-3
Vera font family derivate with additional characters
ttf-dejavu-extra
2.25-3
Vera font family derivate with additional characters
tzdata
2009l-0lenny1.1
time zone and daylight-saving time data
ucf
3.0016
Update Configuration File: preserve user changes to
udev
0.125-7+lenny3
/dev/ and hotplug management daemon
update-inetd
4.31
inetd configuration file updater
usbmount
0.0.14.1
config fil
automatically mount and unmount USB mass storage
devices
usbutils
0.73-10
Linux USB utilities
uswsusp
0.7-1.2
tools to use userspace software suspend provided by
util-linux
2.13.1.1-1
Miscellaneous system utilities
vbetool
1.0-3
run real-mode video BIOS code to alter hardware
vim
1:7.1.314-3+lenny2
Vi IMproved - enhanced vi editor
vim-common
1:7.1.314-3+lenny2
Vi IMproved - Common files
vim-runtime
1:7.1.314-3+lenny2
Vi IMproved - Runtime files
vim-tiny
1:7.1.314-3+lenny2
Vi IMproved - enhanced vi editor - compact version
w3m
0.5.2-2+b1
Linux
state
WWW browsable pager with excellent tables/frames
support
watchdog
5.4-10
A software watchdog
wget
1.11.4-2+lenny1
retrieves files from the web
whiptail
0.52.2-11.3+lenny1
Displays user-friendly dialog boxes from shell scripts
whois
4.7.30
an intelligent whois client
wodim
9:1.1.9-1
command line CD/DVD writing tool
x-ttcidfont-conf
31
TrueType and CID fonts configuration for X
x11-apps
7.3+4
X applications
x11-common
1:7.3+20
X Window System (X.Org) infrastructure
x11-session-utils
7.3+1
X session utilities
x11-utils
7.3+2+nmu1
X11 utilities
x11-xfs-utils
7.3+1
X font server utilities
x11-xkb-utils
7.4+1
X11 XKB utilities
x11-xserver-utils
7.3+5
X server utilities
xauth
1:1.0.3-2
X authentication utility
xbase-clients
1:7.3+20
miscellaneous X clients - metapackage
xfonts-100dpi
1:1.0.0-4
100 dpi fonts for X
xfonts-75dpi
1:1.0.0-4
75 dpi fonts for X
xfonts-base
1:1.0.0-5
standard fonts for X
xfonts-encodings
1:1.0.2-3
Encodings for X.Org fonts
xfonts-scalable
1:1.0.0-6
scalable fonts for X
xfonts-utils
1:7.4+1
X Window System font utility programs
xinit
1.0.9-2
X server initialisation tool
xkb-data
1.3-2
X Keyboard Extension (XKB) configuration data
xml-core
0.12
XML infrastructure and XML catalog file support
xorg
1:7.3+20
X.Org X Window System
xorg-docs
1:1.4-4
Miscellaneous documentation for the X.Org software
suite
xserver-xephyr
2:1.4.2-10.lenny2
nested X server
xserver-xorg
1:7.3+20
the X.Org X server
xserver-xorg-core
2:1.4.2-10.lenny2
Xorg X server - core server
xserver-xorg-input-all
1:7.3+20
the X.Org X server -- input driver metapackage
xserver-xorg-input-evdev
1:2.0.8-1
X.Org X server -- evdev input driver
A-15
Product Name
Software Components
xserver-xorg-input-kbd
1:1.3.1-1
X.Org X server -- keyboard input driver
xserver-xorg-input-mouse
1:1.3.0-1
X.Org X server -- mouse input driver
xserver-xorg-input-synaptics
0.14.7~git20070706-
Synaptics TouchPad driver for X.Org/XFree86 server
3
xserver-xorg-input-wacom
0.7.9.3-2
X.Org X server -- Wacom input driver
xserver-xorg-video-all
1:7.3+20
the X.Org X server -- output driver metapackage
xserver-xorg-video-apm
1:1.2.0-1
X.Org X server -- APM display driver
xserver-xorg-video-ark
1:0.7.0-1
X.Org X server -- ark display driver
xserver-xorg-video-ati
1:6.9.0-1+lenny4
X.Org X server -- ATI display driver wrapper
xserver-xorg-video-chips
1:1.2.0-1
X.Org X server -- Chips display driver
xserver-xorg-video-cirrus
1:1.2.1-1.lenny1
X.Org X server -- Cirrus display driver
xserver-xorg-video-cyrix
1:1.1.0-8
X.Org X server -- Cyrix display driver
xserver-xorg-video-dummy
1:0.3.0-1
X.Org X server -- dummy display driver
xserver-xorg-video-fbdev
1:0.4.0-1
X.Org X server -- fbdev display driver
xserver-xorg-video-glint
1:1.2.1-1
X.Org X server -- Glint display driver
xserver-xorg-video-i128
1:1.3.0-1
X.Org X server -- i128 display driver
xserver-xorg-video-i740
1:1.2.0-1
X.Org X server -- i740 display driver
xserver-xorg-video-imstt
1:1.1.0-7
X.Org X server -- IMSTT display driver
xserver-xorg-video-intel
2:2.3.2-2+lenny6
X.Org X server -- Intel i8xx, i9xx display driver
xserver-xorg-video-mach64
6.8.0-1
X.Org X server -- ATI Mach64 display driver
xserver-xorg-video-mga
1:1.4.9.dfsg-1
X.Org X server -- MGA display driver
xserver-xorg-video-neomagic
1:1.2.1-1
X.Org X server -- Neomagic display driver
xserver-xorg-video-nsc
1:2.8.3-4
X.Org X server -- NSC Geode GX1 display driver
xserver-xorg-video-nv
1:2.1.10-1
X.Org X server -- NV display driver
xserver-xorg-video-openchro
1:0.2.902+svn579-4
X.Org X server -- VIA display driver
me
xserver-xorg-video-r128
6.8.0-1
X.Org X server -- ATI r128 display driver
xserver-xorg-video-radeon
1:6.9.0-1+lenny4
X.Org X server -- ATI Radeon display driver
xserver-xorg-video-radeonhd
1.2.1-2
X.Org X server -- AMD/ATI r5xx, r6xx display driver
xserver-xorg-video-rendition
1:4.2.0.dfsg.1-2
X.Org X server -- Rendition display driver
xserver-xorg-video-s3
1:0.6.0-1
X.Org X server -- legacy S3 display driver
xserver-xorg-video-s3virge
1:1.10.1-1
X.Org X server -- S3 ViRGE display driver
xserver-xorg-video-savage
1:2.2.1-2.lenny1
xserver-xorg-video-siliconmoti 1:1.6.0-1
X.Org X server -- Savage display driver
X.Org X server -- SiliconMotion display driver
on
xserver-xorg-video-sis
1:0.10.0-1
X.Org X server -- SiS display driver
xserver-xorg-video-sisusb
1:0.9.0-1
X.Org X server -- SiS USB display driver
xserver-xorg-video-tdfx
1:1.4.0-1
X.Org X server -- tdfx display driver
xserver-xorg-video-tga
1:1.1.0-9
X.Org X server -- TGA display driver
xserver-xorg-video-trident
1:1.3.0-1
X.Org X server -- Trident display driver
xserver-xorg-video-tseng
1:1.2.0-1
X.Org X server -- Tseng display driver
xserver-xorg-video-v4l
0.2.0-1
X.Org X server -- Video 4 Linux display driver
xserver-xorg-video-vesa
1:1.3.0-4
X.Org X server -- VESA display driver
xserver-xorg-video-vga
1:4.1.0-8
X.Org X server -- VGA display driver
xserver-xorg-video-vmware
1:10.16.2-1
X.Org X server -- VMware display driver
xserver-xorg-video-voodoo
1:1.2.0-1
X.Org X server -- Voodoo display driver
xsltproc
1.1.24-2
XSLT command line processor
xulrunner-1.9
1.9.0.19-1
XUL + XPCOM application runner
yelp
2.22.1-8+b1
Help browser for GNOME 2
zenity
2.22.1-2
Display graphical dialog boxes from shell scripts
zlib1g
1:1.2.3.3.dfsg-12
compression library - runtime
A-16
B
B.
IEEE 1588 Configuration
Moxa’s DA-683-LX embedded computers come with pre-installed IEEE 1588v2-compliant software that helps
deliver the Precision Time Protocol (PTP) in the applications requiring accuracy time synchronization. This
GUI-based program helps users easily configure the parameters for the basic and advanced settings for the
IEEE 1588v2 protocol.
The following topics are covered in this appendix:
Getting Started
Configuration the PTP Settings
Wizard Settings
Basic Settings
Advanced Settings
Monitoring
Product Name
Software Components
Getting Started
After your DA-683-LX has been powered on and booted up, type ptpd2-config to run the configuration
program.
The configuration main screen will appear.
Configuration the PTP Settings
Several methods are available to configure the PTP settings:
Wizard: For users who want to configure in just a few steps.
Basic Settings: For users who have a basic understanding of the PTP protocol.
Advanced Settings: For users who have a full understanding of the PTP protocol.
A-2
Product Name
Software Components
Wizard Settings
Select Wizard and then select OK to continue.
Select Next (press the Enter key) from the Wizard welcome screen.
Use the up and down arrow keys to select on which LAN port you would like to deploy the IEEE 1588 protocol.
Press the space key to confirm your selection. Currently, you can only select one LAN port. When finished,
select Next to continue, or use right arrow to select Cancel to quit.
Select if you would like to use P2P (Peer-to-Peer) mode or E2E (End-to-End) mode for the PTP protocol. When
finished, select Next to continue.
A-3
Product Name
Software Components
Next, select the LNB mode or HAC mode. LNB mode will reduce the network bandwidth, which allows CPU to
handle other tasks more efficiently, while HAC will increase the clock accuracy but consumes more CPU
performance.
When finished, select OK to complete.
When you finish configuring with the Wizard, go back to the main men and select Apply to take effect. It takes
about 10 minutes to complete the configuration.
When finished, select Exit on the main menu to complete.
A-4
Product Name
Software Components
Basic Settings
Select Basic Settings on the main menu.
Mode
Select Mode to configure.
Select P2P (Peer-to-Peer) mode or E2E (End-to-End) mode for the PTP protocol. When finished, select OK to
continue.
A-5
Product Name
Software Components
Interface
Select on which LAN port you would like to deploy the IEEE 1588 protocol. Press the space key to confirm your
selection. Currently, you can only select one LAN port. When finished, select Next to
continu
Synchronization
Select enable if you would like to allow PTP to adjust your system timer, or disable if you would like your
system clock to run as an independent timer. When finished, select OK to complete the process. Remember to
apply your settings by selecting Apply in the main menu.
A-6
Product Name
Software Components
Advanced Settings
Select Advanced Settings from the main menu; you will be guided to the next step for additional
configurations.
Foreign Master
The Foreign Master setting allows users to configure how many foreign masters can be synchronized with the
DA-683. Enter the number in the field; the maximum is 255. When finished, select OK to continue.
A-7
Product Name
Software Components
P2P Interval Setting
Enter the value for the P2P interval, which is used to determine the delay or latency between the slave and the
master hosts. For example, if you enter 3, it means the interval value is 8=23 seconds. The maximum is 255
seconds.
E2E Interval Setting
Enter the value for the E2E interval, which is used to determine the delay or latency between the slave and the
master hosts.
A-8
Product Name
Software Components
Multicast TTL Setting
Select the value for the multicast TTL setting; allowed values are 1, 32, 42 and 128.
PTPd Domain Setting
Enter the number for the domain so that the foreign master records can be sent. When finished, click OK to
continue.
A-9
Product Name
Software Components
Mode Setting
Next, select the LNB mode or HAC mode. LNB mode will reduce the network bandwidth, which allows the CPU
to handle other tasks more efficiently; HAC will increase the clock accuracy, but consumes more CPU power.
Clock Filter Setting
Select enable if you do not want to reset the clock when it has been down for more than 1 second, or disable
if you would like to reset the clock. When finished, click OK to continue.
A-10
Product Name
Software Components
Delay Filter Setting
Enter the value for delaying the filter setting. This value is used to filter a faulty reference for the slave. The
value unit is nanoseconds. When finished, click OK to continue.
PID Servo Setting
Enter the value for PID servo control. Use commas to separate parameters.
A-11
Product Name
Software Components
Delay Filter Stiffness Setting
This function allows users to set a one-way delay filter parameter. Enter the value in the field below. When
finished, click OK.
When finished, go back to the main menu, and select Apply.
Monitoring
Select Monitor on the main menu, and then click OK; you can now monitor the clock information. Click Exit
to leave.
A-12