1
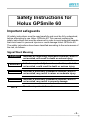
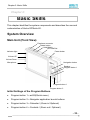
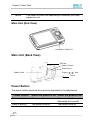
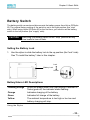
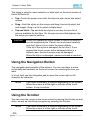
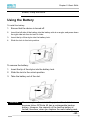
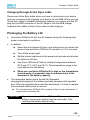
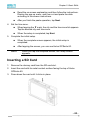
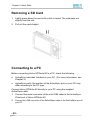
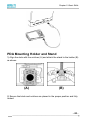
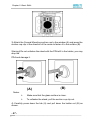
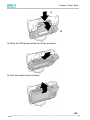
Pocket PC User’s manual Safety Instructions for Holux GPSmile 60 Important safeguards All safety instructions must be read carefully and must be fully understood, before attempting to use Holux GPSmile 60. This manual contains the safety instructions that must be observed in order to avoid potential hazards that could result in personal injuries or could damage Holux GPSmile 60. The safety instructions have been classified according to the seriousness of the risk, as follows: Signal Word Meaning ! DANGER Indicates an imminently hazardous situation, which if not avoided, will result in death or serious injury. ! WARNING Indicates a potentially hazardous situation, which if not avoided, could result in death or serious injury. ! CAUTION Indicates a potentially hazardous situation, which if not avoided, may result in minor or moderate injury. CAUTION Indicates a potentially hazardous situation, which if not avoided, may result in property damage. NOTE Provides important information. -2- Introduction Thank you very much for your purchase of Holux GPSmile 60. Please be sure to read this manual before using Holux GPSmile 60, and ensure that you are aware of the correct handling procedures. • Please be sure to read the “ Important Safety Information” section in this document to learn about important safety issue • After reading this document, keep it in a convenient place for future reference. Copyright Information © 2005 All rights reserved. Under the copyright laws, this manual cannot be reproduced in any form without the prior written permission. No patent liability is assumed, with respect to the use of the information contained herein. Microsoft®, Windows®, ActiveSync®, and PowerPoint® are registered trademarks, and Windows CE™ is a trademark, of Microsoft Corporation. The names of other actual companies, products, and brand names mentioned herein may by trade names, service marks, trademarks, or registered trademarks of their respective owners. -3- Important Safety Information Read this information before using Holux GPSmile 60. To reduce the risk of bodily injury, electric shock, fire, and damage to the equipment observe the following precautions. General Precautions Avoid hot areas: The product should be placed away from heat sources such as radiators, heat registers, or other products (including amplifiers) that produce heat. Please don't put this product in the high-temperature place and the vehicles in high temperature. The heat not only causes the product deformed and battery defective but also has the fire and breakdown. Avoid wet areas: Never use the product in a wet location. Avoid pushing objects into product: Never push objects of any kind into cabinet slots or other openings in the product. Slots and openings are provided for ventilation. These openings must not be blocked or covered. Mounting Accessories: Do not use the product on an unstable table, cart, stand, tripod, or bracket. Any mounting of the product should follow the manufacturer’s instructions, and should use a mounting accessory recommended by the manufacturer. Avoid unstable mounting: Do not place the product with an unstable base. Use product with approved equipment: This product should be used only with personal computers and options identified as suitable for use with your equipment. Avoid abnormal usage/disassembling: Please don't enforce it to be discharged or overcharged/overdischarged with over current or high-tension supply. Do not disassemble, repair, remodel, or pressurize this product; otherwise, it will cause the fire, electric shock, scorch and malfunction. Adjust the volume: Turn down the volume before using headphones or other audio devices. Avoid use for drivers when driving: The driver should not use this product when driving. -4- GPS Usage Precautions Please don’t use this product close to wireless machines; otherwise, malfunction will be caused. This product is delicate electronic machine; thus, please do not put it in the places with strong static and electric waves. GPS may not be efficiently receivable if using this product under following condition: • Tunnel or basement • Parking lot in the building • Indoor • Under the viaduct • In the gross forest Safety Precautions for Battery Warning To reduce the risk of fire or burns, do not disassemble, crush, puncture, short external contacts, or dispose of in fire or water. Danger of explosion if battery is incorrectly replaced. Replace only with specified batteries. Battery may require recycling in accordance with local laws. Contact your local regulatory authorities for more information. Your battery should not be thrown in the trash can. • Please carefully read these precautions before using Holux GPSmile 60, and ensure that you are aware of the correct handling procedures. -5- • The precautions provide essential information for the protection of the user and others from possible injury and property damage. They also provide information on the safe handling of this product. • Please check that you fully understand the definition of the following messages (signs and graphical symbols) before reading the text, and always follow the instructions provided. -6- Supplementary Information: Weitere Informationen: Informations complérnentaires: Información complementaria: Ulteriori informazioni: Ytterligare information: -7- “The product complies with the requirements of the low Voltage Directive 73/23/EEC and the EMC Directive 89/336/EEC.” “Das Produkt entspricht den Anforderungen der Niederspannungsrichtlinie 73/23/EG und der EMC-Richtlinie 89/336/EG.” “Ce produit est conforme aux exigences de la directive sur les basses tensions 73/23/CEE et de la directive EMC 89/336/CEE.” “El Producto cumple los requistos de baja tensión de la Directiva 73/23/CEE y la Directiva EMC 89/336/CEE.” “Il prodotto é conforme ai requisiti della direttiva sulla bassa tensione 73/23/EG e la direttiva EMC 89/336/EG.” “Produkten uppfyller kraven enligt lågspänningsdirektiver 73/23/EEC och EMC-direktiv 89/336/EEC.” Working Environment This product was designed to fulfill the EMC (electromagnetic compatibility) requirements for “residential, commercial and light industry environments.” The use of this product in working environments other than “residential, commercial and light industry environments” is not approved. For example, the following environments are not approved: • Industrial Environments (environments with a main voltage > 230V~) • Medical Environments • Automotive Environments • Aircraft Environments Any consequences resulted from the use of this product in working environments that are not approved are not the responsibility of the manufacturer. The consequences of the use of this product in non-approved working environments may be: • Interference with other devices or machines in the nearby surrounding area • Malfunction of, or data loss from, this product caused by disturbances generated by other devices or machines in the nearby surrounding area Therefore, the manufacturer strongly recommends that the electromagnetic compatibility of this product be suitably tested in all non-approved working environments before use. In the case of automobiles or aircraft, the manufacturer or airline respectively should be asked for permission before use of this product. Furthermore, for general safety reasons, the use of this product in environments with explosive atmospheres is not permitted. -8- CE Compliance This product and the original options are designed to observe the related EMC (electromagnetic compatibility) and safety standards. However, the manufacturer cannot guarantee that this product still observes these EMC standards if options or cables not produced by the manufacturer are connected or implemented. In this case, the persons who have connected or implemented those options or cables have to make sure that the system (Holux GPSmile 60 plus options or cables) still fulfills the required standards. To avoid general EMC problems, the following advice should be observed: • Only CE marked options should be connected or implemented • Only best shielded cables should be connected Canadian Notice This Class B digital apparatus meets all requirements of the Canadian Interference-Causing Equipment Regulations. -9- FCC Notice “Declaration of Conformity” This equipment has been tested and found to comply with the limits for a Class B digital device pursuant to Part 15 of the FCC Rules. These limits are designed to provide reasonable protection against harmful interference in a residential installation. This equipment generates, uses, and can radiate radio frequency energy and, if not installed and used in accordance with the instructions, may cause harmful interference to radio communications. However, there is no guarantee that interference will not occur in a particular installation. If this equipment does cause harmful interference to radio or television reception, which can be determined by turning the equipment off and on, the user is encouraged to try to correct the interference by one or more of the following measures: • Connect the equipment into an AC outlet socket, on a different circuit from which the receiver is connected. • Consult the dealer or an experienced radio/TV technician for help. This device complies with Part 15 of the FCC rules. Operation is subject to the following two conditions: 1. This device may not cause harmful interference. 2. This device must accept any interference received. Including interference that may cause undesired operation. - 10 - Caring for the Environment by Recycling in the European Union This symbol on the product or on its packaging indicates that this product must not be disposed of with your other household waste. Instead, it is your responsibility to designated collection point for the recycling of waste electrical and electronic equipment. For more information about where you can drop off your waste equipment for recycling, please contact your local city office, your household waste disposal service or the shop where you purchased the product. - 11 - Table of Contents Chapter 1: Getting Started ..................................................... 14 Welcome.......................................................... 14 Finding Information .......................................... 15 Chapter 2: Basic Skills ........................................................... 16 System Overview............................................. 16 Battery Switch.................................................. 18 Using the Navigation Button ............................ 19 Using the Battery ............................................. 19 Charging the Battery........................................ 21 Initial Setup and Touch Screen Correction ...... 23 Inserting a SD Card ......................................... 24 Removing a SD Card....................................... 24 Connecting to a PC ......................................... 25 Today Screen................................................... 26 Using the Programs......................................... 30 Checking System Information.......................... 32 Customizing Settings....................................... 32 Adding or Removing Programs in ROM and RAM ................................................................ 33 Adding Programs Using ActiveSync ................ 33 Adding Programs Directly from the Internet .... 34 Adding Programs to the Start Menu ................ 35 Removing Programs........................................ 35 Setting Passwords ........................................... 36 Chapter 3: Microsoft ActiveSync............................................ 37 Changing the Synchronization Schedule ........ 39 Chapter 4: GPS Function....................................................... 37 Enabling the GPS Function ............................. 37 Using GPS Power Control ............................... 40 Using Navigation Control................................. 43 Chapter 5: Additional Information .......................................... 46 Resetting.......................................................... 47 Clearing Memory ............................................. 48 - 12 - Specifications....................................................48 - 13 - Chapter 1: Getting Started Chapter 1: Getting Started Welcome Congratulations on purchasing Holux GPSmile 60. Due to its size and capabilities, you can keep your most important business and personal information up-to-date and close at hand. Microsoft® ActiveSync® increases the power of Holux GPSmile 60 by allowing you to synchronize the information on your PC with Holux GPSmile 60. - 14 - Chapter 1: Getting Started Finding Information This manual describes features, provides program overviews, and describes how to connect Holux GPSmile 60 to your PC, a network, or the Internet. For instructions on setting and installing ActiveSync, consult the documentation that came with ActiveSync. For information on Programs on Holux GPSmile 60 Additional programs that can be installed on Holux GPSmile 60 Connecting to and synchronizing with a PC Last-minute update and detailed technical information Up-to-date information on Holux GPSmile 60 - 15 - See this source The User’s Guide and online help. To view Help, tap and then Help. Holux GPSmile 60 Companion CD. The Quick Start Card or ActiveSync Help on your PC. To view Help, open the Microsoft ActiveSync application, and then click Help. The Read Me files, located in the Microsoft ActiveSync folder on the PC and on Holux GPSmile 60 Companion CD. http://www.guidetek.com.tw Chapter 2: Basic Skills Chapter 2: Basic Skills This chapter identifies the system components and describes the use and customization of Holux GPSmile 60. System Overview Main Unit (Front View) Earphone connector Rotate button Hold Switch. SD Card Slot Power button Indicator light Volume UP Volume Down Microphone Navigation button Speaker Program button 1 Program button 4 Program button 3 Initial Settings of the Program Buttons • Program button 1 = ezGO(Quick menu) • Program button 2 = Navigator application launch buttons • Program button 3 = Calendar / (Zoom in/ Optional) • Program button 4 = Contacts / (Zoom out / Optional) - 16 - Chapter 2: Basic Skills NOTE The zoom in/ zoom out depending on whether your map support or not. Main Unit (End View) ActiveSync Cable Port Main Unit (Back View) SD Card Battery Switch Battery lock Battery Pack Supply Stop Stylus Power Button The power button performs the functions described in the table below. Power button When the power is off When the power is on Press and hold. The power turns on. Press it quickly. The power turns on. - 17 - The screen light alternately turns on/off. The power turns off. Chapter 2: Basic Skills Battery Switch The battery switch connects and disconnects the battery power from Holux GPSmile 60. The original factory setting of the switch is set to the right position (the “stop” side). When using Holux GPSmile 60 for the first time, you need to set the battery switch to the left position (the “supply” side). CAUTION Switching the battery switch to the “stop” position at any time leads to loss of data. Setting the Battery Lock 1. Use the stylus to slide the battery lock to the up position (the “lock” side) See “To install the battery“ later in this chapter. . Lock Battery Lock Unlock Battery/Alarm LED Descriptions Flashing orange Orange Green Yellow When the preset alarm time (set through Calendar or Tasks) goes off, the indicator starts flashing. Indicates charging of the battery. Indicates full charge of the battery. The ambient temperature is too high or too low and battery charging will stop. Using the Stylus - 18 - Chapter 2: Basic Skills The stylus is used for menu selection or data input on the touch screen of Holux GPSmile 60. • Tap—Touch the screen once with the stylus to open items and select options. • Drag—Hold the stylus on the screen and drag it across to select text and images. Drag in a list to select multiple items. • Tap and Hold—Tap and hold the stylus on an item to see a list of actions available for that item. On the pop-up menu that appears, tap the action you want to perform. CAUTION When you operate the touch screen of Holux GPSmile 60, use the supplied stylus. Please use touch panel carefully and don’t place it on or under the sharp objects. If the tip of the stylus is damaged, do not use it. If you operate the touch screen with a damaged stylus or a ballpoint pen, the touch screen may be damaged. When the stylus is damaged, please purchase a new one. Using the Navigation Button The navigation pad consists of five buttons. You can use them to move horizontally and vertically on the touch screen for selecting the item you want. In a text field, use the navigation pad to move the cursor right or left, character by character. NOTE The cursor movement is different depending on the screen. When the cursor is at the right or left side of the touch screen, it may not move. Using the Scroller You can move the cursor on the touch screen by moving the Scroller up and down, as well as launching a program by pressing the Scroller. NOTE - 19 - The cursor movement is different depending on the screen. When the cursor is at the right or left side of the touch Chapter 2: Basic Skills screen, it may not move. Using the Battery To install the battery: 1. Ensure that the device is turned off. 2. Insert the left side of the battery into the battery slot at on angle, and press down the right side into the slot until it clicks. 3. Insert the tip of the stylus into the battery lock. 4. Slide the lock to the lock position. To remove the battery: 1. Insert the tip of the stylus into the battery lock. 2. Slide the lock to the unlock position. 3. Take the battery out of the slot. CAUTION You can replace the main battery pack without data loss because Holux GPSmile 60 has a rechargeable backup battery. However, the capacity of the backup battery is limited; therefore, when you replace the main battery pack, - 20 - Chapter 2: Basic Skills install the new one as soon as possible. Charging the Battery Charge Holux GPSmile 60 by using the AC adaptor: Connect one end of AC adaptor (Mini USB X) into the mini USB Client port Z and connect the other end Y to an electrical outlet to charge Holux GPSmile 60. NOTE - 21 - Maintain an ambient temperature from approximately 32°F to 104°F (0°C to 45°C) while charging the battery. When the battery is being charged, the battery/alarm LED is orange; when the battery is fully charged, the battery/alarm LED changes to green. Chapter 2: Basic Skills Charging through Active Sync cable Please use Active Sync cable when you have to synchronize your device and your computer while charging your device via miniUSB. When you use Active Sync cable to establish connection between your device and the PC, plug the miniUSB connector of the AC Adaptor into miniUSB charger located at the middle of Active Sync cable to start charging. Prolonging the Battery Life • Use Holux GPSmile 60 with the AC adapter during the following high power consumption conditions: • In addition: • Select the short power-off time in the setting menu to shorten the amount time and Holux GPSmile 60 remains on if it is not used. Turn off the screen light. Set the screen brightness to the power saving mode and shorten the light turn-off time. Use Holux GPSmile 60 with an ambient temperature between 59°F and 77°F (15°C and 25°C). This temperature range is the most effective for the battery. When you use Holux GPSmile 60 in high or low temperature environments, the operable time is shortened due to the decrease of the battery capacity. The removable battery has a limited life. Repeated charging/discharging of the battery gradually decreases the operable time. When the operable time has been diminished, it is time to replace the removable battery with a new one. Do not leave Holux GPSmile 60 in a place of high or low temperature. It may shorten the battery life. CAUTION If you have not used Holux GPSmile 60 for several days, its battery charge level reading may be inaccurate. Fully recharge the battery before using. - 22 - Chapter 2: Basic Skills Protecting Data from Low Battery Charge Levels If the battery charge level becomes extremely low or the battery becomes flat, the memory data stored in Holux GPSmile 60 could be lost. When the low battery status icon or alarm message appears, immediately connect the AC adapter with Holux GPSmile 60 to charge the battery. • The removable battery gradually discharges even if Holux GPSmile 60 is not being used. When Holux GPSmile 60 is left idle for a long time, the removable battery may change to will become flat. • It is recommended to save Holux GPSmile 60’s memory data to your PC or storage card. • The manufacturer is not responsible for the data change or clearance due to battery discharge. Initial Setup and Touch Screen Correction When using Holux GPSmile 60 for the first time, follow the initial setup procedures below, after the battery has been charged. When you slide the battery switch to the “supply” position and install the battery, Holux GPSmile 60 powers on automatically and the Welcome screen appears. Tap the screen to start the following setup. 1. Complete the touch screen correction. When the align screen appears, tap the center of the cross target with the stylus. The next target position changes upon tapping the target. Five taps completes the positioning correction. The screen then changes to the stylus screen. If an object touches the screen during correction, the NOTE correction is cancelled. Repeat the correction procedure. 2. Follow the on-screen instructions describing how to use the stylus, and then tap Next. NOTE For more information on stylus operation, see “Using the Stylus” earlier in this chapter. 3. Follow the pop-up menu instructions. - 23 - Chapter 2: Basic Skills Read the on-screen explanation and then follow the instructions. Display the pop-up menu, and then cut and paste the data according to the screen instructions. After you finish the paste operation, tap Next. 4. Set the time zone. When tapping the ▼ mark, the city and the time zone list appears. Tap the desired city and time zone. When the setup is completed, tap Next. 5. Complete the initial setup. When the complete screen appears, the initial setup is completed. After tapping the screen, you can use Holux GPSmile 60. NOTE When you tap the complete screen, the Today screen appears. Inserting a SD Card 1. Remove the dummy card from the SD card slot. 2. Insert the card with its metal contact surface facing the top of Holux GPSmile 60. 3. Press down the card until it clicks in place. - 24 - Chapter 2: Basic Skills Removing a SD Card 1. Lightly press down the card until a click is heard. The card pops out slightly from the slot. 2. Pull out the card straight. Connecting to a PC Before connecting Holux GPSmile 60 to a PC, check the following: • ActiveSync has been installed on your PC. (For more information, see Chapter 3.) • ActiveSync ports: the position of the ActiveSync port on your PC may differ according to the PC type. Connect Holux GPSmile 60 directly to your PC using the supplied ActiveSync cable: 1. Connect the serial connector of the mini USB cable to the ActiveSync Client port of Holux GPSmile 60. 2. Connect the USB connector of the ActiveSync cable to the ActiveSync port of your PC. - 25 - Chapter 2: Basic Skills PDA Mounting Holder and Stand 1) Align the slots with the notches (A) and attach the stand to the holder (B) as shown. (A) (B) 2) Ensure that slots and notches are placed in the proper position and fully locked. - 26 - Chapter 2: Basic Skills 3) Attach the Compal Mounting suction cup to the window (A) and press the suction cup clip in the direction of the arrow to fasten it to the surface (B). Warning! Do not unfasten the stand with the PDA still in the holder, you may drop the PDA and damage it. (A) (B) Notes: ¾ Make sure that the glass surface is clean. ¾ To unfasten the stand, pull the suction cup clip out. 4) Carefully press down the tab (A) and pull down the holder out (B) as shown. - 27 - Chapter 2: Basic Skills A B 5) Place the PDA phone inside the holder as shown. 6) Push the holder back into place. - 28 - Chapter 2: Basic Skills Today Screen When you turn on Holux GPSmile 60 for the first time each day (or after 4 hours of inactivity), the Today screen displays. You can also display it by tapping and then Today. On the Today screen, you can see at a glance important information of the day. The following are some of the status icons you may see. Status Icon Meaning Turn all sounds on. Turn all sounds off. Main battery is charging. Main battery is low. Main battery is very low. Main battery is full. Connection is active. Connection is inactive. Notification that one or more e-mail messages were received. Notification that one or more instant messages were received. NOTE - 29 - If more notification icons need to be displayed than there is displays. room to display them, the Notification icon Tap the icon to view all notification icons. Chapter 2: Basic Skills Using the Programs You can switch from one program to another by selecting it from the menu. (You can customize which programs you see on the menu. For information, see “Customizing Settings” later in this chapter.) To access some programs, tap > Programs, and then the program name. You can also switch to certain programs by pressing the program button assigned to those programs. Holux GPSmile 60 has program buttons located on the front of the device. The icons on the buttons identify the programs they activate. NOTE Some programs have abbreviated labels for check boxes and drop-down menus. To see the full spelling of an abbreviated label, tap and hold the stylus on the label. Drag the stylus off the label so that the command is not carried out. - 30 - Chapter 2: Basic Skills The following table contains a partial list of programs that are included. (Look for additional programs in Holux GPSmile 60 Companion CD.) Icon Program ActiveSync Calendar Contacts Pocket Internet Explorer Messaging Description Synchronize information between Holux GPSmile 60 and PC. Keep track of your appointments and create meeting requests. Keep track of your friends and colleagues. Browse Web and WAP sites and download new programs and files from the Internet. Send and receive email messages. Windows Media Play Play digital audio and video files. Notes Tasks Pocket Excel Pocket Word MSN Messenger - 31 - Create handwritten or typed notes, drawings and recordings. Keep track of your tasks. Create new workbooks or view and edit Excel workbooks created on your PC. Create new documents or view and edit Word documents created on your PC. Send and receive instant messages with your MSN Messenger contacts. Chapter 2: Basic Skills Checking System Information The system information program displays the system information such as CPU clock, CPU stepping, OS version, PIC version, and UUID. The information is displayed in the Identity, Memory, Driver and System items. To check system information, tap > Settings > System > SysInfo. Tools Menu The Tools menu displays the system information and allows the text to be exported. • Export exports all system information parameters to a text (*.txt) file. Customizing Settings You can customize Holux GPSmile 60 by adjusting the settings and installing additional software. Adjust the settings to suit the way you work. To see available options, tap > Settings > Personal or System tab located at the bottom of the screen. You might want to adjust the following: • Clock & Alarms to change the time or to set the alarms • Menus to customize what appears on the pop-up menu from New • Owner Information to enter your contact information menu, and to enable a - 32 - Chapter 2: Basic Skills • Password to limit access to Holux GPSmile 60 • Power to maximize the battery life • Today to customize the look and the information that is displayed on the Today screen • Screen to change the display mode to Landscape or to align the screen Adding or Removing Programs in ROM and RAM Programs added to Holux GPSmile 60 at the factory are stored in read-only memory (ROM). You cannot remove this software, and ROM contents are never lost. ROM programs can be updated using special installation programs with a *.xip extension. All other programs and data files added to Holux GPSmile 60 after the factory installation are stored in random access memory (RAM). You can install programs created for Holux GPSmile 60; the most popular place to find Holux GPSmile 60 software is on Holux GPSmile 60 Web site (http://www.microsoft.com/mobile/pocketpc). Before you install any programs for the first time, be sure that Holux GPSmile 60 has enough memory. Adding Programs Using ActiveSync Install the appropriate software for Holux GPSmile 60 on your PC before installing it on Holux GPSmile 60. 1. Determine Holux GPSmile 60 processor type so that you know which version of the software to install. Tap > Settings. On the System tab, tap About. In the Version tab, make a note of the information in Processor. 2. Download the program to your PC (or insert the CD or disk that contains the program into your PC). You may see a single *.xip, *.exe, or *.zip file, a Setup.exe file, or several versions of files for different device types and processors. Be sure to select the program designed for Holux GPSmile 60 and its processor type. - 33 - Chapter 2: Basic Skills 3. Read any installation instructions, Read Me files, or documentation that comes with the program. Many programs provide special installation instructions. 4. Connect Holux GPSmile 60 to your PC. 5. Double-click the *.exe file. If the file is an installer, the installation wizard begins. Follow the directions on the screen. Once the software has been installed on your PC, the installer automatically transfers the software to Holux GPSmile 60. If the file is not an installer, an error message displays stating that the program is valid but it is designed for a different type of PC. Transfer this file to Holux GPSmile 60. If you cannot find any installation instructions for the program in the Read Me file or documentation, use ActiveSync Explorer to copy the program file to the Program Files folder on Holux GPSmile 60. For more information on copying files using ActiveSync, see ActiveSync Help. If the application is not for Windows Mobile 2003 Second Edition, a message displays stating that the program is designed for a previous version. In this case, the program you have installed may not display properly. 6. Once the installation is complete, tap program icon. > Programs, and then the Adding Programs Directly from the Internet 1. Determine Holux GPSmile 60 processor type so that you know which version of the software to install. Tap > Settings. On the System tab, tap About. In the Version tab, make a note of the information in Processor. 2. Download the program to Holux GPSmile 60 straight from the Internet using Pocket Internet Explorer. You may see a single *.xip, *.exe, or *.zip file, a Setup.exe file, or several versions of files for different device types and processors. Be sure to select the program designed for Holux GPSmile 60 processor type. - 34 - Chapter 2: Basic Skills 3. Read any installation instructions, Read Me files, or documentation that comes with the program. Many programs provide special installation instructions. 4. Tap the file, such as a *.xip or *.exe file. The installation wizard begins. Follow the directions on the screen. If the application you have installed is not for Windows Mobile 2003 Second Edition, the program may not display properly. Adding Programs to the Start Menu Tap > Settings > Menus > the Start Menu tab, and then the check box for the program. If you do not see the program listed, you can either use File Explorer on Holux GPSmile 60 to move the program to the Start Menu folder, or use ActiveSync on your PC to create a shortcut to the program and place the shortcut in the Start Menu folder. • Using File Explorer on Holux GPSmile 60—Tap > Programs > File Explorer, and locate the program (tap the folder list, labeled My Documents by default, and then Local Device to see a list of all folders on Holux GPSmile 60). Tap and hold the program, and tap Cut on the pop-up menu. Open the Start Menu folder located in the Windows folder, tap and hold a blank area of the window, and tap Paste on the pop-up menu. The program appears on the menu. For more information on using File Explorer, refer to Holux GPSmile 60 user’s guide. • Using ActiveSync on your PC—Use the Explorer in ActiveSync to explore your device files and locate the program. Right-click the program, and then click Create Shortcut. Move the shortcut to the Start Menu folder in the Windows folder. The shortcut now appears on the menu. For more information, see ActiveSync Help on your PC. Removing Programs Tap > Settings. On the System tab, tap Remove Programs. If the program does not appear in the list of installed programs, use File Explorer on Holux GPSmile 60 to locate the program, tap and hold the program, and then tap Delete on the pop-up menu. - 35 - Chapter 2: Basic Skills Setting Passwords You can password-protect your data and settings. 1. Tap > Settings. On the Personal tab, tap Password. 2. Select the type of password you would like to use. 3. Enter a password and tap OK. 4. Tap Yes on the confirmation screen. The password is saved and the screen returns to the Personal tab screen. If you tap Yes on the confirmation screen to return to the Personal tab screen, you must enter the password each time you use Holux GPSmile 60. If you forget the password, you must initialize Holux GPSmile 60 (for more information, see “Clearing Memory” on page 48). Please note that when the initialization is performed, data or settings stored in Holux GPSmile 60 are all deleted. - 36 - Chapter 3: Microsoft ActiveSync Chapter 3: Microsoft ActiveSync Using ActiveSync, you can synchronize information between Holux GPSmile 60 and your PC or server. Synchronization compares the data on Holux GPSmile 60 with the data residing on your PC and updates both with the most recent information. For example: • Keep Pocket Outlook data up-to-date by synchronizing Holux GPSmile 60 with Microsoft Outlook data on your PC. • Synchronize Microsoft Word and Microsoft Excel files between Holux GPSmile 60 and your PC. Your files are automatically converted to the correct format. CAUTION ActiveSync does not automatically synchronize all types of information. Use ActiveSync options to turn synchronization on and off for specific information types. With ActiveSync, you can also: • Change synchronization settings and synchronization schedule. • Copy files between Holux GPSmile 60 and PC. • Back up and restore Holux GPSmile 60 information. • Add and remove programs on Holux GPSmile 60. Before synchronizing, confirm that ActiveSync version 3.7.1 or later is installed on your PC. You can install ActiveSync 3.7.1 from Holux GPSmile 60 Companion CD. After the installation is complete, the ActiveSync Setup Wizard helps you connect and synchronize information between Holux GPSmile 60 and your PC, and customize your synchronization settings. Your first synchronization process begins when you finish using the wizard. - 37 - Chapter 3: Microsoft ActiveSync After your first synchronization, take a look at Calendar, Contacts, and Tasks on Holux GPSmile 60. The information you stored in Microsoft Outlook on your PC has been copied to Holux GPSmile 60, and you did not have to type a word. Disconnect Holux GPSmile 60 from your PC and you are ready to go! - 38 - Chapter 3: Microsoft ActiveSync Once you have set up ActiveSync and completed the first synchronization process, you can initiate synchronization from Holux GPSmile 60. To switch to ActiveSync, tap > Programs > ActiveSync. For information about using ActiveSync on your PC, start ActiveSync on your PC and then see ActiveSync Help. For more information about ActiveSync on Holux GPSmile 60, switch to ActiveSync, tap > Help. View connection status. Tap to connect and synchronize. Tap to stop synchronization. Tap to synchronize via IR or change synchronization settings. Changing the Synchronization Schedule Using ActiveSync, you can schedule the synchronization of Holux GPSmile 60 on two separate schedules. • Use the peak times schedule to synchronize during working hours or other times you experience higher mail volumes. • Use the off-peak schedule to synchronize during times when you experience lower mail volumes. - 39 - Chapter 3: Microsoft ActiveSync In ActiveSync on Holux GPSmile 60, tap Tools > Options > the Mobile Schedule tab. 1. To synchronize periodically during peak times, select the frequency of synchronization in the Peak times list. 2. To synchronize periodically during off-peak times, select the frequency of synchronization in the Off-peak times list. 3. To set the days and hours for peak times, tap Peak Times. - 40 - Chapter 4: GPS Function Chapter 4: GPS Function Holux GPSmile 60 is also a global positioning system (GPS) device. It is a very convenient tool for navigation on the road. Note: Please set your GPS before getting on the road. No setting while driving. The actual procedures will depend on the map source which the end users 1. There are two ways to install Map AP. One way is to have Map AP start installation automatically after cold boot. The second way is to install from CD. 2. After installation, if Program button 2 (refer to p17) is programmed to start Map AP, press down Program button 2 will start Map AP. On the other hand, if the programming was not done, press down Program button 2 will open “Welcome to GPS world!” screen. 3. If Program button 2 (refer to p17) is not programmed to start Map AP, please >Settings> Personal > Buttons > Program buttons, then select button select 2 and select the Map AP to be programmed. Finally click OK button to complete the programming. After programming is done, press down Program button 2 will start Map AP. - 41 - Chapter 4: GPS Function 4. To close Map AP, just use the close method of Map AP Start Map AP is not going to start GPS Power. Close Map AP will not close GPS Power either. User has to start/close GPS independently from Map AP. Methods for starting/closing GPS Power 1. Click GPS icon located at the lower right corner of Today screen to start/close GPS Power. 2. GPS Power On GPS Power Off 3. Select > Settings > System > GPS Power Control, press down Power button to start/close GPS Power. 4. - 42 - Chapter 4: GPS Function Zoom in and Zoom out When turn on map program, the program will automatically enter the main screen. Then the buttons of Zoom-in and Zoom-out can work to the map. z Zoom-in button : Press Zoom-in button will enlarge the map display. z Zoom-out button : Press Zoom-out button will diminish the map display. NOTE The zoom in/ zoom out depending on whether your map support or not. Using GPS Power Control To view GPS power control, tap > Setings > System > GPS power control. GPS Power Control is used to configure the GPS settings. Below are the main screen and setting items of GPS Power Control. - 43 - Chapter 4: GPS Function • POWER This item indicates that GPS is enabled (the button appears highlighted) or disabled. • Reset GPS When the positioning fails within 10 minutes at the same spot with a clear view of the sky, pressing this button returns to the normal status. NOTE Execution parameters are used to add parameters for the selected map program. It is not absolutely required to set parameters. Set Environment Profile: Environment Profile can let you quickly adjust Screen light, Speaker/ Microphone and Headphone to fit in with different weather condition and usage environment. For example: 1. Tap Profile on Today 2. Normal chose, Tap Setting - 44 - Chapter 4: GPS Function 3. Adjust Screen light, Speaker/ Microphone, Headphone and Name by your requirement. - 45 - Chapter 5: Additional Information Chapter 5: Additional Information Troubleshooting Check the following table for the possible cause of the problem and how to correct it. Symptom Cause Even if the power button is pressed, the power does not turn on. The battery power is exhausted. The main battery is not installed. The power was suddenly The battery power is cut off. exhausted. Automatic suspend is active. The touch screen was The touch screen tapped, but the correct adjustment is action was not performed. incorrect. The operation is slow in response. Insufficient memory Some malfunction Correction Charge the battery. Install the main battery. Charge the battery. Tap > Settings > System > Power to change the power shutdown time. Tap > Settings > System > Screen > Align Screen to adjust the touch screen. Secure the free memory. Quit the application if it is not in use. Reset the device. If no action is observed after resetting the device, initialize the device. (However, the data will be deleted.) - 46 - Chapter 5: Additional Information Symptom Cause The screen was tapped, but there is no response. The operation button does not work, either. Some malfunction The screen is dark. The screen light is off. The screen is hard to see. The brightness setting is incorrect. Cannot connect to your PC. ActiveSync does not function when Holux GPSmile 60 is connected to your PC with a USB cable. Cannot access the Internet. — Correction Reset the device. If no action is observed after resetting the device, initialize the device. (However, the data will be deleted.) Press and hold the power button until the screen light is turned on. Tap > Settings > System > Screen light to adjust the screen brightness for better sight. See ActiveSync Help. The USB driver on your PC may not be compatible. Re-select the USB driver. The communication settings are incorrect. Carry out correct settings. Resetting Resetting is equivalent to restarting a PC. Reset Holux GPSmile 60 when a button or tapping the screen does not respond. When Holux GPSmile 60 is reset, all data that was not stored during operation is deleted. NOTE If the functionality cannot be restored even if the reset switch is pressed, initialize Holux GPSmile 60. See “Clearing Memory” on page 44. When the power is on, use the stylus to press and hold the reset switch, and then release it. - 47 - Chapter 5: Additional Information Clearing Memory When you initialize Holux GPSmile 60, it returns to the status when it was purchased. CAUTION When you initialize Holux GPSmile 60, all data stored in the memory is deleted. Holux GPSmile 60’s initially installed programs are not deleted. Before the initialization, remove the SD card. 1. Turn off Holux GPSmile 60. 2. Press and hold the power buttons, Program button 3 (p17) and Program button 4(p17), meanwhile, use the stylus to press the reset switch on the back side of Holux GPSmile 60. 3. Release the Power buttons. 4. When a screen appears, release the reset switch. When the initialization is complete, the Welcome screen appears. 5. Follow the on-screen instructions to set up the device. Specifications Item External dimensions (L x W x H) Weight Operating conditions Description Approximately (121 x 71.8 x 17~22 mm) Approx. 160 +/- 5g - 48 - Chapter 5: Additional Information Item Temperature Relative humidity Storage conditions Temperature Relative humidity Battery type Processor Memory Flash ROM Display Interfaces DC-IN Headphone Microphone Speaker USB Client port SD card slot - 49 - Description 32°F ~ 104°F (0°C ~ 40°C) 10% ~ 85% -4°F ~ 140°F (-20°C ~ 60°C) 10% ~ 85% 1320mAh, removable, rechargeable Lithium-Ion battery Intel® bulverde PXA270 312/416 MHz 64 MB 64 MB 3.5” diagonal, TFT color LCD screen, 240 x 320 pixels, up to 64K colors,0.244 mm dot pitch,6 LED Backlight. 5V/1A 3.5 mm, stereo, mini-plug compatible Built-in, highly sensitive microphone Built-in, 0.5W mono speaker USB Client compliant with USB v1.1 SD memory card, SD I/O card or Multimedia card The security function of the SD memory card is disabled. Data encrypted by the SD memory card security function compatible equipment is not usable. Chapter 5: Additional Information Infrared port Audio GPS Receiver Receiver Acquisition time < Typical > Accuracy position Protocol support Map datum Dynamic conditions Accessories Based on IrDA ver. 1.3 Maximum data transmission speed: 115 kbps AC 97 codec Mono record Stereo playback, 8.0 KHz, 11.025 KHz, 22.05 KHz, and 44.1 KHz sample rate Full duplex for simultaneous record and playback On-board microphone On-board speaker Stereo earphone/microphone jack Software volume control Hardware (volume button) & Software volume control. GPS signal: L1, C/A code Channel: 12 channels Tracking sensitivity: -152dBm Hot start: 8 sec Warm start: 38 sec Cold start: 42 sec Update: 1 sec 25M (95%) CEP (without WAAS or DGPS) 1~5M (95%) CEP (with WAAS or DGPS) NMEA 0183 (GGA, GLL, GSA, RMC, VTG) Baud rate 4,800 bps COM port 1 WGS-84 Altitude: 18,000 M Velocity: 515 M/sec Acceleration: 4G maximum Stylus, battery pack, Active Sync cable, AC Adaptor, Companion CD, Car charger, Car Holder(optional), Car stand(optional), Leather case. - 50 -